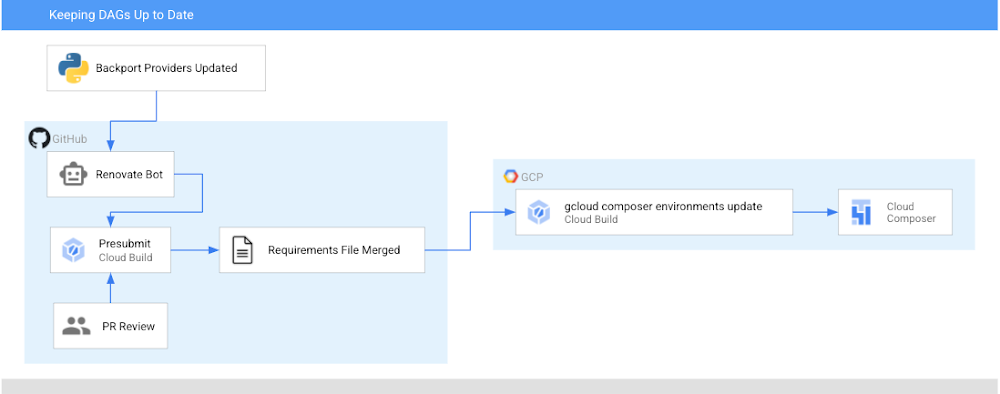
Before 2020, keeping your Airflow operators up to date meant either upgrading to the most recent version of Airflow, or bringing newer versions of the operators in as plugins. Now (if you’re using Airflow 1.10.6 or later), the latest versions of operators are packaged as PyPI modules that can be installed in your Airflow environment! In this post, I’m going to show you how to automatically keep your operators (and any other PyPI packages) up to date in your Cloud Composer environment utilizing Cloud Build and GitHub automation. Note: in Cloud Composer some backport packages come pre-installed in your environment – see the versions list for more details about what is installed in the version you are running.After this walkthrough, this is how your development flow will look when a new version of the operators you are using is released:Step 0: There is an update to operatorsStep 1: Renovate Bot opens up a PR to a requirements-composer.txt file to make this updateStep 2: Cloud build runs unit tests to make sure none of your DAGs immediately breakStep 3: PR is approved and merged to mainStep 4: Cloud Build updates your dev environmentStep 5: You, a human, look at your DAGs in dev to make sure all is well. If there is a problem, you need to resolve this manually and revert your requirements file. Step 6: You, a human, manually update your prod PyPI packagesIn this post, we will first:Create a requirements file that Cloud Build will use to unit test your DAGs with a new version of the operators and eventually to update your Composer EnvironmentSet up the Cloud Build job to unit test your DAGsSet up the Cloud Build job to update your composer environmentsSet up Renovate Bot to automatically check for updates to the Airflow operators (and other dependencies)Repo StructureThis blog post assumes that you have your DAGs and their tests stored in a GitHub repository. In this directory, which contains the contents of an example repository, DAGs and tests are stored in a dags folder, with requirements files and configuration files living at the top level. Setting up Cloud BuildThere will be two Cloud Build steps – one that runs on a pull request to unit test your DAGs, and one that runs when a PR is merged to the “main” branch that updates your Composer environment with the latest PyPI dependency. Job #1 – Unit Testing Your DAGsCreating a requirements fileTo keep track of the PyPI modules installed in my Composer environment, I have been using a special requirements-composer.txt file that lives in the GitHub repository where I store my dags. Create this file now—it’s just like a regular requirements.txt file, only with a special name. In it, I’ve added the most recent version of the operator package I’m using – in this case, apache-airflow-backport-providers-google. I specifically pin the operators to a specific version so it is always clear what version is installed in my environment. requirements-composer.txtapache-airflow-backport-providers-google==2020.11.23Creating Your DockerfileIn order to run the unit tests, create a Dockerfile so that we can make a container image to run in Cloud Build. This Dockerfile installs all relevant dependencies and runs the test command. Creating your cloudbuild.yaml fileCreate a YAML file to configure your Cloud Build job named test-dags.cloudbuild.yaml. In it, there are two steps:The first step builds the Docker image from the Dockerfile you just created. The Docker image is taggedusing default substitutions with the tag cicd and the commit SHA, which acts as a UUID.The second step is to run the container image, executing the DAG testsNote: You can additionally choose to store your image in Container Registry as part of your workflow.Create the Cloud Build TriggerFollowing this guide, create a GitHub app based trigger with the following configurations:Name: test-dagsEvent: Pull RequestSource – Repository: choose your repositorySource – Base branch: ^main$ (or whatever the name of your base branch is)Source – Comment Control: not required (this means that any user can submit a PR that triggers the build)Build Configuration – Cloud build configuration file: /test-dags.cloudbuild.yaml (the path to your build file)To test your build, create a pull request to your main branch – you will see your check, and if you click “Details” and choose “View more details on Google Cloud Build”, you can see your build logs in the Cloud Console.Job #2 – Updating Your Composer EnvironmentNow that you are successfully using Cloud Build to unit test your DAGs against any requirements changes, let’s automate the updating of your Composer environment.Creating a cloudbuild.yaml fileCreate a YAML file to configure your Cloud Build job and name it update-composer.cloudbuild.yaml. In it, there is one step, which invokes the gcloud composer environments update command, passing the requirements-composer.txt file to install the Python dependencies. ${_COMPOSER_NAME} and ${_COMPOSER_REGION} are user-defined substitutions you will define in the next section. This configuration file also includes a timeout – the default Cloud Build timeout is too short to accommodate long running Composer Environment update operations – this timeout ensures the operation can finish and send its end status back to Cloud Build.Create the Cloud Build TriggerFollowing this guide, create a GitHub app based trigger with the following configurations:Name: update-composer-envEvent: Push to a branchSource – Repository: choose your repositorySource – Base branch: ^main$ (or whatever the name of your base branch is)Source – Included files filter (glob): requirements-composer.txt (this means the build should only run if this file is changed)Build Configuration – Cloud build configuration file: /update-composer.cloudbuild.yaml (the path to your build file)In the Advanced configuration, add two substitution variables _COMPOSER_NAME – the name of your composer environment_COMPOSER_REGION – the Compute engine region where your environment is locatedTo test your build, you can manually trigger it from the Triggers page by pressing “RUN” next to your newly created trigger. Additionally, you can create a pull request to your main branch specifically updating the requirements-composer.txt file – you will see your first check, and once you merge the PR to main, you should see the build start in your Build historyTo automate this even further, let’s have a robot keep our dependencies up to date.Setting up a Dependency BotThere are multiple options for bots that keep your dependencies up to date, but I personally prefer WhiteSource renovate bot. Not only does it do what I need, but I have found that the folks who work on it are very responsive and kind when I’ve opened issues and I really appreciate that. First, you’ll need to install the Renovate GitHub App and give it the appropriate access to your repository. You’ll then need to add a configuration file called renovate.json to the GitHub repository. Renovate will automatically look for changes in a regular requirements.txt file, but you can also configure it to watch additional requirements files. In our case, we want to watch the requirements-composer.txt file, so we add it to the pip_requirements filematch object. There are many additional configuration options that you can explore in addition to the ones shown here. Experiment and see what fits your needs!Putting it all togetherWhen there is an update to the packages in requirements-composer.txt, renovate bot will open up a PR to the repo. When that PR is merged to master (either by the bot, if you have automerge set to true in your config, or by a human), it will trigger the cloud build job, which will update your Cloud Composer environment. From now on, this automation will ensure you never miss an update to the Airflow operators!CaveatsIf your update composer environment operation fails, you need to resolve that failure manually, and you will need to make sure your requirements-composer.txt file is reverted to match the dependencies used in your Composer environmentYou will need to verify your DAGs using the Airflow UI as well, and if you’re using a two environment setup (Dev + Prod), it is recommended to use this automation with your dev environment, and only update the production environment once you verify that everything is functioning as expected.ConclusionBy following this process you can automatically keep your operators (and any other PyPI packages) up to date in your Cloud Composer environment utilizing Cloud Build and GitHub automation.Was this so fun that you want to continue automating this process? Check out how to add notifications to your Cloud Build status.Related ArticleGoogle Cloud and GitHub collaborate to make CI fast and easyToday, Google Cloud and GitHub are delivering a new integrated experience that connects GitHub with Google’s Cloud Build, our new CI/CD p…Read Article
Quelle: Google Cloud Platform
Published by