Efficient File Management using Batch Requests with Google Apps Script
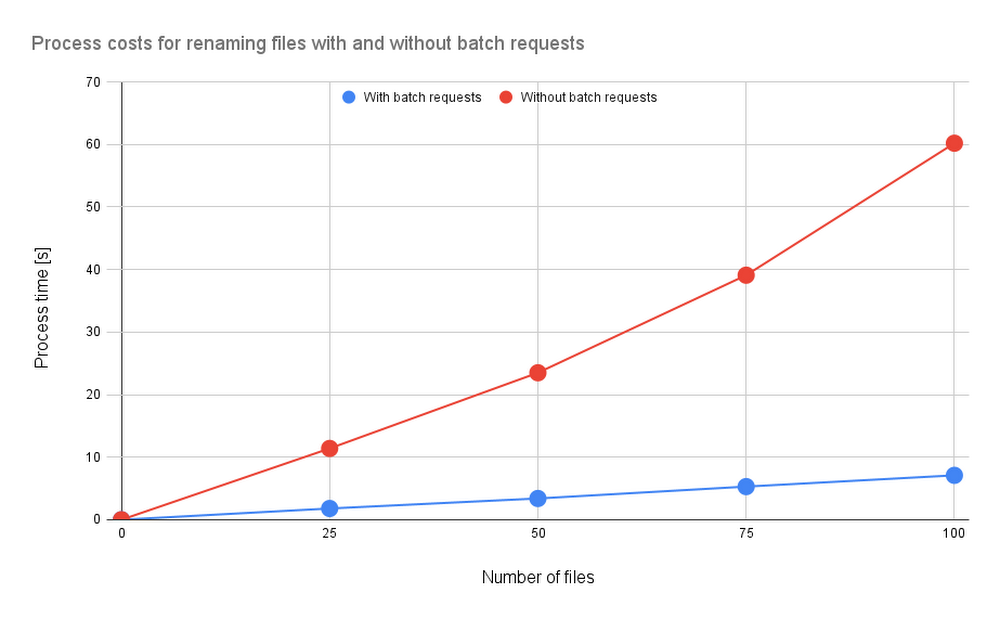
AbstractGoogle Drive alone can handle small file management jobs, but for larger batches of files, it can be too much for a simple Drive script to manage. With Google Apps Script, even large batches can be executed within 6 minutes, offering businesses the monetary and time benefits of efficient file management. This report looks at how Google Apps Script improves file management with batch requests, judging its efficacy by measuring the benchmark.IntroductionWhen you need to manage small sets of files on Google Apps Script, Drive Service is right for the job. But when there are too many files, the process cost of the script the Drive service creates can be too high.In the “Batch requests” section of the official Drive API document, we see that a batch can process multiple requests. In fact, the asynchronous process can handle up to one hundred Drive API requests with one API call. This can lead to significant process cost reduction when using batch requests for file management.The issue is that batch requests aren’t available for synchronous processes run through the Google Apps Script Drive service. This means that these users can’t easily use Drive API for their Google Apps Script batch review, removing the process cost benefit that comes from efficiently managing files during the app development process.To show how much of a difference batch processing makes, this article will measure the benchmarks involved in efficient file management. I’ve reported various Google Apps Script benchmarks before, but this is the first time I’ve measured benchmarks related to file management.Creating batch requests for Google Apps ScriptTo create Google Apps Script batch requests, you need to first build the request body and then send it as “multipart/mixed.” You can find information about Drive API batch requests in the official documentation, but here is a sample script:code_block[StructValue([(u’code’, u’/**rn * Create a request body of batch requests and request it.rn * rn * @param {Object} object Object for creating request body of batch requests.rn * @returns {Object} UrlFetchApp.HTTPResponsern */rnfunction batchRequests(object) {rn const { batchPath, requests } = object;rn const boundary = “sampleBoundary12345″;rn const lb = “rn”;rn const payload = requests.reduce((r, e, i, a) => {rn r += `Content-Type: application/http${lb}`;rn r += `Content-ID: ${i + 1}${lb}${lb}`;rn r += `${e.method} ${e.endpoint}${lb}`;rn r += e.requestBody ? `Content-Type: application/json; charset=utf-8″ ${lb}${lb}` : lb;rn r += e.requestBody ? `${JSON.stringify(e.requestBody)}${lb}` : “”;rn r += `–${boundary}${i == a.length – 1 ? “–” : “”}${lb}`;rn return r;rn }, `–${boundary}${lb}`);rn const params = {rn muteHttpExceptions: true,rn method: “post”,rn contentType: `multipart/mixed; boundary=${boundary}`,rn headers: { Authorization: “Bearer ” + ScriptApp.getOAuthToken() },rn payload,rn };rn return UrlFetchApp.fetch(`https://www.googleapis.com/${batchPath}`, params);rn}’), (u’language’, u”), (u’caption’, <wagtail.wagtailcore.rich_text.RichText object at 0x3ea611bbd1d0>)])]The sample “object” value is as follows:code_block[StructValue([(u’code’, u'{rn batchPath: “batch/drive/v3″,rn requests: [rn {rn method: “PATCH”,rn endpoint: “https://www.googleapis.com/drive/v3/files/{fileId}?fields=name”,rn requestBody: { name: “sample” },rn },rn ],rn}’), (u’language’, u”), (u’caption’, <wagtail.wagtailcore.rich_text.RichText object at 0x3ea61008b910>)])]In this sample object, the filename of an existing file is changed. In the case of Drive API v3, “batchPath” would be “batch/drive/v3″. You can learn more about this in the “batchPath” entry from the Google API Discovery Service documentation. It’s important to remember that when the batch requests are used with Drive API, the maximum number of requests which can be included in one batch request is 100. So, if you want to use 150 requests, you’ll have to run this function twice.Sample scriptsIn this section, I would like to introduce the sample batch request scripts used in this function. The sample scripts in this report use Drive API, so to recreate these, you’ll need to enable Drive API at Advanced Google services. Sample situation 1In this sample situation, filenames in the specific folder —in this sample, it’s Spreadsheet — are modified. Here, the process times were measured by changing the number of files.Sample script 1 – 1This sample script uses the Google Drive service.code_block[StructValue([(u’code’, u’function sample1A() {rn const folderId = “###”; // Please set the folder ID.rnrn const files = DriveApp.getFolderById(folderId).getFiles();rn while (files.hasNext()) {rn const file = files.next();rn const oldName = file.getName();rn const newName = `${oldName}_upadted`;rn file.setName(newName);rn }rn}’), (u’language’, u”), (u’caption’, <wagtail.wagtailcore.rich_text.RichText object at 0x3ea610e79390>)])]Sample script 1 – 2This sample script uses Drive API with the batch requests.code_block[StructValue([(u’code’, u’function sample1B() {rn const folderId = “###”; // Please set the folder ID.rnrn const list = Drive.Files.list({ q: `’${folderId}’ in parents and trashed=false`, fields: “items(id,title)” }).items;rn const requests = list.map(({ id, title }) => ({rn method: “PATCH”,rn endpoint: `https://www.googleapis.com/drive/v3/files/${id}`,rn requestBody: { name: `${title}_updated` }rn }));rn const object = { batchPath: “batch/drive/v3″, requests };rn const res = batchRequests(object);rn if (res.getResponseCode() != 200) {rn throw new Error(res.getContentText());rn }rn}’), (u’language’, u”), (u’caption’, <wagtail.wagtailcore.rich_text.RichText object at 0x3ea610e79990>)])]Sample situation 2In this sample situation, multiple Google Sheets are created to the specific folder, and each Sheet is shared with the specific users with a star. Here, the process times were measured by changing the number of files.Sample script 2 – 1This sample script uses Google Drive service and Google Sheets service.code_block[StructValue([(u’code’, u’function sample2A() {rn const n = 10; // As a sample, 10 Spreadsheets are created.rn const folderId = “###”; // Please set the folder ID.rn const emails = [“###”, “###”]; // Please set the sharing users.rnrn const folder = DriveApp.getFolderById(folderId);rn for (let i = 0; i < n; i++) {rn const name = `sample${i + 1}`;rn const ss = SpreadsheetApp.create(name);rn ss.addEditors(emails);rn const file = DriveApp.getFileById(ss.getId());rn file.setStarred(true).moveTo(folder);rn }rn}’), (u’language’, u”), (u’caption’, <wagtail.wagtailcore.rich_text.RichText object at 0x3ea612b96550>)])]Sample script 2 – 2This sample script uses Drive API with batch requests.code_block[StructValue([(u’code’, u’function sample2B() {rn const n = 10; // As a sample, 10 Spreadsheets are created.rn const folderId = “###”; // Please set the folder ID.rn const emails = [“###”, “###”]; // Please set the sharing users.rnrn const parser_ = text => {rn const temp = text.split(“–batch”);rn const regex = new RegExp(“{[\S\s]+}”, “g”);rn return temp.slice(1, temp.length – 1).map(e => regex.test(e) ? JSON.parse(e.match(regex)[0]) : e);rn };rnrn // Create new Spreadsheets.rn const requests1 = [];rn for (let i = 0; i < n; i++) {rn const name = `sample${i + 1}`;rn requests1.push({rn method: “POST”,rn endpoint: “https://www.googleapis.com/drive/v3/files”,rn requestBody: { name, parents: [folderId], mimeType: MimeType.GOOGLE_SHEETS, starred: true },rn });rn }rn const object1 = { batchPath: “batch/drive/v3″, requests: requests1 };rn const res1 = batchRequests(object1);rn const text1 = res1.getContentText();rn if (res1.getResponseCode() != 200) {rn throw new Error(text1);rn }rnrn // Create permissions.rn const requests2 = parser_(text1).flatMap(({ id }) =>rn emails.map(emailAddress => ({rn method: “POST”,rn endpoint: `https://www.googleapis.com/drive/v3/files/${id}/permissions`,rn requestBody: { role: “writer”, type: “user”, emailAddress }rn }))rn );rn const object2 = { batchPath: “batch/drive/v3″, requests: requests2 };rn const res2 = batchRequests(object2);rn if (res2.getResponseCode() != 200) {rn throw new Error(res2.getContentText());rn }rn}’), (u’language’, u”), (u’caption’, <wagtail.wagtailcore.rich_text.RichText object at 0x3ea610e11690>)])]Results and discussionsFor the above 2 sample situations, the results are as follows:Fig1. Process costs for renaming files with and without batch requests. Blue and red lines are with and without batch requests, respectively.Fig2. Process costs for creating and sharing Sheets with and without batch requests. Blue and red lines are with and without batch requests, respectively.From both results, when the batch requests are used for managing files on Google Drive, the process cost can be reduced. In Fig. 1, only the file metadata is modified, meaning the process cost for renaming the filename is small. For Fig. 2, the process cost for creating the Sheet is high. From this, we see that the process cost for Fig. 2 is higher than that of Fig. 1.SummaryThe result of the benchmarks shows that when batch requests are used for managing files on Google Drive, the process cost can be reduced.Batch requests can be used for not only Drive API, but also other APIs, including Calendar API, Gmail API, Directory API, and Cloud Storage. For example, when you use batch requests with Calendar API, you can reduce the process cost for creating and updating events.Related ArticleCustomize Google Workspace with Add-onsGoogle provides a tool that allows you to customize Google Workspace for exactly the situation I need: Google Apps Script.Read ArticleRelated ArticleHidden gems of Google BigQueryRead on to learn about BigQuery features I did not know about until recently. Once I discovered them, I loved them immediately. I hope yo…Read Article
Quelle: Google Cloud Platform


