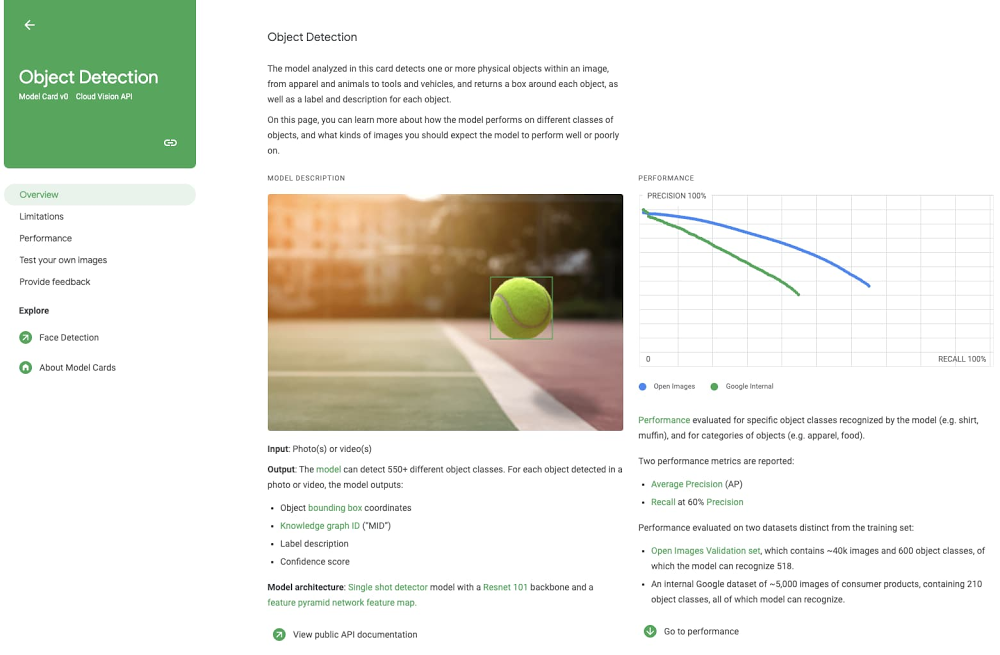
Machine learning models are now being used to accomplish many challenging tasks. With their vast potential, ML models also raise questions about their usage, construction, and limitations. Documenting the answers to these questions helps to bring clarity and shared understanding. To help advance these goals, Google has introduced model cards.Model cards aim to provide a concise, holistic picture of a machine learning model. To start, a model card explains what a model does, its intended audience, and who maintains it. A model card also provides insight into the construction of the model, including its architecture and the training data used. Not only does a model card include raw performance metrics– it puts a model’s limitations and risk mitigation opportunities into context. The Model Cards for Model Reporting research paper provides detailed coverage of model cards.An example model card for object detectionIn this blog post, I hope to show how easy it is for you to create your own model card. We will use the popular scikit-learn framework, but the concepts you learn here will apply whether you’re using TensorFlow, PyTorch, XGBoost, or any other framework.Model Card ToolkitThe Model Card Toolkit streamlines the process of creating a model card. The toolkit provides functions to populate and export a model card. The toolkit can also import model card metadata directly from TensorFlow Extended or ML Metadata, but that capability is not required. We will manually populate the model card fields in this blog post, and then export the model card to HTML for viewing.Dataset and ModelWe’ll be using the Breast Cancer Wisconsin Diagnostic Dataset. This dataset contains 569 instances with numeric measurements from digitized images. Let’s peek at a sample of the data:An extract of rows from the training dataWe’ll use a GradientBoostedClassifier from scikit-learn to build the model. The model is a binary classifier, which means that it predicts whether an instance is of one type or another. In this case, we’re predicting whether a mass is benign or malignant, based on the provided measurements.For example, you can see from the two plots below that the “mean radius” and “mean texture” features are correlated with the diagnosis (0 is malignant, 1 is benign). The model will be trained to optimize for the features, relationships between features, and weights of the features that predict best. For the purposes of this article, we won’t go into more depth on the model architecture.Plots from the dataset showing a relationship with the diagnosisCreating a NotebookAI Platform Notebooks enable data scientists to prototype, develop, and deploy models in the cloud. Let’s start by creating a notebook in the Google Cloud console. You can create a new instance that already has scikit-learn, pandas, and other popular frameworks pre-installed with the “Python 2 and 3″ instance. Once your notebook server is provisioned, select OPEN JUPYTERLAB to begin.Create a new AI Platform Notebooks instanceSince the dataset we’ll use only contains 569 rows, we can quickly train our model within the notebook instance. If you’re building a model based on a larger dataset, you can also leverage the AI Platform Training service to build your scikit-learn model, without managing any infrastructure. Also, when you’re ready to host your model, the AI Platform Prediction service can serve your scikit-learn model, providing a REST endpoint and auto-scaling if needed.Loading the Sample NotebookThe Model Card Toolkit Github repository contains samples along with the project source code. Let’s start by cloning the repository by selecting Git > Clone a Repository in the JupyterLab menu.Then, enter the repository URL (https://github.com/tensorflow/model-card-toolkit), and the contents will be downloaded into your notebook environment. Navigate through the directory structure: model-card-toolkit/model_card_toolkit/documentation/examples, and open the Scikit-Learn notebook.Load the model card toolkit sample notebookCreating a Model CardLet’s get started! In this section, we’ll highlight key steps to create a model card. You can also follow along in the sample notebook, but that’s not required.The first step is to install the Model Card Toolkit. Simply use the Python package manager to install the package in your environment: pip install model-card-toolkit.To begin creating a model card, you’ll need to initialize the model card, and then generate the model card toolkit assets. The scaffolding process creates an asset directory, along with a model card JSON file and a customizable model card UI template. If you happen to use ML Metadata Store, you can optionally initialize the toolkit with your metadata store, to automatically populate model card properties and plots. In this article, we will demonstrate how to manually populate that information.Populating the Model CardFrom this point, you can add a number or properties to the model card. The properties support nesting and a number of different data types, as you can see below, such as arrays of multiple values.The model card schema is available for your reference. It defines the structure and accepted data types for your model card. For example, here’s a snippet that describes the name property we showed above.Images need to be provided as base-64 encoded strings. The sample notebook provides some code that exports plots to PNG format, then encodes them as base-64 strings.The final step is writing the model card contents back to the scaffolded JSON file. This process will first validate the properties you populated in the model card.Generating a Model CardWe’re now ready to generate the model card. In this next code snippet, we’ll simply export the model card to HTML and display it within the notebook.The HTML file is generated into your output directory specified when you initialize the toolkit. By default, the assets are created in a temp directory. Also, you can optionally pass in a custom UI template for your model card. If you choose to do that, the default template is a great starting point.Let’s take a look at the results!A generated model card for the Breast Cancer Wisconsin DatasetNext StepsIn this post, we’ve shown how to create your own model card using scikit-learn. In fact, you can apply what you’ve learned here to any machine learning framework, and if you use TensorFlow Extended (TFX), you can even populate the model card automatically.Using the Model Card Toolkit, it’s as straightforward as populating model properties and exporting the result into an HTML template of your choice. You can use the sample notebook to see how it’s done.We’ve also discussed how you can use the Google Cloud AI Platform to manage the full lifecycle of a scikit-learn model, from developing the model, to training it, and then serving it.We hope that you’re able to use the platform to improve understanding of your own models in the future!Related ArticleIncreasing transparency with Google Cloud Explainable AIWe’re working to build AI that’s fair, responsible and trustworthy, and we’re excited to introduce the latest developments.Read Article
Quelle: Google Cloud Platform

Published by