Google: Chrome soll keine kompletten URLs mehr anzeigen
Google will nur noch den Domain-Namen in der Adresszeile anzeigen und damit Phishing entgegenwirken. (Chrome, Google)
Quelle: Golem

Google will nur noch den Domain-Namen in der Adresszeile anzeigen und damit Phishing entgegenwirken. (Chrome, Google)
Quelle: Golem

Das Vorgehen Donald Trumps gegen chinesische App-Anbieter ist ein Wahlkampfmanöver. Kann Microsoft der Verlockung einer Tiktok-Übernahme widerstehen? Eine Analyse von Friedhelm Greis (Tiktok, Microsoft)
Quelle: Golem

Hintergrund ist eine starke Verschiebung auf das eigene Onlinegeschäft bei den Elektronikmärkten Media Markt Saturn. (Media Markt, Onlineshop)
Quelle: Golem

AMD Ryzen 4000 alias Renoir wird immer beliebter. Die Asus-Notebooks bringen herstellertypische Merkmale wie einen Nummernblock im Trackpad. (Asus, AMD)
Quelle: Golem
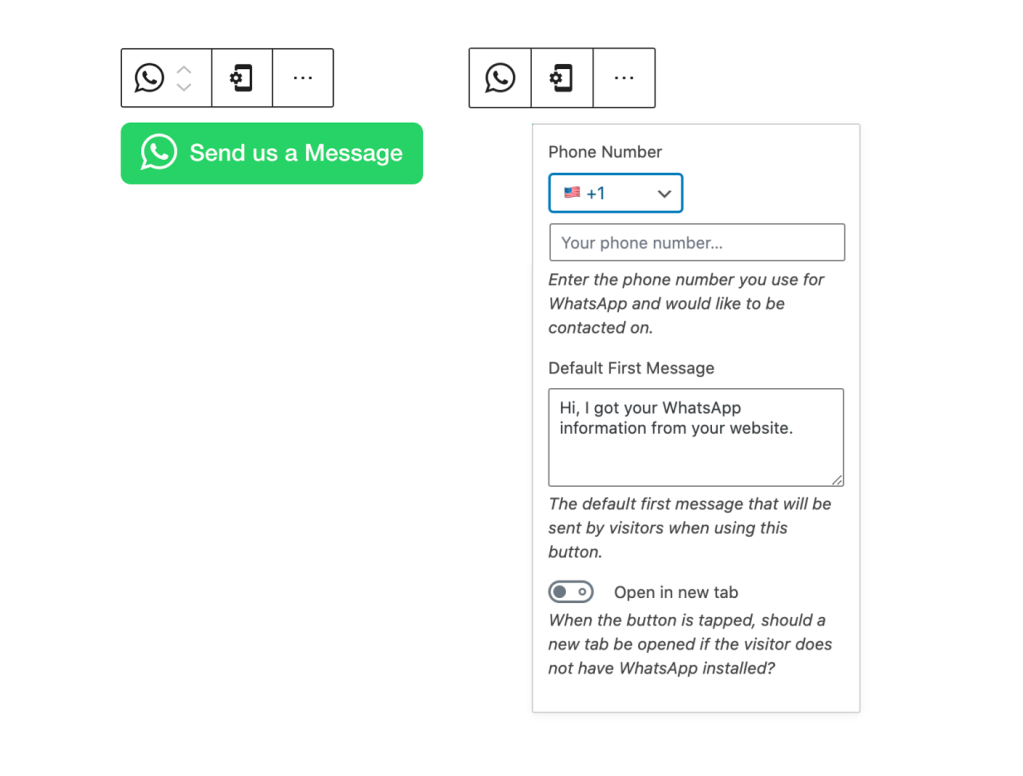
The world is mobile, and your visitors and customers expect to be able to easily contact you using their mobile device. With WordPress.com’s new WhatsApp button, you can provide a one-click, secure way for people to open WhatsApp, with your phone number and a message pre-filled.
Insert the WhatsApp button with your phone number and a custom message pre-filled.
Adding the button is easy. In the block editor, create a new block and search for WhatsApp:
The WhatsApp button is available now to all WordPress.com sites on a Premium, Business, or eCommerce plan. You can upgrade your site to one of these plans, try it out for 30 days, and if you’re not satisfied with your upgrade we’ll grant you a full refund.
If you decide to cancel your paid plan after you’ve already accepted the free custom domain, the domain is yours to keep. We simply ask that you cover the costs for the domain registration.
We hope the WhatsApp button helps you connect with your customers and visitors in new ways. Give it a try today!
Quelle: RedHat Stack
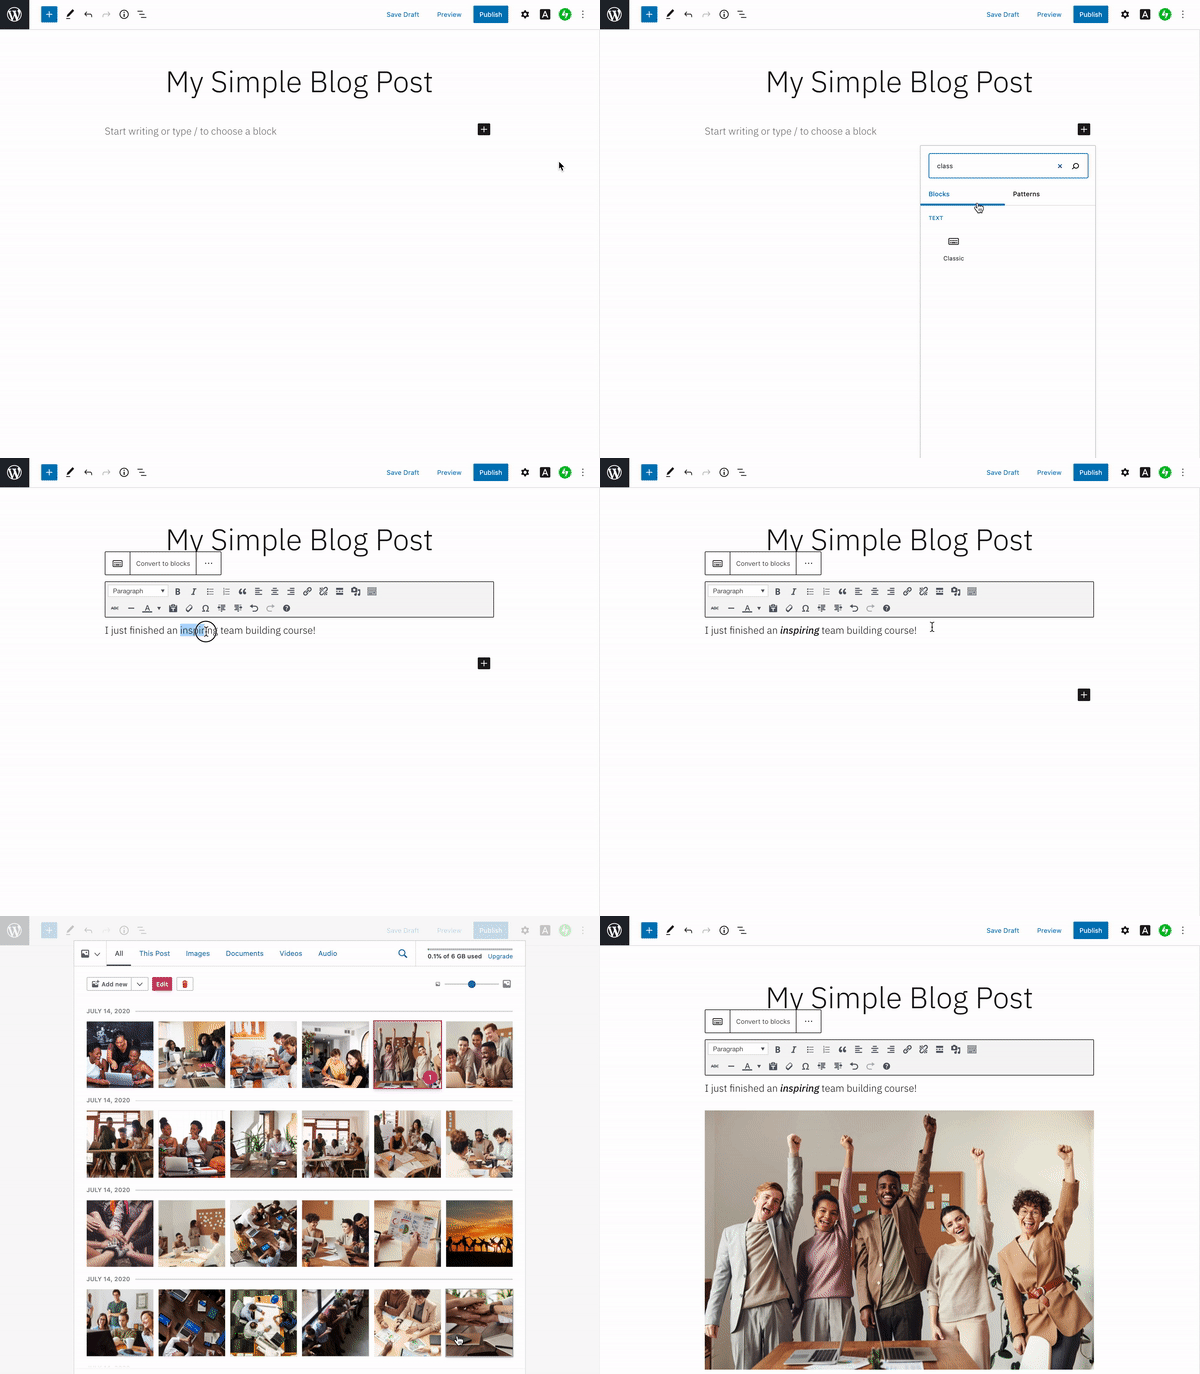
With the introduction of the Block editor, the WordPress.com Classic Editor was set for retirement at the beginning of June. We pushed that back a bit to make time for more changes that ease the transition to the Block editor — and now it’s time! With the new and improved Classic block, you have the best of both editors: the flexibility and stability of the Block editor, and the Classic editor interface you know.
From August 11 all WordPress.com accounts will switch from Classic editor to the new Block editor. It will happen in phases, and you’ll get an email to let you know to expect the change.
Here’s what you need to know if you’re a fan of the Classic editor experience.
Why the change?
There are exciting new features in the pipeline that require the new WordPress editor. It’s not technically possible to retrofit them into the older, Classic editor, and we want to make sure everyone can take advantage of them as they become available. With all WordPress.com users publishing with the Block editor, all WordPress.com users always have the latest and greatest.
Can I create simple blog posts the way I always have?
Yes, with the Classic block! It provides an editing experience that mimics the Classic editor — the same options and tools, in the same spot.
To use it, add a Classic block to your post or page, then add and edit both text and media right inside it.
What about editing posts and pages already created in the Classic editor?
Many of you have lots of pages and posts already created and published with the Classic editor. Previously, editing them in the Block editor led to a lot of prompts asking you to convert the content to blocks. Now there’s a single “Convert to blocks” menu item to take care of it in one go.
Use it to upgrade your posts and pages to block-based content at your leisure.
Can I combine the Classic block with other blocks?
The Classic block gives you the best of both worlds. You can continue writing and editing your posts with the simple Classic interface — but when you want to experiment with more complex layouts and functionality you can play with the flexibility of blocks. For example, have you ever wanted an easy way to show off your favorite podcast?
The Block editor also has updates to bring in some of your favorite classic features, like a clean editing screen. The Block editor displays pop-up options and menus as you type — they give you lots of control, but you might not always want them visible over your content. Turn on Top toolbar mode to keep them pinned to the top of the screen. It’s a great way to experience the full flexibility of the block editor while still allowing distraction-free writing.
Look out for the email letting you know when to expect the Block editor switch! In there meantime, learn more about working with the Block editor and the Classic block.
Quelle: RedHat Stack
The post Mirantis Acquires Lens, the World’s Most Popular Kubernetes IDE, to Simplify App Development for Amazon EKS, Google GKE, Microsoft AKS, and On-Prem Clouds appeared first on Mirantis | Pure Play Open Cloud.
Lens has widespread adoption and is one of the top trending Kubernetes projects on GitHub
Campbell, CA, August 13, 2020 — Mirantis, the open cloud company, today announced the company has acquired Lens – the Kubernetes integrated development environment (IDE) open source project from its authors, bringing multi-cluster management into the mainstream and greatly simplifying the experience for developers working with Kubernetes and cloud-native applications. This follows the Mirantis acquisition of the team behind the product in February.
Available on Github under the MIT license, Lens has garnered widespread adoption since its launch as an open source project in March 2020. With a growing community of 35,000 users and 7,000 stargazers on GitHub, it has become one of the top trending open source projects in the cloud-native ecosystem. According to publicly available data, some of the largest companies in the world are using Lens to accelerate their Kubernetes efforts at scale, including Apple, Rakuten, Zendesk, TIM, and Adobe.
Lens eliminates the Kubernetes complexity that has hindered mainstream developer adoption since its inception. The tool unlocks situational awareness and enables users to easily manage, develop, debug, monitor, and troubleshoot their workloads across multiple clusters in real time. It supports any certified Kubernetes distribution on any infrastructure, providing freedom of choice for hundreds of enterprises around the world. Lens is a standalone desktop application and works with MacOS, Windows, and Linux operating systems. Users may download and install the software free of charge.
“Lens has enabled our developers to be more productive by accelerating and simplifying the Kubernetes development workflow,” said Matti Paksula, CTO at Supervisor.com. “The best feature in my opinion is that when I do kubectl get pod in the terminal, the dashboard you are looking at is always in the right context. Additionally, I don’t need to worry about working with stale information because everything is real time.”
With the acquisition, Mirantis will invest significantly in Lens future development while committing to continue working collaboratively with the Lens community and leading ecosystem players. Lens will remain free and open source.
“Just like Visual Studio was a breakthrough for software developers, Lens is a game changer for Kubernetes developers and operators. It makes writing, testing and running Kubernetes apps easy and simple on any public or private cloud.” said Adrian Ionel, co-founder and CEO, Mirantis. “Lens fills a major gap in moving people from being interested in Kubernetes to being productive with Kubernetes.”
Lens features include:
Immediate Situational Awareness in Context: Lens provides users the easiest and fastest path to situational awareness in real-time for Kubernetes applications and clusters. With a context-aware terminal, built-in Prometheus stats, and comprehensive logging Lens provides users with the easiest and fastest navigation through all layers in the stack, so they can view performance data and troubleshoot issues.
Context-Aware Terminal: The built-in terminal includes a version of kubectl that is always API-compatible with your cluster and in the right context by automatically downloading and assigning the correct version in the background. As the user switches from one cluster to another, the terminal maintains the correct kubectl version and context.
Multi-Cluster Management on Any Cloud: Access and work with any number of Kubernetes clusters on any cloud, from a single unified IDE. The clusters may be local (e.g. minikube, Docker Desktop) or external (e.g. Docker Enterprise, EKS, AKS, GKE, Rancher, or OpenShift). Clusters may be added simply by importing the kubeconfig with cluster details.
Multiple Workspaces: Workspaces are used to organize any number of clusters into logical groups. They are useful for DevOps and SREs who need to manage multiple (even hundreds of) clusters. A single workspace contains a list of clusters and their full configuration.
Built-In Prometheus Stats: See real-time graphs and resource utilization charts integrated into the dashboard, always in the right context. Lens comes with a built-in and multi-tenant Prometheus setup that respects role-based access control (RBAC) for each user. Users will see visualizations for all the namespaces and resources to which they have access.
“It’s been amazing to see the rapid adoption of Lens. User growth has been entirely organic so clearly there was a need for a developer-friendly Kubernetes IDE,” said Miska Kaipiainen, founder and principal of the Lens open source project. “With Mirantis, Lens will remain vendor neutral and open source, and maintain its independence. We’re excited to invest more in new feature development, community building, and cloud native technology integrations to make the product better for everybody in the ecosystem.”
A technical demo video of Lens will be available at the KubeCon EU virtual event August 17-20 in the Demo Theater. Visit the Mirantis booth in the Platinum Expo Hall to chat live with the Lens team.
Join the Lens movement on Slack: k8slens.slack.com.The post Mirantis Acquires Lens, the World’s Most Popular Kubernetes IDE, to Simplify App Development for Amazon EKS, Google GKE, Microsoft AKS, and On-Prem Clouds appeared first on Mirantis | Pure Play Open Cloud.
Quelle: Mirantis
The post Lens, the world’s most popular Kubernetes IDE, has found a new home at Mirantis appeared first on Mirantis | Pure Play Open Cloud.
As you may have heard, Mirantis will oversee development of the open source Lens IDE for Kubernetes. Lens brings multi-cluster management into the mainstream and simplifies the experience for developers working with Kubernetes and cloud-native applications.
Lens is quickly becoming a Big Deal(TM). Available on Github under the MIT license, Lens has seen blistering widespread adoption since its launch as an open source project this March. With a growing community of 40,000+ users and 7,300+ stargazers on GitHub, it is one of the top trending open source projects in the cloud-native ecosystem. (According to publicly available data, some of the largest companies in the world are using Lens to accelerate their Kubernetes efforts at scale, including Apple, Rakuten, Zendesk, TIM, and Adobe.)
So what’s the big fuss? Kubernetes has a dashboard, right? Well, yes, but it’s not really designed to give you the functionality Lens does, including:
Multi-Cluster management on any cloud, whether local (e.g. minikube, Docker Desktop) or external (e.g. Docker Enterprise, EKS, AKS, GKE, Rancher, or OpenShift). Simply import the kubeconfig. You can even group clusters into workspaces.
Immediate situational awareness in context, with a context-aware terminal, built-in Prometheus stats, and comprehensive logging that lets you look at all layers in the stack. Imagine seeing a pod’s logs without having to jump through a million hoops!
Context-aware terminal includes a version of kubectl that is always API-compatible with your cluster and in the right context, even as you switch from one cluster to another.
Built-In Prometheus stats lets you see real-time graphs and resource utilization charts integrated into the dashboard, always in the right context.
That’s a lot of words. Let’s see what Lens looks like:
Crazy that Kubernetes can be that easy, huh? We’re hugely excited to be part of the Lens movement. Join us on the Lens Slack, download Lens now and let us know what you think!
The post Lens, the world’s most popular Kubernetes IDE, has found a new home at Mirantis appeared first on Mirantis | Pure Play Open Cloud.
Quelle: Mirantis
The post Mirantis Acquires Lens, the World’s Most Popular Kubernetes IDE, to Simplify App Development for Amazon EKS, Google GKE, Microsoft AKS, and On-Prem Clouds appeared first on Mirantis | Pure Play Open Cloud.
Lens has widespread adoption and is one of the top trending Kubernetes projects on GitHub
Campbell, CA, August 13, 2020 — Mirantis, the open cloud company, today announced the company has acquired Lens – the Kubernetes integrated development environment (IDE) open source project from its authors, bringing multi-cluster management into the mainstream and greatly simplifying the experience for developers working with Kubernetes and cloud-native applications. This follows the Mirantis acquisition of the team behind the product in February.
Available on Github under the MIT license, Lens has garnered widespread adoption since its launch as an open source project in March 2020. With a growing community of 35,000 users and 7,000 stargazers on GitHub, it has become one of the top trending open source projects in the cloud-native ecosystem. According to publicly available data, some of the largest companies in the world are using Lens to accelerate their Kubernetes efforts at scale, including Apple, Rakuten, Zendesk, TIM, and Adobe.
Lens eliminates the Kubernetes complexity that has hindered mainstream developer adoption since its inception. The tool unlocks situational awareness and enables users to easily manage, develop, debug, monitor, and troubleshoot their workloads across multiple clusters in real time. It supports any certified Kubernetes distribution on any infrastructure, providing freedom of choice for hundreds of enterprises around the world. Lens is a standalone desktop application and works with MacOS, Windows, and Linux operating systems. Users may download and install the software free of charge.
“Lens has enabled our developers to be more productive by accelerating and simplifying the Kubernetes development workflow,” said Matti Paksula, CTO at Supervisor.com. “The best feature in my opinion is that when I do kubectl get pod in the terminal, the dashboard you are looking at is always in the right context. Additionally, I don’t need to worry about working with stale information because everything is real time.”
With the acquisition, Mirantis will invest significantly in Lens future development while committing to continue working collaboratively with the Lens community and leading ecosystem players. Lens will remain free and open source.
“Just like Visual Studio was a breakthrough for software developers, Lens is a game changer for Kubernetes developers and operators. It makes writing, testing and running Kubernetes apps easy and simple on any public or private cloud.” said Adrian Ionel, co-founder and CEO, Mirantis. “Lens fills a major gap in moving people from being interested in Kubernetes to being productive with Kubernetes.”
Lens features include:
Immediate Situational Awareness in Context: Lens provides users the easiest and fastest path to situational awareness in real-time for Kubernetes applications and clusters. With a context-aware terminal, built-in Prometheus stats, and comprehensive logging Lens provides users with the easiest and fastest navigation through all layers in the stack, so they can view performance data and troubleshoot issues.
Context-Aware Terminal: The built-in terminal includes a version of kubectl that is always API-compatible with your cluster and in the right context by automatically downloading and assigning the correct version in the background. As the user switches from one cluster to another, the terminal maintains the correct kubectl version and context.
Multi-Cluster Management on Any Cloud: Access and work with any number of Kubernetes clusters on any cloud, from a single unified IDE. The clusters may be local (e.g. minikube, Docker Desktop) or external (e.g. Docker Enterprise, EKS, AKS, GKE, Rancher, or OpenShift). Clusters may be added simply by importing the kubeconfig with cluster details.
Multiple Workspaces: Workspaces are used to organize any number of clusters into logical groups. They are useful for DevOps and SREs who need to manage multiple (even hundreds of) clusters. A single workspace contains a list of clusters and their full configuration.
Built-In Prometheus Stats: See real-time graphs and resource utilization charts integrated into the dashboard, always in the right context. Lens comes with a built-in and multi-tenant Prometheus setup that respects role-based access control (RBAC) for each user. Users will see visualizations for all the namespaces and resources to which they have access.
“It’s been amazing to see the rapid adoption of Lens. User growth has been entirely organic so clearly there was a need for a developer-friendly Kubernetes IDE,” said Miska Kaipiainen, founder and principal of the Lens open source project. “With Mirantis, Lens will remain vendor neutral and open source, and maintain its independence. We’re excited to invest more in new feature development, community building, and cloud native technology integrations to make the product better for everybody in the ecosystem.”
A technical demo video of Lens will be available at the KubeCon EU virtual event August 17-20 in the Demo Theater. Visit the Mirantis booth in the Platinum Expo Hall to chat live with the Lens team.
Join the Lens movement on Slack: k8slens.slack.com.
About Mirantis
Mirantis is the fastest way to modern apps, providing containers-as-a-service at enterprise scale. The company uses a unique as-a-service model to deliver Kubernetes and related open source software, empowering developers to build, share and run their applications anywhere – from public cloud to hybrid cloud to the edge. Mirantis serves many of the world’s leading enterprises, including Adobe, Cox Communications, DocuSign, Liberty Mutual, PayPal, Reliance Jio, Splunk, STC, Vodafone, and Volkswagen. Learn more at www.mirantis.com.
###
Media Contact
Joseph Eckert for Mirantis
jeckert@eckertcomms.comThe post Mirantis Acquires Lens, the World’s Most Popular Kubernetes IDE, to Simplify App Development for Amazon EKS, Google GKE, Microsoft AKS, and On-Prem Clouds appeared first on Mirantis | Pure Play Open Cloud.
Quelle: Mirantis
The post Getting started with Lens appeared first on Mirantis | Pure Play Open Cloud.
It’s easy to get going with Lens on virtually any computer with a graphical desktop environment (Linux, Mac, or Windows). The only real requirement is that you need one or more pre-existing Kubernetes clusters for Lens to look at. (Otherwise, what’s the point?)
Specifically, Lens talks to the Kubernetes API via kubectl, so you’ll need connectivity to your cluster(s) from the computer on which you want to install Lens to port 6443 of the cluster controller using https. As long as you have the kubeconfig for your cluster stored locally (and Lens can help you find that), you should be good to go.
The cluster itself can be pretty-much anywhere and derive from any source. You can use Lens to control local clusters (such as Docker Kubernetes Service clusters running on your laptop), or remote clusters on bare metal, private, or public clouds. Lens adapts automatically to manage different recent versions of Kubernetes, so dealing with multiple generations of Kubernetes cluster is no problem.
Don’t have a cluster yet? Happily, that’s easy too, because you can install a Docker Enterprise cluster quickly, using Launchpad. In fact, Launchpad and Lens companion very well, since Launchpad is available for Linux, Mac, and Windows, too.
Installing Lens
Basic docs can be found at the Lens repository on GitHub. Downloadables are available on the releases page. Installation on Windows (via .exe) and Mac (via .dmg) is easy; just download those files to the local machine and run them.
On Mac, you can also:
brew cask install lens
to get the latest version.
For Linux, Lens is available via snap or packaged as an AppImage, which we recommend for its convenience. If you haven’t encountered AppImages before (plenty of frequent Linux users haven’t – don’t feel bad), AppImage tech provides a way of packaging application dependencies together in executable binaries that will run on pretty much any Linux machine.
To use the AppImage, just download the release binary to a safe place on your system, make it executable, and run it from the command line or your desktop’s application browser. Because Lens is a desktop application, you don’t even need to be particularly concerned about making sure to save the Lens binary somewhere on your CLI execution path, because the first time it runs, it inserts an icon in your ‘Favorites’ bar that you can pin there to make subsequent execution easy.
Using a standard browser, this is pretty simple, but you can also do it from the command line. To do so, right-click on the link to the AppImage on the Releases page and select Copy link address, then:
Make a lens directory
cd into it
download the binary there using wget, curl, or another tool
make the binary executable, and
run it, prefixing the file name with ./ to tell bash that it needs to look in the local directory instead of elsewhere on your execution path.
For example:
mkdir lens
cd lens
wget https://github.com/lensapp/lens/releases/download/v3.5.2/Lens-3.5.2.AppImage
chmod +x Lens-3.5.2.AppImage
./Lens-3.5.2.AppImage
Lens checks for updates, then opens on your desktop. Right-click on its icon in your Favorites bar and click Add to Favorites to make it more easily accessible.
When launching Lens from a Favorites icon, be sure to just click once for each instance of Lens you want to run. Especially on slowish virtual machines, Lens takes a few moments to start up (check for updates, load contexts, and so on), so it’s easy to get half a dozen instances launching at once if you get impatient and click multiple times.
Configuring Lens to work with your cluster(s)
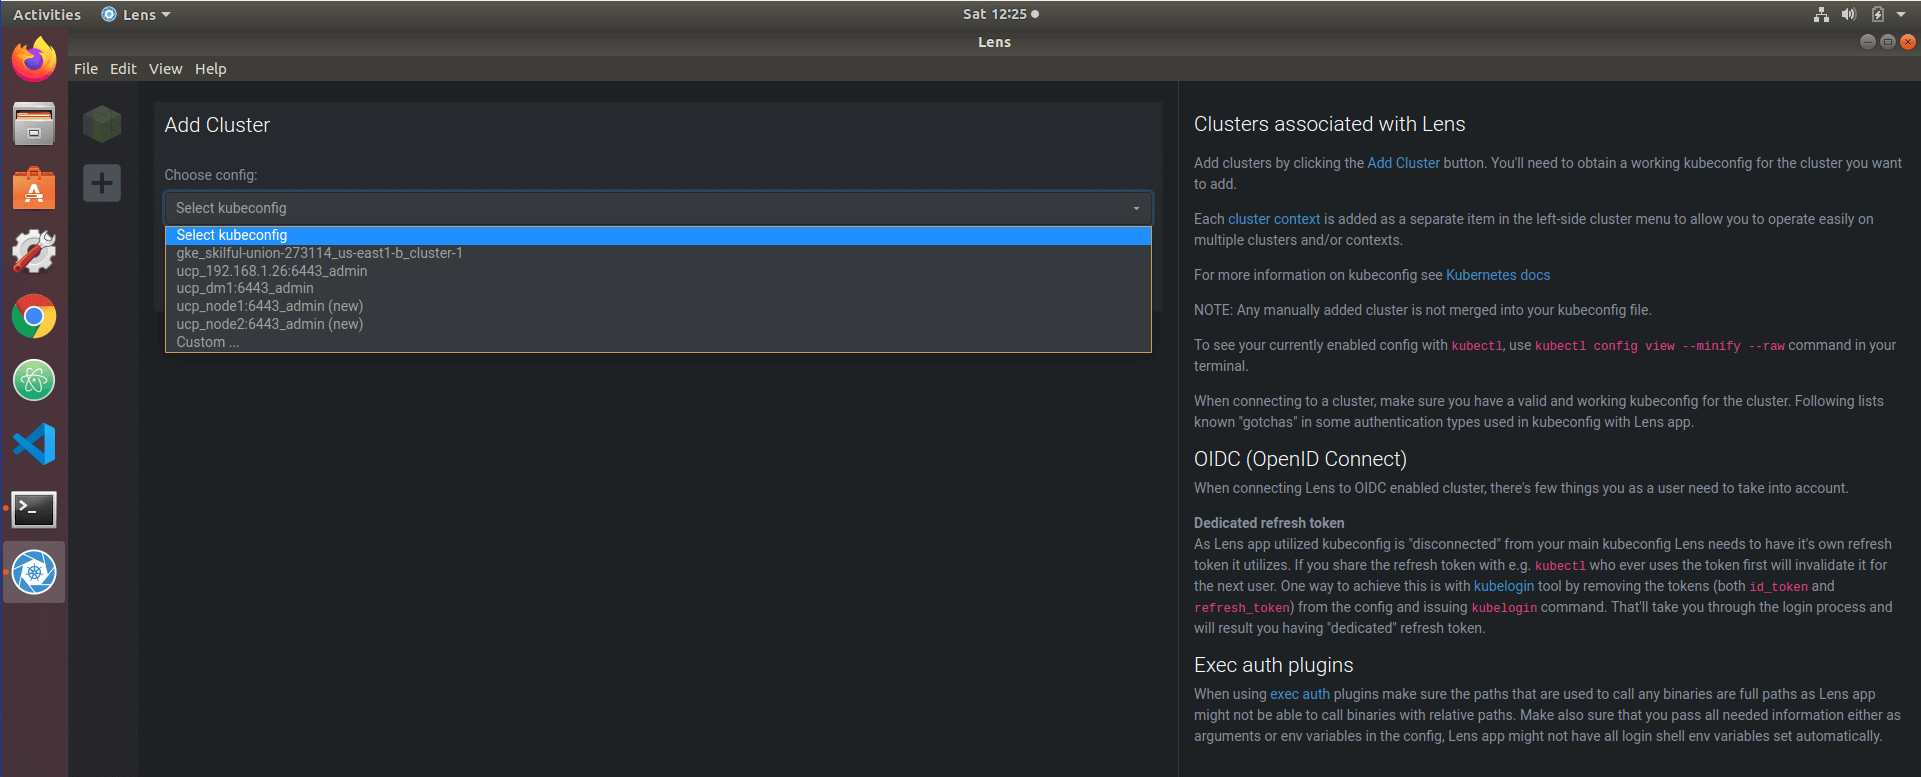
Lens makes configuration very simple. Click Add Cluster in the File menu, and Lens pops up a list of all the kubeconfigs it’s found on your local system. Pick one, and Lens self-configures — creating a context for that cluster so it can manage (for example) the particular version of Kubernetes API it uses, and other details.
If you can’t find your desired kubeconfig in the list, it may be that you haven’t yet downloaded an authentication bundle for that cluster. (Perhaps it was recently deployed, or you deployed it on a public cloud service). For Docker Enterprise clusters, just browse the Universal Control Plane webUI, click on Admin>My Profile>Client Bundles, generate and download a new client bundle, unzip it, and find the kube.yml file; that’s the one Lens needs.
Before manually adding the cluster, it makes sense to use kubectl to make sure the config is working and you can reach the cluster. For Docker Enterprise, this is easy — just source the env.sh from the client bundle, to authenticate:
source env.sh
Then run any kubectl command, such as:
kubectl get pods –all-namespaces
You can then list and copy the kube.yml. In Lens, click on Custom in the kubeconfig pick list, then just paste the YAML into the window and click Add Cluster.
In moments, Lens will populate its context, add your cluster, and show its details in the main window. The only thing you won’t see, at first, is cluster metrics, which is the next thing we’ll set up.
Enabling Lens metrics
Lens can run a small Prometheus instance in your cluster, giving you metrics for nodes visible to you according to RBAC permissions on your account. Admins, of course, will be able to see metrics for everything.
(If you’re already running Prometheus, you can export metrics from this instance to Lens; full instructions are accessible from within the application.)
To set up the internal Prometheus instance, right click on the cluster icon in Lens’ left-hand menu and select Settings, then scroll down to where it says Prometheus to connect an existing Prometheus instance, or a little further, under Features/Metrics, where you can just click Install to have Lens create an instance for you.
Either way, Lens connects to your Prometheus, and cluster metrics automagically appear on your cluster dashboard.
Basic LensOps
Lens makes all the objects and abstractions in each cluster instantly accessible to you. Take a look at the left-hand menu, and try clicking on Workloads. You get a highly browsable submenu (and an alternative, tabbed display) of everything, including handy, color-coded summary graphics that will clue you to any issues.
Drill down anywhere, right-click on the submenu associated with any line-item, and you can edit its YAML in Lens’ built-in editor, then Save to reapply it. Devs working with private clusters can quickly iterate live changes and check results. Drilling in further, Lens lets you access terminals inside running containers, and retrieves container and pod logs directly, with one click, for easy review.
If you’re working on a more infra-as-code basis, Lens also lets you open any number of terminals, letting you quickly browse a local repo for files you need, for example, then push changes to git, issue docker commands, or pop files into VScode or ATOM (or whatever IDE or editor you prefer) for editing, versioning, and careful reapplication.
Where to go from here
The best place to go for inspiration on more advanced use of Lens is the community slack channel (https://k8slens.slack.com), a link to which is provided in the About menu in Lens itself.
Please try Lens, let us know what you think, and what you’d like to see covered in upcoming Lens tutorials. We’re here for you!The post Getting started with Lens appeared first on Mirantis | Pure Play Open Cloud.
Quelle: Mirantis






