The last few years have made it clear that AI models will continue to be a fundamental component of many applications. The catch is that they’re also a fundamentally different type of component, with complex software and hardware requirements that don’t (yet) fit neatly into the constraints of container-oriented development lifecycles and architectures. To help address this problem, Docker launched the Docker Model Runner with Docker Desktop 4.40. Since then, we’ve been working aggressively to expand Docker Model Runner with additional OS and hardware support, deeper integration with popular Docker tools, and improvements to both performance and usability.For those interested in Docker Model Runner and its future, we offer a behind-the-scenes look at its design, development, and roadmap.
Note: Docker Model Runner is really two components: the model runner and the model distribution specification. In this article, we’ll be covering the former, but be sure to check out the companion blog post by Emily Casey for the equally important distribution side of the story.
Design goals
Docker Model Runner’s primary design goal was to allow users to run AI models locally and to access them from both containers and host processes. While that’s simple enough to articulate, it still leaves an enormous design space in which to find a solution. Fortunately, we had some additional constraints: we were a small engineering team, and we had some ambitious timelines. Most importantly, we didn’t want to compromise on UX, even if we couldn’t deliver it all at once. In the end, this motivated design decisions that have so far allowed us to deliver a viable solution while leaving plenty of room for future improvement.
Multiple backends
One thing we knew early on was that we weren’t going to write our own inference engine (Docker’s wheelhouse is containerized development, not low-level inference engines). We’re also big proponents of open-source, and there were just so many great existing solutions! There’s llama.cpp, vLLM, MLX, ONNX, and PyTorch, just to name a few.
Of course, being spoiled for choice can also be a curse — which to choose? The obvious answer was: as many as possible, but not all at once.
We decided to go with llama.cpp for our initial implementation, but we intentionally designed our APIs with an additional, optional path component (the {name} in /engines/{name}) to allow users to take advantage of multiple future backends. We also designed interfaces and stubbed out implementations for other backends to enforce good development hygiene and to avoid becoming tethered to one “initial” implementation.
OpenAI API compatibility
The second design choice we had to make was how to expose inference to consumers in containers. While there was also a fair amount of choice in the inference API space, we found that the OpenAI API standard seemed to offer the best initial tooling compatibility. We were also motivated by the fact that several teams inside Docker were already using this API for various real-world products. While we may support additional APIs in the future, we’ve so far found that this API surface is sufficient for most applications. One gap that we know exists is full compatibility with this API surface, which is something we’re working on iteratively.
This decision also drove our choice of llama.cpp as our initial backend. The llama.cpp project already offered a turnkey option for OpenAI API compatibility through its server implementation. While we had to make some small modifications (e.g. Unix domain socket support), this offered us the fastest path to a solution. We’ve also started contributing these small patches upstream, and we hope to expand our contributions to these projects in the future.
First-class citizenship for models in the Docker API
While the OpenAI API standard was the most ubiquitous option amongst existing tooling, we also knew that we wanted models to be first-class citizens in the Docker Engine API. Models have a fundamentally different execution lifecycle than the processes that typically make up the ENTRYPOINTs of containers, and thus, they don’t fit well under the standard /containers endpoints of the Docker Engine API. However, much like containers, images, networks, and volumes, models are such a fundamental component that they really deserve their own API resource type. This motivated the addition of a set of /models endpoints, closely modeled after the /images endpoints, but separate for reasons that are best discussed in the distribution blog post.
GPU acceleration
Another critical design goal was support for GPU acceleration of inference operations. Even the smallest useful models are extremely computationally demanding, while more sophisticated models (such as those with tool-calling capabilities) would be a stretch to fit onto local hardware at all. GPU support was going to be non-negotiable for a useful experience.
Unfortunately, passing GPUs across the VM boundary in Docker Desktop, especially in a way that would be reliable across platforms and offer a usable computation API inside containers, was going to be either impossible or very flaky.
As a compromise, we decided to run inference operations outside of the Docker Desktop VM and simply proxy API calls from the VM to the host. While there are some risks with this approach, we are working on initiatives to mitigate these with containerd-hosted sandboxing on macOS and Windows. Moreover, with Docker-provided models and application-provided prompts, the risk is somewhat lower, especially given that inference consists primarily of numerical operations. We assess the risk in Docker Desktop to be about on par with accessing host-side services via host.docker.internal (something already enabled by default).
However, agents that drive tool usage with model output can cause more significant side effects, and that’s something we needed to address. Fortunately, using the Docker MCP Toolkit, we’re able to perform tool invocation inside ephemeral containers, offering reliable encapsulation of the side effects that models might drive. This hybrid approach allows us to offer the best possible local performance with relative peace of mind when using tools.
Outside the context of Docker Desktop, for example, in Docker CE, we’re in a significantly better position due to the lack of a VM boundary (or at least a very transparent VM boundary in the case of a hypervisor) between the host hardware and containers. When running in standalone mode in Docker CE, the Docker Model Runner will have direct access to host hardware (e.g. via the NVIDIA Container Toolkit) and will run inference operations within a container.
Modularity, iteration, and open-sourcing
As previously mentioned, the Docker Model Runner team is relatively small, which meant that we couldn’t rely on a monolithic architecture if we wanted to effectively parallelize the development work for Docker Model Runner. Moreover, we had an early and overarching directive: open-source as much as possible.
We decided on three high-level components around which we could organize development work: the model runner, the model distribution tooling, and the model CLI plugin.
Breaking up these components allowed us to divide work more effectively, iterate faster, and define clean API boundaries between different concerns. While there have been some tricky dependency hurdles (in particular when integrating with closed-source components), we’ve found that the modular approach has facilitated faster incremental changes and support for new platforms.
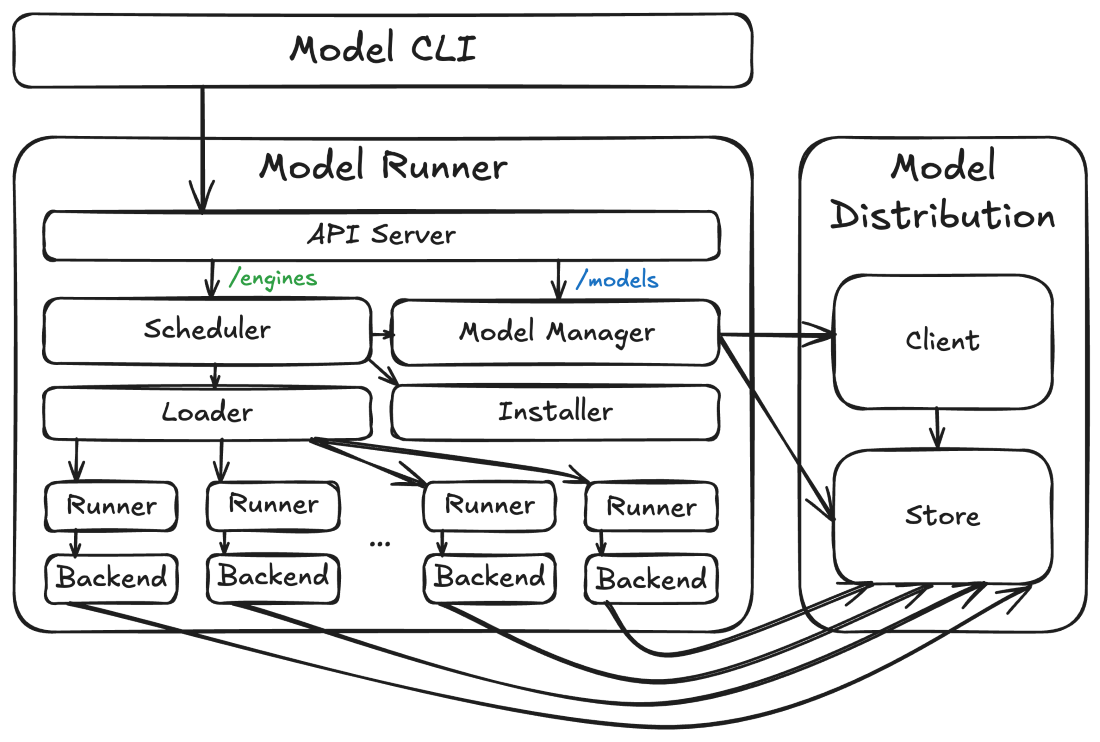
The High-Level Architecture
At a high level, the Docker Model Runner architecture is composed of the three components mentioned above (the runner, the distribution code, and the CLI), but there are also some interesting sub-components within each:
Figure 1: Docker Model Runner high-level architecture
How these components are packaged and hosted (and how they interact) also depends on the platform where they’re deployed. In each case it looks slightly different. Sometimes they run on the host, sometimes they run in a VM, sometimes they run in a container, but the overall architecture looks the same.
Model storage and client
The core architectural component is the model store. This component, provided by the model distribution code, is where the actual model tensor files are stored. These files are stored differently (and separately) from images because (1) they’re high-entropy and not particularly compressible and (2) the inference engine needs direct access to the files so that it can do things like mapping them into its virtual address space via mmap(). For more information, see the accompanying model distribution blog post.
The model distribution code also provides the model distribution client. This component performs operations (such as pulling models) using the model distribution protocol against OCI registries.
Model runner
Built on top of the model store is the model runner. The model runner maps inbound inference API requests (e.g. /v1/chat/completions or /v1/embeddings requests) to processes hosting pairs of inference engines and models. It includes scheduler, loader, and runner components that coordinate the loading of models in and out of memory so that concurrent requests can be serviced, even if models can’t be loaded simultaneously (e.g. due to resource constraints). This makes the execution lifecycle of models different from that of containers, with engines and models operating as ephemeral processes (mostly hidden from users) that can be terminated and unloaded from memory as necessary (or when idle). A different backend process is run for each combination of engine (e.g. llama.cpp) and model (e.g. ai/qwen3:8B-Q4_K_M) as required by inference API requests (though multiple requests targeting the same pair will reuse the same runner and backend processes if possible).
The runner also includes an installer service that can dynamically download backend binaries and libraries, allowing users to selectively enable features (such as CUDA support) that might require downloading hundreds of MBs of dependencies.
Finally, the model runner serves as the central server for all Docker Model Runner APIs, including the /models APIs (which it routes to the model distribution code) and the /engines APIs (which it routes to its scheduler). This API server will always opt to hold in-flight requests until the resources (primarily RAM or VRAM) are available to service them, rather than returning something like a 503 response. This is critical for a number of usage patterns, such multiple agents running with different models or concurrent requests for both embedding and completion.
Model CLI
The primary user-facing component of the Docker Model Runner architecture is the model CLI. This component is a standard Docker CLI plugin that offers an interface very similar to the docker image command. While the lifecycle of model execution is different from that of containers, the concepts (such as pushing, pulling, and running) should be familiar enough to existing Docker users.
The model CLI communicates with the model runner’s APIs to perform almost all of its operations (though the transport for that communication varies by platform). The model CLI is context-aware, allowing it to determine if it’s talking to a Docker Desktop model runner, Docker CE model runner, or a model runner on some custom platform. Because we’re using the standard Docker CLI plugin framework, we get all of the standard Docker Context functionality for free, making this detection much easier.
API design and routing
As previously mentioned, the Docker Model Runner comprises two sets of APIs: the Docker-style APIs and the OpenAI-compatible APIs. The Docker-style APIs (modeled after the /image APIs) include the following endpoints:
POST /models/create (Model pulling)
GET /models (Model listing)
GET /models/{namespace}/{name} (Model metadata)
DELETE /models/{namespace}/{name} (Model deletion)
The bodies for these requests look very similar to their image analogs. There’s no documentation at the moment, but you can get a glimpse of the format by looking at their corresponding Go types.
In contrast, the OpenAI endpoints follow a different but still RESTful convention:
GET /engines/{engine}/v1/models (OpenAI-format model listing)
GET /engines/{engine}/v1/models/{namespace}/{name} (OpenAI-format model metadata)
POST /engines/{engine}/v1/chat/completions (Chat completions)
POST /engines/{engine}/v1/completions (Chat completions (legacy endpoint))
POST /engines/{engine}/v1/embeddings (Create embeddings)
At this point in time, only one {engine} value is supported (llama.cpp), and it can also be omitted to use the default (llama.cpp) engine.
We make these APIs available on several different endpoints:
First, in Docker Desktop, they’re available on the Docker socket (/var/run/docker.sock), both inside and outside containers. This is in service of our design goal of having models as a first-class citizen in the Docker Engine API. At the moment, these endpoints are prefixed with a /exp/vDD4.40 path (to avoid dependencies on APIs that may evolve during development), but we’ll likely remove this prefix in the next few releases since these APIs have now mostly stabilized and will evolve in a backward-compatible way.
Second, also in Docker Desktop, we make the APIs available on a special model-runner.docker.internal endpoint that’s accessible just from containers (though not currently from ECI containers, because we want to have inference sandboxing implemented first). This TCP-based endpoint exposes just the /models and /engines API endpoints (not the whole Docker API) and is designed to serve existing tooling (which likely can’t access APIs via a Unix domain socket). No /exp/vDD4.40 prefix is used in this case.
Finally, in both Docker Desktop and Docker CE, we make the /models and /engines API endpoints available on a host TCP endpoint (localhost:12434, by default, again without any /exp/vDD4.40 prefix). In Docker Desktop this is optional and not enabled by default. In Docker CE, it’s a critical component of how the API endpoints are accessed, because we currently lack the integration to add endpoints to Docker CE’s /var/run/docker.sock or to inject a custom model-runner.docker.internal hostname, so we advise using the standard 172.17.0.1 host gateway address to access this localhost-exposed port (e.g. setting your OpenAI API base URL to http://172.17.0.1:12434/engines/v1). Hopefully we’ll be able to unify this across Docker platforms in the near future (see our roadmap below).
First up: Docker Desktop
The natural first step for Docker Model Runner was integration into Docker Desktop. In Docker Desktop, we have more direct control over integration with the Docker Engine, as well as existing processes that we can use to host the model runner components. In this case, the model runner and model distribution components live in the Docker Desktop host backend process (the com.docker.backend process you may have seen running) and we use special middleware and networking magic to route requests on /var/run/docker.sock and model-runner.docker.internal to the model runner’s API server. Since the individual inference backend processes run as subprocesses of com.docker.backend, there’s no risk of a crash in Docker Desktop if, for example, an inference backend is killed by an Out Of Memory (OOM) error.
We started initially with support for macOS on Apple Silicon, because it provided the most uniform platform for developing the model runner functionality, but we implemented most of the functionality along the way to build and test for all Docker Desktop platforms. This made it significantly easier to port to Windows on AMD64 and ARM64 platforms, as well as the GPU variations that we found there.
The one complexity with Windows was the larger size of the supporting library dependencies for the GPU-based backends. It wouldn’t have been feasible (or tolerated) if we added another 500 MB – 1 GB to the Docker Desktop for Windows installer, so we decided to default to a CPU-based backend in Docker Desktop for Windows with optional support for the GPU backend. This was the primary motivating factor for the dynamic installer component of the model runner (in addition to our desire for incremental updates to different backends).
This all sounds like a very well-planned exercise, and we did indeed start with a three-component design and strictly enforced API boundaries, but in truth we started with the model runner service code as a sub-package of the Docker Desktop source code. This made it much easier to iterate quickly, especially as we were exploring the architecture for the different services. Fortunately, by sticking to a relatively strict isolation policy for the code, and enforcing clean dependencies through APIs and interfaces, we were able to easily extract the code (kudos to the excellent git-filter-repo tool) into a separate repository for the purposes of open-sourcing.
Next stop: Docker CE
Aside from Docker’s penchant for open-sourcing, one of the main reasons that we wanted to make the Docker Model Runner source code publicly available was to support integration into Docker CE. Our goal was to package the docker model command in the same way as docker buildx and docker compose.
The trick with Docker CE is that we wanted to ship Docker Model Runner as a “vanilla” Docker CLI plugin (i.e. without any special privileges or API access), which meant that we didn’t have a backend process that could host the model runner service. However, in the Docker CE case, the boundary between host hardware and container processes is much less disruptive, meaning that we could actually run Docker Model Runner in a container and simply make any accelerator hardware available to it directly. So, much like a standalone BuildKit builder container, we run the Docker Model Runner as a standalone container in Docker CE, with a special named volume for model storage (meaning you can uninstall the runner without having to re-pull models). This “installation” is performed by the model CLI automatically (and when necessary) by pulling the docker/model-runner image and starting a container. Explicit configuration for the runner can also be specified using the docker model install-runner command. If you want, you can also remove the model runner (and optionally the model storage) using docker model uninstall-runner.
This unfortunately leads to one small compromise with the UX: we don’t currently support the model runner APIs on /var/run/docker.sock or on the special model-runner.docker.internal URL. Instead, the model runner API server listens on the host system’s loopback interface at localhost:12434 (by default), which is available inside most containers at 172.17.0.1:12434. If desired, users can also make this available on model-runner.docker.internal:12434 by utilizing something like –add-host=model-runner.docker.internal:host-gateway when running docker run or docker create commands. This can also be achieved by using the extra_hosts key in a Compose YAML file. We have plans to make this more ergonomic in future releases.
The road ahead…
The status quo is Docker Model Runner support in Docker Desktop on macOS and Windows and support for Docker CE on Linux (including WSL2), but that’s definitely not the end of the story. Over the next few months, we have a number of initiatives planned that we think will reshape the user experience, performance, and security of Docker Model Runner.
Additional GUI and CLI functionality
The most visible functionality coming out over the next few months will be in the model CLI and the “Models” tab in the Docker Desktop dashboard. Expect to see new commands (such as df, ps, and unload) that will provide more direct support for monitoring and controlling model execution. Also, expect to see new and expanded layouts and functionality in the Models tab.
Expanded OpenAI API support
A less-visible but equally important aspect of the Docker Model Runner user experience is our compatibility with the OpenAI API. There are dozens of endpoints and parameters to support (and we already support many), so we will work to expand API surface compatibility with a focus on practical use cases and prioritization of compatibility with existing tools.
containerd and Moby integration
One of the longer-term initiatives that we’re looking at is integration with containerd. containerd already provides a modular runtime system that allows for task execution coordinated with storage. We believe this is the right way forward and that it will allow us to better codify the relationship between model storage, model execution, and model execution sandboxing.
In combination with the containerd work, we would also like tighter integration with the Moby project. While our existing Docker CE integration offers a viable and performant solution, we believe that better ergonomics could be achieved with more direct integration. In particular, niceties like support for model-runner.docker.internal DNS resolution in Docker CE are on our radar. Perhaps the biggest win from this tighter integration would be to expose Docker Model Runner APIs on the Docker socket and to include the API endpoints (e.g. /models) in the official Docker Engine API documentation.
Kubernetes
One of the product goals for Docker Model Runner was a consistent experience from development inner loop to production, and Kubernetes is inarguably a part of that path. The existing Docker Model Runner images that we’re using for Docker CE will also work within a Kubernetes cluster, and we’re currently developing instructions to set up a Docker Model Runner instance in a Kubernetes cluster. The big difference with Kubernetes is the variety of cluster and application architectures in use, so we’ll likely end up with different “recipes” for how to configure the Docker Model Runner in different scenarios.
vLLM
One of the things we’ve heard from a number of customers is that vLLM forms a core component of their production stack. This was also the first alternate backend that we stubbed out in the model runner repository, and the time has come to start poking at an implementation.
Even more to come…
Finally, there are some bits that we just can’t talk about yet, but they will fundamentally shift the way that developers interact with models. Be sure to tune-in to Docker’s sessions at WeAreDevelopers from July 9–11 for some exciting announcements around AI-related initiatives at Docker.
Learn more
Explore the story behind our model distribution specification
Read our quickstart guide to Docker Model Runner.
Find documentation for Model Runner.
Subscribe to the Docker Navigator Newsletter.
New to Docker? Create an account.
Have questions? The Docker community is here to help.
Quelle: https://blog.docker.com/feed/