Push configuration with zero downtime using Cloud Pub/Sub and Spring Framework

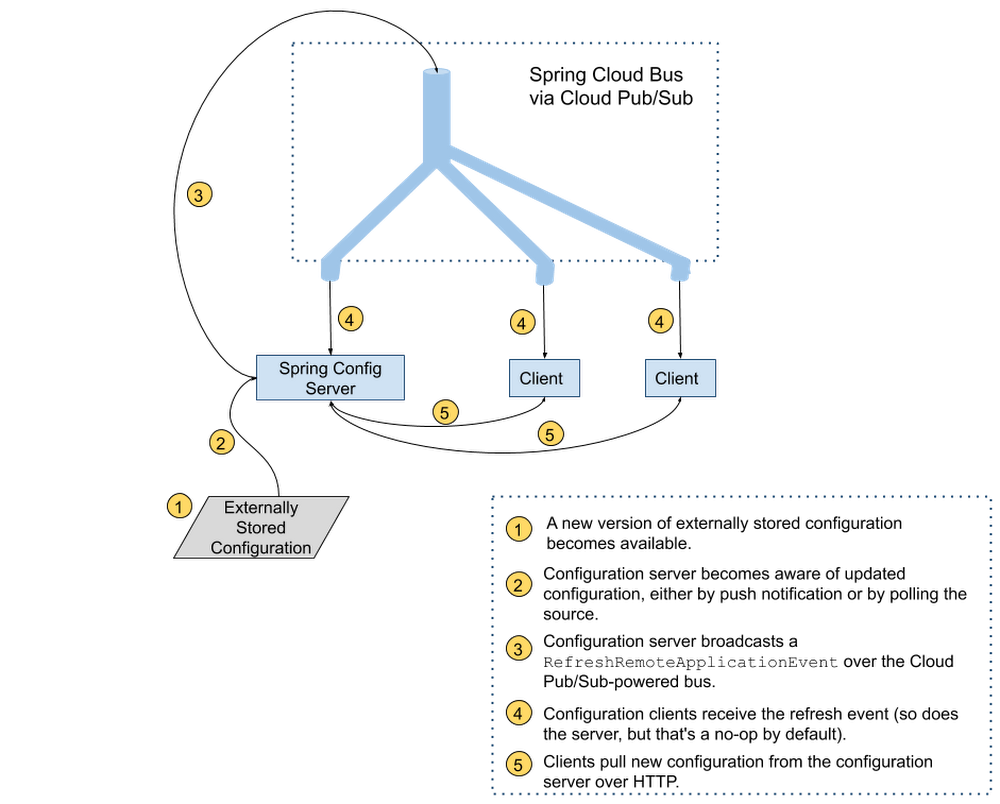
As application configuration grows more complex, treating it with the same care we treat code—applying best practices for code review, and rolling it out gradually—makes for more stable, predictable application behavior. But deploying application configuration together with the application code takes away a lot of the flexibility that having separate configuration offers in the first place. Compared with application code, configuration data has different:Granularity – per server or per region, rather than (unsurprisingly) per application.Lifecycle – more frequent if you don’t deploy your application very often; less frequent, perhaps, if you embrace continuous deployment for code.This leads us to an important best practice for software development teams: separating code from configuration when deploying applications. More recently, DevOps teams have started to practice “configuration as code”—storing configuration in version-tracked repositories. But if you update your configuration data separately, how will your code learn about it and use it? It’s possible, of course, to push new settings and restart all application instances to pick up the updates, but that could result in unnecessary downtime.If you’re a Java developer and use the Spring Framework, there’s good news. Spring Cloud Config lets applications monitor a variety of sources (source control, database etc.) for configuration changes. It then notifies all subscriber applications that changes are available using Spring Cloud Bus and the messaging technology of your choice. If you’re running on Google Cloud, one great messaging option is Cloud Pub/Sub. In the remainder of this blog post, you’ll learn how to configure Spring Cloud Config and Spring Cloud Bus with Cloud Pub/Sub, so you can enjoy the benefits of configuration maintained as code and propagated to environments automatically.Setting up the server and the clientImagine you want to store your application configuration data in a GitHub repository. You’ll need to set up a dedicated configuration server (to monitor and fetch configuration data from its true source), as well as a configuration client embedded in the application that contains your business logic. In a real world scenario, you’d have many business applications or microservices, each of which has an embedded configuration client talking to the server and retrieving the latest configuration from it. You can find the full source code for all the examples in this post in this Spring Cloud GCP sample app.Configuration server setupTo take advantage of the power of distributed configuration, it’s common to set up a dedicated configuration server. You configure a GitHub webhook to notify it whenever there are changes, and the configuration server, in turn, notifies all the interested applications that run the business logic that new configuration is available to be picked up.The configuration server has the following three dependencies (we recommend using the Spring Cloud GCP Bill Of Materials for setting up dependency versions):pom.xmlThe first dependency, spring-cloud-gcp-starter-bus-pubsub, ensures that Cloud Pub/Sub is the Spring Cloud Bus implementation that powers all the messaging functionality.The other two dependencies make this application act as a Spring Cloud Config server capable of being notified of changes by the configuration source (Github) on the /monitor HTTP endpoint it sets up.The config server application also needs to be told where to find the updated configuration; we use a standard Spring application properties file to point it to the GitHub repository containing the configuration:application.propertiesYou’ll need to customize the port if you are running the example locally. Like all Spring Boot applications, the configuration server normally runs on port 8080 by default, but that port is used by the business application we are about to configure, so an override is needed.The last piece you need to run a configuration server is the Java code!PubSubConfigGitHubServerApplication.javaAs is typical for Spring Boot applications, the boilerplate code is minimal—all the functionality is driven by a single annotation, @EnableConfigServer. This annotation, combined with the dependencies and configuration, gives you a fully functional configuration server capable of being notified when a new configuration arrives by way of the /monitor endpoint. Then, in turn, the configuration server notifies all the client applications through a Cloud Pub/Sub topic.Speaking of the Cloud Pub/Sub topic, if you run just the server application, you’ll notice in the Google Cloud Console that a topic named springCloudBus was created for you automatically, along with a single anonymous subscription (a bit of trivia: every configuration server is capable of receiving the configuration it broadcasts, but configuration updates are suppressed on the server by default).Configuration client setupNow that you have a configuration server, you’re ready to create an application that subscribes to that server’s vast (well… not that vast) knowledge of configuration.The client application dependencies are as follows:pom.xmlThe client needs a dependency on spring-cloud-gcp-starter-bus-pubsub, just as the server did. This dependency enables the client application to subscribe to configuration change notifications arriving over Cloud Pub/Sub. The notifications do not contain the configuration changes; the client applications will pull those over HTTP.Notice that the client application only has one Spring Cloud Config dependency: spring-cloud-config-client. This application doesn’t need to know how the server finds out about configuration changes, hence the simple dependency.For this demo, we made a web application, but client applications can be any type of application that you need. They don’t even need to be Java applications, as long as they know how to subscribe to a Cloud Pub/Sub topic and retrieve content from an HTTP endpoint!Nor do you need any special application configuration for a client application. By default, all configuration clients look for a configuration server on local port 8888 and subscribe to a topic named springCloudBus. To customize the configuration server location for a real-world deployment, simply configure the spring.cloud.config.uri property in the bootstrap.properties file, which is read before the regular application initialization. To customize the topic name, add the spring.cloud.bus.destination property to the regular application.properties file, making sure that the config server and all client applications have the same value.And now, it’s time to add the client application’s code:PubSubConfigApplication.javaExampleController.javaAgain, the boilerplate here is minimal—PubSubConfigApplication starts up a Spring Boot application, and ExampleController sets up a single HTTP endpoint /message. If no configuration server is available, the endpoint serves the default message of “none”. If a configuration server is found on the default localhost:8888 URL, the configuration found there at client startup time will be served. The @RefreshScope annotation ensures that the message property gets a new value whenever a configuration refresh event is received.The code is now complete! You can use the mvn spring-boot:run command to start up the config server and client in different terminals and try it out. To test that configuration changes propagate from GitHub to the client application, update configuration in your GitHub repository, and then manually invoke the /monitor endpoint of your config server (you would configure this to be done automatically through a GitHub webhook for a deployed config server):After running the above command, the /message endpoint serves the most recent value retrieved from GitHub.And that’s all that’s required for a basic Spring Cloud Config with Cloud Pub/Sub-enabled bus server/client combination. In the real world, you’ll most likely serve different configurations to different environments (dev, QA etc.). Because Spring Cloud Config supports hierarchical representation of configuration, it can grow to adapt to any environment setup.For more information, visit the Spring Cloud GCP documentation and sample.
Quelle: Google Cloud Platform

How Traveloka brings partners in for a smooth landing with APIs

Editor’s note: Today we hear from Felix Perdana, engineering manager at Traveloka, on how the company uses the Apigee API management platform to become a one-stop travel and lifestyle platform in Southeast Asia and beyond. Traveloka uses APIs to grow and consolidate its inventories while bringing customers and partners together to book flights, vehicles, hotels, and vacation packages. Traveloka is an Indonesian tech company currently focusing on the travel and lifestyle markets. Our customers, the majority of which come from Southeast Asia, visit the site mainly to book flights, hotels, transportation, lifestyle experiences (e.g. theme parks, movie tickets, beauty and spa treatments, and restaurant vouchers), and much more. We aim to serve more customers across the globe as part of our giant expansion plans.In past blog posts, my colleagues have written about how Traveloka is using Google Cloud for data provisioning and stream analytics. Today, I’m sharing how we use Apigee API Management Platform from Google Cloud, a key part of my role as an engineering manager in charge of the after-sales and affiliation domain.Extending the global footprint with ApigeeExpanding to markets globally means dealing with a lot of unique and challenging factors in each country. Thinking about different government regulations, currencies, payment systems, and customer service expectations is only the beginning. There’s a lot of potential obstacles given how differently each country’s marketplace operates, which is why we use APIs and a partner integration approach to better distribute our inventory, thus helping us to scale our business quickly in a competitive space.When we started Traveloka, we were serious about building a product that would be better than our competitors. Better in terms of inventories, services, and also pricing. We also knew that we wanted to have the best strategies for increasing our exposure within and outside of Southeast Asia. With all the right features needed (security, high performance, monitoring, and low development and maintenance costs), Apigee helps us execute on our business plan, by making it quick and easy to work with the partners that make the Traveloka platform a success. Deciding between make versus buy for an API gatewayWhen we started, we built our own API gateway with our first version of API specifications. Before that, we looked into several API gateway products (including Apigee), did some research, some POCs, and had several meetings with vendors. However, since we were just starting to dip our toes into the API business and didn’t have enough use cases to justify the purchase, we decided to build our own system with the bare minimum requirements. After a while, other Traveloka products that also wanted to have their API exposed rebuilt the same thing. Problems arose when partners who had connected with our flights API wanted to add another service, like accommodation. They felt like they were working with a different company. Different standards, different security practices, different formats—it wasn’t an optimal way to work.About a year and a half after the release, we started to understand the scale, needs, and the limitations of our own platform. We were convinced that a better solution was needed to support our business growth. We then met with Apigee team again, at the Google Cloud Summit 2018 in Jakarta.Aside from standardizing our APIs, Apigee supports benchmarking, a fantastic developer portal, a sandbox environment, and great monitoring and analytics. Apigee gives us remarkable speed and agility. It enables us to scale quickly, which is vital to executing our business plan to offer more services in more regions. I also like the rate-limiting feature that lets us limit the throughput rate from one API to another. The fact that we can do this not only per URL, but also per partner, gives us a lot of flexibility. For example, if partner A has a throughput of 100 calls per second, but partner B needs 500, we can easily meet those differing needs and manage our traffic efficiently. When we evaluated API gateways, Apigee was the only one that enabled us to limit to that level of granularity. Our APIs are meant for B2B, not for the public. Because of the requirements, we need a high level of security. Apigee helps us in managing the security with its SSL handshake features as well as the authentication and authorization methods. Executing an aggressive growth plan with ApigeeBefore we had Apigee, sharing APIs with partners was a laborious process. We exposed approximately 20 APIs through a shared document that listed our APIs with the types of the requests and responses they need to handle. Partners could see what was available and how they could integrate into our staging. More work was required before they could come in and try APIs in our sandbox. It used to take up to three months to deploy a new API for a partner. Now that we have the Apigee developer portal, it just takes a few days.The developer portal enables our partners to view all of our APIs and try them out in the sandbox. The simplicity in creating and managing proxies is also a huge time saver. Right now, we have two B2B partners onboarded to the developer platform, and a few more still working manually through our old, in-house platform. We expect to transition them over and add 20 new partners to the Apigee platform this year. Because it now takes us as little as two weeks to onboard a new partner from first establishment to go live, we’re ramping up quickly. We estimate that we saved at least a year of development time by deploying the Apigee platform as opposed to building one in-house.Rapid learning, rapid onboardingOur developers are very happy with Apigee and feel the portal makes Traveloka look more professional. Equally important, the Apigee learning curve for developers and partners has been short. In just one week our partners know how to use all our APIs. If you compare that to the previous process of referring to a Google Doc and building their own servers to connect to our staging, it’s incredibly easy.We look forward to exploring other ways that the Apigee platform can help Traveloka; we see strong potential to use even more features to help Traveloka grow and stay competitive.
Quelle: Google Cloud Platform

Take charge of your data: Scan for sensitive data in just a few clicks

Preventing the exposure of sensitive data is of critical importance for many businesses—particularly those in industries like finance and healthcare. Cloud Data Loss Prevention (DLP) lets you protect sensitive data by building in an additional layer of data security and privacy into your data workloads. It also provides native services for large-scale inspection, discovery, and classification of data in storage repositories like Cloud Storage and BigQuery. Originally released as an API, Cloud DLP now includes a user interface (UI), which helps extend these capabilities to security, privacy, and compliance teams. Using the Cloud DLP UI, now generally available in the Google Cloud Console, you can discover, inspect, and classify sensitive data in just a few clicks by creating jobs, job triggers, and configuration templates.In addition, Cloud DLP now features simplified storage inspection pricing based on bytes scanned, making costs more predictable.Interacting with Cloud DLP through the UI provides many of  the same features and benefits of the API. For example, you can:Inspect Cloud Storage, BigQuery, and Cloud Datastore repositories for sensitive data using one-off jobs, or create a job trigger to automate and monitor resources on a schedule you define.Detect and classify common infoTypes (sensitive data type detectors such as email addresses or credit card numbers) or custom infoTypes you define to protect internal identifiers or company secrets.Create data inspection templates to re-use configuration settings across multiple scan jobs or job triggers. Publish Cloud DLP scan findings to BigQuery, Data Catalog, and Cloud Security Command Center for further analysis and reporting.Include Cloud DLP as part of Google Cloud’s fully automated and scalable service suite to help meet regulatory compliance requirements.Let’s take a deeper look at the Google Cloud Platform Console user interface and show how you can start to inspect your enterprise data with just a few clicks.Getting started with the Cloud DLP UI The Cloud DLP UI lets you perform the most common data protection tasks: scanning Cloud Storage buckets, BigQuery and Cloud Datastore; configuring timespans, and setting up monitoring with periodic scans. Let’s take a closer look. Scanning Cloud Storage BucketsCloud Storage is a highly scalable object storage for developers and enterprises, which use it as an integral part of their applications and data workloads. These workloads can include sensitive data such as credit card numbers, medical information, Social Security numbers, driver’s license numbers, addresses, full names, and service account credentials—all of which need strong protection. This is where using Cloud DLP with Cloud Storage can help. Using Cloud DLP with your Cloud Storage repositories lets you can identify where sensitive data is stored, and then use tools to redact those sensitive identifiers. Cloud DLP uses more than 100 predefined detectors to help you better discover, classify, and govern your data. With the DLP UI in Cloud Console, you can now discover and inspect your data in a few steps.  1. Define what you want to scan, such as a Cloud Storage bucket, folder, or individual file.2. Then, filter that data by adding include or exclude patterns to narrow down the files you want to inspect3. Scale your scans, by turning on sampling to increase efficiency and reduce cost:Sample storage objectsSample bytes per objectYou can also take advantage of our integration with the Cloud Storage UI, where you can select a bucket and simply click “Scan with DLP.” (More details on that here.)Scanning BigQueryBigQuery is a serverless, highly-scalable, and cost-effective cloud data warehouse. It can help you analyze your company’s most critical data assets and natively delivers powerful features like business intelligence (BI)-engine and machine learning. Similar to Cloud Storage, this data may contain sensitive or regulated information such as personally identifiable information (PII). Using Cloud DLP with BigQuery can help you discover and classify this information.  Here’s how.1. Define the BigQuery table you want to scan.2. Decide whether to perform an exhaustive or sampled scan… For BigQuery, you can sample a random percentage or a fixed number of rows:3. Since BigQuery data is “structured” tabular data, your findings will include additional metadata such as column names. You can optionally specify an identifying field such as a row or record number so that you can pinpoint findings and map them back to your source tables.You can also take advantage of our integration into the BigQuery UI, where you can select a table and click “Scan with DLP.” (More details on that here.)Scanning Cloud DatastoreCloud Datastore is a highly scalable NoSQL database for web and mobile applications. Cloud DLP enables you to inspect data stored in Datastore by simply specifying the namespace and kind.Configuring timespansWhen managing data at scale, it’s critical that you can scan only what you need to scan. TimespanConfig enables you to narrow a scan based on the create or modify date/timestamp. For example, you might only want to scan data that was created within a two-week window or only scan data that has a create or modify date since the last scan.Set up monitoring with periodic scansUsing DLP job triggers, you can configure inspection scans to run on a periodic schedule.These job runs can scan all content,sample from all content, or be limited to content created or modified since the last run. Triggered jobs are collected together as part of a trigger and enable you to see trends of data over time (job to job).Tailor data detectors to your needs Cloud DLP makes it easy to find sensitive data, with over 100 pre-defined infoTypes that you can turn on and use instantly from the UI. You can also take advantage of a rich set of customizations to tailor detection to your needs, help reduce false positives, and improve overall quality. Selecting built-in InfoTypesYou can select from a long list of built-in infoTypes.Building custom infoTypesYou can create custom infoTypes based on patterns, word lists, or dictionaries.You can also create word lists inline or pull dictionary lists from Cloud Storage paths.Create inspection rulesetsRulesets can help tune results from both predefined and custom infoTypes. For example, maybe you want to find all EMAIL_ADDRESS infoTypes but exclude your own employees’ email addresses. With a simple exclusion list, you can do this.Persist configuration with templatesFinally, you can also share inspection configuration across multiple jobs using templates.  View findings and take actionWhether you want to generate detailed findings to power an audit report, conduct an investigation, or use summary findings to trigger automated actions and alerts, it’s easy to do so from the Cloud DLP UI. View job status and findings summaries directly in the UI.Take actionWhen an inspection job is completed, Cloud DLP can automatically trigger actions.Save to BigQuery: Write detailed findings (see more details below).Publish to Cloud Pub/Sub: Emit a pub/sub notification when a job is completed. This can trigger custom logic in, for instance, a Cloud Function. See Automating the Classification of Data Uploaded to Cloud Storage for an example.Publish to Cloud Security Command Center (currently only available for Cloud Storage scans)Publish to Data Catalog (currently only available for BigQuery scans)Notify by email: Send an email with job completion details.Detailed FindingsDetailed findings can be turned on and written directly to BigQuery, enabling:Cloud Storage object-level findings – Includes the object path for every findingBigQuery column level findings – Includes the table field name with every findingRun analytics in SQLGenerate custom dashboards or audit reports in tools like Data Studio (watch a demo of this from a recent Cloud OnAir webinar here).Export findings to your SIEMInclude QuoteYou can optionally turn on “include quote” when writing detailed findings. This writes a copy of the finding alongside the metadata in the BigQuery output. The quote can help you:Do analysis of findings to help inform tuning rules and reduce unwanted results (e.g., inform exclusion rules).Help build a customer or user  inventory so you know where data exists per subject, which can help inform your privacy and compliance processes for efforts like data access and deletion requests. Now, everyone can protect sensitive data Cloud DLP is a powerful, flexible service that brings state-of-the-art data protection capabilities to a variety of workloads and storage formats. And now, with an easy-to-use UI, those capabilities are available to broader security, compliance and legal teams. To learn more, visit our Cloud Data Loss Prevention page for more resources on getting started. Special thanks to Scott Ellis, Product Manager, Noël Bankston, User Experience Researcher, and Jesse Flemming, Engineer, who contributed to this post.
Quelle: Google Cloud Platform

Transitioning a typical engineering ops team into an SRE powerhouse

Perpetually adding engineers to ops teams to meet customer growth doesn’t scale. Google’s Site Reliability Engineering (SRE) principles can help, bringing software engineering solutions to operational problems. In this post, we’ll take a look at how we transformed our global network ops team by abandoning traditional network engineering orthodoxy and replacing it with SRE. Read on to learn how Google’s production networking team tackled this problem and consider how you might incorporate SRE principles in your own organization.Scaling to the limitIn 2011, a talented and rapidly growing team of engineers supported Google’s production network: a constellation of technology, constantly growing, and constantly in need of attention. We were debugging, upgrading, upsizing, repairing, monitoring, and installing 24 hours a day, seven days a week. We were spread across three time zones, and we followed the sun.In a 100-person team, communication was hard, and decision making was even harder. As a consequence, a tendency toward resisting change crept in. With resistance to change came difficulty in supporting Google’s agile development teams. Therefore, as a logical next step, we broke this large group into smaller teams, each with more focus. That was certainly necessary, and it helped us to go deeper into the technology and make better decisions, but this, too, had a time limit. The technology evolved on a weekly basis, and eventually the workload started to outstrip the available engineering resources. The constant demand for specialist expertise meant that it wasn’t possible to simply throw more people at the problem.As an example, let’s say that Google’s network had 100 routers that carried its production traffic, and we wanted to upgrade each router, each quarter. Well, that’s roughly 33 routers divided between 33 people in each engineering site, or one per person. That’s a piece of cake: We all got to upgrade one router each quarter.That doesn’t sound burdensome, but let’s say we found a bug in the latest release and we needed to roll back. Further, what would happen when we got to 1,000 routers? Each engineer now has to upgrade 10 routers every month. How about 10,000 routers? You’ve got to be kidding me. Upgrading router software every day for the whole year? It became clear that we would eventually be performing this work to the exclusion of other important work, and struggling to hire enough people (and train them!) to keep up with the demand.Finding a new hopeIndeed, the idea of upgrading router software day-in, day-out with no reprieve didn’t sound like a job we could hire for in the long term. What we noticed about this particular task was that it looked:RepetitiveMundaneAutomatableCheck, check, check—you may be wondering, “What does upgrading routers have to do with transforming a team?” Domain expertise in operating Google’s network is hard-earned; we wanted to transform our network engineers into SREs (rather than merely replace engineers with SREs), so we could retain them and their expertise in software and systems. We approached this carefully and grew our confidence through a series of engineering wins, with this router upgrade challenge being our first.Upgrading routers was a good candidate for a software engineering project, and fit well with the description of SRE from Google’s VP of Engineering Ben Treynor: “Fundamentally, it’s what happens when you ask a software engineer to design an operations function.”But we were a team of network engineers, experts in the likes of Cisco and Juniper routers. What did we know about writing software? At the time, not a lot. Along with having network ops backgrounds, we didn’t think about our problems as though they were simply a software system waiting to be built.We decided to take a risk: We were going to write software to solve our problem. As engineers who cared for the network, we were genuinely worried that we might run out of people to upgrade our routers, and that would have been a much greater risk to the business. After a few months, we got a prototype working, leaning on our partners in adjacent SRE and development teams for advice.Our operation group’s senior leaders empowered us to take the project further, but not without careful exploration of the risks involved. Automation can perform work that’s laborious for humans in record time, but if it fails, it can cause record damage. Being one of the last domains inside Google to turn to an SRE approach, we were able to build on past experience in the machine world.At first, it felt unnatural to lose the direct experience of connecting to a network device and have software do it, even more so for those network engineers who hadn’t worked on the software project. That is a feeling that anyone who replaces human operations with software is going to encounter. Eventually, our persistence paid off, and by publishing our designs and demonstrating the system’s safety features, we won the trust of the rest of the network ops group.Twelve months later, having a network engineer upgrade a router manually became the exception rather than the rule. In fact, the system was so much more reliable that manual upgrades demanded some rationale. In a short period of time, our small team that built the upgrade system found that they were at the forefront of solving a very new and novel set of problems: scaling the system up and engineering for reliability.Once we reached this point, we had proven that SRE principles could be applied in our domain. Essentially, there was nothing special about networks that made them unsuitable for SRE.Soon after that, more engineers followed, until around 10% of the team was successfully building systems to automate toil. We built metrics to quantify the impact, and yet it was clear we still couldn’t keep abreast of the ever-mounting toil from our growth.Embarking on a full-scale conversionSRE execution was driving our ability to meet demand, so we decided that what we needed was more of it—a lot more. What came next was the largest full-scale conversion of an operations team to SRE at Google. We recognized that the network engineer job role was not a good fit for the team or our business needs any longer, and so we set a deadline to transition all staff in the team to a more appropriate role—SRE. This was probably the most powerful signal that a real change in execution was afoot.Over the course of 18 months, our team leaders made plans to split into four separate SRE teams, each responsible for a different part of Google’s network infrastructure. Instead of following the sun—meaning each of the three sites handing issues to the next site as the working day ended—each of the teams would instead be spread across two locations, each covering a 12-hour on-call shift.There were trade-offs in switching to this model, and it took the team time to adjust. On the one hand, engineers in the team now needed to carry an off-duty pager, and their regular working group shrunk. But on the other, collaboration increased and decision making became much easier because the working groups were smaller. Operational issues that were previously handed to a different person each day were now handed back-and-forth between a smaller set of on-callers, which resulted in an improvement in ownership and willingness to make forward progress. Meetings between the sites could now largely happen during time zone overlap when everyone was in their usual working hours, and this helped to build a single-team identity that just happened to stretch across two time zones.We discovered some real skill gaps in the team. For starters, most staff had no software engineering experience (but they did know the network!), so we spun up internal programs to educate everyone, leaving room for self-study time and giving ourselves lots of room to ramp up, fail safely, and ask questions. We didn’t do that alone: A lot of help came from our peers in software development and SRE teams, who provided classes, exercises and hand-holding until we built a critical mass of talent and could teach internally. We recruited a handful of willing teachers who could guide the journey—experienced SREs and SWEs from the engineering pool.We learned that conducting job interviews for our network engineers to transition to the site reliability engineering role was inefficient and slowed us down. Interviews are targeted at external hires and we already knew we wanted to keep our staff. We also didn’t need our staff to prepare for interviews—we wanted them to build systems to replace operations functions. After all, we still needed to do our day job. To compensate for this, we created a new process to submit work evidence that demonstrated the key competencies of a Google SRE. If the evidence stacked up, engineers were switched to SRE.Router upgrades, and many other successful new systems, were born of this journey, and these engineering projects were what drove our success. It became a self-perpetuating culture cycle: build systems, lower toil, become an SRE, build more systems, make them reliable, and so on.Getting started on your own SRE journeyIf you’re reading this page, you’ll notice that Google’s network is still delivering packets; in fact, it grew by an order of magnitude. This transformation wasn’t at all straightforward. There were many logistical issues to solve, careful teasing apart of workloads, planning of new systems, training of staff, dealing with fear, uncertainty and doubt, and learning to grow in ways nobody quite imagined at the beginning of their careers. Ultimately, though, it was possible.We got a lot of help along the way. If you’re starting an SRE function from scratch, this help may not be immediately available. Having existing SREs and SWEs who could help us with training and cultural transfer was an enormous win. Setting job titles aside, what really mattered was having talented engineers on the team who were determined to understand and adopt SRE principles and practices—and importantly, who could code.Our thesis held water: Yes, it is possible to take a traditional engineering operations team and turn that team into a successful—might I even say wonderful—team of SREs.If you’re contemplating a change like this in your own organization, here’s one final thought: Do you have people in your operational teams who can solve problems with code? If so, have you empowered them to try?Learn more about SRE fundamentals.Thanks to Steve Carstensen‎, Adrian Hilton, Dave Rensin, John Truscott Reese, Jamie Wilkinson, David Parrish, Matt Brown, Gustavo Franco, David Ferguson, JB Feldman, Anton Tolchanov, Alec Warner, Jennifer Petoff, Shylaja Nukala, and Christine Cignoli, among others, for their insights and contributions to this blog.
Quelle: Google Cloud Platform

Last month today: GCP in September

Here at Google Cloud Platform (GCP), we welcomed fall and back-to-school season in September with new Anthos and Kubernetes features, along with sharing new customer stories. Here are the top stories from last month.Building your cloud, your wayA few new Anthos capabilities came out last month, adding even more flexibility to our hybrid services platform. New Anthos Service Mesh connects, manages, and secures microservices, and Cloud Run for Anthos lets you run stateless workloads on a fully managed Anthos environment. Together, these new features help to free up time for developers to build apps, not worry about infrastructure.Container-native load balancing in Google Kubernetes Engine (GKE) is now generally available. This feature can improve the efficiency, traffic visibility and support for advanced load balancer capabilities by removing the second hop between VMs running containers in your GKE cluster and the containers serving requests. The new load balancing feature lets you create services using network endpoint groups (NEGs) to streamline the process.We announced the general availability of virtual display devices for Compute Engine VMs, so you can now add these devices to any VM on Google Cloud. It’s a way to give video graphics array (VGA) capabilities to your VMs without having to use pricier GPUs. These come in handy if you’re running systems management tools, remote desktop software, and graphics-heavy apps. You can add the virtual display at VM startup or to already existing and running VMs.Cloud adoption on the groundWe were happy to share Mayo Clinic’s Google Cloud story in September. The renowned hospital and research center is building its data platform on Google Cloud, along with using our AI capabilities to improve patient and community health by understanding healthcare data insights at scale. Mayo Clinic also plans to create machine learning models for serious and complex diseases that can eventually be shared with caregivers around the world.And advertising holding company WPP shared their Google Cloud adoption story last month, with details on how cloud helps them provide media, creative, public relations and marketing analytics expertise for their enterprise customers. Getting value out of all their data at scale, and avoiding silos, is essential for WPP to serve its clients and their audiences. Using GCP, they’ll focus on a few key initiatives: campaign governance, customer data management, and AI and ML.Coding on a Pixelbook—more than just fun and gamesFinally, in the spirit of learning new things as the school year starts, here are some tips on using a Pixelbook for software development (yes, really!). Here, a Google Cloud engineer walks you through how to set up a workflow on a Pixelbook that allows for simple, repeatable, productive development; portability among platforms; and support for the GCP SDK, Github, Kubernetes and Docker. You’ll get a step-by-step look at setting up the development environment using Cloud Code for Visual Studio Code, remote extensions and more. That’s a wrap for September. Stay tuned to the blog and find us on Twitter for all the latest on Google Cloud.
Quelle: Google Cloud Platform

Black Knight and the quest to conquer an ecosystem of partners, developers, and customers with Apigee

Editor’s note: Today we hear from Brad Homer, Senior API Strategy Product Manager at Black Knight Inc., on how the company uses the Apigee API Management Platform from Google Cloud to transform integrated software, data, and analytics solutions for the mortgage industry. Read on to learn how Black Knight uses APIs to facilitate and automate many of the business processes across the homeownership life cycle. Black Knight is a leading provider of technology, data, and analytics to the mortgage industry, catering to both large and mid-tier banks in the United States. Over the past few decades, we tended to manage customer integrations on a case-by-case basis. Whenever a bank needed to connect with a Black Knight app, we’d launch another integration project. Lather, rinse, repeat. Needless to say, this was inefficient; we knew we had to do something to centralize this process.Building versus buying an API management platformTo start, we created some homegrown API solutions. Despite being largely successful with one of these solutions, we saw that technology advances were outpacing our capacity to update our solutions in-house. We knew we needed to move toward an API platform that would support RESTful architecture and that would fully enable mobile solutions. It also had to be extremely secure. Knowing how complicated such a platform would be to build ourselves, we decided that our developers were better off focusing on providing core solutions to Black Knight clients; engaging with an outside provider was the right way for us to advance our API strategy. After a lengthy proof-of-concept process, we went into production with the Apigee API Management Platform from Google Cloud in 2018. In our opinion, Apigee was the most complete, robust, technically sound and full-featured option from among all of the API management tools we evaluated. Its ease of use was the deciding factor for our developers, and the Apigee analytics capabilities provided considerable insight into the anatomy of an API call—something the other platforms we considered didn’t do as well. Choosing Apigee meant that we didn’t have to focus on developing and maintaining a tool or spend enormous amounts of money trying to keep up with security patching. For a large company like Black Knight, an API management tool is something we don’t want to spend a lot of time on. We know that Google Cloud devotes tremendous resources to it, and it would be difficult to replicate that in-house. Black Knight has more than 150 client-facing applications. Almost half of them now are built with APIs that are externally facing, and many of these apps use APIs that integrated with other Black Knight applications. Add to that the huge number of applications out there that come from clients and third-party vendors, and suddenly, we had a management challenge from an API perspective.Driving cultural changeWe came to Apigee with the goal of containing and empowering our huge ecosystem of APIs, customers, third parties, and internal users.  Given Black Knight’s size, our developers and customers understandably each have different business goals, so getting everyone to come to a centralized platform is a great opportunity. My role is to help people consider other options so they can be open to the benefits that Apigee brings us.Now that we’ve engaged with Apigee for over a year, we see two big benefits. First, the huge reduction in point-to-point integrations has produced tremendous efficiencies for us and our customers, who now get instant integration once they’ve been authorized for a particular API. Second, Apigee’s capacity for mobile enablement lets us satisfy our customers’ needs for secure mobile apps.  Simplifying securityFrom a technical perspective, security is complicated for mobile apps. We’re often accessing sensitive information on a mobile device that can’t always be trusted. This kind of scenario requires us to implement a number of security precautions to help ensure confidential information remains protected.  The Apigee API management platform addresses these needs in the simplest way possible. It solves complex problems related to security without having to deploy a new API proxy each time we need to support a particular mobile device upgrade. Our back-end applications remain protected because Apigee helps manage security, requests, access tokens, and authorizations. Today, our back-end applications work with Apigee to communicate with mobile devices or servers coming over the internet. Apigee has also enabled us to do a better job sharing a variety of APIs. The developer portal lets us stitch together APIs and get more creative about how we can innovate and build new solutions based on these collections of APIs. At this point, anybody that has a nondisclosure agreement with us can register for the developer portal. The nature of our business is such that we can’t just open up our APIs to anybody, but it’s available to our contracted third parties.Our Apigee journey has been exciting, and we’re making great progress. I’m looking forward to what innovations we will come up with next, thanks to the way Apigee enables us to create, implement, and deliver.To learn more about API management on Google Cloud, visit the Apigee page.
Quelle: Google Cloud Platform

Don't get pwned: practicing the principle of least privilege

When it comes to security, managing access is a foundational capability—whether you’re talking about a physical space or your cloud infrastructure. If you were securing an office, you wouldn’t give every employee a master key that can open the front door, the mailbox, and the safe. Likewise, when you’re securing your cloud infrastructure, you should limit employees’ access based on their role and what they require to do their job. This concept is known as the principle of least privilege, which NIST’s Computer Security Resource Center defines as: “A security principle that restricts the access privileges of authorized personnel… to the minimum necessary to perform their jobs.” In practice, this means assigning credentials and privileges only as needed to both users and services, and removing any permissions that are no longer necessary. Keeping the principle of least privilege in mind, here are five practical tips to minimize the surface area of exposed resources on Google Cloud Platform (GCP) and defend against some common attacks. #1: Avoid excessive use of broad primitive rolesPrimitive roles like Owner and Editor grant wide-ranging access to all project resources. To tighten access security, consider using more specific predefined roles in Cloud Identity and Access Management (IAM), or defining custom roles that are better suited to your organization. For example, if you have a Cloud SQL database, instead of granting the project-wide Editor role to everybody, you could grant the cloudsql.editor role to users who create new databases, cloudsql.client to those who only need to connect to existing databases, and limit cloudsql.admin to database administrators.Our policy design page has some sample structures and policies for different types of organizations, including startups, large enterprises, and education and training customers.#2: Assign roles to groups, not individualsIf you assign an IAM role directly to an individual, they retain the rights granted by that role even if they change roles, move around your organization, or no longer require them. A safer and more maintainable option is to place users into logical groups. For example, to manage databases, you could create db-editors, db-viewers, and db-admins groups, and let users inherit roles from these groups:An example of assigning users and roles to groups.Groups can be created within the Admin Console for any G Suite domain, or federated from an external tool like Active Directory. By using groups for ownership, you can also avoid “orphaned” projects and resources—where a project or resource has a single owner who leaves the organization. You can assign roles at the organization, folder, project, or resource level. This lets larger organizations easily manage roles for, say, a specific developer team or the entire accounting department. Be aware, however, that a child resource cannot limit roles granted by a parent: a user’s project-level cloudsql.viewer role, for example, will override any resource-level restrictions on any database in the same project.#3: Reduce the risks of default service account behaviorService accounts are a special type of account intended for apps that need to access data. If the app’s own private credentials are compromised, however, the attacker then has all the access granted to the app by the service account’s roles.The Compute Engine default service account, which has the editor role, is enabled for all instances created in a project unless you specify otherwise.The default service account has editor-level access to all project resources.Creating a custom service account to use for creating instances and limiting its roles to the minimum necessary significantly reduces risk. For example, many apps using Cloud SQL only need the cloudsql.client role that lets them connect to an existing database.With custom service accounts, you can grant the minimum privileges needed for instances and apps.An alternative approach is to grant the instance service account minimal privileges and create dedicated service accounts for your apps. This gives you more fine-grained control over each app’s privileges, although you will need to carefully manage the service account credentials.#4: Reduce risk and control access to your project by using networking featuresTo enable inter-resource communication, new GCP projects initially have a default network connecting all resources in that project. This is convenient for development, but in this default configuration, if an attacker gains unauthorized access to one resource, they may be able to reach others as well.To limit this risk, don’t use the default network in production and explicitly specify accepted source IP ranges, ports, and protocols in network firewalls. You should also separate sensitive apps into individual virtual private clouds (VPCs), and if inter-app connectivity is required, use a Shared VPC. In each VPC, use different subnets for public facing services (e.g., web servers and bastion hosts) and private backend services. Allocate public IPs only to instances in the public subnet and add firewall rules with network tags to control which services can communicate with each other. Finally, grant permission to create or modify firewalls and routes only to those directly responsible for the network.An example of limiting access with firewalls and separate public and private subnetworks.The Secure Instances and Apps with Custom Networks codelab walks you through setting up the public/private subnet configuration above. The Policy design for customers article we mentioned earlier also contains sample network designs for common use cases. For guidance on the tradeoffs of single, multiple, and shared VPCs, see Best practices and reference architectures for VPC design.#5: Consider using managed platforms and servicesIf you deploy and manage your own applications, you are responsible for security configuration, including the maintenance of accounts and permissions. You can limit your responsibilities by hosting your apps on managed platforms like Cloud Run, App Engine, or Cloud Functions, or by using fully managed services for databases and processing frameworks like Cloud SQL for MySQL and Postgres, Cloud Dataproc for Hadoop and Spark, and Cloud Memorystore for Redis.A final noteSecurity is a priority in all aspects of Google Cloud, but cloud security is a shared responsibility, and ultimately you are responsible for making the right configuration and product choices for your organization to protect your data on GCP. These tips are a great starting point to help reduce your attack surface and help you make more informed risk decisions. For more resources and security solutions for your business, be sure to check out our Trust & Security page.
Quelle: Google Cloud Platform

Take time for discovery and assessment—and consider a partner—for a successful cloud migration

One of the most interesting facets of any migration project is why it succeeds or fails. In our experience, we’ve found that there is one factor that overwhelmingly determines migration success or failure: the process of discovery and assessment. For organizations that take the time to do a complete, thorough analysis of their existing IT landscape, they’re almost always better suited to succeed at their migration. This is because they gain a crisp, full understanding of what they’re working with on-prem (or in other clouds) and how it all ties together. From there, they can make smart choices about what they migrate, how they migrate it, and to where. In many cases, an organization might spend more time on their assessment and subsequent planning than they do on the actual migration! If you’ve laid the proper foundation up front, it will make your migration go that much more smoothly. For example, a big part of migration is understanding the dependencies between systems you wish to migrate. By understanding those dependencies, you can create a more precise migration plan, which includes the groups of systems you move and the order you move them in. The inverse is true, too: if you don’t spend enough time on discovery, assessment, and planning, then you’re likely to hit unforeseen challenges and obstacles during your migration that can result in time and cost overruns, or sometimes outright failure. Following our example above, if you try to migrate a system that has dependencies that you weren’t aware of, it’s possible to inadvertently break the functionality that those systems were providing. That’s not a situation any business wants to be in. Thankfully, those situations are entirely avoidable with the right up-front planning. Planning for success with discovery and assessmentGiven how important discovery, assessment, and planning is to a successful cloud migration, what are the steps organizations can take to do those tasks well? From our perspective, we want to make sure these crucial phases get done right, so we’ve handpicked a few technology partners who have purpose-built solutions for these exact use cases. We work with these partners to make sure their solutions are thorough and accurate, and can deliver the intelligence our customers need for their existing landscapes. In addition to that, we integrate our own Google Cloud Console with key capabilities from some of these discovery and assessment solutions. With RISC Networks, for example, you can port the discovery and assessment results directly into a file that Migrate for Compute Engine, one of Google Cloud’s migration tools, will use to migrate your systems. These types of integration give you a seamless way to transition from planning to migration, helping reduce the time and labor you need to spend on your migration project, and also giving you a better chance for success through tighter integrations. To make your experiences with these tools as simple as possible, we’ve written some walkthroughs on how to get started with two of our partners:RISC Networks, which is ideal when you are looking for tighter product integrations between your discovery and assessment tools and your migration tools. Check out the RISC Networks tutorial.StratoZone, which is ideal for end-to-end cloud migration capabilities, including discovery, assessment, planning, and migration. Check out the StratoZone tutorial.You can also read about our other discovery and assessment partners Cloud Physics and Cloudamize, or learn more about migrating your VMs into VMs in Google Compute Engine or into containers in Google Kubernetes Engine.
Quelle: Google Cloud Platform

How to manage BigQuery flat-rate slots within a project

If you’re part of a large enterprise using BigQuery, you’ll likely find yourself using BigQuery’s flat-rate pricing model, in which slots are purchased in monthly or yearly commitments as opposed to the default on-demand pricing. Enterprises favor flat-rate pricing because it gives your business predictable costs, and you’re not charged for the amount of data processed by each query.In the flat-rate model, you pay for your own dedicated query processing resources, measured in slots, so you’ll likely want to manage how your business consumes these slots. You have the option to manage your BigQuery footprint by partitioning your purchased slots into reservations, and then assigning your Google Cloud Platform (GCP) projects to these reservations. Projects inside a reservation will have priority to use the reservation’s slots over other projects outside the reservation. This flat-rate model presents a question we often hear from users: Can I allocate BigQuery slots at a more granular level than the GCP project level? These users generally have multiple applications inside the same GCP project, each with unique BigQuery resourcing needs, or just one application with varying resourcing needs (e.g. Apache Airflow running BigQuery jobs of varying priorities).  You should ideally separate your applications into their own projects, but what if you have multiple applications running on the same infrastructure (Hello, containers!)? We’ll describe here how to configure applications within the same project so their queries execute within separate projects with their own parent slot reservations.Configuring applications for granular slot allocationThe diagram below describes a simple environment that accomplishes this. It uses three GCP projects. Two applications reside in Project_A: Application 1 to read from BigQuery and Application 2 to write to it. Project_B and Project_C exist solely to run queries executed by those applications.Example of two projects serving as query runners for applications in Project A Here’s how this works in practice:In Project A, create two service accounts (one for each application) and give minimal privileges to them, which can be seen in the bottom left of the diagram under “Project Policy Binding(s).” These two service accounts and their applications belong to Project A, but they are executing their queries in Projects B and C. To enable this cross-project query execution:Create Cloud Identity and Access Management (Cloud IAM) policy bindings in Projects B and C, which bind the service accounts to the bigquery.jobUser role.Specify the project in which queries will execute by setting the projectId parameter in the BigQuery job reference. The following example demonstrates this by setting the project_id flag with the bq command-line tool:Idle slots are seamlessly shared across BigQuery reservations and across GCP projects in the same reservation. This flexibility allows your projects to maintain high performance while preventing bottlenecking that may occur if slots run dry within a single project. If Project B requires more slots than the 1,000 it is allocated, it can borrow any idle slots from the 3,000 slots allocated to Project C. This is useful when Project B needs to run several high-computation queries concurrently. However, if at any moment Project C needs its allocated slots, it will take back any slots borrowed by Project B. You can reconfigure applications in the same way as business needs change. For example, suppose you have a data engineering team that wants control over data storage and permissions for your data. You can produce this additional separation by creating a fourth project that houses BigQuery datasets. Application 1 uses Project B to execute read queries, Application 2 uses Project C to execute write queries, and Project D stores BigQuery datasets. The architecture diagram below demonstrates this clear separation of storage and resource utilization, since the cost for data storage will be listed under Project D, and the cost for query execution will be listed under Project B and Project C.Example: using a separate project to store datasetsYou may need some time to experiment and find the proper allocation of BigQuery slots for your applications as you transition from on-demand to flat-rate pricing model. The concepts and examples presented in this post intend to help you accelerate this process. Refer to our online documentation to learn more about optimizing BigQuery.
Quelle: Google Cloud Platform

4 steps to stop data exfiltration with Google Cloud

Editor’s note: This the fifth blog and video in our six-part series on how to use Cloud Security Command Center. There are links to the four previous installments at the end of this post. Compliance is a complex, ever changing issue that can put a real strain on your IT department—and your bottom line. As the cost of data breaches and compliance violations continues to rise, it’s never been more important to prevent sensitive data from being exposed. Cloud Data Loss Prevention (Cloud DLP) helps you better understand and manage sensitive data and personally identifiable information (PII) to meet your specific compliance requirements. It does this by providing fast, scalable classification and redaction of information like credit card numbers, names, social security numbers, US and selected international identifier numbers, phone numbers, and GCP credentials. With just a few clicks directly from the Cloud Storage interface, Cloud DLP scans Cloud Storage buckets, folders, and objects for sensitive data, helping you stay in compliance with regulations and keep your data safe. In this blog, we’ll look at how you can get started protecting sensitive data with Cloud DLP, and then send the results directly to Cloud Security Command Center (Cloud SCC). Step 1: Select your storage repositories The first step is to choose the storage repository you want Cloud DLP to scan. If you want to scan your own existing Cloud Storage bucket, BigQuery table, or Cloud Datastore kind, simply open the project that the repository is in.Step 2: Enable Cloud DLPFor Cloud DLP to scan a project, that project must be in the same organization where you enable Cloud SCC, and must contain the Cloud Storage bucket, BigQuery table, or Cloud Datastore kind you want to scan.Once you’ve confirmed this information, go to APIs and Services in the menu on the left, then Library. Then all you have to do is search for the Cloud DLP API and enable it.Step 3: Choose the Organization Administrator IAM roleBefore you can use Cloud DLP to send the results of your scans to Cloud SCC, you need to first ensure that you have the Organization Administrator IAM role before you can enable additional Cloud IAM roles. To set this up, click on the Organization drop down list and select the organization for which you want to enable Cloud SCC. Find the username in the Member column or add a new user, then add the Security Center Admin and DLP Jobs roles.Step 4: Enable Cloud DLP as a Security Source for Cloud SCCFrom Cloud Security Command Center, go to Security Sources and toggle on Cloud DLP. Findings for Cloud DLP will display in the Findings cards on the Cloud SCC dashboard—which lets you view security information from Cloud DLP and other security products in one centralized location. Cloud DLP uses information types—or infoTypes—to define what it scans for. An infoType is a type of sensitive data, such as a name, email address, telephone number, identification number, credit card number, and so on. You can find out more about infoTypes in the Cloud DLP documentation.To learn more about how to enable Cloud DLP and how you can use it from Cloud Security Command Center, check out the video embedded below.Previous blogs in this series:5 steps to improve your cloud security posture with Cloud Security Command CenterCatch web app vulnerabilities before they hit production with Cloud Web Security Scanner3 steps to detect and remediate security anomalies with Google CloudDetect and respond to high-risk threats in your logs with Google Cloud
Quelle: Google Cloud Platform