Editor’s note: This is one installment in a series about managing BigQuery costs. Check out the other posts on using Reservations effectively and how to use Flex Slots to save on costs.When you use data to guide your business decision-making process, you need to continually optimize your data analytics usage to get more out of that data. Here, we’ll share some ways to be more efficient with your BigQuery usage through ups and downs and changing demands.Like a lot of things in the data realm, there are simple answers that address simple situations. For the more complex situations, the answers get less simple, but the solutions are much more powerful. In this post, we’ll walk through a few scenarios that illustrate the ways you can deploy BigQuery to fit the particular needs of your business.First, a quick intro: BigQuery is Google Cloud’s fully managed enterprise data warehouse. We decouple storage and compute, so the costs for storage and compute are decoupled as well. We’ll only address compute costs in this post.So let’s talk about how compute is billed in BigQuery. You can use BigQuery entirely for free via the sandbox. You can use a pure pay-as-you-go model, where you pay for only the compute you use for querying data. In this pay-as-you-go model, also known as on-demand pricing, you are billed based on the number of bytes your queries scan. In the flat-rate model, you pay a fixed amount each month for dedicated resources in the BigQuery service, and you can scan as much data as you want.Let’s describe each of these in a little more detail.BigQuery sandboxThe BigQuery sandbox can be used by anyone with a Google account, even if they haven’t set up Google Cloud billing. This means the usage, while subject to some limits, is entirely free.BigQuery on-demand pricing modelBigQuery’s on-demand model gets every Google Cloud project up to 2,000 slots, with the ability to burst beyond that when capacity is available. Slots are BigQuery’s unit of computational capacity, and they get scheduled dynamically as your queries execute. As above, when your queries execute, they’ll scan data. You get billed based on how many bytes you scan in the on-demand billing model.BigQuery flat-rate pricing modelIn the flat-rate model, you decide how many slots you’d like to reserve, and you pay a fixed cost each month for those resources. You can choose whether to reserve slots for as little as one minute, or on a month-to-month basis, or commit to a year. In this model, you’re no longer billed based on your bytes scanned. Think of this like an all-you-can-query plan.How to choose the best plan for your situation? Let’s look at a few scenarios that will illuminate some of the decision points. The scenarios build on each other, with each representing an increasingly more complex environment.You’re just getting started with BigQuery. You don’t know how much querying you’re going to do, and you need to be efficient with your spend.You’ve been using BigQuery for a while. Your data is growing, and more and more people are using the warehouse as the business seeks greater access to data. You want to support this while keeping costs in check.You’re looking to consolidate data silos into one source for analytics workloads, and you’re looking to support advanced analytics using Spark or Python. This is in addition to serving multiple lines of business, with a mix of different workloads, from ad-hoc analytics to business intelligence. Some of these workloads will have tight service-level objectives, while others can tolerate best-effort service levels.Here’s how to tackle each of these scenarios.1. You’re just getting started.BigQuery’s on-demand model is perfect for anyone who’s looking for cost efficiency and to pay only for what they consume. If you follow our best practices for cost optimization and make use of custom cost controls, you will be billed for only what you use, while guarding against unexpected spikes in consumption.Since you optimize for cost and performance in BigQuery in almost exactly the same ways (by limiting the data you scan), you’ll get better performance while consuming the least resources possible—the best of all worlds!On-demand slots scale to zero when you’re not querying, and it happens instantly. You don’t need to wait for an inactivity timeout that may never come in order to shut down some nodes. BigQuery only ever schedules as many resources as are necessary to complete your queries, and when the queries complete, the resources are released immediately.One of the most important things to do early on is set up monitoring of your BigQuery usage. Your job metadata is stored for the past 180 days in INFORMATION_SCHEMA tables that you can query and report against. You should also make use of the BigQuery metrics stored in Cloud Monitoring to understand your slot utilization and more.2. You’ve been using BigQuery for a while.As your use of BigQuery grows, you’ll scan more data, so your costs will increase correspondingly. If you’re using the on-demand model, you might look for opportunities to save on cost. One option is to consider BigQuery Reservations.The first thing to know is that the BigQuery Reservations and on-demand pricing models are not mutually exclusive. You can use one or the other, you can combine them as you see fit, or you can try out a reservation with a short-term allocation of Flex Slots. What are Flex Slots? Flex Slots let you scale your data warehouse up and down very quickly—for as little as 60 seconds at a time. Flex Slots let you quickly respond to increased demand for analytics and prepare for business events such as retail holidays and app launches. In addition, Flex Slots are a great way to test a dedicated reservation for a short period of time to help determine whether a longer slot commitment is right for your workloads. Since many businesses have analytics needs that vary seasonally, monthly, or even on an hourly basis, you can reserve Flex Slots to add capacity to your slot pool when you need it.Consider also that you can address different workloads with a combination of cost models. Let’s imagine you have several workloads that revolve around BigQuery: You ingest data, you transform it in an ELT style, and serve both reporting and ad-hoc query usage.Ad-hoc workloads are less predictable, almost by definition. If you’re looking to keep costs in check without hampering your users’ ability to explore data, it can be a good idea to use the flat-rate model to provide an all-you-can-query experience. Reporting workloads are the yin to ad-hoc workloads’ yang. In contrast to the unpredictable load ad-hoc queries can bring, reporting workloads can be much more predictable. Ad-hoc workloads are usually assigned best-effort resources, while reporting workloads tend to have strict SLAs. For workloads with SLAs, it’s helpful to earmark resources for them and ensure that other workloads don’t get in the way. This is where BigQuery’s workload management through reservations comes in. You can configure a project to consume slots from the slot pool on a best-effort basis, while reserving slots for high-SLA workloads. When the high-SLA workloads are not consuming their reservation, the slots can be seamlessly shared with other workloads under the reservation. And when the workloads with strict SLAs run, BigQuery will automatically and non-disruptively pre-empt the slots that had been shared with other, less critical workloads.Finally, maybe the amount of data you transform on a daily basis is fairly predictable. In other words, you know that your ELT jobs will be processing about the same amount of data each day. Since the number of bytes you process is predictable, this workload may be a good match for on-demand pricing. So you might decide to run your ELT workloads in a project that is not assigned to a reservation, thus using on-demand resources. In addition to paying only for the bytes you scan, you also can burst beyond the usual 2,000 slots per project when conditions allow.3. You’re consolidating data silos and more.So you’re consolidating from multiple data silos, and you’ve got lots of workloads. In addition to the kinds of workloads described in the second scenario above, there are power users and data scientists consuming data from your data lake using Spark or Jupyter, and they’d like to continue to do the same thing with BigQuery. They plan to use BigQuery ML to create and get batch inferences from ML models. You might choose to mix and match models as above, but consider that flat rate also includes all BigQuery ML usage, and 300 TB per month of Storage API usage. So for data science and advanced analytics involving Python (Jupyter, Pandas, etc.) or Spark, there may be savings to be had by running those workloads in a Google Cloud project that is assigned a slot reservation.Putting it all togetherBy the time your infrastructure has matured to have a situation like that in the third scenario, you may be mixing and matching multiple billing constructs in order to achieve your cost and efficiency goals: BigQuery Reservations for cost predictability and to provide guaranteed capacity for workloads with SLAs; BigQuery Flex Slots for cyclical workloads that require extra capacity, or for workloads that need to process a lot of data in a short time, and so would be less expensive to run using reserved slots for a short time;On-demand for workloads where the volume of data to be processed is predictable. The per-byte-scanned billing model can be advantageous in that you pay precisely for what you use, with the amount of scanned data as a proxy for compute consumption.Provided you can place your workloads in Google Cloud projects aligned to reservations, or to projects that are opted out of reservations, you can choose the resource that’s right for you on a workload-by-workload basis. Learn more about BigQuery pricing models.
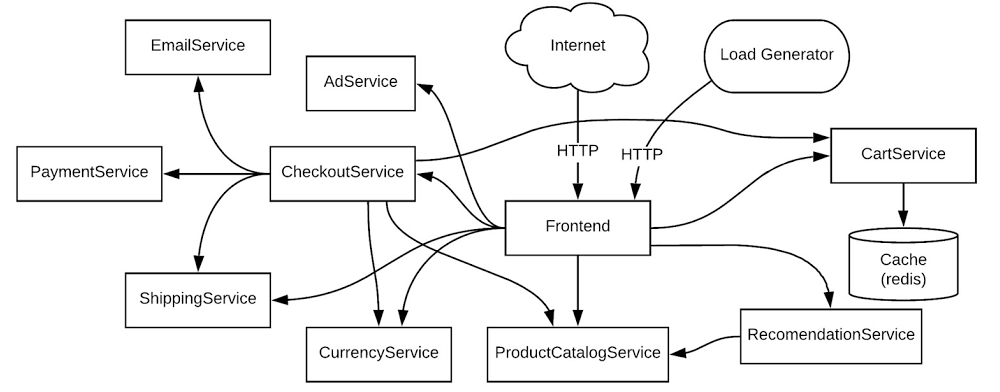
Quelle: Google Cloud Platform