What a trip! Measuring network latency in the cloud

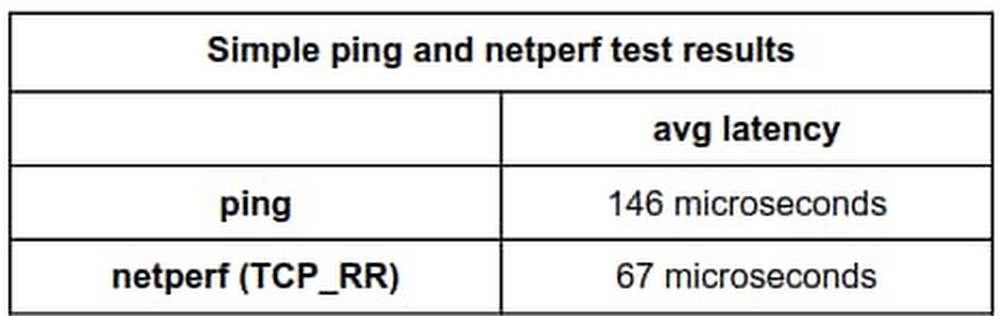
A common question for cloud architects is “Just how quickly can we exchange a request and a response between two endpoints?” There are several tools for measuring round-trip network latency, namely ping, iperf, and netperf, but because they’re not all implemented and configured the same, different tools can return different results. And in most cases, we believe netperf returns the more representative answer to the question—you just need to pay attention to the details. Google has lots of practical experience in latency benchmarking, and in this blog, we’ll share techniques jointly developed by Google and researchers at Southern Methodist University’s AT&T Center for Virtualization to inform your own latency benchmarking before and after migrating workloads to the cloud. We’ll also share our recommended commands for consistent, repeatable results running both intra-zone cluster latency and inter-region latency benchmarks.Which tools and whyAll the tools in this area do roughly the same thing: measure the round trip time (RTT) of transactions. Ping does this using ICMP packets, and several tools based on ping such as nping, hping, and TCPing perform the same measurement using TCP packets. For example, using the following command, ping sends one ICMP packet per second to the specified IP address until it has sent 100 packets.ping <ip.address> -c 100Network testing tools such as netperf can perform latency tests plus throughput tests and more. In netperf, the TCP_RR and UDP_RR (RR=request-response) tests report round-trip latency. With the -o flag, you can customize the output metrics to display the exact information you’re interested in. Here’s an example of using the test-specific -o flag so netperf outputs several latency statistics:netperf -H <ip.address> -t TCP_RR —   -o min_latency,max_latency,mean_latency*Note: this uses global options: -H for remote-host and -t for test-name with a test-specific option -o for output-selectors. Example.As described in a previous blog post, when we run latency tests at Google in a cloud environment, our tool of choice is PerfKit Benchmarker (PKB). This open-source tool allows you to run benchmarks on various cloud providers while automatically setting up and tearing down the virtual infrastructure required for those benchmarks. Once you set up PerfKit Benchmarker, you can run the simplest ping latency benchmark or a netperf TCP_RR latency benchmark using the following commands:These commands run intra-zone latency benchmarks between two machines in a single zone in a single region. Intra-zone benchmarks like this are useful for showing very low latencies, in microseconds, between machines that work together closely. We’ll get to our favorite options and method to run these commands later in this post.Latency discrepanciesLet’s dig into the details of what happens when PerfKit Benchmarker runs ping and netperf to illustrate what you might experience when you run such tests.Here, we’ve set up two c2-standard-16 machines running Ubuntu 18.04 in zone us-east1-c, and we’ll use internal ip addresses to get the best results. If we run a ping test with default settings and set the packet count to 100, we get the following results:By default, ping sends out one request each second. After 100 packets, the summary reports that we observed an average latency of 0.146 milliseconds, or 146 microseconds.For comparison, let’s run netperf TCP_RR with default settings for the same amount of packets.Here, netperf reports an average latency of 66.59 microseconds. The ping average latency reported is ~80 microseconds different than the netperf one; ping reports a value more than twice that of netperf! Which test can we trust?To explain, this is largely an artifact of the different intervals the two tools used by default. Ping uses an interval of 1 transaction per second while netperf issues the next transaction immediately when the previous transaction is complete. Fortunately, both of these tools allow you to manually set the interval time between transactions, so you can see what happens when adjusting the interval time to match. For ping, use the -i flag to set the interval, given in seconds or fractions of a second. On Linux systems, this has a granularity of 1 millisecond, and rounds down. For example, if you use an interval of 0.00299 seconds, this rounds down to 0.002 seconds, or 2 milliseconds. If you request an interval smaller than 1 millisecond, ping rounds down to 0 and sends requests as quickly as possible. You can start ping with an interval of 10 milliseconds using:$ ping <ip.address> -c 100 -i 0.010For netperf TCP_RR, we can enable some options for fine-grained intervals by compiling it with the –enable-spin flag. Then, use the -w flag, which sets the interval time, and the -b flag, which sets the number of transactions sent per interval. This approach allows you to set intervals with much finer granularity, by spinning in a tight loop until the next interval instead of waiting for a timer; this keeps the cpu fully awake. Of course, this precision comes at the cost of much higher CPU utilization as the CPU is spinning while waiting. *Note: Alternatively, you can set less fine-grained intervals by compiling with the –enable-intervals flag. Use of the -w and -b options requires building netperf with either the –enable-intervals or –enable-spin flag set.The tests here are performed with the –enable-spin flag set. You can start netperf with an interval of 10 milliseconds using:$ netperf -H <ip.address> -t TCP_RR -w 10ms -b 1 —   -o min_latency,max_latency,mean_latencyNow, after aligning the interval time for both ping and netperf to 10 milliseconds, the effects are apparent:ping:netperf:By setting the interval of each to 10 milliseconds, the tests now report an average latency of 81 microseconds for ping and 94.01 microseconds for netperf, which are much more comparable.You can illustrate this effect more clearly by running more tests with ping and netperf TCP_RR over a range of varied interval times ranging from 1 microsecond to around ~1 second and plotting the results.The latency curves from both tools look very similar. For intervals below ~1 millisecond, round-trip latency remains relatively constant around 0.05-0.06 milliseconds. From there, latency steadily increases.TakeawaysSo which tool’s latency measurement is more representative—ping or netperf—and when does this latency discrepancy actually matter?Generally, we recommend using netperf over ping for latency tests. This isn’t due to any lower reported latency at default settings, though. As a whole, netperf allows greater flexibility with its options and we prefer using TCP over ICMP. TCP is a more common use case and thus tends to be more representative of real-world applications. That being said, the difference between similarly configured runs with these tools is much less across longer path lengths.Also, remember that interval time and other tool settings should be recorded and reported when performing latency tests, especially at lower latencies, because these intervals make a material difference.To run our recommended benchmark tests with consistent, repeatable results, try the following:For intra-zone cluster latency benchmarking:This benchmark uses an instance placement policy which is recommended for workloads which benefit from machines with very close proximity to each other.For inter-region latency benchmarking:Notice that the netperf TCP_RR benchmarks run with no additional interval setting. This is because by default netperf inserts no added intervals between request/response transactions; this induces more accurate and consistent results.Note: This latest netperf intra-zone cluster latency result benefits from controlling any added intervals in the test and from using a placement group.What’s nextIn our next network performance benchmarking post, we’ll get into the details about how to use the new public-facing Google Cloud global latency dashboard to better understand the impact of cloud migrations on your workloads. Also, be sure to check out our PerfKit Benchmarker white paper and the PerfKit Benchmarker tutorials for step-by-step instructions running networking benchmark experiments!Special thanks to Mike Truty, Technical Curriculum Lead, Google Cloud Learning for his contributions.
Quelle: Google Cloud Platform

Introducing Spark 3 and Hadoop 3 on Dataproc image version 2.0

Dataproc makes open source data and analytics processing fast, easy, and more secure in the cloud. Dataproc provides fully configured autoscaling clusters in around 90 seconds on custom machine types. This makes Dataproc an ideal way to experiment with and test the latest functionality from the open source ecosystem. Dataproc provides image versions that align with bundles of core software that typically come on Hadoop and Spark clusters. Dataproc optional components can extend this bundle to include other popular open source technologies, including Anaconda, Druid, HBase, Jupyter, Presto, Tanager, Solr, Zeppelin, and Zookeeper. You can customize the cluster even further with your own configurations that can be deployed via initialization actions. Check out the Dataproc initialization actions GitHub repository, a collection of scripts that can help you get started with installations like Kafka. Dataproc image version 2.0 is the latest set of open source software that is ready for testing. (It’s in preview image, a Dataproc term for images that signifies a new version in a generally available service.) It provides a step function increase over past OSS functionality and is the first new version track for Dataproc since it became a generally available service in early 2016. Let’s look at some of the highlights of Dataproc image version 2.0. You can use Spark 3 in previewApache Spark 3 is the highly anticipated next iteration of Apache Spark. Apache Spark 3 is not yet recommended for production workloads. It remains in a preview state in the open source community. However, if you’re anxious to take advantage of Spark 3’s improvements, you can start the work of migrating jobs using isolated clusters on Dataproc image version 2.0.  The main headline of new Spark 3 is “performance.” There will be lots of speed and performance gains from under-the-hood changes to Spark’s processing. Some examples of performance optimization include:Adaptive queries: Spark can now optimize a query plan while execution is occuring. This will be a big gain for data lake queries that often lack proper statistics in advance of the query processing. Dynamic partition pruning: Avoiding unnecessary data scans are critical in queries that resemble data warehouse queries, which use a single fact table and many dimension tables. Spark 3 brings this data pruning technique to Spark.GPU acceleration: NVIDIA has been collaborating with the open source community to bring GPUs into Spark’s native processing. This allows Spark to hand off processing to GPUs where appropriate. In addition to performance, advances in Spark on Kubernetes in version 3 will bring shuffle improvements that enable dynamic scaling, making running Dataproc jobs on Google Kubernetes Engine (GKE) a preferred migration option for many of those moving jobs to Spark 3.As often with major version overhauls in software, upgrades come with deprecations and Spark 3 is no exception. However, there are gains that come from some of these deprecations. MLLib (the Resilient Distributed Datasets or RDD version of ML) has been deprecated. While most of the functionality is still there, it will no longer be worked on or tested, so it’s a good idea to move away from MLLib on your migration to Spark 3. As you move from MLLib, it will also be an opportunity to evaluate if a deep learning model may make sense instead. Spark 3 will have better bridges to deep learning models that run on GPUs from ML pipelines.GraphX will be deprecated in favor of a new graphing component, SparkGraph, based on Cypher, a much richer graph language than previously offered by GraphX.DataSource API will become DataSource V2, giving a unified way of writing to various data sources, pushdown to those sources, and a data catalog within Spark. Python 2.7 will no longer be supported in favor of Python 3.  Hadoop 3 is now available  Another major version upgrade on the Dataproc image version 2.0 track is Hadoop 3, which is composed of two parts: HDFS and YARN. Many on-prem Hadoop deployments have benefited from 3.0 features such as HDFS federation, multiple standby name nodes, HDFS erasure encoding, and a global scheduler for YARN. In cloud-based deployments of Hadoop, there tends to be less reliance on HDFS and YARN. HDFS storage will be substituted for Cloud Storage in most situations. YARN is still used for scheduling resources within a cluster, but in the cloud, Hadoop customers start to think about job and resource management at the cluster or VM level. Dataproc offers job-scoped clustersthat are right-sized for the task at hand instead of being limited to just configuring a single cluster’s YARN queues with complex workload management policies. However, if you don’t want to overhaul your architectures before moving to Google Cloud, you can lift and shift your on-prem Hadoop 3 infrastructure to Dataproc image version 2.0 and keep all your current tooling and processes in place. New cloud methodologies can then gradually be introduced for the right workloads over time. While migrating to the cloud technology may relegate many features of Hadoop 3 to niche use cases, there are still a couple of useful Hadoop 3 features that will appeal to many existing Dataproc customers:Native support for GPUs in the YARN scheduler This makes it possible for YARN to identify the right nodes to use when GPUs are needed, properly isolate the GPU resources on a shared cluster, and autodiscover the GPUs available (previously, administrators needed to configure the GPUs). The GPU information will even show up in the YARN UI, which is easily accessed via the Dataproc Component Gateway. YARN containerization Modern open source components like Spark and Flink have native support for Kubernetes, which offers production-grade container orchestration. However, there are still many legacy Hadoop components that have not yet been ported away from YARN and into Kubernetes. Hadoop 3’s YARN containerization can help manage those components using Docker containers and today’s CI/CD pipelines. This feature will be very useful for applications such as HBase that need to stay up and would benefit from additional software isolation. Other software upgrades on Dataproc image version 2.0Various other advances are available on Dataproc image version 2.0, and include:Software librariesShared librariesIn conjunction with the component upgrades, other shared libraries will also be upgraded to prevent runtime incompatibilities and offer the full features of the new OSS offerings.You may also find that Dataproc image version 2.0 will change many previous configuration settings to optimize the OSS software and settings for Google Cloud. Getting startedTo get started with Spark 3 and Hadoop 3, simply run the following command to create a Dataproc image version 2.0 cluster:When you are ready to move from development to production, check out these 7 best practices for running Cloud Dataproc in production.
Quelle: Google Cloud Platform

Data scientists assist medical researchers in the fight against COVID-19

Cutting-edge technological innovation will be a key component to overcoming the COVID-19 pandemic. Kaggle—the world’s largest community of data scientists, with nearly 5 million users—is currently hosting multiple data science challenges focused on helping the medical community to better understand COVID-19, with the hope that AI can help scientists in their quest to beat the pandemic.The Kaggle community has been working hard forecasting COVID-19 fatalities, summarizing the COVID-19 literature, and sharing their work under open-source Apache 2.0 licenses (on Kaggle.com). In this post, we’ll take a detailed look at a few of the challenges underway right now, and some interesting strategies our community is using to solve them. NLP vs. COVID-19 The volume of COVID-19 research is becoming unmanageable. In May there were about 357 scientific papers on COVID-19 published per day, up from 16 per day in February. In March, officials from the White House and global research organizations asked Kaggle to host a natural language processing (NLP) challenge with the goal of distilling knowledge from a large number of continuously released pre-print publications. Specifically, Kaggle’s community is trying to answer nine key questions that were drawn from both the National Academies of Sciences, Engineering, and Medicine’s Standing Committee on Emerging Infectious Diseases research topics and the World Health Organization’s R&D Blueprint for COVID-19. To answer these questions, we’re sharing a corpus of more than 139,000 scientific articles that have been stored in a machine-readable format. Already, there’s a lot of interesting work being done using transformer language models such as SciBERT, BioBERT, and other similar models, and we encourage you to check out the code (Python/R), which has all been open-sourced.Figure 1, for instance, illustrates the first two rows from an article summary table that describes recent findings concerning the impact of temperature and humidity on the transmission of COVID-19. Preliminary tables are generated by Kaggle notebooks that extract as much relevant information as possible, and then the results are double-checked for accuracy and missing values by a team of medical experts. The article summary tables contain text excerpts that were extracted directly from the original publications. Summary tables like these, which can be produced in an expedited fashion, make it much easier for researchers to keep up with the rapid rate of publication.Figure 1Figure 1: A representative article summary table from here. The articles are sorted chronologically and the table provides information about the study results, the study type, and the study design. Each row also shows the title of the study, complete with a link to the full-text PDF, and a reference to the journal that the article was published in.“My initial approach was to build a semantic similarity index over the data, enabling researchers to find topic/keyword matches. I learned that while search is important, researchers need more context to evaluate the study behind the paper,” explained David Mezzetti, a US-based contributor on Kaggle and founder of NeuML. “Much of my efforts have been focused on using NLP to extract study metadata (design, sample size/method, risk factor stats), allowing researchers to not only find relevant papers but also judge the credibility of its conclusions.” Time series forecasting vs. COVID-19 On March 23, Kaggle also started hosting a series of global transmission forecasting competitions, to explore new approaches to modeling that may be useful for epidemiologists. The goal is to predict the total number of infections and fatalities for various regions—with the idea being that these numbers should correlate well with the actual number of hospitalizations, ICU patients, and deaths—as well as the total number of scarce resources that will be needed to respond to the crisis.  Forecasting COVID-19 has been a very challenging task, but we hope that our community can generate approaches to forecasting that can be useful for medical researchers. So far, the results have been promising. As we can see in the plot below, the winning solution from the Kaggle competitions performed on par with the best epidemiological models in April in terms of RMSLE—Root Mean Square Log Error, a measure of the differences between the log of predicted values and actual values—for predicting fatalities in 51 U.S. states and territories over the following 29 days. (Models may have been optimized for varying objective functions, and so this is an approximate comparison.)Figure 2Figure 2: Measurements of error for four different COVID-19 forecasting models, taken from here. The y-axis is the root mean square log error (RMSLE) for predictions over the next 29 days; lower is better.“This competition series showed that it is still a challenging problem to solve and currently a combination of transforming data into a consumable format from various sources, understanding the difference in modelling short-term forecasts vs. long-term forecasts, and using simpler machine learning models with some adjustments seems to perform the best,” said Rohan Rao, a Kaggle competitor based in India. “I hope with more data availability and research of how the virus spreads in various countries, we should be able to add intelligent features to improve and optimize these forecasts and tune it for each geography.” Participants have had success using advanced ensembles of machine learning models such as XGBoost and LightGBM (ex1, ex2, ex3). Participants have also identified important sources of external data that can potentially help to make more accurate predictions (ex1), including population size, population density, age distribution, smoking rates, economic indicators, and nation-wide lockdown dates. By examining the relative contribution of different model features using techniques such as feature importances and SHAP Values (SHapley Additive exPlanations), participants have been able to shed light on the factors that are most predictive in forecasting COVID-19 infections and fatalities. There is a lot of interesting work being done using neural networks and gradient boosted machines, and we encourage you to check out the code (Python/R), which has all been open-sourced.Public data vs. COVID-19 Kaggle also hosted a dataset curation challenge with the goal of finding, curating, and sharing useful COVID-19-related datasets—especially those that can be useful for forecasting the virus’s spread. Winning submissions thus far include: County-level Dataset for Informing the United States’ Response to COVID-19: describes behaviors concerning demographics, healthcare, and social distancing interventions, that can potentially be used to predict the progress of the pandemic.COVID-19 Lockdown Dates by Country: can potentially inform models by indicating a point in time when the rate of growth should slow.COVID-19 Tests Conducted by Country: can potentially inform models of whether the increased number of infections is due to a spread of the disease or due to a spread of our testing capabilities. By considering these regional policies, dates of enforcement, and testing protocols you can make much better data-driven conclusions.  Along those same lines, dataset publishers can also quickly spin up self-service tasks or challenges on Kaggle. For example, the Roche Data Science Coalition (RDSC) recently published a collection of publicly available COVID-related datasets and formed a challengefocused on attempting to answer the most pressing questions forwarded to them from frontline responders in healthcare and public policy. Kaggle is a free platform that allows all users to upload datasets, host data analysis challenges, and publish notebooks—and we encourage data scientists and data publishers to come together to fight COVID-19.ConclusionData scientists across the globe are collaborating to help the medical community to defeat COVID-19, and we could use your help. You can keep up-to-date with our challenges at kaggle.com/covid19, and see the progress our community is making towards achieving the goals we’ve discussed here at kaggle.com/covid-19-contributions.
Quelle: Google Cloud Platform

Automating Cloud Data Fusion deployments via Terraform

Cloud Data Fusion is a fully managed, cloud-native data integration service that helps users efficiently build and manage ETL data pipelines. It’s powered by the open source project CDAP.How Cloud Data Fusion worksMany enterprises have data integration pipelines that take data from multiple sources and transform that data into a format useful for analytics. Cloud Data Fusion is a Google Cloud service that lets you build out these pipelines with little to no coding. One way of configuring these pipelines is via the UI. While using the UI is a visually intuitive way to architect pipelines, many organizations have requirements to automate deployments in production environments. A manageable way is to do this via infrastructure as code. Terraform, an infrastructure as code tool managed by Hashicorp, is an industry-standard way of spinning up infrastructure. While CDAP makes authoring pipelines easy, automating deployments with the CDAP REST API requires some additional work. In this blog, we’ll explain how to automate deployments of various CDAP resources in infrastructure as code with Terraform, leveraging useful abstractions on the CDAP REST API built into the community-maintained Terraform CDAP provider. This post highlights further abstractions open-sourced in the Cloud Foundations toolkit modules. Creating a Cloud Data Fusion instanceYou can create a Cloud Data Fusion instance with the datafusion module. This shows the module’s basic usage:The name of the instance, project ID, region, and subnetwork to create or reuse are all required inputs to the module. The instance type defaults to enterprise unless otherwise specified. The dataproc_subnet, labels, and options are also optional inputs. Deploying prerequisites for a private IP CDF instanceMany use cases need to have a connection to Cloud Data Fusion established over a private VPC network, as traffic over the network does not go through the public internet. In order to create a private IP Cloud Data Fusion instance, you’ll need to deploy specific infrastructure. Specifically, you’ll need a VPC network, a custom subnet to deploy Dataproc clusters in, and IP allocation for peering with the Data Fusion tenant project. VPC can be deployed via the use of the private network module. Additionally, if you’re using Cloud Data Fusion version 6.1.2 or older, the module can create the SSH ingress rule to allow the Data Fusion instance to reach Dataproc clusters on port 22. Here’s a snippet showing the basic usage of the module:The module requires several inputs: the Data Fusion service account, private Data Fusion instance ID, VPC network to be created with firewall rules for a private Data Fusion instance, the gcp project ID for private Data Fusion setup, and the private Data Fusion instance ID. Output from this module are the IP CIDR range reserved for the private Data Fusion instance, the VPC created for the private Data Fusion instance, the subnetwork created for Dataproc clusters controlled by the private Data Fusion instance, and the VPC created for the private Data Fusion instance. Configuring a namespaceNamespaces are used to logically partition Cloud Data Fusion instances. They exist in order to achieve pipeline, plugin, metadata, and configuration isolation during runtime, as well as to provide multi-tenancy. This could be useful in cases where there are different sub-organizations all in the same instance. Thus, each namespace in an instance is separate from all other namespaces in the instance, with respect to pipelines, preferences, and plugins/artifacts in the instance. This CDAP REST API Document shows the API calls needed to perform different operations on namespaces. Check out a Terraform example of the namespace.In this module, you have to provide the name of the namespace you’d like to create, as well as the preferences (any runtime arguments that are configured during runtime) to set in this namespace.Deploying a compute profileIn Cloud Data Fusion, compute profiles represent the execution environment for pipelines. They allow users to specify the required resources to run a pipeline. Currently, Cloud Data Fusion pipelines primarily execute as Apache Spark or MapReduce programs on Dataproc clusters. Compute profiles can manage two types of Dataproc clusters: ephemeral clusters and persistent clusters. Ephemeral clusters are created for the duration of the pipeline, and destroyed when the pipeline ends. On the other hand, persistent clusters are pre-existing, and await requests for data processing jobs. Persistent clusters can accept multiple pipeline runs, while ephemeral clusters are job-scoped. Ephemeral clusters include a startup overhead for each run of the pipeline, since you need to provision a new cluster each time. Ephemeral clusters have the advantage of being a more managed experience, and don’t require you to provide SSH keys for communication with the cluster, since these keys are generated automatically by the CDAP service. This CDAP REST API document shows the API calls needed to perform different operations on compute profiles. We have written a Terraform module so you can deploy a custom compute profile, allowing you to configure settings such as the network and compute service accounts—settings that are not configurable in the default compute profile.In this example, the name of the profile and the label of the profile are required inputs.The module allows for many more optional inputs, such as name of the network, name of the subnetwork, or name of the service account to run the Dataproc cluster on. It also allows you to provide the namespace to deploy the profile in, as well as the account key used for authentication.Deploying and updating a pipelineA pipeline can be deployed using the pipeline module. The name, namespace, and the path to an exported pipeline (the json_spec_path) are required as inputs. This can be obtained by clicking on Actions>Export after the pipeline is deployed on the Data Fusion UI.These CDAP documents explain the nuances of a pipeline.As mentioned earlier, the namespace is required for achieving application and data isolation. Finally, since the path to the exported JSON pipeline contains a hard-coded reference to the checkpoint directory of the instance on which it was authored, the json_spec_path must be without the checkpoint key. The checkpointDir key must be removed from the config block of exported pipeline JSONs. On a new instance, when this key is missing, it gets inferred to the correct checkpoint bucket. Checkpointing must be used in CDAP real-time apps, since they won’t start the Spark context because they do not respect the disableCheckpoints key of the pipeline config. Find more details on this. A common way to remove this checkpoint key is to use a jq command. CheckpointDir keys are generated in a JSON file whenever Apache Spark is run. A challenge faced here is that the checkpointDir key must manually be removed from the JSON. The key must be removed, since it will be hard-coded to the checkpointDir from the Cloud Data Fusion instance from which it was exported. This could cause issues if the instances are different environments (i.e., prod and dev). This key must be absent to infer the correct checkpoint bucket in a new instance.Here’s a snippet of the cdap_application resource:To update an already deployed pipeline, simply make a pull request on the repository. This will stop this run on Terraform apply. Additionally, Terraform will add plugin resources for new versions of a plugin required by this pipeline. Since applications are immutable, when pipelines are updated, they should be treated as a new pipeline (with a versioned name).Streaming program runA program run is when the pipeline is passed in runtime arguments and run, after it is deployed. Streaming pipelines can be managed as infrastructure as code due to the fact that they are long-running infrastructure, as opposed to batch jobs, which are manually scheduled or triggered. These CDAP documents explain the relevant API calls to perform operations, such as starting and stopping programs, as well as starting and checking the status of multiple programs.Here’s an example of the cdap_streaming_program_run resource:The name of the app, name of the program, any runtime arguments, and type (mapreduce, spark, workers, etc.) are required. The namespace is optional (if none provided, default is used), and the cdap run_id is computed. A challenge of the automation is that real-time sources do not support variable configurations at runtime, also known as macros. This means that an additional hard-coded application that achieves the functionality of a macro must be written for every run. This is achieved by rendering the JSON file as a template file (at Terraform apply time) to substitute runtime arguments there.Try running Cloud Data Fusion via the modules provided. As a reminder, step number one is to create a Cloud Data Fusion instance with the datafusion module. Our team welcomes all feedback, suggestions, and comments. To get in touch, create an issue on the repository itself.
Quelle: Google Cloud Platform

New ways to manage custom Cloud Monitoring dashboards

Earlier this year, we added a Dashboard API to Cloud Monitoring, allowing you to manage custom dashboards and charts programmatically, in addition to managing them with the Google Cloud Console. Since then, you’ve asked us to provide more sample dashboard templates that target specific Google Cloud services. Many of you have also asked us to provide a Terraform module to help you set up an automated deployment process.Today, we are excited to share our newly created GitHub repository with more than 30 dashboard templates to help you get started. These templates currently cover compute, storage, data processing, networking, database, tooling, and our microservice demo application. The Terraform module for this API is available on GitHub as well. Using the sample dashboardsTo help you understand the intent of each dashboard sample, there is a README  file in each folder that summarizes the content and metrics used.Please note that while putting these sample dashboards together, we made assumptions and aggregated some of the data based on specific use cases. For example, for CPU utilization and memory usage, the dashboard is by default unaggregated. For network egress and ingress, the widgets on the dashboard are aggregated by sum to reflect the intent to capture total bytes. In addition, a single dashboard can have multiple charts for different services. It allows you to quickly have a holistic view for the state of your workloads by grouping related services.For instance, the dataprocessing-monitoring.json template creates a dashboard that provides a view for the data processing pipeline metrics from multiple data analytics services.To use these dashboard templates, you can check them out from the GitHub repo, use the gcloud CLI, Terraform, or Deployment Manager to deploy the samples to your project using the following steps:1. Check it out from GitHub. You can do that in Cloud Shell by clicking on this button:2. Use the gcloud monitoring dashboards create command to create a dashboard. Make sure you replace the [file-name.json] with the path in the command:gcloud monitoring dashboards create –config-from-file=[file_name.json]For example:3. You can also use Terraform to deploy the dashboards. There is a script under the terraform folder that uses the dashboard module to demonstrate this step.4. Alternatively, you can use Cloud Deployment Manager to deploy the dashboards using the scripts under the dm folder.With these capabilities, it’s easier to integrate dashboard development and deployment into an automated pipeline. For instance, you can check your dashboard JSON files into a Git repository, and updates to the repository can trigger a Cloud Build process and automatically deploy the changes to Cloud Monitoring. Over time, we hope to improve this template library, and here are a few things we are focusing on:Covering more Google Cloud servicesExtending our dashboard templates to cover multiple services under one dashboardProviding built-in filters and aggregation capabilities to help you slice and dice your data so that you can have more insightPlease let us know if you have comments or feedback by creating issues in the repo. We welcome and encourage you to contribute and improve the new templates with us!
Quelle: Google Cloud Platform

Creating a secure email ecosystem and blocking COVID-19 cyberthreats in India, Brazil, and the UK

As the world continues to adapt to the changes brought on by the COVID-19 pandemic, cyberthreats are evolving as well. From mimicking stimulus payments, to providing purchase opportunities for items in short supply, bad actors are tailoring attacks to mimic authoritative agencies or exploit fear of the pandemic.Last month, we posted about the large amount of COVID-19 related attacks we were seeing across the globe. At that time, Gmail was seeing 18 million daily malware and phishing emails, and more than 240 million spam emails, specifically using COVID-19 as a lure. To keep you updated on where the threat landscape stands, today we’d like to share some additional email threat examples and trends, highlight some ways we’re trying to keep users safe, and provide some actionable tips on how organizations and users can join the fight.The attacks we’re seeing (and blocking) in India, Brazil, and the UKAs COVID-19 attacks continue to evolve, over the past month we’ve seen the emergence of regional hotspots and threats.Specifically, we’ve been seeing COVID-19-related malware, phishing, and spam emails rising in India, Brazil, and the UK. These attacks and scams use regionally relevant lures, financial incentives, and fear to create urgency and entice users to respond. Let’s look at some examples from these countries.IndiaIn India, we’ve seen an increase in the number of scams targeting Aarogya Setu, an initiative by the Indian Government to connect the people of the country with essential health services.Also, as India is opening back up and employees are getting back to their workplaces, we’re starting to see more attacks masquerading as COVID-19 symptom tracking.And with more and more people looking to buy health insurance in India, phishing scams targeting insurance companies have become more prevalent. Often these scams rely on quoting established institutions, and getting viewers to click on malicious links.The United KingdomWith the UK government announcing measures to help businesses get through the COVID-19 crisis, attackers are imitating government institutions to try to gain access to personal information.These attackers often try to masquerade as Google, as well. But whether they’re imitating the government or Google, these attacks are automatically blocked.BrazilWith the increased popularity of streaming services, we’re seeing increased phishing attacks targeting these services.Here’s another example that relies on fear, suggesting that the reader will be subject to fines if they don’t respond.How we’re blocking novel threats Overall, Gmail continues to block more than 99.9% of spam, phishing, and malware from reaching our users. We’ve put proactive monitoring in place for COVID-19-related malware and phishing across our systems and workflows. In many cases, however, these threats are not new—rather, they’re existing malware campaigns that have simply been updated to exploit the heightened attention on COVID-19. While we’ve put additional protections in place, our AI-based protections are also built to naturally adapt to an evolving threat landscape, picking up new trends and novel attacks automatically. For example, the deep-learning-based malware scanner we announced earlier this year continues to scan more than 300 billion documents every week, and boosts detection of malicious scripts by more than 10%. These protections, newly developed and already existing, have allowed us to react quickly and effectively to COVID-19-related threats, and will allow us to adapt quickly to new ones. Additionally, as we uncover threats, we assimilate them into our Safe Browsing infrastructure so that anyone using the Safe Browsing APIs can automatically stop them. Safe Browsing threat intelligence is used across Google Search, Chrome, Gmail, Android, as well as by other organizations across the globe.G Suite protectionsOur advanced phishing and malware controls come standard with every version of G Suite, and are automatically turned on by default. This is a key step as we move forward to a safe-by-default methodology for Google Cloud products. Our anti-abuse models look at security signals from attachments, links, external images, and more to block new and evolving threats. Keeping email safe for everyoneWhile many of the defenses in Gmail leverage our technology and scale, we recognize that email as a whole is a large and complex network. This is why we’re working not just to keep Gmail safe, but to help keep the entire ecosystem secure. We’re doing this in many ways, from developing and contributing to standards like DMARC (Domain-based Message Authentication, Reporting, and Conformance) and MTA-STS (Mail Transfer Agent Strict Transport Security), to making our technology available to others, as we have with Safe Browsing and TensorFlow Extended (TFX). We’re also contributing to working groups where we collaborate and share best practices with others in the industry. For example, Google is a long-time supporter and contributor to the Messaging, Malware, and Mobile Anti-Abuse Working Group (M3AAWG), an industry consortium focused on combating malware, spam, phishing, and other forms of online exploitation. The M3AAWG community often comes together to support important initiatives, and today we’re co-signing a statement on the importance of authentication. You can help keep email safe for everyone by bringing authentication to your organization.Bringing authentication to your organizationSpeaking of authentication, as we mentioned above, Gmail recommends senders adopt DMARC to help prevent spam and abuse. DMARC uses Sender Policy Framework (SPF) and DomainKeys Identified Mail (DKIM) to help ensure that platforms receiving your email have a way to know that it originally came from your systems. Adopting DMARC has many benefits, including:It can provide a daily report from all participating email providers showing how many messages were authenticated, how often invalidated messages were seen, and what kind of policy actions were taken on those messages It helps create trust with your user base—when a message is sent by your organization, the user receiving it can be sure it’s from youIt helps email providers such as Gmail handle spam and abuse more effectivelyBy using DMARC, we all contribute to creating a safe email ecosystem between providers, organizations, and users. In our previous post, we shared that we worked with the WHO to clarify the importance of an accelerated implementation of DMARC. The WHO has now completed the transition of the entire who.int domain to DMARC and has been able to stop the vast majority of impersonated emails within days after switching to enforcement. You can find more information on setting up DMARC here. Our safety recommendations for users As a user, there are also steps you can take to become even more secure:Take the Security Checkup. We built this step-by-step tool to give you personalized and actionable security recommendations and help you strengthen the security of your Google account.Avoid downloading files that you don’t recognize; instead, use Gmail’s built-in document preview.Check the integrity of URLs before providing login credentials or clicking a link—fake URLs generally imitate real ones and include additional words or domains. Report phishing emails. Turn on 2-step verification to help prevent account takeovers, even in cases where someone obtains your password. Consider enrolling in Google’s Advanced Protection Program (APP)—we’ve yet to see anyone in the program be successfully phished, even if they’re repeatedly targeted. Be thoughtful about sharing personal information such as passwords, bank account or credit card numbers, and even your birthday.  Safety and security are a priority for us at Google Cloud, and we’re working to ensure all our users have a safe-by-default experience, no matter what new threats come our way.
Quelle: Google Cloud Platform

Google Cloud firewalls adds new policy and insights

Firewalls are an integral part of almost any IT security plan. With our native, fully distributed firewall technology, Google Cloud aims to provide the highest performance and scalability for all your enterprise workloads. We also know that the more control and flexibility you have, the more secure you can be. With that in mind, today we’re adding some new firewall features that provide even more flexibility, control, visibility, and optimization. Hierarchical firewall policiesNow in beta, Google Cloud’s hierarchical firewall policies provide new, flexible levels of control so that you can benefit from centralized control at the organization and folder level, while safely delegating more granular control within a project to the project owner. Virtual Private Cloud (VPC) firewall rules are created at the network level within a given Google Cloud project. Using hierarchical firewall policies, you can create both ingress and egress rules at the organization and folder levels within an organization. This allows security admins to define and deploy consistent firewall rules across a number of projects. Support for Target Service Account in the hierarchical firewall policies also allows security admins to target certain firewall rules to a selected group of instances across the organization without having to define such rules within each individual project. The org- and folder-level rules are automatically applied to existing and new VMs in each relevant project. This means that hierarchical firewall policies can’t be overridden by VPC firewall rules, providing assurance that traffic going in and out of all VMs in an organization is guarded by the most critical rules, such as blocking traffic from specific IP ranges, allowing administration connections to specific IP ranges, and ensuring that traffic from security probers can reach all VMs.To learn more, please read the documentation.Firewall insightsFirewall insights, also available in beta, is a new tool for firewall visibility and optimization that helps you keep your firewall configuration safe and easy to manage. Firewall insights helps you safely optimize your firewall configurations with a number of detection capabilities, including shadowed rule detection to identify firewall rules that have been accidentally shadowed by conflicting rules with higher priorities. In other words, you can automatically detect rules that can’t be reached during firewall rule evaluation due to overlapping rules with higher priorities. You’re also able to detect:Unnecessary allow rules, open ports, and IP ranges and remove them to tighten the security boundarySudden hit increases on firewall rules and drill down to the source of the traffic to catch an emerging attackRedundant firewall rules and clean them up to reduce the total firewall rule countDenied traffic from suspicious sources trying to access unauthorized IP ranges and portsWith metrics reports, you can track firewall utilization to help analyze the usage of firewall rules in your VPC network. This allows security admins to verify that firewall rules are being used in the intended way, ensure that firewall rules allow or block their intended connections, and perform live debugging of connections that are inadvertently dropped due to firewall rules. All firewall metrics are automatically exported to Stackdriver, and you can easily define custom alerts and build custom dashboards to capture interesting conditions that will help you maintain a robust firewall rule set on an ongoing basis.  You can find firewall insights in the Network Intelligence Center, and can use its API integration to integrate insights with the tools of your choice. Check out the video to learn more. We’re committed to keeping your Google Cloud workloads protected, and will continue to develop features to make your firewalls more flexible, manageable, and secure. To learn more check out the Google Cloud firewalls webpage.
Quelle: Google Cloud Platform

Building resilient systems to weather the unexpected

The global cloud that powers Google runs lots of products that people rely on every day—Google Search, YouTube, Gmail, Maps, and more. In this time of increased internet use and virtual everything, it’s natural to wonder if the internet can keep up with, and stay ahead of, all this new demand. The answer is yes, in large part due to an internal team and set of principles guiding the way: site reliability engineering (SRE).  Nearly two decades ago, I was asked to lead Google’s “production team,” which at the time was seven engineers. Today, that team—Site Reliability Engineering, or SRE—has grown to be thousands of Googlers strong. SRE is one of our secret weapons for keeping Google up and running. We’ve learned a lot over the years about planning and resilience, and are glad to share these insights as you navigate your own business continuity and disaster recovery scenarios. SRE follows a set of practices and principles engineering teams can use to ensure that services stay reliable for users. Since that small team formed nearly 20 years ago, we’ve evolved our practices, done a lot of testing, written three books, and seen other companies—like Samsung— build SRE organizations of their own. SRE work can be summed up with a phrase we use a lot around here: Hope is not a strategy; wish for the best, but prepare for the worst. Ideally, you won’t have to face the worst-case scenario—but being ready if that happens can make or break a business.For more than a decade, extensive disaster recovery planning and testing has been a key part of SRE’s practice. At Google, we regularly conduct disaster recovery testing, or DiRT for short: a regular, coordinated set of both real and fictitious incidents and outages across the company to test everything from our technical systems to processes and people. Yes, that’s right—we intentionally bring down parts of our production services as part of these exercises. To avoid affecting our users, we use capacity that is unneeded at the time of the test; if engineers can’t find the fix quickly, we’ll stop the test before the capacity is needed again. We’ve also simulated natural disasters in different locations, which has been useful in the current situation where employees can’t come into the office. This kind of testing takes time, but it pays off in the long run. Rigorous testing lets our SRE teams find unknown weaknesses, blind spots, and edge cases, and create processes to fix them. With any software or system, disruptions will happen, but when you’re prepared for a variety of scenarios, panic is optional. SRE takes into account that humans are running these systems, so practices like blameless post-mortems and lots of communication let team members work together constructively.If you’re just getting started withdisaster recovery planning, you might consider beginning your drills by focusing on small, service-specific tests. That might include putting in place a handoff between on-call team members as they finish a shift, along with continuous documentation to pass on to colleagues. You can also make sure backup relief is accessible if needed. You can also find tips here on common initial SRE challenges and how to meet them.   Inside a service disruptionWith any user-facing service, it’s not a matter of if, but when, a service disruption will happen. Here’s a look at how we handle them at Google. First, it’s important to detect and immediately start work on the issue. Our SREs often carry pagers so they can hear about a critical disruption or outage right away and immediately post to internal admin channels. We page on service-level objectives (SLOs), and recommend customers do the same, so it’s clear that every alert requires human attention.Define roles and responsibilities among on-call SRE team members. Some SREs will mitigate the actual issue, while others may act as project managers or communications managers, updating and fielding questions from customers and non-SRE colleagues.Find and fix the root cause of the problem. The team finds what’s causing the disruption or outage and mitigates it. At the same time, communications managers on the team follow the work as it progresses and add updates on any customer-facing channels.Hand off, if necessary. On-call SREs document progress and hand off to colleagues starting a shift or in the next time zone, if the problem persists that long. SREs also make sure to look out for each other and initiate backup if needed.Finally, write the postmortem. This is a place to detail the incident, the contributing causes, and what the team and business will do to prevent future similar incidents. Note that SRE postmortems are blameless; we assume skill and good intent from everyone involved in the incident, and focus our attention on how to make the systems function better.Throughout any outage, remember that it’s difficult to overcommunicate. While SREs prioritize mitigation work, rotating across global locations to maintain 24×7 coverage, the rest of the business is going about its day. During that time, the SRE team sets a clear schedule for work. They maintain multiple communication channels—across Google Meet, Chat rooms, Google Docs, etc.—for visibility, and in case a system goes down. SRE during COVID-19During this global coronavirus pandemic, our normal incident response process has only had to shift a little. SRE teams were generally already split between two geographic locations. For our employees working in data centers, we’ve separated staff members and taken other measures to avoid coronavirus exposure. In general, a big part of healthy SRE teams is the culture—that includes maintaining work-life balance and a culture of “no heroism.” We’re finding those tenets even more important now to keep employees mentally and physically healthy.For more on SRE, and more tips on improving system resilience within your own business, check out the video that I recently filmed with two of our infrastructure leads, Dave Rensin and Ben Lutch. We discuss additional lessons Google has learned as a result of the pandemic.Planning, testing, then testing some more pays off in the long run with satisfied, productive, and well-informed users, whatever service you’re running. SRE is truly a team effort, and our Google SREs exemplify that collaborative, get-it-done spirit. We wish you reliable services, strong communication, and quick mitigation as you get started with your own SRE practices. Learn more about meeting common SRE challenges when you’re getting started.
Quelle: Google Cloud Platform

3 strategies to ensure business continuity using Anthos

Whether your organization is scaling up to meet a sudden surge in demand or scaling down to manage costs, business continuity has never been more important. And in a climate where IT needs are rapidly changing, driven by evolving customer demands, business continuity means so much more than having the right a backup and disaster recovery plan.Our new whitepaper, ”Beyond business continuity: Three IT strategies for navigating change” addresses a broader definition of business continuity, and helps you build a path forward so you’re well prepared to handle whatever comes next.Here’s an overview of what the new whitepaper covers.Strategy #1: Ensure you have sufficient access to developers and IT professionals that can help build and operate your applications. Many organizations support existing legacy applications and struggle with technical debt such as poor alignment to standards and lack of enough programmers to keep their systems up and running. Organizations like these benefit from using a standardized technology platform that makes it easy to manage legacy applications and build new ones—no need to find employees that know a decades-old programming language.A standardized technology platform can also help you prepare for the future. It makes it easier to attract new talent when you run your IT on modern technology, and makes you less dependent on proprietary systems. Implementing a platform using OSS tools is one way to gain greater access to talent and avoid vendor lock-in.  Strategy #2: Ensure you can run IT services 24/7 and scale up or down with demand to manage costs.Modernizing your existing applications to a cloud-native architecture goes well beyond having the right disaster recovery and data backup plan. A cloud-native architecture makes it possible to scale up or down based on market conditions so you can deliver uninterrupted services while at the same time controlling costs. Modern cloud-native technologies like containers, serverless, and service mesh also mean you can build microservices-based applications, with a modular architecture that’s easier to update and scale than tightly coupled monolithic applications.Strategy #3: Centralize operations with control and automation to minimize cognitive load on operators, while ensuring rapid mitigation of failures.IT leaders are under increasing pressure to prioritize investments and optimize costs to support changing business goals in the short and long term. With budgets being prioritized to replace outdated technologies, you may find yourself being asked to do more with less. Investing in a standardized technology platform provides greater observability and delivers tools to consistently manage and maintain application configuration and security, saving you time and effort. Taking a GitOps approach and implementing modern CI/CD on that standardized platform also helps you to decouple infrastructure from applications and gain more flexibility and control for your operations.Anthos, our application modernization platform, supports all these strategies while delivering high availability, scalability, data protection and security for your services. Anthos democratizes access to modern technologies such as containers and service mesh, so you can modernize your existing applications and build new ones without having to start over. With the zero-trust model of security implemented by default, Anthos equips you to deliver reliable IT services. The declarative approach to policy and configuration management available in Anthos lets you control and automate IT operations without disruption. To learn more about the strategies, and how Anthos can help, read Beyond business continuity: Three IT strategies for navigating change.
Quelle: Google Cloud Platform

Introducing table-level access controls in BigQuery

We’re announcing a key capability to help organizations govern their data in Google Cloud. Our new BigQuery table-level access controls (table ACLs) are an important step that enables you to control your data and share it at an even finer granularity. Table ACLs also bring closer compatibility with other data warehouse systems where the base security primitives include tables—allowing migration of security policies more easily. Table ACLs are built on top of Cloud Identity and Access Management (Cloud IAM), Google Cloud’s enterprise-grade access control platform that integrates across our cloud products. BigQuery already lets organizations provide controls over access to data sets, projects, and folders. With BigQuery table-level ACLs, you can use these same controls at the table scope, satisfying the principle of “least privilege.” This capability, combined with BigQuery column-level security, is key in helping organizations effectively govern data in Google Cloud and maintain regulatory compliance, such as GDPR, CCPA, etc.    Table ACLs enable you to share a single table, for reading and/or writing, without the surrounding dataset. This capability opens up use cases like sharing a single table externally with an outside contributor and segregating access control at the individual table level.Many BigQuery customers use authorized views to control read-only access to tables. Authorized views allow data owners to join multiple tables and reshape the data before sharing it. However, if you want to simply share a single table as is, authorized views become cumbersome. Table ACLs streamline and simplify this use case. Getting started with table ACLsTable ACLs are available in the BigQuery Web UI as a “share table” button that exposes the Cloud IAM permission panel (same as for sharing a dataset):The Table ACL functionality is also available via the BigQuery command line and REST APIs. Both of them use Cloud IAM Policy JSON. A policy defines and enforces which roles are granted to which members, and this policy is attached to a resource. The following example shows a policy where alice@example.com has been granted the BigQuery data owner role, and bob@example.com has been granted the BigQuery data viewer role:To obtain or set table policy, you can use bq get-iam-policy and bq set-iam-policy commands, respectively. Similarly, you can use tables.getIamPolicy and table.setIamPolicy REST APIs. For more info about IAM policies, see Understanding policies.To get started, check out the BigQuery table ACL documentation to learn more about specific permission types and use cases.
Quelle: Google Cloud Platform