Anthos in depth: Easy load balancing for your on-prem workloads

For organizations that need to run their workloads on-prem, Anthos is a real game changer. As a hybrid multi-cloud platform that’s managed by Google Cloud, Anthos includes all the innovations that we’ve developed for Google Kubernetes Engine (GKE) over the years, but running in the customer’s data center. And as such, Anthos can integrate with your existing on-prem networking stack. One of the key pieces of integration is getting traffic into the Anthos cluster, which often involves using an external load balancer. When running Anthos on Google Cloud, you create a Kubernetes service accessible from the internet through Ingress or servicetype load balancer, and Google Cloud takes care of assigning the virtual IP (VIP) and making it available to the rest of the world. In contrast, when running Anthos on-prem, advertising the service’s VIP to your on-prem network happens using an external load balancer. Anthos provides three different options for deploying an external load balancer: the F5 Container Ingress Services (CIS) controller; manually mapping your load balancer to Kubernetes with static mapping; and Anthos’ own bundled load balancer.In this post, we’ll introduce these three options and dive deep into the Anthos bundled load balancer.F5 load balancingIn this mode, Anthos integrates with F5 by including the F5 Container Ingress Services (CIS) controller with Anthos running on-prem. This approach is ideal if you have an existing investment in F5 load balancing and want to use it with your Anthos on-prem cluster.Manual load balancingIf you have another third-party load balancer, you can manually map your external load balancer to your Kubernetes resources, allowing you to use the load balancer of your choice. As there is no controller here to map the Kubernetes resources to the external load balancer, you need to perform static mapping of the load balancer service.Anthos-bundled load balancingIn both the above modes, there are costs (licensing and hardware) and expertise associated with managing the external load balancer. More importantly, there can be organizational friction, both technical and non-technical, as external load balancers and Anthos clusters are often managed by different teams. Anthos’ bundled load balancer provides an option to customers who want to program the VIP dynamically, without having to configure or support a third-party option.The Anthos-bundled load balancer takes care of integrating external load balancer functionality as well as announcing the VIP to the external world. In contrast to the previous modes, Anthos itself now bridges the Kubernetes domain with the rest of your network. This approach brings several advantages: The team managing the on-prem Anthos cluster also manages the advertisement of VIPs. This mitigates the requirements for any tight collaboration and dependency between different organizations, groups and admins.Costs are streamlined, as you don’t have to manage a separate invoice, bill or vendor for your external load balancing needs.Simplified management, as Anthos controls both the controller as well as the VIP announcement. This has benefits in operational management, support, provisioning etc., making it a more seamless experience.Multinational investment banking firm HSBC uses Anthos’ bundled load balancer and reports that it’s easy to install and configure, with minimal system requirements. “Anthos running on-premises has brought the best of Google’s managed Kubernetes to our data centers. Specifically, the bundled load-balancer provides HSBC with a highly available, high performing, layer 4 load-balancer with minimal system requirements. Configuration and installation are simple and automate deployment for each new on-prem cluster. This decreases our time to market, installation complexity, and costs for each cluster we deploy.” – Scott Surovich Global Container Engineering Lead – HSBC Operations, Services & TechnologyUsing the Anthos bundled load balancer Using Anthos’ bundled load balancer on-prem is a relatively straightforward process.The bundled load balancer uses the Seesaw load balancer, which Google created and open sourced. In high availability mode, two instances run in active-passive pairs talking the standard Virtual Router Redundancy Protocol (VRRP). The passive instance becomes the active if it does not receive an advertisement from the active instance for two seconds, based on today’s default configuration.You can create a load-balancer-typed Kubernetes service to expose your application through the bundled load balancer. For example:Here, the bundled load balancer exposes a service to clients at port 80. The service config is sent to the load balancer automatically, which begins to announce SVIP by replying to ARP (address resolution protocol) requests. The load balancer runs in IPVS gatewaying mode (also known as “direct routing” mode), not touching the IP layer of packets and delivering packets to a Kubernetes node by modifying the destination MAC address. The advantage of running in this mode is that it doesn’t add any additional IP headers to the traffic, and therefore does not impact performance. The Kubernetes data plane (iptables in this case) on the node then picks up the packets destined to SVIP:80 and routes them to backends pods. Thanks to the gatewaying mode, the load balancer achieves “Direct Server Return (DSR)” and the responses bypass the load balancers. This saves capacity needed for the load balancers. Also because of DSR, the client IP can be visible in pods by setting “externalTrafficPolicy” to “Local” on the service.No external load balancer? No problemIf you don’t have an external load balancer that’s qualified for your network—or don’t have the in-house expertise to set one up—Anthos’ bundled load balancer can help. And thankfully, it’s easy to set up and use. Click here to learn more about Anthos’ networking capabilities, and stay tuned for our upcoming post, where we’ll show you how to use GKE private clusters for increased security and compliance.Related ArticleGKE best practices: Exposing GKE applications through Ingress and ServicesWe’ll walk through the different factors you should consider when exposing applications on GKE, explain how they impact application expos…Read Article
Quelle: Google Cloud Platform

All together now: Fleet-wide monitoring for your Compute Engine VMs

Cloud Monitoring has always provided comprehensive visibility and management into individual Compute Engine virtual machines (VMs). But many Google Cloud customers have hundreds, thousands, or tens of thousands of VMs that they need to manage. Cloud Monitoring now gives you zero-config, out-of-the-box visibility into your entire Compute Engine VM fleet, with quick access to advanced Monitoring features such as installing the Cloud Monitoring agent and configuring fleetwide alerts. Our new Infrastructure Summary dashboard and expanded VM Instances dashboard jump-start your troubleshooting with no setup required!Monitor your VM fleet’s health with infrastructure summaryThe new single-pane-of-glass Infrastructure Summary dashboard lets you see aggregate fleet-wide statistics at a glance, and provides insight into the top VMs for a select group of key CPU, disk, memory, and network metrics. You can use the quick links in the top left to jump into detailed troubleshooting dashboards for load balancers, network, and VM instances. The filter bar enables you to narrow your view if you want to see a specific subset of VMs.Troubleshoot issues with VM instances fleet-wide viewYou’ve always been able to view and filter all your VM instances in Cloud Monitoring, and now you can do much more. The VM Instances dashboard now includes agent visibility and installation, and its new tabs let you see fleet-wide information across key metrics.View top VMs across key metrics for CPU, disk, memory, and networkDedicated tabs for CPU, disk, memory, and network show you outlier VMs for key metrics in each category, so you can visually inspect for anomalies and quickly drill into problem areas and VMs. Filtering allows you to narrow down the set of VMs being displayed in any tab for detailed analysis.View Monitoring agent status and install in the UIThe per-VM status of the Cloud Monitoring agent is now available in the main inventory page, and you can install the agent on a VM using our built-in wizard. Use the agent to track specified system and application metrics, including: Memory and disk metricsAdvanced system metricsMetrics for workloads like MySQL, Apache, Java virtual machine, and othersIf you want to install and manage the agent across multiple VMs at once, you can use our new Ops Agent Policies.Understand your advanced metricsThe “Explore” tab gives you insight into the advanced metrics you’re currently collecting in Cloud Monitoring, and quick links to information on how to send additional metrics, so you can see even more metrics in one place.Enable recommended alertsWe’ve made it easy to enable predefined recommended alerts across your whole VM fleet. With one click, you can ensure that all the VMs in your fleet are continuously monitored for excessive utilization (memory, disk, network, etc), and receive alert notifications across a variety of channels (email, SMS, Slack, PagerDuty, Cloud Console mobile app, Cloud Pub/Sub, and webhooks). You can also override recommended alert thresholds based on your needs.A fleet of new capabilitiesAs with all our operations tools, we want Cloud Monitoring to include everything you need to manage your environment, whether it consists of one VM or thousands. To get started with Cloud Monitoring, check out this demo.Related ArticleHigh-resolution user-defined metrics in Cloud MonitoringNow you can write custom and Prometheus metrics for Cloud Monitoring every 10 secondsRead Article
Quelle: Google Cloud Platform

Migrate your custom ML models to Google Cloud in 3 steps

Building end-to-end pipelines is becoming more important as many businesses realize that having a machine learning model is only one small step towards getting their ML-driven application into production. Google Cloud offers a tool for training and deploying models at scale, Cloud AI Platform, which integrates with multiple orchestration tools like TensorFlow Extended and KubeFlow Pipelines (KFP). However, it is often the case that businesses have models which they have built in their own ecosystem using frameworks like scikit-learn and xgboost, and porting these models to the cloud can be complicated and time consuming. Even for experienced ML practitioners on Google Cloud Platform (GCP),  migrating a scikit-learn model (or equivalent) to AI Platform can take a long time due to all the boilerplate that is involved. ML Pipeline Generator is a tool that allows users to easily deploy existing ML models on GCP, where they can then benefit from serverless model training and deployment and a faster time to market for their solutions.This blog will provide an overview of how this solution works and the expected user journey, and instructions for orchestrating a TensorFlow training job on AI Platform. OverviewML Pipeline Generator allows users with pre-built scikit-learn, xgboost, and TensorFlow models to quickly generate and run an end-to-end ML pipeline on GCP using their own code and data. In order to do this, users must fill in a config file describing their code’s metadata. The library takes this config file and generates all the necessary boilerplate for the user to train and deploy their model on the cloud in an orchestrated fashion using a templating engine. In addition, users who train TensorFlow models can use the Explainable AI feature to better understand their model.In the figure below, we highlight the architecture of the generated pipeline. The user will bring their own data, define how they perform data preprocessing, and add their ML model file. Once the user fills out the config file, they use a simple python API to generate self-contained boilerplate code which takes care of any preprocessing specified, uploads their data to Google Cloud Storage (GCS), and launches a training job with hyperparameter tuning. Once this is completed, the model is then deployed to be served and, depending on the model type, model explainability is performed. This whole process can be orchestrated using Kubeflow Pipelines.Click to enlargeStep-by-step instructionsWe’ll demonstrate how you can build an end-to-end Kubeflow Pipeline for training and serving a model, given the model config parameters and the model code. We will build a pipeline to train a shallow TensorFlow model on the Census Income Data Set. The model will be trained on Cloud AI Platform and can be monitored in the Kubeflow UI. Before you beginTo ensure that you are able to fully use the solution, you need to set up a few items on GCP:1. You’ll need a Google Cloud project to run this demo. We recommend creating a new project and ensure the following APIs are enabled for the project: Compute Engine AI Platform Training and PredictionCloud Storage 2. Install the Google Cloud SDK so that you can access required GCP services via the command line. Once the SDK is installed, set up application default credentials with the project ID of the project you created above.3. If you’re looking to deploy your ML model on Kubeflow Pipelines using this solution, create a new KFP instance on AI Platform Pipelines in your project. Note down the instance’s hostname (Dashboard URL of the form [vm-hash]-dot-[zone].pipelines.googleusercontent.com).4. Lastly, create a bucket so that data and the models can be stored on GCS. Note down the bucket ID.Step 1: Setting up the environmentClone the github repo for the demo code, and create a Python virtual environment.Install the ml-pipeline-gen package.The following files are of interest to us to be able to get our model up and running:1. The examples/ directory contains sample code for sklearn, Tensorflow and XGBoost models. We will use the examples/kfp/model/tf_model.py  to deploy a TensorFlow model on Kubeflow Pipelines. However, if you are using your own model you can modify the tf_model.py file with your model code. 2. The examples/kfp/model/census_preprocess.py downloads the Census Income dataset and preprocesses it for the model. For your custom model, you can modify the preprocessing script as required. 3. The tool relies on a config.yaml file for the required metadata to build artifacts for the pipeline. Open the examples/kfp/config.yaml.example template file to see the sample metadata parameters and you can find the detailed schema here. 4. If you’re looking to use Cloud AI Platform’s hyperparameter tuning feature, you can include the parameters in a hptune_config.yaml file and add its path in config.yaml. You can check out the schema for hptune_config.yaml here.Step 2: Setting up required parameters1. Make a copy of the kfp/ example directory2. Create a config.yaml file using the config.yaml.example template and update the following parameters with the project ID, bucket ID, the KFP hostname you noted down earlier, and a model name.Step 3: Building the pipeline and training the modelWith the config parameters in place, we’re ready to generate modules that will build the pipeline to train the TensorFlow model. Run the demo.py file.The first time you run the Kubeflow Pipelines demo, the tool provisions Workload Identity for the GKE cluster which modifies the dashboard URL. To deploy your model, simply update the URL in config.yaml and run the demo again. The demo.py script downloads the census dataset from a public Cloud Storage bucket, prepares the datasets for training and evaluation as per examples/kfp/model/census_preprocess.py, uploads the dataset to the Cloud Storage URLs specified in config.yaml, builds the pipeline graph for training and uploads the graph on the Kubeflow Pipelines application instance as an experiment. Once the graph has been submitted for a run, you can monitor the progress of the run in the Kubeflow Pipelines UI. Open the Cloud AI Platform Pipelines page and open the Dashboard for your Kubeflow Pipelines cluster.Note:If you would like to use the Scikit-learn or XGBoost examples, you can follow the same steps above, but modify the examples/sklearn/config.yaml with similar changes as above without the additional step of creating a Kubeflow Pipelines instance. For more details, refer to the instructions in the public repo or follow our end-to-end tutorial written in a Jupyter notebook. ConclusionIn this post we showed you how to migrate your custom ML model for training and deployment to Google Cloud in three easy steps. Most of the heavy-lifting is done by the solution, where the user simply needs to bring their data, model definition and state how they would like the training and serving to be handled. We went through one example in detail and the public repository includes examples for other supported frameworks. We invite you to utilize the tool and start realizing one of the many benefits of Cloud for your Machine Learning workloads. For more details, check out the public repo. To learn more about Kubeflow Pipelines and its features, check out this session from Google Cloud Next ‘19.AcknowledgementsThis work would not have been possible without the hard work of the following people (in alphabetical order of last name): Chanchal Chatterjee, Stefan Hosein, Michael Hu, Ashok Patel and Vaibhav Singh.Related ArticleExplaining model predictions on image dataA conceptual overview and technical deep dive into how XAI works on image dataRead Article
Quelle: Google Cloud Platform

Modern detection for modern threats: Changing the game on today’s threat actors

2020 has introduced complex challenges for enterprise IT environments. Data volumes have grown, attacker techniques have become complex yet more subtle, and existing detection and analytics tools struggle to keep up. In legacy security systems, it’s difficult to run many rules in parallel and at scale—so even if detection is possible, it may be too late. Most analytics tools use a data query language, making it difficult to write detection rules described in scenarios such as the Mitre ATT&CK framework. Finally, detections often require threat intelligence on attacker activity that many vendors simply don’t have. As a result, security tools are unable to detect many modern threats.To address these needs, today at Google Cloud Security Talks we’re announcing Chronicle Detect, a threat detection solution built on the power of Google’s infrastructure to help enterprises identify threats at unprecedented speed and scale. Earlier this year at RSA, we introduced the building blocks for Chronicle Detect: a data fusion model that stitches events into a unified timeline, a rules engine to handle common events, and a language for describing complex threat behaviors. With today’s announcement, we complete the rest of the solution.”The scale and SaaS deployment model of Google Chronicle drove NCR’s initial interest and investment. Their speed to deliver new features and integration have kept us productive and continued to impress. By operationalizing Chronicle for threat investigations, we have significantly improved our detection metrics. As an early design partner with Chronicle around its rules engine, Chronicle Detect, we see a clear opportunity to extend its benefits and impact to advanced threat detection.”—Bob Varnadoe, CISO at NCR CorporationIntroducing Chronicle’s next generation rules engineChronicle Detect brings modern threat detection to enterprises with the next generation of our rules engine that operates at the speed of search, a widely-used language designed specifically for describing threat behaviors, and a regular stream of new rules and indicators, built by our research team.Chronicle Detect makes it easy for enterprises to move from legacy security tools to a modern threat detection system. Using our Google-scale platform, security teams can send their security telemetry to Chronicle at a fixed cost so that diverse, high value security data can be taken into account for detections. We automatically make that security data useful by mapping it to a common data model across machines, users, and threat indicators, so that you can quickly apply powerful detection rules to a unified set of data.Detection rules trigger based on high value security telemetry sent to the Chronicle platform.With Chronicle Detect, you can use advanced rules out-of-the-box, build your own, or migrate rules over from legacy tools. The rules engine incorporates one of the most flexible and widely-used detection languages in the world, YARA, which makes it easy to build detections for tactics and techniques found in the commonly used MITRE ATT&CK security framework. YARA-L, a language for describing threat behaviors, is the foundation of the Chronicle Detect rules engine. Many organizations are also integrating Sigma-based rules that work across systems, or converting their legacy rules to Sigma for portability. Chronicle Detect includes a Sigma-YARA converter so that customers can port their rules to and from our platform.Using the YARA-L language, it’s easy to edit and build detection rules in the Chronicle interface.Get real-time threat indicators and automatic rules from Uppercase Chronicle customers can also take advantage of detection rules and threat indicators from Uppercase, Chronicle’s dedicated threat research team. Uppercase researchers leverage a variety of novel tools, techniques, and data sources (including Google threat intelligence and a number of industry feeds) to provide Chronicle customers with indicators spanning the latest crimeware, APTs, and unwanted malicious programs. The Uppercase-provided IOCs—such as high-risk IPs, hashes, domains, registry keys—are analyzed against all security telemetry in your Chronicle system, and let you know right away when high-risk threat indicators are present in your environment.“As an early adopter, Quanta has benefited from Chronicle’s scale, performance and economic benefits in security investigations and threat hunting. We are excited to see Chronicle extend the Google advantage to threat detection with the launch of Chronicle Detect backed by the Chronicle Uppercase research team.” —James Stinson, VP IT at Quanta Services, IncThe combination of these capabilities helps enterprises uncover multi-event attacks in their systems such as a new email sender followed by an HTTP post to a rare domain, or a suspiciously long powershell script accessing a low prevalence domain. Since joining Google Cloud over a year ago, the Chronicle team has been innovating on our investigation and hunting platform to bring a new set of capabilities to the security market—and we won’t stop here. Chronicle has also added new global availability and data localization options, including data center support for all capabilities in Europe and the Asia Pacific region.  We’ll continue to build out integrations and help enterprises uncover threats with Chronicle wherever their data and applications reside, on-premises, in Google Cloud, and even in other cloud environments. To learn more about Chronicle Detect, read the Chronicle blog or contact the Chronicle sales team.
Quelle: Google Cloud Platform

Cloud Run for Anthos brings eventing to your Kubernetes microservices

Building microservices on Google Kubernetes Engine (GKE) provides you with maximum flexibility to build your applications, while still benefiting from the scale and toolset that Google Cloud has to offer. But with great flexibility comes great responsibility. Orchestrating microservices can be difficult, requiring non-trivial implementation, customization, and maintenance of messaging systems. Cloud Run for Anthos now includes an events feature that allows you to easily build event-driven systems on Google Cloud. Now in beta, Cloud Run for Anthos’ event feature assumes responsibility for the implementation and management of eventing infrastructure, so you don’t have to.With events in Cloud Run for Anthos, you getThe ability to trigger a service on your GKE cluster without exposing a public HTTP endpointSupport for Google Cloud Storage, Cloud Scheduler, Pub/Sub, and 60+ Google services through Cloud Audit logsCustom events generated by your code to signal between services through a standardized eventing infrastructureA consistent developer experience, as all events, regardless of the source, follow the CloudEvents standardYou can use events for Cloud Run for Anthos for a number of exciting use cases, including:Use a Cloud Storage event to trigger a data processing pipeline, creating a loosely coupled system with the minimum effort.Use a BigQuery audit log event to initiate a process each time a data load completes, loosely coupling services through the data they write. Use a Cloud Scheduler event to trigger a batch job. This allows you to focus on the code of what that job is doing and not its scheduling.Use Custom Events to directly signal between microservices, leveraging the same standardized infrastructure for any asynchronous coordination of services.How it worksCloud Run for Anthos lets you run serverless workloads on Kubernetes, leveraging the power of GKE. This new events feature is no different, offering standardized infrastructure to manage the flow of events, letting you focus on what you do best: building great applications. The solution is based on open-source primitives (Knative), avoiding vendor-lock-in while still providing the convenience of a Google-managed solution. Let’s see events in action. This demo app builds a BigQuery processing pipeline to query a dataset on a schedule, create charts out of the data and then notify users about the new charts via SendGrid. You can find  the demo on github.You’ll notice in the example above that the services do not communicate directly with each other, instead we use events on Cloud Run for Anthos to ‘wire up’ coordination between these services, like so:Let’s break this demo down further. Step 1- Create the Trigger for Query Runner: First, create a trigger targeting the Query runner service based on a cloud scheduler job.Step 2- Handle the event in your code: In our example we need details provided in the trigger. These are delivered via the HTTP header and body of the request and can easily be unmarshalled using the CloudEvent SDK and libraries. In this example, we use C#:Read the event using CloudEvent SDK:Step 3 – Signal the Chart Creator with a custom event: Using custom events we can easily signal a downstream service without having to maintain a backend. In this example we raise an event of type dev.knative.samples.querycompletedThen we create a trigger for the Chart Creator service that fires when that custom event occurs. In this example we use the following gcloud command to create the trigger:Step 4 – Signal the notifier service based on a GCS event: We can trigger the notifier service once the charts have been written to the storage service by simply creating a Cloud Storage trigger.And there you have it! From this example you can see how with events for Cloud Run for Anthos, it’s easy to build a standardized event-based architecture, without having to manage the underlying infrastructure. To learn more and get started, you can:Get started with Events for Cloud Run for Anthos Follow along with our demo in our QwiklabView our recorded talk at Next 2020Related ArticleWhat’s new in Cloud Run for AnthosThe GA of Cloud Run for Anthos includes several new featuresRead Article
Quelle: Google Cloud Platform

SRE Classroom: exercises for non-abstract large systems design

Have you ever tried your hand at designing a resilient distributed software system? If you have, you likely found that there are many factors that contribute to the overall reliability of a system. Different parts of the system can fail in varied and unexpected ways. Certain architecture patterns work well in some situations, but poorly in others. There are many tradeoffs to be made about which parts of the system to optimize and when to optimize them.Navigating the many nuances of designing a distributed system can be daunting. However, anyone can be equipped to tackle these problems with the right tools and practice. There are many ways to design distributed systems. One way involves growing systems organically, adding and rewriting components as the system handles more requests or changes scope. At Google, we use a method called non-abstract large system design (NALSD). NALSD is an iterative process for designing, assessing, and evaluating distributed systems such as the Borg cluster management for distributed computing and the Google distributed file system. With this in mind, we’ve developed exercises to provide hands-on experience with the NALSD techniques. NALSD exercises are designed to equip engineers with the foundational knowledge and problem-solving skills needed to design planet-scale systems. You’ll learn how to evaluate whether a particular design achieves a service’s required service-level objectives (SLOs). These workshops challenge you to translate abstract designs into concrete plans using back-of-the-envelope calculations. Most importantly, they provide a chance for you to put these abstract concepts into practice.Planet-scale system (noun): A system that delivers services to users, no matter where they are around the world. Such a system delivers its services reliably, with high performance and availability to all of its usersSRE Classroom and the first NALSD workshopDeveloped by Google engineers, SRE Classroom is a workshop series designed to drive understanding of concepts like NALSD and other core SRE principles. Over the past few years, these workshops—taught within Google and at external conferences—have helped numerous engineers improve their system design and thinking skills. Our mission is to ensure engineering teams everywhere can understand and apply these concepts and best practices to their own systems.We’re pleased to make available all of the materials for our Distributed Pub/Sub workshop—the first of our NALSD-focused exercises from SRE Classroom. You can now freely use and re-use this material, available under the Creative Commons CC-BY 4.0 license, as long as Google is credited as the original author. Run your own version of this workshop and teach your coworkers, customers, or conference attendees about how to design large-scale distributed systems!What’s covered in the Distributed PubSub workshopThe PubSub exercise is about designing a planet-scale asynchronous publish-subscribe communication system. The workshop presents the problem statement, describes the requirements and available infrastructure, and walks through a sample solution.The workshop and material is broken into three stages:Design a working solution for a single data center.Extend that design to multiple data centers.Provision the system (i.e., how much hardware and bandwidth do we need?).For each stage of the workshop, participants will work through their own solution first. After they have a chance to explore their own ideas, the workshop leader presents a sample solution along with reasons for why certain design decisions were made.The exercise covers a wide variety of topics related to distributed system design, including scaling, replication, sharding, consensus, availability, consistency, distributed architecture patterns (such as microservices), and more. We present these concepts in contexts where they are useful to solving the problem at hand: designing a system to meet specific requirements. This helps bring clarity to where and why a particular concept might be useful for solving a particular problem.Typically, when we run this workshop, we break participants up into groups of four to six to work collaboratively toward a solution. Each group is paired with an experienced SRE volunteer who facilitates the discussion, encourages participation, and keeps the group on track.Run your own PubSub workshop!If this sounds interesting, check out the Presenter Guide and the Facilitator Guide, which have a lot more information on how to organize a Distributed Pub/Sub workshop. If you don’t have a whole team to educate, you can also work through this exercise with a buddy or on your own. Exploring multiple solutions to the problem and identifying the pros and cons of each solution may also be a meaningful exercise.Learn more about SRE and industry-leading practices for service reliability.
Quelle: Google Cloud Platform

Are you an Elite DevOps performer? Find out with the Four Keys Project

Through six years of research, the DevOps Research and Assessment (DORA) team has identified four key metrics that indicate the performance of a software development team: Deployment Frequency – How often an organization successfully releases to productionLead Time for Changes – The amount of time it takes a commit to get into productionChange Failure Rate – The percentage of deployments causing a failure in productionTime to Restore Service – How long it takes an organization to recover from a failure in productionAt a high level, Deployment Frequency and Lead Time for Changes measure velocity, while Change Failure Rate and Time to Restore Service measure stability. And by measuring these values, and continuously iterating to improve on them, a team can achieve significantly better business outcomes. DORA, for example, uses these metrics to identify Elite, High, Medium and Low performing teams, and finds that Elite teams are twice as likely to meet or exceed their organizational performance goals.1Baselining your organization’s performance on these metrics is a great way to improve the efficiency and effectiveness of your own operations. But how do you get started? The journey starts with gathering data. To help you generate these metrics for your team, we created the Four Keys open source project, which automatically sets up a data ingestion pipeline from your Github or Gitlab repos through Google Cloud services and into Google DataStudio. It then aggregates your data and compiles it into a dashboard with these key metrics, which you can use to track your progress over time. To use the Four Keys project, we’ve included a setup script in the repo to make it easy to collect data from the default sources and view your DORA metrics. For anyone interested in contributing to the project or customizing it to their own team’s use cases, we’ve outlined the three key components below: the pipeline, the metrics, and the dashboard. The Four Keys pipelineThe Four Keys pipeline is the ETL pipeline which collects your DevOps data and transforms it into DORA metrics.One of the challenges of gathering these DORA metrics, however, is that, for any one team (let alone all the teams in an organization), deployment, change, and incident data are usually in different disparate systems. How do we develop an open-source tool that can capture data from these different sources—as well as from sources that you may want to use in the future? With Four Keys, our solution was to create a generalized pipeline that can be extended to process inputs from a wide variety of sources. Any tool or system that can output an HTTP request can be integrated into the Four Keys pipeline, which receives events via webhooks and ingests them into BigQuery.Click to enlargeIn the Four Keys pipeline, known data sources are parsed properly into changes, incidents and deployments. For example, GitHub commits are picked up by the changes script, Cloud Build deployments fall under deployments, and GitHub issues with an ‘incident’ label are categorized as incidents. If a new data source is added and the existing queries do not categorize it properly, the developer can recategorize it by editing the SQL script.Data extraction and transformationOnce the raw data is in the data warehouse, there are two challenges: extraction and transformation. To optimize for business flexibility, both of these processes are handled with SQL. Four Keys uses BigQuery scheduled queries to create the downstream tables from the raw events table.Four Keys categorizes events into Changes, Deployments, and Incidents using `WHERE` statements, and normalizes and transforms the data with the `SELECT` statement. The precise definition of a change, deployment, or incident depends on a team’s business requirements, making it all the more important to have a flexible way to include or exclude additional events.While the definition may different from team to team, the scripts do provide defaults to get you started. As an example, here’s the Deployments script:Four Keys uses the WHERE filter to only pull relevant rows from the events_raw table, and the SELECT statement to map the corresponding fields in the JSON to the commit id. One of the benefits of doing data transformations in BigQuery is that you don’t need to re-run the pipeline to edit or recategorize the data. The JSON_EXTRACT_SCALAR function allows you to parse and manipulate the JSON data in the SQL itself. BigQuery even allows you to write custom javascript functions in SQL!Calculating the metricsThis section discusses how to translate the DORA metrics to systems-level calculations. The original research done by the DORA team surveyed real people rather than gathering systems data and bucketed metric into a performance level, as follows:Click to enlargeHowever, it’s a lot easier to ask a person how frequently they deploy than it is to ask a computer! When asked if they deploy daily, weekly, monthly, etc., a DevOps manager usually has a gut feeling which bucket their organization falls into. However, when you demand the same information from a computer, you have to be very explicit about your definitions and make value judgments. Let’s look at some of the nuances in the metrics definitions and calculations.Deployment frequency`How often an organization successfully releases to production.`Deployment Frequency is the easiest metric to collect, because it only needs one table.  However, the bucketing for frequency is also one of the trickier elements to calculate. It would be simple and straightforward to show daily deployment volume or to grab the average number of deployments per week, but the metric is deployment frequency, not volume.  In the Four Keys scripts, Deployment Frequency falls into the Daily bucket when the median number of days per week with at least one successful deployment is equal to or greater than three. To put it more simply, to qualify for “deploy daily,” you must deploy on most working days. Similarly, if you deploy most weeks, it will be weekly, and then monthly and so forth.Next you have to consider what constitutes a successful deployment to production. Do you  include deployments that are only to 5% traffic? 80%? Ultimately, this depends on your team’s individual business requirements. By default, the dashboard includes any successful deployment to any level of traffic, but this threshold can be adjusted by editing the SQL scripts in the project. Lead Time for Changes`The amount of time it takes a commit to get into production`Lead Time to Changes metric requires two important pieces of data: when the commit happened, and when the deployment happened. This means that for every deployment, you need to maintain a list of all the changes included in the deployment. This is easily done by using triggers with a SHA mapping back to the commits. With the list of changes in the deploy table, you can join back to the changes table to get the timestamps, and then calculate the median lead time. Change Failure Rate`The percentage of deployments causing a failure in production`The Change Failure Rate depends on two things: how many deployments were attempted, and how many resulted in failures in production? To get this number, Four Keys needs the total count of deployments—easily acquired from the deployment table—and then links it to incidents. An incident may come from bugs or labels on github incidents, a form to spreadsheet pipeline, an issue management system, etc. The only requirement is that it contain the ID of the deployment so we can join the two tables together. Time to Restore Services`How long it takes an organization to recover from a failure in production`To measure the Time to Restore Services, you need to know when the incident was created and when it was resolved. You also need to know when the incident was created and when a deployment resolved said incident. Similar to the last metric, this data could come from any incident management system. The dashboardClick to enlargeWith all the data now aggregated and processed in BigQuery, you can visualize it in the Four Keys dashboard. The Four Keys setup script uses a DataStudio connector, which allows you to connect your data to the Four Keys dashboard template. The dashboard is designed to give you high-level categorizations based on the DORA research for the four key metrics, and also to show you a running log of your recent performance. This allows developer teams to get a sense of a dip in performance early on so they can mitigate it. Alternately, if performance is low, teams will see early signs of progress before the buckets are updated. Ready to get started?Please head over to the Four Keys project to try it out. The setup scripts will get you started setting up the architecture and integrating with your projects. We welcome feedback and contributions! To learn more about how to apply DevOps practices to improve your software delivery performance, visit cloud.google.com/devops. And be on the lookout for a follow-up post on gathering DORA metrics for applications that are hosted entirely in Google Cloud.1. The 2019 Accelerate State of DevOps: Elite performance, productivity, and scalingRelated ArticleThe 2019 Accelerate State of DevOps: Elite performance, productivity, and scalingDORA and Google Cloud have published the 2019 Accelerate State of DevOps Report.Read Article
Quelle: Google Cloud Platform

Better together: Google Cloud Load Balancing, Cloud CDN, and Google Cloud Armor

Like many Google Cloud customers, you probably use Global Load Balancing platform to get benefits such as high availability, low latency, and the convenience of a single anycast IP to front-end your global load balancing capacity. But did you know that by adding Cloud CDN and Google Cloud Armor to your existing Global HTTP(S) load balancer deployment, you can get improved web protection and faster web performance. Read on to learn more.Accelerate web performance by enabling Cloud CDNAt Google we are committed to making the web faster. For example, Cloud Load Balancing supports modern protocols such as Google QUIC and HTTP/2, which improve performance and reduce latency, especially for users on mobile networks. Then there’s Cloud CDN, which runs on our globally distributed edge points to reduce network latency by caching content closer to your users. Whenever a request is served from the Cloud CDN cache, the load balancer doesn’t need to retrieve content from the backend infrastructure. This allows you to scale seamlessly and easily handle large spikes in demand (e.g., from holiday shopping). As static web elements such as images, videos, etc., can be served from Google’s global edge instead of your backend systems, your users can enjoy faster page loads and a smoother web experience. Finally, Cloud CDN helps you optimize and reduce the cost of delivery: it keeps load off your web servers, keeping down compute usage, and content served out of Google’s edge cache is billed at a lower egress cost. Improve web protection by enabling Cloud ArmorGoogle Cloud Armor is the web-application firewall (WAF) and DDoS mitigation service that defends your web apps and services at Google scale. Cloud Armor automatically protects HTTP(S) Load Balancer workloads from volumetric and protocol based DDoS attacks. Users can configure Cloud Armor security policies for custom layer 7 filtering to further protect against application layer attacks.Cloud Armor helps protect your applications from the threats from the internet while satisfying your organization’s security and compliance requirements and providing near-real time visibility and telemetry about the traffic targeting your applications. With Cloud Armor’s pre-configured WAF rules, you can easily help mitigate the OWASP Top 10 web application security risks and prevent exploit attempts such as SQL injection (SQLi), Cross-Site Scripting (XSS), or Remote Code Execution (RCE). Cloud Armor allows users to customize the behavior of the edge of Google’s network to suit your business needs. Custom rules can be created using our comprehensive rules language to narrowly tailor what traffic is able to reach your web apps or services by filtering on request headers, parameters, and cookies. For example, you can create geography based access controls, leveraging Google’s own geo-ip database, to make your application available only in desired geographies. We recently launched Cloud Armor Managed Protection Plus (Beta), which is a managed application protection service bundling Cloud Armor WAF, DDoS Mitigation, and Google-curate rules, and other associated services. Managed Protection Plus is offered as a monthly subscription with enterprise-friendly predictable pricing to further help mitigate the impact of DDoS attacks. Getting started with enabling Google Cloud Armor and Cloud CDN With Google Cloud Load Balancing, Google Cloud Armor and Cloud CDN deployed at the edge, your users can get fast, reliable and secure web delivery with global scale and reach.Once you have set up the HTTP(S) load balancing, Cloud CDN can be enabled by clicking a single checkbox. For details on how to enable Cloud CDN, look at the Cloud CDN how-to guides. You can learn more about the benefits of Cloud CDN in this infographic.For details on how to enable Cloud Armor for your external HTTP(S) load balancer, look at the Google Cloud Armor how-to guides.Related ArticleGoogle Cloud networking in depth: Cloud Load Balancing deconstructedTake a deeper look at the Google Cloud networking load balancing portfolio.Read Article
Quelle: Google Cloud Platform

Cloud migration: What you need to know (and where to find it)

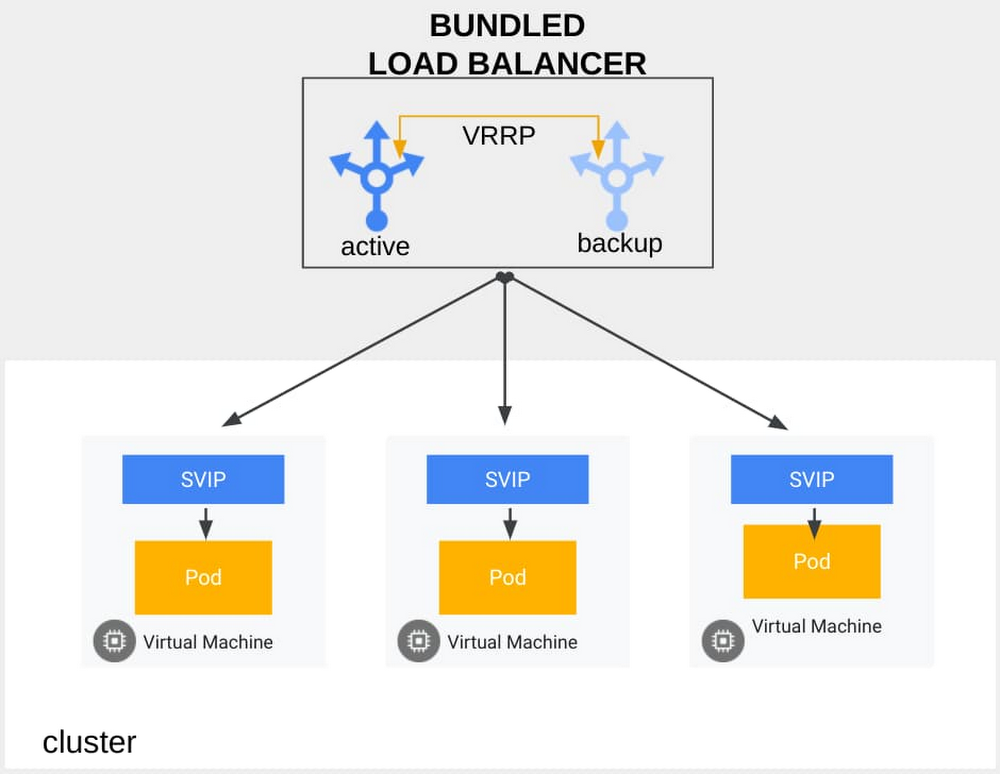
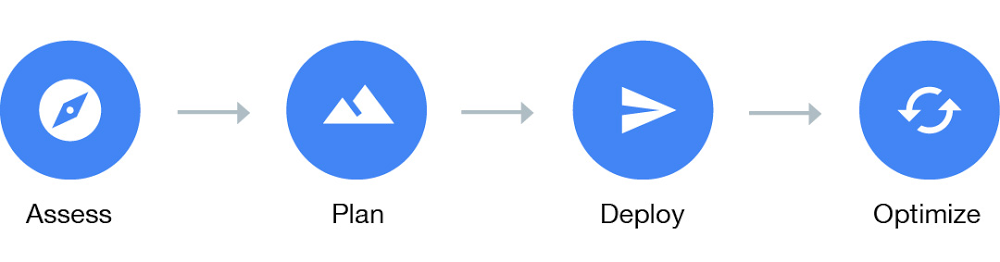
Migrating to the cloud for an enterprise that has been running workloads on premises for years can be very daunting. To be successful, a migration plan needs to factor in many different aspects relating to people, process and technology. If you are designing the migration, you need guidance and best practices to help steer you through this process.Building on our experience as solutions architects, we have put together a comprehensive set of documents for IT practitioners who are planning, designing, and implementing a migration to Google Cloud. At our Migration to Google Cloud page, you’ll find extensive technical information and advice you need to help plan and execute a successful migration. To help you get started faster, this blog post provides a high-level outline and links into the relevant part of the documentation where you can get more information.Getting started with the migrationBefore you start your migration, you should gather some foundational understanding about Google Cloud, your environment, and different migration approaches:1. Understand the difference between Google Cloud and the current environment. The source environment could be on-premises or a private hosting environment. These environments have a different operational model compared to a public cloud, from a physical security, networking, power, hardware and virtualization standpoint.2. Identify the type of workloads that need to be migrated. We recommend you start your migration by classifying workloads as either legacy, or cloud-native. Legacy workloads were developed without any consideration for cloud environments, with limited support for scaling resources such as disks and compute. As a result, these workloads can be difficult to modify and expensive to run and maintain. When designed following best practices, cloud-native workloads are natively scalable, portable, available, and secure. As a result, cloud-native workloads tend to increase developer productivity and agility, because developers can focus on the actual workloads, rather than spending effort to manage development and runtime environments.3. Determine your organization’s maturity level for cloud technologies. When identified early, skill gaps can be addressed as part of the migration process through actions like self-study, training or peer mentorship. You can use Google Cloud’s Cloud Adoption Framework to measure your organization’s cloud adoption maturity.4. Familiarize yourself with the different types of migration approaches and their tradeoffs, because different workloads might require different migration approaches. We define three types of migrations:Lift and shift. You migrate the workload, applying the least amount of changes.Improve and move. You modify parts of the workload to adopt cloud-native approaches as part of the migration.Rip and replace. You decommission the workload, and write a new workload, adopting a cloud-native approach.For more information on migration types refer to the migration guide’s section on Types of migration.The four phases of migrationBroadly speaking, the migration journey can be captured as a four-phase process: Assess, Plan, Deploy and Optimize. It’s easier to show this linearly, but it’s rarely so straightforward, with these phases often happening in parallel for different workloads. Phase 1: Assess the workloads to be migratedThis phase builds on any pre-work that you’ve done, with a focus on taking an inventory of the workloads that you plan to migrate and their respective dependencies. Things to think about include (but are not limited to) hardware and performance requirements, users, licensing, compliance needs and workload dependencies. Then, map this information into an app catalog that summarizes the information across some key axis questions—for example:Whether the workload has dependencies, or is a dependency for other workloadsHow critical the workload is to the business How difficult it is to migrate the workloadThe app catalog will provide you with a high-level view of the amount of effort to migrate all your different workloads. You can also use automated tools such as StratoZone that can scan your existing workloads and provide you with information based on the data gathered. StratoZone not only helps with discovery but can also help you map your instances to matching Google Compute Engine instances. Check out this blog post for an introduction to StratoZone.  Additional information on how to conduct discovery is also available in the Categorizing your apps section. To further get a sense of the size of risk or effort, you should conduct a proof of concept (POC) that tests the different use cases and requirements of the workload, with a focus on the more complicated workloads. This aids with getting more information early as well as reducing unknowns.You should also perform a total cost of ownership (TCO) calculation at this phase, giving the business visibility into what their cloud expenditure will look like as a result of the migration, compared to your existing environment. When moving from an on-prem to a cloud environment, there are often hidden costs that are missed when calculating the costs in the old data center. We list out some of the things to look out for when building this TCO in the Calculating total cost of ownership section of our guide. Getting the business to understand the shift in cost models and all of the additional benefits gained will be crucial to migration success. Lastly, you need to decide on which workloads to migrate first. The answer will vary from business to business depending on many different factors such as business value of the workload, complexity of migration, and the availability and requirements of the workload. To help guide this decision, it’s a good idea to call a meeting of the subject matter experts of the different workloads and go through a jointly agreed list of factors. Succeeding with the first workload is key to the overall success of your migration journey, as early success yields trust and goodwill, whereas early challenges can sometimes derail entire migration projects. Phase 2: Plan the foundationThe next phase is to plan the foundational pieces of the new cloud environment, which consist of but are not limited to:1. Establishing user and service identities. How will users and service accounts be created and managed? You can choose between G Suite or Cloud Identity domains, and optionally integrating with your existing Identity Provider (IdP). Read up on this in the Identity and Access management section.2. Designing a resource organization hierarchy. How are the different Google Cloud resources structured hierarchically? Organization nodes, folders and projects provide the building blocks to set up a resource organization hierarchy. A properly designed resource organization simplifies access control and billing management. Examples of different types of designs are:Environment oriented hierarchy – This design separates out your production, quality assurance and development environments. Function orientated hierarchy – This design breaks different business functions into their own folders at the top level, and implements an environment-orientated hierarchy beneath it.Granular orientated hierarchy – This design builds on top of the function-orientated hierarchy by adding a business unit organization at the top level.You can dive deep on this topic in the resource hierarchy section.3. Defining groups and roles for resource access. What are the different roles of users who will be accessing your cloud environment? What permissions should these different roles have? You need to create manager roles such as organizational admin, network admin and security admins to manage the cloud resources. It is also a best practice to create specific roles for the different classes of users who will be using the cloud environment, for example developers, testers and site reliability engineers (SREs). All these roles will have a minimum set of permissions associated with them to carry out their tasks. The Best practices for enterprise organizations document provides more details on this topic.4. Designing your network topology and connectivity. Into which regions will you deploy your application? Will there be connectivity back into the source environment? How many separate networks will you need to set up? The answers to these questions will feed into how you design your Virtual Private Cloud (VPC), which is your private network within Google Cloud. One VPC maps to one standalone network within your cloud environment. A VPC has subnets, firewall rules and routes that allow you to mimic the characteristics of a physical network. It’s important to also ensure you are applying security best practices; you can read about those in the Security section, as well as in the Secure your apps and data section of our Best practice for enterprise organizations guide. Connectivity back to the source environment is also possible using options such as direct interconnect, peering or a VPN. For more information read the Connectivity and networking section.Phase 3: Deploy the workloadsOnce the foundation for your migration is in place, the next step is to determine the best approach to deploy your workloads to your cloud environment. You don’t need to take the same approach for all your workloads, however, the more standardized the process is, the more opportunity for cross-team learning and improvement of the deployment process. Example of different deployment approaches are:1. Fully manual deployments. This approach is the simplest and quickest way to get your workload up and running, and can be performed from the Cloud Console or Cloud SDK directly. Although a manual deployment might be all right for some experimentation, we do not recommend this approach for production workload deployments because it is error prone, not repeatable and tends to be poorly documented. If you are currently using manual deployments, the Migration from manual deployments to automated, containerized deployments section will be able to help you improve your process. For production environments, , a more practical option is to use a service that can automatically replicate the existing workloads in your current environment and deploy it to GCP. Google Cloud offers several such services:Migrate for Compute Engine – This allows you to migrate VM-based applications from your existing environment (e.g. VMware, Azure, AWS) to GCP with minimal downtime and risk. Migrate for Anthos – Instead of migrating VMs as-is, you can intelligently convert and workloads running in VMs and migrate those workloads into containers in GKE. This often results in a reduction of cost and management. Database Migration Solutions – Whether through third parties such as Striim, or using native replication support in Google Cloud SQL, there are lots of different techniques to getting your data into Google Cloud.VMware Engine – Migrate any existing VMware-based workloads from your on-prem infrastructure without any changes directly to Google Cloud VMware Engine. This allows you to reuse any existing VMware deployment tooling and get started immediately with your migration, and easily add new workloads with the VMware framework within Google Cloud.2. Deploy using configuration management tools. Using configuration management (CM) tools such as Ansible, Chef or Puppet provides a repeatable, automated and controlled way to run your deployment. However, these tools are best suited for provisioning and configuration, and less suitable for workload deployments. This is because the tools require bespoke deployment logic to handle procedures such as zero-downtime deploys, blue-green deployments or rolling updates, and end up becoming more difficult to manage and maintain over the long run. 3. Deploy by using container orchestration tools. If your workloads are containerized you can use Google Kubernetes Engine (GKE) to handle the deployment process. The Kubernetes orchestrator supports many types of deployment logic such as zero-downtime deploys and rolling updates out of the box. Alternatively if your workloads are still on VMs running GCE, Azure or AWS Migrate for Anthos allows you to convert your VMs into containers automatically. This allows you to gain the benefit of running on containers quicker. 4. Deploy automatically. An automated deployment process is triggered based on some action that results in a change in the workload and can be built on top of any orchestration tool that can be scripted. Automated deployments allow you to streamline and standardize your deployment process reducing human error.You can use tools such as Jenkins, SonarQube, Cloud Build or Spinnaker to build an end-to-end automated deployment pipeline on top of your existing orchestration tools. The key steps of an automated deployment process are:Code review. Every change to your codebase should be reviewed by a peer to ensure the quality of the change before merging it into the codebase.Continuous integration (CI). Once merged, the CI tool runs all existing tests against the new version for the codebase and ensures that no tests fail. Only then does it mark the build as successful.Artifact production. For every successful build an artifact is produced. A container is an example of an artifact. Tests can also be run by using tools such as Serverspec to ensure that the artifacts are working well.Continuous deployment (CD).A successful artifact is then deployed into your development or quality assurance cloud environment, after which another set of functional tests could be run against the deployment to ensure that its running well. Once those tests pass, the deployment can then be deployed to your production environment, either automatically, or after being manually triggered by an operator.5. Deploy by applying the infrastructure-as-code pattern. The idea behind infrastructure as code is to treat configuring and provisioning your cloud resources in the same way you treat the source code for your workloads. Similar to how new versions of workloads are deployed by going through a series of automated steps and tests, any changes to the infrastructure configuration also go through a series of steps that involve testing before being deployed to the target cloud environment. This is our recommended best practice as it provides repeatability and traceability, which improve overall deployment velocity. This process can be implemented using tools such as Terraform and managed services such as a Deployment Manager.Phase 4: Optimize your environmentOnce a basic deployment of your workloads is running and tested in your new Google Cloud environment, you can start to improve on this foundation. This includes critical pieces that should be completed before cutting over live traffic, for example training your team on new cloud operational playbooks as well as ensuring that logging, monitoring and alerting for these workloads are in place.Other aspects that you can optimize once the workload is serving production traffic include: Cost optimization with autoscalingMoving to managed workloads to reduce operational overheadAutomating the deployment process Read up on how best to approach this in the Optimizing your environment section. Read on to ensure a successful cloud migrationA large migration can be daunting for the most ambitious of teams. But with the right methodology, planning, and testing before deployment, you can break the problem down into smaller, more manageable steps. Our Migration to Google Cloud solution guide covers the above in more detail, and also provides additional resources, like our ‘Finding Help’ section, that you can use to help start migrating your workloads to the cloud.  If you require more assistance from professionals who have a track record of successful migrations, the Google Cloud Professional Services Organization offers consulting services directly or via a host of partners with a wide range of specialties. Just reach out and we can help you get on your way!
Quelle: Google Cloud Platform

gVisor: Protecting GKE and serverless users in the real world

Security is a top priority for Google Cloud, and we protect our customers through how we design our infrastructure, our services, and how we work. Googlers created some of the fundamental components of containers, like cgroups, and we were an early adopter of containers for our internal systems. We realized we needed a way to increase the security of this technology. This led to the development of gVisor, a container security sandbox that we have since open sourced and integrated into multiple Google Cloud products. When a recent Linux kernel vulnerability was disclosed, users of these products were not affected because they were protected by gVisor.The latest container escapeWhile auditing the 5.7 kernel release, an employee of Palo Alto Networks recently discovered a Linux kernel vulnerability, which has the potential to be used for “container escapes.” Containers share the same host kernel, which is one of the properties that allow them to be densely packed and highly portable. A container escape refers to a category of vulnerabilities seen in containerized systems where—typically through privilege escalation—an unauthorized user gains access to the host system, giving the attacker an entrypoint for whatever they’d like to do next, for example data exfiltration or cryptomining. (You can learn more container security fundamentals in this ebook, “Why Container Security Matters to Your Business.”)This vulnerability, CVE-2020-14386, uses the CAP_NET_RAW capability of the Linux kernel to cause memory corruption, allowing an attacker to gain root access when they should not have. In Docker, the most commonly used container format with Kubernetes, the CAP_NET_RAW capability is enabled by default. This means that “out of the box,” your Kubernetes deployment—or the infrastructure of your serverless applications—could be compromised by this recent vulnerability. Even if your security team has told you to disable some of these default capabilities, CAP_NET_RAW is commonly used by networking tools such as ping and tcpdump, and may have been re-enabled for troubleshooting purposes! Mitigating CVE-2020-14386 with gVisorIf you saw the Google Kubernetes Engine security bulletin, you may have noticed a line you hadn’t seen before: “Pods running inGKE Sandboxare not able to leverage this vulnerability.” If you’re a user of Cloud Run, Cloud Functions orApp Engine standard environment, you are protected from this vulnerability as well, and will not have experienced any service disruptions or been issued patching instructions. All these platforms utilize gVisor to securely “sandbox” workloads, which protected users from this vulnerability.gVisor takes inspiration from a common principle in security that states that you should have multiple distinct layers of protection, and that those layers should not be susceptible to the same kinds of compromises. Containers rely on namespaces and cgroups as their primary layer of isolation; gVisor then introduces a second layer by handling syscalls through the Sentry (a kernel written in Go) that emulates Linux in userspace. This significantly reduces the number of syscalls allowed to reach the host kernel, and thereby reduces the attack surface. In addition to the isolation provided by the Sentry, gVisor uses a specific TCP/IP stack, Netstack, for yet another layer of protection. In this case, the vulnerability is first hindered by having CAP_NET_RAW disabled by default. However, even if enabled, the vulnerability does not exist for gVisor: the problematic C code in Linux is not used in the gVisor networking stack. More importantly, this kind of attack—the exploitation of out-of-bounds array writes—is much less likely in the Sentry and its networking stack, thanks to the use of Go. You can read a technical deep dive on how gVisor mitigates this vulnerability here.Making security a priorityTaking a step back, Linux is a fundamentally complex and evolving system, and security is thus an ongoing challenge. As a professor at UC Berkeley in 1996, I first worked on intercepting syscalls to improve Linux security and it remains an important approach. The Dune system later showed how to use virtualization hardware to intercept syscalls, leading essentially to a “virtual process” rather than a “virtual machine.” However, as with the earlier work, it then forwarded calls to the normal Linux kernel, and attackers could thus still reach the underlying kernel. In contrast, gVisor actually implements the Linux syscalls directly in Go. Although it still makes some use of the underlying kernel, gVisor is never a direct passthrough of adversary-controlled data. In some sense gVisor is really a safe (small) version of Linux. Because Go is type- and memory-safe, huge classes of classic Linux problems, such as buffer overflows and out-of-bounds array writes, just disappear. The implementation is also orders-of-magnitude smaller, which further improves security.However, the gVisor approach introduces tradeoffs, and there are currently downsides to picking this more secure path. The first downside is that gVisor will always have semantic differences from “real” Linux, although it is close enough to execute the vast majority of applications in practice. The rise of containers helps on this front, as it has led to less interest in distro specifics and more demand for portability. And Linux has done an incredible job on API stability, so the semantics are stable and well defined.The second downside is that intercepting syscalls has performance overhead for workloads that are I/O intensive (based more on the number of calls than the amount of data). This will of course improve over time, but it is a factor for some applications. Many applications should prefer stronger security, but clearly not all do.My hope is that Linux and the security community can get to a place where the user doesn’t have to sacrifice performance for security. To make this a reality, open-source communities are going to have to prioritize security in upstream design in the kernel and other core open-source projects. Efforts like the Open Source Security Foundation make me hopeful that we can solve this together.Protecting your cloud-native applications In the meantime, we’re committed to making the “secure” thing to do, the easy thing to do. At Google Cloud, we offer you the ability to use gVisor for your Google Kubernetes Engine (GKE) cluster with GKE Sandbox, and have built gVisor into the infrastructure that runs our serverless services App Engine, Cloud Run and Cloud Functions. In the case of GKE, added layers of defense are only clicks away, and for Cloud Run and App Engine, users get these added layers of protection without having to do anything!If you’re running on GKE Sandbox, your pods are not affected by this vulnerability. However, as part of your security best practices, you should still upgrade to protect system containers that run on all nodes. If you are not a GKE Sandbox user, your first step is to upgrade your control plane and nodes to one of the versions listed in the GKE security bulletin, and then follow the recommendations for removing CAP_NET_RAW through Policy Controller, Gatekeeper, or PodSecurityPolicy.Your next step is to enable GKE Sandbox. As a managed service, GKE Sandbox handles the internals of running open-source gVisor for you; there are no changes needed to your applications, and adding defense-in-depth to your pods is just a matter of a few clicks.Whether your applications run in containers or serverlessly, get started with GKE or Google Cloud’s serverless solutions to get the security benefits of gVisor.Related ArticleOpen-sourcing gVisor, a sandboxed container runtimeContainers have revolutionized how we develop, package, and deploy applications. However, the system surface exposed to containers is bro…Read Article
Quelle: Google Cloud Platform