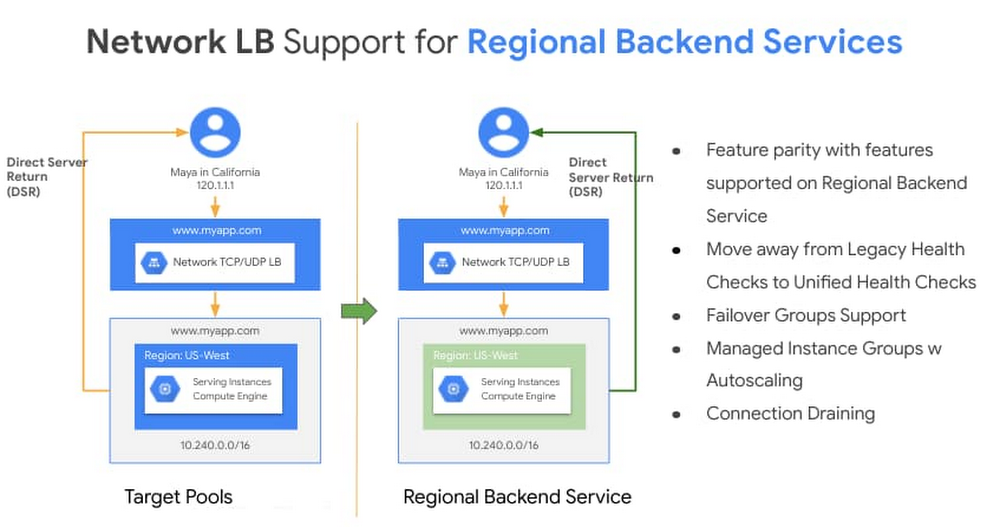
Why Verizon Media picked BigQuery for scale, performance and cost

As the owner of Analytics, Monetization and Growth Platforms at Yahoo, one of the core brands of Verizon Media, I’m entrusted to make sure that any solution we select is fully tested across real-world scenarios. Today, we just completed a massive migration of Hadoop and enterprise data warehouse (EDW) workloads to Google Cloud’s BigQuery andLooker.In this blog we’ll walk through the technical and financial considerations that led us to our current architecture. Choosing a data platform is more complicated than just testing it against standard benchmarks. While benchmarks are helpful to get started, there is nothing like testing your data platform against real world scenarios. We’ll discuss the comparison that we did between BigQuery and what we’ll call the Alternate Cloud (AC), where each platform performed best, and why we chose BigQuery and Looker.  We hope that this can help you move past standard industry benchmarks and help you make the right decision for your business. Let’s get into the details.What is a MAW and how big is it?Yahoo’s MAW (Media Analytics Warehouse) is the massive data warehouse which houses all the clickstream data from Yahoo Finance, Yahoo Sports, Yahoo.com, Yahoo Mail, Yahoo Search and various other popular sites on the web that are now part of Verizon Media. In one month in Q4 2020, running on BigQuery, we measured the following stats for active users, number of queries, and bytes scanned, ingested, and stored.Who uses the MAW data and what do they use it for?Yahoo executives, analysts, data scientists, and engineers all work with this data warehouse. Business users create and distribute Looker dashboards, analysts write SQL queries, scientists perform predictive analytics and the data engineers manage the ETL pipelines. The fundamental questions to be answered and communicated generally include: How are Yahoo’s users engaging with the various products? Which products are working best for users? And how could we improve the products for better user experience?The Media Analytics Warehouse and analytics tools built on top of it are used across different organizations in the company. Our editorial staff keeps an eye on article and video performance in real time, our business partnership team uses it to track live video shows from our partners, our product managers and statisticians use it for A/B testing and experimentation analytics to evaluate and improve product features, and our architects and site reliability engineers use it to track long-term trends on user latency metrics across native apps, web, and video. Use cases supported by this platform span across almost all business areas in the company. In particular, we use analytics to discover rends in access patterns and in which partners are providing the most popular content, helping us assess our next investments. Since end-user experience is always critical to a media platform’s success, we continually track our latency, engagement, and churn metrics across all of our sites.  Lastly, we assess which cohorts of users want which content by doing extensive analyses on clickstream user segmentation.If this all sounds similar to questions that you ask of your data, read on. We’ll now get into the architecture of products and technologies that are allowing us to serve our users and deliver these analytics at scale.Identifying the problem with our old infrastructureRolling the clock back a few years, we encountered a big problem: We had too much data to process to meet our users’ expectations for reliability and timeliness. Our systems were fragmented and the interactions were complex. This led to difficulty in maintaining reliability and it made it hard to track down issues during outages. That leads to frustrated users, increasingly frequent escalations, and the occasional irate leader.  Managing massive-scale Hadoop clusters has always been Yahoo’s forte. So that was not an issue for us. Our massive-scale data pipelines process petabytes of data every day and they worked just fine. This expertise and scale, however, were insufficient for our colleagues’ interactive analytics needs. Deciding solution requirements for analytics needsWe sorted out the requirements of all our constituent users for a successful cloud solution. Each of these various usage patterns resulted in a disciplined tradeoff study and led to  four critical performance requirements:Performance RequirementsLoading data requirement: Load all previous day’s data by next day at 9am. At forecasted volumes, this requires a capacity of more than 200TB/day.Interactive query performance: 1 to 30 seconds for common queriesDaily use dashboards: Refresh in less than 30 secondsMulti-week data: Access and query in less than one minute.The most critical criteria was that we would make these decisions based on user experience in a live environment, and not based on an isolated benchmark run by our engineers.In addition to the performance requirements, we had several system requirements that spanned the multiple stages that a modern data warehouse must accommodate: simplest architecture, scale, performance, reliability, interactive visualization, and cost.System RequirementsSimplicity and architectural integrationsANSI SQL compliantNo-op/serverless—ability to add storage and compute without getting into cycles of determining the right server type, procuring, installing, launching, etc.Independent scaling of storage and computeReliabilityReliability and availability: 99.9% monthly uptimeScaleStorage capacity: hundreds of PBQuery capacity: exabyte per monthConcurrency: 100+ queries with graceful degradation and interactive responseStreaming ingestion to support 100s of TB/dayVisualization and interactivityMature integration with BI toolsMaterialized views and query rewriteCost-efficient at scaleProof of concept: strategy, tactics, resultsStrategically, we needed to prove to ourselves that our solution could meet the requirements described above at production scale. That meant that we needed to use production data and even production workflows in our testing. To focus our efforts on our most critical use cases and user groups, we focused on supporting dashboarding use cases with the proof-of-concept (POC) infrastructure. This allowed us to have multiple data warehouse (DW) backends, the old and the new, and we could dial up traffic between them as needed. Effectively, this became our method of doing a staged rollout of the POC architecture to production, as we could scale up traffic on the CDW and then do a cut over from legacy to the new system in real time, without needing to inform the users.Tactics: Selecting the contenders and scaling the dataOur initial approach to analytics on an external cloud was to move a three petabyte subset of data. The dataset we selected to move to the cloud also represented one complete business process, because we wanted to transparently switch a subset of our users to the new platform and we did not want to struggle with and manage multiple systems. After an initial round of exclusions based on the system requirements, we narrowed the field to two cloud data warehouses. We conducted our performance testing in this POC on BigQuery and “Alternate Cloud.” To scale the POC, we started by moving one fact table from MAW (note: we used a different dataset to test ingest performance, see below). Following that, we moved all the MAW summary data into both clouds. Then we would move three months of MAW data into the most successful cloud data warehouse, enabling all daily usage dashboards to be run on the new system. That scope of data allowed us to calculate all of the success criteria at the required scale of both data and users.Performance testing resultsRound 1: Ingest performance.The requirement is that the cloud load all the daily data in time to meet the data load service-level agreement (SLA) of “by 9 am the next day”—where day was local day for a specific time zone. Both the clouds were able to meet this requirement.Bulk ingest performance: TieRound 2: Query performanceTo get an apples-to-apples comparison, we followed best practices for BigQuery and AC to measure optimal performance for each platform. The charts below show the query response time for a test set of thousands of queries on each platform.  This corpus of queries represents several different workloads on the MAW. BigQuery outperforms AC particularly strongly in very short and very complex queries.  Half (47%) of the queries tested in BigQuery finished in less than 10 sec compared to only 20% on AC.  Even more starkly, only 5% of the thousands of queries tested took more than 3 minutes to run on BigQuery whereas almost half (43%) of the queries tested on AC took 3 minutes or more to complete.Query performance: BigQueryRound 3: ConcurrencyOur results corroborated this study from AtScale: BigQuery’s performance was consistently outstanding even as the number of concurrent queries expanded.Concurrency at scale: BigQueryRound 4: Total cost of ownershipThough we can’t discuss our specific economics in this section, we can point to third-party studies and describe some of the other aspects of TCO that were impactful.We found the results in this paper from ESG to be both relevant and accurate to our scenarios. The paper reports that for comparable workloads, BigQuery’s TCO is 26% to 34% less than competitors.Other factors we considered included:  Capacity and Provisioning EfficiencyScaleWith 100PB of storage and 1EB+ of query over those bytes each month, AC’s 1PB limit for a unified DW was a significant barrier.  Separation of Storage and ComputeAlso with AC, you cannot buy additional compute without buying additional storage, which would lead to significant and very expensive overprovisioning of compute.Operational and Maintenance CostsServerlessWith AC, we needed a daily standup to look at ways of tuning queries (a bad use of the team’s time). We had to be upfront about which columns would be used by users (a guessing game) and alter physical schema and table layout accordingly. We also had a weekly “at least once” ritual of re-organizing the data for better query performance. This required reading the entire data set and sorting it again for optimal storage layout and query performance. We also had to think ahead of time (at least by a couple of months) about what kind of additional nodes were required based on projections around capacity utilization. We estimated this tied up significant time for engineers on the team and translated into a cost equivalent to 20+ person hours per week. The architectural complexity on the alternate cloud – because of its inability to handle this workload in a true serverless environment – resulted in our team writing additional code to manage and automate data distribution and aggregation/optimization of data load and querying. This required us to dedicate effort equivalent to two full time engineers to design, code and manage tooling around alternate cloud limitations. During a time of material expansion, this cost would go up further. We included that personnel cost in our TCO. With BigQuery, the administration and capacity planning has been much easier, taking almost no time. Infact, we barely even talk within the team before sending additional data over to Bigquery. With BigQuery we spend zero/little time doing maintenance or performance tuning activities.Productivity ImprovementsOne of the advantages of using Google BigQuery as the database, was that we could now simplify our data model and also unify our semantic layer by leveraging a then new BI tool – Looker. We timed how long it took our analysts to create a new dashboard using BigQuery with Looker and compared it to a similar development on AC with a legacy BI tool. The time for an analyst to create a dashboard went from one to four hours to just 10 minutes – a 90+% productivity improvement across the board. The single biggest reason for this improvement was a much simpler data model to work with and the fact that all the datasets could now be together in a single database. With hundreds of dashboards and analysis conducted every month, saving about one hour per dashboard returns thousands of person-hours in productivity to the organization.The way BigQuery handles peak workloads also drove a huge improvement in user experience and productivity versus the AC. As users logged-in and started firing their queries on the AC, they would get stuck because of the workload. Instead of a graceful degradation in query performance, we saw a massive queueing up of workloads. That created a frustrating cycle of back-and-forth between users, who were waiting for their queries to finish, and the engineers, who would be scrambling to identify and kill expensive queries, to allow for other queries to complete.TCO SummaryIn these dimensions—finances, capacity, ease of maintenance and productivity improvements— BigQuery was the clear winner with a lower total cost of ownership than the alternative cloud.Lower TCO: BigQueryRound 5: The intangiblesAt this point in our testing, the technical outcomes were pointing solidly to BigQuery. We had very positive experiences working with the Google account, product and engineering teams as well. Google was transparent, honest and humble in their interactions with Yahoo. In addition, the data analytics product team at Google Cloud conducts monthly meetings of a customer council that have been exceedingly valuable.Another reason why we saw this kind of success with our prototyping project, and eventual migration, was the Google team with whom we engaged. The account team, backed by some brilliant support engineers stayed on top of issues and resolved them expertly.  Support and Overall Customer ExperiencePOC SummaryWe designed the POC to replicate our production workloads, data volumes, and usage loads. Our success criteria for the POC were the same SLAs that we have for prod. Our strategy of mirroring a subset of our production with the POC paid off well. We fully tested the capabilities of the data warehouses; and consequently we have very high confidence  that the chosen tech, products, and support team will meet our SLAs at our current load and future scale.Lastly, the POC scale and design are sufficiently representative of our prod workloads that other teams within Verizon can use our results to inform their own choices. We’ve seen other teams in Verizon move to BigQuery, at least partly informed by our efforts.Here’s a roundup of the overall proof-of-concept trial that helped us pick BigQuery as the winner:With these results, we concluded that we would move more of our production work to BigQuery by expanding the number of dashboards that hit the BigQuery backend as opposed to Alternate Cloud. The experience of that rollout was very positive, as BigQuery continued to scale in storage, compute, concurrence, ingest and reliability as we added more and more users, traffic, and data. I’ll explore our experience fully using BigQuery in production in the second blog post of this series.
Quelle: Google Cloud Platform

Migrate to regional backend services for Network Load Balancing

With Network Load Balancing, Google Cloud customers have a powerful tool for distributing external TCP and UDP traffic among virtual machines in a Google Cloud region. In order to make it easier for our customers to manage incoming traffic and to control how the load balancer behaves, we recently added support for backend services to Network Load Balancing. This provides improved scale, velocity, performance and resiliency to our customers in their deployment—all in an easy to manage way. As one of the earliest members of the Cloud Load Balancing family, Network Load Balancing uses a 5-tuple hash consisting of the source and destination IP address, protocol and source and destination ports. Network load balancers are built using Google’s own Maglev, which load-balances all traffic that comes into our data centers and front-end engines at our network edges, and can scale to millions of requests per-second, optimizing for latency and performance with features like direct server return, and minimizing the impact of unexpected faults on connection oriented protocols. In short, Network Load Balancing is a great Layer-4 load balancing solution if you want to preserve a client IP address all the way to the backend instance and perform TLS termination on the instances. We now support backend services with Network Load Balancing—a significant enhancement over the prior approach, target pools. A backend service defines how our load balancers distribute incoming traffic to attached backends and provides fine-grained control for how the load balancer behaves. This feature now provides a common unified data model for all our load-balancing family members and accelerates the delivery of exciting features on Network Load Balancing. As a regional service, a network load balancer has one regional backend service. In this blog post, we share some of the new features and benefits you can take advantage of with regional backend services and how to migrate to them. Then, stay tuned for subsequent blogs where we’ll share some novel ways customers are using Network Load Balancing, upcoming features and ways to troubleshoot regional backend services. Regional backend services bring the benefitsChoosing a regional backend service as your load balancer brings a number of advantages to your environment.Click to enlargeOut of the gate, regional backend services provide:High-fidelity health checking with unified health checking – With regional backend services you can now take full advantage of load balancing health check features, freeing yourself from the constraints of legacy HTTP health checks. For compliance reasons, TCP health checks with support for custom request and response strings or HTTPS were a common request for Network Load Balancing customers. Better resiliency with failover groups – With failover groups, you can designate an Instance Group as primary and another one as secondary and failover the traffic when the health of the instances in the active group goes below a certain threshold. For more control on the failover mechanism, you can use an agent such as keepalived or pacemaker and have a healthy or failing health check exposed based on changes of state of the backend instance.Scalability and high availability withManaged Instance Groups – Regional backend services support Managed Instance Groups as backends. You can now specify a template for your backend virtual machine instances and leverage autoscaling based on CPU utilization or other monitoring metrics.In addition to the above you will be able to take advantage of Connection Draining for connection oriented protocol (TCP) and faster programming time for large deployments.Migrating to regional backend servicesYou can migrate from target pools to regional backend services in five simple steps.1.Create unified health checks for your backend service.2. Create instance-groups from existing instances in the target pool3. Create a backend service and associate it with the newly created health checks.4. Configure your backend service and add the instance groups.5. Run get-health on your configured Backend Services to make sure the set of backends are accurate and health-status determined. Then use the set-target API to update your existing forwarding rules to the newly created backend service. UDP with regional backend services Google Cloud networks forward UDP fragments as they arrive. In order to forward the UDP fragments of a packet to the same instance for reassembly, set session affinity to None (NONE). This indicates that maintaining affinity is not required, and hence the load balancer uses a 5-tuple hash to select a backend for unfragmented packets, but 3-tuple hash for fragmented packets.Next stepsWith support for regional backend services with Network Load Balancing, you can now use high-fidelity health checks including TCP, getter better performance in programming times, use a uniform data model for configuring your load-balancing backends be they Network Layer Load Balancing or others, get feature parity with Layer 4 Internal Load Balancing with support for connection draining and failure groups. Learn more about regional backend services here and get a head start on your migration. We have a compelling roadmap for Network Load Balancing ahead of us, so stay tuned for more updates.Related ArticleGoogle Cloud networking in depth: Cloud Load Balancing deconstructedTake a deeper look at the Google Cloud networking load balancing portfolio.Read Article
Quelle: Google Cloud Platform

Orchestrating the Pic-a-Daily serverless app with Workflows

Over the past year, we (Mete and Guillaume) have developed a picture sharing application, named Pic-a-Daily, to showcase Google Cloud serverless technologies such as Cloud Functions, App Engine, and Cloud Run. Into the mix, we’ve thrown a pinch of Pub/Sub for interservice communication, a zest of Firestore for storing picture metadata, and a touch of machine learning for a little bit of magic.We also created a hands-on workshop to build the application, and slides with explanations of the technologies used. The workshop consists of codelabs that you can complete at your own pace. All the code is open source and available in a GitHub repository. Initial event-driven architectureThe Pic-a-Daily application evolved progressively. As new services were added over time, a loosely-coupled, event-driven architecture naturally emerged, as shown in this architecture diagram:To recap the event-driven flow:Users upload pictures on an App Engine web frontend. Those pictures are stored in a Google Cloud Storage bucket, which triggers file creation and deletion events, propagated through mechanisms such as Pub/Sub and Eventarc. A Cloud Function (Image analysis) reacts to file creation events. It calls the Vision API to assign labels to the picture, identify the dominant colors, and check if it’s a picture safe to show publicly. All this picture metadata is stored in Cloud Firestore. A Cloud Run service (Thumbnail service) also responds to file creation events. It generates thumbnails of the high-resolution images and stores them in another bucket. On a regular schedule triggered by Cloud Scheduler, another Cloud Run service (Collage services) creates a collage from thumbnails of the four most recent pictures. Last but not least, a third Cloud Run service (Image garbage collector) responds to file deletion events received through (recently generally available) Eventarc. When a high-resolution image is deleted from the pictures bucket, this service deletes the thumbnail and the Firestore metadata of the image.These services are loosely coupled and take care of their own logic, in a smooth choreography of events. They can be scaled independently. There’s no single point of failure, since services can continue to operate even if others have failed. Event-based systems can be extended beyond the current domain at play by plugging in other events and services to respond to them.However, monitoring such a system in its entirety usually becomes complicated, as there’s no centralized place to see where we’re at in the current business process that spans all the services. Speaking of business processes, it’s harder to capture and make sense of the flow of events and the interplay between services. Since there’s no global vision of the processes, how do we know if a particular process or transaction is successful or not? And when failures occur, how do we deal properly and explicitly with errors, retries, or timeouts?As we kept adding more services, we started losing sight of the underlying “business flow”. It became harder to isolate and debug problems when something failed in the system. That’s why we decided to investigate an orchestrated approach.Orchestration with WorkflowsWorkflows recently became generally available. It offered us a great opportunity to re-architect our application and use an orchestration approach, instead of a completely event-driven one. In orchestration, instead of microservices responding to events, there is an external service, such as Workflows, calling microservices in a predefined order. After some restructuring, the following architecture emerged with Workflows:Let’s recap the orchestrated approach:App Engine is still the same web frontend that accepts pictures from our users and stores them in the Cloud Storage bucket. The file storage events trigger two functions, one for the creation of new pictures and one for the deletion of existing pictures. Both functions create a workflow execution. For file creation, the workflow directly makes the call to the Vision API (declaratively instead of via Cloud Function code) and stores picture metadata in Firestore via its REST API. In between, there’s a function to transform the useful information of the Vision API into a document to be stored in Firestore. Our initial image analysis function has been simplified: The workflow makes the REST API calls and only the data transformation part remains. If the picture is safe to display, the workflow saves the information in Firestore, otherwise, that’s the end of the workflow. This branch of the workflow ends with calls to Thumbnail and Collage Cloud Run services. This is similar to before, but with no Pub/Sub or Cloud Scheduler to set up. The other branch of the workflow is for the picture garbage collection. The service itself was completely removed, as it mainly contained API calls without any business logic. Instead, the workflow makes these calls. There is now a central workflows.yaml file capturing the business flow. You can also see a visualization of the flow in Cloud Console:The Workflows UI shows which executions failed, at which step, so we can see which one had an issue without having to dive through heaps of logs to correlate each service invocation. Workflows also ensures that each service call completes properly, and it can apply global error and retry policies.With orchestration, the business flows are captured more centrally and explicitly, and can even be version controlled. Each step of a workflow can be monitored, and errors, retries, and timeouts can be laid out clearly in the workflow definition. When using Cloud Workflows in particular, services can be called directly via REST, instead of relying on events on Pub/Sub topics. Furthermore, all the services involved in those processes can remain independent, without knowledge of what other services are doing.Of course, there are downsides as well. If you add an orchestrator into the picture, you have one more component to worry about, and it could become the single point of failure of your architecture (fortunately, Google Cloud products come with SLAs!). Last, we should mention that relying on REST endpoints might potentially increase coupling, with a heavier reliance on strong payload schemas vs lighter events formats.Lessons learnedWorking with Workflows was refreshing in a number of ways and offered us some lessons that are worth sharing. Better visibilityIt is great to have a high-level overview of the underlying business logic, clearly laid out in the form of a YAML declaration. Having visibility into each workflow execution was useful, as it enabled us to clearly understand what worked in each execution, without having to dive into the logs to correlate the various individual service executions.Simpler codeIn the original event-driven architecture, we had to deal with three types of events:Cloud Functions’ direct integration with Cloud Storage eventsHTTP wrapped Pub/Sub messages with Cloud Storage events for Cloud RunEventarc’s CloudEvents based Cloud Storage events for Cloud RunAs a result, the code had to cater to each flavor of events:In the orchestrated version, there’s only a simple REST call and HTTP POST body to parse:Less codeMoving REST calls into the workflow definition as a declaration (with straightforward authentication) enabled us to eliminate quite a bit of code in our services; one service was trimmed down into a simple data transformation function, and another service completely disappeared! Two functions for triggering two paths in the workflow were needed though, but with a future integration with Eventarc, they may not be required anymore. Less setupIn the original event-driven architecture, we had to create Pub/Sub topics, and set up Cloud Scheduler and Eventarc to wire-up services. With Workflows, all of this setup is gone. Workflows.yaml is the single source of setup needed for the business flow. Error handlingError handling was also simplified in a couple of ways. First, the whole flow stops when an error occurs, so we were no longer in the dark about exactly which services succeeded and which failed in our chain of calls. Second, we now have the option of applying global error and retry policies. Learning curveNow, everything is not always perfect! We had to learn a new service, with its quirks and limited documentation — it’s still early, of course, and the documentation will improve over time with feedback from our customers.Code vs. YAML As we were redesigning the architecture, an interesting question came up over and over: “Should we do this in code in a service or should we let Workflows make this call from the YAML definition?”In Workflows, more of the logic lands in the workflow definition file in YAML, rather than code in a service. Code is usually easier to write, test, and debug than YAML, but it also requires more setup and maintenance than a step definition in Workflows. If it’s boilerplate code that simply makes a call to some API, that should be turned into YAML declarations. However, if the code also has extra logic, then it’s probably better to leave it in code, as YAML is less testable. Although there is some level of error reporting in the Workflows UI, it’s not a full-fledged IDE that helps you along the way. Even when working in your IDE on your development machine, you’ll have limited help from the IDE, as it only checks for valid YAML syntax.Loss of flexibilityThe last aspect we’d like to mention is perhaps a loss of flexibility. Working with a loosely-coupled set of microservices that communicate via events is fairly extensible, compared to a more rigid solution that mandates a strict definition of the business process descriptions.Choreography or orchestration?Both approaches are totally valid, and each has its pros and cons. We mentioned this topic when introducing Workflows. When should you choose one approach over the other? Choreography can be a better fit if services are not closely related, or if they can exist in different bounded contexts. Whereas orchestration might be best if you can describe the business logic of your application as a clear flow chart, which can then directly be described in a workflow definition. Next stepsTo go further, we invite you to have a closer look at Workflows, and its supported features, by looking at the documentation, particularly the reference documentation and the examples. We also have a series of short articles that cover Workflows, with various tips and tricks, as well as introductions to Workflows, with a first look at Workflows and some thoughts on choreography vs orchestration.If you want to study a concrete use case, with an event-based architecture and an equivalent orchestrated approach, feel free to look into our Serverless Workshop. It offers codelabs spanning Cloud Functions, Cloud Run, App Engine, Eventarc, and Workflows. In particular, lab 6 is the one in which we converted the event-based model into an orchestration with Workflows. All the code is also available as open source on GitHub.We look forward to hearing from you about your workflow experiments and needs. Feel free to reach out to us on Twitter at @glaforge and @meteatamel.Related ArticleGet to know Workflows, Google Cloud’s serverless orchestration engineGoogle Cloud’s purpose-built Workflows tool lets you orchestrate complex, multi-step processes more effectively than general-purpose tools.Read Article
Quelle: Google Cloud Platform

Application modernization isn’t easy. But we can make it easier.

Migrating and modernizing your application and moving to the Cloud can be a really fun and interesting challenge. You can learn a lot through looking at solutions and architectures. But, If anyone tells you that migrating applications is “easy”, you probably stop listening immediately. The tools might be easy to use, but application migration is never instant, never just a clean one-and-done kind of adventure. It can be daunting to even know what tools to try out. We can make it easier for you and help you experiment. Here are my top four Google tips on how to make your migration journey a bit easier that you (probably) didn’t know about.Modern developer experience: Try Anthos without buying Anthos, or anything elseAnthos is Google’s platform to build and manage distributed infrastructure and services. You want a bunch of cloud native services plus GKE? Then you want Anthos. You can run it in a lot of places including other major clouds and on prem, not just on Google Cloud.However,  taking on a full Anthos deployment can be daunting and what the heck is it anyway? Sure you can learn about it in our great videos. But wouldn’t you rather just try it? Back in November, in order to help people try out Anthos we announced the Anthos Developer Sandbox. All you need is a Google account. That’s it, you don’t even need a credit card. Bonus you get to try out Cloud Build.You can ask Mike Coleman about this at his upcoming live Getting Started with Anthos event on Feb. 18 from 9-10am PST.Migrate VM-based workloads to Kubernetes: Use Anthos Migrate without buying AnthosAnthos Migrate lets you extract, migrate and modernize your existing applications. Sure you COULD rebuild the whole application, or manually refactor a monolithic application to run in containers. But if you don’t have the time or inclination, or you have a bunch of apps you need to move over, Anthos Migrate helps you do that. What you may not know is that Anthos Migrate is provided free of charge, and can be used to migrate apps to Google Kubernetes Engine as well as to Anthos.If you want to know more about Anthos Migrate, check out these videos we just released:Intro to Anthos MigrateMigrating Linux applications with Migrate for AnthosMigrating Windows applications with Migrate for Anthos Migrate platforms: Use Kf for a Cloud Foundry experience on KubernetesCloud Foundry is a popular open source PaaS platform and has a great developer experience. Migrating developers to a new platform isn’t just about the tech. It’s also about infrastructure and development workflows and practices. It can be really disruptive, particularly if you have application development workflows that really work for you. To address this problem for Cloud Foundry developers we created Kf. You can use Kf in place of many Cloud Foundry cf commands. Platform engineers can migrate the platform to Google Kubernetes Engine and take advantage of all the declarative infrastructure goodness that GKE gives you.  All with minimal disruption to developers who love Cloud Foundry.Migrate databases: Database Migration Service makes migration easierMoving to a fully managed database, such as Cloud SQL, can help you reduce maintenance costs and downtime. And, it provides easier integration with our other Cloud Services. Data migration is one of the more complicated aspects of moving applications.We recently released Database Migration Service to preview. Migrating a MySQL database – and soon Postgres and SQL Server – to Cloud SQL is now easier. Check out this form to request access.Preparing a database for migration is an important step, and part of what makes this “easier” and not “easy”. Check out these posts detailing more on how to prepare and to use DMS, and this video introducing the service.Where to go from hereMigrations are never easy, don’t let anyone tell you otherwise. And every new tool takes some evaluation, some testing. Hopefully these tips can help you smooth over some of the rougher steps, make the jump to a new platform easier.For more thoughts, check out the: Getting Started with Anthos event on Feb. 18 from 9-10am PST as a great place to get started, and check out some of the following resources:More events at Cloud OnAirThe GCP PodcastThe Kubernetes Podcast from GoogleAnd of course our YouTube channel 
Quelle: Google Cloud Platform

Accelerating IoT device deployment with Google Cloud and Arm Mbed OS

For IoT to be successful and scale, IoT devices need to seamlessly communicate the data they capture to cloud services, where any additional compute capabilities cloud vendors provide can efficiently analyse the data and unlock business value. In this blog, we highlight how Mbed OS and Google Cloud IoT Core together provide developers with quick and easy access to a range of features and services to accelerate their IoT product. Mbed OS: simplifying IoT developmentArm’s key goal for Mbed OS is to simplify the development and deployment of IoT devices for software developers. Mbed OS provides a complete software platform OS for IoT that can be used with a wide array of hardware platforms. Arm has an active ecosystem of sensor vendors who provide software drivers that can easily be integrated with microcontrollers to quickly prototype and develop a fully functioning IoT device. Last year, Mbed OS announced the ability to connect to any public cloud, including Google IoT Cloud, providing developers more choice for building and deploying IoT devices.A seamless development experienceWhilst Arm’s focus has been on the device side of IoT, no IoT solution can add value without accessing and using cloud services to unlock the value of the data captured by the device through the onboard sensors. The integration with Google IoT Cloud enables Mbed OS-based devices to securely connect and ingest data to Google Cloud through Cloud IoT Core. The data received by Cloud IoT Core is seamlessly forwarded to Google Cloud’s data analytics platform that comes with some of the most popular tools such as BigQuery, Dataflow, BigTable, and Looker for developers and data scientists to efficiently analyze, store, and visualize large amounts of data. These services are managed by Google Cloud and will easily scale with the amount of workload. Without needing to manage the infrastructure, development time is saved to focus on solving the problem and creating new solutions that deliver value for users and businesses.Cloud IoT Core’s device management capability also enables control and configuration messages to be pushed to the IoT devices. By centrally controlling the devices with insights from data analytic processes, we can make an IoT solution data-driven and smart.Integration architecture diagramIntelligent IoTIn addition to our collaboration with Arm to simplify their IoT device development, our engineering teams are also optimizing support for developers building AI applications.The combination of Google’s TensorFlow Lite for Microcontrollers (TF-Lµ) and Arm’s open-source CMSIS-NN library help developers achieve accelerated AI performance without having to do any additional work. The TF-Lµ framework is optimised for Arm Cortex-M processors and the Mbed development environment. Arm and TensorFlow team have recently announced improved benchmarks demonstrating a 4.9x performance uplift for a person detection example using TF-Lµ and CMSIS-NN.Read more about the enhanced performance here.In the future, we expect most AI processing to be delivered on-device, making technology more efficient, reliable, and secure. However, cloud connectivity will remain key. Using a predictivemaintenance machine in an industrial setting as an example, the machine learning model on-device will be trained to recognize an anomaly, with cloud connectivity being used to signal when a failure is imminent.AI and IoT have the potential to ignite a new wave of creativity, and the work underway between Arm and Google Cloud will make it easier for developers to innovate the devices of the future.Mbed OS and Google IoT Cloud: Get started Learn about the Cloud IoT Device SDK used in this integration on the github repository.Follow this example integration to quickly configure and connect an Mbed OS-based device to Google services.At the Mbed OS Tech Forum on Feb 10 this integration is discussed in more detail. Watch the episode here.Read about the improved inference on Arm microcontrollers with TensorFlow Lite for Microcontrollers and CMSIS-NN. Learn more about Google Cloud IoT Core.Related ArticleIntroducing the Cloud IoT Device SDK: a new way for embedded IoT devices to connect to Google Cloud IoT CoreThe Cloud IoT Device SDK provides flexible libraries for your embedded devices to connect to Cloud IoT Core.Read Article
Quelle: Google Cloud Platform

Protect your Google Cloud spending with budgets

TL;DR: Budgets and alerts are probably the first step to staying on top of your Google Cloud costs. If you care about money, you should definitely set up a budget. In this post, I break down a budget and show how to set one up.Budgets and alerts fit well into the inform phase of the FinOps lifecycle for visibilityThe cloud is great because it’s incredibly easy to spin up a virtual machine, use a managed data warehouse, or even create a globally replicated relational database (this still blows my mind). But while you, or your eng team, might be more than happy to create and toy around with these resources, they cost money and someone has to pay the bills. Let’s look a bit more at what makes up a budget, and how to set one up (feel free to skip ahead if you just want the how-to).What is this “budget” you speak of?Budgets are the first and simplest way to get a handle on your costs. With all the potential ways that you can spend money on the cloud, you’ll want to make sure you can keep track of it. Once you’ve put budgets in place, you can freely launch experimental and production features with better visibility into what’s going on.They don’t actually cap your usage (we’ll talk about how to do that in another post), but they send alerts based on your costs. For now, the key idea is that a budget sends an alert when you hit any threshold for the cost amount for resources that are in scope. Let’s break that down.BudgetThis is what we’re talking about, and it starts with a name (as well as a unique ID). You can (and most certainly should), create multiple budgets, and budgets are attached to a billing account which is where all your cloud costs go. If you’re working with multiple billing accounts (tip: try to consolidate to one billing account per organization), you can set up budgets on each one. You can also automate setting these up rather than doing it manually, but let’s stick to the basics for now and come back to that in another post.AmountEach budget can also have an amount, which will be in the currency of your billing account. You can specify an exact amount, like $1000, or choose “Last month’s spend”. If you choose the last month option, the amount will automatically update based on what you spent last month. In addition, you can select to include credits as part of your amount if you want to count usage against credits (usage discounts, promotions, etc.) or not. We’ll also talk about budgets without an amount in a future post.ThresholdEach budget can have multiple thresholds, and every threshold is essentially a percentage of the budget amount (or you can specify the amount directly, it’s the same either way). So, a 50% threshold on a $1000 budget would trigger at $500. Since you can add multiple, you could set thresholds at 25%, 50%, 75%, and 100% just to make sure you’re on track with your spending throughout a month.Some example thresholds for a $1000 budgetEach threshold can also be actual, or forecasted. Simply put, actual thresholds are based on the actual costs. That is, you’ll hit 100% of a $1000 budget when you’ve spent $1000. On the other hand, forecasted is all about when Google Cloud estimates (using science, machine learning, and maybe some magic) that you’ll end up spending that much by the end of the month. As in, if you set a forecasted threshold for 100% on your $1000 budget, the alert will trigger as soon as Google Cloud forecasts that your costs for the month will be $1000. Forecast thresholds are great to understand where your costs may be trending and to get early alerts.AlertBy default, alerts are emails that get sent out to all Billing Account Administrators and Billing Account Users on that billing account. The email alerts are simple but descriptive, giving you exactly the information you need to know what happened.An actual budget email, even though I changed the billing account IDFirst up, we can see that the billing account is Billing-Reports-Demo and we have the ID in case we need it. Then there’s the budget amount and the percentage hit of the budget, 50% of a $1000 budget. Finally, we know that this is for the month of July, and that this alert was sent on July 8th.Note: Spend some time thinking about a good naming scheme for your budgets; one that works for the people who will be receiving them. The alert has the key information, but if the budget name isn’t descriptive it may be more difficult to track down where the costs are coming from.If I was only expecting to spend $1000 in all of July and then received this alert 8 days in, there’s a good chance there might be some surprise costs happening. Good thing I got this alert so I can figure out what’s going on! There’s more we can do than just send an email, which I’ll cover in the next posts.ScopeEach budget has a scope associated with it, and by default that’s the entire billing account. That would include all projects and Google Cloud services attached to that billing account. To get more granular, you can specify projects, products, or labels. For projects and products, you can choose to include certain ones, so you might have a budget that covers all your production projects and another budget specific to BigQuery costs on your data science projects. You may have heard how important it is to structure your Google Cloud resources to match your actual organization, and that’s fairly evident when you look at setting up budgets!A reasonable (and simplified) example of how you might organize your Google Cloud resources like your (probably less simple) organizationYou’re also able to scope your budget to resource labels, which are another important part of organizing your resources. Currently this is limited to a single label, but it’s a fantastic way to set a budget for any effort like if you label all your resources with “env:production” or “team:infra”. On top of all of that, you can also scope to subaccounts, which is for resellers.Setting up a budgetOkay, with all that background information out of the way, setting up a budget is super quick! First things first, you’ll need to be a Billing Account Administrator (or have a custom role with the appropriate billing.budget permissions). Then you just need to head to my favorite place in the console, the Billing page, and select “Budgets & Alerts”.Is it weird that the billing part of the console is my favorite? I feel like that’s weirdIf you’ve already got some budgets, they’ll be listed on this page along with the thresholds and your current spending amount.So far, I’ve spent nearly $80 on my $1000 budget, well below the first 50% thresholdYou can click on an existing budget to edit it, but just click on “Create Budget” to get started on making a new one. The first step is to name your budget and select your scope. For this new budget, let’s keep an eye on all our BigQuery spending. I’ll keep the scope to all projects and select BigQuery from the products list.By the time I publish this, there will probably be more than 750 optionsNext, we’ll move to the second page: amount. As mentioned above, you can specify an exact amount or dynamically set the budget to last month’s spending. Since my monthly budget for BigQuery is $500 (which I just now made up), I’ll put that in, as well as enabling to include credits. That way, if I received $200 worth of credits in some month, I could spend $700 on BigQuery and still be on budget.Choosing last month’s spend could give me a better view of how my costs might fluctuate month over monthOn the final page, we can add multiple thresholds so we’ll get alerts for each one. I’ll set up 50%, 90%, and 100% so I can keep on top of my costs, and one additional for 120% forecasted. If I get the 120% forecasted cost, that’s a good signal that I should jump into my projects and figure out what’s happening.See those options at the bottom? We’re gonna talk about those in the next blog posts!And just like that, we’ve made a new budget! Everyone who is a Billing Account Administrator or Billing Account User will start to get alerts as our costs go up, and we can use those as good signals to make sure we’re on track.You should consider multiple budgets to track different scopesOne important note is that billing data can sometimes take a bit of time to be reported, which means a budget might be a bit behind if you have fast-rising costs. This is where forecasted thresholds can help, so you can be prepared ahead of time.Email alerts are a quick and easy way to stay on top of your costs, but it’s also just the start of working with budgets. In the next (and hopefully shorter) post, we’ll go over how to add more people than just the Billing Account Admin/Users. After that, we’ll look at using budgets to take more action than just sending a notification. In the meantime, check out the documentation if you’d like to read more about budgets.Related ArticleMonitor cloud costs and create budgets at scaleYou can monitor cloud costs and create budgets, including alerts, with Google Cloud’s Budget API, now available in beta.Read Article
Quelle: Google Cloud Platform

What you can learn in our Q1 2021 Google Cloud Security Talks

Join us for our first Google Cloud Security Talks of 2021, a live online event on March 3rd where we’ll help you navigate the latest in cloud security.We’ll share expert insights into our security ecosystem and cover the following topicsSunil Potti and Rob Sadowski will kick off Security Talks on March 3rd.Thomas Kurian and Juan Rajlin join us for a conversation on overcoming risk management challenges in the Cloud.This will be followed by a roundtable to get insight into cloud risk management with Phil Venables and leaders from the industry.Javier Soltero and Karthik Lakshminarayan will talk about information governance in Google Workspace and how it can enable users to access data safely and securely while preserving privacy.Following this will be a panel discussion on the future of Confidential Computing with Raghu Nambiar (AMD), Harold Giménez (Hashicorp), Solomon Cates (Thales), Nelly Porter & Sam Lugani.You will learn about the unique components of the Chronicle security analytics platform that enable security teams to supercharge their security telemetry with Mike Hom.Peter Blum and Emil Kiner will present the innovations we are making with machine learning to better protect networks. You will also learn about Chrome browser’s security capabilities, including how Chrome helps support a zero trust environment, with Philippe Rivard and Robert Shield.Finally, Timothy Peacock will do a deep dive into Container Threat Detection, a built-in service of Security Command Center that detects the most common container runtime attacks and alerts you to any suspicious activity. We look forward to sharing our latest security insights and solutions with you. Sign-up now to reserve your virtual seat.Related ArticleNew research reveals who’s targeted by email attacksOur new study examines over a billion phishing and malware emails and their anonymized targets to better understand what factors influenc…Read Article
Quelle: Google Cloud Platform

Freedom of choice: 9TB SSDs bring ultimate IOPS/$ to Compute Engine VMs

Applications that perform low-latency, I/O-intensive operations need to run on virtual machines with high-performance storage that’s tightly coupled with compute. This is especially important for applications built around real-time analytics, e-commerce, gaming, social media, and advertising platforms. Custom machine types in Compute Engine not only let you attach high-performance Local SSD, but give you the flexibility to customize your VMs to your workload’s exact needs.   Today, we are excited to announce that you can attach 6TB and 9TB Local SSD to second-generation general-purpose N2 Compute Engine VMs, for great IOPS per dollar. 9TB Local SSD delivers up to 2.4 million IOPS and 9.4 GB/s of throughput at direct-attach latencies, on any N2 VM with 24 or more vCPUs. And because you can attach these SSDs to any N2 VM shape (including custom shapes), you can define the exact VM that your application needs in terms of CPU, RAM, and SSD. You don’t need to attach more CPU and memory than what your I/O-intensive or storage-intensive workload demands, so you can optimize specifically for IOPS/$ or density/$—or a combination thereof.Disclaimer: Results are based on Google Cloud’s internal benchmarkingMaximum storage performance with fewer vCPUs6TB and 9TB Local SSDs have been available for N1 VMs, allowing you to achieve that maximum 2.4 million IOPS with 32 vCPUs or more. With N2 VMs, you need as few as 24 vCPUs to drive that same performance. This translates to a 7% better total cost of ownership for N2 VMs, relative to N1s. Some applications afford you the flexibility to optimize performance further, at different I/O queue depths or different block sizes. Using performance benchmarking tools like FIOcan help you make the optimal choice. As shown below, internal testing demonstrates that Local SSDs offer consistent performance across a broad range of configurations that your workloads might demand.Disclaimer: Results are based on Google Cloud’s internal benchmarkingMaximum throughputAttaching Local SSD to a VM is also a good strategy for workloads that demand high storage throughput. As you can see from the charts below, Local SSD can deliver close to maximum throughput at a wide range of block sizes (4K, 16K, 128K) and I/O depths, depending on the needs of your databases and applications.Disclaimer: Results are based on Google Cloud’s internal benchmarkingGet started todayLocal SSD are priced per-GB irrespective of the VM to which they are attached. Visit our pricing page for specific pricing in your region. 6TB and 9TB Local SSDs are now Generally Available on both N2 and N2D VMs. For more details, check out our documentation for Local SSDs. If you have questions or feedback, check out the Getting Help page.Related ArticleLocal SSDs + VMs = love at first (tera)byteIn Google Cloud Storage you can now attach 6TB and 9TB local SSDs to virtual machines (VMs) for higher throughput and IOPS per VM.Read Article
Quelle: Google Cloud Platform

Build a chatbot resume on Google Cloud

Getting the job you want requires you to stand out to potential employers—especially in the current job market. Recently I did just that by building a conversational chatbot on Google Cloud that answers questions about my professional experience (plus some surprises). Not only did I stand out, but I learned how to build and host my own chatbot on my website. Creating a new Dialogflow agent1. If you don’t have one, Create a Google Cloud project – for new users there’s a $300 credit that was more than enough for this application in my case.  2. After you have a Google Cloud project and have your GCP account,  go to the Dialgoflow Essentials Console. (Google has two different products Dialogflow CX and Dialogflow Essentials, and we’ll be using Essentials for this simple application).  On the top left you should see something that allows you to choose a location first (in case you have data location requirements), and then create a new agent.After you click that button, name your agent and associate it with your Google Cloud Project. Here are the values I chose for my agent:Give your agent some understanding3. Let’s create an intent. The way the agent communicates is by inferring the “Intents” of its interlocutor. When a user writes or says something the agent matches the expression to the best intent that you created in your Dialogflow agent. For each Dialogflow agent, you define many intents, where your combined intents can handle a complete conversation. So we need to create these: find the intents button on the left side navigation bar.And then in the centre  click “create intent” to create a new one.Creating an intent has two main parts: (1) what the agent expects its interlocutor to write or say and (2) what the agent says in response. For example, I want to create an intent where the interlocutor is asking about my certifications, and my agent responds with which certifications I have.  For this I need to give it “Training Phrases”.  In practice, it helps me to think about this as a sink or funnel: I start by deciding I want my agent to be able to talk about a topic (the response, the bottom of the funnel) so I’ll have to think about the kinds of sentences that I want to fall into that funnel (the training phrases, the catching area of the funnel). The example will make it clear:3.1. Let’s create that top part of the intent.  Click on “Add Training Phrases “Add some training phrases that exemplify what the intent should capture. I name the intent “Certifications” and  I add some sentences like this:It’s best if you add more than 10 sentences that cover the range of ways you want to capture the conversation into the “Certifications” funnel response. 3.2. Now the bottom part of the funnel: what should the agent say in response? Click “Add Response”Here’s what I’ve put in my case:Click “Save” on the top of the page. Let’s try it out: on the top right hand side of the page, look for “Try it now”. Notice how I can ask a question that has different words (accreditations, diploma) and still get the agent to understand what the intent is, and therefore what answer to give.This is what the NLP models are doing for you: from your dozen examples, they understand the kinds of sentences that the agent should link to that intent, and then return the appropriate answer. In the funnel analogy: it’s capturing related questions into the same funnel and responding with the appropriate answer. 4. Next, let’s change the Welcome Intent. As a best practice, you should start the conversation with a greeting plus a few lines on what your specific agent can do for the user. This way you can direct the conversation in the right direction. To change the Default Welcome intent, first save the work you have done earlier. Click on the “Save” button on the top right hand of the page. Next, click again on “Intents” on the left of the navigation bar and then click on “Default Welcome Intent” on the main menu. In the “Responses” section you’ll see the default responses.Which you can then change to something more appropriate, like:Once you have changed the default responses to something that fits your application, click Save. 5. Go create more intents! For a conversational-resume these should be questions that you’d expect to get from a recruiter. I have some general intents like “Favourite Project” (trained with sentences like “What was Filipe’s favourite project in his career?”  and “Tell me what Filipe is most proud of achieving. ”) or “Strengths” (trained with sentences like “What are some of Filipe’s main strengths?” and “Tell me what kinds of tasks people turn to Filipe for?”). Because I have a background in data science and programming, I also have intents that ask about my statisticals skills, or familiarity with Cloud technologies. Don’t forget to keep testing your agent on the panel on the right, to see if it responds as you want to inputs from interlocutors. Once done, you are ready to deploy your agentHost your agent on a website6. Let’s get a website! The easiest way here is to click here to get a google site. Just use a template or create a blank one. Later, if you buy your own domain, you can host it there. That’s what I did: www.filipegracio.com is built on top of a Google Site. 7. Now we’re going to get the agent on the website. Go back to the Dialogflow console, go to integrations, and turn on the Dialogflow Messenger option.When you do this, you’ll see a new window appear with a bit of code you’ll be able to embed on your site. Make sure your integration is enabled. Here’s what the bit of code looks like:Copy that code with the little clipboard symbol on the bottom right. 8. Next we just need to put the agent on your site! You do this back on your created website. While editing the content of Google website, on a blank page section, double click and you’ll see this wheel show up, click on Embed.And now embed the code of the bot that you copied from the Dialogflow console. Like so:After you do this, and “Publish” the website (on the top right there’s the button) your website should be available to the public with your agent ready to answer everything the visitors ask about. Explore your creativity You can make your chatbot be about whatever you want. It can help your business, it can promote your hobby, and it can help you find a job. If you use it like I did, put a link to the website on top of your resume, and make sure it’s visible on your social profiles, share it online. People will notice and you’ll be proving that you have skills, that you made a special effort, and that you think creatively. Good luck!Related ArticleRespond to customers faster and more accurately with Dialogflow CXNew Dialogflow CX Virtual Agents can jumpstart your contact center operational efficiency goals, drive CSAT up and take care of your huma…Read Article
Quelle: Google Cloud Platform

How to trigger Cloud Run actions on BigQuery events

Many BigQuery users ask for database triggers—a way to run some procedural code in response to events on a particular BigQuery table, model, or dataset. Maybe you want to run an ELT job whenever a new table partition is created, or maybe you want to retrain your ML model whenever new rows are inserted into the table.In the general category of “Cloud gets easier”, this article will show how to quite simply and cleanly tie together BigQuery and Cloud Run. Because if you love BigQuery and you love Cloud Run, how can you not love when they get together?!Cloud Run will be triggered when BigQuery writes to its audit log. Every data access in BigQuery is logged (there is no way to turn it off), and so all that we need to do is to find out the exact log message that we are looking for.Follow along with me.Find the BigQuery eventI’m going to take a wild guess here and assume that you don’t want to muck up your actual datasets, so create a temporary dataset named cloud_run_tmp in your project in BigQuery.In that project, let’s create a table into which we will insert some rows to try things out. Grab some rows from a BigQuery public dataset to create this table:Then, run the insert query that we want to build a database trigger for:Now, in another Chrome tab, click on this link to filter for BigQuery audit events in Cloud Logging.I found this event:Note that there will be several audit logs for a given BigQuery action. In this case, for example, when we submit a query, a log will be generated immediately. But only after the query is parsed does BigQuery know which table(s) we want to interact with, so the initial log will not have the table name. Keep in mind that you don’t want any old audit log… make sure to look for a unique set of attributes that clearly identifies your action.In the case of inserting rows, this is the combination:The method is google.cloud.bigquery.v2.JobService.InsertJobThe name of the table being inserted to is the protoPayload.resourceNameThe dataset id is available as resource.labels.dataset_idThe number of inserted rows is protoPayload.metadata.tableDataChanged.insertedRowsCountWrite the Cloud Run ActionNow that we know the payload that we are looking for, we can write the Cloud Run action. Let’s do it in Python as a Flask App (full code is on GitHub).First, we make sure that this is the event we want to process:Once we have identified that this is the event we want, then we carry out the action that we want to do. Here, let’s do an aggregation and write out a new table:The Dockerfile for the container is simply a basic Python container into which we install Flask and the BigQuery client library:Deploy Cloud RunBuild the container and deploy it using a couple of gcloud commands:Setup Event TriggerIn order for the trigger to work, the service account for Cloud Run will need a couple of permissions:Finally create the event trigger:The important thing to note is that we are triggering on any Insert log created by BigQuery. That’s why, in the action, we had to filter these events based on the payload.What events are supported? An easy way to check is to look at the Web Console for Cloud Run. Here are a few to get your mind whirring:Try it outNow, try out the BigQuery -> Cloud Run trigger and action. Go to the BigQuery console and insert a row or two:Watch as a new table called created_by_trigger  gets created! You have successfully triggered a Cloud Run action on a database event in BigQuery. Enjoy!ResourcesAll the code, along with a README with instructions, is on GitHub.This blog post is an update to the book BigQuery: The Definitive Guide.  My goal is to update the book contents approximately once a year, and provide updates in the form of blogs like this.You can find previous such update blogs linked from the GitHub repository of the book.Thanks to Prashant Gulati.Related Article3 cool Cloud Run features that developers loveCloud Run developers enjoy pay-per-use pricing, multiple concurrency and secure event processing.Read Article
Quelle: Google Cloud Platform