Cloud Firestore explained: for users who never used Firestore before

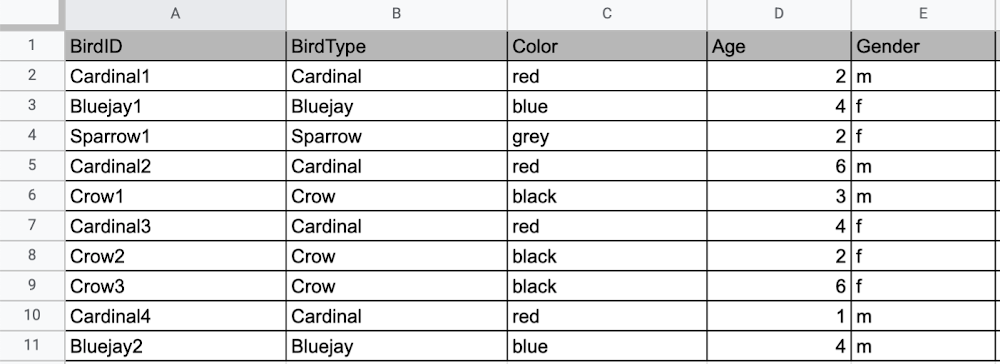
Learning to use a new database can be daunting, even more so if you don’t already have technical knowledge about databases. In this article, I will break down some database basics, terms you should know, what Firestore is, how it works, how it stores data, and how to get started using it with the assumption that you don’t have any existing database knowledge.Before we dive into what Cloud Firestore is, let’s discuss some key database terms you should know. Feel free to skip this section if you are already familiar with the basics of Relational and non-relational databases. What is a database? A database is software that allows you to easily access, manage, modify, update, control and organize data. The way you want to store information can impact what type of database you choose. There are two major categories of databases, Relational and non-relational. Relational DatabaseA relational database can be thought of like a spreadsheet. You can store information in your spreadsheet like this: Now, what happens if I want to store information about where Sparrow1 lives, in my spreadsheet, but I don’t care about where the other birds live? I would have to add another column to my spreadsheet, called home, that would only contain data for the sparrow. That would look like this:Even though I only want to know information about where the sparrow lives, I am required to have blank spaces in the column for all of the other animals. This is because in a relational database, you have a specific structure of your data called a schema. Just like in a spreadsheet, every item you are storing information  on must have a place to put information about the bird’s home, even if you only want that information for one bird. This is enforced by the schema, which is essentially the column headers you put in the sheet and dictates a strict structure for the data, which has pros and cons.The strict structure of a relational database allows your application to know what kind of data exists, to know what the data type is, and to enforce rules such as requiring data to be unique, or enforcing type of data stored etc. A schema, by design, forces the data in each row to have the same characteristics, which means it is not very flexible, unless you change the schema for the database. That means if you want to add different data that doesn’t fit your existing schema, you have to change the schema. As we discussed above, if you want to change the schema we are using to store information, such as Home, there is some information that will be stored for all rows, even if you don’t want to store anything. The amount of wasted storage is different between database engines, data types etc.  Another thing to consider about Relational databases is that at scale, some traditional Relational databases will require more advanced deployments to handle the scale.Changing the schema of a relational database can be highly disruptive, especially for busy workloads because it requires running scripts to change the schema and coordinating it carefully with the code changes in the app.  Due to locking, you might even experience downtime in some cases.  Now contrast that with a non-relational document database like Firestore, where you don’t have to worry about schema changes in the databases or downtime as a result of it.Also, when you have a lot of data that you want to collect and it only applies to a few things in your database, having extra space with no information in it can become wasteful because it uses up storage space in many cases.  A non-relational database can help get around this problem. Non-relational databasesGenerally speaking, a non-relational database stores information in a different format than a Relational database. There are 4 major categories of non-relational databases that you will hear most frequently.Column-Family Document (Firestore) Key-Value Graph Since this post is focusing on Firestore, in this section we will dive into what a document database is, how it is used, and when to use it.Document database (Firestore) A document database can be thought of as a multi layered collection of entities, such as this: As you can see, when the list is all collapsed, you can only see the information at the top; in this case, that is the BirdID (Cardinal1, Bluejay1, Sparrow1, Cardinal2, Crow1 etc. When I open the list I see “word: word”. For example, the document ID Sparrow1, points to a document with “Type: Sparrow”. I also see “Color: grey”, “Age: 2”, “Gender: f” and “Home: Birdhouse #3”This is known as a key value pair. For “Type: Sparrow”, Type is the key and Sparrow is the value. All of the keys in the Sparrow1 document are: Type, Color, Age, Gender, House. All of the values in the Sparrow1 document are: Sparrow, grey, 2, f, Birdhouse #3.Similarly to how the key gives you context, it allows you to ask the computer for a specific piece of information, such as the age of the bird. It is important to decide on a specific key term you will use for each piece of data you collect so your data can be easily read programmatically. This is called an implicit schema, an implied understanding of how data is stored that is not enforced by the database. Let’s go over what happens when we use an implicit schema.Under Cardinal1, you see Type, Color, Age, and Gender; however, under Sparrow1 you also see House. This is possible because in a non-relational database you don’t have a schema that requires you to store the same information about every bird in your database; instead, you can store the specific information that you need for each bird, regardless of what is stored for other birds. This is a great benefit in terms of flexibility, but because of this flexibility, maintaining standard naming conventions is very important.Now, let’s discuss why using standard naming conventions is so important. In the example above, if I ask a human: “What is the age of Cardinal1?”, they would probably tell me 2. If I asked them: “What is the Age of Bluejay1?”, they would probably tell me 4. These are both correct answers, but they are only correct because a human is able to assume what Age means. A computer, on the other hand, can’t make assumptions. If I ask a computer: “What is the Age of Cardinal1?” it would say 2, but if I ask it: “What is the Age of Bluejay1?”  it would not know. This is because the computer is looking for the keyword Age and it isn’t able to use any context clues to determine what other words might mean Age. However, if I asked the computer: “What is the BirdAge of Bluejay1?”, the computer would tell me 4. Why do I care that I need to tell the computer to look for BirdAge to get the age of blujay one, but to look for Age to get the age of Cardinal one? I care because it means I would have to write two entirely different sets of instructions (i.e software code) to get the age of Cardinal1 and the age of Bluejay1 if I am not careful in how I structure my data. But when I structure my data well, this is not an issue and is infact a benefit by adding added flexibility. What we see from this example, is that even without a strict schema, we can (and should) define conventions for document formats. If conventions aren’t defined, things can get unwieldy quickly. How information is accessedNow, let’s discuss how the information is accessed. If I wanted to know information about which birds are blue in our drop down list example, I would need to expand every section of the list to check if the bird is blue or not. As you can imagine, once you start to get a lot of birds in your database, it becomes cumbersome to open every drop down and see if the bird is blue. Luckily, Firestore lets you run these types of queries against the data  (See more here) and receive all the documents that satisfy your conditions. On the other hand, if I wanted to know all of the information about Cardinal1, I could just open the drop down for Cardinal1 and I would have all of the information about that bird. Now let’s start using some Firestore specific terminology. For the example we just discussed:CollectionsIn Firestore, your data lives in collections. You can think of collections as tabs in a spreadsheet.Collections can be used to organize data. For example, if I decide that I want to collect data about birds and fish, the data about birds could be put in a birds collection, and the data about fish could be put in a Fish collection. ex:DocumentsThis is the unit of storage that Firestore uses. In our example, each bird is its own document. Documents reside in collections. This is what one document would contain:Each Document corresponds to a row in the sheet. The following diagram demonstrates that each column header maps to a property name in the document and that each value in a row maps to a value in the document.Each document must be identified by a unique identifier. In our example, that is BirdID. Notice that the value for BirdID is stored at the top level of the list, so when the document is closed, you can only see Cardinal1 and Cardinal1 is not also stored within the document.  ReferencesAll documents can be uniquely identified by their location. Let’s think through this in words first before we move to code. If I want to tell someone to get data about the sparrow from the drop down lists, I would need to tell them:In the bird drop down list, can you please get all the information under Sparrow1 and put it on a piece of paper called sparrow1Info?Now let’s try that again using Firestore terms. From the birds collection, can you please get the document for sparrow1 from the Firestore database (db) and save it as sparrow1Info?Now let’s try it in code.var sparrow1Info = db.collection(‘birds’).doc(‘sparrow1′);SubcollectionsA subcollection is a collection associated with a document. Using our example of the drop down list, we can add a collection called sightings that stores documents about each sighting of the specific bird. This is what that would look like: It is important to note that you don’t need to have the same subcollections on all documents. For example, Cardinal1 can be the only document that has a subcollection of Sightings. How to search on Google about FirestoreThe hardest part of learning a new technology can often be knowing the right terms to put into Google search to get the answers you are looking for. Here are some key terms that can help you get startedYour question: How should I arrange my data to store it in Firestore?Search: Document database implicit schema designYour Question:What other databases are similar to firestore?Search:What are some document databases Your Question:How do I get all documents in the Birds collection?Search:How to use wildcards in Firestore What next?Try this guide to get started building your first application that uses Firestore: https://firebase.google.com/docs/firestore/quickstart 
Quelle: Google Cloud Platform

How Mr. Cooper is using AI to increase speed and accuracy for mortgage processing

Editor’s note:  Mr. Cooper Group is an industry-leading mortgage services provider serving customers through servicing, originations, and digital real estate solutions. Using Google Cloud AI and ML solutions, they created a highly reliable, cloud native document analysis and processing platform to process lending documents and unlocked new levels of accuracy and operational efficiency that help them to scale and control the cost at the same time. Read on to hear how they did it.  Mr. Cooper is one of the largest home loan servicers in the country focused on delivering a variety of servicing and lending products, services and technologies to homeowners. Our goal is to shorten the time for loan servicing to increase efficiency and customer satisfaction and are looking for technologies that go beyond typical OCR to identify, classify and extract value out of the document. This would enable getting the right document and document data, to the right person, at the right time thereby improving the overall digital experience for the end customerTo realize these goals, we have to innovate and evolve with at least 3 key metrics: throughput (amount of document pages processed /minute), accuracy (accurately identify and extract information) and cost savings (cost per document page). Additionally, to address both internal customers and external partners, we have to provide an API based integration and a seamless search experience for documents and extracted data.After several pilot verifications and technology spikes, we decided to zero in on the following technology stack: Document AI (including Vision AI, Cloud AutoML), Cloud Storage, Vertex AI, Google Kubernetes Engine (GKE), Cloud SQL, BigQuery, Looker and Apigee on Google Cloud. Here are the advantages we discovered with Google Cloud machine learning services that allowed us to improve performance, better manage our costs, and gain critical smart analytics capabilities: Document AI: The Document AI technology stack, which includes Vision AI and AutoML Natural Language, provides high precision in data processing and helps us understand the documents early in the supply chain, thereby reducing cost and improving efficiency of a highly reliable pipeline.Cloud Storage: This provides us with a landing zone to ingress and egress the documents in a safe and efficient manner, and with Interconnect and VPC Service Controls to ensure that the pipeline is secure.Cost-optimized Kubernetes apps: We were very impressed by GKE’s cost optimizations. We were able to run the nodes at >90% CPU load and managed GKE also provided us with PCI compliance.Fully managed relational database service for MySQL: With Cloud SQL, we were able to scale our databases effortlessly, without compromising performance or availability. We also saw a significant reduction in maintenance costs. Serverless, highly scalable, and cost-effective data warehouse: By integrating BigQuery into our new architecture, we have the analytics capabilities we need, with zero operational overhead.Vertex AI (formerly AI Platform): Helped us to craft various models that are specific to the mortgage documents we need to process.Apigee: The API management platform helped us by providing a common layer to consume the data as APIs, and provided monitoring and monetization functionality.Looker: Integration into Looker provided us with a unified surface to access data across the platform.Building a container-based document pipelineTo start, we kept our architecture modular and designed around lightweight containers and managed services from Google Cloud AI, so that the care and feeding of the server infrastructure was taken care of. To avoid significant manual refactoring and to handle rapid changes in workloads, we built everything as code (Infrastructure as Code). We jived with the Google Cloud AI team to help us validate the architecture and to bring the best of Google to Mr. Cooper.The design to use containers was based on more efficient resource utilization of container-based artifacts and IaaC (using terraform) was already a part of our technology stack, so it was relatively easy to spin up an entire pipeline in a short period of time.Google’s expertise with regards to developing and running artificial intelligence at scale using managed services was a key differentiator in choosing them as a partner. It was through this deep partnership and tight collaboration that we were able to build and execute the right strategy and achieve our desired outcomes.Our team at Mr. Cooper was able to develop and train state-of-the-art machine learning models on mortgage specific documents with very high accuracy along with opportunities to retrain the models using humans in the loop as appropriate.From there, we strived to improve the accuracy of our models by either training the models with additional documents, using models in ensemble fashion and decoupling various parts of the application using an async approach to processing. To achieve this, we mainly relied on these Google Cloud AI services:Google Cloud Vertex AI GKE with Cluster Autoscaling and cluster multi-tenancy to run the codeCloud SQL to manage the databasesClick to enlargeWhile there are more components in our new architecture, because we chose managed services, this did not add additional overhead to our teams. Instead, we focused on achieving our goal of maximizing throughput, improving accuracy and decreasing the cost of the platform.The whole platform was based on an API-first approach. Through Apigee, we exposed these APIs for internal as well as external use to unlock cost savings and improve customer experiences for homeowners.How does Vertex AI and Document AI fit in the picture?Once the documents came into the platform, the Kubernetes Engine at Google with Asynchronous events managed the whole process from landing of the documents through the whole supply chain including state management and any user inputs.There were various classification and extraction cycles that needed to be done on these documents once in the pipeline, where Document AI and Vertex AI from Google Cloud helped us manage multiple versions of custom mortgage models that would extract, classify and store the metadata at scale.To continue to improve accuracy, our team at Mr. Cooper continues to update existing ML models and train new ML models as document format changes or data drift occurs from heterogeneous sources.Building a successful partnershipLooking back, this initiative was incredibly beneficial because it provided us with a wealth of information that, when cross referenced, has the opportunity to open up new monetization opportunities, unlock cost savings, and improve customer experiences, especially during these unprecedented times. In terms of data, we ended up with accuracy of over 95% for critical documents, a peak throughput of 4000 pages/min, an average throughput of 2000 pages/min. This increased our document processing efficiency by 400%, which significantly reduced our costs.It was not only the incredible technology that drove us to choose Google Cloud, but also their team’s unique knowledge of what it takes to scale. Google has nine products with over one billion users each and is uniquely positioned to offer expertise in achieving peak performance at scale. This collaborative partnership with their teams helped guide us on our journey to accomplish this critical strategic initiative.Related ArticleCustomers cut document processing time and costs with DocAI solutions, now generally availableDocument AI platform, Lending DocAI and Procurement DocAI are generally available.Read Article
Quelle: Google Cloud Platform

Security Command Center now supports CIS 1.1 benchmarks and granular access control

Security Command Center (SCC) is our native Google Cloud product that helps manage and improve your cloud security and risk posture. As a native offering, SCC is constantly evolving and adding new capabilities that deliver more insight to security practitioners. We’ve just released new capabilities in Security Command Center Premium that enable organizations to improve their security posture and efficiently manage risk for their Google Cloud environment. SCC now supports CIS benchmarks for Google Cloud Platform Foundation v1.1, enabling you to monitor and address compliance violations against industry best practices in your Google Cloud environment. Additionally, SCC now supports fine-grained access control for administrators that allows you to easily adhere to the principles of least privilege – restricting access based on roles and responsibilities to reduce risk and enabling broader team engagement to address security.Security Command Center with its native security and risk management capabilities is used by enterprises across the world to protect their environment by gaining visibility into cloud assets, discovering misconfigurations and vulnerabilities in resources, detecting threats targeting Google Cloud assets, and maintaining compliance based on industry standards and benchmarks. These new capabilities further enhance enterprise security teams’ ability to demonstrate accountability and transparency of their Cloud compliance stance and gain operational efficiency with scoped access.Improve your security posture with CIS Google Cloud Foundation 1.1 benchmarkOrganizations can now monitor and see how their Google Cloud environment stacks up against CIS Google Cloud Computing Foundations Benchmark v1.1. The CIS benchmark provides guidance for securing the GCP environment that can help organizations protect from common cyber threats and improve their overall security posture. CIS 1.1 expands coverage to additional Google Cloud services and refines instructions and guidance. With this release in SCC, you can continuously monitor resources and policy violations against common security controls described in the CIS Google Cloud Foundation 1.1 and certified by the Center for Internet Security for alignment with CIS Google Cloud Computing Foundations Benchmark v1.1.0. Security Health Analytics is a built-in service in Security Command Center that provides misconfiguration findings across your GCP environment along with recommendations to remediate those findings. These findings are mapped to the supported compliance standards and industry best practices, giving you the ability to prioritize actions based on the compliance regime applicable to your organization. SCC provides a one-click compliance dashboard, making it seamless to get a complete view of where your environment is passing and failing against the CIS 1.1 benchmarks. It gives you quick posture stance metrics against the different levels in CIS 1.1 benchmarks – Level 1 is considered as a base recommendation to lower the attack surface and Level 2 is considered as a best practice for security conscious organizations. The CIS 1.1 report indicates the number of controls that are passed, how many need to be addressed, and remediation steps for addressing the failed controls against the standard. It also provides an export capability that lets you easily demonstrate your compliance stance to internal and external audit teams.Click to enlargeIn addition to CIS, SCC also supports Payment Card Industry Data Security Standard (PCI DSS v3.2.1), International Organization for Standardization (ISO 27001), and National Institute of Standards and Technology (NIST 800-53). Manage assets and findings within an assigned scope.With the new fine-grained access control capability, you can grant access to assets and findings at the folder and project level. This enables you to isolate projects and folders and restrict employee access to only those who need to do their jobs. If you need to delegate SCC findings to specific teams without having to give those teams a view of the entire organization or need to restrict specific folders for compliance regimes, you can now achieve this using the access control capability. Many organizations are looking to ensure security is addressed earlier on in the development and their application roll out lifecycle. Organizations can use this capability to engage development teams and line-of-businesses to take ownership for addressing the security findings for the assets their teams own. Enabling fine-grained access control at the folder and project level provides individual teams to review findings and quickly act on the ones they are responsible to address. These fine-grained access controls enable your security teams to scale, help reduce the security risk, and achieve compliance goals by limiting access as needed within your organization.If you are already using SCC Premium, you can get started with these new capabilities today using our product documentation. If you don’t yet have an SCC Premium subscription, contact your Google Cloud Platform sales team.
Quelle: Google Cloud Platform

5 ways Vertex Vizier hyperparameter tuning improves ML models

We recently launched Vertex AI to help you move machine learning (ML) from experimentation into production faster and manage your models with confidence—speeding up your ability to improve outcomes at your organization.But we know many of you are just getting started with ML and there’s a lot to learn! In tandem with building the Vertex AI platform, our teams are dropping as much best practices content as we can to help you come up to speed. Plus, we have a dedicated event on June 10th, Applied ML Summit, with sessions on how to apply ML technology in your projects, as well as grow your skills in this field. In the meantime, we couldn’t resist a quick lesson on hyperparameter tuning, because (a) it’s incredibly cool (b) you will impress your coworkers (c) Google Cloud has some unique battle tested tech in this area and (d) you will save time by getting better ML models into production faster. Vertex Vizier, on average, finds optimal parameters for complex functions in over 80% fewer trials than traditional methods. So it’s incredibly cool, but what is it?While machine learning models automatically learn from data, they still require user-defined knobs which guide the learning process. These knobs, commonly known as hyperparameters, control, for example, the tradeoff between training accuracy and generalizability.  Examples of hyperparameters are the optimizer being used, its learning rate, regularization parameters, the number of hidden layers in a DNN, and their sizes.Setting hyperparameters to their optimal values for a given dataset can make a huge difference in model quality. Typically, optimal hyperparameter values are found via grid searching a small number of combinations, or tedious manual experimentation. Hyperparameter tuning automates this work for you by searching for the best configuration of hyperparameters for optimal model performance. Vertex Vizier enables automated hyperparameter tuning in several ways:”Traditional” hyperparameter tuning: by this we mean finding the optimal value of hyperparameters by measuring a single objective metric which is the output of an ML model.  For example, Vizier selects the number of hidden layers and their sizes, an optimizer and its learning rate, with the goal of maximizing model accuracy.When hyperparameters are evaluated, models are trained and evaluated on splits of the data set. If evaluation metrics are streamed to Vizier (e.g. as a function of epoch) as the model is trained, Vizier’s early stopping algorithms can predict the final objective value, and recommend which unpromising trials should be early stopped. This conserves compute resources and speeds up convergence.Oftentimes, models are tuned sequentially on different data sets. Vizier’s built in transfer learning learns priors from previous hyperparameter tuning studies, and leverages them to converge faster on subsequent hyperparameter tuning studies.AutoML is a variant of #1, where Vertex Vizier performs both model selection, and also tunes architectures/non-architecture modifying hyperparameters. AutoML usually requires more code on top of Vertex Vizier (to ingest data etc), but Vizier is in most cases the “engine” behind the process. AutoML is implemented by defining a tree like (DAG) search space, rather than a “flat” search space (like in #1). Note that you can use DAG search spaces for any other purpose where searching over a hierarchical space makes sense.There are times when you may wish to optimize more than one metric. For example, we would like to optimize model accuracy, while minimizing model latency. Vizier can find thePareto frontier, which presents tradeoffs for multiple metrics, allowing users to choose the appropriate tradeoff. Simple example: I want to make a more accurate model, but would like to minimize serving latency. I do not know ahead of time what’s the tradeoff between the two metrics. Vizier can be used to explore and plot a tradeoff curve, so users can select on the most appropriate one. For example, “a latency decrease of 200ms will only decrease accuracy by 0.5%”Google Vizier is all yours with Vertex AIGoogle published the Vizier research paper in 2017, sharing our work and use cases for black-box optimization—i.e. The process of finding the best settings for a bunch of parameters or knobs when you can’t peer inside a system to see how well the knobs are working. The paper discusses our requirements, infrastructure design, underlying algorithms, and advanced features such as transfer learning that the service provides. Vizier has been essential to our progress with machine learning at Google, which is why we are so excited to make it available to you on Vertex AI.Vizier has already tuned millions of ML models at Google, and its algorithms are continuously improved for faster convergence and handling of real-life edge cases. Vertex Vizier’s models are very well calibrated and are self-tuning (they adapt to user data), and offer unique power features, such as hierarchical search spaces and multi-objective optimization. We believe Vertex Vizier’s set of features is a unique capability to Google Cloud, and look forward to optimizing the quality of your models by automatically tuning hyperparameters for you.To learn more about Vertex Vizier, check out these docs and if you are interested in what’s coming in machine learning over the next five years, tune in to our Applied ML Summit on June 10th, or watch the sessions on demand in your own time.Related ArticleGoogle Cloud unveils Vertex AI, one platform, every ML tool you needGoogle Cloud launches Vertex AI, a managed platform for experimentation, versioning and deploying ML models into production.Read Article
Quelle: Google Cloud Platform

Serve a TensorFlow Hub model in Google Cloud with Vertex AI

Good artists copy, great artists steal, and smart software developers use other people’s machine learning models.If you’ve trained ML models before, you know that one of the most time-consuming and cumbersome parts of the process is collecting and curating data to train those models. But for lots of problems, you can skip that step by instead using somebody else’s model that’s already been trained to do what you want–like detect spam, convert speech to text, or label objects in images. All the better if that model is built and maintained by folks with access to big datasets, powerful training rigs, and machine learning expertise.One great place to find these types of “pre-trained” models is TensorFlow Hub, which hosts tons of state-of-the-art models built by Google Research that you can download and use for free. Here you’ll find models for doing tasks like image segmentation, super resolution, question answering, text embedding, and a whole lot more. You don’t need a training data set to use these models, which is good news, since some of them are huge and trained on massive datasets. But if you want to use one of these big models in your app, the challenge then becomes where to host them (in the cloud, most likely) so they’re fast, reliable, and scalable. For this, Google’s new Vertex AI platform is just the ticket. In this post, we’ll download a model from TensorFlow Hub and upload it to Vertex’s prediction service, which will host our model in the cloud and let us make predictions with it through a REST endpoint. It’s a serverless way to serve machine learning models. Not only does this make app development easier, but it also lets us take advantage of hardware like GPUs and model monitoring features built into Vertex. Let’s get to it.Prefer doing everything in code from a Jupyter notebook? Check out this colab.Download a model from TensorFlow HubOn https://tfhub.dev/, you’ll find lots of free models that process audio, text, video, and images. In this post, we’ll grab one of the most popular Hub models, the Universal Sentence Encoder. This model takes as input a sentence or paragraph and returns a vector or “embedding” that maps the text to points in space. These embeddings can then be used for everything from sentence similarity to smart search to building chatbots (read more about them here).On the Universal Sentence Encoder page, click “Download” to grab the model in TensorFlow’s SavedModel format. You’ll download a zipped file that contains a directory formatted like so:-universal-sentence-encoder_4          -assets              -saved_model.pb          -variables                  – variables.data-00000-of-00001                  – variables.indexHere, the saved_model.pb file describes the structure of the saved neural network, and the data in the variables folder contains the network’s learned weights.On the model’s hub page, you can see it’s example usage:You feed the model an array of sentences and it spits out an array of vectors.Without this example, we can still learn about what input and output the model supports by using TensorFlow’s SavedModel CLI. If you’ve got TensorFlow installed on your computer, in the directory of the Hub model you downloaded, run:For this model, that command outputs:From this, we know that our model expects as input a one-dimensional array of Strings. We’ll use this in a second.Getting started with Vertex AIVertex AI is a new platform for training, deploying, and monitoring machine learning models launched this year at Google I/O.For this project, we’ll just use the prediction service, which will wrap our model in a convenient REST endpoint.To get started, you’ll need a Google Cloud account with a GCP project set up. Next, you’ll need to create a Cloud Storage bucket, which is where you’ll upload the TensorFlow Hub model. You can do this from the command line using gsutil:If this model is big, this could take a while!In the side menu, enable the Vertex AI API. Once your Hub model is uploaded to Cloud Storage, it’s straightforward to import it into Vertex AI following the docs or this quick summary:On the Vertex AI “Models” tab, click import:2. Choose any name for your model:3. Choose a compatible version of TensorFlow to use with your model (for newer models, >= 2.0 should work). Select “GPU” if you want to pay for GPUs to speed up prediction time:4. Point “Model artifact location” to the model folder you uploaded to Cloud Storage:5. Click “Import.” 6. Once your model is imported, you’ll be able to try it out straight from the models tab. Click on the name of your model:7. Here in the model page, you can test your model right from the UI. Remember how we inspected our model with the saved_model_cli earlier and learned it accepted as input an array of strings? Here’s how we can call the model with that input:8. Once you’ve verified your model works in the UI, you’ll want to deploy it to an endpoint so you can call it from your app. In the “Endpoint” tab, click “Create Endpoint” and select the model you just imported:9. Voila! Your TensorFlow Hub model is deployed and ready to be used. You can call it via POST request from any web client or using the Python client library:Now that we’ve set our TensorFlow Hub model on Vertex, we can use it in our app without having to think about (most of) the performance and ops challenges of using big machine learning models in production. It’s a nice serverless way to get building with AI fast. Happy hacking!Related ArticleWhat is Vertex AI? Developer advocates share moreDeveloper Advocates Priyanka Vergadia and Sara Robinson explain how Vertex AI supports your entire ML workflow—from data management all t…Read Article
Quelle: Google Cloud Platform

What is Cloud Spanner?

Databases are part of virtually every application you run in your organization and great apps need great databases. This post is focused on one such great database—Cloud Spanner.Cloud Spanner is the only enterprise-grade, globally-distributed, and strongly-consistent database service built for the cloud, specifically to combine the benefits of relational database structure with non-relational horizontal scale. It is a unique database that combines transactions, SQL queries, and relational structure with the scalability that you typically associate with non-relational or NoSQL databases.Click to enlargeHow does Spanner work?In the image you see a four-node regional Cloud Spanner instance hosting two databases. A node is a measure of compute in Spanner. Node servers serve the read and write/commit transaction requests, but they don’t store the data. Each node is replicated across three zones in the region. The database storage is also replicated across the three zones. Nodes in a zone are responsible for reading and writing to the storage in their zone. The data is stored in Google’s underlying Colossus distributed replicated file system. This provides huge advantages when it comes to redistributing load, as the data is not linked to individual nodes. If a node or a zone fails, the database remains available, being served by the remaining nodes. No manual intervention is needed to maintain availability.How does Spanner provide high availability and scalability?  Each table in the database is stored sorted by primary key. Tables are divided by ranges of the primary key and these divisions are known as splits. Each split is managed completely independently by different Spanner nodes. The number of splits for a table varies according to the amount of data: empty tables have only a single split. The splits are rebalanced dynamically depending on the amount of data and the load (dynamic resharding). But remember that the table and nodes are replicated across three zones, how does that work?Everything is replicated across the three zones – the same goes for split management. Split replicas are associated with a group (Paxos) that spans zones. Using Paxos consensus protocols, one of the zones is determined to be a leader. The leader is responsible for managing write transactions for that split, while the other replicas can be used for reads. If a leader fails, the consensus is redetermined and a new leader may be chosen. For different splits, different zones can become leaders, thus distributing the leadership roles among all the Cloud Spanner compute nodes. Nodes will likely be both leaders for some splits and replicas for others. Using this distributed mechanism of splits, leaders, and replicas, Cloud Spanner achieves both high availability and scalability. How do reads and writes work?There are two types of reads in Cloud Spanner:Strong reads- used when the absolute latest value needs to be read. Here is how it works:The Cloud Spanner API identifies the split, looks up the Paxos group to use for the split and routes the request to one of the replicas (usually in the same zone as the client) In this example, the request is sent to the read-only replica in zone 1.The replica requests from the leader if it is OK to read and it asks for the TrueTime timestamp of the latest transaction on this rowThe leader responds, and the replica compares the response with its own state. If the row is up-to-date it can return the result.  Otherwise it needs to wait for the leader to send updates. The response is sent back to the client. In some cases, for example, when the row has just been updated while the read request is in transit, the state of the replica is sufficiently up-to-date that it does not even need to ask the leader for the latest transaction.Stale reads are used when low read latency is more important than getting the latest values, so some data staleness is tolerated. In a stale read, the client does not request the absolute latest version, just the data that is most recent (e.g. up to n seconds old). If the staleness factor is at least 15 seconds, the replica in most cases can simply return the data without even querying the leader as its internal state will show that the data is sufficiently up-to-date. You can see that in each of these read requests, no row locking was required – the ability for any node to respond to reads is what makes Cloud Spanner so fast and scalable.How does Spanner provide global consistency?TrueTime is essential to make Spanner work as well as it does…so, what is it, and how does it help?TrueTime is a way to synchronize clocks in all machines across multiple datacenters. The system uses a combination of GPS and atomic clocks, each correcting for the failure modes of the other. Combining the two sources (using multiple redundancy, of course) gives an accurate source of time for all Google applications. But, clock drift on each individual machine can still occur, and even with a sync every 30 seconds, the difference between the server’s clock and reference clock can be as much as 2ms. The drift will look like a sawtooth graph with the uncertainty increasing until corrected by a clock sync. Since 2ms is quite a long duration (in computing terms, at least), TrueTime includes this uncertainty as part of the time signal.ConclusionIf your application requires a highly scalable relational database, then check out Spanner. For a more in-depth look into Spanner, explore the documentation.For more #GCPSketchnote, follow the GitHub repo. For similar cloud content follow me on Twitter @pvergadia and keep an eye out on thecloudgirl.dev.
Quelle: Google Cloud Platform

Streamline your ML training workflow with Vertex AI

At one point or another, many of us have used a local computing environment for machine learning (ML). That may have been a notebook computer or a desktop with a GPU. For some problems, a local environment is more than enough. Plus, there’s a lot of flexibility. Install Python, install JupyterLab, and go!What often happens next is that model training just takes too long. Add a new layer, change some parameters, and wait nine hours to see if the accuracy improved? No thanks. By moving to a Cloud computing environment, a wide variety of powerful machine types are available. That same code might run orders of magnitude faster in the Cloud.Customers can use Deep Learning VM images (DLVMs) that ensure that ML frameworks, drivers, accelerators, and hardware are all working smoothly together with no extra configuration. Notebook instances are also available that are based on DLVMs, and enable easy access to JupyterLab. Benefits of using the Vertex AI custom training serviceUsing VMs in the cloud can make a huge difference in productivity for ML teams. There are some great reasons to go one step further, and leverage our new Vertex AI custom training service. Instead of training your model directly within your notebook instance, you can submit a training job from your notebook.The training job will automatically provision computing resources, and de-provision those resources when the job is complete. There is no worrying about leaving a high-performance virtual machine configuration running.The training service can help to modularize your architecture. As we’ll discuss further in this post, you can put your training code into a container to operate as a portable unit. The training code can have parameters passed into it, such as input data location and hyperparameters, to adapt to different scenarios without redeployment. Also, the training code can export the trained model file, enabling working with other AI services in a decoupled manner.The training service also supports reproducibility. Each training job is tracked with inputs, outputs, and the container image used. Log messages are available in Cloud Logging, and jobs can be monitored while running.The training service also supports distributed training, which means that you can train models across multiple nodes in parallel. That translates into faster training times than would be possible within a single VM instance.Example NotebookIn this blog post, we are going to explain how to use the custom training service, using code snippets from a Vertex AI example. The notebook we’re going to use covers the end-to-end process of custom training and online prediction. The notebook is part of the ai-platform-samples repo, which has many useful examples of how to use Vertex AI.Figure 1: Custom training and online prediction notebookCustom model training conceptsThe custom model training service provides pre-built container images supporting popular frameworks such as TensorFlow, PyTorch, scikit-learn, and XGBoost. Using these containers, you can simply provide your training code and the appropriate container image to a training job. You are also able to provide a custom container image. A custom container image can be a good choice if you’re using a language other than Python, or are using an ML framework that is not supported by a pre-built container image. In this blog post, we’ll use a pre-built TensorFlow 2 image with GPU support.There are multiple ways to manage custom training jobs: via the Console, gcloud CLI, REST API, and Node.js / Python SDKs. After jobs are created, their current status can be queried, and the logs can be streamed.The training service also supports hyperparameter tuning to find optimal parameters for training your model. A hyperparameter tuning job is similar to a custom training job, in that a training image is provided to the job interface. The training service will run multiple trials, or training jobs with different sets of hyperparameters, to find what results in the best model. You will need to specify the hyperparameters to test; the range of values to explore for those hyperparameters; and details about the number of trials.Both custom training and hyperparameter tuning jobs can be wrapped into a training pipeline. A training pipeline will execute the job, and can also perform an optional step to upload the model to Vertex AI after training.How to package your code for a training jobIn general, it’s a good practice to develop your model training code that is self-contained when especially executing them inside containers. This means the training codebase would operate in a standalone manner when executed. Below is a template of such a self-contained, heavily-commented Python script that you can follow for your own projects too.Note that the MODEL_DIR needs to be a location inside a Google Cloud Storage (GCS) bucket. This is because the training service can only communicate with that and not with our local system. Here is a sample location inside a GCS Bucket to save a model: gs://caip-training/cifar10-model where caip-training is the name of the GCS bucket.Although we are not using any custom modules in the above code listing, one can easily incorporate them as we would normally inside a Python script. Refer to this document if you want to know more. Next up, we will review how to configure the training infrastructure, including the type and number of GPUs to use, and submit a training script to run inside the infrastructure. How to submit a training job, including configuring which machines to useTo train a deep learning model efficiently on large datasets, we need hardware accelerators that are suited to run matrix multiplication in a highly parallelized manner. Distributed training is also common when it comes to training a large model on a large dataset. For this example, we will be using asingle Tesla K80 GPU. Vertex AI supports a range of different GPUs (find out more here). Here is how we initialize our training job with the Vertex AI SDK:(aiplatform is aliased as from google.cloud import aiplatform)Let’s review the arguments:display_name refers to a unique identifier to the training job used for easily locating it. script_path refers to the path of the training script to run. This is the script we discussed in the section above.container_uri refers to the URI of the container that will be used to run our training script. For this, we have several options to choose from. For this example, we will use gcr.io/cloud-aiplatform/training/tf-gpu.2-1:latest. We will use this same container for deployment as well but with a slightly changed container URI. You can find the containers available for model training here and the containers available for deployment purposes can be found here. requirements let us specify any external packages that might be required to run the training script. model_serving_container_image_uri specifies the container URI that would be used during deployment. Note: Using separate containers for distinct purposes like training and deployment is often a good practice, since it isolates the relevant dependencies for each purpose.We are now all set up to submit a custom training job:Here, we have:model_display_name that provides a unique name to identify our trained model. This comes in handy later down the pipeline when we would deploy it using the prediction service. args are our command-line arguments typically used to specify things like hyperparameter values.replica_count denotes the number of worker replicas to be used during training. machine_type specifies the type of base machine to be used during training. accelerator_type denotes the type of accelerator to be used during training. If we are interested in using a Tesla K80, then TRAIN_GPU should be specified as aip.AcceleratorType.NVIDIA_TESLA_K80. (aip is aliased as from google.cloud.aiplatform import gapic as aip.)accelerator_count specifies the number of accelerators to use. For a single host multi-GPU configuration, we would set the replica_count to 1 and then specify the accelerator_count as per our choice depending on the resource available under the corresponding compute zone. Note that model here is a google.cloud.aiplatform.models.Model object. It is returned by the training service after the job is completed. With this setup, we can actually start a custom training job that we can monitor. After we submit the above training pipeline, we should see some initial logs resembling this:Figure 2: Logs after submitting a training job with aiplatformThe link highlighted  in Figure 2 will redirect to the dashboard of the training pipeline which looks like so:Figure 3: Training pipeline dashboardAs seen in Figure 3, the dashboard provides a comprehensive summary of all the necessary artifacts related to our training pipeline. Monitoring your model training is also very important especially to catch any early training bugs. To view the training logs, we need to click the link beside the “Custom job” tab (refer to Figure 3). There also we are presented with roughly similar information as shown in Figure 3 but this time it includes the logs as well: Figure 4: Training job dashboardNote: Once we submit the custom training job, a training pipeline is first created to provision the training. Then inside the pipeline, the actual training job is started. This is why we see two very similar dashboards above but they have different purposes. Let’s check out the logs (which is maintained using Cloud Logging automatically):Figure 5: Model training logsWith Cloud Logging, it is also possible to set alerts on the basis of different criteria. For example, alerting the users when the training job fails or completes so that some immediate action could be taken. You can refer to this post for more details.  After the training pipeline is completed, on your end, you will notice the success status:Figure 6: Training pipeline completion statusAccessing the trained modelRecall that we had to serialize our model inside a GCS Bucket in order to make it compatible with the training service. So, after the model is trained, we can access it from that location. We can even directly load it using the following line of code:Note that we are referring to the TensorFlow model that resulted from training. The training service also maintains a similar “model” namespace to help us manage these models. Recall that the training service returns a  google.cloud.aiplatform.models.Model object as mentioned earlier. It comes with a deploy() method that allows us to deploy our model programmatically within minutes with several different options. Check out this link if you are interested in deploying your models using this option. Vertex AI also provides a dashboard for all the models that have been trained successfully and it can be accessed with this link. It resembles this:Figure 7: Models dashboardIf we click the model as listed in Figure 7, we should be able to directly deploy from the interface:Figure 8: Model deployment right from the browserIn this post, we will not be covering deployment, but you are encouraged to try it out yourself. After the model is deployed to an endpoint, you will be able to use it to make online predictions.Wrapping UpIn this blog post, we discussed the benefits of using the Vertex AI custom training service, including better reproducibility and management of experiments. We also walked through the steps to convert your Jupyter Notebook codebase to a standard containerized codebase, which will be useful not only for the training service, but for other container-based environments. The example notebook provides a great starting point to understand each step, and to use as a template for your own projects.Related ArticleGoogle Cloud unveils Vertex AI, one platform, every ML tool you needGoogle Cloud launches Vertex AI, a managed platform for experimentation, versioning and deploying ML models into production.Read Article
Quelle: Google Cloud Platform

Zero-trust managed security for services with Traffic Director

We created Traffic Director to bring to you a fully managed service mesh product that includes load balancing, traffic management and service discovery. And now, we’re happy to announce the availability of a fully-managed zero-trust security solution using Traffic Director with Google Kubernetes Engine (GKE) and Certificate Authority (CA) Service.When platform administrators and security professionals think about modernizing their applications with a forward-looking security posture, they look for “zero-trust” security. This security posture is based on few fundamental blocks:A means of allocating and asserting service identity (for example, using X.509 certificates)Mutual authentication (mTLS) or server authentication (TLS)Encryption for all traffic flows (TLS encryption)Authorization checks and minimal privilegesInfrastructure to make all of the above manageable and reliableTraffic Director does this by integrating with CA Service, a highly available private CA which issues private certificates expressing service identities, and provides a managed mTLS certificate infrastructure with full certificate lifecycle management. Together, these solve both certificate issuance and CA rotation complexities. With Traffic Director managing your service-to-service security, you can now enjoy end-to-end encryption, service-level authentication and granular authorization policies for your service mesh.With this new capability, you can now:Implement mutual TLS (mTLS) and TLS between your services, including certificate lifecycle management. Communications within your mesh are authenticated and encrypted.Enable identity-based authorization, as well as authorization based on other parameters (such as the request method). These concepts underpin role-based access controls (RBAC) and enable you to take a “least privileges” stance where only authorized services can communicate with each other based on ALLOW/DENY rules.mTLS is supported whether you’re using Envoy or proxyless gRPC for your service mesh. Authorization support for proxyless gRPC is coming later this year. Check out our documentation tolearn moreandgetstarted with Envoyorproxyless gRPC.
Quelle: Google Cloud Platform

DevOps on Google Cloud: tools to speed up software development velocity

Editor’s note: Today we hear from ForgeRock, a multinational identity and access management software company with more than 1,100 enterprise customers, including a major public broadcaster. In total, customers use the ForgeRock Identity Platform to authenticate and log in over 45 million users daily, helping them manage identity, governance, and access management across all platforms, including on-premises and multicloud environments. Operating at that kind of scale isn’t easy. In this blog post, ForgeRock Engineering Director, Warren Strange discusses the three things that help make their developers efficient and productive, and the Google Cloud tools they use along the way. At ForgeRock, we’ve been an early adopter of Kubernetes, viewing it as a strategic platform. Running on Kubernetes allows us to drive multicloud support across Google Kubernetes Engine (GKE), Amazon (EKS), and Azure (AKS). So no matter which cloud our customers are running on, we are able to seamlessly integrate our products into customers’ environments. Making it easier for ForgeRock’s developers and operators to build, deploy and manage applications has been crucial in our ability to continually provide high quality solutions for our customers. We’re always looking for tools to improve productivity and keep our developers focused on coding instead of configuration. Google Cloud’s suite of DevOps tools have streamlined three specific practices to help keep our developers productive: 1. Make developers productive within IDEsDeveloper productivity is core to the success of any organization, including ForgeRock. Since developers spend most of their time within their IDE of choice, our goal at ForgeRock has been to make it easier for our developers to write Kubernetes applications within the IDEs they know and love. Cloud Code helps us precisely with that: it makes the process of building, deploying, scaling, and managing Kubernetes infrastructure and applications a breeze. In particular, working with the Kubernetes YAML syntax and schema takes time, and a lot of trial and error to master. Thanks to YAML authoring support within Cloud Code, we can easily avoid the complicated and time consuming task of writing YAML files at ForgeRock. With YAML authoring support, developers save time on every bug. Cloud Code’s inline  snippets, completions, and schema validation, a.k.a. “linting,” further streamline working with YAML files. The benefits of Cloud Code extend to local development as well. Iterating locally on Kubernetes applications often requires multiple manual steps, including building container images, updating Kubernetes manifests, and redeploying applications. Doing these steps over and over again can be a chore. Cloud Code supports Skaffold under the hood, which tracks changes as they come and automatically rebuilds and redeploys—reducing repetitive development tasks. Finally, developing for Kubernetes usually involves jumping between the IDE, documentation, samples etc. Cloud Code reduces this context switching with Kubernetes code samples. With samples, we can get new developers up and running quickly. They spend less time learning about configuration and management of the application—and spend more time on writing and evolving the code.2. Drive end-to-end automationTo further improve developer productivity, we’ve focused on end-to-end automation: from writing code within IDEs, to automatically triggering CI/CD pipelines and running the code in production. In particular, Tekton, Cloud Build, Container Registry, and GKE have been critical to Forgerock as we streamline the flow of code, feedback and remediation through the build and deployment processes. The process looks something like this:We begin by developing Kubernetes manifests and dockerfiles using Cloud Code. Then we use Skaffold to build containers locally, while Cloud Build helps with continuous integration (CI). The Cloud Build GitHub app allows us to automate builds and tests as part of our GitHub workflow. Cloud Build is differentiated from other continuous integration tools since it is fully serverless. It scales up and scales down in response to load, with no need for us to pre-provision servers or pay in advance for additional capacity. We pay for the exact resources we use. Once the image is built by Cloud Build, it is stored, managed, and secured in Google’s Container Registry. Just like Cloud Build, Container Registry is serverless, so we only pay for what we  use. Additionally, since Container Registry comes with automatic vulnerability scanning, every time we upload a new image to Container Registry, we can also scan it for vulnerabilities. Next, a Tekton pipeline is triggered, which deploys the docker images stored in Container Registry and Kubernetes manifests to a running GKE cluster. Along with Cloud Build, Tekton is a critical part of our CI/CD process at ForgeRock. Most importantly, since Tekton comes with standardized Kubernetes-native primitives, we can create continuous delivery workflows very quickly.After deployment, Tekton triggers a functional test suite to ensure that the applications we deploy perform as expected. The test results are posted to our team Slack channel so all developers have instant access and insights about each cluster. From there, we are able to provide our customers with their finished product request.3.  Leverage multicloud patterns and practicesThe industry has seen a shift towards multicloud. Organizations have adopted multicloud strategies to minimize vendor lock-in, take advantage of best-in-class solutions, improve cost-efficiencies, and increase flexibility through choice. At ForgeRock, we’re big proponents of multicloud. Part of that comes from the fact that our identity and access management product work across Google Cloud, AWS, and Azure. Developing products using open-source technologies such as Kubernetes has been particularly helpful in driving this interoperability. Tekton has been another critical project that has allowed us to prevent vendor lock-in. Thanks to Tekton, our continuous delivery pipelines can deploy across any Kubernetes cluster. Most importantly, since Tekton pipelines run on Kubernetes, these pipelines can be decoupled from the runtime. Like Tekton and Kubernetes, both Cloud Build and Container Registry are based on open technologies. Community-contributed buildersand official builder images allow us to connect to a variety of tools as a part of the build process. And finally, with support for open technologies like Google Cloud buildpacks within Cloud Build, we can build containers without even knowing Docker. Making it easier for developers and operators to build, deploy and manage applications is critical for the success of any organization. Driving developer productivity within IDEs, leveraging end-to-end automation, and support for multi-cloud patterns and practices are just some of the ways we are trying to achieve this at ForgeRock. To learn more about ForgeRock, and to deploy the ForgeRock Identity Platform into your Kubernetes cluster, check out our open-source ForgeOps repository on GitHub.
Quelle: Google Cloud Platform

Introducing logical replication and decoding for Cloud SQL for PostgreSQL

Last week, we announced the Preview of Datastream, our serverless and easy-to-use change data capture and replication service. Datastream currently supports access to streaming, low-latency data from Oracle and MySQL databases into Google Cloud services such as Cloud Spanner, Cloud SQL, and BigQuery.With this in mind, we understand that our customers are using different tools and technologies and we want to meet them where they are. Logical replication and decoding for example, is an inherent part of the PostgreSQL ecosystem and it is a commonly used functionality. Therefore, today we are excited to announce the public preview of logical replication and decoding for Cloud SQL for PostgreSQL. By releasing those capabilities and enabling change data capture (CDC) from Cloud SQL for PostgreSQL, we strengthen our commitment to building an open database platform that meets critical application requirements and integrates seamlessly with the PostgreSQL ecosystem.Let’s take, for example, a retailer’s ecommerce system in which each order is saved in a database. Placing the order in the database is just one part of the order processing. How does the inventory get updated? By leveraging CDC, downstream systems can be notified of such changes and act accordingly—in this case, update the inventory in the warehouse.Another common use case is data analytics pipelines. Businesses want to perform analytics on the freshest data possible. For example, low stock on some products might need to kick off certain logistical processes, such as restocking or alerting. You can leverage logical decoding and replication to get the freshest data from the operational systems to your data pipelines and from there to your analytics platform with low latency.What is logical replication and decoding?Logical replication enables the mirroring of database changes between two Postgres instances in a storage-agnostic fashion. Logical replication provides flexibility both in terms of what data can be replicated between instances and what versions those instances can be running.Logical decoding enables the capture of all changes to tables within a database in different formats, such as JSON or plaintext, to name a few. Once captured, they can be consumed by a streaming protocol or a SQL interface. What problems can I solve with logical replication and decoding?Here’s what you can solve easily with logical replication and decoding:Selective replication of sets of tables between instances so that only relevant data sets need be sharedSelective replication of table rows between instances mainly to reduce size of dataSelective replication of table columns from the source to remove non-essential or sensitive dataData gather/merge from multiple sources to form a data lakeStream fresh data from operational database to the data warehouse for near real time analyses Upgrades instances between major versions with near zero downtimeHow can I participate in the public preview?To get started, check out documentation for this feature and release notes. To use this feature in public preview, spin up a new instance of Postgres (any version is fine) and follow the instructions in the documentation.Related ArticleThe 5 benefits of Cloud SQL [infographic]Check out this infographic on the 5 benefits of Cloud SQL, Google Cloud’s managed database service for MySQL, PostgreSQL and SQL Server.Read Article
Quelle: Google Cloud Platform