Cloud Run min instances: Minimize your serverless cold starts

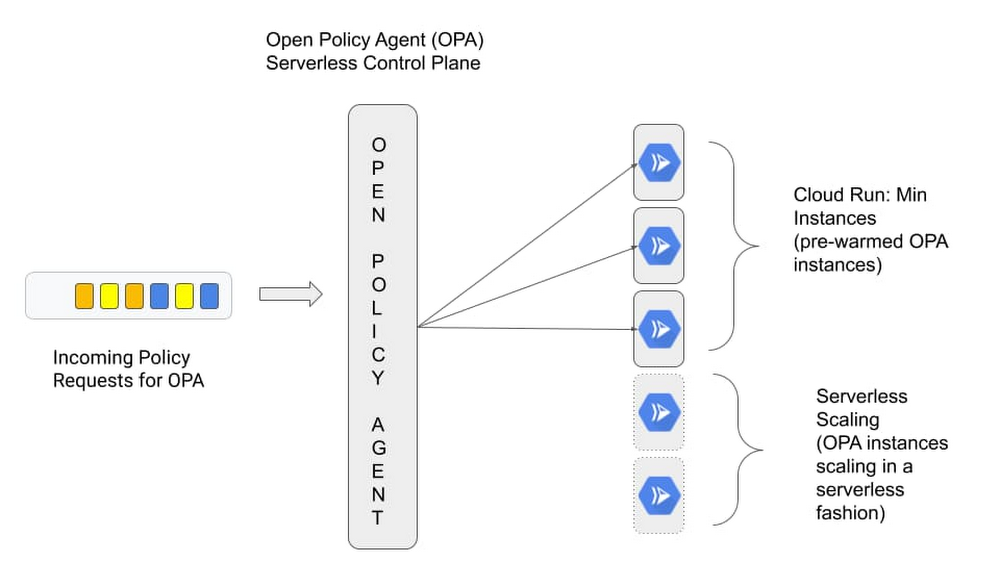
One of the great things about serverless is its pay-for-what-you-use operating model that lets you scale a service down to 0. But for a certain class of applications, the not-so-great thing about serverless is that it scales down to 0, resulting in latency to process the first request when your application wakes back up again. This so-called “startup tax” is novel to serverless, since, as the name implies, there are no servers running if an application isn’t receiving traffic. Today, we’re excited to announce minimum (“min”) instances for Cloud Run, our managed serverless compute platform. This important new feature can dramatically improve performance for your applications. And as a result, it makes it possible to run latency-sensitive applications on Cloud Run, so they too can benefit from a serverless compute platform. Let’s take a deeper look. Cut your cold startsWith this feature, you can configure a set of minimum number of Cloud Run instances that are on standby and ready to serve traffic, so your service can start serving requests with minimal cold starts. To use Cloud Run’s new min instances feature, simply configure the number of min instances for your Cloud Run service with a simple gcloud command or the UI.Once configured, the min instances will be ready and waiting to serve traffic for your application, thereby minimizing the cold starts for your application and enabling you to run latency sensitive applications on Cloud Run.Reuse bootstrapping logicIn addition to minimizing cold starts, Cloud Run min instances also helps you cut down on bootstrapping time for key operations such as opening database connections or loading files from Cloud Storage into memory. By lowering bootstrapping time, min instances help reduce request latency further, since you only need to run your bootstrapping logic once, and then leverage it across multiple requests for your configured number of min instances.Consider the following golang serverless function, which shows how you can run your bootstrapping logic once, and reuse it across your min instances:Run bootstrapping logic once, and reuse it across Min InstancesReap benefits of serverless at lower cost  In addition to setting a minimum number of instances, Cloud Run min instances also lets you configure them with throttled CPU, so you can take advantage of this capability at a much lower cost. This way, you can have your cake and eat it too: leverage the efficiency and cost advantages of serverless, while moving latency sensitive workloads to serverless.Cloud Run min instances in actionSo we talked about the benefits that Cloud Run min instances can bring, and how to use the feature, but how does it work in real life and why would you want to use it? Traditionally serverless platforms cater to applications that benefit from scaling to zero, but make certain trade offs on initial response times due to cold start latency during the bootstrap period. This is acceptable for applications you’ve built from the ground up and for which you have full control over the source and how it behaves at runtime. But there’s a whole class of applications that people use off the shelf for which a traditional serverless approach isn’t a great fit. Think custom control planes such as Prometheus for collecting metrics and Open Policy Agent (OPA) for making policy decisions. These control planes typically require advanced configuration and a bit of bootstrapping during the initial start up, and can’t tolerate additional latency. When you’re starting up OPA, for instance, you typically fetch policies from a remote source and cache them to speed up future policy decisions. In a typical serverless environment, control planes such as OPA would take a performance hit when scaling to zero and back up again to handle policy requests, as it sits in the request path for critical user transactions.Cloud Run min instances allows you to address this problem head on. Instead of scaling to zero and possibly having to bootstrap the policy engine between each request, we can now ensure each request will be handled by a “warm” instance of OPA.Let’s look at this in action. In the following section we deploy OPA to run as a central control plane and enable min instances to meet our performance requirements.We configure the OPA server to pull a policy bundle from a Cloud Storage bucket at run time, which, when queried will allow http GET requests for the “/health” HTTP path. Here is what the OPA policy looks like:The policy is packaged in a policy bundle and uploaded to a Cloud Storage bucket. But first, we need to bootstrap some dependencies, as we show in this tutorial about the bootstrapping process. To keep things simple we leverage a helper script.Change into the min-instances-tutorial directory:Before we can deploy the OPA Cloud Run instance we need to perform the following tasks:Create an OPA service account Create a Cloud Storage bucket to hold the OPA policy bundleUpload the OPA policy bundle (bundle.tar.gz) to Cloud StorageGrant permission to the OPA service account to access the OPA bundleAt this point all the dependencies to host OPA are in place. We are ready to deploy OPA using the ‘gcloud’ command. The bucket name and the service account email address are stored in the ‘.env’ file created by the bootstrapping script run in the previous step.$ source .envCreate the open-policy-agent Cloud Run instance:Here’s the output from the command, signaling that we’ve successfully bootstrapped our environment:Now, when the OPA server starts up for the first time, it downloads the policy bundle from Cloud Storage and caches it. But thanks to the min instances, this only happens once.Now we are ready to test making a policy decision. We can do that with curl. Retrieve the open-policy-agent cloud run URL:Query the OPA server by providing a set of input and retrieve a policy decision based on the policy bundle stored in Cloud Storage:Here’s the response:Now if you wait for a few minutes you’ll observe that OPA does not scale to zero, and that the process is frozen in the background, and will only be thawed when the next request hits the instance. If you would like to learn more about how this affects pricing be sure to check out the Pricing Page. Min instances for a maximum of applications At first glance, Cloud Run min instances may seem like a small thing, but we believe that this feature is going to enable more off-the-shelf applications to run under the serverless model and be more cost efficient—and give you more control over the trade-offs inherent in serverless compute. To get started with Cloud Run, check out these Quickstarts.
Quelle: Google Cloud Platform
Control access to your web sites with Identity-Aware Proxy

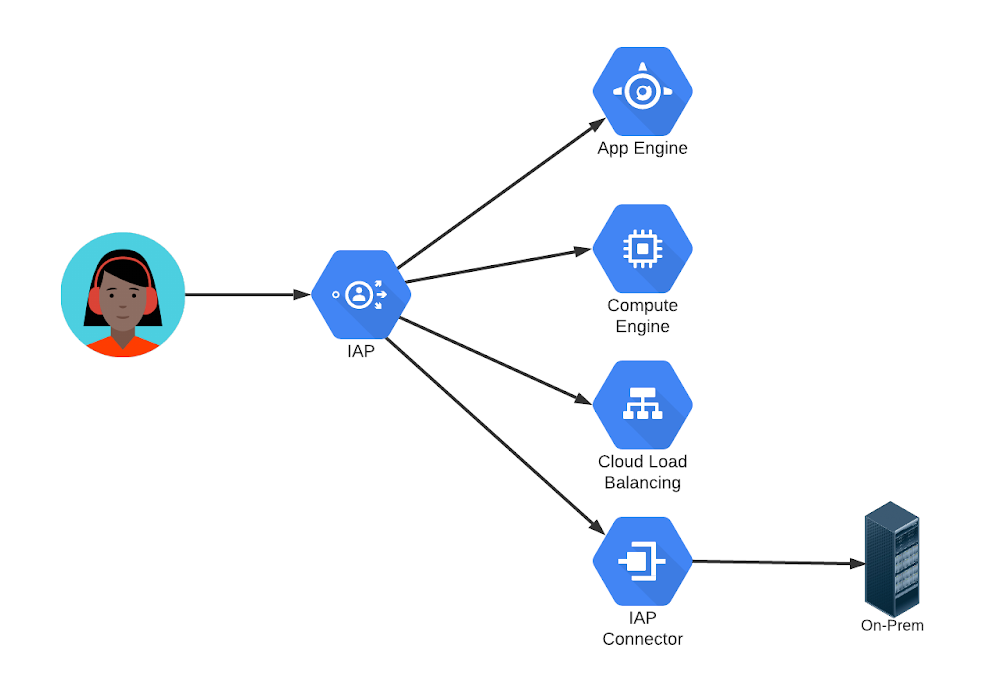
Does your company need to make an internal website accessible to employees, temporary workers, and contractors? How about running a public site open to all, but with some functions requiring personalization? Or perhaps providing a highly restricted site that only authorized users, running on secure platforms, can access?Those are all common use cases, and there are many different ways to address each of them. But there is one easy-to-use and deploy solution that can handle them all: Google Cloud Identity-Aware Proxy (IAP).IAP is a service that intercepts requests to a web site, authenticates the user making the request, and allows only authorized users’ requests to reach the site. IAP can be used to protect web sites running on many platforms, including App Engine, Compute Engine, and other services behind a Google Cloud Load Balancer. But it isn’t restricted to Google Cloud: you can use it with IAP Connector to protect your own on-premises applications, too.Protecting a website with IAP can be configured using the Google Cloud Console. Identity-Aware Proxy is managed under the Security submenu. From there, an organization can enable IAP and then turn it on for selected sites. Access is permitted by granting the IAP-secured Web App User role to one or more individual email addresses, entire email domains, or a group email address. Those users can use the sites just like any other internet site after an authentication step.The core steps are similar regardless of the case:Create an employee-only, or “intranet”, server by specifying that only users who authenticate with company email addresses should be allowed access. IAP can authenticate Gmail or Google Workspace addresses, addresses in a company’s Active Directory or other LDAP directory via Google Cloud Directory Sync, or addresses supported by other common identity providers. For public, but authenticated, access, specify that IAP should allow “allAuthenticatedUsers”. Anyone willing and able to authenticate will be given access to the site. IAP’s second major function is to add headers to each request with user identity information, so the receiving site can use that information without having to perform its own authentication.Access can be limited to any group, or combination of groups, by specifying a group email address instead of individual ones. And IAP can go even further than basing access on identity only. Organizations can set device policies members of a group must follow in order to be given access. Those policies can require specific operating system versions, use of company profiles on browsers or mobile devices, or even use of company owned equipment only.Over my career, I have set up web sites, managed user registration and authentication, tracked sessions, configured firewalls, and used VPNs for internal sites. I was thrilled to discover Identity-Aware Proxy. I didn’t need to do any of those things any more! It seemed almost magical. If you have similar use cases, you should take a close look at IAP for yourself.Related ArticleCloud Identity-Aware Proxy: Protect application access on the cloudWhether your application is lift-and-shift or cloud-native, administrators and developers want to provide simple protected application ac…Read Article
Quelle: Google Cloud Platform

Integrating Dialogflow with Google Chat

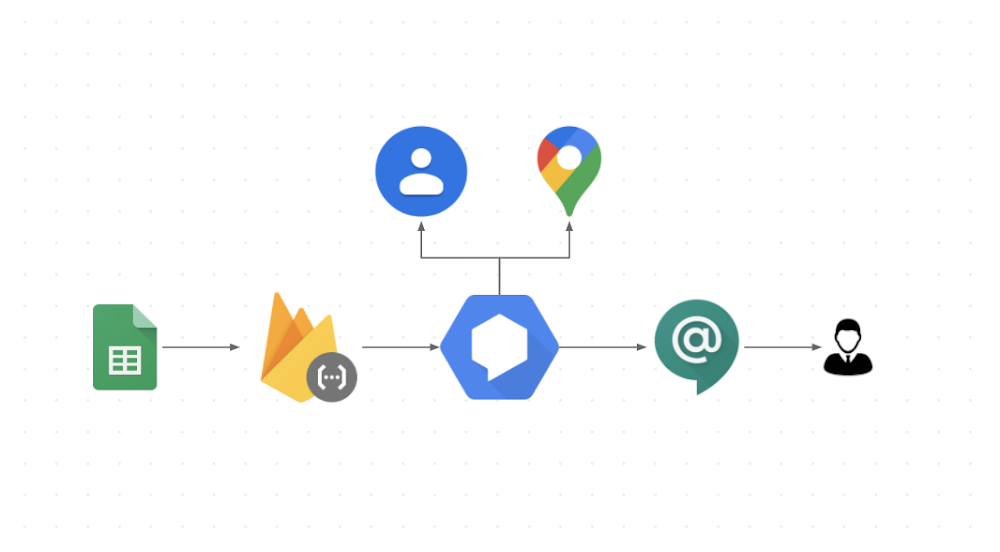
In today’s world, where online collaborative work is crucial and maintaining productivity is key,  chatbots have an important role to play. Why chatbots? Workers frequently need to incorporate information from external sources in their communications, and chatbots can help them find that information all in one place. In this post we’ll walk you through a bot that was inspired by a real use case here at Google. In large companies such as Google, it can be difficult to find out which person is responsible for a specific product area. When customer teams have a question they often have to go through many ad hoc trackers such as the one here in Sheets (sample scrubbed data) to find answers. When you are on the go a lot, this gets even harder, especially if you don’t remember the Sheets URL and how to use it to find your answer. Instead of sifting through a spreadsheet, what if you could just send a chat message to see who to contact for networking or security expertise? That’s where the integration between Dialogflow and Google Chat comes in! It helps reduce context switching for users, because they can ask their questions right within Google Chat, addressing a bot built in Dialogflow that integrates with the Sheets API to find answers. Let’s see how it works!If you’d rather watch than read, we share the entire process in this video:How does it work?When a user asks a question in  Google Chat, the bot that is initiated integrates with Dialogflow to facilitate natural conversations. Dialogflow, in turn, integrates with a backend database or Sheets (as shown in the image) via a Cloud Functions fulfillment. Extracting the information from Google SheetsTo extract the information from Sheets we first need to know exactly what information is relevant to fulfill a request. After identifying the pieces of information we need, we use the Sheets API to extract them. Defining the input phrasesWhile it would be easier to write a basic bot that requires the input to be formatted in a predetermined order, such a bot would be difficult to use. Users would have to remember the order and always spell everything correctly. And if a tool is too hard to use, people aren’t going to use it.The key to chatbot adoption is usability, and that means the ability to handle phrases that occur in natural conversation, like these: “Who is on Gmail for data management?””I would like to know the data management guru “”Tell me who is the data management specialist”This is where Dialogflow comes in. Dialogflow is a natural language understanding platform that simplifies the design and integration of conversational user experiences for mobile apps, web apps, bots, and more. We built our bot in three easy steps, which should look familiar to you if  you’ve completed the Deconstructing Chatbots video series. Step 1: Define the entitiesDialogflow uses models trained on natural conversation.  Before we can use these models, however, our bot needs to know the key phrases in our context, such as the role types, skills, and account names (e.g.,  Account Specialist, Gmail, and Security).Step 2: Configure the intentsAn intent is essentially the user’s question. This is where we define how to use the entities we just created by defining Actions and Parameters. When we add the bot to a room, the intent is where the response comes from.Actions and ParametersThe entities you define are used in  configuring your actions and parameters. In this case, Roles, Skills, and Accounts are all required parameters for this intent to be fulfilled (and the user can provide these in any order they like). If a user forgets one, we define a prompt to get it from the user. Training phrases Because different people talk differently, we use training phrases to provide different examples of user requests. Dialogflow uses a pretrained NLP model, and these training phrases are the realistic questions that help train a specific model for our use case.Step 3: Set up fulfillment codeFulfillment is where we glue everything together, connecting all the APIs in a Node.js Firebase function. In this case, we use the Sheets API but you can connect to any backend you choose. Refer to the sample code for details.One-click integration Dialogflow integrates with many popular conversation platforms like Google Chat, Google Assistant, Slack, and more. Direct end-user interactions are handled for you, so you can focus on building your agent. Each integration handles end-user interactions in a platform-specific way, so see the documentation for your integration platform for details. ConclusionBuilding a chatbot that integrates Google Chat, Dialogflow, and Sheets (or another data source) is straightforward.  For more details, watch our Integrate Dialogflow with Google Chat video, where we talk in more depth about the process, and check out the full source code on GitHub. Want to learn more about building chat and voice applications using Dialogflow? We’ve created an entire video series on Deconstructing Chatbots that will take you from zero to hero in no time!For more cloud content follow us on Twitter @pvergadia and @srivas_dev.Related ArticleConversational AI drives better customer experiencesConversational AI takes contact centers into a new era of customer service.Read Article
Quelle: Google Cloud Platform