Introduction to Kubernetes: The Ultimate Guide
The post Introduction to Kubernetes: The Ultimate Guide appeared first on Mirantis | Pure Play Open Cloud.
Given the importance of Kubernetes in today’s environment, we wanted to give you a “one stop shop” for any information you may need.
What is Kubernetes?
Simply put, Kubernetes, or K8s, is a container orchestration system. In other words, when you use Kubernetes, a container based application can be deployed, scaled, and managed automatically.
The objective of Kubernetes is to abstract away the complexity of managing a fleet of containers that represent packaged applications and include everything needed to run wherever they’re provisioned. By interacting with the Kubernetes REST API, you can describe the desired state of your application, and Kubernetes does whatever is necessary to make the infrastructure conform. It deploys groups of containers, replicates them, redeploys if some of them fail, and so on.
Because it’s open source, a k8s cluster can run almost anywhere, and the major public cloud providers all provide easy ways to consume this technology. Private clouds based on OpenStack can also run Kubernetes, and bare metal servers can be leveraged as worker nodes for it. So if you describe your application with Kubernetes building blocks, you’ll then be able to deploy it within VMs or bare metal servers, on public or private clouds.
Let’s take a look at the basics of how Kubernetes works so that you will have a solid foundation to dive deeper.
What is a Kubernetes cluster? The Kubernetes architecture
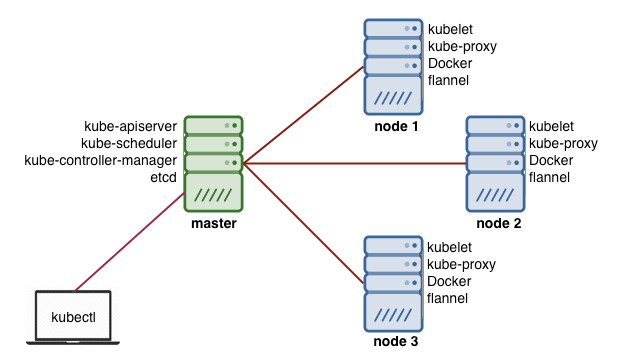
The Kubernetes architecture is relatively simple. You never interact directly with the nodes hosting your application, but only with the control plane, which presents an API and is in charge of scheduling and replicating groups of containers named Pods. Kubectl is the command line interface you can use to interact with the API to share the desired application state or gather detailed information on the infrastructure’s current state.
Let’s look at the various pieces.
Nodes
Each node that hosts part of your distributed application does so by leveraging Docker or a similar container technology, such as Rocket from CoreOS. The nodes also run two additional pieces of software: kube-proxy, which gives access to your running app, and kubelet, which receives commands from the k8s control plane. Nodes can also run flannel, an etcd backed network fabric for containers.
Master
The control plane itself runs the API server (kube-apiserver), the scheduler (kube-scheduler), the controller manager (kube-controller-manager) and etcd, a highly available key-value store for shared configuration and service discovery implementing the Raft consensus Algorithm.
Now let’s look at some of the terminology you might run into.
Terminology
Kubernetes has its own vocabulary which, once you get used to it, gives you some sense of how things are organized. These terms include:
Pods: Pods are a group of one or more containers, their shared storage, and options about how to run them. Each pod gets its own IP address.
Labels: Labels are key/value pairs that Kubernetes attaches to any objects, such as pods, Replication Controllers, Endpoints, and so on.
Annotations: Annotations are key/value pairs used to store arbitrary non-queryable metadata.
Services: Services are an abstraction, defining a logical set of Pods and a policy by which to access them over the network.
Replication Controller: Replication controllers ensure that a specific number of pod replicas are running at any one time.
Secrets: Secrets hold sensitive information such as passwords, TLS certificates, OAuth tokens, and ssh keys.
ConfigMap: ConfigMaps are mechanisms used to inject containers with configuration data while keeping containers agnostic of Kubernetes itself.
Why Kubernetes?
So what is Kubernetes used for? In order to justify the added complexity that Kubernetes brings, there need to be some benefits. At its core, a cluster manager such as k8s exists to serve developers so they can serve themselves without having to involve the operations team.
Reliability is one of the major benefits of Kubernetes; Google has over 10 years of experience when it comes to infrastructure operations with Borg, their internal container orchestration solution, and they’ve built Kubernetes based on this experience. Kubernetes can be used to prevent failure from impacting the availability or performance of your application, and that’s a great benefit.
Scalability is handled by Kubernetes on different levels. You can add cluster capacity by adding more worker nodes, which can even be automated in many public clouds with autoscaling functionality based on CPU and Memory triggers. The Kubernetes Scheduler includes affinity features to spread your workloads evenly across the infrastructure, maximizing availability. Finally, k8s can autoscale your application using the Pod autoscaler, which can be driven by custom triggers.
Ultimate guide to Kubernetes
Now that you have the basics, we can look at more information. Here at Mirantis we’re committed to making things easy for you to get your work done, so we’ve decided to put together this guide to Kubernetes.
If you have suggestions for topics you’d like us to cover, or links to resources you find particularly valuable, please let us know.
Introduction to Kubernetes
Don’t Be Scared of Kubernetes
Kubernetes has the broadest capabilities of any container orchestrator available today, which adds up to a lot of power and complexity. That can be overwhelming for a lot of people jumping in for the first time – enough to scare people off from getting started. Here are five things you might be afraid of, and 5 ways to get started.
Deploying Kubernetes
Building Your First Certified Kubernetes Cluster On-Premises
Where following entries have shown how to create a basic dev/test cluster, this article explains how to create a production cluster using Docker Enterprise.
How to install Kubernetes with Kubeadm: A quick and dirty guide
Sometimes you just need a Kubernetes cluster, and you don’t want to mess around. This article is a quick and dirty guide to creating a single-node Kubernetes cluster using Kubeadm, a tool the K8s community created to simplify the deployment process.
Multi-node Kubernetes with KDC: A quick and dirty guide
Kubeadm-dind-cluster, or KDC, is a configurable script that enables you to easily create a multi-node cluster on a single machine by deploying Kubernetes nodes as Docker containers (hence the Docker-in-Docker (dind) part of the name) rather than VMs or separate bare metal machines.
Create and manage an OpenStack-based KaaS child cluster
Once you’ve deployed your KaaS management cluster, you can begin creating actual Kubernetes child clusters. These clusters will use the same cloud provider type as the management cluster, so if you’ve deployed your management nodes on OpenStack, your child cluster will also run on OpenStack.
How to deploy Airship in a Bottle: A quick and dirty guide
Airship is designed to deploy OpenStack, but it deploys it on Kubernetes, so the first thing it does is deploy a Kubernetes cluster, so it’s another option for getting a cluster up and running.
Configuring Kubernetes and components
Virtlet: run VMs as Kubernetes pods
Virtlet enables you to run VMs as first class citizens within Kubernetes; this article explains how and why to make that work.
Everything you ever wanted to know about using etcd with Kubernetes v1.6 (but were afraid to ask)
The etcd key-value store is the only stateful component of the Kubernetes control plane. This makes matters for an administrator simpler, but when etcd went from v2 to v3, it was a headache for operators.
Development
Modeling complex applications with Kubernetes AppController
When you’re first looking at Kubernetes applications, it’s common to see a simple scenario that may include several pieces — but not explicit dependencies. But what happens when you have an application that does include dependencies. For example, what happens if the database must always be configured before the web servers, and so on? It’s common for situations to arise in which resources need to be created in a specific order, which isn’t easily accommodated with today’s templates.
Designing Kubernetes-based applications
How do you build 12-factor apps using Kubernetes?
It’s said that there are 12 factors that define a cloud-native application. It’s also said that Kubernetes is designed for cloud native computing. So how do you create a 12-factor application using Kubernetes? Let’s take a look at exactly what twelve factor apps are and how they relate to Kubernetes.
Creating YAML
Introduction to Kustomize, Part 1: Creating a Kubernetes app out of multiple pieces
Kustomize is a tool that lets you create an entire Kubernetes application out of individual pieces — without touching the YAML for the individual components. For example, you can combine pieces from different sources, keep your customizations — or kustomizations, as the case may be — in source control, and create overlays for specific situations.
Introduction to Kustomize, Part 2: Overriding values with overlays
In part 1 of this tutorial, we looked at how to use Kustomize to combine multiple pieces into a single YAML file that can be deployed to Kubernetes. In doing that, we used the example of combining specs for WordPress and MySQL, automatically adding a common app label. Now we’re going to move on and look at what happens when we need to override some of the existing values that aren’t labels.
Introduction to YAML, Part 1: Creating a Kubernetes deployment
In previous articles, we’ve been talking about how to use Kubernetes to spin up resources. So far, we’ve been working exclusively on the command line, but there’s an easier and more useful way to do it: creating configuration files using YAML. In this article, we’ll look at how YAML works and use it to define first a Kubernetes Pod, and then a Kubernetes Deployment.
Introduction to YAML, Part 2: Kubernetes Services, Ingress, and repeated nodes
In part 1 of this series, we looked at the basics behind YAML and showed you how to create basic Kubernetes objects such as Pods and Deployments using the two basic structures of YAML, Maps and Lists. Now we’re going to look at enhancing your YAML documents with repeated nodes in the context of Kubernetes Services, Endpoints, and Ingress.
Containerize an application
How do I build a containerized app on Mirantis OpenStack with native Docker tools?
In this article, we take a look at what’s really going on behind the scenes of a containerized application by building one on OpenStack using native Docker tools.
Create an application
Best of 2019 Blogs: Designing Your First App in Kubernetes
Kubernetes is a powerful container orchestrator and has been establishing itself as IT architects’ container orchestrator of choice. But Kubernetes’ power comes at a price; jumping into the cockpit of a state-of-the-art jet puts a lot of power under you, but knowing how to actually fly it is not so simple.
Creating and accessing a Kubernetes cluster on OpenStack, part 3: Run the application
In part 2, you created the actual cluster, so finally, you’re ready to actually interact with the Kubernetes API that you installed. To do that, you’ll need to define the security credentials for accessing your applications, deploy a containerized app to the cluster, and expose the app to the outside world so you can access it.
Docker: (a few) Best Practices
As Docker continues to evolve, it is important to stay up to date with best practices. We joined JFrog to go over the challenges of Dockerization, Dockerfile tips, and configuration tweaks for production.
Multi-container pods and container communication in Kubernetes
Containers are often intended to solve a single, narrowly defined problem, such as a microservice, but in the real world, problems require multiple containers for a complete solution. In this article, we’re going to talk about combining multiple containers into a single Kubernetes Pod, and what it means for inter-container communication.
Deploy an application with Helm
Using Kubernetes Helm to install applications: A quick and dirty guide
Deploying an application using containers can be much easier than trying to manage deployments of a traditional application over different environments, but trying to manage and scale multiple containers manually is much more difficult than orchestrating them using Kubernetes. But even managing Kubernetes applications looks difficult compared to, say, “apt-get install mysql”. Fortunately, the container ecosystem has now evolved to that level of simplicity. Enter Helm.
Infrastructure and operations
Kubernetes Lifecycle Management with Docker Kubernetes Service (DKS)
There are many tutorials and guides available for getting started with Kubernetes. Typically, these detail the key concepts and outline the steps for deploying your first Kubernetes cluster. However, when organizations want to roll out Kubernetes at scale or in production, the deployment is much more complex and there are new requirements around both the initial setup and configuration and the ongoing management – often referred to as “Day 1 and Day 2 operations.”
We installed an OpenStack cluster with close to 1000 nodes on Kubernetes. Here’s what we found out.
We did a number of tests that looked at deploying close to 1000 OpenStack nodes on a pre-installed Kubernetes cluster as a way of finding out what problems you might run into, and fixing them, if at all possible. In all we found several, and though in general, we were able to fix them, we thought it would still be good to go over the types of things you need to look for.
Scale and Performance Testing of Kubernetes
Managing thousands of containers can be challenging, but if you want to know how Kubernetes will behave at scale we might be able to provide an answer. At KubeCon in Seattle, we shared the data we collected in our scale lab, which consists of 500 physical nodes. Using virtual machines, we can simulate up to 5000 Kubernetes minions running actual workloads, and our tests are designed to reveal how Kubernetes behaves while managing a complex application (in this case, OpenStack services) at large scale.
Kubernetes as an Edge substrate
How to build an edge cloud part 1: Building a simple facial recognition system
If you look at the internet, there’s a lot of talk about edge clouds and what they are — from a conceptual level. But not too many people are telling you how to actually build one. Today we’re going to start to change that.
Open Source IoT Platform based on OpenStack and Kubernetes
This blog post explains open source IoT platform introduced at OpenStack Summit Keynote at Austin in more detail. First we explain our approach and vision to IoT, technical overview and show two sample use cases.
Scaling your application
Clustered RabbitMQ on Kubernetes
There are a lot of possible approaches to setting up clustered RabbitMQ on Kubernetes. Today I’m going to talk about the most common pitfalls or all approaches to RabbitMQ clustering, so if you want to come up with your own solution, you should find a good bit of the material meaningful to you.
Kubernetes Replication Controller, ReplicaSet and Deployments: Understanding replication options
As a container management tool, Kubernetes was designed to orchestrate multiple containers and replication, and in fact there are currently several ways to do it. In this article, we’ll look at three options: Replication Controllers, ReplicaSets, and Deployments.
Scaling with Kubernetes DaemonSets
We’re used to thinking about scaling from the point of view of a Deployment; we want it to scale up under different conditions, so it looks for appropriate nodes, and puts pods on them. DaemonSets, on the other hand, take a different tack: any time you have a node that belongs to the set, it runs the pods you specify. For example, you might create a DaemonSet to tell Kubernetes that any time you create a node with the label app=webserver you want it to run Nginx. Let’s take a look at how that works.
Security
Make your container images safer and more reliable with Harbor, the cloud native registry
Container registries such as DockerHub have made container application development much easier, but they have introduced another problem: how do you know downloaded images are production-ready and secure? To solve this problem, private registries such as Harbor enable your developers to get the benefits of pre-defined images while enabling you to designate what images can be used.
Controlling access to Kubernetes using RBAC
Role-based Access Control for Kubernetes with Docker Enterprise
Docker Enterprise Edition 2.0 provides a single management control plane for both Swarm and Kubernetes-based clusters – including clusters made up of both Swarm and Kubernetes workers. It also provides a web interface enabling you to manage user access to those clusters using RBAC.
Networking
Calico
BGPaaS in OpenStack – Kubernetes with Calico in OpenStack with OpenContrail
It’s been a while since the new version 3.X of OpenContrail was released, so let’s take a good look at new features of this most deployed SDN/NFV with OpenStack, and specifically use cases and how to use BGP as a Service in OpenStack private cloud.
Kubernetes and OpenStack
Kubernetes and OpenStack multi-cloud networking
The use of real bare metal Kubernetes clusters for application workloads from a networking point of view.
Using a service mesh
What is Istio? It’s a service mesh. Great. What’s a service mesh?
Istio has been all over the ecosystem wherever there’s talk about service meshes, but it’s important that we take a look at what all of that means.
Containers aren’t a game: industry gets serious about Kubernetes development with Draft and Istio
As the infrastructure market settles down, more attention is being paid to what happens after you have your cloud up and running. This week, we saw the announcement of not one, but two frameworks aimed at developers of Kubernetes-based applications.
Spinnaker Shpinnaker and Istio Shmistio to make a shmesh! (Part 1)
I’m guessing that whenever your manager approaches you and says “We have a problem,” you sort of know that it really means “I have a problem for you to solve.” Such is often the case with our customers, who are frequently attempting to move from a cascading (waterfall) style of delivering application services on bare metal to a more modern way of approaching continuous delivery geared toward cloud native applications.
Return of the Smesh (Spinnaker Shpinnaker and Istio Shmistio to make a Smesh! Part 2)
One of the first things I learned on my sojourn through the open source world is that there are ALWAYS new and different approaches to building the better mouse trap when it comes to component design within a given architecture, and that a single project doesn’t usually contain all of the answers to questions created when developing new application architectures.
OpenDaylight
What’s in OpenDaylight?
The momentum to recognize the OpenDaylight Project as the standard open source software-defined networking (SDN) continues to grow. Established to accelerate the adoption of SDN and Network Functions Virtualization (NFV), OpenDaylight provides an open platform for network programmability designed to enable SDN and create a solid NFV foundation for all sizes of networks.
What are the resources you’ve found to be most helpful? Let us know in the comments!The post Introduction to Kubernetes: The Ultimate Guide appeared first on Mirantis | Pure Play Open Cloud.
Quelle: Mirantis