Keyless API authentication—Better cloud security through workload identity federation, no service account keys necessary

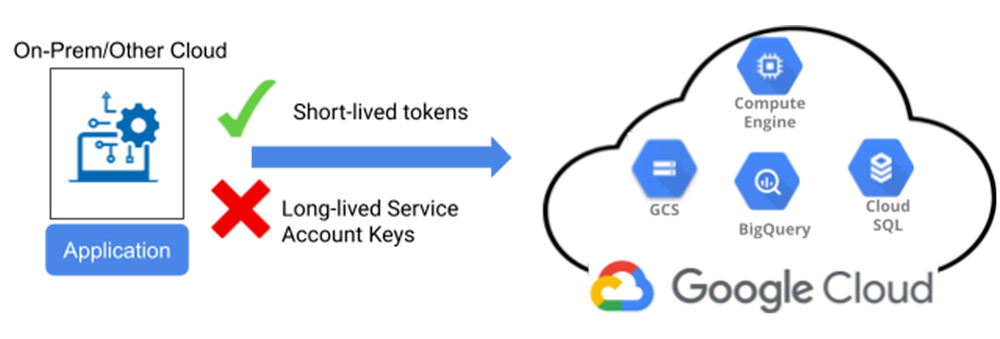
Organizations often have applications that run on multiple platforms, on-premises or cloud. For such applications that call Google Cloud Platform (GCP) APIs, a common challenge admins face is securing long-lived service account keys used to authenticate to GCP. Examples of such applications might include:Analytics workloads running on AWS or Azure that access sensitive datasets stored in Google Cloud Storage CI/CD pipelines that use external tools such as Terraform to provision projects and VMs on GCP Microservice-based apps running on GKE that connect to one or more GCP services.  Since these applications rely on service account keys to access GCP APIs, you need to create and manage these credentials and have safeguards in place to ensure that long-lived service keys are well protected, securely distributed, and frequently rotated. If these credentials are compromised, a bad actor can use them to access your resources and data, and put your business at risk. Managing service account keys can become even more challenging as your organization’s cloud consumption and deployment of multi-cloud applications grows, putting you in the unenviable position of having to self-manage thousands of service account credentials or invest in third-party solutions to safeguard these service account keys.The best way to alleviate the challenges around service account keys is not to use them at all – and with workload identity federation, a new feature on Google Cloud, you can do just that.What is workload Identity federation and how do I set it up?Workload identity federation is a new keyless application authentication mechanism that allows your workloads running on-premises, in AWS, or in Azure to federate with an external Identity provider (IdP) and call Google Cloud resources without using a service account key. Your workloads instead call our security token service (STS) endpoint to exchange the authentication token they obtained from the IdP for a short-lived GCP access token. They then use this access token to impersonate a service account and inherit the permissions of the service account to access GCP resources.Here are the steps to set up workload identity Federation:1 .Create a workload identity pool resource object in your GCP project. The workload identity Pool is a new component built to facilitate this keyless federation mechanism. The pool acts as a container for your collection of external identities.2. Connect one or more of your IdPs to the workload identity Pool. The IdP can be an AWS or Azure account(s) or provider(s) that support OIDC protocol (SAML is coming soon).3. Grant the pool access to resources by defining two IAM policies:A policy granting a service account access to desired resources. You can create a new service account or re-use an existing service account. A policy that allows identities from the pool to impersonate the service account. Detailed information on creating these policies are available in our documentation.4. Authenticate your workloads to the STS endpoint, impersonate the service account, and have them call the desired GCP APIs.More detailed information on how to set up workload identity federation and configure policies can be found here. Integration with authentication client librariesWe’ve provided extensive client library support in many languages to help your application developers simplify and secure the authentication process with minimal coding. We highly-recommend you use them. Here’s an example of how developers can can start using workload identity pools with the Google Cloud Client libraries in two steps:Generate the credentials configuration file for your workload identity pool provider:Set the GOOGLE_APPLICATION_CREDENTIALS environment variable on your VM to point to the generated credentials config file.You can now start using workload identity pools to call Google APIs as illustrated in this Python snippet:You can use custom attributes (claims) from the IdP to define fine-grained IAM access policy to allow or deny your workloads access to resources and audit their calls using Cloud Audit Logs.Improving your cloud security postureMoving from service account keys to the keyless application authentication mechanism enabled by workload identity federation can help you reduce the risks associated with managing long-lived keys for application authentication across your environment. With this new capability, developers can build more secure applications and better protect access to GCP services. To learn more about workload identity federation, take a look at our documentation.Related ArticleHelp keep your Google Cloud service account keys safe: taking charge of your securityGoogle Cloud Platform (GCP) offers robust service account key management capabilities to help ensure that only authorized and properly au…Read Article
Quelle: Google Cloud Platform

Recovering global wildlife populations using ML

Wildlife provides critical benefits to support nature and people. Unfortunately, wildlife is slowly but surely disappearing from our planet and we lack reliable and up-to-date information to understand and prevent this loss. By harnessing the power of technology and science, we can unite millions of photos from [motion sensored cameras] around the world and reveal how wildlife is faring, in near real-time…and make better decisions wildlifeinsights.org/aboutCase study backgroundGoogle partnered with several leading conservation organizations to build a project known as Wildlife Insights, which is a web app that enables people to upload, manage, and identify images of wildlife from camera traps. The intention is for anyone in the world who wishes to protect wildlife populations and take inventory of their health, to do so in a non-invasive way. The tricky part, however, is reviewing each of the millions of photos and identifying every species, and so this is where Machine Learning is of great help with this big data problem. Themodels built by the inter-organizational collaboration, presently classifies up to 732 species and includes region-based logic such as preventing a camera trap in Asia—for example—from classifying an African elephant (using geo-fencing). These models have been in development for several years, and are continuously being evolved to serve animals all over the globe. You can learn more about it here.This worldwide collaboration took a lot of work, but much of the basic technology used isavailable to you at WildlifeLifeInsights.org!And, for those interested in wanting to learn how to build a basic image classifier inspired from this wildlife project, please continue reading. You can also go deeper by trying out our sample tutorial at the end, which contains the code we used, and lets you run it interactively in a step-by-step notebook (you can click the “play” icon at each step to run each process).How to build an image classification model to protect wildlifeWe’re launching a Google Cloud series called “People and Planet AI” to empower users to build amazing apps that can help solve complex social and environmental challenges inspired from real case studies such as the project above. In this first episode, we show you how to use Google Cloud’s Big Data & ML capabilities to automatically classify images of animals from camera traps. You can check out the video here.Requirements to get startedHardwareYou would require two hardware components:Camera trap(s) → to take photos (which we also strongly recommend you share by uploading on Wildlife Insights to help build a global observation network of wildlife). Micro controller(s) (like a Raspberry Pi or Arduino) →  to serve as a small linux computer for each camera. It hosts the ML model locally and does the heavy lifting of labeling images by species as well as omitting blank images that aren’t helpful.With these two tools, the goal is to have the labeled images then uploaded via an internet connection. This can be done over a cellular network. However, in remote areas you can carry the microcontroller to a wifi enabled area periodically to do the transfer.

Creating a SQL Server instance integrated with Active Directory using Google Cloud SQL

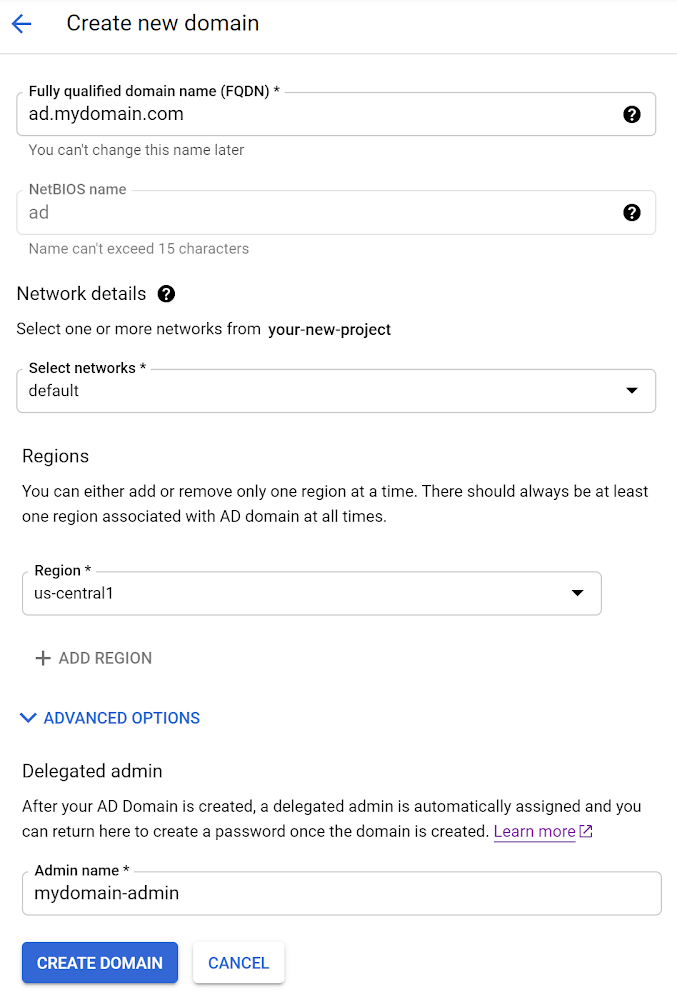
SQL Server instances in Google Cloud SQL now integrate with Microsoft Active Directory (AD) as a pre-GA feature that you can try out for yourself right now. This post describes the basic steps required to create a SQL Server instance with this new functionality. If you’re looking for complete details see the official documentation.Create a domain with Managed Service for Microsoft Active DirectoryThe first step is to create a domain with Managed Service for Microsoft AD. This can be done easily via the “Managed Microsoft Active Directory” section in the Google Cloud Console. Click the “CREATE NEW AD DOMAIN” button and enter the following information:Specify a Fully Qualified Domain NameExample: ad.mydomain.comSelect a VPC networkExample: defaultSpecify a suitable CIDR range for the AD domain Example: 10.1.0.0/24Select a Region where the AD domain should be locatedExample: us-central1Specify an admin name for the AD domain’s delegated administratorExample: mydomain-adminWith all of that information provided it should look something like this:Click “CREATE DOMAIN” to complete the process of creating the AD domain. You’ll have to be patient for a bit since it can take up 60 minutes for the domain to be available for use. Once it is ready it will look like this in the list of domains:The final step to configure the AD domain is to set the “Delegated admin” password. Click the domain name in the list of domains to go to its details page. On that page, click the “SET PASSWORD” link and make a note of the password which we’ll use in a later step of this blog post.Create a SQL Server instance with Windows AuthenticationAfter your AD domain is available for use you can start creating SQL Server instances that utilize the AD domain to enable Windows Authentication with AD-based identities. Go ahead and try out creating a new SQL Server instance by going to the Cloud SQL section of the Google Cloud Console. Click the “CREATE INSTANCE” button. Then click “Choose SQL Server” and enter the following information:Specify an Instance IDExample: sql-server-with-adEnter a password for the ‘sqlserver’ user and make a note of this for use in a later step.Select a Database version. All versions will work with Active Directory. I selected  “SQL Server 2017 Standard”.Select a Region where the instance should be located. It is recommended that you locate the SQL Server instance in the same region as the AD domain for the lowest network latency and the best performance.Example: us-central1Select whether the instance should be located in a “Single zone” or “Multiple zones”. For production instances “Multiple zones” is recommended to achieve high availability which provides automatic failover to another zone within your selected region. Select “SHOW CONFIGURATION OPTIONS”Click the “Connections” section to expand it and select both the “Private IP” and “Public IP” options. Note, if this is the first time creating a Private IP for the “Network” you select, you’ll be prompted that a “Private service connection is required”.Click “SET UP CONNECTION” and select “Use an automatically allocated IP range” in the “Enable Service Networking API” dialog that appears: Then click the “Continue” button to complete the process.Back in the instance “Configuration Options”, click the “Authentication” section to expand it.From the dropdown menu for joining a managed Active Directory domain, select the domain that you created in the first step of this blog post.Cloud SQL will automatically create a Per-Product, Per-Project Service account used for authentication to the instance. You will be prompted to grant the service account the “managedidentities.sqlintegrator” IAM role.With all of that information provided the create instance form should look something like this:Click “CREATE INSTANCE” to complete the process of creating the instance. Once the instance is created you should see the new instance’s overview page that should look something like this:Well done! You now have a SQL Server instance on Google Cloud that you can log into using Windows Authentication with an AD-based identity. Connecting to the SQL Server instance using Windows authenticationLet’s go ahead and confirm that everything works as expected. To do so I’ll create a Windows Server 2019 VM using Google Compute Engine. Using it I can add a new user to the Managed Active Directory, give that user access to the SQL Server instance in Cloud SQL and then connect to the SQL Server instance as that user with Windows Authentication.Windows Server VM’s are easy to create using Google Compute Engine’s marketplace.Searching for “Windows Server 2019″ in the marketplace returns many options to choose from.I’ll create a VM using the “Secured SQL Server 2017 Standard on Windows Server 2019″ option. After choosing the VM option, click the “Launch” button and you’ll be taken to the instance creation page. Review the settings of the VM instance to be created, especially the “Network” selection under the “Networking” section, to ensure that the selected “Network” is a network that is included in your Active Directory domain. Then scroll to the bottom of the instance creation page and click the “Create” button. Once the VM creation process is complete, you’ll be taken to the instance detail page. Click the “Set Windows password” button to set a password to use for logging into the VM. Then use the “Remote Desktop Protocol” (RDP) button to login in to the VM.Once you are logged into the VM instance you can now join the VM to the Managed Active Directory domain. Click the “Windows” icon on the bottom left of the screen, type “Control Panel”, and then press ENTER. Navigate to “System and Security”, and then click “System”. Under Computer name, domain, and workgroup settings, click “Change settings”.Then click the “Change” button in the System Properties dialog box.Enter the name of your Managed Active Directory in the “Domain” input text box and click the “OK” button.A welcome to the domain message should appear that looks something like this:Now that we have a Windows Server VM in our Managed Active Directory, we can add a User. To do so, we’ll need to install the necessary Remote Server Administration Tools (RSAT). Open “Server Manager” and click the “Manage” menu item and select “Add Roles and Features” wizard.In the wizard, advance to the Select features page. You can select Features from the sidebar or select Next until you reach it.On the Select features page, in the Features list, expand Remote Server Administration Tools, and then expand Role Administration Tools.Under Role Administration Tools, select AD DS and AD LDS Tools. This enables the following features:Active Directory module for Windows PowerShellAD LDS Snap-Ins and Command-Line ToolsActive Directory Administrative CenterAD DS Snap-Ins and Command-Line ToolsOptional: You may also want to enable the following features:Group Policy ManagementDNS Server Tools (under Role Administration Tools)Close the wizard.Excellent! Now the Windows Server VM is enabled with the tools to add Users to the Managed AD domain. Remember the “Delegated admin” that we specified when we created the AD domain at the beginning of this blog post? Well now it’s time to use it. We’ll log out of the Windows Server VM and log back in as the “Delegated admin”. Log out of the Windows VM by clicking the “Windows” icon at the bottom left of the VM instance screen, then clicking the “power” icon and selecting “Disconnect”.Back on the Google Compute Engine instances page click the “RDP” button to log back into the Window Server VM, but this time do so with the AD domain “Delegated admin” username and password.Once logged in, open “Server Manager”, click the “Tools” menu item and select  “Active Directory Users and Computers”. In the “Active Directory Users and Computers” dialog window that appears, expand the ad.mydomain.com item and click the “Cloud” sub-item. Then Click the “Create a New User in the current container” icon to create a new User.Enter a First and Last name for the User along with a logon name and click the “Next” button.Enter and confirm a Password for the User, then click the “Next” button again. Finally click the “Finish” button in the confirmation dialog box to create the User.Great! Now we’ve got a new AD domain User. But they still need to be granted access to the SQL Server instance on Cloud SQL. We can do that with Azure Data Studio. Open a browser on the Windows Server VM and go to the Azure Data Studio download page. Click the “System Installer” link to initiate the download, and click the “Run” button in the download dialog window that appearsAfter the Azure Data Studio installation wizard completes, with “Launch Azure Data Studio” checkbox selected, click the “Finish” button to open the program. In the start screen Azure Data Studio click the “New Connection” link.For “Server” enter the “Active Directory FQDN (Private)” value from the Cloud SQL – SQL Server instance details page:Example:  private.sql-server-with-ad.us-central1.your-new-project.cloudsql.ad.mydomain.comFor Authentication type select “SQL Login”For the “User name” enter “sqlserver” and for “Password” enter the password for the “sqlserver” User that you specified when you created the SQL Server instance.With all of that information specified the Connection Details should look something like this:Click the “Connect” button to connect to the SQL Server instance. Once the connection is made, click the “New query” link and enter the following query:CREATE LOGIN [ad.mydomain.comclouduser] FROM WINDOWSand click the “Run” button.Wonderful! We’re completely done with the setup and now it is time for the moment of truth.Let’s test out connecting to our SQL Server instance as our new AD domain User via Windows Authentication. Close the Azure Data Studio. Now we’ll reopen Azure Data Studio but we’ll do so as the new AD domain User. Click the “Windows” icon at the bottom left of the VM instance screen and type “Azure Data Studio”. Right-click the “Azure Data Studio” icon and select “Run as a different user”.Enter the “User name” and “Password” for the AD domain User in the dialog box that appears.On the Azure Data Studio start page, click the “New Connection” link.  For “Server” enter the “Active Directory FQDN (Private)” value from the Cloud SQL – SQL Server instance details page:Example:  private.sql-server-with-ad.us-central1.your-new-project.cloudsql.ad.mydomain.comFor Authentication type select “Windows Authentication”.Click the “Connect” button… and smile because your SQL Server on Cloud SQL is now integrated with Managed Active Directory.Getting startedWindows Authentication for Cloud SQL for SQL Server is available in preview for all customers today!  Learn more and get started.
Quelle: Google Cloud Platform

Changing How Updates Work with Docker Desktop 3.3

Today we are pleased to announce the release of Docker Desktop 3.3.

We’ve been listening to your feedback on our Public Roadmap and we are consistently asked for three things: smaller downloads, more flexible installation options, and more frequent feature releases, bug fixes, and security updates.

We also heard from our community that the smaller updates are appreciated, requiring immediate installation is not convenient, and automatic background downloads are problematic for developers on constrained or metered bandwidth.

We’ve heard you and are changing how updates to Docker Desktop work, while still maintaining the ability to provide you with smaller, faster updates. We are also providing additional flexibility to developers with Pro or Team subscriptions.

Flexibility for Updates 

With Docker Desktop 3.3, when a new update to Docker Desktop is available, it will no longer be automatically downloaded and installed on your next restart. You can now choose when to start the download and installation process.

To encourage developers to stay up to date, we have built in increasingly persistent reminders after an update has become available.

If you use Docker Desktop at work you may need to skip a specific update. For this reason, Pro or Team subscription developers can skip notifications for a particular update when a reminder appears.

Finally, developers in larger organizations, who don’t have administrative access to install updates to Docker Desktop, or are only allowed to upgrade to IT-approved versions, there is now an option in the Settings menu to opt out of notifications altogether for Docker Desktop updates if your Docker ID is part of a Team subscription.

It’s your positive feedback that helps us continue to improve the Docker experience. We truly appreciate it. Please keep that feedback coming by raising tickets on our Public Roadmap.

See the release notes for Docker Desktop for Mac and Docker Desktop for Windows for the complete set of changes in Docker Desktop 3.3 including the latest Compose release, update to Linux Kernel 5.10, and several other bug fixes and improvements you’ve been waiting for.

And check out our Tech Preview page for the latest updates on support for Apple Silicon (there’s an RC3!).

Interested in learning more about what else is included with a Pro or Team subscription in addition to more flexible update options? Check out our pricing page for a detailed breakdown.
The post Changing How Updates Work with Docker Desktop 3.3 appeared first on Docker Blog.
Quelle: https://blog.docker.com/feed/

Cook up your own ML recipes with AI Platform

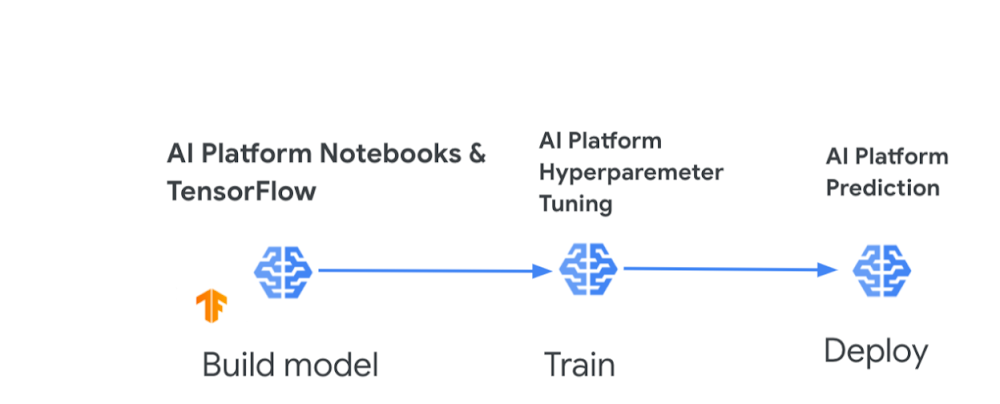
For anyone with a sweet tooth for confections and machine learning, I have some good news. You might remember recently my colleagues, Sara Robinson and Dale Markowitz, collaborated to create some delicious new baked inventions, including the Breakie (a fusion between cake, cookies, and bread). All of this was done through a baking ML model that they built with AutoML Tables, a no-code way to create machine learning models on tabular data.Well, it wasn’t long before legendary confectionery manufacturer Mars Wrigley approached Sara and Cloud AI for a Maltesers + AI kitchen collaboration. Sara trained a new ML model to generate recipes for cookies, cakes, scones, traybakes, and any “hy-bread” of these. After hours of model training and baking experiments, Sara combined Maltesers with her model’s AI-optimized cake and cookie recipes to create a brand new dessert, which even includes the classic British ingredient, Marmite. To break it down, Sara used a few tools to build and customize her model:AI Platform Notebooks (Jupyter lab environment for feature engineering and model development) and TensorFlow AI Platform Hyperparameter Tuning(model training)AI Platform Prediction (model deployment)You can try out Sara’s AI-powered Mars recipe yourself, but if you have an appetite to build your own ML model for other creations like pizzas, pies, milkshakes, or stir-frys, let’s boil down the objectives and steps to get you started:Objective: Create a model that takes a type of dish as input, and produces the amounts of the different ingredients needed to create it.Steps:Collect the data. You’ll want to collect a sizable dataset around the dish recipes you’re interested in (various types of pizzas, baked goods, or noodles for example). You’ll want data on the amount of each ingredient that goes into the dish. So if you’re focused on pizzas, you need data on the amounts of dough, cheese, and toppings that make up each pizza type. Prepare the data. Whittle down each of those recipes to core ingredients that span the dishes. This might be a bit arbitrary but think about which ingredients affect the fundamental makeup of all dishes like texture, flavor, or consistency. In the pizza example, I’d narrow it down to only dough ingredients, cheese type, sauce, and common toppings. Preprocess the data. Make sure all ingredient amounts are in the same measurement unit (e.g., ounces or grams). You may also need to scale the model inputs so that all ingredient amounts fall within a standard range. You can use data augmentation to create new training examples. If you’re using AutoML you can skip this step, as it handles many data preparation tasks for you, but keep in mind best practicesfor creating training data. Build your model. AI Platform lets you develop, train, and deploy your model using notebooks, a built-in Data Labeling Service, and the ability to store datasets in Cloud Storage or BigQuery. You can also use AutoML Tables and import data directly from CSV files, Google Sheets, or a BigQuery database. Train your model. You can use AI Platform Hyperparameter Tuning, a service for running multiple training job trials to optimize a model’s hyperparameters. Additionally,  AutoML Tables provides automated feature engineering. With either tool, you can determine which ingredients are important predictors of each dish type, such as basil  being an important predictor of a Margherita pizza (this can be more easily done using AutoML). Deploy your model and predict. Once you have tuned your hyperparameters and trained your model, you can use AI Platform Prediction to create custom recipes (amounts of ingredients to create a dish or combo-dish). With both AI Platform and AutoML you can also discover feature importance scores (how heavily weighted ingredients are for a dish). AI-powered recipes delivered! Now before you run off to grab your apron, let me share some sweet resources to help you get started.AI resources to give you a tasteAI Platform QuickstartThis tutorial shows how to train a neural network on AI Platform using the Keras sequential API and how to serve predictions from that model. You can also run the tutorial as a notebook in Colab. You’ll learn how to:Train a model on AI Platform using prewritten Keras codeDeploy the trained model to AI PlatformServe online predictions from the deployed modelPlus learn how to dig into the training code used for this model and ensure it’s compatible with AI Platform. Even though the dataset is around US Census income, you can use the tutorial as a framework for understanding how to train, deploy, and serve models on AI Platform for cooking-inspired (or other) datasets of your choosing. Build your first AI Platform NotebookIn this tutorial, Sara walks you through tools in AI Platform Notebooks for exploring your data and prototyping ML models. You’ll learn how to: Create and customize an AI Platform Notebooks instanceTrack your notebook code with git, directly integrated into AI Platform NotebooksUse the What-If Tool within your notebookAutoML TablesI’d be remiss if I didn’t emphasize that you can also create custom ML models without code. I mentioned that when Sara and Dale teamed up to create their Breakie recipe, they used AutoML Tables, which relieves much of the heavy burden by automating feature engineering so you can easily build and deploy state-of-the-art machine learning models on structured data. The codeless interface guides you through the full end-to-end ML workflow, making it easy for anyone to build models and reliably incorporate them into broader applications. There are a ton of quickstarts, samples, and videos to help you get started on AutoML Tables. Use them to learn how to:Create a dataset and modelImport data into a datasetDeploy a modelEvaluate your modelUse AutoML Tables from a Jupyter notebookAI Adventures video playlistCheck out coverage from Yufeng Guo and Priyanka Vergadia on AI Platform. In this featured video, Yufeng covers how you can use AI Platform built-in algorithms to train and deploy machine learning models without writing any training code. Plus check out other videos in the playlist to learn about:Training models with custom containers on AI PlatformAI Platform Pipelines for improving the reliability of your ML workflowsUsing AI Prediction service to get explanations of your models and better understand their outputsMaking the most of the AI Data Labeling service on AI PlatformIf you’ve made it to this point, you’re probably getting hungry and eager to put this in action. You can explore more AI on Google Cloud, and share your recipes with Sara, Dale, and me online. We’ve tried this with baking, but we’d love to hear if you have success with models for other types of recipes! – StephanieRelated ArticleHow sweet it is: Using Cloud AI to whip up new treats with Mars MaltesersMars uses Google Cloud AI to invent a tasty new cake that includes maltesers and marmite!Read Article
Quelle: Google Cloud Platform