13 best practices for user account, authentication, and password management, 2021 edition

Updated for 2021: This post includes updated best practices including the latest from Google’s Best Practices for Password Management whitepapers for both users and system designers.Account management, authentication and password management can be tricky. Often, account management is a dark corner that isn’t a top priority for developers or product managers. The resulting experience often falls short of what some of your users would expect for data security and user experience.Fortunately, Google Cloud brings several tools to help you make good decisions around the creation, secure handling and authentication of user accounts (in this context, anyone who identifies themselves to your system—customers or internal users). Whether you’re responsible for a website hosted in Google Kubernetes Engine, an API on Apigee, an app using Firebase, or other service with authenticated users, this post lays out the best practices to follow to ensure you have a safe, scalable, usable account authentication system.1. Hash those passwordsMy most important rule for account management is to safely store sensitive user information, including their password. You must treat this data as sacred and handle it appropriately.Do not store plaintext passwords under any circumstances. Your service should instead store a cryptographically strong hash of the password that cannot be reversed—created with Argon2id, or Scrypt. The hash should be salted with a value unique to that specific login credential. Do not use deprecated hashing technologies such as MD5, SHA1 and under no circumstances should you use reversible encryption or try to invent your own hashing algorithm. Use a pepper that is not stored in the database to further protect the data in case of a breach. Consider the advantages of iteratively re-hashing the password multiple times.Design your system assuming it will be compromised eventually. Ask yourself “If my database were exfiltrated today, would my users’ safety and security be in peril on my service or other services they use?” As well as “What can we do to mitigate the potential for damage in the event of a leak?”Another point: If you could possibly produce a user’s password in plaintext at any time outside of immediately after them providing it to you, there’s a problem with your implementation.If your system requires detection of near-duplicate passwords, such as changing “Password” to “pAssword1″, save the hashes of common variants you wish to ban with all letters normalized and converted to lowercase. This can be done when a password is created or upon successful login for pre-existing accounts. When the user creates a new password, generate the same type of variants and compare the hashes to those from the previous passwords. Use the same level of hashing security as with the actual password. 2. Allow for third-party identity providers if possibleThird-party identity providers enable you to rely on a trusted external service to authenticate a user’s identity. Google, Facebook, and Twitter are commonly used providers.You can implement external identity providers alongside your existing internal authentication system using a platform such as Identity Platform. There are a number of benefits that come with Identity Platform, including simpler administration, a smaller attack surface, and a multi-platform SDK. We’ll touch on more benefits throughout this list.3. Separate the concept of user identity and user accountYour users are not an email address. They’re not a phone number. They’re not even a unique username. Any of these authentication factors should be mutable without changing the content or personally identifiable information (PII) in the account. Your users are the multi-dimensional culmination of their unique, personalized data and experience within your service, not the sum of their credentials. A well-designed user management system has low coupling and high cohesion between different parts of a user’s profile.Keeping the concepts of user account and credentials separate will greatly simplify the process of implementing third-party identity providers, allowing users to change their username, and linking multiple identities to a single user account. In practical terms, it may be helpful to have an abstract internal global identifier for every user and associate their profile and one or more sets of authentication datavia that ID as opposed to piling it all in a single record.4. Allow multiple identities to link to a single user accountA user who authenticates to your service using their username and password one week might choose Google Sign-In the next without understanding that this could create a duplicate account. Similarly, a user may have very good reason to link multiple email addresses to your service. If you’ve properly separated user identity and authentication, it will be a simple process to link several authentication methods to a single user.Your backend will need to account for the possibility that a user gets part or all the way through the signup process before they realize they’re using a new third-party identity not linked to their existing account in your system. This is most simply achieved by asking the user to provide a common identifying detail, such as email address, phone, or username. If that data matches an existing user in your system, require them to also authenticate with a known identity provider and link the new ID to their existing account.5. Don’t block long or complex passwordsNIST publishes guidelines on password complexity and strength. Since you are (or will be very soon) using a strong cryptographic hash for password storage, a lot of problems are solved for you. Hashes will always produce a fixed-length output no matter the input length, so your users should be able to use passwords as long as they like. If you must cap password length, do so based on the limits of your infrastructure; often this is a matter of memory usage (memory used per login operation * potential concurrent logins per machine), or more likely—the maximum POST size allowable by your servers. We’re talking numbers from hundreds of KB to over 1MB. Seriously. Your application should already be hardened to prevent abuse from large inputs. This doesn’t create new opportunities for abuse if you employ controls to prevent credential stuffing and hash the input as soon as possible to free up memory.Your hashed passwords will likely already consist of a small set of ASCII characters. If not, you can easily convert a binary hash to Base64. With that in mind, you should allow your users to use literally any characters they wish in their password. If someone wants a password made of Klingon, Emoji, and ASCII art with whitespace on both ends, you should have no technical reason to deny them. Just make sure to perform Unicode normalization to ensure cross-platform compatibility. See our system designers whitepaper (PDF) for more information on Unicode and supported characters in passwords.Any user attempting to use an extreme password is probably following password best practices (PDF) including using a password manager, which allows the entry of complex passwords even on limited mobile device keyboards. If a user can input the string in the first place (i.e., the HTML specification for password input disallows line feed and carriage return), the password should be acceptable.6. Don’t impose unreasonable rules for usernamesIt’s not unreasonable for a site or service to require usernames longer than two or three characters, block hidden characters, and prevent whitespace at the beginning and end of a username. However, some sites go overboard with requirements such as a minimum length of eight characters or by blocking any characters outside of 7-bit ASCII letters and numbers.A site with tight restrictions on usernames may offer some shortcuts to developers, but it does so at the expense of users and extreme cases will deter some users.There are some cases where the best approach is to assign usernames. If that’s the case for your service, ensure the assigned username is user-friendly insofar as they need to recall and communicate it. Alphanumeric generated IDs should avoid visually ambiguous symbols such as “Il1O0.” You’re also advised to perform a dictionary scan on any randomly generated string to ensure there are no unintended messages embedded in the username. These same guidelines apply to auto-generated passwords.7. Validate the user’s identityIf you ask a user for contact information, you should validate that contact as soon as possible. Send a validation code or link to the email address or phone number. Otherwise, users may make a typo in their contact info and then spend considerable time using your service only to find there is no account matching their info the next time they attempt login. These accounts are often orphaned and unrecoverable without manual intervention. Worse still, the contact info may belong to someone else, handing full control of the account to a third party.8. Allow users to change their usernameIt’s surprisingly common in legacy systems or any platform that provides email accounts not to allow users to change their username. There are very good reasons not to automatically release usernames for reuse, but long-term users of your system will eventually come up with significant reasons to use a different username and they likely won’t want to create a new account.You can honor your users’ desire to change their usernames by allowing aliases and letting your users choose the primary alias. You can apply any business rules you need on top of this functionality. Some orgs might limit the number of username changes per year or prevent a user from displaying or being contacted via anything but their primary username. Email address providers are advised to never re-issue email addresses, but they could alias an old email address to a new one. A progressive email address provider might even allow users to bring their own domain name and have any address they wish.If you are working with a legacy architecture, this best practice can be very difficult to meet. Even companies like Google have technical hurdles that make this more difficult than it would seem. When designing new systems, make every effort to separate the concept of user identity and user account and allow multiple identities to link to a single user account and this will be a much smaller problem. Whether you are working on existing or greenfield code, choose the right rules for your organization with an emphasis on allowing your users to grow and change over time.9. Let your users delete their accountsA surprising number of services have no self-service means for a user to delete their account and associated PII. Depending on the nature of your service, this may or may not include public content they created such as posts and uploads. There are a number of good reasons for a user to close an account permanently and delete all their PII . These concerns need to be balanced against your user experience, security, and compliance needs. Many if not most systems operate under some sort of regulatory control (such as PCI or GDPR), which provides specific guidelines on data retention for at least some user data. A common solution to avoid compliance concerns and limit data breach potential is to let users schedule their account for automatic future deletion.In some circumstances, you may be legally required to comply with a user’s request to delete their PII in a timely manner. You also greatly increase your exposure in the event of a data breach where the data from “closed” accounts is leaked.10. Make a conscious decision on session lengthAn often overlooked aspect of security and authentication is session length. Google puts a lot of effort into ensuring users are who they say they are and will double-check based on certain events or behaviors. Users can take steps to increase their security even further.Your service may have good reason to keep a session open indefinitely for non-critical analytics purposes, but there should be thresholds after which you ask for password, 2nd factor, or other user verification.Consider how long a user should be able to be inactive before re-authenticating. Verify user identity in all active sessions if someone performs a password reset. Prompt for authentication or 2nd factor if a user changes core aspects of their profile or when they’re performing a sensitive action. Re-authenticate if the user’s location changes significantly in a short period of time. Consider whether it makes sense to disallow logging in from more than one device or location at a time.When your service does expire a user session or requires re-authentication, prompt the user in real time or provide a mechanism to preserve any activity they have not saved since they were last authenticated. It’s very frustrating for a user to take a long time to fill out a form, only to  find all their input has been lost and they must log in again.11. Use 2-Step VerificationConsider the practical impact on a user of having their account stolen when choosing 2-Step Verification (also known as two-factor authentication, MFA, or 2FA) methods. Time-based one-time passwords (TOTP), email verification codes, or “magic links” are consumer-friendly and relatively secure. SMS 2FA auth has been deprecated by NIST due to multiple weaknesses, but it may be the most secure option your users will accept for what they consider a trivial service.Offer the most secure 2FA auth you reasonably can. Hardware 2FA such as the Titan Security Key are ideal if feasible for your application. Even if a TOTP library is unavailable for your application, email verification or 2FA provided by third-party identity providers is a simple means to boost your security without great expense or effort. Just remember that your user accounts are only as secure as the weakest 2FA or account recovery method.12. Make user IDs case-insensitiveYour users don’t care and may not even remember the exact case of their username. Usernames should be fully case-insensitive. It’s trivial to store usernames and email addresses in all lowercase and transform any input to lowercase before comparing. Make sure to specify a locale or employ Unicode normalization on any transformations.Smartphones represent an ever-increasing percentage of user devices. Most of them offer autocorrect and automatic capitalization of plain-text fields. Preventing this behavior at the UI level might not be desirable or completely effective, and your service should be robust enough to handle an email address or username that was unintentionally auto-capitalized.13. Build a secure auth systemIf you’re using a service like Identity Platform, a lot of security concerns are handled for you automatically. However, your service will always need to be engineered properly to prevent abuse. Core considerations include implementing a password reset instead of password retrieval, detailed account activity logging, rate-limiting login attempts to prevent credential stuffing, locking out accounts after too many unsuccessful login attempts, and requiring two-factor authentication for unrecognized devices or accounts that have been idle for extended periods. There are many more aspects to a secure authentication system, so please see the further reading section below for links to more information. Further readingThere are a number of excellent resources available to guide you through the process of developing, updating, or migrating your account and authentication management system. I recommend the following as a starting place:Our Modern Password Security for System Designers whitepaper (PDF)The related Modern password security for users whitepaper (PDF)NIST 800-063B covers Authentication and Lifecycle Management OWASP continually updates their Password Storage Cheat Sheet OWASP goes into even more detail with the Authentication Cheat SheetGoogle Cloud Identity Platform is a multi-protocol customer identity and access management solution, with robust authentication featuresGoogle’s Firebase Authentication site has a rich library of guides, reference materials and sample codeRelated ArticleCybersecurity Awareness Month—New security announcements for Google CloudToday’s announcements include new security features, whitepapers that explore our encryption capabilities, and use-case demos to help dep…Read Article
Quelle: Google Cloud Platform
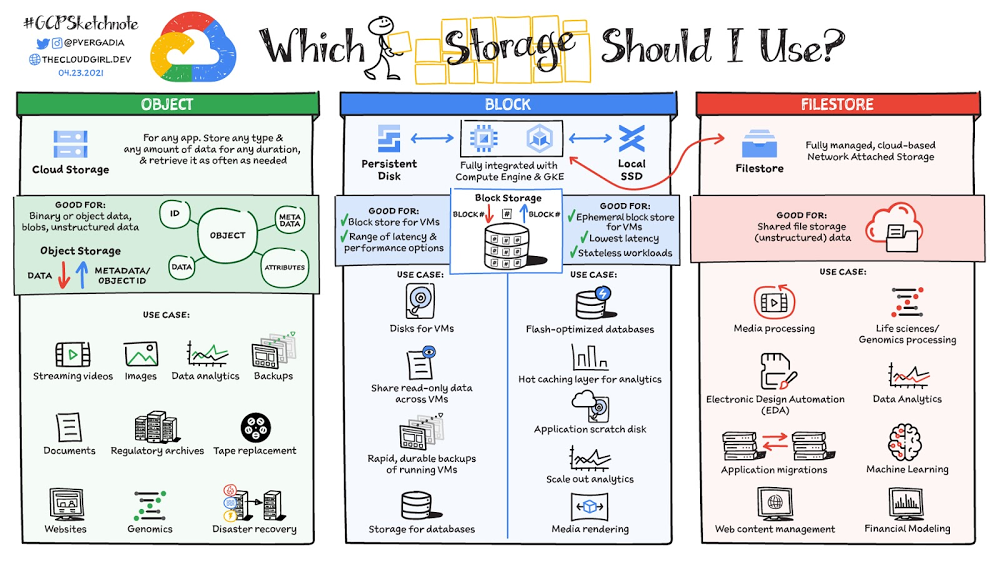
A map of storage options in Google Cloud

Where should your application store data?Of course, the choice depends on the use case. This post covers the different storage options available within Google Cloud across three storage types: object storage, block storage, and file storage. It also covers the use cases that are best suited for each storage option.(Click to enlarge)Object storage—Cloud StorageCloud Storage is an object store for binary and object data, blobs, and unstructured data. You would typically use it for any app, any type of data that you need to store, for any duration. You can add data to it or retrieve data from it as often as you need. The objects stored have an ID, metadata, attributes, and the actual data. The metadata could include all sorts of things about security classification of the file, the applications that can access it, and similar information. Object store use cases include applications that need data to be highly available and highly durable, such as streaming videos, serving images and documents, and websites. It is also used for storing large amounts of data for use cases such as genomics and data analytics. You can also use it for storing backups and archives for compliance with regulatory requirements. Or, use it to replace old physical tape records and move them over to cloud storage. It is also widely used for disaster recovery because it takes practically no time to switch to a backup bucket to recover from a disaster. There are 4 storage classes that are based on budget, availability and access frequency.1. Standard buckets for high-performance, frequent access and highest availability:    – Regional / dual-regional locations for data accessed frequently / high throughput needs    – Multi-region for serving content globally2. Nearline for data access less than once a month access3. Coldline for data accessed roughly less than once a quarter4. Archive for data that you want to put away for years It costs a bit more to use standard storage because it allows for automatic redundancy and frequent access options. Nearline, coldline and archive storage offer 99% availability and cost significantly less. Block storage—Persistent Disk and Local SSDPersistent Disk and Local SSD are block storage options. They are integrated with Compute Engine virtual machines and Kubernetes Engine. With block storage, files are split into evenly sized blocks of data, each with its own address but with no additional information (metadata) to provide more context for what that block of data is. Block storage can be directly accessed by the operating system as a mounted drive volume. Persistent Disk is a block store for VMs that offers a range of latency and performance options. I have covered persistent disk in detail in this article. The use cases of Persistent Disk include disks for VMs and shared read-only data across multiple VMs. It is also used for rapid, durable backups of running VMs. Because of the high-performance options available, Persistent Disk is also a good storage option for databases. Local SSD is also block storage but it is ephemeral in nature, and therefore typically used for stateless workloads that require the lowest available latencies. The use cases include flash optimized databases, host caching layers for analytics, or scratch disks for any application, as well as scale out analytics and media rendering. File storage—Filestore Now, Filestore! As fully managed Network Attached Storage (NAS), Filestore provides a cloud-based shared file system for unstructured data. It offers really low latency and provides concurrent access to tens of thousands of clients with scalable and predictable performance up to hundreds of thousands of IOPS, tens of GB/s of throughput, and hundreds of TBs. You can scale capacity up and down on-demand. Typical use cases of Filestore include high performance computing (HPC), media processing, electronics design automation (EDA), application migrations, web content management, life science data analytics, and more! ConclusionThat was a quick overview of different storage options in Google Cloud. For a more in-depth look into each of these storage options check out this cloud storage options page or this video

PyTorch on Google Cloud: How To train PyTorch models on AI Platform

PyTorch is an open source machine learning and deep learning library, primarily developed by Facebook, used in a widening range of use cases for automating machine learning tasks at scale such as image recognition, natural language processing, translation, recommender systems and more. PyTorch has been predominantly used in research and in recent years it has gained tremendous traction in the industry as well due to its ease of use and deployment. Google Cloud AI Platform is a fully managed end-to-end platform for data science and machine learning on Google Cloud. Leveraging Google’s expertise in AI, AI Platform offers a flexible, scalable and reliable platform to run your machine learning workloads. AI Platform has built-in support for PyTorch through Deep Learning Containers that are performance optimized, compatibility tested and ready to deploy. In this new series of blog posts, PyTorch on Google Cloud, we aim to share how to build, train and deploy PyTorch models at scale and how to create reproducible machine learning pipelines on Google Cloud.Why PyTorch on Google Cloud AI Platform?Cloud AI Platform provides flexible and scalable hardware and secured infrastructure to train and deploy PyTorch based deep learning models.Flexibility: AI Platform Notebooks and AI Platform Training gives  flexibility to design your compute resources to match any workload while the platform manages the bulk of the dependencies, networking and monitoring under the hood. Spend your time building models, not worrying about infrastructure.Scalability: Run your experiments with AI Platform Notebooks using pre-built PyTorch containers or custom containers and scale your code with high availability using AI Platform Training by training models on GPUs or TPUs. Security: AI Platform leverages the same global scale technical infrastructure designed to provide security through the entire information processing lifecycle at Google.Support: AI Platform collaborates closely with PyTorch and NVIDIA to ensure top-notch compatibility between AI Platform and NVIDIA GPUs including PyTorch framework support.Here is a quick reference of support for PyTorch on Google Cloud(Click to enlarge)In this post, we will cover:Setting up a PyTorch development environment on JupyterLab notebooks with AI Platform NotebooksBuilding a sentiment classification model using PyTorch and training on AI Platform TrainingYou can find the accompanying code for this blog post on the GitHub repository and the Jupyter Notebook.Let’s get started!Use case and datasetIn this article we will  fine tune a transformer model (BERT-base) from Huggingface Transformers Library for a sentiment analysis task using PyTorch. BERT (Bidirectional Encoder Representations from Transformers) is a Transformer model pre-trained on a large corpus of unlabeled text in a self-supervised fashion. We will begin experimentation with the IMDB sentiment classification dataset on AI Platform Notebooks. We recommend using an AI Platform Notebook instance with limited compute for development and experimentation purposes. Once we are satisfied with the local experiment on the notebook, we show how you can submit the same Jupyter notebook to the AI Platform Training service to scale the training with bigger GPU shapes. AI Platform Training service optimizes the training pipeline by spinning up infrastructure for the training job and spinning it down after the training is complete, without you having to manage the infrastructure.In upcoming posts, we will show how you can deploy and serve these PyTorch models on AI Platform Prediction service.  Creating a development environment on AI Platform NotebooksWe will be working with JupyterLab notebooks as a development environment on AI Platform Notebooks. Before you begin, you must set up a project on Google Cloud Platform with the AI Platform Notebooks API enabled. Please note that you will be charged when you create an AI Platform Notebook instance. You pay only for the time your notebook instance is up and running. You can choose to stop the instance which will save your work and only charge for the boot disk storage until you restart the instance. Please delete the instance after you are done.You can create an AI Platform Notebooks instance:Using thepre-built PyTorch image from AI Platform Deep Learning VM (DLVM) Image or Using a custom container with your own packagesCreating a Notebook instance with the pre-built PyTorch DLVM imageAI Platform Notebooks instances are AI Platform Deep Learning VM Image instances with JupyterLab notebook environments enabled and ready for use. AI Platform Notebooks offers PyTorch image family supporting multiple PyTorch versions. You can create a new notebook instance from Google Cloud Console or command line interface (CLI). We will use the gcloud CLI to create the Notebook instance on NVIDIA Tesla T4 GPU. From Cloud Shell or any terminal where Cloud SDK is installed, run the following command to create a new notebook instance:To interact with the new notebook instance, go to the AI Platform Notebooks page in the Google Cloud Console and click the “OPEN JUPYTERLAB” link next to the new instance, which becomes active when it’s ready to use.Most of the libraries needed for experimenting with PyTorch have already been installed on the new instance with the pre-built PyTorch DLVM image. To install additional dependencies, run %pip install <package-name> from the notebook cells. For the sentiment classification use case, we will be installing additional packages such as Hugging Face transformers and datasets libraries.Notebook instance with custom containerAn alternative to installing dependencies with pip in the Notebook instance is to package the dependencies inside a Docker container image derived from AI Platform Deep Learning Container images and create a custom container. You can use this custom container for creating AI Platform Notebooks instances or AI Platform Training jobs. Here is an example to create a Notebook instance using a custom container.1. Create a Dockerfile with one of the AI Platform Deep Learning Container images as base image (here we are using PyTorch 1.7 GPU image) and run/install packages or frameworks you need. For the sentiment classification use case include transformers and datasets.2.  Build image from Dockerfile using Cloud Build from terminal or Cloud Shell and get the image location gcr.io/{project_id}/{image_name}3.  Create a notebook instance with the custom image created in step #2 using the command line.Training a PyTorch model on AI Platform trainingAfter creating the AI Platform Notebooks instance, you can start with your experiments. Let’s look into the model specifics for the use case.The model specificsFor analyzing sentiments of the movie reviews in IMDB dataset, we will be fine-tuning a pre-trained BERT model from Hugging Face. Fine-tuning involves taking a model that has already been trained for a given task and then tweaking the model for another similar task. Specifically, the tweaking involves replicating all the layers in the pre-trained model including weights and parameters, except the output layer. Then adding a new output classifier layer that predicts labels for the current task. The final step is to train the output layer from scratch, while the parameters of all layers from the pre-trained model are frozen. This allows learning from the pre-trained representations and “fine-tuning” the higher-order feature representations more relevant for the concrete task, such as analyzing sentiments in this case. For the scenario here analyzing sentiments, the pre-trained BERT model already encodes a lot of information about the language as the model was trained on a large corpus of English data in a self-supervised fashion. Now we only need to slightly tune them using their outputs as features for the sentiment classification task. This means quicker development iteration on a much smaller dataset, instead of training a specific Natural Language Processing (NLP) model with a larger training dataset.Pretrained Model with classification layer: The Blue-box indicates the pre-trained BERT Encoder module. Output of the encoder is pooled into linear layer with number of outputs same as the number of target labels (classes).For training the sentiment classification model, we will:Preprocess and transform (tokenize) the reviews dataLoad the pre-trained BERT model and add the sequence classification head for sentiment analysisFine-tune the BERT model for sentence classificationFollowing is the snippet of code to preprocess the data and fine-tune a pre-trained BERT model. Please refer to the Jupyter Notebook for complete code and detailed explanation of these tasks.In the snippet above, notice that the encoder (also referred to as the base model) weights are not frozen. This is why a very small learning rate (2e-5) is chosen to avoid loss of pre-trained representations. Learning rate and other hyperparameters are captured under the TrainingArguments object. During the training, we are only capturing accuracy metrics. You can modify the compute_metrics function to capture and report other metrics.We will explore integration with Cloud AI Platform Hyperparameter Tuning Service in the next post of this series.Training the model on Cloud AI PlatformWhile you can do local experimentation on your AI Platform Notebooks instance, for larger datasets or models often a vertically scaled compute resource or horizontally distributed training is required. The most effective way to perform this task is AI Platform Training service. AI Platform Training takes care of creating designated compute resources required for the task, performs the training task, and also ensures deletion of compute resources once the training job is finished.Before running the training application with AI Platform Training, the training application code with required dependencies must be packaged and uploaded into a Google Cloud Storage bucket that your Google Cloud project can access. There are two ways to package the application and run on AI Platform Training:Package application and Python dependencies manually using Python setup toolsUse custom containers to package dependencies using Docker containersYou can structure your training code in any way you prefer. Please refer to the GitHub repository or Jupyter Notebook for our recommended approach on structuring training code. Using Python packaging to build manuallyFor this sentiment classification task, we have to package the training code with standard Python dependencies – transformers, datasets and tqdm – in the setup.py file. The find_packages() function inside setup.py includes the training code in the package as dependencies.Now, you can submit the training job to Cloud AI Platform Training using the gcloud command from Cloud Shell or terminal with gcloud SDK installed. gcloud ai-platform jobs submit training command stages the training application on GCS bucket and submits the training job. We are attaching 2 NVIDIA Tesla T4 GPUs to the training job for accelerating the training.  Training with custom containersTo create a training job with a custom container, you have to define a Dockerfile to install the dependencies required for the training job. Then, you build and test your Docker image locally to verify it before using it with AI Platform Training.Before submitting the training job, you need to push the image to Google Cloud Container Registry and then submit the training job to Cloud AI Platform Training using the gcloud ai-platform jobs submit training command.Once the job is submitted, you can monitor the status and progress of training job either in Google Cloud Console or using gcloud commands as shown below:You can also monitor the job status and view the job logs from the Google AI Platform Jobs console.Let’s run prediction calls on the trained model locally with a few examples (refer to the notebook for the complete code). The next post in this series will show you how to deploy this model on AI Platform Prediction service.Cleaning up the Notebook environmentAfter you are done experimenting, you can either stop or delete the AI Notebook instance. Delete the AI Notebook instance to prevent any further charges. If you want to save your work, you can choose to stop the instance instead.What’s next?In this article, we explored Cloud AI Platform Notebooks as a fully customizable IDE for PyTorch model development. We then trained the model on Cloud AI Platform Training service, a fully managed service for training machine learning models at scale.ReferencesIntroduction to AI Platform NotebooksGetting started with PyTorch | AI Platform TrainingConfiguring distributed training for PyTorch | AI Platform TrainingGitHub repository with code and accompanying notebookIn the next installments of this series, we will examine hyperparameter tuning on Cloud AI Platform and deploying PyTorch models on AI Platform Prediction service. We encourage you to explore the Cloud AI Platform features we have examined. Stay tuned. Thank you for reading! Have a question or want to chat? Find authors here – Rajesh [Twitter | LinkedIn] and Vaibhav [LinkedIn].Thanks to Amy Unruh and Karl Weinmeister for helping and reviewing the post.
Quelle: Google Cloud Platform

Video: How to Dockerize a Python App with FastAPI

Join host Peter McKee and Python wizard Michael Kennedy for a warts-and-all demo of how to Dockerize a Python app using FastAPI, a popular Python framework. Kennedy is a developer and entrepreneur, and the founder and host of two successful Python podcasts — Talk Python To Me and Python Bytes. He’s also a Python Software Foundation Fellow.

With some skillful back-seat driving by McKee, Kennedy shows how to build a bare-bones web API — in this case one that allows you to ask questions and get answers about movies (director, release date, etc.) — by mashing together a movie service and FastAPI. Next, he shows how to put it into a Docker container, create an app and run it, finally sharing the image on GitHub.

If you’re looking for a scripted, flawless, pre-recorded demo, this is not the one for you! McKee and Kennedy iterate and troubleshoot their way through the process — which makes this a great place to start if you’re new to Dockerizing Python apps. Install scripts, libraries, automation, security, best practices, and a pinch of Python zen — it’s all here. (Duration 1 hour, 10 mins.)

Join Us for DockerCon LIVE 2021  

Join us for DockerCon LIVE 2021 on Thursday, May 27. DockerCon LIVE is a free, one day virtual event that is a unique experience for developers and development teams who are building the next generation of modern applications. If you want to learn about how to go from code to cloud fast and how to solve your development challenges, DockerCon LIVE 2021 offers engaging live content to help you build, share and run your applications. Register today at https://dockr.ly/2PSJ7vn
The post Video: How to Dockerize a Python App with FastAPI appeared first on Docker Blog.
Quelle: https://blog.docker.com/feed/