Agents have moved from demos to daily work faster than almost anyone planned for. In our State of Agentic AI report, 60% of organizations already run AI agents in production, and yet 40% name security and compliance as the number-one thing holding them back from scaling further. That gap, between what teams have already shipped and what they can safely operate, is the real story of AI agents right now.
But what is an AI agent, and why does the term suddenly stretch from a coding assistant to an autonomous research system? The short version is that an agent doesn’t just respond, it acts: give it a goal and it’ll plan the steps, call tools, check the results, and adjust, usually without stopping to ask. That’s what separates an agent from the generative AI it’s built on, and it’s why where an agent runs matters as much as which model sits behind it.
Key takeaways
• An AI agent pursues a goal on its own. It reasons, picks tools, and takes actions in a loop rather than answering one prompt at a time.
• The model decides, tools act, and the environment is where those actions land.
• Autonomy is the point and the risk. Once an agent can act on its own, where it runs decides how much a wrong move can cost.
• Building agents is largely an infrastructure problem: framework choice, tool access, and an isolated place to run them safely.
What is an AI agent?
Strip away the hype and an AI agent is software that takes a goal, decides how to reach it, and acts through tools to get there, then uses what it learns to choose its next move. The model supplies the reasoning, the tools give it hands, and the environment is where its actions actually happen. Put those three together and you get a system that can work through a task instead of just describing one.
That’s the difference between an agent and the chatbot experience most people started with. A chatbot answers the question in front of it. An agent takes an objective and works the problem: it breaks the goal into steps, decides which tool fits each step, runs it, reads the outcome, and keeps going until the goal is met or it gets stuck. A coding agent asked to fix a failing test might read the codebase, edit a file, install a dependency, run the suite, and open a pull request, all from one instruction.
Three properties make that possible:
Autonomy lets it decide the next action without waiting for approval at each step.
Tool use lets it reach beyond text to run code, query APIs, and change files.
Memory lets it carry context across steps, so later decisions build on earlier ones.
Remove any one of them and you’re back to a smarter chatbot rather than an agent.
How do AI agents work?
Under the hood, an agent runs a loop. It takes in the current state of its task, reasons about what to do next, acts through a tool, observes what changed, and feeds that back into the next round of reasoning. The loop repeats until the goal is reached or a stopping condition kicks in.
In one pass of the loop, the agent perceives first, gathering context like the goal, relevant memory, and the results of whatever it did last. In the reason step, the model plans the next action and picks a tool. In the act step, it invokes that tool, a shell command, an API call, a database query. In the observe step, it reads the result, including errors. Then it adapts, updating its plan based on what happened, because a failed test isn’t a dead end for an agent, just new input for the next loop.
The parts that make it run
Most agent frameworks assemble the same core pieces, even when they name them differently.
Component
What it does
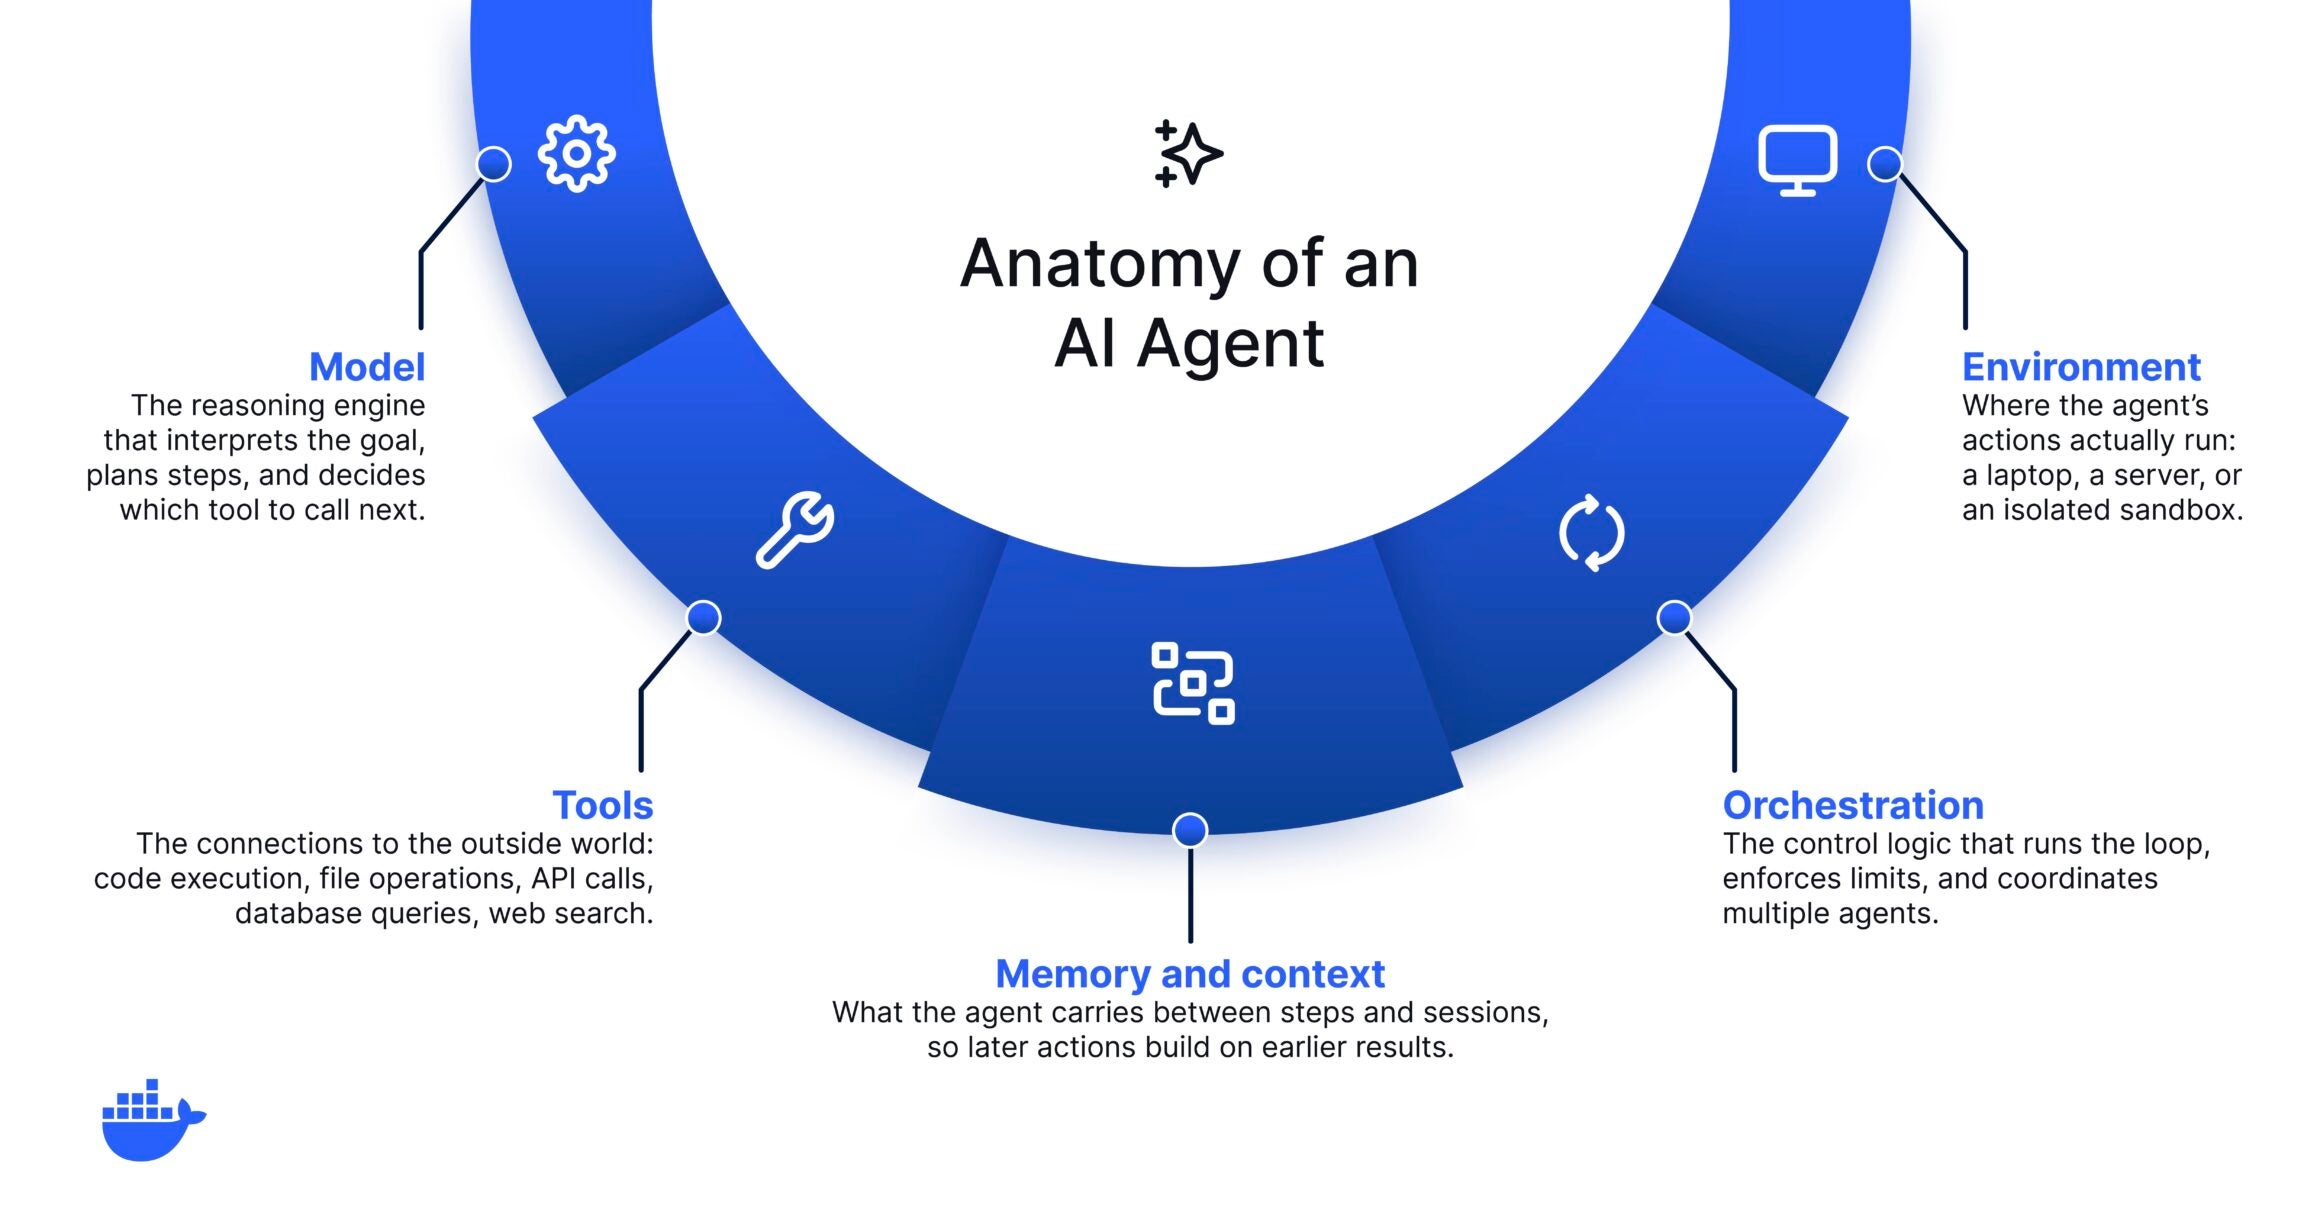
Model
The reasoning engine. It interprets the goal, plans steps, and decides which tool to call next.
Tools
The connections to the outside world: code execution, file operations, API calls, database queries, web search.
Memory and context
What the agent carries between steps and sessions, so later actions build on earlier results instead of starting fresh.
Orchestration
The control logic that runs the loop, enforces limits, and coordinates multiple agents when a task is split across them.
Environment
Where the agent’s actions actually execute: your laptop, a server, or an isolated sandbox. This is the part most explanations skip, and the part that decides your risk.
What are AI agents used for?
Here are a few common examples of AI agents:
Coding agents read a repository, write and refactor code, run tests, and open pull requests.
Support agents triage tickets, pull answers from internal docs, and take action in connected systems.
Data agents query multiple sources, reconcile the results, and write a summary.
Operations agents watch infrastructure, investigate alerts, and run routine fixes.
What ties these together is the shape of the work. If a task can be described as a goal plus a handful of tools plus a definition of done, an agent can usually attempt it. That’s also why agents are showing up in so many roadmaps at once.
Agents vs. chatbots, vs. generative AI
Agents, chatbots, and GenAI often get used interchangeably, which muddies the water. Generative AI produces content in response to a prompt. A chatbot wraps that in a conversation. An agent adds autonomy and tools on top, so it can act on the world rather than just describe it. The clearest way to see it is side by side.
Capability
Chatbot
AI agent
Responds to a prompt
Yes
Yes
Uses external tools
Rarely
Yes
Plans and runs multiple steps
No
Yes
Acts without approval at each step
No
Yes
If you want a deeper comparison between generative and agentic systems, we cover it in GenAI vs. agentic AI. But in essence, the moment a system can take actions on its own, you’re no longer just evaluating output quality. You’re also deciding what that system is allowed to touch.
How AI agents are changing software development
An agent is only as safe as the environment it runs in and the access it’s granted. While a chatbot that hallucinates gives you a wrong answer. An agent that goes wrong can delete files, leak secrets, or push a broken change. The autonomy that makes agents productive is the same autonomy that widens the blast radius when something misfires.
Scenario spotlight: Consider what can go wrong when an agent runs directly on a developer’s machine. A vaguely worded cleanup instruction leads a coding agent to run a destructive delete against the wrong directory, which is exactly the kind of failure Docker documented in the rm -rf incident. The agent was trying to help. Nothing contained the mistake, so it reached real files.
This is why experienced teams treat agents as an infrastructure decision, not just a model choice. The interesting engineering questions are about containment: where does the agent execute, which tools can it call for this specific task, whose credentials does it use, and how do you see what it did afterward. Get those right and you can let an agent run without approving each step.
Common misconceptions about AI agents
A few beliefs cause most of the confusion.
“More autonomy is always better.” Not quite. Autonomy is a dial, not a switch. More of it means more speed and a larger blast radius at the same time.
“Agent security is the model’s job.” The model can’t contain itself. Real safety comes from the infrastructure around it, which is the whole point of securing AI agents at the isolation and access layers.
“Governance is only for big enterprises.” Even a solo developer benefits from basic guardrails. As soon as more than one person runs agents, you need shared rules, which is where AI governance starts to earn its keep.
How to start building and running agents safely
You don’t need a platform team to begin, just a few deliberate choices. Pick a harness that matches your task rather than the one with the loudest launch. Connect only the tools the agent needs for the job in front of it, not every tool it might ever want. And decide where it runs before you hand it real access.
That last choice does the most work. Running an agent inside an isolated, disposable environment gives it a real place to work, install packages, edit files, run services, while keeping it away from your host, your credentials, and your other projects. If something goes wrong, you throw the environment away and start a new one. This is the same reasoning behind sandbox security and the microVM architecture that makes strong isolation practical without slowing the agent down. Permission prompts feel like control, but they mostly train you to click allow. A boundary gives you both speed and safety.
Running agents you can actually trust
AI agents are the rare technology where the hard part isn’t getting them to do something, it’s deciding how much they’re allowed to do and where. Once you see an agent as a model plus tools plus an environment, the path forward gets clearer: choose the model, scope the tools, and put real thought into the environment. The first two get most of the attention. The third is where safety actually lives.
That’s the gap Docker Sandboxes is built to close. Each agent runs in its own disposable microVM with control over networking, filesystem access, and resource limits, so it can move fast inside a boundary instead of loose on your machine. And when you’re running agents across a team, AI Governance lets you set the rules once, which actions are allowed, what the network can reach, which credentials and tools are in play, and enforce them everywhere developers work. Define the boundary, then let the agents run.
Frequently asked questions
What is an AI agent in simple terms?
An AI agent is software that takes a goal and works toward it on its own, reasoning about what to do, using tools to act, and adjusting based on the results. Unlike a chatbot, which answers a single prompt, an agent runs a loop of decisions and actions until the task is done.
What is the difference between an AI agent and a chatbot?
A chatbot responds to what you type. An agent pursues an objective across multiple steps, calling tools to change files, run code, or query systems along the way. The agent decides its own sequence of actions rather than following a fixed script.
What are AI agents used for?
Common uses include writing and testing code, triaging support tickets, analyzing data across multiple sources, and handling routine operations tasks. The common thread is multi-step work that involves some judgment and a few tools, rather than a single question and answer.
Are AI agents safe to run in production?
They can be, if you contain them. Because agents act autonomously, safety comes from the environment they run in and the access they hold, not from the model alone. Isolation, scoped tool access, dedicated credentials, and monitoring are what make production use responsible.
Do I need special infrastructure to run AI agents?
For experiments, no. For anything that touches real code, data, or credentials, you want an isolated place for the agent to run so a mistake can’t reach your host. That’s why sandboxed, disposable environments have become the default pattern for running capable agents.
Quelle: https://blog.docker.com/feed/