How the Lens Extension API lets you add on to an already great Kubernetes IDE

The post How the Lens Extension API lets you add on to an already great Kubernetes IDE appeared first on Mirantis | Pure Play Open Cloud.
You may already know Lens as the Kubernetes IDE that makes it simple for developers to work with Kubernetes and Kubernetes objects, but what if you could customize it for the way you work and what information you see from your cluster?

Today we’re announcing Lens 4.0 and the Lens Extensions API, which lets you quickly code lightweight integrations that customize Lens for your own tools and workflows. The  REACT.js-based Extensions API enables extensions to work through the Lens user interface, leverage Lens’ ability to manage access and permissions, and automate around Helm and kubectl. 

The Extensions API makes it possible to add new tabs and screens to Lens, and to work with custom resources, so you can do things like integrate your own CI/CD workflows, databases, and even your own internal corporate applications, to speed your workflow.

But you don’t have to build your own extensions to benefit from the API, because partners in the Lens and Kubernetes ecosystems are already building their own integrations that enable you to use their products with Lens.  By extending Lens to show information beyond the core Kubernetes constructs we’re able to build more comprehensive situational awareness and help Kubernetes users get more value out of their clusters.

Many of the extensions announced today revolved around improving security.  For example, Aqua’s Starboard project brings security information natively into Kubernetes in the form of custom resources. By extending Lens to display these resources, the integration makes security information easily accessible and actionable for Kubernetes users. 

“Aqua’s open source project Starboard makes security reports from a variety of tools and vendors available as Kubernetes-native resources,” said Liz Rice, VP Open Source Engineering, Aqua Security. “The new Lens API allows us to make such security information accessible to developers within their IDE, giving them immediate and actionable information about potential security risks in their K8s deployment, in an approach that’s true to DevSecOps principles.”

Carbonetes evaluates your code for risks (vulnerabilities, SCA, licenses, bill of materials, malware, and secrets), compares those results against company policy, and recommends the most efficient fix. Carbonetes integrates seamlessly into your CI/CD pipeline with plug-ins, enabling full automation.

“Carbonetes is excited to provide enhanced security insights in conjunction with Lens’ amazing cluster monitoring platform,” said Mike Hogan, CEO of Carbonetes, “In addition to addressing compliance and security risks in runtime clusters, Carbonetes streamlines the process of building new and more secure containers, protecting your cluster against stale images, outdated open source tools, policy drift, and more.”

Thanks to the Extensions API, Lens will even help you with projects that rely on specialized hardware.  Entrust hardware security modules are hardened devices designed to safeguard and manage cryptographic keys. Validated to FIPS 140-2 level 3 and Common Criteria EAL4+ and offered as on-premises appliance, or as a service, nShield delivers enhanced key generation, signing, and encryption to protect sensitive containerized data and transactions.

“Having recently completed the integration and certification of our FIPS-validated nShield hardware security modules (HSMs) with the [Mirantis Kubernetes Engine (formerly Docker Enterprise)] container platform from Mirantis, Entrust looks forward to continuing the development of our high assurance security solutions to provide developers not only quick and easy access to cryptographic capabilities, but also greater visibility over their Kubernetes cluster deployments,” said Tony Crossman, Director of Business Development at Entrust. “Entrust nShield is the first certified HSM in the market to deliver enhanced security to the Docker Enterprise container platform. The new certified integration provides a root of trust, enabling developers to add robust cryptographic services offered by Entrust nShield HSMs to containerized applications.”

That’s not to say that the Lens Extension API is only for security issues.  For example, Kong Enterprise is a service connectivity platform that provides technology teams at multi-cloud and hybrid organizations the “architectural freedom” to build APIs and services anywhere. 

Kong’s service connectivity platform provides a flexible, technology-agnostic platform that supports any cloud, platform, protocol and architecture. Kong Enterprise supports the full lifecycle of service management, enabling users to easily design, test, secure, deploy, monitor, monetize and version their APIs.

A Kong Lens extension would enable admins to better control and manage all Kubenetes objects under Kong’s domain. For example, the plugin will provide a visual representation of all dependencies a given Kubernetes Ingress has in terms of Kong policies.

The Extensions API lets you focus on the user experience.  For example, integrated KubeLinter static analysis for YAML files and Helm charts, combined with StackRox Kubernetes-native security info, policies, and recommendations, provides Lens users powerful security tools that always stay in context across their clusters.

“Introducing an Extensions API to Lens is a game-changer for Kubernetes operators and developers, because it will foster an ecosystem of cloud-native tools that can be used in context with the full power of Kubernetes controls at the users’ fingertips,” said Viswajith Venugopal, StackRox software engineer and lead developer of KubeLinter. “At StackRox, we initiated the open source project KubeLinter to help incorporate production-ready policies into developer workflows when working with Kubernetes YAMLs and Helm charts, and we look forward to integrating KubeLinter with Lens for a more seamless user experience.”

StackRox delivers the industry’s first Kubernetes-native security platform that enables organizations to secure their cloud-native apps from build to deploy to runtime.

The StackRox Kubernetes Security Platform leverages Kubernetes as a common framework for security controls across DevOps and Security teams. KubeLinter, a new open source static analysis tool recently launched by StackRox, helps Kubernetes users identify misconfigurations in their deployments.

The Extensions API is also helping Ambassador Labs to improve your ability to use Lens for one of it’s greatest strengths: troubleshooting.  “We are thrilled to partner with Mirantis on a Telepresence plugin for Lens. With Lens and Telepresence, users will be able to quickly code, debug, and troubleshoot cloud-native applications on Kubernetes faster than ever before,”  Ambassador CEO Richard Li said.

Ambassador Labs makes the popular open source projects Kubernetes Ambassador Edge Stack and Telepresence. The plug-in integrates Telepresence with Lens, making it possible for Kubernetes developers to quickly and easily test changes to their Kubernetes services locally while bridging to a remote Kubernetes cluster.

Extensions are even enabling Lens to branch out into machine learning-enabled optimization.  

“Carbon Relay is thrilled to be the Kubernetes Optimization partner of choice for Lens. The Lens IDE enables users to easily manage, develop, debug, monitor, and troubleshoot their apps across a fleet of Kubernetes clusters on any infrastructure. We extend upon the Lens IDE by delivering machine learning-powered optimization, affording users performance reliability and cost-efficiencies without sacrificing scale.” Joe Wykes, Chief Sales Officer for Carbon Relay said.

Carbon Relay combines cloud-native performance testing with machine learning-powered optimization, and the Carbon Relay platform helps DevOps teams build optimization into their CI/CD workflow to proactively ensure performance, reliability, and cost-efficiency.

As you can see, Lens is branching out, and fast!  If you haven’t tried it yet, you can get it here. If you are already a Lens user, you are probably thinking about how you can use the Extensions API to your advantage (aside from bugging your favorite vendors to build their own plugins).  If so, watch this space for instructions on building your own Lens plugin! The post How the Lens Extension API lets you add on to an already great Kubernetes IDE appeared first on Mirantis | Pure Play Open Cloud.
Quelle: Mirantis

Congratulations to the K0s team on their new Kubernetes distribution!

The post Congratulations to the K0s team on their new Kubernetes distribution! appeared first on Mirantis | Pure Play Open Cloud.
We’ve got a lot going on here at Mirantis, and one thing that’s flown under the radar is the K0s project, a real game-changer of a small, fast, robust, easy-to-use Kubernetes distribution.

As Adam Parco said on his blog (and believe me, he’s excited about this!):  “It is created by the team behind Lens, the Kubernetes IDE project. This new open source project is the spiritual successor to the Pharos Kubernetes distro that was also developed and maintained by the team. I like to say that k0s does for Kubernetes what Docker did for containers.”

We’ll be talking more about K0s in the days to come, but in the meantime we wanted to extend our heartiest congratulations to the team that has worked so hard on it!The post Congratulations to the K0s team on their new Kubernetes distribution! appeared first on Mirantis | Pure Play Open Cloud.
Quelle: Mirantis

Learn from the experts: Create a successful blog with our brand new course

WordPress.com is excited to announce our newest offering: a course just for beginning bloggers where you’ll learn everything you need to know about blogging from the most trusted experts in the industry. We have helped millions of blogs get up and running, we know what works, and we want you to to know everything we know. This course provides all the fundamental skills and inspiration you need to get your blog started, an interactive community forum, and content updated annually. 

How it works: Upon registering, you will receive access to review the lessons at your own pace. Our curriculum includes:

Foundations of bloggingGetting started with block basicsBuilding your blogUnderstanding audiences Designing your blogWriting for the internetBranding and growing your blogEarning money with your blog 

You’ll also be able to connect with WordPress.com experts and other aspiring bloggers, who will create content alongside you. Beyond the modules, this course provides: 

Monthly office hours with WordPress experts to answer your questions A certificate of completionAccess to a private blogging community onlineVirtual meetups scheduled quarterly

Cost: A $49 annual subscription gives you access to all of these on-demand blogging resources, community events, and course updates. That way, you won’t have to waste time looking for answers all over the web—you’ll be able to get started right away.

Join by Thursday, December 10th and enjoy 50% off with code WPCOURSES50.

We are looking forward to reading your new blogs soon!

Register now

Quelle: RedHat Stack

The Spearhead Theme: A Minimal Design and Clean Slate for All Content Creators

When AngelList and Venture Hacks co-founder Babak Nivi came to us and wanted to donate a theme, our team was excited to work on the design to make it available to everyone on WordPress.com for free. Designed by Cece Yu and originally developed for the Spearhead podcast, the new Spearhead theme is fully block-powered and the first among our themes to support dark mode.

Spearhead works seamlessly with the block editor, supporting a wide range of blocks — Audio, Video, Image, TikTok, Loom, and many more — so you can customize posts and pages as you like and showcase various types of content, from podcast episodes to video tutorials and more. And while Spearhead shines as a theme for media, its sparse design also displays long-form writing and text and images beautifully.

Spearhead comes with some block patterns, or collections of predefined blocks, to give you a boost as you start building your site. There are a couple of patterns you can use to show a list of places where people can listen to your podcast, as well as a custom archive page.

Being the first theme on WordPress.com to support dark mode, Spearhead’s default color scheme has a white background, but if your operating system shifts into dark mode, the theme will change and display a dark background with light text.

Our team especially loves the theme’s clean design, which lets the content you create shine through. Your listeners and readers can sit back with their cup of coffee — headphones on — and enjoy your latest episode and read along with the transcript!

Explore the Spearhead demo site to see the design in action, and then visit the Spearhead page to activate the theme.

Activate the Spearhead theme

Quelle: RedHat Stack

Introducing Patterns: Prebuilt Blocks for Beautifully Designed Websites

The WordPress Editor is a powerful tool that can help bring your design ideas to life but one of the best parts is, you don’t have to start from scratch. Building sophisticated designs can be as easy as picking Patterns from our growing library, and snapping them together to create beautiful-looking posts and pages. As of today, we’re now offering over 100 individual Patterns — with more being added all the time!

If you’ve never used Patterns before we’ve got an introduction to help you get started and also highlight some new features.

The best way to introduce Patterns is to use them. Here’s how you can add them to a post or a page on WordPress.com.

Head to the WordPress Editor and click the + icon to add a new block.Click on the Patterns tab.Click on the Pattern you’d like to see in your document and it’ll be inserted at the location of your cursor.

Here’s a quick demo that shows how to add an image gallery. 

If you’re familiar with the Block Editor, the process will look similar. Once you’ve inserted a Pattern into a post or a page, you’ll be able to see how you can customize and edit the Pattern by clicking on different areas. The image below reveals the editing options that appear with our example. 

Each Pattern is a collection of different blocks carefully put together to help you produce great looking blog posts and pages in the Editor. In the example above, it’s a collection of Image, Paragraph, Spacer, and Column Blocks. All pre-arranged into a simple but elegant Pattern for displaying images. Using Patterns in the Editor is kind of like having a WordPress web designer right there with you building up a design element by element.

The idea is that, once you’ve inserted a Pattern, you can start customizing it to make it yours.

For even more customization options with Patterns, try combining them with the updated fonts on WordPress.com.

Over 100 Patterns to Choose From

This is where the number of Patterns gets exciting. Think of it like having over 100 templates you can add to your posts and pages. You can browse by category to see all the available Pattern options.

Taking a look at a few all together might be helpful. Here are some of my recent favorites. 

They’re not favorites because they look great, but instead because these Patterns use so many different Blocks to produce a unique and useful design. Take the center Registration Form Pattern, for example. It combines a Heading Block, Paragraph Blocks, the Form Block, and the Columns Block into one Pattern that together, can make up an entire page.

More Patterns are on the Way

We’re just getting started creating new Patterns for you. What type of Pattern would make it easier to create Posts and Pages on your site? More are on the way and we’d love to hear your ideas and feedback so we can make your publishing and site-building experience even better.

And if you have anything to share that you’ve made with a Pattern or with the Editor let us know! We’d love to see and hear how you’re using Patterns on WordPress.com.
Quelle: RedHat Stack

Expert Advice: How to Improve Remote Education Collaboration

As we’re witnessing with schools and learning communities around the world, education is shifting dramatically. With the right set of tools, your class, team, or group can learn to communicate and collaborate more efficiently online. Since our company was founded over fifteen years ago, the people behind the scenes at WordPress.com have worked from home — or from anywhere they choose in the world — and have learned a lot along the way.

A tool we call P2 has been indispensable to us, and to a growing number of educators. Want to learn our tips and tricks? Join us for a free webinar on Thursday, November 5, so you and your team can learn to make the most of this tool for remote collaboration. You can also sign up for the free beta version of P2 that is now available.

Date: Thursday, November 5, 2020Time: 10:00 am PT | 12:00 pm CT | 1:00 pm ET | 18:00 UTCRegistration link: https://zoom.us/webinar/register/4016033198190/WN_WjX8jQhIQ0iZVPpfGAklhQWho’s invited: Anyone looking to improve internal team collaboration or build a public forum with P2 are welcome, but this webinar is specially designed for educators and teachers.

Register for the webinar today! We look forward to seeing you.
Quelle: RedHat Stack

What is container orchestration?

The post What is container orchestration? appeared first on Mirantis | Pure Play Open Cloud.
The past several years have brought the onset of applications built in containers such as Docker containers, but running a production application means more than simply creating a container and running it on Docker Engine. It means container orchestration.
Understanding container orchestration
Before we get into the specifics of how it works, we should understand what is meant by container orchestration.
Containerization of applications makes it possible to more easily run them in diverse environments, because Docker Engine acts as the application’s conceptual “home”.  However, it doesn’t solve all of the problems involved in running a production application — just the opposite, in fact.
A non-containerized application assumes that it will be installed and run manually, or at least delivered via a virtual machine. But a containerized application has to be placed, started, and  provided with resources. This kind of container automation is why you need container orchestration tools.
These Docker container orchestration tools perform the following tasks:

Determine what resources, such as compute nodes and storage, are available
Determine the best node (or nodes) on which to run specific containers
Allocate resources such as storage and networking
Start one or more copies of the desired containers, based on redundancy requirements
Monitor the containers and in the event that one or more of them is no longer functional, replace them.

Multiple container orchestration tools exist, and they don’t all handle objects in the same way.
How to plan for container orchestration
In an ideal situation, your application should not be dependent on which container orchestration platform you’re using. Instead, you should be able to orchestrate your containers using any platform as long as you configure that platform correctly.
All of this relies, again, on knowing the architecture of your application so that you can implement it outside of the application itself.  For example, let’s say we’re building an e-commerce site.

We have a database, web server, and payment gateway, all of which communicate over a network.  We also have all of the various passwords needed for them to talk to each other.
The compute, network, storage, and secrets are all resources that need to be handled by the container orchestration platform, but how that happens depends on the platform that you choose.
Types of container orchestration platforms
Because different environments require different levels of orchestration, the market has spun off multiple container orchestration tools over the last few years.  While they all do the same basic job of container automation, they work in different ways and were designed for different scenarios.
Docker Swarm Orchestration
To the engineers at Docker, orchestration was a capability to be provided as a first class citizen.  As such, Swarm is included with Docker itself. Enabling Swarm mode is straightforward, as is adding nodes.
Docker Swarm enables developers to define applications in a single file, such as:
version: “3.7”
services:
 database:
   image: dockersamples/atsea_db
   ports:
     – “5432”
   environment:
     POSTGRES_USER: gordonuser
     POSTGRES_DB_PASSWORD_FILE: /run/secrets/postgres-password
     POSTGRES_DB: atsea
     PGDATA: /var/lib/postgresql/data/pgdata
   networks:
     – atsea-net
   secrets:
     – domain-key
     – postgres-password
   deploy:
     placement:
       constraints:
         – ‘node.role == worker’

 appserver:
   image: dockersamples/atsea_app
   ports:
     – “8080”
   networks:
     – atsea-net
   environment:
     METADATA: proxy-handles-tls
   deploy:
     labels:
       com.docker.lb.hosts: atsea.docker-ee-stable.cna.mirantis.cloud
       com.docker.lb.port: 8080
       com.docker.lb.network: atsea-net
       com.docker.lb.ssl_cert: wildcard_docker-ee-stable_crt
       com.docker.lb.ssl_key: wildcard_docker-ee-stable_key
       com.docker.lb.redirects: http://atsea.docker-ee-stable.cna.mirantis.cloud,https://atsea.docker-ee-stable.cna.mirantis.cloud
       com.libkompose.expose.namespace.selector: “app.kubernetes.io/name:ingress-nginx”
     replicas: 2
     update_config:
       parallelism: 2
       failure_action: rollback
     placement:
       constraints:
         – ‘node.role == worker’
     restart_policy:
       condition: on-failure
       delay: 5s
       max_attempts: 3
       window: 120s
   secrets:
     – domain-key
     – postgres-password

 payment_gateway:
   image: cna0/atsea_gateway
   secrets:
     – staging-token
   networks:
     – atsea-net
   deploy:
     update_config:
       failure_action: rollback
     placement:
       constraints:
         – ‘node.role == worker’

networks:
 atsea-net:
   name: atsea-net

secrets:
 domain-key:
   name: wildcard_docker-ee-stable_key
   file: ./wildcards.docker-ee-stable.key
 domain-crt:
   name: wildcard_docker-ee-stable_crt
   file: ./wildcards.docker-ee-stable.crt
 staging-token:
   name: staging_token
   file: ./staging_fake_secret.txt
 postgres-password:
   name: postgres_password
   file: ./postgres_password.txt

In this example, we have three services: the database, the application server, and the payment gateway, all of which include their own particular configurations.  These configurations also refer to objects such as networks and secrets, which are defined independently.
The advantage of Swarm is that it’s got a small learning curve, and developers can run their applications in the same environment on their laptop as it will use when it runs in production. The disadvantage is that it’s not as full-featured as its companion, Kubernetes.
Kubernetes Orchestration
While Swarm is still widely used in many contexts, the acknowledged champion of container orchestration is Kubernetes. Like Swarm, Kubernetes enables developers to create resources such as groups of replicas, networking, and storage, but it’s done in a completely different way.
For one thing, Kubernetes is a separate piece of software; in order to use it, you must either install a distribution locally or have access to an existing cluster.  For another, the entire architecture of applications and how they’re created is totally different from Swarm.  For example, the application we created in the earlier example would look like this:
apiVersion: v1
data:
 staging-token: c3RhZ2luZw0K
kind: Secret
metadata:
 creationTimestamp: null
 labels:
   io.kompose.service: staging-token
 name: staging-token
type: Opaque

apiVersion: v1
data:
 postgres-password: cXdhcG9sMTMNCg==
kind: Secret
metadata:
 creationTimestamp: null
 labels:
   io.kompose.service: postgres-password
 name: postgres-password
type: Opaque

apiVersion: apps/v1
kind: Deployment
metadata:
 annotations:
   kompose.version: 1.21.0 (HEAD)
 creationTimestamp: null
 labels:
   io.kompose.service: payment-gateway
 name: payment-gateway
spec:
 replicas: 1
 selector:
   matchLabels:
     io.kompose.service: payment-gateway
 strategy: {}
 template:
   metadata:
     annotations:
       kompose.version: 1.21.0 (HEAD)
     creationTimestamp: null
     labels:
       io.kompose.network/atsea-net: “true”
       io.kompose.service: payment-gateway
   spec:
     containers:
       – image: cna0/atsea_gateway
         name: payment-gateway
         resources: {}
         volumeMounts:
           – mountPath: /run/secrets/staging-token
             name: staging-token
     nodeSelector:
       node-role.kubernetes.io/worker: “true”
     restartPolicy: Always
     volumes:
       – name: staging-token
         secret:
           items:
             – key: staging-token
               path: staging-token
           secretName: staging-token
status: {}

apiVersion: networking.k8s.io/v1
kind: NetworkPolicy
metadata:
 creationTimestamp: null
 name: ingress-appserver
spec:
 ingress:
   – from:
       – namespaceSelector:
           matchLabels:
             app.kubernetes.io/name: ingress-nginx
       – podSelector: {}
 podSelector:
   matchLabels:
     io.kompose.network/atsea-net: “true”
 policyTypes:
   – Ingress

apiVersion: v1
data:
 domain-key: <snip>
kind: Secret
metadata:
 creationTimestamp: null
 labels:
   io.kompose.service: domain-key
 name: domain-key
type: Opaque

apiVersion: v1
data:
 Domain-crt: <snip>
kind: Secret
metadata:
 creationTimestamp: null
 labels:
   io.kompose.service: domain-crt
 name: domain-crt
type: Opaque

apiVersion: v1
kind: Service
metadata:
 annotations:
   kompose.version: 1.21.0 (HEAD)
 creationTimestamp: null
 labels:
   io.kompose.service: database
 name: database
spec:
 ports:
   – name: “5432”
     port: 5432
     targetPort: 5432
 selector:
   io.kompose.service: database
status:
 loadBalancer: {}

apiVersion: apps/v1
kind: Deployment
metadata:
 annotations:
   kompose.version: 1.21.0 (HEAD)
 creationTimestamp: null
 labels:
   io.kompose.service: database
 name: database
spec:
 replicas: 1
 selector:
   matchLabels:
     io.kompose.service: database
 strategy: {}
 template:
   metadata:
     annotations:
       kompose.version: 1.21.0 (HEAD)
     creationTimestamp: null
     labels:
       io.kompose.network/atsea-net: “true”
       io.kompose.service: database
   spec:
     containers:
       – env:
           – name: PGDATA
             value: /var/lib/postgresql/data/pgdata
           – name: POSTGRES_DB
             value: atsea
           – name: POSTGRES_DB_PASSWORD_FILE
             value: /run/secrets/postgres-password
           – name: POSTGRES_USER
             value: gordonuser
         image: dockersamples/atsea_db
         name: database
         ports:
           – containerPort: 5432
         resources: {}
         volumeMounts:
           – mountPath: /run/secrets/domain-key
             name: domain-key
           – mountPath: /run/secrets/postgres-password
             name: postgres-password
     nodeSelector:
       node-role.kubernetes.io/worker: “true”
     restartPolicy: Always
     volumes:
       – name: domain-key
         secret:
           items:
             – key: domain-key
               path: domain-key
           secretName: domain-key
       – name: postgres-password
         secret:
           items:
             – key: postgres-password
               path: postgres-password
           secretName: postgres-password
status: {}

apiVersion: networking.k8s.io/v1
kind: NetworkPolicy
metadata:
 creationTimestamp: null
 name: atsea-net
spec:
 ingress:
   – from:
       – podSelector:
           matchLabels:
             io.kompose.network/atsea-net: “true”
 podSelector:
   matchLabels:
     io.kompose.network/atsea-net: “true”

apiVersion: v1
kind: Service
metadata:
 annotations:
   kompose.version: 1.21.0 (HEAD)
 creationTimestamp: null
 labels:
   io.kompose.service: appserver
 name: appserver
spec:
 ports:
   – name: “8080”
     port: 8080
     targetPort: 8080
 selector:
   io.kompose.service: appserver
status:
 loadBalancer: {}

apiVersion: v1
kind: Pod
metadata:
 creationTimestamp: null
 labels:
   io.kompose.network/atsea-net: “true”
   io.kompose.service: appserver
 name: appserver
spec:
 containrs:
   – env:
       – name: METADATA
         value: proxy-handles-tls
     image: dockersamples/atsea_app
     name: appserver
     ports:
       – containerPort: 8080
     resources: {}
     volumeMounts:
       – mountPath: /run/secrets/domain-key
         name: domain-key
       – mountPath: /run/secrets/postgres-password
         name: postgres-password
 nodeSelector:
   node-role.kubernetes.io/worker: “true”
 restartPolicy: OnFailure
 volumes:
   – name: domain-key
     secret:
       items:
         – key: domain-key
           path: domain-key
       secretName: domain-key
   – name: postgres-password
     secret:
       items:
         – key: postgres-password
           path: postgres-password
       secretName: postgres-password
status: {}

apiVersion: networking.k8s.io/v1beta1
kind: Ingress
metadata:
 annotations:
   kompose.version: 1.21.0 (HEAD)
 creationTimestamp: null
 labels:
   io.kompose.service: appserver
 name: appserver
spec:
 rules:
   – host: atsea.docker-ee-stable.cna.mirantis.cloud
     http:
       paths:
         – backend:
             serviceName: appserver
             servicePort: 8080
 tls:
   – hosts:
       – atsea.docker-ee-stable.cna.mirantis.cloud
     secretName: tls
status:
  loadBalancer: {}
The application is the same, it’s just created in a different way. As you can see, the web application server, the database, and the payment gateway are still created using Kubernetes, just with a different structure. In addition, the support structures such as networks and secrets must be created. 
The additional complexity does bring a number of benefits, however. Kubernetes is much more full-featured than Swarm, and can be appropriate in both small and large environments.
Where to find container orchestration
Not only are there different types of container orchestration, you can also find it in different places, depending on your situation.
Local desktop/laptop
Most developers work on their desktop or laptop machine, so it’s convenient if the target container orchestration platform is available at that level.  
For Swarm users, the process is straightforward; Swarm is already part of Docker and just needs to be enabled. 
For Kubernetes, the developer needs to take an additional step to install Kubernetes on their machine, but there are several tools that make this possible, such as Kubeadm.
Internal network
Once the developer is ready to deploy, if the application will live on an on-premise data center, typically the user won’t need to install a cluster because it will have been installed by administrators; instead they will connect using the connection information given to them.
Administrators can deploy a number of different cluster types; for example, enterprise grade Docker Swarm clusters and Kubernetes clusters can be deployed by Docker Enterprise Container Cloud. 
AWS
Businesses that run their infrastructure on Amazon Web Services have a number of different choices. For example, you can run install Docker Enterprise on Amazon EC2 compute servers, or you can use Docker Enterprise Container Cloud to deploy clusters directly on Amazon Web Services. You also have the option to use specific container resources, such as Amazon Container Services or Amazon Kubernetes service.
Google
Choices for Google cloud are similar; you can install a container management platform such as Docker Enterprise, or you can use Google Kubernetes Engine to spin up clusters using Google’s hardware and software — and their API.
Azure
The situation is the same for Azure Cloud: you must choose between deploying a distribution such as Docker Enterprise on compute nodes, providing Swarm and Kubernetes capabilities, or use the Azure Kubernetes Service to provide Kubernetes clusters to your users.
Getting started with container orchestration
The best way to get started with container orchestration is to simply pick a system and try it out!  You can try installing kubeadm, or you can make it easy on yourself and install a full system such as Docker Enterprise, which provides you with multiple options for container orchestration platforms.
The post What is container orchestration? appeared first on Mirantis | Pure Play Open Cloud.
Quelle: Mirantis

What is Infrastructure as a Service?

The post What is Infrastructure as a Service? appeared first on Mirantis | Pure Play Open Cloud.
There was a time when if you needed a computer, you had to go and get a physical piece of hardware, set it up, connect it to the network, and so on. These days, however, if you need a “computer”, what you’re really looking for is infrastructure — a collection of resources, such as compute, memory, storage, and so on — and you need to be able to get it in as flexible a manner as possible.  Enter Infrastructure as a Service (IaaS).
At its core, a computer is a collection of resources:

As long as your program has access to these resources, it doesn’t care what form the machine actually takes.

In fact, the program doesn’t even care if it’s a physical machine at all.  In fact, it could be a Virtual Machine:

In this case, you can see that a single physical machine, or host, can provide multiple Virtual Machines, or VMs.  Each of these VMs is like a tiny (or not-so-tiny) computer within the host computer, and each is completely isolated from all the others, so as far as the user and any of their programs are concerned, it’s just the same as a physical machine (for the most part).
The purpose of Infrastructure as a Service
The idea of Infrastructure as a service is to make it possible for users to request the infrastructure they need when they need it and get it without having to involve an administrator or fill out a ticket and wait 6 weeks to get a response.
Instead, they can go to a (typically web-based) user interface and specify the needed resources, which are provided near-instantly.
These resources may consist of compute power (CPUs, or more properly, virtual CPUs (vCPUs)), RAM, storage, and even networking. 
As a rule, the user neither knows nor cares where these resources are physically located — that is, which actual machine they live on.  For the purposes of them using the resources, it doesn’t matter.
What is IaaS in cloud computing?
Because IaaS resources are non-location-specific, they are a perfect application for cloud computing, where hardware resources can be dispersed over an arbitrarily large area.  For example, you might have a small data center on premises, or multiple data centers in multiple on-premise locations, or you might use public cloud resources.
In any case, the idea is that IaaS providers make IaaS services available over these hardware resources that are provided in a cloud-based architecture. In fact, when it comes to IaaS, cloud is a requirement.
Types of Infrastructure as a Service providers
So far, our discussion of Infrastructure as a Service has been completely generic.  In fact, there are multiple ways to handle Infrastructure as a Service, depending on your needs and the level of open source versus proprietary software you’re comfortable with.
VMware
In the beginning, there was VMware.  In many ways, VMware started the virtualization revolution, making it possible to run multiple virtual machines on a single host.  VMware created a large portfolio of products and services, but these were primarily proprietary software products, which meant that not only were they not interoperable with any other IaaS, but every additional VM involved additional licensing costs, sometimes referred to as the “VMware Tax.”  
Public Cloud
Meanwhile, the Public Cloud industry started with Amazon Web Services providing Infrastructure as a Service, as Amazon discovered it could squeeze revenue out of its enormous hardware portfolio by making it possible for external users to create and essentially rent virtual machines.  Amazon also created a large portfolio of different services, all of which were freely available — but firmly under the control of Amazon, on AWS servers.
Other public cloud providers also began offering IaaS, such as Google Cloud Services and Microsoft Azure.
All of these IaaS cloud providers also developed additional services to work with their Virtual Machines, and all of these services were largely proprietary (though some are based on open source projects) and their services are based on the idea that customer applications and data are hosted on and served from the provider’s hardware. Each also had its own independent (and non-interoperable) API.
While public cloud solutions did solve the problem of the VMware Tax, they introduced their own problems.  Companies realized that their data was outside of their owned infrastructure — and the meter was running. 
OpenStack
Enter OpenStack.  The idea behind the open source OpenStack project is to make it possible for companies to essentially create their own “on premise” cloud. This way internal end users could request Infrastructure as a Service just as they would from AWS or Google Cloud, but data and applications would remain under the company’s control and supervision — and starting a new VM wouldn’t trigger a new hourly charge the way it did with public cloud.
Like the OpenStack also provides a number of related services, such as Networking as a Service, Storage as a Service, DNS as a Service, and so on. 
OpenStack provides a robust platform for companies with significant IaaS needs and can be more cost effective than public cloud.  For example, this cloud TCO calculator shows the differences between running a datacenter on AWS and on Mirantis Cloud Platform OpenStack.
Other on-premise solutions
All of this assumes that you are mostly interested in running full Virtual Machines and other IaaS services and resources. But the concept of Infrastructure as a Service is rooted in the ability of users to create and enable resources on their own.
For example, you may be working with containerized applications rather than VMs.  In this case, you may need different kinds of Infrastructure as a Service.  You may need VMs on which to run your containers, or a container orchestration platform such as Kubernetes.
You may also want to provide these resources in an “as a Service” way.  For example, Docker Enterprise Container Cloud enables you to provide users with a UI from which they can create and provision their own Swarm or Kubernetes-based Docker Enterprise clusters, either on-premise or on Amazon Web Services.
Ultimately the idea behind Infrastructure as a Service is to give you and your users control over when and where to make resources available.
 
The post What is Infrastructure as a Service? appeared first on Mirantis | Pure Play Open Cloud.
Quelle: Mirantis

Introduction to Kubernetes: The Ultimate Guide

The post Introduction to Kubernetes: The Ultimate Guide appeared first on Mirantis | Pure Play Open Cloud.
Given the importance of Kubernetes in today’s environment, we wanted to give you a “one stop shop” for any information you may need.
What is Kubernetes?
Simply put, Kubernetes, or K8s, is a container orchestration system. In other words, when you use Kubernetes, a container based application can be deployed, scaled, and managed automatically.

The objective of Kubernetes is to abstract away the complexity of managing a fleet of containers that represent packaged applications and include everything needed to run wherever they’re provisioned. By interacting with the Kubernetes REST API, you can describe the desired state of your application, and Kubernetes does whatever is necessary to make the infrastructure conform. It deploys groups of containers, replicates them, redeploys if some of them fail, and so on.

Because it’s open source, a k8s cluster can run almost anywhere, and the major public cloud providers all provide easy ways to consume this technology. Private clouds based on OpenStack can also run Kubernetes, and bare metal servers can be leveraged as worker nodes for it. So if you describe your application with Kubernetes building blocks, you’ll then be able to deploy it within VMs or bare metal servers, on public or private clouds.

Let’s take a look at the basics of how Kubernetes works so that you will have a solid foundation to dive deeper.
What is a Kubernetes cluster? The Kubernetes architecture
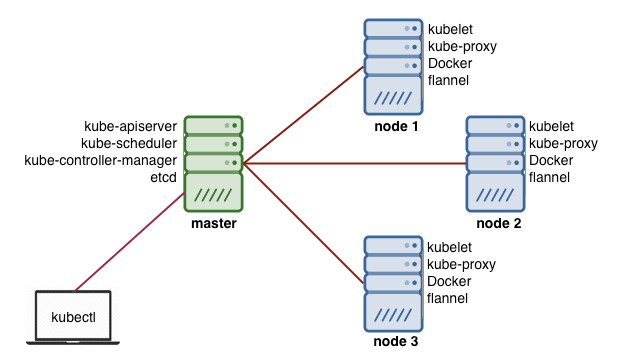
The Kubernetes architecture is relatively simple. You never interact directly with the nodes hosting your application, but only with the control plane, which presents an API and is in charge of scheduling and replicating groups of containers named Pods. Kubectl is the command line interface you can use to interact with the API to share the desired application state or gather detailed information on the infrastructure’s current state.

Let’s look at the various pieces.
Nodes
Each node that hosts part of your distributed application does so by leveraging Docker or a similar container technology, such as Rocket from CoreOS. The nodes also run two additional pieces of software: kube-proxy, which gives access to your running app, and kubelet, which receives commands from the k8s control plane. Nodes can also run flannel, an etcd backed network fabric for containers.
Master
The control plane itself runs the API server (kube-apiserver), the scheduler (kube-scheduler), the controller manager (kube-controller-manager) and etcd, a highly available key-value store for shared configuration and service discovery implementing the Raft consensus Algorithm.

Now let’s look at some of the terminology you might run into.
Terminology
Kubernetes has its own vocabulary which, once you get used to it, gives you some sense of how things are organized. These terms include:

Pods: Pods are a group of one or more containers, their shared storage, and options about how to run them. Each pod gets its own IP address.
Labels: Labels are key/value pairs that Kubernetes attaches to any objects, such as pods, Replication Controllers, Endpoints, and so on.
Annotations: Annotations are key/value pairs used to store arbitrary non-queryable metadata.
Services: Services are an abstraction, defining a logical set of Pods and a policy by which to access them over the network.
Replication Controller: Replication controllers ensure that a specific number of pod replicas are running at any one time.
Secrets: Secrets hold sensitive information such as passwords, TLS certificates, OAuth tokens, and ssh keys.
ConfigMap: ConfigMaps are mechanisms used to inject containers with configuration data while keeping containers agnostic of Kubernetes itself.

Why Kubernetes?
So what is Kubernetes used for?  In order to justify the added complexity that Kubernetes brings, there need to be some benefits. At its core, a cluster manager such as k8s exists to serve developers so they can serve themselves without having to involve the operations team.

Reliability is one of the major benefits of Kubernetes; Google has over 10 years of experience when it comes to infrastructure operations with Borg, their internal container orchestration solution, and they’ve built Kubernetes based on this experience. Kubernetes can be used to prevent failure from impacting the availability or performance of your application, and that’s a great benefit.

Scalability is handled by Kubernetes on different levels. You can add cluster capacity by adding more worker nodes, which can even be automated in many public clouds with autoscaling functionality based on CPU and Memory triggers. The Kubernetes Scheduler includes affinity features to spread your workloads evenly across the infrastructure, maximizing availability. Finally, k8s can autoscale your application using the Pod autoscaler, which can be driven by custom triggers.
Ultimate guide to Kubernetes
Now that you have the basics, we can look at more information. Here at Mirantis we’re committed to making things easy for you to get your work done, so we’ve decided to put together this guide to Kubernetes.

If you have suggestions for topics you’d like us to cover, or links to resources you find particularly valuable, please let us know.
Introduction to Kubernetes
Don’t Be Scared of Kubernetes
Kubernetes has the broadest capabilities of any container orchestrator available today, which adds up to a lot of power and complexity. That can be overwhelming for a lot of people jumping in for the first time – enough to scare people off from getting started. Here are five things you might be afraid of, and 5 ways to get started.
Deploying Kubernetes
Building Your First Certified Kubernetes Cluster On-Premises
Where following entries have shown how to create a basic dev/test cluster, this article explains how to create a production cluster using Docker Enterprise.
How to install Kubernetes with Kubeadm: A quick and dirty guide
Sometimes you just need a Kubernetes cluster, and you don’t want to mess around. This article is a quick and dirty guide to creating a single-node Kubernetes cluster using Kubeadm, a tool the K8s community created to simplify the deployment process.
Multi-node Kubernetes with KDC: A quick and dirty guide
Kubeadm-dind-cluster, or KDC, is a configurable script that enables you to easily create a multi-node cluster on a single machine by deploying Kubernetes nodes as Docker containers (hence the Docker-in-Docker (dind) part of the name) rather than VMs or separate bare metal machines. 
Create and manage an OpenStack-based KaaS child cluster
Once you’ve deployed your KaaS management cluster, you can begin creating actual Kubernetes child clusters. These clusters will use the same cloud provider type as the management cluster, so if you’ve deployed your management nodes on OpenStack, your child cluster will also run on OpenStack.
How to deploy Airship in a Bottle: A quick and dirty guide
Airship is designed to deploy OpenStack, but it deploys it on Kubernetes, so the first thing it does is deploy a Kubernetes cluster, so it’s another option for getting a cluster up and running.
Configuring Kubernetes and components
Virtlet: run VMs as Kubernetes pods
Virtlet enables you to run VMs as first class citizens within Kubernetes; this article explains how and why to make that work.
Everything you ever wanted to know about using etcd with Kubernetes v1.6 (but were afraid to ask)
The etcd key-value store is the only stateful component of the Kubernetes control plane. This makes matters for an administrator simpler, but when etcd went from v2 to v3, it was a headache for operators.
Development
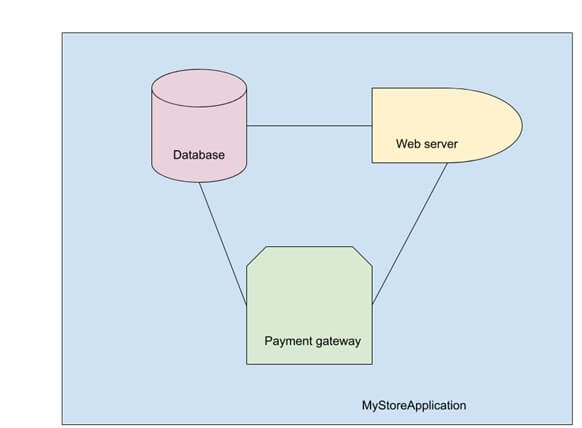
Modeling complex applications with Kubernetes AppController
When you’re first looking at Kubernetes applications, it’s common to see a simple scenario that may include several pieces — but not explicit dependencies. But what happens when you have an application that does include dependencies. For example, what happens if the database must always be configured before the web servers, and so on? It’s common for situations to arise in which resources need to be created in a specific order, which isn’t easily accommodated with today’s templates.
Designing Kubernetes-based applications
How do you build 12-factor apps using Kubernetes?
It’s said that there are 12 factors that define a cloud-native application.  It’s also said that Kubernetes is designed for cloud native computing. So how do you create a 12-factor application using Kubernetes?  Let’s take a look at exactly what twelve factor apps are and how they relate to Kubernetes.
Creating YAML
Introduction to Kustomize, Part 1: Creating a Kubernetes app out of multiple pieces
Kustomize is a tool that lets you create an entire Kubernetes application out of individual pieces — without touching the YAML for the individual components.  For example, you can combine pieces from different sources, keep your customizations — or kustomizations, as the case may be — in source control, and create overlays for specific situations.
Introduction to Kustomize, Part 2: Overriding values with overlays
In part 1 of this tutorial, we looked at how to use Kustomize to combine multiple pieces into a single YAML file that can be deployed to Kubernetes. In doing that, we used the example of combining specs for WordPress and MySQL, automatically adding a common app label. Now we’re going to move on and look at what happens when we need to override some of the existing values that aren’t labels.
Introduction to YAML, Part 1: Creating a Kubernetes deployment
In previous articles, we’ve been talking about how to use Kubernetes to spin up resources. So far, we’ve been working exclusively on the command line, but there’s an easier and more useful way to do it: creating configuration files using YAML. In this article, we’ll look at how YAML works and use it to define first a Kubernetes Pod, and then a Kubernetes Deployment.
Introduction to YAML, Part 2: Kubernetes Services, Ingress, and repeated nodes
In part 1 of this series, we looked at the basics behind YAML and showed you how to create basic Kubernetes objects such as Pods and Deployments using the two basic structures of YAML, Maps and Lists. Now we’re going to look at enhancing your YAML documents with repeated nodes in the context of Kubernetes Services, Endpoints, and Ingress.
Containerize an application
How do I build a containerized app on Mirantis OpenStack with native Docker tools?
In this article, we take a look at what’s really going on behind the scenes of a containerized application by building one on OpenStack using native Docker tools.
Create an application
Best of 2019 Blogs: Designing Your First App in Kubernetes
Kubernetes is a powerful container orchestrator and has been establishing itself as IT architects’ container orchestrator of choice. But Kubernetes’ power comes at a price; jumping into the cockpit of a state-of-the-art jet puts a lot of power under you, but knowing how to actually fly it is not so simple. 
Creating and accessing a Kubernetes cluster on OpenStack, part 3: Run the application
In part 2, you created the actual cluster, so finally, you’re ready to actually interact with the Kubernetes API that you installed. To do that, you’ll need to define the security credentials for accessing your applications, deploy a containerized app to the cluster, and expose the app to the outside world so you can access it.
Docker: (a few) Best Practices
As Docker continues to evolve, it is important to stay up to date with best practices. We joined JFrog to go over the challenges of Dockerization, Dockerfile tips, and configuration tweaks for production.
Multi-container pods and container communication in Kubernetes
Containers are often intended to solve a single, narrowly defined problem, such as a microservice, but in the real world, problems require multiple containers for a complete solution. In this article, we’re going to talk about combining multiple containers into a single Kubernetes Pod, and what it means for inter-container communication.
Deploy an application with Helm
Using Kubernetes Helm to install applications: A quick and dirty guide
Deploying an application using containers can be much easier than trying to manage deployments of a traditional application over different environments, but trying to manage and scale multiple containers manually is much more difficult than orchestrating them using Kubernetes. But even managing Kubernetes applications looks difficult compared to, say, “apt-get install mysql”. Fortunately, the container ecosystem has now evolved to that level of simplicity. Enter Helm.
Infrastructure and operations
Kubernetes Lifecycle Management with Docker Kubernetes Service (DKS)
There are many tutorials and guides available for getting started with Kubernetes. Typically, these detail the key concepts and  outline the steps for deploying your first Kubernetes cluster. However, when organizations want to roll out Kubernetes at scale or in production, the deployment is much more complex and there are new requirements around both the initial setup and configuration and the ongoing management – often referred to as “Day 1 and Day 2 operations.”
We installed an OpenStack cluster with close to 1000 nodes on Kubernetes. Here’s what we found out.
We did a number of tests that looked at deploying close to 1000 OpenStack nodes on a pre-installed Kubernetes cluster as a way of finding out what problems you might run into, and fixing them, if at all possible. In all we found several, and though in general, we were able to fix them, we thought it would still be good to go over the types of things you need to look for.
Scale and Performance Testing of Kubernetes
Managing thousands of containers can be challenging, but if you want to know how Kubernetes will behave at scale we might be able to provide an answer. At KubeCon in Seattle, we shared the data we collected in our scale lab, which consists of 500 physical nodes. Using virtual machines, we can simulate up to 5000 Kubernetes minions running actual workloads, and our tests are designed to reveal how Kubernetes behaves while managing a complex application (in this case, OpenStack services) at large scale.
Kubernetes as an Edge substrate
How to build an edge cloud part 1: Building a simple facial recognition system
If you look at the internet, there’s a lot of talk about edge clouds and what they are — from a conceptual level.  But not too many people are telling you how to actually build one. Today we’re going to start to change that.
Open Source IoT Platform based on OpenStack and Kubernetes
This blog post explains open source IoT platform introduced at OpenStack Summit Keynote at Austin in more detail. First we explain our approach and vision to IoT, technical overview and show two sample use cases.
Scaling your application
Clustered RabbitMQ on Kubernetes
There are a lot of possible approaches to setting up clustered RabbitMQ on Kubernetes. Today I’m going to talk about the most common pitfalls or all approaches to RabbitMQ clustering, so if you want to come up with your own solution, you should find a good bit of the material meaningful to you.
Kubernetes Replication Controller, ReplicaSet and Deployments: Understanding replication options
As a container management tool, Kubernetes was designed to orchestrate multiple containers and replication, and in fact there are currently several ways to do it. In this article, we’ll look at three options: Replication Controllers, ReplicaSets, and Deployments.
Scaling with Kubernetes DaemonSets
We’re used to thinking about scaling from the point of view of a Deployment; we want it to scale up under different conditions, so it looks for appropriate nodes, and puts pods on them. DaemonSets, on the other hand, take a different tack: any time you have a node that belongs to the set, it runs the pods you specify.  For example, you might create a DaemonSet to tell Kubernetes that any time you create a node with the label app=webserver you want it to run Nginx.  Let’s take a look at how that works.
Security
Make your container images safer and more reliable with Harbor, the cloud native registry
Container registries such as DockerHub have made container application development much easier, but they have introduced another problem: how do you know downloaded images are production-ready and secure? To solve this problem, private registries such as Harbor enable your developers to get the benefits of pre-defined images while enabling you to designate what images can be used.
Controlling access to Kubernetes using RBAC
Role-based Access Control for Kubernetes with Docker Enterprise
Docker Enterprise Edition 2.0 provides a single management control plane for both Swarm and Kubernetes-based clusters – including clusters made up of both Swarm and Kubernetes workers. It also provides a web interface enabling you to manage user access to those clusters using RBAC.
Networking
Calico
BGPaaS in OpenStack – Kubernetes with Calico in OpenStack with OpenContrail
It’s been a while since the new version 3.X of OpenContrail was released, so let’s take a good look at new features of this most deployed SDN/NFV with OpenStack, and specifically use cases and how to use BGP as a Service in OpenStack private cloud.
Kubernetes and OpenStack
Kubernetes and OpenStack multi-cloud networking
The use of real bare metal Kubernetes clusters for application workloads from a networking point of view.
Using a service mesh
What is Istio? It’s a service mesh. Great. What’s a service mesh?
Istio has been all over the ecosystem wherever there’s talk about service meshes, but it’s important that we take a look at what all of that means.
Containers aren’t a game: industry gets serious about Kubernetes development with Draft and Istio
As the infrastructure market settles down, more attention is being paid to what happens after you have your cloud up and running. This week, we saw the announcement of not one, but two frameworks aimed at developers of Kubernetes-based applications.  
Spinnaker Shpinnaker and Istio Shmistio to make a shmesh! (Part 1)
I’m guessing that whenever your manager approaches you and says “We have a problem,” you sort of know that it really means “I have a problem for you to solve.” Such is often the case with our customers, who are frequently attempting to move from a cascading (waterfall) style of delivering application services on bare metal to a more modern way of approaching continuous delivery geared toward cloud native applications.
Return of the Smesh (Spinnaker Shpinnaker and Istio Shmistio to make a Smesh! Part 2)
One of the first things I learned on my sojourn through the open source world is that there are ALWAYS new and different approaches to building the better mouse trap when it comes to component design within a given architecture, and that a single project doesn’t usually contain all of the answers to questions created when developing new application architectures.
OpenDaylight
What’s in OpenDaylight?
The momentum to recognize the OpenDaylight Project as the standard open source software-defined networking (SDN) continues to grow. Established to accelerate the adoption of SDN and Network Functions Virtualization (NFV), OpenDaylight provides an open platform for network programmability designed to enable SDN and create a solid NFV foundation for all sizes of networks.

What are the resources you’ve found to be most helpful? Let us know in the comments!The post Introduction to Kubernetes: The Ultimate Guide appeared first on Mirantis | Pure Play Open Cloud.
Quelle: Mirantis