From Security Blocked to Prod Ready: ClickHouse on Docker Hardened Images
In November 2025, a team self-hosting Langfuse, an open-source LLM observability platform, on Kubernetes uploaded their ClickHouse image to AWS ECR as part of their production preparation. They found that the pipeline scanner had returned three critical vulnerabilities – not in ClickHouse, but in the base image. Their security team saw the findings and blocked the deployment before it ever reached production.
“Our security team is not allowing us to take it to production. Please suggest alternatives.“
vinaygoel586
GitHub Issue #286, November 28, 2025
If you’ve shipped containers into an enterprise environment recently, this situation will sound familiar. A perfectly functional deployment gets blocked not because something is broken, but because a scanner found CVEs in packages the application never even touches. A day goes into investigating the findings, a risk exception gets written up, and the security team rejects it anyway, because the vulnerabilities are technically real even if they’re practically irrelevant to your workload.
This post is about how Docker Hardened Images (DHI) gets you unstuck, when a security team blocks the deployment of a container that has CVEs. In this case we will specifically look at the image for ClickHouse, one of the most widely pulled database images on Docker Hub.
A Quick Word on ClickHouse
ClickHouse is an open-source columnar database built for analytical workloads at scale. It is capable of querying billions of rows and returning results in milliseconds in a way that traditional row-oriented databases simply can’t match. Companies such as Cloudflare, Uber, and Spotify all run it in production. With over 100 million pulls from Docker Hub, it has become the default infrastructure choice for teams that need serious analytics throughput. The image’s default security posture, though, was designed with developer ease-of-use in mind rather than the hardening that enterprise production environments demand and that gap is where the trouble starts.
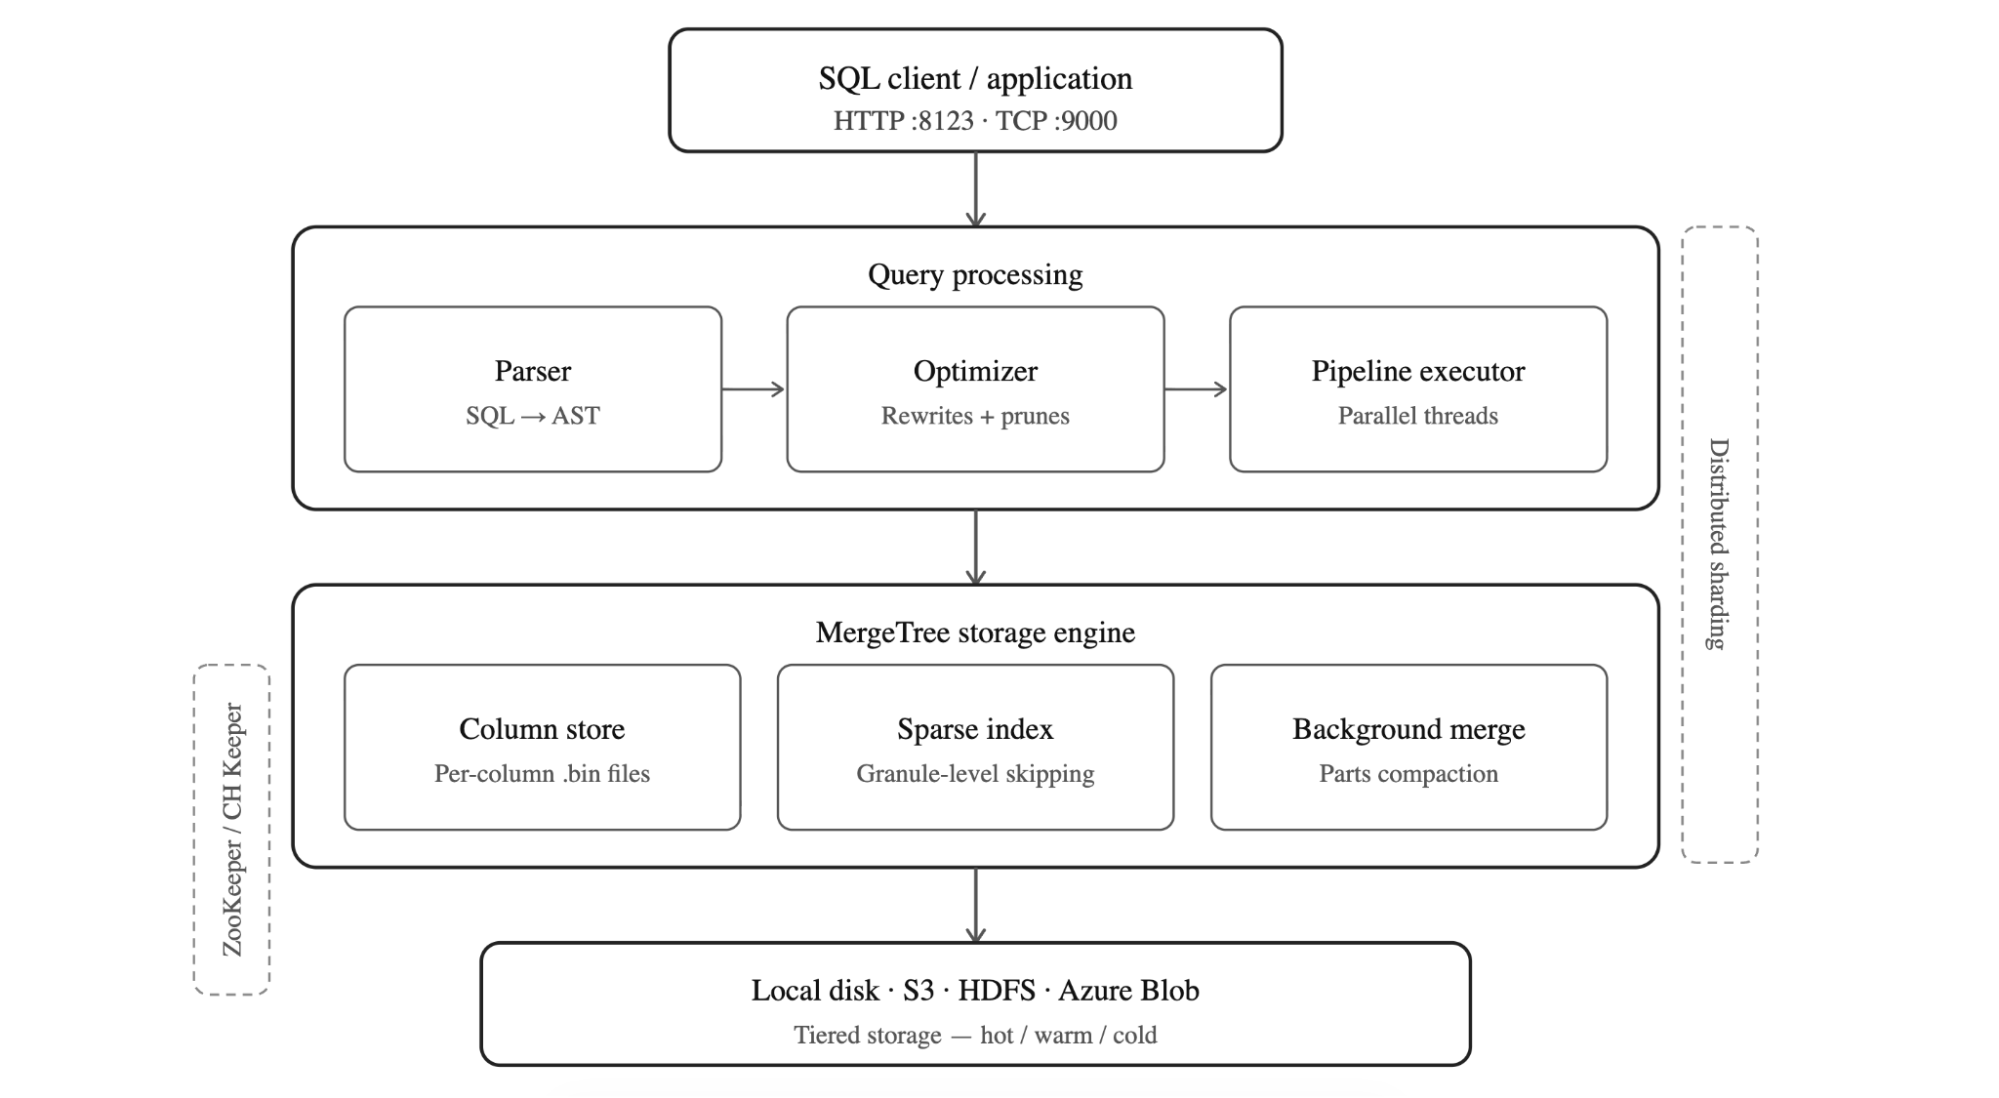
Figure: The layered architecture of ClickHouse
How ClickHouse is Structured
ClickHouse follows a layered architecture. It is designed for analytical speed at scale. SQL queries arrive over HTTP (port 8123) or TCP (port 9000), then pass through the optimizer which parses into an abstract syntax tree and prunes it before the pipeline executor picks it up and hands the work off to parallel threads. Beneath the query layer sits the MergeTree storage engine, the heart of ClickHouse which stores data in columnar .bin files. It uses a sparse primary index to skip irrelevant granules without reading entire columns, and runs background merge processes to compact parts and maintain query performance over time.
At the bottom, storage is pluggable: local disk, S3, HDFS, or Azure Blob, with tiered hot/warm/cold policies to balance cost and latency. In distributed deployments, ClickHouse Keeper (or ZooKeeper) coordinates replication across replicas, while sharding splits data horizontally across nodes allowing the cluster to scale reads and writes independently. The result is a database that processes hundreds of millions of rows per second per server, making it the default choice for teams running serious analytics workloads.
The Real Problem: It’s Not ClickHouse, It’s the Packaging
The standard clickhouse/clickhouse-server image is built on a full Ubuntu 22.04 base. The base ships with a lot of things ClickHouse doesn’t need such as Perl, system utilities, apt itself, and dozens of transitive dependencies that exist in the image simply because Ubuntu brought outdated package along and in many cases, Ubuntu maintainers decide to not backport fixes from upstream.
ClickHouse doesn’t use most of those system utilities. But the CVEs in those packages are real. They show up in Trivy, Grype, and AWS ECR has no way to distinguish a vulnerable library that’s never loaded from one that’s actively running in production. Your security team sees critical findings and blocks the deployment, which is the correct thing for them to do given what the scanner is telling them.
The instinct at this point is to argue the case, documenting why each CVE doesn’t apply to your workload, writing risk exceptions and escalating, but that’s a slow process. The only real fix is to remove those unnecessary packages entirely. That’s what Docker Hardened Images do.
What DHI Actually Changes
Docker Hardened Images for ClickHouse are built around a straightforward question: what does the database actually need to run? Rather than starting from a full Ubuntu base and hoping the CVE count stays manageable, DHI ships only what ClickHouse requires and leaves everything else out.
The most immediate consequence of that is the absence of apt at runtime. Without a package manager, an attacker who gains a foothold in the container has no obvious path to installing tools or establishing persistence. Network utilities like curl and wget are gone for the same reason, the standard clickhouse/clickhouse-server image has been carrying wget with CVE-2021-31879 unpatched since 2021 because there is no upstream fix as noted by the Ubuntu maintainer, a vulnerability in a tool ClickHouse never needed in the first place. DHI doesn’t patch it; it simply doesn’t include wget at all. A shell is still available for operational work, but without the package manager and network tools, there’s very little an attacker can actually do with it.
To make this practical across different stages of a pipeline, DHI ships two variants. The development image (dev) includes additional tooling that makes local testing and debugging more comfortable. The production image (runtime) strips that back to the absolute minimum, giving you the smallest possible attack surface for the workload that actually faces the world. The intent is that teams adopt the dev variant early in the pipeline and promote the hardened production image through to deployment, rather than discovering the differences at the point where it matters most.
The image also runs as a non-root user uid=65532 out of the box, with no additional Dockerfile configuration required. On the provenance side, every DHI image ships with SLSA Level 3 attestation, which provides cryptographic proof of exactly what went into the build and how it was produced. Docker’s security team actively tracks and patches CVEs, and the presence of 2026 CVE IDs in DHI’s findings is evidence of that remediation happening ahead of public disclosure feeds rather than in response to them.
Getting Started
Before you can pull a DHI image, you need to mirror it to your organization’s namespace on Docker Hub. This is a one-time setup per image not per tag and it means all future updates flow to your namespace automatically.
Log in to Docker Hub and open the DHI catalog
Find clickhouse-server and select Mirror to repository
Follow the on-screen instructions
Authenticate locally: docker login dhi.io
Once that’s done, you’re pulling from your own namespace with the same image, same tags, same ClickHouse – just hardened.
Your first DHI ClickHouse container
docker run –name my-clickhouse-server -d
–ulimit nofile=262144:262144
dhi.io/clickhouse-server:26.2-debian13
The –ulimit nofile=262144:262144 flag is a ClickHouse requirement, not a DHI one – ClickHouse needs high file descriptor limits to operate correctly. Keep it in all your run commands.
Verify it started:
docker exec my-clickhouse-server clickhouse-client
–query "SELECT 'Hello from DHI ClickHouse!'"
Production setup with persistent storage
For anything beyond local testing, you want volumes and a password:
docker run -d
–name my-clickhouse-server
–ulimit nofile=262144:262144
-e CLICKHOUSE_PASSWORD=mysecretpassword
-v clickhouse-data:/var/lib/clickhouse
-v clickhouse-logs:/var/log/clickhouse-server
-p 8123:8123 -p 9000:9000
dhi.io/clickhouse-server:26.2-debian13
Note that CLICKHOUSE_PASSWORD is required if you want to access ClickHouse over the network. DHI disables unauthenticated network access by default which is the right call for any production deployment.
Test it over HTTP:
curl "http://localhost:8123/?query=SELECT%20version()&user=default&password=mysecretpassword"
Custom configuration
If you’re already running ClickHouse with custom XML config, nothing changes. Same format, same mount path:
cat > custom-config.xml << EOF
<clickhouse>
<logger>
<level>information</level>
<console>true</console>
</logger>
<listen_host>0.0.0.0</listen_host>
</clickhouse>
EOF
docker run -d
–name my-clickhouse-server
–ulimit nofile=262144:262144
-v $(pwd)/custom-config.xml:/etc/clickhouse-server/config.d/custom.xml:ro
-p 8123:8123 -p 9000:9000
dhi.io/clickhouse-server:26.2-debian13
Running DHI ClickHouse on Kubernetes
For Kubernetes, there’s one important addition to your pod spec. Since DHI runs as a non-root user, you need to set fsGroup to ensure your persistent volume data is accessible:
spec:
template:
spec:
securityContext:
runAsNonRoot: true
runAsUser: 65532 # DHI nonroot user
fsGroup: 65532 # makes mounted volumes accessible to the nonroot user
containers:
– name: clickhouse-server
image: dhi.io/clickhouse-server:26.2-debian13
ports:
– containerPort: 8123
– containerPort: 9000
volumeMounts:
– name: clickhouse-data
mountPath: /var/lib/clickhouse
– name: clickhouse-logs
mountPath: /var/log/clickhouse-server
resources:
limits:
cpu: "2"
memory: "4Gi"
One thing worth mentioning: ClickHouse’s default ports 8123 and 9000 are above the 1024 privileged port boundary, so running as nonroot doesn’t cause any port binding issues.
The metrics exporter
If you’re running ClickHouse on Kubernetes and need Prometheus metrics, Docker also ships clickhouse-metrics-exporter – a hardened image that works with the ClickHouse Operator to expose a /metrics endpoint. It’s 65% smaller than the standard exporter (10.3 MB vs 29.4 MB) and has 75% fewer layers (5 vs 20). Same data, dramatically smaller surface.
containers:
– name: metrics-exporter
image: dhi.io/clickhouse-metrics-exporter:0-debian13
ports:
– name: metrics
containerPort: 8888
resources:
limits:
cpu: 100m
memory: 128Mi
requests:
cpu: 50m
memory: 64Mi
Debugging without the usual tools
The debugging story is simpler than it might seem. docker debug attaches an ephemeral layer to the running container that includes bash, curl, strace, vim, and anything else you need without modifying the production image itself. When you exit, the layer disappears and the container is exactly as it was. It’s a cleaner approach than shelling directly into a production container, and in practice it’s a single command:
docker debug my-clickhouse-server
Or if you prefer, you can mount a debug image alongside the container:
docker run –rm -it –pid container:my-clickhouse-server
–mount=type=image,source=<your-namespace>/dhi-busybox,destination=/dbg,ro
dhi.io/clickhouse-server:26.2-debian13 /dbg/bin/sh
There’s also a broader security benefit that goes beyond CVE counts. If something does go wrong in production, an attacker who gets into the container finds no package manager to install tools with, no curl or wget to exfiltrate data through, and no obvious path to reach out to the network which significantly limits what a compromise can actually turn into.
ClickHouse: Non-hardened Image vs. Hardened Image Compared
A Docker Scout scan of both images puts the difference in plain numbers. Using ubuntu:22.04 as its base, the standard image carries 8 medium and 11 low severity vulnerabilities across 111 packages, including the wget and tar findings that are most likely to trigger a security block in an enterprise pipeline. The DHI image eliminates all medium severity findings entirely and comes in at 14 low severity items but these are in core system libraries like glibc and openssl where no fix exists on any distribution, not in unnecessary utilities that had no business being in the image. The 3 unconfirmed findings that Scout surfaces have already been assessed and suppressed via VEX attestation, which ships with the image as part of its SLSA Level 3 provenance
To view the difference between versions for any other image, you can run your own scan with Docker Scout for a quick comparison using this command:
docker scout quickview clickhouse/clickhouse-server:latest
docker pull dhi.io/clickhouse-server:26.2-debian13
docker tag dhi.io/clickhouse-server:26.2-debian13 clickhouse-dhi:latest
docker scout quickview clickhouse-dhi:latest
Non-Hardened ClickHouse Image
Docker Hardened Image
Default user
root (steps down to clickhouse user at runtime via entrypoint, but Dockerfile has no USER directive overridable with CLICKHOUSE_RUN_AS_ROOT=1)
nonroot (enforced at image level via USER directive cannot be overridden at runtime)
Shell access
Full shell (bash/sh) available
bash present, no network tools or package manager
Package manager
apt available
No package manager
CVE exposure
Ships wget (CVE-2021-31879, unpatched since 2021), tar (CVE-2025-45582)
No wget, no tar – unnecessary packages removed entirely
CVE patching
Unpatched findings from 2021–2025 due to the lack of upstream fixes from Ubuntu base image.
Actively tracked, 2026 CVE IDs show proactive remediation
Provenance
Standard
SLSA Level 3 attestation
Compliance
Manual hardening required
CIS, NIST, FedRAMP-aligned
Debugging
Traditional shell debugging
Use docker debug or Image Mount for troubleshooting
The Security Team Conversation
The team that got blocked at AWS ECR in November 2025 didn’t have a ClickHouse problem, they had a base image problem. Their database was fine; what the scanner was finding were CVEs in Perl, system utilities, and other packages that had come along in the Debian base and never used by the application. Nothing in the scanner output made that distinction, so the security team did exactly what they were supposed to do and blocked the deployment.
With DHI, that conversation with your security team becomes considerably more straightforward. Rather than building a case for why specific CVEs don’t apply to your workload, you can point to an image built by Docker’s security team from the minimum required components, with SLSA Level 3 provenance and independent validation by SRLabs. The ClickHouse runtime itself is unchanged ~ queries, ports, configuration files, and performance all carry over so the only thing you’re actually changing is the answer you can give when someone asks whether this image can go to production.For teams that need stronger guarantees, DHI Enterprise adds SLA-backed CVE remediation within seven days, FIPS and STIG variants, and extended lifecycle support. For most teams, the free Enterprise trial is the right starting point. It answers the question that actually matters before you commit to anything. Interested to learn further? Start with this blog that walks through the trial and sets you up for success.
Migration Checklist
☐ Mirror clickhouse-server DHI image to your Docker Hub namespace (one-time setup)
☐ Update your image reference to dhi.io/clickhouse-server:26.2-debian13
☐ Set CLICKHOUSE_PASSWORD (required for network access in DHI)
☐ Keep –ulimit nofile=262144:262144 on all run commands
☐ In Kubernetes: add fsGroup: 65532 to your pod securityContext
☐ Switch from kubectl exec to kubectl debug for troubleshooting
☐ Run trivy against both images to see the difference yourself:
trivy image clickhouse/clickhouse-server:latest
trivy image dhi.io/clickhouse-server:26.2-debian13
The migration is narrower in scope than it might appear – your volume mounts, port mappings, and existing XML configuration files all carry over without modifications, and on Kubernetes the only structure addition is the fsGroup security context. Everything else is an image reference change.
Resources
Docker Hardened Images Documentation
DHI ClickHouse Server Guide
DHI ClickHouse Metrics Exporter Guide
Docker Debug Documentation
Free DHI Catalog
DHI Community Announcement
Docker Scout Documentation
Quelle: https://blog.docker.com/feed/