How to Automate Arm Migration with Docker MCP Toolkit, VS Code, and GitHub Copilot
This post is a collaboration between Docker and Arm, demonstrating how Docker MCP Toolkit and the Arm MCP Server work together to simplify architecture migrations.
Moving workloads from x86 to Arm64 architecture has become increasingly important. Organizations seek to reduce cloud costs and improve performance. AWS Graviton, Azure Cobalt, and Google Cloud Axion have made Arm-based computing mainstream, promising 20-40% cost savings and better performance for many workloads.
But here’s the challenge: How do you migrate your applications to Arm without breaking things?
Traditional migration approaches require:
Manual code analysis for x86-specific dependencies
Tedious compatibility checks across multiple tools
Manual performance evaluation
What if you could orchestrate the entire Arm migration workflow from a single interface? Docker MCP Toolkit makes this possible.
By connecting specialized Arm migration tools directly to GitHub Copilot, you can automate compatibility analysis, intrinsic conversion, and performance prediction—all through natural conversation in VS Code.
Here’s what that looks like in practice: You ask GitHub Copilot to migrate your legacy C++ application to Arm64. Copilot doesn’t just tell you what needs changing—it actually executes: scanning your code for x86 intrinsics, converting x86 SIMD intrinsics to Arm SIMD intrinsics, updating your Dockerfile, predicting Arm performance improvements, and creating a pull request with all changes. All through natural conversation in VS Code. No manual porting. No up-front architecture expertise required.
If you have questions about any step in the process, you can directly ask Copilot, which will invoke the Arm MCP Server knowledge base tool. The knowledge base has information pulled directly from all Learning Paths on learn.arm.com, as well as knowledge of all Arm intrinsics, and will both summarize that information for you as well as provide links to the concrete documentation that you can peruse yourself.
Now you might ask – “Can’t I just rebuild my Docker image for Arm64?” True, for most applications. But when you hit that one legacy app with hand-optimized x86 assembly, AVX2 intrinsics, or architecture-specific compiler flags? That’s when Docker MCP Toolkit with the Arm MCP Server becomes essential.
By the end of this guide, you’ll migrate a real-world legacy application—a matrix multiplication benchmark written with AVX2 intrinsics for x86—to Arm64 automatically using GitHub Copilot and Docker MCP Toolkit.
What normally takes 5-7 hours of manual work will take you about 25 to 30 minutes.
The Arm Migration Challenge
Let me show you exactly what we’re solving. Consider a matrix multiplication benchmark originally written for x86-64 with AVX2 optimizations—the kind of code that makes Arm migration painful.
Here’s a Dockerfile that will cause problems when trying to migrate to Graviton:
FROM centos:6
# CentOS 6 reached EOL, need to use vault mirrors
RUN sed -i 's|^mirrorlist=|#mirrorlist=|g' /etc/yum.repos.d/CentOS-Base.repo &&
sed -i 's|^#baseurl=http://mirror.centos.org|baseurl=http://vault.centos.org|g' /etc/yum.repos.d/CentOS-Base.repo
# Install EPEL repository (required for some development tools)
RUN yum install -y epel-release &&
sed -i 's|^mirrorlist=|#mirrorlist=|g' /etc/yum.repos.d/epel.repo &&
sed -i 's|^#baseurl=http://download.fedoraproject.org/pub/epel|baseurl=http://archives.fedoraproject.org/pub/archive/epel|g' /etc/yum.repos.d/epel.repo
# Install Developer Toolset 2 for better C++11 support (GCC 4.8)
RUN yum install -y centos-release-scl &&
sed -i 's|^mirrorlist=|#mirrorlist=|g' /etc/yum.repos.d/CentOS-SCLo-scl.repo &&
sed -i 's|^mirrorlist=|#mirrorlist=|g' /etc/yum.repos.d/CentOS-SCLo-scl-rh.repo &&
sed -i 's|^# baseurl=http://mirror.centos.org|baseurl=http://vault.centos.org|g' /etc/yum.repos.d/CentOS-SCLo-scl.repo &&
sed -i 's|^# baseurl=http://mirror.centos.org|baseurl=http://vault.centos.org|g' /etc/yum.repos.d/CentOS-SCLo-scl-rh.repo
# Install build tools
RUN yum install -y
devtoolset-2-gcc
devtoolset-2-gcc-c++
devtoolset-2-binutils
make
&& yum clean all
WORKDIR /app
COPY *.h *.cpp ./
# AVX2 intrinsics are used in the code
RUN scl enable devtoolset-2 "g++ -O2 -mavx2 -o benchmark
main.cpp
matrix_operations.cpp
-std=c++11"
CMD ["./benchmark"]
Now you might ask why this won’t work on Arm? Looking at this Dockerfile, there are two immediate blockers for Graviton migration:
No Arm64 support in base image – The centos:6 image was built for x86 only, so this container won’t even start on Arm hardware.
x86-specific compiler flag – The -mavx2 flag tells the compiler to use AVX2 vector instructions, which don’t exist on Arm processors.
Even experienced developers miss these issues in larger codebases.
The source code uses AVX2 intrinsics for vectorized operations:
#include "matrix_operations.h"
#include <iostream>
#include <random>
#include <chrono>
#include <stdexcept>
#include <immintrin.h> // AVX2 intrinsics
Matrix::Matrix(size_t r, size_t c) : rows(r), cols(c) {
data.resize(rows, std::vector<double>(cols, 0.0));
}
void Matrix::randomize() {
std::random_device rd;
std::mt19937 gen(rd());
std::uniform_real_distribution<> dis(0.0, 10.0);
for (size_t i = 0; i < rows; i++) {
for (size_t j = 0; j < cols; j++) {
data[i][j] = dis(gen);
}
}
}
Matrix Matrix::multiply(const Matrix& other) const {
if (cols != other.rows) {
throw std::runtime_error("Invalid matrix dimensions for multiplication");
}
Matrix result(rows, other.cols);
// x86-64 optimized using AVX2 for double-precision
for (size_t i = 0; i < rows; i++) {
for (size_t j = 0; j < other.cols; j++) {
__m256d sum_vec = _mm256_setzero_pd();
size_t k = 0;
// Process 4 elements at a time with AVX2
for (; k + 3 < cols; k += 4) {
__m256d a_vec = _mm256_loadu_pd(&data[i][k]);
__m256d b_vec = _mm256_set_pd(
other.data[k+3][j],
other.data[k+2][j],
other.data[k+1][j],
other.data[k][j]
);
sum_vec = _mm256_add_pd(sum_vec, _mm256_mul_pd(a_vec, b_vec));
}
// Horizontal add using AVX
__m128d sum_high = _mm256_extractf128_pd(sum_vec, 1);
__m128d sum_low = _mm256_castpd256_pd128(sum_vec);
__m128d sum_128 = _mm_add_pd(sum_low, sum_high);
double sum_arr[2];
_mm_storeu_pd(sum_arr, sum_128);
double sum = sum_arr[0] + sum_arr[1];
// Handle remaining elements
for (; k < cols; k++) {
sum += data[i][k] * other.data[k][j];
}
result.data[i][j] = sum;
}
}
return result;
}
double Matrix::sum() const {
double total = 0.0;
for (size_t i = 0; i < rows; i++) {
for (size_t j = 0; j < cols; j++) {
total += data[i][j];
}
}
return total;
}
void benchmark_matrix_ops() {
std::cout << "n=== Matrix Multiplication Benchmark ===" << std::endl;
const size_t size = 200;
Matrix a(size, size);
Matrix b(size, size);
a.randomize();
b.randomize();
auto start = std::chrono::high_resolution_clock::now();
Matrix c = a.multiply(b);
auto end = std::chrono::high_resolution_clock::now();
auto duration = std::chrono::duration_cast<std::chrono::milliseconds>(end – start);
std::cout << "Matrix size: " << size << "x" << size << std::endl;
std::cout << "Time: " << duration.count() << " ms" << std::endl;
std::cout << "Result sum: " << c.sum() << std::endl;
}
If you look at the following code, you might find that this code is heavily optimized for Intel/AMD x86 processors and won’t work on Arm.
x86-exclusive header – #include <immintrin.h> only exists on x86 systems. Arm uses <arm_neon.h> instead.
AVX2 intrinsics throughout – Every _mm256_* function is Intel-specific:
_mm256_setzero_pd() – Creates a 256-bit zero vector (Arm NEON is 128-bit)
_mm256_loadu_pd() – Loads 4 doubles at once (NEON loads 2)
_mm256_set_pd() – Sets 4 doubles (no direct NEON equivalent)
_mm256_add_pd() / _mm256_mul_pd() – 256-bit operations (NEON uses 128-bit)
_mm256_extractf128_pd() – Extracts high 128 bits (not needed on NEON)
Vector width mismatch – AVX2 processes 4 doubles per operation, while Arm NEON processes 2. The entire loop structure needs adjustment. (SVE/SVE2 on newer Arm cores (Neoverse V1/V2, Graviton 3/4) provides 256-bit or wider vector-length agnostic (VLA) registers, matching or exceeding AVX2 registers.)
Horizontal reduction logic – The horizontal add pattern using _mm256_extractf128_pd and _mm256_castpd256_pd128 is x86-specific and must be completely rewritten for Arm SIMD.
Manual conversion requires rewriting 30+ lines of intrinsic code, adjusting loop strides, and testing numerical accuracy. This is exactly where automated migration tools become essential.
Each of these issues blocks Arm migration in different ways. Manual migration requires not just converting intrinsics, but also modernizing the entire build infrastructure, finding Arm equivalents, and validating performance. For any substantial codebase, this becomes prohibitively expensive.
What GitHub Copilot Can and Can’t Do Without Arm MCP
Let’s be clear about what changes when you add the Arm MCP Server to Docker MCP Toolkit.
Without Arm MCP
You ask GitHub Copilot to migrate your C++ application from x86 to Arm64. Copilot responds with general advice: “Convert AVX2 intrinsics to NEON”, “Update your Dockerfile to use ARM64 base image”, “Change compiler flags”. Then you must manually research NEON equivalents, rewrite hundreds of lines of intrinsic code, update the Dockerfile yourself, hope you got the conversion right, and spend hours debugging compilation errors.
Yes, Copilot can write code. But without specialized tools, it’s guessing based on training data—not using concrete knowledge base documentation or using purpose-built tools to analyze your actual application architecture.
With Arm MCP + Docker MCP Toolkit
You ask GitHub Copilot the same thing. Within minutes, it:
Uses check_image tool to verify your base image supports ARM64
Runs migrate_ease_scan on your actual codebase to find x86-specific code
Uses knowledge_base_search to find correct Arm SIMD equivalents for every x86 intrinsic
Converts your code with architecture-specific accuracy
Updates your Dockerfile with Arm-compatible base images
Creates a pull request with all changes.
Real code gets scanned. Real intrinsics get converted. Real pull requests appear in your repository. Close VS Code, come back tomorrow, and the migration is ready to test, complete with documentation explaining every change.
The difference? Docker MCP Toolkit gives GitHub Copilot access to actual Arm migration tooling, not just general knowledge about Arm architecture.
Why This Is Different from Manual Migration
You could manually use Arm migration tools: install utilities locally, run checks, research intrinsics, update code. Here’s what that process looks like:
Manual process:
Install Arm migration tools (15 minutes)
Run compatibility scans (5 minutes)
Research each x86 intrinsic equivalent (30 minutes per intrinsic)
Manually rewrite code (2-3 hours)
Update Dockerfile (15 minutes)
Fix compilation errors (1-2 hours)
Document changes (30 minutes)
Total: 5-7 hours per application
With Docker MCP Toolkit + Arm MCP:
Ask GitHub Copilot to migrate (20 minutes)
Review and approve changes (10-20 minutes)
Merge pull request
Total: 30-40 minutes per application
Setting Up Visual Studio Code with Docker MCP Toolkit
Prerequisites
Before you begin, make sure you have:
A machine with 8 GB RAM minimum (16GB recommended)
The latest Docker Desktop release
VS Code with GitHub Copilot extension
GitHub account with personal access token
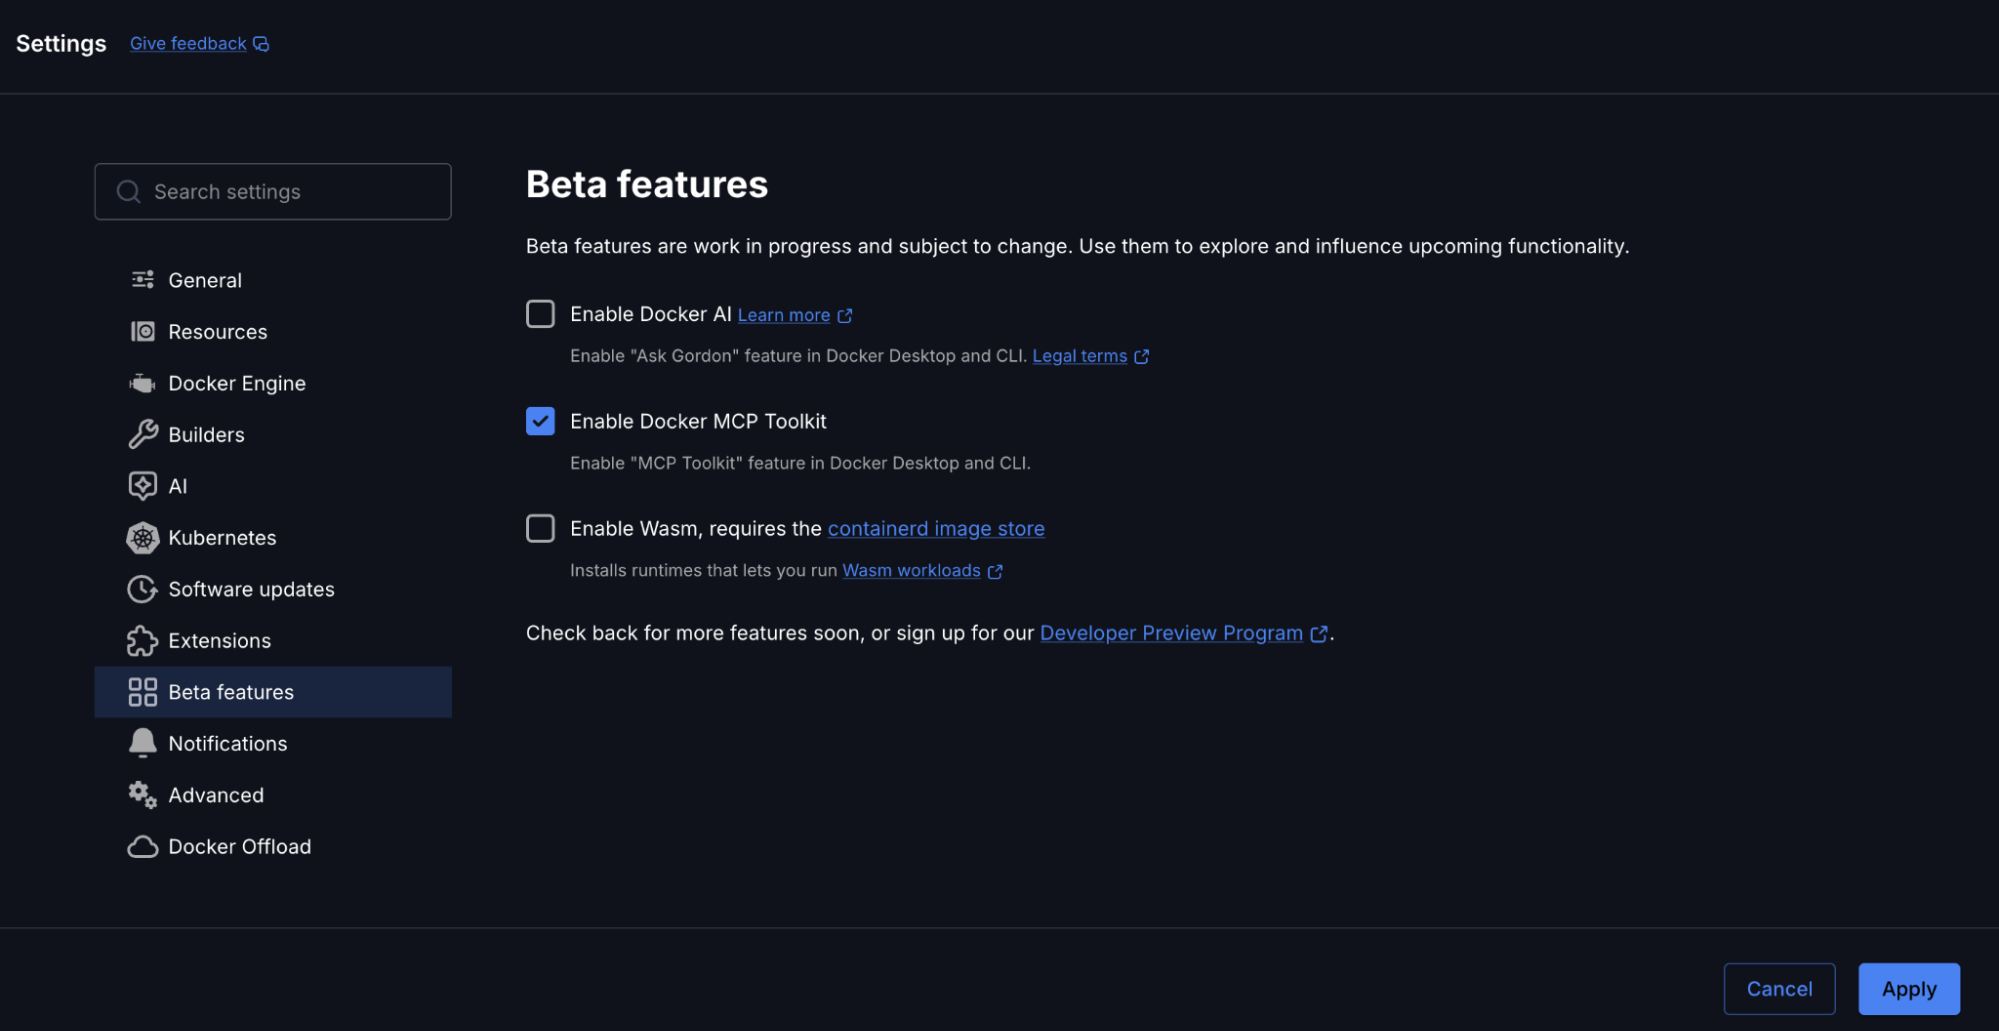
Step 1. Enable Docker MCP Toolkit
Open Docker Desktop and enable the MCP Toolkit from Settings.
To enable:
Open Docker Desktop
Go to Settings → Beta Features
Toggle Docker MCP Toolkit ON
Click Apply
Caption: Enabling Docker MCP Toolkit under Docker Desktop
Add Required MCP Servers from CatalogAdd Arm, Sequential Thinking and GitHub Official by following the links below, or by selecting “Catalog” in the Docker Desktop MCP toolkit:
Arm MCP Server – Arm migration tools and architecture expertise
GitHub MCP Server – Repository operations and pull request management
Sequential Thinking MCP Server – Complex problem decomposition and planning
Caption: Searching for Arm MCP Server in the Docker MCP Catalog
Step 2. Configure the Servers
Configure the Arm MCP Server
To access your local code for the migrate-ease scan and MCA tools, the Arm MCP Server needs a directory configured to point to your local code.
Caption: Arm MCP Server configuration
Once you click ‘Save’, the Arm MCP Server will know where to look for your code. If you want to give a different directory access in the future, you’ll need to change this path.
Available Arm Migration Tools
Click Tools to view all the six MCP tools available under Arm MCP Server.
Caption: List of MCP tools provided by the Arm MCP Server
knowledge_base_search – Semantic search of Arm learning resources, intrinsics documentation, and software compatibility
migrate_ease_scan – Code scanner supporting C++, Python, Go, JavaScript, and Java for Arm compatibility analysis
check_image – Docker image architecture verification (checks if images support Arm64)
skopeo – Remote container image inspection without downloading
mca – Machine Code Analyzer for assembly performance analysis and IPC predictions
sysreport_instructions – System architecture information gathering
Configure GitHub MCP Server
The GitHub MCP Server lets GitHub Copilot create pull requests, manage issues, and commit changes.
Caption: Steps to configure GitHub Official MCP Server
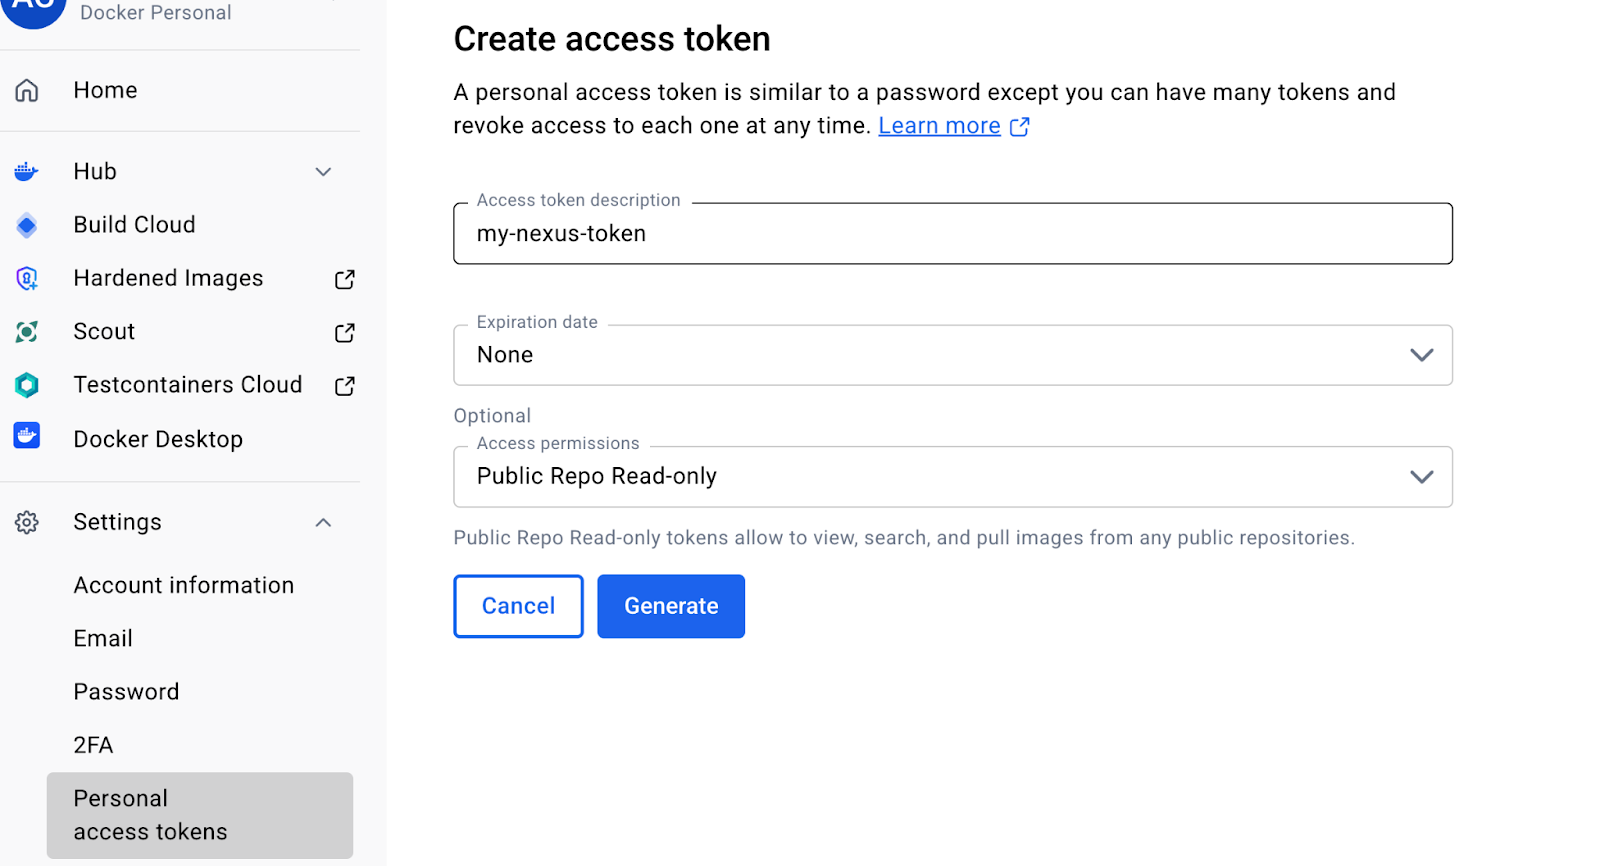
Configure Authentication:
Select GitHub official
Choose your preferred authentication method
For Personal Access Token, you’ll need to get the token from GitHub > Settings > Developer Settings
Caption: Setting up Personal Access Token in GitHub MCP Server
Configure Sequential Thinking MCP Server
Click “Sequential Thinking”
No configuration needed
Caption: Sequential MCP Server requires zero configuration
This server helps GitHub Copilot break down complex Arm migration decisions into logical steps.
Step 3. Add the Servers to VS Code
The Docker MCP Toolkit makes it incredibly easy to configure MCP servers for clients like VS Code.
To configure, click “Clients” and scroll down to Visual Studio Code. Click the “Connect” button:
Caption: Setting up Visual Studio Code as MCP Client
Now open VS Code and click on the ‘Extensions’ icon in the left toolbar:
Caption: Configuring MCP_DOCKER under VS Code Extensions
Click the MCP_DOCKER gear, and click ‘Start Server’:
Caption: Starting MCP Server under VS Code
Now you’re ready to perform an Arm migration!
Step 4. Verify Connection
Open GitHub Copilot Chat in VS Code and ask:
What Arm migration tools do you have access to?
You should see tools from all three servers listed. If you see them, your connection works. Let’s migrate some code.
Caption: Playing around with GitHub Co-Pilot
Real-World Demo: Migrating a Legacy x86 Application
Now that you’ve connected GitHub Copilot to Docker MCP Toolkit, let’s migrate that matrix multiplication benchmark we looked at earlier.
Time to migrate: 20 minutesInfrastructure: $0 (all runs in Docker containers)Prerequisites: The code we showed earlier in this post
The Workflow
Docker MCP Toolkit orchestrates the migration through a secure MCP Gateway that routes requests to specialized tools: the Arm MCP Server scans code and converts intrinsics, GitHub MCP Server creates pull requests, and Sequential Thinking plans multi-step migrations. Each tool runs in an isolated Docker container: secure, reproducible, and under your control.
Step 1. Clone the repo
git clone https://github.com/JoeStech/docker-blog-arm-migration
Give GitHub Copilot Migration Instructions
Open your project in VS Code. In GitHub Copilot Chat, paste this prompt:
Your goal is to migrate this codebase from x86 to Arm64. Use the Arm MCP Server tools to help you with this migration.
Steps to follow:
1. Check all Dockerfiles – use check_image and/or skopeo tools to verify Arm compatibility, changing the base image if necessary
2. Scan the codebase – run migrate_ease_scan with the appropriate language scanner and apply the suggested changes
3. Use knowledge_base_search when you need Arm architecture guidance or intrinsic equivalents
4. Update compiler flags and dependencies for Arm64 compatibility
5. **Create a pull request with all changes using GitHub MCP Server**
Important notes:
– Your current working directory is mapped to /workspace on the MCP server
– NEON lane indices must be compile-time constants, not variables
– If you're unsure about Arm equivalents, use knowledge_base_search to find documentation
– Be sure to find out from the user or system what the target machine is, and use the appropriate intrinsics. For instance, if neoverse (Graviton, Axion, Cobalt) is targeted, use the latest SME/SME2.
**After completing the migration:**
– Create a pull request with a detailed description of changes
– Include performance predictions and cost savings in the PR description
– List all tools used and validation steps needed
Step 2. Watch Docker MCP Toolkit Execute
GitHub Copilot orchestrates the migration using Docker MCP Toolkit. Here’s what happens:
Phase 1: Image Analysis
GitHub Copilot starts by analyzing the Dockerfile’s base image using the Arm MCP Server’s skopeo tool.
Caption: GitHub Copilot uses the skopeo tool from the Arm MCP Server to analyze the centos:6 base image. The tool reports that this image has no arm64 build available. This is the first blocker identified – the container won’t even start on Arm hardware.
This immediately identifies that CentOS 6 has no Arm64 builds and must be replaced.
Phase 2: Code Analysis
Next, Copilot runs the migrate_ease_scan tool with the C++ scanner on the codebase.
Caption: The migrate_ease_scan tool analyzes the C++ source code and detects AVX2 intrinsics, the -mavx2 compiler flag, and x86-specific headers. This automated scan identifies all architecture-dependent code that requires conversion – work that could take hours to find manually.
The scan results show exactly what needs to change for Arm compatibility. Each detected issue includes the file location, line number, and specific code that requires modification. This precision eliminates guesswork and ensures nothing is missed.
Phase 3: Arm Optimization and Best Practices
Forx86 intrinsics found in Phase 2, Copilot queries the Arm MCP Server’s knowledge base for Arm equivalents, if needed. It then makes replacements as necessary.
Caption: GitHub Copilot uses the knowledge_base_search tool to find Arm NEON equivalents for each AVX2 intrinsic.
The tool returns official Arm documentation showing the conversions: _mm256_loadu_pd() becomes vld1q_f64(), _mm256_add_pd() becomes vaddq_f64(), and so on. This knowledge comes from learn.arm.com learning paths and intrinsic documentation.
The knowledge base provides not just the conversion mappings, but also architectural context: AVX2’s 256-bit vectors vs NEON’s 128-bit vectors, which means loop adjustments are needed. Copilot uses this information to rewrite the matrix multiplication code correctly.
Phase 4: Create the GitHub PR and Summarize
After completing the migration, Copilot creates a PR in GitHub and summarizes the changes made.
The changes are substantial:
Replaced centos:6 → ubuntu:22.04, added TARGETARCH for multi-arch builds
Added Arm64 detection and -march=armv8-a+simd compiler flag
Converted AVX2 → NEON intrinsics with architecture guards
The build is now simpler, modern, and Arm-compatible.
Phase 5: Checking the Pull Request
You can verify the Pull Request by visiting https://github.com/JoeStech/docker-blog-arm-migration/pull/1/
To verify performance, you can build and run the benchmark:
docker buildx build –platform linux/arm64 -t benchmark:arm64 . –load
docker run –rm benchmark:arm64
Which should output:
SIMD Matrix Operations Benchmark
================================
Running on Arm64 architecture with NEON optimizations
=== Matrix Multiplication Benchmark ===
Matrix size: 200×200
Time: 17 ms
Result sum: 1.98888e+08
Caveats
A very important thing to remember is that not all models will provide equal results, and while the Arm MCP Server provides deterministic context, the models themselves are stochastic. Always use a flagship latest-generation model to get the best results, and test any guesses the model makes regarding performance improvement.
How Docker MCP Toolkit Changes Development
Docker MCP Toolkit changes how developers interact with specialized knowledge and capabilities. Rather than learning new tools, installing dependencies, or managing credentials, developers connect their AI assistant once and immediately access containerized expertise.
The benefits extend beyond Arm migration:
Consistency – Same tools, same results across all developers
Security – Containerized isolation prevents tool interference
Version Control – MCP server versions tracked with application code
Reproducibility – Migrations behave identically across environments
Discoverability – Docker MCP Catalog makes finding the right server straightforward
Most importantly, developers remain in their existing workflow. VS Code. GitHub Copilot. Git. No context switching to external tools or dashboards.
Wrapping Up
You’ve just automated Arm64 migration using Docker MCP Toolkit, the Arm MCP Server, and GitHub Copilot. What used to require architecture expertise, manual intrinsic conversion, and hours of debugging now happens through natural conversation, safely executed in Docker containers.
Ready to try it? Open Docker Desktop and explore the MCP Catalog. Start with the Arm MCP Server, add GitHub, experiment with Sequential Thinking. Each server unlocks new capabilities.
The future of migration isn’t manually porting every application. It’s having an AI assistant that can execute tasks across your entire stack securely, reproducibly, and at the speed of thought.
Learn More
New to Docker? Download Docker Desktop
Explore the MCP Catalog: Discover containerized, security-hardened MCP servers
Get Started with MCP Toolkit: Official Documentation
Quelle: https://blog.docker.com/feed/