MCP Horror Stories: The Security Issues Threatening AI Infrastructure

This is issue 1 of a new series – MCP Horror Stories – where we will examine critical security issues and vulnerabilities in the Model Context Protocol (MCP) ecosystem and how Docker MCP Toolkit provides enterprise-grade protection against these threats.

What is MCP?

The Model Context Protocol (MCP) is a standardized interface that enables AI agents to interact with external tools, databases, and services. Launched by Anthropic in November 2024, MCP has achieved remarkable adoption, with thousands of MCP server repositories emerging on GitHub. Major technology giants, including Microsoft, OpenAI, Google, and Amazon, have officially integrated MCP support into their platforms, with development tools companies like Block, Replit, Sourcegraph, and Zed also adopting the protocol. 

Think of MCP as the plumbing that allows ChatGPT, Claude, or any AI agent to read your emails, update databases, manage files, or interact with APIs. Instead of building custom integrations for every tool, developers can use one protocol to connect everything. 
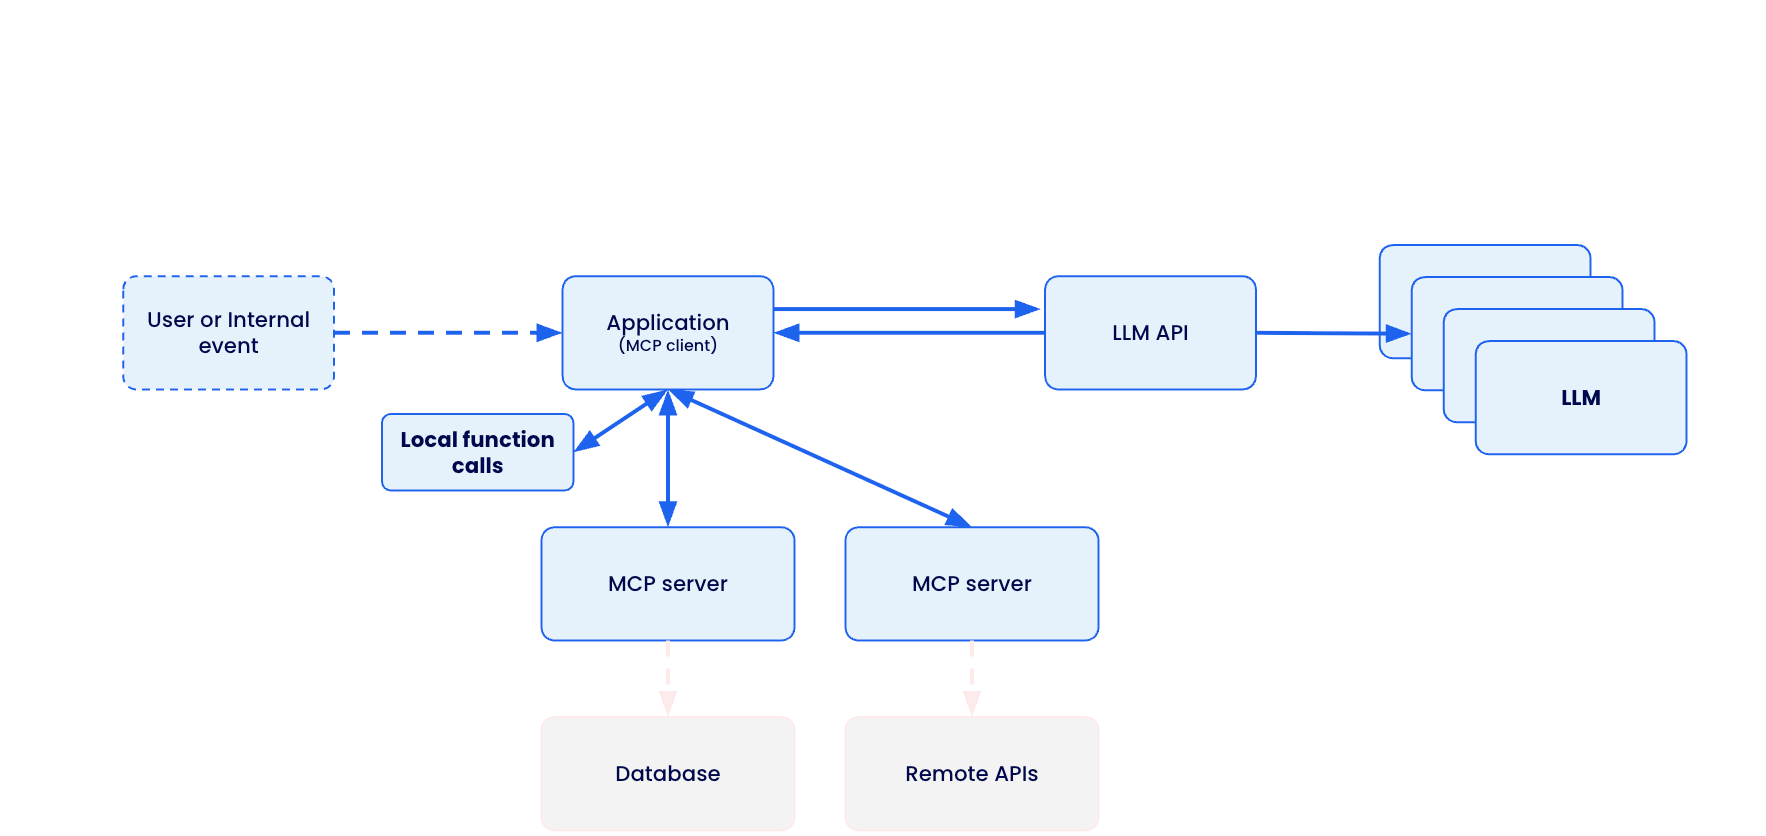
How does MCP work?

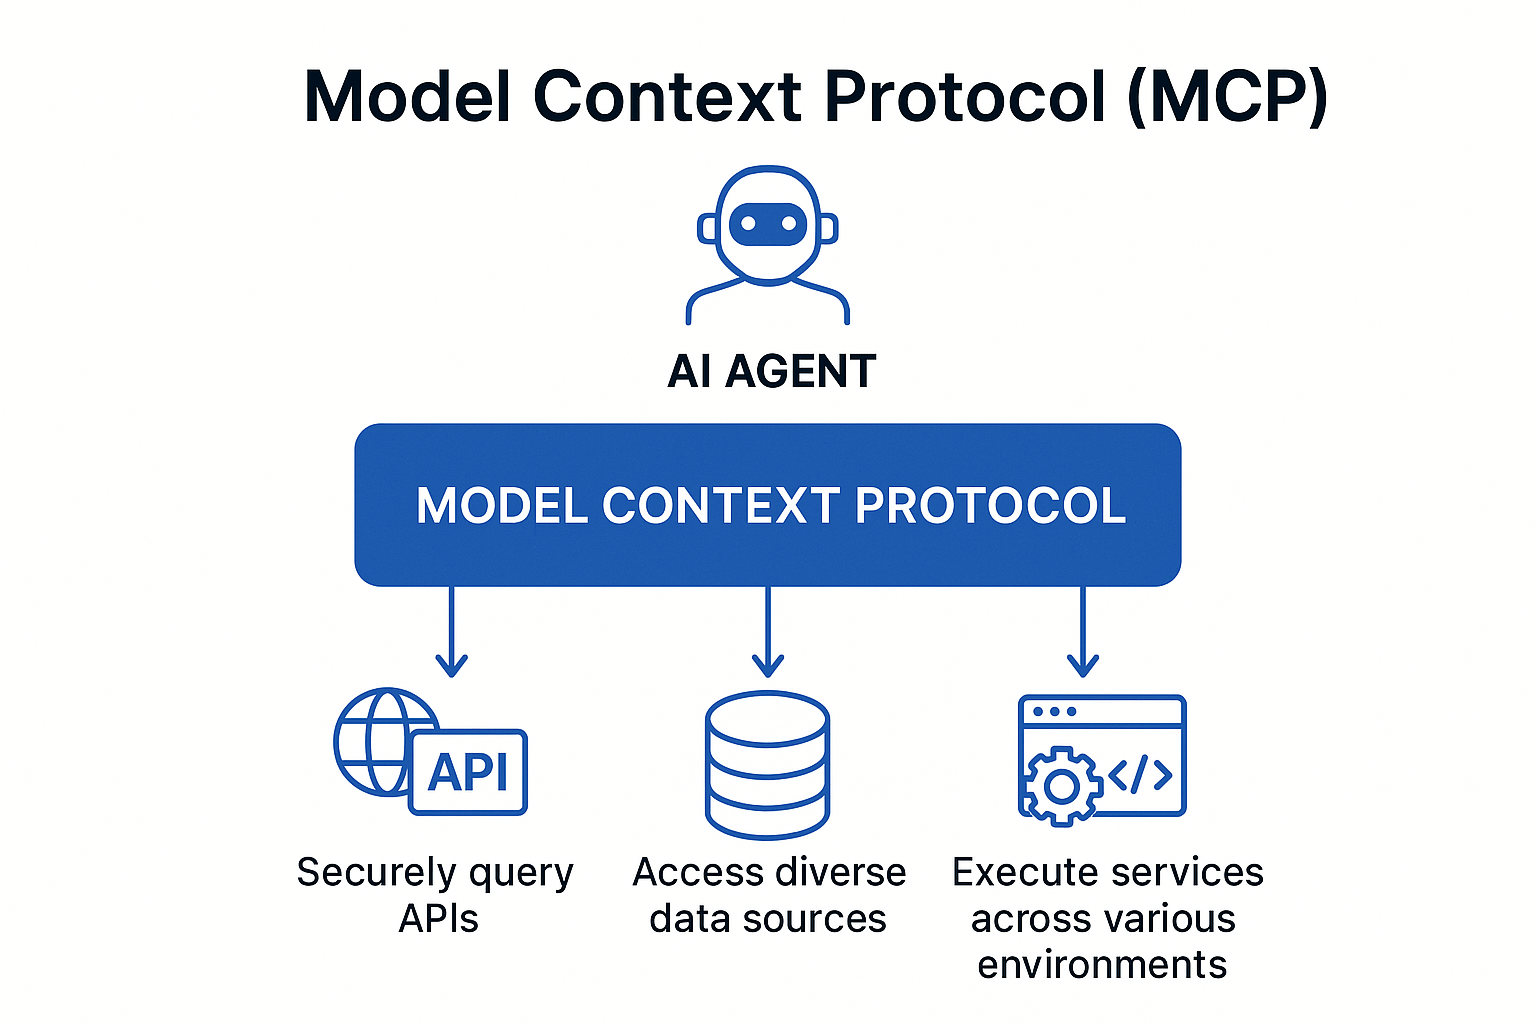
MCP creates a standardized bridge between AI applications and external services through a client-server architecture. 

The Model Context Protocol (MCP) creates a standardized bridge between AI applications and external services through a client-server architecture. 

When a user submits a prompt to their AI assistant (like Claude Desktop, VS Code, or Cursor), the MCP client actually sends the tool descriptions to the LLM, which does analysis and determines which, if any, tools should be called. The MCP host executes these decisions by routing calls to the appropriate MCP servers – whether that’s querying a database for customer information or calling remote APIs for real-time data. Each MCP server acts as a standardized gateway to its respective data source, translating between the universal MCP protocol and the specific APIs or database formats underneath. 

Caption: Model Context Protocol client-server architecture enabling standardized AI integration across databases, APIs, and local functions

The overall MCP architecture enables powerful AI workflows where a single conversation can seamlessly integrate multiple services – for example, an AI agent could analyze data from a database, create a GitHub repository with the results, send a Slack notification to the team, and deploy the solution to Kubernetes, all through standardized MCP interactions. However, this connectivity also introduces significant security risks, as malicious MCP servers could potentially compromise AI clients, steal credentials, or manipulate AI agents into performing unauthorized actions.

The Model Context Protocol (MCP) was supposed to be the “USB-C for AI applications” – a universal standard that would let AI agents safely connect to any tool or service. Instead, it’s become a security nightmare that’s putting organizations at risk of data breaches, system compromises, and supply chain attacks.

The promise is compelling: Write once, connect everywhere. The reality is terrifying: A protocol designed for convenience, not security.

Caption: comic depicting MCP convenience and potential security risk

MCP Security Issues by the Numbers

The scale of security issues with MCP isn’t speculation – it’s backed by a comprehensive analysis of thousands of MCP servers revealing systematic flaws across six critical attack vectors:

OAuth Discovery Vulnerabilities

Command Injection and Code Execution

Unrestricted Network Access

File System Exposure

Tool Poisoning Attacks

Secret Exposure and Credential Theft

1. OAuth Discovery Vulnerabilities

What it is: Malicious servers can inject arbitrary commands through OAuth authorisation endpoints, turning legitimate authentication flows into remote code execution vectors.

The numbers: Security researchers analyzing the MCP ecosystem found that OAuth-related vulnerability represent the most severe attack class, with command injection flaws affecting 43% of analyzed servers. The mcp-remote package alone has been downloaded over 558,846 times, making OAuth vulnerabilities a supply chain attack affecting hundreds of thousands of developer environments.

The horror story: CVE-2025-6514 demonstrates exactly how devastating this vulnerability class can be – turning a trusted OAuth proxy into a remote code execution nightmare that compromises nearly half a million developer environments.

Strategy for mitigation: Watch out for MCP servers that use third-party OAuth tools like mcp-remote, have non-https endpoints, or need complex shell commands. Instead, pick servers with built-in OAuth support and never run OAuth proxies that execute shell commands.

2. Command Injection and Code Execution

What it is: MCP servers can execute arbitrary system commands on host machines through inadequate input validation and unsafe command construction.

The numbers: Backslash Security’s analysis of thousands of publicly available MCP servers uncovered “dozens of instances” where servers allow arbitrary command execution. Independent assessments confirm 43% of servers suffer from command injection flaws – the exact vulnerability enabling remote code execution.

The horror story: These laboratory findings translate directly to real-world exploitation, as demonstrated in our upcoming coverage of container breakout attacks targeting AI development environments.

Strategy for mitigation: Avoid MCP servers that don’t validate user input, build shell commands from user data, or use eval() and exec() functions. Always read the server code before installing and running MCP servers in containers.

3. Unrestricted Network Access

What it is: MCP servers with unrestricted internet connectivity can exfiltrate sensitive data, download malicious payloads, or communicate with command-and-control infrastructure.

The numbers: Academic research published on arXiv found that 33% of analyzed MCP servers allow unrestricted URL fetches, creating direct pathways for data theft and external communication. This represents hundreds of thousands of potentially compromised AI integrations with uncontrolled network access.

The horror story: The Network Exfiltration Campaign shows how this seemingly innocent capability becomes a highway for stealing corporate data and intellectual property.

Strategy for mitigation: Skip MCP servers that don’t explain their network needs or want broad internet access without reason. Use MCP tools with network allow-lists and monitor what connections your servers make.

4. File System Exposure

What it is: Inadequate path validation allows MCP servers to access files outside their intended directories, potentially exposing sensitive documents, credentials, and system configurations.

The numbers: The same arXiv security study found that 22% of servers exhibit file leakage vulnerabilities that allow access to files outside intended directories. Combined with the 66% of servers showing poor MCP security practices, this creates a massive attack surface for data theft.

The horror story: The GitHub MCP Data Heist analysis reveals how these file access vulnerabilities enable unauthorized access to private repositories and sensitive development assets.

Strategy for mitigation: Avoid MCP servers that want access beyond their work folder. Don’t use tools that skip file path checks or lack protection against directory attacks. Stay away from servers running with too many privileges. Stay secure by using containerized MCP servers with limited file access. Set up monitoring for file access.

5. Tool Poisoning Attack

What it is: Malicious MCP servers can manipulate AI agents by providing false tool descriptions or poisoned responses that trick AI systems into performing unauthorized actions.

The numbers: Academic research identified 5.5% of servers exhibiting MCP-specific tool poisoning attacks, representing a new class of AI-targeted vulnerabilities not seen in traditional software security.

The horror story:  The Tenable Website Attack demonstrates how tool poisoning, combined with localhost exploitation, turns users’ own development tools against them.

Strategy for mitigation: Carefully review the MCP server documentation and tool descriptions before installation. Monitor AI agent behavior for unexpected actions. Use MCP implementations with comprehensive logging to detect suspicious tool responses.

6. Secret Exposure and Credential Theft

What it is: MCP deployments often expose API keys, passwords, and sensitive credentials through environment variables, process lists, and inadequate secret management.

The numbers: Traditional MCP deployments systematically leak credentials, with plaintext secrets visible in process lists and logs across thousands of installations. The comprehensive security analysis found 66% of servers exhibiting code smells, indicating poor MCP security practices, compounding this credential exposure problem.

The horror story: The Secret Harvesting Operation reveals how attackers systematically collect API keys and credentials from compromised MCP environments, enabling widespread account takeovers.

Strategy for mitigation: Avoid MCP servers that need credentials as environment variables. Don’t use tools that log or show sensitive info. Stay away from servers without secure credential storage. Be careful if docs mention storing credentials as plain text. Protect your credentials by using secure secret management systems.

How Docker MCP Tools Address MCP Security Issues

While identifying vulnerabilities is important, the real solution lies in choosing secure-by-design MCP implementations. Docker MCP Catalog, Toolkit and Gateway represent a fundamental shift toward making security the default path for MCP development.

Security-first Architecture

MCP Gateway serves as the secure communication layer between AI clients and MCP servers. Acting as an intelligent proxy, the MCP Gateway intercepts all tool calls, applies security policies, and provides comprehensive monitoring. This centralized security enforcement point enables features like network filtering, secret scanning, resource limits, and real-time threat detection without requiring changes to individual MCP servers.

Secure Distribution through Docker MCP Catalog provides cryptographically signed, immutable images that eliminate supply chain attacks targeting package managers like npm.

Container Isolation ensures every MCP server runs in an isolated container, preventing host system compromise even if the server is malicious. Unlike npm-based MCP servers that execute directly on your machine, Docker MCP servers can’t access your filesystem or network without explicit permission.

Network Controls with built-in allowlisting ensure MCP servers only communicate with approved destinations, preventing data exfiltration and unauthorized communication.

Secret Management via Docker Desktop’s secure secret store replaces vulnerable environment variable patterns, keeping credentials encrypted and never exposed to MCP servers directly.

Systematic Vulnerability Elimination

Docker MCP Toolkit systematically eliminates each vulnerability class through architectural design.

OAuth Vulnerabilities -> Native OAuth Integration

OAuth vulnerabilities disappear entirely through native OAuth handling in Docker Desktop, eliminating vulnerable proxy patterns without requiring additional tools. 

# No vulnerable mcp-remote needed
docker mcp oauth ls
github | not authorized
gdrive | not authorized

# Secure OAuth through Docker Desktop
docker mcp oauth authorize github
# Opens browser securely via Docker's OAuth flow

docker mcp oauth ls
github | authorized
gdrive | not authorized

Command Injection -> Container Isolation

Command injection attacks are contained within container boundaries through isolation, preventing any host system access even when servers are compromised. 

# Every MCP server runs with security controls
docker mcp gateway run
# Containers launched with: –security-opt no-new-privileges –cpus 1 –memory 2Gb

Network Attacks -> Zero-Trust Networking

Network attacks are blocked through zero-trust networking with –block-network flags and real-time monitoring that detects suspicious patterns. 

# Maximum security configuration
docker mcp gateway run
–verify-signatures
–block-network
–cpus 1
–memory 1Gb

Tool Poisoning -> Comprehensive Logging

Tool poisoning becomes visible through complete interaction logging with –log-calls, enabling automatic blocking of suspicious responses. 

# Enable comprehensive tool monitoring
docker mcp gateway run –log-calls –verbose
# Logs all tool calls, responses, and detects suspicious patterns

Secret Exposure -> Secure Secret Management

Secret exposure is eliminated through secure secret management combined with active scanning via –block-secrets that prevents credential leakage.

# Secure secret storage
docker mcp secret set GITHUB_TOKEN=ghp_your_token
docker mcp secret ls
# Secrets never exposed as environment variables

# Block secret exfiltration
docker mcp gateway run –block-secrets
# Scans tool responses for leaked credentials

Enterprise-grade Protection

For production environments, Docker MCP Gateway provides a maximum security configuration that combines all protection mechanisms:

# Production hardened setup
docker mcp gateway run
–verify-signatures # Cryptographic image verification
–block-network # Zero-trust networking
–block-secrets # Secret scanning protection
–cpus 1 # Resource limits
–memory 1Gb # Memory constraints
–log-calls # Comprehensive logging
–verbose # Full audit trail

This configuration provides:

Supply Chain Security: –verify-signatures ensures only cryptographically verified images run

Network Isolation: –block-network creates L7 proxies allowing only approved destinations

Secret Protection: –block-secrets scans all tool responses for credential leakage

Resource Controls: CPU and memory limits prevent resource exhaustion attacks

Full Observability: Complete logging and monitoring of all tool interactions

Security Aspect

Traditional MCP

Docker MCP Toolkit

Execution Model

Direct host execution via npx/mcp-remote

Containerized isolation

OAuth Handling

Vulnerable proxy with shell execution

Native OAuth in Docker Desktop

Secret Management

Environment variables

Docker Desktop secure store

Network Access

Unrestricted host networking

L7 proxy with allowlisted destinations

Resource Controls

None

CPU/memory limits, container isolation

Supply Chain

npm packages (can be hijacked)

Cryptographically signed Docker images

Monitoring

No visibility

Comprehensive logging with –log-calls

Threat Detection

None

Real-time secret scanning, anomaly detection

The result is a security-first MCP ecosystem where developers can safely explore AI integrations without compromising their development environments. Organizations can deploy AI tools confidently, knowing that enterprise-grade security is the default, not an afterthought.

Stay tuned for upcoming issues in this series:

1. OAuth Discovery Vulnerabilities → JFrog Supply Chain Attack

Malicious authorization endpoints enable remote code execution

Affects 437,000+ downloads of mcp-remote through CVE-2025-6514

2. Prompt Injection Attacks → GitHub MCP Data Heist

AI agents manipulated into accessing unauthorized repositories

Official GitHub MCP Server (14,000+ stars) weaponized against private repos

3. Drive-by Localhost Exploitation → Tenable Website Attack

Malicious websites compromise local development environments

MCP Inspector (38,000+ weekly downloads) becomes attack vector

4. Tool Poisoning + Container Escape → AI Agent Container Breakout

Containerized MCP environments breached through combined attacks

Isolation failures in AI development environments

5. Unrestricted Network Access → Network Exfiltration Campaign

33% of MCP tools allow unrestricted URL fetches

Creates pathways for data theft and external communication

6. Exposed Environment Variables → Secret Harvesting Operation

Plaintext credentials visible in process lists and logs

Traditional MCP deployments leak API keys and passwords

In the next issue of this series, we will dive deep into CVE-2025-6514 – the supply chain attack that turned a trusted OAuth proxy into a remote code execution nightmare, compromising nearly half a million developer environments. 

Learn more

Explore the MCP Catalog: Visit the MCP Catalog to discover MCP servers that solve your specific needs securely.

Use and test hundreds of MCP Servers: Download Docker Desktop to download and use any MCP server in our catalog with your favorite clients: Gordon, Claude, Cursor, VSCode, etc

Submit your server: Join the movement toward secure AI tool distribution. Check our submission guidelines for more.

Follow our progress: Star our repository and watch for updates on the MCP Gateway release and remote server capabilities.

Quelle: https://blog.docker.com/feed/

GenAI vs. Agentic AI: What Developers Need to Know

Generative AI (GenAI) and the models behind it have already reshaped how developers write code and build applications. But a new class of artificial intelligence is emerging: agentic AI. Unlike GenAI, which focuses on content generation, agentic systems can plan, reason, and take actions across multiple steps, enabling a new approach to building intelligent, goal-driven agents.

In this post, we’ll explore the key differences between GenAI and agentic AI. More specifically, we’ll cover how each is built, their challenges and trade-offs, and where Docker fits into the developer workflow. You’ll also find example use cases and starter projects to help you get hands-on with building your own GenAI apps or agents.

What is GenAI?

GenAI is a subset of machine learning, is powered by large language models to create new content, from writing text and code to creating images and music based on prompts or input. At their core, generative AI models are prediction engines. Trained on vast data, these models learn to guess what comes next in a sequence. This could be the next word in a sentence, the next pixel in an image, or the next line of code. Some even call GenAI autocomplete on steroids. Common examples include ChatGPT, Claude, and GitHub Copilot.

Use cases for GenAI

Top use cases of GenAI are coding, image and video production, writing, education, chatbot, summarization, workflow automation, and across consumer and enterprise applications (1). To build an AI application with generative models, developers typically start by looking at the use cases, then choosing a model based on their goals and performance needs. The model can then be accessed via remote APIs (for hosted models like GPT-4 or Claude) or run locally (with Docker Model Runner or Ollama). This distinction shapes how developers build with GenAI: locally hosted models offer privacy and control, while cloud-hosted ones often provide flexibility, state-of-the-art models, and larger compute resources. 

Developers provide user input/prompts or fine-tune the model to shape its behavior, then integrate it into their app’s logic using familiar tools and frameworks. Whether building a chatbot, virtual assistant, or content generator, the core workflow involves sending input to the model, processing its output, and using that output to drive user-facing features.

Figure 1: A simple architecture diagram of how GenAI works

Despite their sophistication, GenAI systems remain fundamentally passive and require human input. They respond to static prompts without understanding broader goals or retaining memory of past interactions (unless explicitly designed to simulate it). They don’t know why they’re generating something, only how, by recognizing patterns in the training data.

GenAI application examples

Millions of developers use Docker to build cloud-native apps. Now, you can use similar commands and familiar workflows to explore generative AI tools. Docker’s Model Runner enables developers to run local models with zero hassle. Testcontainers help to quickly spin up integration testing to evaluate your app by providing lightweight containers for your services and dependencies. 

Here are a few examples to help you get started.

1. Getting started with running models locally

A simple chatbot web application built in Go, Python, and Node.js that connects to a local LLM service to provide AI-powered responses.

2. How to Make an AI Chatbot from Scratch using Docker Model Runner

Learn how to make an AI chatbot from scratch and run it locally with Docker Model Runner.

3. Build a GenAI App With Java Using Spring AI and Docker Model Runner

Build a GenAI app with RAG in Java using Spring AI, Docker Model Runner, and Testcontainers. 

4. Building an Easy Private AI Assistant with Goose and Docker Model Runner

Learn how to build your own AI assistant that’s private, scriptable, and capable of powering real developer workflows.

5. AI-Powered Testing: Using Docker Model Runner with Microcks for Dynamic Mock APIs

Learn how to create AI-enhanced mock APIs for testing with Docker Model Runner and Microcks. Generate dynamic, realistic test data locally for faster dev cycles.

What is agentic AI?

There’s no single industry-standard definition for agentic AI. You’ll see terms like AI agents, agentic systems, or agentic applications used interchangeably. For simplicity, we’ll just call them AI agents.

AI agents are AI systems designed to take initiative, make decisions, and carry out complex tasks to achieve a goal. Unlike traditional GenAI models that respond only to individual human prompts, agents can plan, reason, and take actions across multiple steps. This makes agents especially useful for open-ended or loosely defined tasks. Popular examples include OpenAI’s ChatGPT agent and Cursor’s agent mode that completes programming tasks end-to-end.  

Use cases for agentic AI

Organizations that have successfully deployed AI agents are using them across a range of high-impact areas, including customer service and support, internal operations, sales and marketing, security and fraud detection, and specialized industry workflows (2). But despite the potential, adoption is still in its early stages from a business context. A recent Capgemini report found that only 14% of companies have moved beyond experimentation to implementing agentic AI.

How agentic AI works

While implementations vary, most AI agents consist of three main components: models, tools, and an orchestration layer. 

Models: Interprets high-level goals, reasons, and breaks them into executable steps.

Tools: External functions or systems the agent can call. The Model Context Protocol (MCP) is emerging as the de facto standard for connecting agents to external tools, data, and services. 

The orchestration layer: This is the coordination logic that ties everything together. Frameworks like LangChain, CrewAI, and ADK manage tool selection, memory, planning, and state and control flow. 

Figure 2: A high-level architecture diagram of how a multi-agent system works.

To build agents, developers typically start by breaking a use case into concrete workflows the agent needs to perform and identifying key steps, decision points, and the tools required to get the job done. From there, they choose the appropriate model (or combination of models), integrate the necessary tools, and use an orchestration framework to tie everything together. In more complex systems, especially those involving multiple agents, each agent often functions like a microservice, handling one specific task as part of a larger workflow. 

While the agentic stack introduces some new components, much of the development process will feel familiar to those who’ve built cloud-native applications. There’s the complexity of coordinating loosely coupled components. There’s a broader security surface, especially as agents get access to sensitive tools and data. It’s no wonder some in the community have started calling agents “the new microservices.” They’re modular, flexible, and composable, but they also come with a need for secure architecture, reliable tooling, and consistency from development to production. 

Agentic AI application examples

As agents become more modular and microservice-like, Docker’s tooling has evolved to support developers building and running agentic applications. 

Figure 3: Docker’s AI technology ecosystem, including Compose, Model Runner, MCP Gateway, and more.

For running models locally, especially in use cases where privacy and data sensitivity matter, Docker Model Runner provides an easy way to spin up models. If models are too large for local hardware, Docker Offload allows developers to tap into GPU resources in the cloud while still maintaining a local-first workflow and development control. 

When agents require access to tools, the Docker MCP Toolkit and Gateway make it simple to discover, configure, and run secure MCP servers. Docker Compose remains the go-to solution for millions of developers, now with support for agentic components like models, tools, and frameworks, making it easy to orchestrate everything from development to production.

To help you get started, here are a few example agents built with popular frameworks. You’ll see a mix of single-agent and multi-agent setups, examples using single and multiple models, both local and cloud-hosted, offloaded to cloud GPUs, and demonstrations of how agents use MCP tools to take actions. All of them run with just a single Docker Compose file.

1. Beyond the Chatbot: Event-Driven Agents in Action

This GitHub webhook-driven project uses agents to analyze PRs for training repositories to determine if they can be automatically closed, generate a comment, and then close the PR. 

2. SQL Agent with LangGraph

This project demonstrates an AI agent that uses LangGraph to answer natural language questions by querying a SQL database.

3. Spring AI + DuckDuckGo

This project demonstrates a Spring Boot application using Spring AI and the MCP tools DuckDuckGo to answer natural language questions.

4. Building an autonomous, multi-agent virtual marketing team with CrewAI

This project showcases an autonomous, multi-agent virtual marketing team built with CrewAI. It automates the creation of a high-quality, end-to-end marketing strategy from research to copywriting.

5. GitHub Issue Analyzer built with Agno

This project demonstrates a collaborative multi-agent system built with Agno, where specialized agents, including a coordinator agent and 3 sub-agents, work together to analyze GitHub repositories. 

6. A2A Multi-Agent Fact Checker

This project demonstrates a collaborative multi-agent system built with the Agent2Agent SDK (A2A) and OpenAI, where a top-level Auditor agent coordinates the workflow to verify facts.

More agent examples can be found here. 

GenAI vs. agentic AI: Key differences

Attributes

Generative AI (GenAI)

Agentic AI

Definition

AI systems that generate content (text, code, images, etc.) based on prompts

AI systems that plan, reason, and act across multiple steps to achieve a defined goal

Core Behavior

Predicts the next output based on input (e.g., next word, token, or pixel)

Takes initiative, capable of decision making, executes actions, and can operate independently

Examples

ChatGPT, Claude, GitHub Copilot

ChatGPT agent, Cursor agent mode, Manus

Top Use Cases

Code generation, content creation, summarization, education, chatbots, image/video creation

Customer support automation, IT operations, multi-step strategies, security, and fraud detection

Adoption Stage

Widely adopted across consumer and enterprise applications

Early-stage; 14% of companies using at scale

Development Workflow

– Choose model

– Prompt or fine-tune

– Integrate with app logic

– Break use case into steps

– Choose model(s) and tools

– Use a framework to coordinate agent flow

Common Challenges

Model selection and ensuring consistent and reliable behavior

More complex task coordination and expanded security surface

Analogy

Autocomplete on steroids

The new microservices

Final thoughts

Whether you’re building with GenAI or exploring the potential of agents, AI proficiency is becoming a core skill for developers as more organizations double down on their AI initiatives. GenAI offers a fast path to content-driven applications with relatively simple integration and human input. On the other hand, agentic AI can execute multi-step strategies and enables goal-oriented workflows that resemble the complexity and modularity of microservices. 

While agentic AI systems are more powerful, they also introduce new challenges around orchestration, tool integration, and security. Knowing when to use each and how to build effectively using AI solutions, like Docker Model Runner, Offload, MCP Gateway, and Compose, will help streamline development and prepare your production application.

Build your first AI application with Docker

Whether you’re prototyping a private LLM chatbot or building a multi-agent system that acts like a virtual team, now’s the time to experiment. With Docker, you get the flexibility to develop easily, scale securely, and move fast, using the same familiar commands and workflows you already know!

Learn how to build an agentic AI application →

Learn more

Discover secure MCP servers and feature your own on Docker

Pick the right local LLM for tool calling 

Discover other AI solutions from Docker 

Learn how Compose makes building AI agents easier 

Sign up for our Docker Offload beta program and get 300 free GPU minutes to boost your agent. 

References

Chip Huyen, 2025, AI Engineering Building Application with Foundation Models, O’Reilly

Bornet Pascal, 2025, Agentic Artificial Intelligence, Harnessing AI Agents to Reinvent Business, Work and Life, ‎Irreplaceable Publishing  

Quelle: https://blog.docker.com/feed/

Retiring Docker Content Trust

Docker Content Trust (DCT) was introduced 10 years ago as a way to verify the integrity and publisher of container images using The Update Framework (TUF) and the Notary v1 project. However, the upstream Notary codebase is no longer actively maintained and the ecosystem has since moved toward newer tools for image signing and verification. Accordingly, DCT usage has declined significantly in recent years. Today, fewer than 0.05% of Docker Hub image pulls use DCT and Microsoft recently announced the deprecation of DCT support in Azure Container Registry. As a result, Docker is beginning the process of retiring DCT, beginning with Docker Official Images (DOI).

Docker is committed to improving the trust of the container ecosystem and, in the near future, will be implementing a different image signing solution for DOI that is based on modern, widely-used tools to help customers start and stay secure. Watch this blog for more information.

What This Means for You

If you pull Docker Official Images

Starting on August 8th, 2025, the oldest of DOI DCT signing certificates will begin to expire. You may have already started seeing expiry warnings if you use the docker trust commands with DOI. These certificates, once cached by the Docker client, are not subsequently refreshed, making certificate rotation impractical. If you have set the DOCKER_CONTENT_TRUST environment variable to True (DOCKER_CONTENT_TRUST=1), DOI pulls will start to fail. The workaround is to unset the DOCKER_CONTENT_TRUST environment variable. The use of  docker trust inspect will also start to fail and should no longer be used for DOI.

If you publish images on Docker Hub using DCT 

You should start planning to transition to a different image signing and verification solution (like Sigstore or Notation). Docker will be publishing migration guides soon to help you in that effort. Timelines for the complete deprecation of DCT are being finalized and will be published soon.

We appreciate your understanding as we modernize our security infrastructure and align with current best practices for the container ecosystem. Thank you for being part of the Docker community.

Quelle: https://blog.docker.com/feed/

Accelerate modernization and cloud migration

In our recent report, we describe that many enterprises today face a stark reality: despite years of digital transformation efforts, the majority of enterprise workloads—up to 80%—still run on legacy systems. This lag in modernization not only increases operational costs and security risks but also limits the agility needed to compete in a rapidly evolving market. The pressure is on for technology leaders to accelerate the ongoing modernization of legacy applications and to accelerate cloud adoption, but the path forward is often blocked by technical complexity, risk, and resource constraints.  Full Report: Accelerate Modernization with Docker.Enterprises have long been treating modernization as a business imperative. Research shows that 73% of CIOs identify technological disruption as a major risk, and 82% of CEOs believe companies that fail to transform fundamentally risk obsolescence within a decade. Enterprises that further delay modernization risk falling farther behind more agile competitors who are already leveraging cloud-native platforms, DevSecOps practices, and AI or Agentic applications to drive business growth and innovation.

Enterprises challenges for modernization and cloud migration

Transitioning from legacy systems to modern, cloud-native architectures is rarely straightforward. Enterprises face a range of challenges, including:

Complex legacy dependencies: Deeply entrenched systems with multiple layers and dependencies make migration risky and costly.

Security and compliance risks: Moving to the cloud can increase vulnerabilities by up to 46% if not managed correctly.

Developer inefficiencies: Inconsistent environments and manual processes can delay releases, with 69% of developers losing eight or more hours a week to inefficiencies.

Cloud cost overruns: Inefficient resource allocation and lack of governance often lead to higher-than-expected cloud expenses.

Tool fragmentation: Relying on multiple, disconnected tools for modernization increases risk and slows progress.

These challenges have stalled progress for years, but with the right strategy and tools, enterprises can overcome them and unlock the full benefits of modernization and migration.

How Docker accelerates modernization and cloud migration

Docker products can help enterprises modernize legacy applications and migrate to the cloud efficiently, securely, and incrementally.

Docker brings together Docker Desktop, Docker Hub, Docker Build Cloud, Docker Scout, Testcontainers Cloud, and Administration into a seamless, integrated experience. This solution empowers development teams to:

Containerize legacy applications: Simplify the process of packaging and migrating legacy workloads to the cloud.

Automate CI/CD pipelines: Accelerate build, test, and deployment cycles with automated workflows and cloud-based build acceleration.

Embed security and governance: Integrate real-time vulnerability analysis, policy enforcement, and compliance checks throughout the development lifecycle.

Use trusted secure content: Hardened Images ensures every container starts has a signed, distroless base that cuts the attack surface by up to 95 % and comes with built-in SBOMs for effortless audits.

Standardize environments: Ensure consistency across development, testing, and production, reducing configuration drift and late-stage defects.

Implement incremental, low-risk modernization: Rather than requiring a disruptive, multi-year overhaul, Docker enables enterprises to modernize incrementally. 

Increased agility: By modernizing legacy applications and systems, enterprises achieve faster release cycles, rapid product launches, reduced time to market, and seamless scaling in the cloud.

Do not further delay modernization and cloud migrations. Get started with Docker today

Enterprises don’t need to wait for a massive, “big-bang” project — Docker makes it possible to start small, deliver value quickly, and scale ongoing modernization efforts across the organization. By empowering teams with the right tools and a proven approach, Docker enables enterprises to accelerate ongoing application modernization and cloud migrations —unlocking innovation, reducing costs, and securing their competitive edge for the future.

Ready to accelerate your modernization journey?  Learn more about how Docker can help enterprises with modernization and cloud migration – Full Report: Accelerate Modernization with Docker.  

___________Sources:– IBM 1; Gartner 1, 2, 3 – PWC 1, 2– The Palo Alto Networks State of Cloud-Native Security 2024– State of Developer Experience Report 2024___________Tags: #ApplicationModernization #Modernization #CloudMigration #Docker #DockerBusiness #EnterpriseIT #DevSecOps #CloudNative #DigitalTransformation

Quelle: https://blog.docker.com/feed/

Beyond the Chatbot: Event-Driven Agents in Action

Docker recently completed an internal 24-hour hackathon that had a fairly simple goal: create an agent that helps you be more productive.

As I thought about this topic, I recognized I didn’t want to spend more time in a chat interface. Why can’t I create a fully automated agent that doesn’t need a human to trigger the workflow? At the end of the day, agents can be triggered by machine-generated input.

In this post, we’ll build an event-driven application with agentic AI. The event-driven agent we’ll build will respond to GitHub webhooks to determine if a PR should be automatically closed. I’ll walk you through the entire process from planning to coding, including why we’re using the Gemma3 and Qwen3 models, hooking up the GitHub MCP server with the new Docker MCP Gateway, and choosing the Mastra agentic framework.

The problem space

Docker has a lot of repositories used for sample applications, tutorials, and workshops. These are carefully crafted to help students learn various aspects of Docker, such as writing their first Dockerfile, building agentic applications, and more.

Occasionally, we’ll get pull requests from new Docker users that include the new Dockerfile they’ve created or the application updates they’ve made.

Sample pull request in which a user submitted the update they made to their website while completing the tutorial

Although we’re excited they’ve completed the tutorial and want to show off their work, we can’t accept the pull request as it’ll impact the ability for the next person to complete the work.

Recognizing that many of these PRs are from brand new developers, we want to write a nice comment to let them know we can’t accept the PR, yet encourage them to keep learning.

While this doesn’t take a significant amount of time, it does feel like a good candidate for automation. We can respond more timely and help keep PR queues focused on actual improvements to the materials.

The plan to automate

The goal: Use an agent to analyze the PR and detect if it appears to be a “I completed the tutorial” submission, generate a comment, and auto-close the PR. And can we automate the entire process?

Fortunately, GitHub has webhooks that we can receive when a new PR is opened.

As I broke down the task, I identified three tasks that need to be completed:

Analyze the PR – look at the contents of the PR and possibly expand into the contents of the repo (what’s the tutorial actually about?). Determine if the PR should be closed.

Generate a comment – generate a comment indicating the PR is going to be closed, provide encouragement, and thank them for their contribution.

Post the comment and close the PR – do the actual posting of the comment and close the PR.

With this setup, I needed an agentic application architecture that looked like this:

Architecture diagram showing the flow of the app: PR opened in GitHub triggers a webhook that is received by the agentic application and delegates the work to three sub-agents

Building an event-driven application with agentic AI

The first thing I did was pick an agentic framework. I ended up landing on Mastra.ai, a Typescript-based framework that supports multi-agent flows, conditional workflows, and more. I chose it because I’m most comfortable with JavaScript and was intrigued by the features the framework provided.

1. Select the right agent tools

After choosing the framework, I next chose the tools that agents would need. Since this was going to involve analyzing and working with GitHub, I chose the GitHub Official MCP server. 

The newly-released Docker MCP Gateway made it easy for me to plug it into my Compose file. Since the GitHub MCP server has over 70 tools, I decided to filter the exposed tools to include only those I needed to reduce the required context size and increase speed.

services:
mcp-gateway:
image: docker/mcp-gateway:latest
command:
– –transport=sse
– –servers=github-official
– –tools=get_commit,get_pull_request,get_pull_request_diff,get_pull_request_files,get_file_contents,add_issue_comment,get_issue_comments,update_pull_request
use_api_socket: true
ports:
– 8811:8811
secrets:
– mcp_secret
secrets:
mcp_secret:
file: .env

The .env file provided the GitHub Personal Access Token required to access the APIs:

github.personal_access_token=personal_access_token_here

2. Choose and add your AI models

Now, I needed to pick models. Since I had three agents, I could theoretically pick three different models. But, I also wanted to reduce model swapping if possible, yet keep performance as quick as possible. I experimented with a few different approaches, but landed with the following:

PR analyzer – ai/qwen3 – I wanted a model that could do more reasoning and could perform multiple steps to gather the context it needed

Comment generator – ai/gemma3 – the Gemma3 models are great for text generation and run quite quickly

PR executor – ai/qwen3 – I ran a few experiments, and the qwen models did best for the multiple steps needed to post the comment and close the PR

I updated my Compose file with the following configuration to define the models. I gave the Qwen3 model an increased context size to have more space for tool execution, retrieving additional details, etc.:

models:
gemma3:
model: ai/gemma3
qwen3:
model: ai/qwen3:8B-Q4_0
context_size: 131000

3. Write the application

With the models and tools chosen and configured, it was time to write the app itself! I wrote a small Dockerfile and updated the Compose file to connect the models and MCP Gateway using environment variables. I also added Compose Watch config to sync file changes into the container.

services:
app:
build:
context: .
target: dev
ports:
– 4111:4111
environment:
MCP_GATEWAY_URL: http://mcp-gateway:8811/sse
depends_on:
– mcp-gateway
models:
qwen3:
endpoint_var: OPENAI_BASE_URL_ANALYZER
model_var: OPENAI_MODEL_ANALYZER
gemma3:
endpoint_var: OPENAI_BASE_URL_COMMENT
model_var: OPENAI_MODEL_COMMENT
develop:
watch:
– path: ./src
action: sync
target: /usr/local/app/src
– path: ./package-lock.json
action: rebuild

The Mastra framework made it pretty easy to write an agent. The following snippet defines a MCP Client, defines the model connection, and creates the agent with a defined system prompt (which I’ve abbreviated for this blog post). 

You’ll notice the usage of environment variables, which match those being defined in the Compose file. This makes the app super easy to configure.

import { Agent } from "@mastra/core/agent";
import { MCPClient } from "@mastra/mcp";
import { createOpenAI } from "@ai-sdk/openai";
import { Memory } from "@mastra/memory";
import { LibSQLStore } from "@mastra/libsql";

const SYSTEM_PROMPT = `
You are a bot that will analyze a pull request for a repository and determine if it can be auto-closed or not.
…`;

const mcpGateway = new MCPClient({
servers: {
mcpGateway: {
url: new URL(process.env.MCP_GATEWAY_URL || "http://localhost:8811/sse"),
},
},
});

const openai = createOpenAI({
baseURL: process.env.OPENAI_BASE_URL_ANALYZER || "http://localhost:12434/engines/v1",
apiKey: process.env.OPENAI_API_KEY || "not-set",
});

export const prExecutor = new Agent({
name: 'Pull request analyzer,
instructions: SYSTEM_PROMPT,
model: openai(process.env.OPENAI_MODEL_ANALYZER || "ai/qwen3:8B-Q4_0"),
tools: await mcpGateway.getTools(),
memory: new Memory({
storage: new LibSQLStore({
url: "file:/tmp/mastra.db",
}),
}),
});

I was quite impressed with the Mastra Playground, which allows you to interact directly with the agents individually. This makes it easy to test different prompts, messages, and model settings. Once I found a prompt that worked well, I would update my code to use that new prompt.

The Mastra Playground showing ability to directly interact with the “Pull request analyzer” agent, adjust settings, and more.

Once the agents were defined, I was able to define steps and a workflow that connects all of the agents. The following snippet shows the defined workflow and conditional branch that occurs after determining if the PR should be closed:

const prAnalyzerWorkflow = createWorkflow({
id: "prAnalyzerWorkflow",
inputSchema: z.object({
org: z.string().describe("The organization to analyze"),
repo: z.string().describe("The repository to analyze"),
prNumber: z.number().describe("The pull request number to analyze"),
author: z.string().describe("The author of the pull request"),
authorAssociation: z.string().describe("The association of the author with the repository"),
prTitle: z.string().describe("The title of the pull request"),
prDescription: z.string().describe("The description of the pull request"),
}),
outputSchema: z.object({
autoClosed: z.boolean().describe("Whether the PR was auto-closed"),
comment: z.string().describe("Comment to be posted on the PR"),
}),
})
.then(determineAutoClose)
.branch([
[
async ({ inputData }) => inputData.recommendedToClose,
createCommentStep
]
])
.then(prExecuteStep)
.commit();

With the workflow defined, I could now add the webhook support. Since this was a simple hackathon project and I’m not yet planning to actually deploy it (maybe one day!), I used the smee.io service to register a webhook in the repo and then the smee-client to receive the payload, which then forwards the payload to an HTTP endpoint.

The following snippet is a simplified version where I create a small Express app that handles the webhook from the smee-client, extracts data, and then invokes the Mastra workflow.

import express from "express";
import SmeeClient from 'smee-client';
import { mastra } from "./mastra";

const app = express();
app.use(express.json());

app.post("/webhook", async (req, res) => {
const payload = JSON.parse(req.body.payload);

if (!payload.pull_request)
return res.status(400).send("Invalid payload");

if (payload.action !== "opened" && payload.action !== "reopened")
return res.status(200).send("Action not relevant, ignoring");

const repoFullName = payload.pull_request.base.repo.full_name;

const initData = {
prNumber: payload.pull_request.number,
org: repoFullName.split("/")[0],
repo: repoFullName.split("/")[1],
author: payload.pull_request.user.login,
authorAssociation: payload.pull_request.author_association,
prTitle: payload.pull_request.title,
prBody: payload.pull_request.body,
};

res.status(200).send("Webhook received");

const workflow = await mastra.getWorkflow("prAnalyzer").createRunAsync();
const result = await workflow.start({ inputData: initData });
console.log("Result:", JSON.stringify(result));
});

const server = app.listen(3000, () => console.log("Server is running on port 3000"));

const smee = new SmeeClient({
source: "https://smee.io/SMEE_ENDPOINT_ID",
target: "http://localhost:3000/webhook",
logger: console,
});
const events = await smee.start();
console.log("Smee client started, listening for events now");

4. Test the app

At this point, I can start the full project (run docker compose up) and open a PR. I’ll see the webhook get triggered and the workflow run. And, after a moment, the result is complete! It worked!

Screenshot of a GitHub PR that was automatically closed by the agent with the generated comment.

If you’d like to view the project in its entirety, you can check it out on GitHub at mikesir87/hackathon-july-2025.

Lessons learned

Looking back after this hackathon, I learned a few things that are worth sharing as a recap for this post.

1. Yes, automating workflows is possible with agents. 

Going beyond the chatbot opens up a lot of automation possibilities and I’m excited to be thinking about this space more.

2. Prompt engineering is still tough. 

It took many iterations to develop prompts that guided the models to do the right thing consistently. Using tools and frameworks that let you iterate quickly help tremendously (thanks Mastra Playground!).

3. Docker’s tooling made it easy to try lots of models. 

I experimented with quite a few models to find those that would handle the tool calling, reasoning, and comment generation. I wanted the smallest model possible that would still work. It was easy to simply adjust the Compose file, have environment variables be updated, and try out a new model.

4. It’s possible to go overboard on agents. Split agentic/programmatic workflows are powerful. 

I was having struggles writing a prompt that would get the final agent to simply post a comment and close the PR reliably – it would often post the comment multiple times or skip the PR closing. But, I found myself asking “does an agent need to do this step? This step feels like something I can do programmatically without a model, GPU usage, and so on. And it would be much faster too.” I do think that’s something to consider – how to build workflows where some steps use agents and some steps are simply programmatic (Mastra supports this by the way).

5. Testing? 

Due to the timing, I didn’t get a chance to explore much on the testing front. All of my “testing” was manual verification. So, I’d like to loop back on this in a future iteration. How do we test this type of workflow? Do we test agents in isolation or the entire flow? Do we mock results from the MCP servers? So many questions.

Wrapping up

This internal hackathon was a great experience to build an event-driven agentic application. I’d encourage you to think about agentic applications that don’t require a chat interface to start. How can you use event-driven agents to automate some part of your work or life? I’d love to hear what you have in mind!

View the hackathon project on GitHub

Try Docker Model Runner and MCP Gateway

Sign up for our Docker Offload beta program and get 300 free GPU minutes to boost your agent. 

Use Docker Compose to build and run your AI agents

Discover trusted and secure MCP servers for your agent on Docker MCP Catalog

Quelle: https://blog.docker.com/feed/

Docker MCP Catalog: Finding the Right AI Tools for Your Project

As large language models (LLMs) evolve from static text generators to dynamic agents capable of executing actions, there’s a growing need for a standardized way to let them interact with external tooling securely. That’s where Model Context Protocol (MCP) steps in, a protocol designed to turn your existing APIs into AI-accessible tools. 

My name is Saloni Narang, a Docker Captain. Today, I’ll walk you through what the Model Context Protocol (MCP) is and why, despite its growing popularity, the developer experience still lags behind when it comes to discovering and using MCP servers. Then I will explore Docker Desktop’s latest MCP Catalog and Toolkit and demonstrate how you can find the right AI developer tools for your project easily and securely.

What is MCP? 

Think of MCP as the missing middleware between LLMs and the real-world functionality you’ve already built. Instead of doing the prompt hacks or building custom plugins for each model, MCP allows you to define your capabilities as structured tools that any compliant AI client can discover, invoke, and interact with safely and predictably. While the protocol is still maturing and the documentation can be opaque, the underlying value is clear: MCP turns your backend into a toolbox for AI agents. Whether you’re integrating scraping APIs, financial services, or internal business logic, MCP offers a portable, reusable, and scalable pattern for AI integrations.

Overview of the Model Context Protocol (MCP)

The Pain Points of Equipping Your AI Agent with the Right Tools

You might be asking, “Why should I care about finding MCP servers? Can’t my agent just call any API?” This is where the core challenges for AI developers and agent builders lie. While MCP offers incredible promise, the current landscape for using AI agents with external capabilities is riddled with obstacles.

Integration Complexity and Agent Dev Overhead

Each MCP server often comes with its own unique configurations, environment variables, and dependencies. You’re typically left sifting through individual GitHub repositories, deciphering custom setup instructions, and battling conflicting requirements. This “fiddly, time-consuming, and easy to get wrong” process makes quick experimentation and rapid iteration on agent capabilities nearly impossible, significantly slowing down your AI development cycle.

A Fragmented Landscape of AI-Ready Tools

The internet is a vast place, and while you can find some random MCP servers, they’re scattered across various registries and personal repositories. There’s no central, trusted source, making discovery of AI-compatible tools a hunt rather than a streamlined process, impacting your ability to find and integrate the right functionalities quickly.

Trust and Security for Autonomous Agents

When your AI agent needs to access external services, how do you ensure the tools it interacts with are trustworthy and secure? Running an unknown MCP server on your machine presents significant security risks, especially when dealing with sensitive data or production environments. Are you confident in its provenance and that it won’t introduce vulnerabilities into your AI pipeline? This is a major hurdle, especially in enterprise settings where security and AI governance are paramount.

Inconsistent Agent-Tool Interface

Even once you’ve managed to set up an MCP server, connecting it to your AI agent or IDE can be another manual nightmare. Different AI clients or frameworks might have different integration methods, requiring specific JSON blocks, API keys, or version compatibility. This lack of a unified interface complicates the development of robust and portable AI agents.

These challenges slow down AI development, introduce potential security risks for agentic systems, and ultimately prevent developers from fully leveraging the power of MCP to build truly intelligent and actionable AI.

Why is Docker a game-changer for AI, and specifically for MCP tools?

Docker has already proven to be the de facto standard for creating and distributing containerized applications. Its user experience is the key reason why I and millions of other developers use Docker today. Over the years, Docker has evolved to cater to the needs of developers, and it entered the AI game too. With so many MCP servers having a set of configurations living on separate GitHub repositories and different installation methods, Docker has again changed the game on how we think and run these MCP servers and connect to MCP clients like Claude.

Docker has introduced the Docker MCP Catalog and Toolkit (currently in Beta). This is a comprehensive solution designed to streamline the developer experience for building and using MCP-compatible tools.

MCP Toolkit Interface in Docker Desktop

What is the Docker MCP Catalog?

The Docker MCP Catalog is a centralized, trusted registry that offers a curated collection of MCP-compatible tools packaged as Docker images. Integrated with Docker Hub and available directly through Docker Desktop, it simplifies the discovery, sharing, and execution of over 100 plus verified MCP servers from partners like Stripe, Grafana, etc. By running each tool in an isolated container, the catalog addresses common issues such as environment conflicts, inconsistent platform behavior, and complex setups, ensuring portability, security, and consistency across systems. Developers can instantly pull and run these tools using Docker CLI or Desktop, with built-in support for agent integration via the MCP Toolkit.

MCP Catalog on Docker Hub hosts the largest collection of containerized MCP servers

With Docker, you now have access to the largest library of secure, containerized MCP servers, all easily discoverable and runnable directly from Docker Desktop, Docker Hub, or the standalone MCP Catalog. Whether you want to create a Jira issue, fetch GitHub issues, run SQL queries, search logs in Loki, or pull transcripts from YouTube videos, there’s likely an MCP server for that. The enhanced catalog now lets you browse by use case, like Data Integration, Development Tools, Communication, Productivity, or Analytics, and features powerful search filters based on capabilities, GitHub tags, and tool categories. You can launch these tools in seconds, securely running them in isolated containers. 

You can find the MCP servers online but they are all scattered, and every MCP server has its own process of installation, manual steps to configure with your client. This is where the MCP server catalog comes in. When browsing the Docker MCP Catalog, you’ll notice that MCP servers fall into two categories: Docker-built and community-built. This distinction helps developers understand the level of trust, verification, and security applied to each server.

Docker-Built Servers

These are MCP servers that Docker has packaged and verified through a secure build pipeline. You can think of them as certified and hardened; they come with verified metadata, supply chain transparency, and automated vulnerability scanning. These servers are ideal when security and provenance are critical, like in enterprise environments.

Community-Built Servers

These servers are built and maintained by individual developers or organizations. While Docker doesn’t oversee the build process, they still run inside isolated containers, offering users a safer experience compared to running raw scripts or binaries. They give developers a diverse set of tools to innovate and build, enabling rapid experimentation and expansion of the available tool catalog.

How to Find the Right AI Developer Tool with MCP Catalog

With Docker, you now have access to the largest library of secure, containerized MCP servers, all easily discoverable and runnable directly from Docker Desktop, Docker Hub, or the standalone MCP Catalog. Whether you want your AI agent to create a Jira issue, run SQL queries, search logs in Loki, or pull transcripts from YouTube videos, there’s likely an MCP server for that.

Enhanced Search and Browse by AI Use Case

The enhanced catalog now lets you browse by specific AI use cases, like Data Integration for LLMs, Development Tools for Agents, Communication Automation, AI Productivity Enhancers, or Analytics for AI Insights, and features powerful search filters based on capabilities, GitHub tags, and tool categories. You can launch these tools in seconds, securely running them in isolated containers to empower your AI agents.

The Docker MCP Catalog is built with AI developers in mind, making it easy to discover tools based on what you want your AI agent to do. Whether your goal is to automate workflows, connect to dev tools, retrieve data, or integrate AI into your app, the catalog organizes MCP servers by real-world use cases such as:

AI Tools (e.g., summarization, chat, transcription for agentic workflows)

Data Integration (e.g., Redis, MongoDB for feeding data to agents)

Productivity & Developer Tools (e.g., Pulumi, Jira for agent-driven task management)

Monitoring & Observability (e.g., Grafana for AI-powered system insights)

Browsing MCP Tools by AI Use Case

Search & Category Filters

The Catalog also includes powerful filtering capabilities to narrow down your choices:

Filter by tool category, like “Data visualization” or “Developer tools”

Search by keywords, GitHub tags, or specific capabilities

View tools by their trust level (Docker-built vs. community-built)

These filters are particularly useful when you’re looking for a specific type of tool (like something for logs or tickets), but don’t want to scroll through a long list.

Browsing MCP Tools by AI Use Case (Expanded)

One-Click Setup Within Docker Desktop

Once you’ve found a suitable MCP server, setting it up is incredibly simple. Docker Desktop’s MCP Toolkit allows you to:

View details about each MCP server (what it does, how it connects)

Add your credentials or tokens, if required (e.g., GitHub PAT)

Click “Connect”, and Docker will pull, configure, and run the MCP server in an isolated container

No manual config files, no YAML, no shell commands, just a unified, GUI-based experience that works across macOS, Windows, and Linux. It’s the fastest and easiest way to test or integrate new tools with your AI agent workflows.

Example – Powering Your AI Agent with Redis and Grafana MCP Servers

Let’s imagine you’re building an AI agent in your IDE (like VS Code with Agent Mode enabled) that needs to monitor application performance in real-time. Specifically, your agent needs to:

Retrieve real-time telemetry data from a Redis database (e.g., user activity metrics, API call rates).

Visualize performance trends from that data using Grafana dashboards, and potentially highlight anomalies.

Traditionally, an AI developer would have to manually set up both a Redis server and a Grafana instance, configure their connections, and then painstakingly figure out how your agent can interact with their respective APIs, a process prone to errors and security gaps. This is where the Docker MCP Catalog dramatically simplifies the AI tooling pipeline.

Step 1: Discover and Connect to Redis MCP Server for Agent Data Ingestion

Instead of manual setup, you’ll simply:

Go to the Docker Desktop MCP Catalog: Search for “Redis.” You’ll find a Redis MCP Server listed, ready for integration with your agent.

Redis MCP Server

Add MCP server: Docker Desktop handles pulling the Redis MCP server image, configuring it, and running it in an isolated container. You might need to provide basic connection details for your Redis instance, but it’s all within a guided UI, ensuring secure credential management for your agent. All the tools that will be visible in the MCP client are visible when you select the MCP server. 

Currently I am running Redis as a Docker container locally and using that as the configuration for Redis MCP server. 

Below is the Docker command to run Redis locally 

docker run -d
–name my-redis
-p 6379:6379
-e REDIS_PASSWORD=secret123
redis:7.2-alpine
redis-server –requirepass secret123

Running Redis MCP Server Locally

Step 2: Discover Grafana MCP Server for Agent-Driven Visualization

Next, for visualization and anomaly detection: Here also I am running Grafana as a docker container locally and then generating the api key secret using the grafana dashboard. 

docker run -d
–name grafana
-p 3000:3000
-e "GF_SECURITY_ADMIN_USER=admin"
-e "GF_SECURITY_ADMIN_PASSWORD=admin"
grafana/grafana-oss

Go back to the Docker Desktop MCP Catalog: Search for “Grafana.”

Add MCP Server: Similar to Redis, Docker will spin up the Grafana MCP server. You’ll likely input your Grafana instance URL and API key directly into Docker Desktop’s secure interface.

Step 3: Connect via the MCP Toolkit to Empower Your AI Agent

With both Redis and Grafana MCP servers running and exposed via the Docker MCP Toolkit, your AI Clients like Claude or Gordon can now seamlessly interact with them. Your IDE’s agent, utilizing its tool-calling capabilities, can:

Query the Redis MCP Server to fetch specific user activity metrics or system health indicators.

Pass that real-time data to the Grafana MCP Server to generate a custom dashboard URL, trigger a refresh of an existing dashboard, or even request specific graph data points, which the agent can then analyze or present to you.

Before doing the tool call, let’s add some data to our Redis locally.

docker exec -it my-redis redis-cli -a secret123
SET user:2001 "{"name":"Saloni Narang","role":"Co Founder","location":"India"}"

The next step involves connecting the client to the MCP server. You can easily select from the provided list of clients and connect them with one click; for this example, Claude Desktop will be used. Upon successful connection, the system automatically configures and integrates the settings required to discover and connect to the MCP servers. Should any errors occur, a corresponding log file will be generated on the client side.

Now let’s open Claude Desktop and run a query 

Claude UI Permission Prompt 

 Claude Agent Using Redis and Grafana MCP Servers

This is how you can use the power of AI along with MCP servers via Docker Desktop. 

How to Contribute to the Docker MCP Registry

The Docker MCP Registry is open for community contributions, allowing developers and teams to publish their own MCP servers to the official Docker MCP Catalog. Once listed, these servers become accessible through Docker Desktop’s MCP Toolkit, Docker Hub, and the web-based MCP Catalog, making them instantly available to millions of developers.

Here’s how the contribution process works:

Option A: Docker-Built Image

In this model, contributors provide the MCP server metadata, and Docker handles the entire image build and publishing process. Once approved, Docker builds the image using their secure pipeline, signs it, and publishes it to the mcp/ namespace on Docker Hub.

Option B: Self-Built Image

Contributors who prefer to manage their own container builds can submit a pre-built image for inclusion in the catalog. These images won’t receive Docker’s build-time security guarantees, but still benefit from Docker’s container isolation model.

Updating or Removing an MCP Entry

If a submitted MCP server needs to be updated or removed, contributors can open an issue in the MCP Registry GitHub repo with a brief explanation.

Submission Requirements

To ensure quality and security across the ecosystem, all submitted MCP servers must:

Follow basic security best practices

Be containerized and compatible with MCP standards

Include a working Docker deployment

Provide documentation and usage instructions

Implement basic error handling and logging

Non-compliant or outdated entries may be flagged for revision or removal.

Contributing to the Docker MCP Catalog is a great way to make your tools discoverable and usable by AI agents across the ecosystem-whether it’s for automating tasks, querying APIs, or powering real-time agentic workflows.

Want to contribute? Head over to github.com/docker/mcp-registry to get started.

Conclusion

Docker has always stood at the intersection of innovation and simplicity, from making containerization accessible to now enabling developers to build, share, and run AI developer tools effortlessly. With the rise of agentic AI, the Docker MCP Catalog and Toolkit bring much-needed structure, security, and ease-of-use to the world of AI integrations.

Whether you’re just exploring what MCP is or you’re deep into building AI agents that need to interact with external tools, Docker gives you the fastest on-ramp, no YAML wrangling, no token confusion, just click and go.

As we experiment with building our own MCP servers in the future, we’d love to hear from you:

–  Which MCP server is your favorite?–  What use case are you solving with Docker + AI today?

You can quote this post and put your use case along with your favorite MCP server, and tag Docker on LinkedIn or X. 

Quelle: https://blog.docker.com/feed/

Compose Editing Evolved: Schema-Driven and Context-Aware

Every day, thousands of developers are creating and editing Compose files. At Docker, we are regularly adding more features to Docker Compose such as the new provider services capability that lets you run AI models as part of your multi-container applications with Docker Model Runner. We know that providing a first-class editing experience for Compose files is key to empowering our users to ship amazing products that will delight their customers. We are pleased to announce today some new additions to the Docker Language Server that will make authoring Compose files easier than ever before.

Schema-Driven Features

To help you stay on the right track as you edit your Compose file, the Docker Language Server brings the Compose specification into the editor to help minimize window switching and keeps you in your editor where you are most productive.

Figure 1: Leverage hover tooltips to quickly understand what a specific Compose attribute is for.

Context-Aware Intelligence

Although attribute names and types can be inferred from the Compose specification, certain attributes have a contextual meaning on them and reference values of different attributes or content from another file. The Docker Language Server understands these relationships and will suggest the available values so that there is no guesswork on your part.

Figure 2: Code completion understands how your files are connected and will only give you suggestions that are relevant in your current context.

Freedom of Choice

The Docker Language Server is built on the Language Server Protocol (LSP) which means you can connect it with any LSP-compatible editor of your choosing. Whatever editor you like using, we will be right there with you to guide you along your software development journey.

Figure 3: The Docker Language Server can run in any LSP-compliant editor such as the JetBrains IDE with the LSP4IJ plugin.

Conclusion

Docker Compose is a core part of hundreds of companies’ development cycles. By offering a feature-rich editing experience with the Docker Language Server, developers everywhere can test and ship their products faster than ever before. Install the Docker DX extension for Visual Studio Code today or download the Docker Language Server to integrate it with your favourite editor.

What’s Next

Your feedback is critical in helping us improve and shape the Docker DX extension and the Docker Language Server.

If you encounter any issues or have ideas for enhancements that you would like to see, please let us know:

Open an issue on the Docker DX VS Code extension GitHub repository or the Docker Language Server GitHub repository 

Or submit feedback through the Docker feedback page

We’re listening and excited to keep making things better for you!

Learn More

Setup the Docker Language Server after installing LSP4IJ in your favorite JetBrains IDE.

Quelle: https://blog.docker.com/feed/

Docker Unveils the Future of Agentic Apps at WeAreDevelopers

Agentic applications – what actually are they and how do we make them easier to build, test, and deploy? At WeAreDevelopers, we defined agentic apps as those that use LLMs to define execution workflows based on desired goals with access to your tools, data, and systems. 

While there are new elements to this application stack, there are many aspects that feel very similar. In fact, many of the same problems experienced with microservices now exist with the evolution of agentic applications.

Therefore, we feel strongly that teams should be able to use the same processes and tools, but with the new agentic stack. Over the past few months, we’ve been working to evolve the Docker tooling to make this a reality and we were excited to share it with the world at WeAreDevelopers.

Let’s unpack those announcements, as well as dive into a few other things we’ve been working on!

Docker Captain Alan Torrance from JPMC with Docker COO Mark Cavage and WeAreDevelopers organizers

WeAreDeveloper keynote announcements

Mark Cavage, Docker’s President and COO, and Tushar Jain, Docker’s EVP of Product and Engineering, took the stage for a keynote at WeAreDevelopers and shared several exciting new announcements – Compose for agentic applications, native Google Cloud support for Compose, and Docker Offload. Watch the keynote in its entirety here.

Docker EVP, Product & Engineering Tushar Jain delivering the keynote at WeAreDevelopers

Compose has evolved to support agentic applications

Agentic applications need three things – models, tools, and your custom code that glues it all together. 

The Docker Model Runner provides the ability to download and run models.

The newly open-sourced MCP Gateway provides the ability to run containerized MCP servers, giving your application access to the tools it needs in a safe and secure manner.

With Compose, you can now define and connect all three in a single compose.yaml file! 

Here’s an example of a Compose file bringing it all together:

# Define the models
models:
gemma3:
model: ai/gemma3

services:
# Define a MCP Gateway that will provide the tools needed for the app
mcp-gateway:
image: docker/mcp-gateway
command: –transport=sse –servers=duckduckgo
use_api_socket: true

# Connect the models and tools with the app
app:
build: .
models:
gemma3:
endpoint_var: OPENAI_BASE_URL
model_var: OPENAI_MODEL
environment:
MCP_GATEWAY_URL: http://mcp-gateway:8811/sse

The application can leverage a variety of agentic frameworks – ADK, Agno, CrewAI, Vercel AI SDK, Spring AI, and more. 

Check out the newly released compose-for-agents sample repo for examples using a variety of frameworks and ideas.

Taking Compose to production with native cloud-provider support

During the keynote, we shared the stage with Google Cloud’s Engineering Director Yunong Xiao to demo how you can now easily deploy your Compose-based applications with Google Cloud Run. With this capability, the same Compose specification works from dev to prod – no rewrites and no reconfig. 

Google Cloud’s Engineering Director Yunong Xiao announcing the native Compose support in Cloud Run

With Google Cloud Run (via gcloud run compose up) and soon Microsoft Azure Container Apps, you can deploy apps to serverless platforms with ease. It already has support for the newly released model support too!

Compose makes the entire journey from dev to production consistent, portable, and effortless – just the way applications should be.

Learn more about the Google Cloud Run support with their announcement post here.

Announcing Docker Offload – access to cloud-based compute resources and GPUs during development and testing

Running LLMs requires a significant amount of compute resources and large GPUs. Not every developer has access to those resources on their local machines. Docker Offload allows you to run your containers and models using cloud resources, yet still feel local. Port publishing and bind mounts? It all just works.

No complex setup, no GPU shortages, no configuration headaches. It’s a simple toggle switch in Docker Desktop. Sign up for our beta program and get 300 free GPU minutes!

Getting hands-on with our new agentic Compose workshop

Selfie with at the end of the workshop with attendees

At WeAreDevelopers, we released and ran a workshop to enable everyone to get hands-on with the new Compose capabilities, and the response blew us away!

In the room, every seat was filled and a line remained outside well into the workshop hoping folks would leave early to open a spot. But, not a single person left early! It was so thrilling to see attendees stay fully engaged for the entire workshop.

During the workshop, participants were able to learn about the agentic application stack, digging deep into models, tools, and agentic frameworks. They used Docker Model Runner, the Docker MCP Gateway, and the Compose integrations to package it all together. 

Want to try the workshop yourself? Check it out on GitHub at dockersamples/workshop-agentic-compose.

Lightning talks that sparked ideas

Lightning talk on testing with LLMs in the Docker booth

In addition to the workshop, we hosted a rapid-fire series of lightning talks in our booth on a range of topics. These talks were intended to inspire additional use cases and ideas for agentic applications:

Digging deep into the fundamentals of GenAI applications

Going beyond the chatbot with event-driven agentic applications

Using LLMs to perform semantic testing of applications and websites

Using Gordon to build safer and more secure images with Docker Hardened Images

These talks made it clear: agentic apps aren’t just a theory—they’re here, and Docker is at the center of how they get built.

Stay tuned for future blog posts that dig deeper into each of these topics. 

Sharing our industry insights and learnings

At WeAreDevelopers, our UX Research team was able to present their findings and insights after analyzing the past three years of Docker-sponsored industry research. And interestingly, the AI landscape is already starting to have an impact in language selection, attitudes toward trends like shifted-left security, and more!

Julia Wilson on stage sharing insights from the Docker UX research team

To learn more about the insights, view the talk here.

Bringing a European Powerhouse to North America

In addition to the product announcements, we announced a major co‑host partnership between Docker and WeAreDevelopers, launching WeAreDevelopers World Congress North America, set for September 2026. Personally, I’m super excited for this because WeAreDevelopers is a genuine developer-first conference – it covers topics at all levels, has an incredibly fun and exciting atmosphere, live coding hackathons, and helps developers find jobs and further their career!

The 2026 WeAreDevelopers World Congress North America will mark the event’s first major expansion outside Europe. This creates a new, developer-first alternative to traditional enterprise-style conferences, with high-energy talks, live coding, and practical takeaways tailored to real builders.

Docker Captains Mohammad-Ali A’râbi (left) and Francesco Ciulla (right) in attendance with Docker Principal Product Manager Francesco Corti (center)

Try it, build it, contribute

We’re excited to support this next wave of AI-native applications. If you’re building with agentic AI, try out these tools in your workflow today. Agentic apps are complex, but with Docker, they don’t have to be hard. Let’s build cool stuff together.

Sign up for our beta program and get 300 free GPU minutes! 

Use Docker Compose to build and run your AI agents

Watch the keynote, a panel on securing the agentic workflow, and dive into insights from our annual developer survey here. 

Try Docker Model Runner and MCP Gateway

Quelle: https://blog.docker.com/feed/

GoFiber v3 + Testcontainers: Production-like Local Dev with Air

Intro

Local development can be challenging when apps rely on external services like databases or queues, leading to brittle scripts and inconsistent environments. Fiber v3 and Testcontainers solve this by making real service dependencies part of your app’s lifecycle, fully managed, reproducible, and developer-friendly.

With the upcoming v3 release, Fiber is introducing a powerful new abstraction: Services. These provide a standardized way to start and manage backing services like databases, queues, and cloud emulators, enabling you to manage backing services directly as part of your app’s lifecycle, with no extra orchestration required. Even more exciting is the new contrib module that connects Services with Testcontainers, allowing you to spin up real service dependencies in a clean and testable way.

In this post, I’ll walk through how to use these new features by building a small Fiber app that uses a PostgreSQL container for persistence, all managed via the new Service interface.

TL;DR

Use Fiber v3’s new Services API to manage backing containers.

Integrate with testcontainers-go to start a PostgreSQL container automatically.

Add hot-reloading with air for a fast local dev loop.

Reuse containers during dev by disabling Ryuk and naming them consistently.

Full example here: GitHub Repo

Local Development, state of the art

This is a blog post about developing in Go, but let’s look at how other major frameworks approach local development, even across different programming languages.

In the Java ecosystem, the most important frameworks, such as Spring Boot, Micronaut and Quarkus, have the concept of Development-time services. Let’s look at how other ecosystems handle this concept of services.

From Spring Boot docs:

Development-time services provide external dependencies needed to run the application while developing it. They are only supposed to be used while developing and are disabled when the application is deployed.

Micronaut uses the concept of Test Resources:

Micronaut Test Resources adds support for managing external resources which are required during development or testing.

For example, an application may need a database to run (say MySQL), but such a database may not be installed on the development machine or you may not want to handle the setup and tear down of the database manually.

And finally, in Quarkus, the concept of Dev Services is also present.

Quarkus supports the automatic provisioning of unconfigured services in development and test mode. We refer to this capability as Dev Services.

Back to Go, one of the most popular frameworks, Fiber, has added the concept of Services, including a new contrib module to add support for Testcontainers-backed services.

What’s New in Fiber v3?

Among all the new features in Fiber v3, we have two main ones that are relevant to this post:

Services: Define and attach external resources (like databases) to your app in a composable way. This new approach ensures external services are automatically started and stopped with your Fiber app.

Contrib module for Testcontainers: Start real backing services using Docker containers, managed directly from your app’s lifecycle in a programmable way.

A Simple Fiber App using Testcontainers

The application we are going to build is a simple Fiber app that uses a PostgreSQL container for persistence. It’s based on todo-app-with-auth-form Fiber recipe, but using the new Services API to start a PostgreSQL container, instead of an in-memory SQLite database.

Project Structure

.
├── app
| ├── dal
| | ├── todo.dal.go
| | ├── todo.dal_test.go
| | ├── user.dal.go
| | └── user.dal_test.go
| ├── routes
| | ├── auth.routes.go
| | └── todo.routes.go
| ├── services
| | ├── auth.service.go
| | └── todo.service.go
| └── types
| ├── auth.types.go
| ├── todo.types.go
| └── types.go
├── config
| ├── database
| | └── database.go
| ├── config.go
| ├── config_dev.go
| ├── env.go
| └── types.go
├── utils
| ├── jwt
| | └── jwt.go
| ├── middleware
| | └── authentication.go
| └── password
| └── password.go
├── .air.conf
├── .env
├── main.go
└── go.mod
└── go.sum

This app exposes several endpoints, for /users and /todos, and stores data in a PostgreSQL instance started using Testcontainers. Here’s how it’s put together.

Since the application is based on a recipe, we’ll skip the details of creating the routes, the services and the data access layer. You can find the complete code in the GitHub repository.

I’ll instead cover the details about how to use Testcontainers to start the PostgreSQL container, and how to use the Services API to manage the lifecycle of the container, so that the data access layer can use it without having to worry about the lifecycle of the container. Furthermore, I’ll cover how to use air to have a fast local development experience, and how to handle the graceful shutdown of the application, separating the configuration for production and local development.

In the config package, we have defined three files that will be used to configure the application, depending on a Go build tag. The first one, the config/types.go file, defines a struct to hold the application configuration and the cleanup functions for the services startup and shutdown.

package config

import (
"context"

"github.com/gofiber/fiber/v3"
)

// AppConfig holds the application configuration and cleanup functions
type AppConfig struct {
// App is the Fiber app instance.
App *fiber.App
// StartupCancel is the context cancel function for the services startup.
StartupCancel context.CancelFunc
// ShutdownCancel is the context cancel function for the services shutdown.
ShutdownCancel context.CancelFunc
}

The config.go file has the configuration for production environments:

//go:build !dev

package config

import (
"github.com/gofiber/fiber/v3"
)

// ConfigureApp configures the fiber app, including the database connection string.
// The connection string is retrieved from the environment variable DB, or using
// falls back to a default connection string targeting localhost if DB is not set.
func ConfigureApp(cfg fiber.Config) (*AppConfig, error) {
app := fiber.New(cfg)

db := getEnv("DB", "postgres://postgres:postgres@localhost:5432/postgres?sslmode=disable")
DB = db

return &AppConfig{
App: app,
StartupCancel: func() {}, // No-op for production
ShutdownCancel: func() {}, // No-op for production
}, nil
}

The ConfigureApp function is responsible for creating the Fiber app, and it’s used in the main.go file to initialize the application. By default, it will try to connect to a PostgreSQL instance, using the DB environment variable, falling back to a local PostgreSQL instance if the environment variable is not set. It also uses empty functions for the StartupCancel and ShutdownCancel fields, as we don’t need to cancel anything in production.

When running the app with go run main.go, the !dev tag applies by default, and the ConfigureApp function will be used to initialize the application. But the application will not start, as the connection to the PostgreSQL instance will fail.

go run main.go

2025/05/29 11:55:36 gofiber-services/config/database/database.go:18
[error] failed to initialize database, got error failed to connect to `user=postgres database=postgres`:
[::1]:5432 (localhost): dial error: dial tcp [::1]:5432: connect: connection refused
127.0.0.1:5432 (localhost): dial error: dial tcp 127.0.0.1:5432: connect: connection refused
panic: gorm open: failed to connect to `user=postgres database=postgres`:
[::1]:5432 (localhost): dial error: dial tcp [::1]:5432: connect: connection refused
127.0.0.1:5432 (localhost): dial error: dial tcp 127.0.0.1:5432: connect: connection refused

goroutine 1 [running]:
gofiber-services/config/database.Connect({0x105164a30?, 0x0?})
gofiber-services/config/database/database.go:33 +0x9c
main.main()
gofiber-services/main.go:34 +0xbc
exit status 2

Let’s fix that!

Step 1: Add the dependencies

First, we need to make sure we have the dependencies added to the go.mod file:

Note: Fiber v3 is still in development. To use Services, you’ll need to pull the main branch from GitHub:

go get github.com/gofiber/fiber/v3@main
go get github.com/gofiber/contrib/testcontainers
go get github.com/testcontainers/testcontainers-go
go get github.com/testcontainers/testcontainers-go/modules/postgres
go get gorm.io/driver/postgres

Step 2: Define a PostgreSQL Service using Testcontainers

To leverage the new Services API, we need to define a new service. We can implement the interface exposed by the Fiber app, as shown in the Services API docs, or simply use the Testcontainers contrib module to create a new service, as we are going to do next.

In the config/config_dev.go file, we define a new function to add a PostgreSQL container as a service to the Fiber application, using the Testcontainers contrib module. This file is using the dev build tag, so it will only be used when we start the application with air.

//go:build dev

package config

import (
"fmt"

"github.com/gofiber/contrib/testcontainers"
"github.com/gofiber/fiber/v3"
tc "github.com/testcontainers/testcontainers-go"
"github.com/testcontainers/testcontainers-go/modules/postgres"
)

// setupPostgres adds a Postgres service to the app, including custom configuration to allow
// reusing the same container while developing locally.
func setupPostgres(cfg *fiber.Config) (*testcontainers.ContainerService[*postgres.PostgresContainer], error) {
// Add the Postgres service to the app, including custom configuration.
srv, err := testcontainers.AddService(cfg, testcontainers.NewModuleConfig(
"postgres-db",
"postgres:16",
postgres.Run,
postgres.BasicWaitStrategies(),
postgres.WithDatabase("todos"),
postgres.WithUsername("postgres"),
postgres.WithPassword("postgres"),
tc.WithReuseByName("postgres-db-todos"),
))
if err != nil {
return nil, fmt.Errorf("add postgres service: %w", err)
}

return srv, nil
}

This creates a reusable Service that Fiber will automatically start and stop along with the app, and it’s registered as part of the fiber.Config struct that our application uses. This new service uses the postgres module from the testcontainers package to create the container. To learn more about the PostgreSQL module, please refer to the Testcontainers PostgreSQL module documentation.

Step 3: Initialize the Fiber App with the PostgreSQL Service

Our fiber.App is initialized in the config/config.go file, using the ConfigureApp function for production environments. For local development, instead, we need to initialize the fiber.App in the config/config_dev.go file, using a function with the same signature, but using the contrib module to add the PostgreSQL service to the app config.

We need to define a context provider for the services startup and shutdown, and add the PostgreSQL service to the app config, including custom configuration. The context provider is useful to define a cancel policy for the services startup and shutdown, so we can cancel the startup or shutdown if the context is canceled. If no context provider is defined, the default is to use the context.Background().

// ConfigureApp configures the fiber app, including the database connection string.
// The connection string is retrieved from the PostgreSQL service.
func ConfigureApp(cfg fiber.Config) (*AppConfig, error) {
// Define a context provider for the services startup.
// The timeout is applied when the context is actually used during startup.
startupCtx, startupCancel := context.WithCancel(context.Background())
var startupTimeoutCancel context.CancelFunc
cfg.ServicesStartupContextProvider = func() context.Context {
// Cancel any previous timeout context
if startupTimeoutCancel != nil {
startupTimeoutCancel()
}
// Create a new timeout context
ctx, cancel := context.WithTimeout(startupCtx, 10*time.Second)
startupTimeoutCancel = cancel
return ctx
}

// Define a context provider for the services shutdown.
// The timeout is applied when the context is actually used during shutdown.
shutdownCtx, shutdownCancel := context.WithCancel(context.Background())
var shutdownTimeoutCancel context.CancelFunc
cfg.ServicesShutdownContextProvider = func() context.Context {
// Cancel any previous timeout context
if shutdownTimeoutCancel != nil {
shutdownTimeoutCancel()
}
// Create a new timeout context
ctx, cancel := context.WithTimeout(shutdownCtx, 10*time.Second)
shutdownTimeoutCancel = cancel
return ctx
}

// Add the Postgres service to the app, including custom configuration.
srv, err := setupPostgres(&cfg)
if err != nil {
if startupTimeoutCancel != nil {
startupTimeoutCancel()
}
if shutdownTimeoutCancel != nil {
shutdownTimeoutCancel()
}
startupCancel()
shutdownCancel()
return nil, fmt.Errorf("add postgres service: %w", err)
}

app := fiber.New(cfg)

// Retrieve the Postgres service from the app, using the service key.
postgresSrv := fiber.MustGetService[*testcontainers.ContainerService[*postgres.PostgresContainer]](app.State(), srv.Key())

connString, err := postgresSrv.Container().ConnectionString(context.Background())
if err != nil {
if startupTimeoutCancel != nil {
startupTimeoutCancel()
}
if shutdownTimeoutCancel != nil {
shutdownTimeoutCancel()
}
startupCancel()
shutdownCancel()
return nil, fmt.Errorf("get postgres connection string: %w", err)
}

// Override the default database connection string with the one from the Testcontainers service.
DB = connString

return &AppConfig{
App: app,
StartupCancel: func() {
if startupTimeoutCancel != nil {
startupTimeoutCancel()
}
startupCancel()
},
ShutdownCancel: func() {
if shutdownTimeoutCancel != nil {
shutdownTimeoutCancel()
}
shutdownCancel()
},
}, nil
}

This function:

Defines a context provider for the services startup and shutdown, defining a timeout for the startup and shutdown when the context is actually used during startup and shutdown.

Adds the PostgreSQL service to the app config.

Retrieves the PostgreSQL service from the app’s state cache.

Uses the PostgreSQL service to obtain the connection string.

Overrides the default database connection string with the one from the Testcontainers service.

Returns the app config.

As a result, the fiber.App will be initialized with the PostgreSQL service, and it will be automatically started and stopped along with the app. The service representing the PostgreSQL container will be available as part of the application State, which we can easily retrieve from the app’s state cache. Please refer to the State Management docs for more details about how to use the State cache.

Step 4: Optimizing Local Dev with Container Reuse

Please note that, in the config/config_dev.go file, the tc.WithReuseByName option is used to reuse the same container while developing locally. This is useful to avoid having to wait for the database to be ready when the application is started.

Also, set TESTCONTAINERS_RYUK_DISABLED=true to prevent container cleanup between hot reloads. In the .env file, add the following:

TESTCONTAINERS_RYUK_DISABLED=true

Ryuk is the Testcontainers companion container that removes the Docker resources created by Testcontainers. For our use case, where we want to develop locally using air, we don’t want to remove the container when the application is hot-reloaded, so we disable Ryuk and give the container a name that will be reused across multiple runs of the application.

Step 5: Retrieve and Inject the PostgreSQL Connection

Now that the PostgreSQL service is part of the application, we can use it in our data access layer. The application has a global configuration variable that includes the database connection string, in the config/env.go file:

// DB returns the connection string of the database.
DB = getEnv("DB", "postgres://postgres:postgres@localhost:5432/postgres?sslmode=disable")

Retrieve the service from the app’s state and use it to connect:

// Add the PostgreSQL service to the app, including custom configuration.
srv, err := setupPostgres(&cfg)
if err != nil {
panic(err)
}

app := fiber.New(cfg)

// Retrieve the PostgreSQL service from the app, using the service key.
postgresSrv := fiber.MustGetService[*testcontainers.ContainerService[*postgres.PostgresContainer]](app.State(), srv.Key())

Here, the fiber.MustGetService function is used to retrieve a generic service from the State cache, and we need to cast it to the specific service type, in this case *testcontainers.ContainerService[*postgres.PostgresContainer].

testcontainers.ContainerService[T] is a generic service that wraps a testcontainers.Container instance. It’s provided by the github.com/gofiber/contrib/testcontainers module.

*postgres.PostgresContainer is the specific type of the container, in this case a PostgreSQL container. It’s provided by the github.com/testcontainers/testcontainers-go/modules/postgres module.

Once we have the postgresSrv service, we can use it to connect to the database. The ContainerService type provides a Container() method that unwraps the container from the service, so we are able to use the APIs provided by the testcontainers package to interact with the container. Finally, we pass the connection string to the global DB variable, so the data access layer can use it to connect to the database.

// Retrieve the PostgreSQL service from the app, using the service key.
postgresSrv := fiber.MustGetService[*testcontainers.ContainerService[*postgres.PostgresContainer]](app.State(), srv.Key())

connString, err := postgresSrv.Container().ConnectionString(context.Background())
if err != nil {
panic(err)
}

// Override the default database connection string with the one from the Testcontainers service.
config.DB = connString

database.Connect(config.DB)

Step 6: Live reload with air

Let’s add the build tag to the air command, so our local development experience is complete. We need to add the -tags dev flag to the command used to build the application. In .air.conf, add the -tags dev flag to ensure the development configuration is used:

cmd = "go build -tags dev -o ./todo-api ./main.go"

Step 7: Graceful Shutdown

Fiber automatically shuts down the application and all its services when the application is stopped. But air is not passing the right signal to the application to trigger the shutdown, so we need to do it manually.

In main.go, we need to listen from a different goroutine, and we need to notify the main thread when an interrupt or termination signal is sent. Let’s add this to the end of the main function:

// Listen from a different goroutine
go func() {
if err := app.Listen(fmt.Sprintf(":%v", config.PORT)); err != nil {
log.Panic(err)
}
}()

quit := make(chan os.Signal, 1) // Create channel to signify a signal being sent
signal.Notify(quit, os.Interrupt, syscall.SIGTERM) // When an interrupt or termination signal is sent, notify the channel

<-quit // This blocks the main thread until an interrupt is received
fmt.Println("Gracefully shutting down…")
err = app.Shutdown()
if err != nil {
log.Panic(err)
}

And we need to make sure air is passing the right signal to the application to trigger the shutdown. Add this to .air.conf to make it work:

# Send Interrupt signal before killing process (windows does not support this feature)
send_interrupt = true

With this, air will send an interrupt signal to the application when the application is stopped, so we can trigger the graceful shutdown when we stop the application with air.

Seeing it in action

Now, we can start the application with air, and it will start the PostgreSQL container automatically, and it will handle the graceful shutdown when we stop the application. Let’s see it in action!

Let’s start the application with air. You should see output like this in the logs:

air

`.air.conf` will be deprecated soon, recommend using `.air.toml`.

__ _ ___
/ / | | | |_)
/_/– |_| |_| _ v1.61.7, built with Go go1.24.1

mkdir gofiber-services/tmp
watching .
watching app
watching app/dal
watching app/routes
watching app/services
watching app/types
watching config
watching config/database
!exclude tmp
watching utils
watching utils/jwt
watching utils/middleware
watching utils/password
building…
running…
[DATABASE]::CONNECTED

2025/05/29 07:33:19 gofiber-services/config/database/database.go:44
[89.614ms] [rows:1] SELECT count(*) FROM information_schema.tables WHERE table_schema = CURRENT_SCHEMA() AND table_name = 'users' AND table_type = 'BASE TABLE'

2025/05/29 07:33:19 gofiber-services/config/database/database.go:44

[31.446ms] [rows:0] CREATE TABLE "users" ("id" bigserial,"created_at" timestamptz,"updated_at" timestamptz,"deleted_at" timestamptz,"name" text,"email" text NOT NULL,"password" text NOT NULL,PRIMARY KEY ("id"))

2025/05/29 07:33:19 gofiber-services/config/database/database.go:44
[28.312ms] [rows:0] CREATE UNIQUE INDEX IF NOT EXISTS "idx_users_email" ON "users" ("email")

2025/05/29 07:33:19 gofiber-services/config/database/database.go:44
[28.391ms] [rows:0] CREATE INDEX IF NOT EXISTS "idx_users_deleted_at" ON "users" ("deleted_at")

2025/05/29 07:33:19 gofiber-services/config/database/database.go:44
[28.920ms] [rows:1] SELECT count(*) FROM information_schema.tables WHERE table_schema = CURRENT_SCHEMA() AND table_name = 'todos' AND table_type = 'BASE TABLE'

2025/05/29 07:33:19 gofiber-services/config/database/database.go:44
[29.659ms] [rows:0] CREATE TABLE "todos" ("id" bigserial,"created_at" timestamptz,"updated_at" timestamptz,"deleted_at" timestamptz,"task" text NOT NULL,"completed" boolean DEFAULT false,"user" bigint,PRIMARY KEY ("id"),CONSTRAINT "fk_users_todos" FOREIGN KEY ("user") REFERENCES "users"("id"))

2025/05/29 07:33:19 gofiber-services/config/database/database.go:44
[27.900ms] [rows:0] CREATE INDEX IF NOT EXISTS "idx_todos_deleted_at" ON "todos" ("deleted_at")

_______ __
/ ____(_) /_ ___ _____
/ /_ / / __ / _ / ___/
/ __/ / / /_/ / __/ /
/_/ /_/_.___/___/_/ v3.0.0-beta.4
————————————————–
INFO Server started on: http://127.0.0.1:8000 (bound on host 0.0.0.0 and port 8000)
INFO Services: 1
INFO [ RUNNING ] postgres-db (using testcontainers-go)
INFO Total handlers count: 10
INFO Prefork: Disabled
INFO PID: 36210
INFO Total process count: 1

If we open a terminal and check the running containers, we see the PostgreSQL container is running:

docker ps
CONTAINER ID IMAGE COMMAND CREATED STATUS PORTS NAMES
8dc70e1124da postgres:16 "docker-entrypoint.s…" 2 minutes ago Up 2 minutes 127.0.0.1:32911->5432/tcp postgres-db-todos

Notice two important things:

the container name is postgres-db-todos, that’s the name we gave to the container in the setupPostgres function.

the container is mapping the standard PostgreSQL port 5432 to a dynamically assigned host port 32911 in the host. This is a Testcontainers feature to avoid port conflicts when running multiple containers of the same type, making the execution deterministic and reliable. To learn more about this, please refer to the Testcontainers documentation.

Fast Dev Loop

If we now stop the application with air, we see the container is stopped, thanks to the graceful shutdown implemented in the application.

But, best of all, if you let air handle reloads, and you update the application, air will hot-reload the application, and the PostgreSQL container will be reused, so we do not need to wait for it to be started! Sweet!

Check out the full example in the GitHub repository.

Integration Tests

The application includes integration tests for the data access layer, in the app/dal folder. They use Testcontainers to create the database and test it in isolation! Run the tests with:

go test -v ./app/dal

In less than 10 seconds, we have a clean database and our persistence layer is verified to behave as expected!

Thanks to Testcontainers, tests can run alongside the application, each using its own isolated container with random ports.

Conclusion

Fiber v3’s Services abstraction combined with Testcontainers unlocks a simple, production-like local dev experience. No more hand-crafted scripts, no more out-of-sync environments — just Go code that runs clean everywhere, providing a “Clone & Run” experience. Besides that, using Testcontainers offers a unified developer experience for both integration testing and local development, a great way to test your application cleanly and deterministically—with real dependencies.

Because we’ve separated configuration for production and local development, the same codebase can cleanly support both environments—without polluting production with development-only tools or dependencies.

What’s next?

Check the different testcontainers modules in the Testcontainers Modules Catalog.

Check the Testcontainers Go repository for more information about the Testcontainers Go library.

Try Testcontainers Cloud to run the Service containers in a reliable manner, locally and in your CI.

Have feedback or want to share how you’re using Fiber v3? Drop a comment or open an issue in the GitHub repo!

Quelle: https://blog.docker.com/feed/

Powering Local AI Together: Docker Model Runner on Hugging Face

At Docker, we always believe in the power of community and collaboration. It reminds me of what Robert Axelrod said in The Evolution of Cooperation: “The key to doing well lies not in overcoming others, but in eliciting their cooperation.” And what better place for Docker Model Runner to foster this cooperation than at Hugging Face, the well-known gathering place for the AI, ML, and data science community. We’re excited to share that developers can use Docker Model Runner as the local inference engine for running models and filtering for Model Runner supported models on Hugging Face!

Of course, Docker Model Runner has supported pulling models directly from Hugging Face repositories for some time now:

docker model pull hf.co/bartowski/Llama-3.2-1B-Instruct-GGUF

Local Inference with Model Runner on Hugging Face

But so far, it has been cumbersome to rummage through the vast collection of models available at Hugging Face and find repositories that work with Docker Model Runner. But not anymore! Hugging Face now supports Docker as a Local Apps provider, so you can select it as the local inference engine to run models. And you don’t even have to configure it in your account; it is already selected as a default Local Apps provider for all users.

Figure 1: Docker Model Runner is a new inference engine available in Hugging Face for running local models.

This makes running a model directly from HuggingFace as easy as visiting a repository page, selecting Docker Model Runner as the Local Apps provider, and executing the provided snippet:

Figure 2: Running models from Hugging Face using Docker Model Runner is now a breeze!

You can even get the list of all models supported by Docker Model Runner (meaning repositories containing models in GGUF format) through a search filter!

Figure 3: Easily discover models supported by Docker Model Runner with a search filter in Hugging Face

We are very happy that HuggingFace is now a first-class source for Docker Model Runner models, making model discovery as routine as pulling a container image. It’s a small change, but one that quietly shortens the distance between research and runnable code.

Conclusion

With Docker Model Runner now directly integrated on Hugging Face, running local inference just got a whole lot more convenient. Developers can filter for compatible models, pull them with a single command, and get the run command directly from the Hugging Face UI using Docker Model Runner as the Local Apps engine. This tighter integration makes model discovery and execution feel as seamless as pulling a container image. 

And coming back to Robert Axelrod and The Evolution of Cooperation, Docker Model Runner has been an open-source project from the very beginning, and we are interested in building it together with the community. So head over to GitHub, check out our repositories, log issues and suggestions, and let’s keep on building the future together.

Learn more

Sign up for the Docker Offload Beta and get 300 free minutes to run resource-intensive models in the cloud, right from your local workflow.

Get an inside look at the design architecture of the Docker Model Runner. 

Explore the story behind our model distribution specification

Read our quickstart guide to Docker Model Runner.

Find documentation for Model Runner.

Visit our new AI solution page

New to Docker? Create an account. 

Quelle: https://blog.docker.com/feed/