Introducing a new dashboard creation experience in Cloud Monitoring

Having good observability is vital to the health of your cloud infrastructure and applications, and a key element to using that information effectively is being able to create dashboards with relevant metrics.Today we are announcing a new dashboard creation experience from Cloud Monitoring that allows you to generate a greater variety of visualization types, introduces better flexibility for dashboard layouts, and makes data manipulation easier so you can create dashboards that better fit your needs.So, what’s new with the dashboard?More flexibilityWith this update Cloud Monitoring now supports a mosaic layout with drag-n-drop charts that are easier to resize. Charts can be arranged in whatever position is most convenient for you with just a few clicks of your mouse. We also increased the total number of charts from 25 to 40 per dashboard.New component typesThree new component types are now available in the dashboard creation UI: gauge, scorecard and text. These new types join the existing four: line, stacked area, stacked bar, and heatmap.On a gauge chart you can display a single value for time-series data to assess the performance of that value. For example, the chart below displays how much of the CPU is being utilized by all VMs averaged across the entire project. You can use other aggregation types like Min and Max. You can also specify the warning or danger threshold ranges for the chart to change colors.The scorecard chart also allows you to display a single value. However, unlike a gauge chart, it tracks the value over time:In a text component, you can use markdown to link to another dashboard, a playbook, an incident page or a specific instance ID so you can get yourself around faster. For example, to add a link to the Google Cloud Console, the markdown is [Google Cloud Platform] (https://console.cloud.google.com/) as in the screenshot below. You can also place multiple text charts as line breaks to separate sections on your dashboard.Advanced visualization configurationsIn addition to these new features, we are introducing an advanced configuration capability and adding Monitoring Query Language (MQL) support for almost all visualization types. Cloud Monitoring’s basic mode has settings that should capture most of your needs so you can visualize your time series without requiring any complex configuration. If your data visualization requires more than a basic configuration, you can use advanced mode, which supports custom aggregations and multiple time series on one chart. Using MQL, you can perform calculations between metrics to generate a ratio of time-series or apply other advanced queries to reveal deeper insights from your data.Backwards compatibilityWith all these updates, you may be wondering if you’ll still be able to view and edit all your previous dashboards with the new editor? The answer is yes. Additionally, the new editor allows you to perform much more advanced data processing, for example preprocessing metrics of the distribution value type (a bucket of numeric values) into a single numeric value within one simple click.These exciting new dashboard creation features are available by default today. Just go to the Google Cloud Console,  navigate to the monitoring dashboard section and try it out! We can’t wait to hear from you about your experience and feedback!Related ArticleHigh-resolution user-defined metrics in Cloud MonitoringNow you can write custom and Prometheus metrics for Cloud Monitoring every 10 secondsRead Article
Quelle: Google Cloud Platform

How to automatically scale your machine learning predictions

Historically, one of the biggest challenges in the data science field is that many models don’t make it past the experimental stage. As the field has matured, we’ve seen MLOps processes and tooling emerge that have increased project velocity and reproducibility. While we’ve got a ways to go, more models than ever before are crossing the finish line into production.That leads to the next question for data scientists: how will my model scale in production? In this blog post, we will discuss how to use a managed prediction service, Google Cloud’s AI Platform Prediction, to address the challenges of scaling inference workloads.Inference WorkloadsIn a machine learning project, there are two primary workloads: training and inference. Training is the process of building a model by learning from data samples, and inference is the process of using that model to make a prediction with new data.Typically, training workloads are not only long-running, but also sporadic. If you’re using a feed-forward neural network, a training workload will include multiple forward and backward passes through the data, updating weights and biases to minimize errors. In some cases, the model created from this process will be used in production for quite some time, and in others, new training workloads might be triggered frequently to retrain the model with new data.On the other hand, an inference workload consists of a high volume of smaller transactions. An inference operation essentially is a forward pass through a neural network: starting with the inputs, perform matrix multiplication through each layer and produce an output. The workload characteristics will be highly correlated with how the inference is used in a production application. For example, in an e-commerce site, each request to the product catalog could trigger an inference operation to provide product recommendations, and the traffic served will peak and lull with the e-commerce traffic.Balancing Cost and LatencyThe primary challenge for inference workloads is balancing cost with latency. It’s a common requirement for production workloads to have latency < 100 milliseconds for a smooth user experience. On top of that, application usage can be spiky and unpredictable, but the latency requirements don’t go away during times of intense use.To ensure that latency requirements are always met, it might be tempting to provision an abundance of nodes. The downside of overprovisioning is that many nodes will not be fully utilized, leading to unnecessarily high costs.On the other hand, underprovisioning will reduce cost but lead to missing latency targets due to servers being overloaded. Even worse, users may experience errors if timeouts or dropped packets occur.It gets even trickier when we consider that many organizations are using machine learning in multiple applications. Each application has a different usage profile, and each application might be using a different model with unique performance characteristics. For example, in this paper, Facebook describes the diverse resource requirements of models they are serving for natural language, recommendation, and computer vision.AI Platform Prediction ServiceThe AI Platform Prediction service allows you to easily host your trained machine learning models in the cloud and automatically scale them. Your users can make predictions using the hosted models with input data. The service supports both online prediction, when timely inference is required, and batch prediction, for processing large jobs in bulk.To deploy your trained model, you start by creating a “model”, which is essentially a package for related model artifacts. Within that model, you then create a “version”, which consists of the model file and configuration options such as the machine type, framework, region, scaling, and more. You can even use a custom container with the service for more control over the framework, data processing, and dependencies.To make predictions with the service, you can use the REST API, command line, or a client library. For online prediction, you specify the project, model, and version, and then pass in a formatted set of instances as described in the documentation.Introduction to scaling optionsWhen defining a version, you can specify the number of prediction nodes to use with the manualScaling.nodes option. By manually setting the number of nodes, the nodes will always be running, whether or not they are serving predictions. You can adjust this number by creating a new model version with a different configuration.You can also configure the service to automatically scale. The service will increase nodes as traffic increases, and remove them as it decreases. Auto-scaling can be turned on with the autoScaling.minNodes option. You can also set a maximum number of nodes with autoScaling.maxNodes.  These settings are key to improving utilization and reducing costs, enabling the number of nodes to adjust within the constraints that you specify.Continuous availability across zones can be achieved with multi-zone scaling, to address potential outages in one of the zones. Nodes will be distributed across zones in the specified region automatically when using auto-scaling with at least 1 node or manual scaling with at least 2 nodes.GPU SupportWhen defining a model version, you need to specify a machine type and a GPU accelerator, which is optional. Each virtual machine instance can offload operations to the attached GPU, which can significantly improve performance. For more information on supported GPUs in Google Cloud, see this blog post: Reduce costs and increase throughput with NVIDIA T4s, P100s, V100s.The AI Platform Prediction service has recently introduced GPU support for the auto-scaling feature. The service will look at both CPU and GPU utilization to determine if scaling up or down is required.How does auto-scaling work?The online prediction service scales the number of nodes it uses, to maximize the number of requests it can handle without introducing too much latency.  To do that, the service:Allocates some nodes (the number can be configured by setting the minNodes option on your model version) the first time you request predictions. Automatically scales up the model version’s deployment as soon as you need it (traffic goes up).Automatically scales it back down to save cost when you don’t (traffic goes down).Keeps at least a minimum number of nodes (by setting the minNodes option on your model version) ready to handle requests even when there are none to handle.Today, the prediction service supports auto-scaling based on two metrics: CPU utilization and GPU duty cycle. Both metrics are measured by taking the average utilization of each model. The user can specify the target value of these two metrics in the CreateVersion API (see examples below);  the target fields specify the target value for the given metric; once the real metric deviates from the target by a certain amount of time, the node count adjusts up or down to match.How to enable CPU auto-scaling in a new modelBelow is an example of creating a version with auto-scaling based on a CPU metric. In this example, the CPU usage target is set to 60% with the minimum nodes set to 1 and maximum nodes set to 3. Once the real CPU usage exceeds 60%, the node count will increase (to a maximum of 3).  Once the real CPU usage goes below 60% for a certain amount of time, the node count will decrease (to a minimum of 1).  If no target value is set for a metric, it will be set to the default value of 60%.REGION=us-central1using gcloud: gcloud beta ai-platform versions create v1 –model ${MODEL}  –region ${REGION}  –accelerator=count=1,type=nvidia-tesla-t4   –metric-targets cpu-usage=60  –min-nodes 1 –max-nodes 3  –runtime-version 2.3 –origin gs://<your model path> –machine-type n1-standard-4 –framework tensorflowcurl example:curl -k -H Content-Type:application/json -H “Authorization: Bearer $(gcloud auth print-access-token)” https://$REGION-ml.googleapis.com/v1/projects/$PROJECT/models/${MODEL}/versions -d@./version.jsonversion.jsonUsing GPUs Today, the online prediction service supports GPU-based prediction, which can significantly accelerate the speed of prediction. Previously, the user needed to manually specify the number of GPUs for each model. This configuration had several limitations:To give an accurate estimate of the GPU number, users would need to know the maximum throughput one GPU could process for certain machine types. The traffic pattern for models may change over time, so the original GPU number may not be optimal. For example, high traffic volume may cause resources to be exhausted, leading to timeouts and dropped requests, while low traffic volume may lead to idle resources and increased costs.To address these limitations, the AI Platform Prediction Service has introduced GPU based auto-scaling.Below is an example of creating a version with auto-scaling based on both GPU and CPU metrics. In this example, the CPU usage target is set to 50%, GPU duty cycle is 60%, minimum nodes are 1, and maximum nodes are 3. When the real CPU usage exceeds 60% or the GPU duty cycle exceeds 60% for a certain amount of time, the node count will increase (to a maximum of 3). When the real CPU usage stays below 50% or GPU duty cycle stays below 60% for a certain amount of time, the node count will decrease (to a minimum of 1).  If no target value is set for a metric, it will be set to the default value of 60%. acceleratorConfig.count is the number of GPUs per node. REGION=us-central1gcloud Example:gcloud beta ai-platform versions create v1 –model ${MODEL}  –region ${REGION}  –accelerator=count=1,type=nvidia-tesla-t4   –metric-targets cpu-usage=50  –metric-targets gpu-duty-cycle=60  –min-nodes 1 –max-nodes 3  –runtime-version 2.3 –origin gs://<your model path> –machine-type n1-standard-4 –framework tensorflowCurl Example: curl -k -H Content-Type:application/json -H “Authorization: Bearer $(gcloud auth print-access-token)” https://$REGION-ml.googleapis.com/v1/projects/$PROJECT/models/${MODEL}/versions -d@./version.jsonversion.jsonConsiderations when using automatic scalingAutomatic scaling for online prediction can help you serve varying rates of prediction requests while minimizing costs. However, it is not ideal for all situations. The service may not be able to bring nodes online fast enough to keep up with large spikes of request traffic. If you’ve configured the service to use GPUs, also keep in mind that provisioning new GPU nodes takes much longer than CPU nodes. If your traffic regularly has steep spikes, and if reliably low latency is important to your application, you may want to consider setting a low threshold to spin up new machines early, setting minNodes to a sufficiently high value, or using manual scaling.It is recommended to load test your model before putting it in production. Using the load test can help tune the minimum number of nodes and threshold values to ensure your model can scale to your load. The minimum number of nodes must be at least 2 for the model version to be covered by the AI Platform Training and Prediction SLA.The AI Platform Prediction Service has default quotas enabled for service requests, such as the number of predictions within a given period, as well as CPU and GPU resource utilization. You can find more details on the specific limits in the documentation. If you need to update these limits, you can apply for a quota increase online or through your support channel.Wrapping upIn this blog post, we’ve shown how the AI Platform Prediction service can simply and cost-effectively scale to match your workloads. You can now configure auto-scaling for GPUs to accelerate inference without overprovisioning.If you’d like to try out the service yourself, we have a sample notebook which demonstrates how to deploy a model and configure auto-scaling settings. The AI Platform Prediction documentation also provides a thorough walkthrough of how to use the service and its configuration options.Related ArticleAI Platform Prediction goes GA with improved reliability & ML workflow integrationAI Platform Prediction goes GA with enhanced reliability & ML workflow integration.Read Article
Quelle: Google Cloud Platform

Better together: Expanding the Confidential Computing ecosystem

Core to our goal of delivering security innovation is the ability to offer powerful features as part of our cloud infrastructure that are easy for customers to implement and use. Confidential computing can provide a flexible, isolated, hardware-based trusted execution environment, allowing adopters to protect their data and sensitive code against malicious access and memory snooping while data is in use. Today, we are happy to announce that we have completed the rollout of Confidential VMs to general availability in nine regions. Our partners have played a huge part in this journey. They have been critical in establishing an ecosystem that aims to make Confidential Computing ubiquitous across mobile, edge, and cloud. We spoke to Raghu Nambiar from AMD, Mark Shuttleworth from Canonical, Burzin Patel from HashiCorp, Mike Bursell from Red Hat, Dr. Thomas Di Giacomo from SUSE, and Solomon Cates from Thales. Here are the excerpts.Raghu Nambiar, Corporate Vice President, Data Center Ecosystems, AMDConfidential Computing is a relatively new concept with a goal to encrypt data in use in the main memory of the system, while still offering high performance. Confidential Computing addresses key security concerns many organizations have today in migrating their sensitive applications to the cloud and safeguarding their most valuable information while in-use by their applications. It wouldn’t be a surprise if in a few years, all virtual machines (VMs) in the cloud are Confidential VMs. How did you approach confidential computing?The 2nd Gen AMD EPYC processors used by Google for its Confidential VMs uses an advanced security feature called Secure Encrypted Virtualization (SEV). SEV is available on all AMD EPYC processors and, when enabled by an OEM or cloud provider, it encrypts the data-in-use on a virtual machine, helping to keep it isolated from other guests, the hypervisor and even the system administrators. The SEV feature works by providing each virtual machine with an encryption key that isolates guests and the hypervisor from one another, and these keys are created, distributed, and managed by the AMD Secure Processor. The benefit of SEV is that customers don’t have to re-write or re-compile applications to access these security features With SEV-enabled Confidential VMs, customers have better control of their data, enabling them to better secure their workloads and collaborate in the cloud with confidence. What kind of performance can we expect?What’s really impressive about Google Confidential VMs powered by AMD EPYC processors with SEV enabled is that it offers performance close to that of non-confidential VMs. AMD and Google’s engineering teams ran a set of well-known application benchmarks for relational database, graph database, webserver as well as Computational Fluid Dynamics and popular simulation workloads in FSI on Google Confidential VMs and Google’s N2D VMs, of which Confidential VMs are based on. The difference in using SEV versus not using SEV on the applications listed, was measured to be just a small overhead in application performance. Any final thoughts?Confidential Computing is a game-changer for computing in the public cloud as it addresses important security concerns many organizations have about migrating their sensitive applications to the cloud. Google Confidential VMs, with AMD EPYC processors and SEV, strengthen VM isolation and data-in-use protection helping customers safeguard their most valuable information while in-use by applications in the public cloud. This is a paradigm shift and we’re excited to work with Google to make this possible.Mark Shuttleworth, CEO, CanonicalConfidential Computing directly addresses the question of trust between cloud providers and their customers, with guarantees of data security for guest machines enforced by the underlying hardware of the cloud. With Google’s addition of Confidential Computing to multiple regions, customers gain a secure substrate for large-scale computation with sensitive data and a path to regulatory compliance for new classes of workload on the cloud.What value does the partnership between GCP and Canonical create?Close technical collaboration between Google and Canonical ensures that Ubuntu is optimized for GCP operations at scale. Confidential Computing requires multiple pieces to align and we are delighted to offer full Ubuntu support for this crucial capability at the outset with Google.How will this benefit organizations?Organizations gain peace of mind that large classes of attack on cloud guests are mitigated by Confidential Computing. Memory encryption with hardware key management and attestation prevents a compromise of the hypervisor becoming a compromise of guest data or integrity. Customers can now consider GCP as secure as private infrastructure for a much wider class of workloads. Canonical Ubuntu fully supports Confidential Computing on Google Cloud, providing a new level of trust in public cloud infrastructure.Burzin Patel, Vice President of Global Alliances, HashiCorpHashiCorp Vault enables teams to securely store and tightly control access to tokens, passwords, certificates, and encryption keys for protecting machines and applications. When combined with GCP’s Confidential Computing capabilities, confidentiality can be extended to the HashiCorp Vault server’s system memory, ensuring that malware, malicious privileged users, or zero days on the host cannot compromise data. Why did you choose Google Cloud as a partner for Confidential Computing?Google Cloud’s Confidential Computing nodes operate exactly like regular compute nodes making the offering very easy to use. We were able to take our existing Vault binary and host it on the Confidential Computing node to leverage the confidential computing benefits. No code or configuration changes were needed.What is the gap confidential computing solves specifically for your customers?Vault stores all of its sensitive data in memory and is stored as plaintext. In the past there were no easy solutions to keep this runtime memory protected. However, with the availability of confidential computing nodes, the data in memory is protected via encryption by utilizing the security features of modern CPUs together with confidential computing services.Any use-cases that are top of mind for you when it comes to confidential computing?HashiCorp Vault allows organizations to eliminate system complexity where any mistakes or misconfiguration could lead to a breach or data-leakage that in turn can halt operations and erode trust across customers. Together, HashiCorp Vault and Google Cloud’s Confidential Computing help organizations manage their most critical secrets and assets. This includes the entire secret lifecycle, from the initial creation, to sharing and distribution, and to the revocation or expiration of credentials and secrets.Any final thoughts?Security is the most critical element for enterprise customers looking to adopt the cloud. Customers are looking for a flexible solution that is robust and highly secure. The combination of HashiCorp Vault and Google Cloud Confidential Computing provide users a critical solution for their enterprise-wide cloud security needs.Mike Bursell, Chief Security Architect, Red HatAs more businesses and organizations move to the cloud, security remains a top priority. Maintaining the same levels of confidentiality that their partners, customers, regulators and shareholders expect across private and public clouds is vital. Red Hat believes that Confidential Computing is one key approach to extend security from on-premises deployments into the cloud, and Google’s announcement of Confidential VMs is an example of how customers can further secure their applications and workloads.What has Red Hat’s approach been to Confidential Computing?Red Hat Enterprise Linux is an enterprise operating system designed to handle the needs of customers across on-premises and hybrid cloud environments. Customers need stability, predictability and management solutions that scale with their workloads, which is why we enable Confidential Computing solutions in our product portfolio. That way customers don’t have to worry about migration costs. How will confidential computing impact cloud adoption?Often, customers with regulatory concerns have greater concerns about shifting into a truly open hybrid cloud environment, as they cannot expose their more sensitive data and applications outside their own data centers. Red Hat believes Confidential Computing can help them make this shift, expanding their opportunities for digital transformation, allowing them to provide quicker, more scalable and more competitive solutions, while maintaining the data privacy and protection assurances that their customers expect and require. As organizations balance the need for security with the opportunities presented by the cloud, Confidential Computing provides new ways to safely and securely embrace those opportunities.Dr. Thomas Di Giacomo, Chief Technology & Product Officer, SUSEConfidential VMs is a cloud industry security game-changer. This offering for our joint cloud customers expands sensitive data protection and compliance requirements, especially for regulated industries. The best part is you can run legacy and cloud-native workloads securely without any refactoring to the underlying application code, simplifying the transition to the cloud, all with little to no performance penalty.How has SUSE been working with Google Cloud and AMD?Working closely with AMD, SUSE added upstream support for AMD EPYC SEV processor to the Linux Kernel and was the first to announce Confidential VM support in SUSE Linux Enterprise Server 15 SP1 available in the Google Cloud Marketplace. These innovations allow our customers to take advantage of the scale and cost savings of Google Cloud Platform and the mission-critical manageability, compliance, and support from the #1 rated Linux support team, SUSE.How do you foresee this benefiting organizations?Confidential VMs will help tremendously accelerate our customer migrations to the cloud on their hybrid cloud digital transformation journey. This technology opens up new areas of migration opportunities for legacy on-premises workloads, custom applications as well as Private and Government workloads that require the utmost security and compliance requirements once considered not cloud-ready in the past.Solomon Cates, Principal Technologist, CTO Office, ThalesConfidential computing is a fundamental step in providing users control of their data as it goes “off premise” into cloud environments and all the way to the edge. Customers can essentially transition their workloads to the cloud with high assurance that includes auditable “proof” of control. And, architecturally, it opens up so many possibilities for customers.Many enterprises have significant trepidation when it comes to security in the cloud. Confidential computing helps alleviate that. For example, security professionals no longer have to worry about a cloud provider seeing or using their data.How does Confidential Computing help your customers?Confidential computing solves an issue that enterprises specifically have around trust in memory—namely that memory cannot be seen or used by a cloud provider. Three key use cases that can immediately benefit from this technology include edge computing, external key management and in-memory secrets.What made you partner with Google Cloud?Thales and Google Cloud have collaborated across a number of areas including cloud, security, Kubernetes containers and new technologies such as Continuous Access Evaluation Protocol (CAEP).  At the core, we both strive to offer customers the best option for strong security and privacy protection.Any final thoughts?From both a strategic and technical standpoint, Thales and Google Cloud have a shared vision that focuses on customer control and security of their data in the cloud. Through our work around confidential computing, we will bring new possibilities for securing workloads at the edge. Together, we are making it possible for enterprises to put their trust in the cloud with more sovereign control over their data security.We thank our hardware and software partners for their continuous innovation in this space. Confidential Computing can help organizations ensure the confidentiality of sensitive, business critical information and workloads, and we are excited to see the possibilities this technology will open up for your organization.
Quelle: Google Cloud Platform

Dataproc Metastore: Fully managed Hive metastore now in public preview

The Apache Hive metastore service has become a building block for data lakes that utilize the diverse world of open-source software, such as Apache Spark and Presto. We’re launching the Dataproc Metastore into public preview today, so these powerful tools are now easy to use by any Google Cloud customer with fewer distractions and delays. The Dataproc Metastore is a fully managed, highly available, auto-healing, open-source Apache Hive metastore service that simplifies technical metadata management for customers building data lakes on Google Cloud. And for a limited time only, it’s free! This launch exemplifies our commitment to fast-paced innovation and delivery, combining cloud technology with open source, and closely follows our announcement of the private preview in June of this year. Before we go into more detail, we would also like to thank our private preview users for testing and providing rich feedback—the launch today has been made better with your valuable input.  What does this mean for my data lake?If you are familiar with the Hive Metastore, you likely already know it is a critical component of many data lakes because it acts as a central repository of metadata. In fact, a whole ecosystem of tools, open-source and otherwise, are built around the Hive Metastore, some of which this diagram illustrates.The Dataproc Metastore is a serverless Hive Metastore that unlocks several key data lake use cases in Google Cloud, including:Many ephemeral Dataproc clusters can utilize a Dataproc Metastore at the same time, allowing many users of open-source tools, such as Spark , Hive, and Presto, to access consistent metadata at the same time. Unifying metadata between open-source tables and Data Fusion, so ETL and ELT on those tables is easier and code-free.Tying together metadata into a central store so cloud-natiove services like Dataproc can seamlessly interoperate with other open-source tools or partner technologies.The Dataproc Metastore now means your data lake is easier to manage, more unified, and increasingly serverless for fewer distractions. New features in Dataproc MetastoreThroughout the private preview period, and since our initial announcement in June, we have added many new features to the Dataproc Metastore. Several of these new features are launching with this release today.IAM and Kerberos—Fine-grained Cloud Identity and Access Management (Cloud IAM) support, along with out-of-the-box support for Kerberos and other security tools such as Apache Ranger.Import/export—Metadata can be imported and exported to enable bidirectional integration with and migration from other Hive Metastores, such as those on-premises.VPC-SC—Support for Google Cloud VPC Service Controls to mitigate data exfiltration risks.ACID transactions—Dataproc Metastore supports ACID transactions using Hive’s ACID transaction capabilities.Cloud Monitoring integration—Logging and monitoring of Dataproc Metastore instances seamlessly inside of Cloud Monitoring and Logging.Broad Dataproc compatibility—Compatible with a broad range of Dataproc releases, including the Dataproc 2.0 preview release with Spark, Hadoop, and Hive 3.x. Service updates—You can transactionally update elements of the hive Metastore service including configurations, tiers, ports, maintenance window, and more.Cloud Console and Cloud SDK—Dataproc Metastore supports both the Cloud Console and the Cloud SDK command line (gcloud beta metastore).We will continue to move quickly to get the Dataproc Metastore into general availability while also adding highly requested features such as customer-managed encryption keys.Dataproc Metastore public preview pricingDuring the public preview period, which starts today and lasts until GA, the Dataproc Metastore will be offered at a 100% discount. This discount is intended for you to use and test the technology without incurring costs for the testing. The Dataproc Metastore is offered in two service tiers, developer and enterprise, each of which offer different features, service levels, and pricing because they are intended for different use cases.This pricing allows you to create developer instances for quick testing and prototyping without needing to test against your production environment or create multiple copies of your production database. The enterprise tier is intended for production deployments that require high availability, performance, and stability. Future releases will also incorporate features targeted at specific tiers, such as Data Catalog integration.You can find more information in the pricing documentation for Dataproc Metastore.Serverless open sourceThe Dataproc Metastore is a good example of how the best of Google Cloud infrastructure can be used to run managed open source. As a result of innovations in how we run, secure, and scale the Hive Metastore, we have been able to make the Dataproc Metastore serverless. This launch is the beginning of how we’re reshaping managed open source for data analytics in cloud. As a team passionate about both cloud and open source, it is our goal to bring the very things that make the Hive Metastore uniquely great, including no infrastructure to manage, automated scalability, enhanced hands-off high availability, and easier pricing to other popular open source components in the future. Get startedAny Google Cloud customer can use the Dataproc Metastore, for free during preview, starting today. You can follow the quickstart guide or review the full documentation for more information on how to get started.Related ArticleDataproc Hub makes notebooks easier to use for machine learningDataproc Hub, now generally available, makes it easy to use open source, notebook-based machine learning on Google Cloud, powered by Spark.Read Article
Quelle: Google Cloud Platform

Migrating apps to containers? Why Migrate for Anthos is your best bet

Most of us know that there is real value to be had in modernizing workloads, and there are plenty of customer success stories to showcase that. But, even though the value in modernizing workloads to Kubernetes has been well documented, there are still plenty of businesses that haven’t been able to make the jump. Reluctant businesses say that manually modernizing traditional workloads running on VMs into containers is a very complex/challenging project that involves significant time and costs. For instance, some proposals to refactor a single small to medium application can be $100,000 or more. Multiply that by 500 applications, and that’s a $50,000,000 project! To say nothing of how long it might take. Moreover, for some workloads (e.g., from third parties or ISVs) there is no access to the source code, precluding manual containerization altogether. As a result, these become blockers for many enterprises in their data center migration, especially for customers that don’t just want to lift and shift their important workloads. However, there’s an alternative. By leveraging automated containerization technologies and the right solution partners, you can cut the time and cost of a modernization project by as much as 90%, while enjoying most of the benefits that come with manual refactoring. Given that, using tools like Migrate for Anthos is a uniquely smart, efficient way to modernize traditional applications away from virtual machines and into native containers. Our unique automation approach extracts critical application elements from a VM so you can easily insert those elements into containers running on Google Kubernetes Engine (GKE), without artifacts like guest OS layers that VMs need but that are unnecessary for containers. For example, Migrate for Anthos automatically generates a container image, a Dockerfile for day-2 image updates and application revisions, Kubernetes deployment YAMLs and (where relevant) a persistent data volume onto which the application data files and persistent state are copied. This automated, intelligent extraction is significantly faster and easier than manually modernizing the app, especially when source code or deep application rebuild knowledge is unavailable. That’s why using Migrate for Anthos is one of the most scalable approaches to modernize applications with Kubernetes orchestration, image-based container management and DevOps automation.One of our customers, British newspaper The Telegraph, used Migrate for Anthos to accelerate its modernization and avoid the blockers we mentioned above. Here’s what Andrew Gregory, Systems Engineer Manager and Amit Lalani, Sr. Systems Engineer, had to say about the effort: “The Telegraph was running a legacy content management system (CMS) in another public cloud on several instances. Upgrading the actual system or migrating the content to our main Website CMS was problematic, but we wanted to migrate it from the public cloud it was on. With the help of our partners at Claranet and Google engineers, Migrate for Anthos delivered results quickly and efficiently. This legacy (but very important) system is now safely in GKE and joins its more modern counterparts, and is already seeing significant savings on infrastructure and reduced day-to-day operational costs.”Like at The Telegraph, any means that can accelerate and enable modernization of enterprise workloads is of high business value to our customers. Migrate for Anthos can accelerate and simplify the transition from VMs to GKE and Anthos by automating the containerization and “kubernetization” of the workloads. While manual refactoring typically takes many weeks or months, Migrate for Anthos can deliver containerization in hours or days. And once you’ve done so, you’ll start seeing immediate benefits in terms of infrastructure efficiency, operational productivity, and developer experience. To showcase that, Forrester’s New Technology Projection: The Total Economic Impact™ of Anthos (2019) report states: “When you are ready to migrate existing applications to the cloud, Migrate for Anthos makes that process simple and fast. The composite organization is projected to have 58% to 75% faster app migration and modernization process when using Anthos. After you containerize your existing applications you can take advantage of Anthos GKE, both on-prem and in the cloud, and consistently manage your Kubernetes deployments.”Let’s take a deeper look at some of the benefits you can expect from modernizing your VM-based workloads into containers on Kubernetes with Migrate for Anthos. Infrastructure efficiencyInternal Google studies have shown that converting VMs to containers in Kubernetes can yield between 30 – 65% savings on what you’re currently paying for your infrastructure, by means of: Higher utilization and density, leveraging automatic bin-packing and auto-scaling capabilities, Kubernetes places containers optimally in nodes based on required resources while scaling as needed, without impairing availability. In addition, unlike VMs, all containers on a single node share one copy of the operating system and don’t each require their own OS image and vCPU, resulting in a much smaller memory footprint and CPU needs. This means more workloads running on fewer compute resources. Shortened provisioning means you’re paying less to run the same workloads on account of them being ready sooner/easier. Operational productivityEmpowering your IT team to do more in less time also yields about 20 – 55% cost savings through reduced overall IT management and administration, for example:  Simplified OS management – In Anthos, the node and its operating system are managed by the system, so you don’t need to manage or be responsible for kernel security patches and upgrades. Configuration encapsulation – By leveraging declarative specification (infrastructure as code) you can simplify and automate your deployment and more easily perform maintenance tasks like rollback and upgrades. This all leads to a faster, more agile IT lifecycle.Reduced downtime – By leveraging Kubernetes features like self healing and dynamic scaling you’ll reduce incidents and have easier desired state management.Unified management – By modernizing legacy workloads into containers, DevOps engineers can use the same method to manage all their workloads, both cloud-native and cloud “naturalized” workloads, making it faster and easier for IT to manage your hybrid IT landscape. Environment parity with improved visibility and monitoring, makes finding and fixing problems less toilsome. Developer productivity When you’ve got a better and more agile IT environment, your developers can do more with less, usually resulting in cost savings from developer efficiency and reduced infrastructure. Apps that have been converted into containers benefit from:Layering efficiency – The ability to use Docker images and layers (which Migrate for Anthos extracts as part of the container artifacts). Developer velocity – You can finally “write once run everywhere,” and combine automated CI/CD pipelines with on-demand, repeatable test deployments using declarative models and Kubernetes orchestration.Faster lifecycle – Get products to market quicker, yielding additional revenue and competitive market advantages, on top of savings. In short, modernizing your VMs into containers running on Kubernetes has benefits across infrastructure, operations, and development. Although modernization may seem intimidating at first, Migrate for Anthos helps make this process fast and painless. You can read more about it here, watch a quick video on using Migrate for Anthos on Linux or Windows workloads, or try it yourself using Qwiklabs.And if you’re interested in talking to someone about using Migrate for Anthos please fill out this form (mention “Migrate for Anthos” in the ‘Your Project’ field) and someone will contact you directly.
Quelle: Google Cloud Platform

Create a secure and code-free data pipeline in minutes using Cloud Data Fusion

Organizations are increasingly investing in modern cloud warehouses and data lake solutions to augment analytics environments and improve business decisions. The business value of such repositories increases as additional data is added. And with today’s connected world and many companies adopting a multi-cloud strategy, it is very common to see a scenario where the source data is stored in a cloud provider different from where the final data lake or warehouse is deployed. Source data may be in Azure or Amazon Web Services (AWS) storage, for example, while the data warehouse solution is deployed in Google Cloud. Additionally, in many cases, regulatory compliance may dictate the need to anonymize pieces of the content prior to loading it into the lake so that the data can be de-identified prior to data scientists or analytic tools’ consumption. Last, it may be important for customers to perform a straight join on data coming from disparate data sources and apply machine learning predictions to the overall dataset once the data lands in the data warehouse. In this post, we’ll describe how you can set up a secure and no-code data pipeline and demonstrate how Google Cloud can help you move data easily, while anonymizing it in your target warehouse. This intuitive drag-and-drop solution is based on pre-built connectors, and the self-service model of code-free data integration removes technical expertise-based bottlenecks and accelerates time to insight. Additionally, this serverless approach that uses the scalability and reliability of Google services means you get the best of data integration capabilities with a lower total cost of ownership.Here’s what that architecture will look like:Understanding a common data pipeline use caseTo provide a little bit more context, here is an illustrative (and common) use case:An application is hosted at AWS and generates log files on a recursive basis. The files are compressed using gzip and stored on an S3 bucket. An organization is building a modern data lake and/or cloud data warehouse solution using Google Cloud services and must ingest the log data stored in AWS.The ingested data needs to be analyzed by SQL-based analytics tools and also be available as raw files for backup and retention purposes. The source files contain PII data, so parts of the content need to be masked prior to its consumption.New log data needs to be loaded at the end of each day so next day analysis can be performed on it. Customer needs to perform a straight join on data coming from disparate data sources and apply machine learning predictions to the overall dataset once the data lands in the data warehouse. Google Cloud to the rescueTo address the ETL (extract,transform and load) scenario above, we will be demonstrating the usage of four Google Cloud services: Cloud Data Fusion, Cloud Data Loss Prevention (DLP), Google Cloud Storage, and BigQuery. Data Fusion is a fully managed, cloud-native, enterprise data integration service for quickly building and managing data pipelines. Data Fusion’s web UI allows organizations to build scalable data integration solutions to clean, prepare, blend, transfer, and transform data without having to manage the underlying infrastructure. Its integration with Google Cloud simplifies data security and ensures data is immediately available for analysis. For this exercise, Data Fusion will be used to orchestrate the entire data ingestion pipeline. Cloud DLP can be natively called via APIs within Data Fusion pipelines. As a fully managed service, Cloud DLP is designed to help organizations discover, classify, and protect their most sensitive data. With over 120 built-in InfoTypes, Cloud DLP has native support for scanning and classifying sensitive data in Cloud Storage and BigQuery, and a streaming content API to enable support for additional data sources, custom workloads, and applications. For this exercise, Cloud DLP will be used to mask sensitive personally identifiable information (PII) such as a phone number listed in the records. Once data is de-identified, it will need to be stored and available for analysis in Google Cloud. To cover the specific requirements listed earlier, we will demonstrate the usage of Cloud Storage (Google’s highly durable and geo-redundant object storage) and BigQuery, Google’s serverless, highly scalable, and cost-effective multi-cloud data warehouse solution. Conceptual data pipeline overviewHere’s a look at the data pipeline we’ll be creating that starts at an AWS S3 instance, uses Wrangler and Redact API for anonymization, and then moves data into both Cloud Storage or BigQuery.Walking through the data pipeline development/deployment processTo illustrate the entire data pipeline development and deployment process, we’ve created a set of seven videos. You’ll see the related video in each of the steps here. Step 1 (Optional): Did not understand the use case yet or would like to watch a refresh? This video provides an overview of the use case, covering the specific requirements to be addressed. Feel free to watch it if required.Step 2: This next video covers how the source data is organized. After watching the recording, you will be able to understand how the data is stored in AWS and explore the structure of the sample file used by the ingestion pipeline.Step 3: Now that you understand the use case goals and how the source data is structured, start the pipeline creation by watching this video. On this recording you will get a quick overview of Cloud Data Fusion, understand how to perform no-code data transformations using the Data Fusion Wrangler feature, and initiate the ingestion pipeline creation from within the Wrangler screen.Step 4: As mentioned previously, de-identifying the data prior to its consumption is a key requirement of this example use case. Continue the pipeline creation and understand how to initiate Cloud DLP API calls from within Data Fusion, allowing you to perform data redaction on the fly prior to storing it permanently. Watch this video for the detailed steps.Step 5: Since the data is now de-identified, it’s time to store it in Google Cloud. Since the use case mandated both structured file backups and SQL-based analytics, we will store the data in both Cloud Storage and BigQuery. Learn how to add both Cloud Storage and BigQuery sinks to the existing pipeline in this recording.Step 6: You are really close now! It’s time to validate your great work. Wouldn’t it be nice to “try” your pipeline prior to fully deploying it? That’s what the pipeline preview feature allows you to do. Watch this quick video and understand how to preview and subsequently deploy your data ingestion pipeline, taking some time to observe the scheduling and deployment profile options.Step 7: Woohoo! Last step. Check this video out and observe the ability to analyze the full pipeline execution. In addition, this recording will cover how to perform high-level data validation on both Cloud Storage and BigQuery targets.Next steps:Have a similar challenge? Try Google Cloud and this Cloud Data Fusion quickstart next. Have fun exploring!
Quelle: Google Cloud Platform

The serverless gambit: Building ChessMsgs.com on Cloud Run

While watching The Queen’s Gambit on Netflix just recently, I was reminded about how much I used to enjoy playing chess. I was eager to play a game, so I started to tweet, “D2-D4” knowing that someone would recognize this as an opening move and likely respond with their move, giving me the fix I needed. I paused before hitting the tweet button because I realized that I’d need to set up a board (physical or virtual) to keep track of the game. If I received multiple responses, I’d need multiple boards. I decided not to send the tweet.Later in the day, I had the idea to create a simple service that addresses my use case. Instead of designing a full chess site, I decided to create a chess board logger/visualizer to make it practical to play via Twitter or any other messaging/social platform.Instead of tweeting moves back and forth, players tweet links back and forth, and those links go to a site that renders the current chessboard, allows a new move, and creates a new link to paste back to the opponent. I wanted this to be 100% serverless, meaning that it will scale to zero and have zero maintenance requirements. Excited about this idea, I put together a shopping list:My MVP requirements:Represent the board position—ideally completely in the URL to keep it stateless from a server-side perspectiveDisplay a chessboard and let the player make their next move.Stretch goals:Enforce chess rules (allow only legal moves).Dynamically create a png/jpg of the chessboard that I can use as an Open Graph and Twitter card image so that when a player sends the link, the image of the board will automatically display.Putting it all togetherRepresenting the board positionThere is a standard notation for describing a particular board position of a chess game called Forsyth–Edwards Notation (FEN) that was exactly what I needed. A FEN is a sequence of ASCII characters. For example, the starting position for any chess game can be represented by the following string:rnbqkbnr/pppppppp/8/8/8/8/PPPPPPPP/RNBQKBNR w KQkq – 0 1Each letter is a piece: pawn = “P”, knight = “N”, bishop = “B”, rook = “R”, queen = “Q” and king = “K”. Uppercase letters represent white pieces and lowercase letters represent black. The last part of the string is specific to certain rules in chess (read more about FEN).I knew I could use this in the URL, so my first requirement was complete and I was able to represent the board state in the URL eliminating the need for a backend data store.Displaying the chessboard and allowing drag-and-drop movesNumerous chess libraries are available. One in particular that caught my eye was chessboard.js—described as “a JavaScript chessboard component with a flexible ‘just a board’ API”. I quickly discovered that this library can display chess boards from a FEN, allow pieces to be moved, and update the FEN. Perfect!In only two hours, I had the basic functionality implemented.Enforcing chess rulesI originally thought that making this service aware of chess rules would be difficult, but then I saw the example in the chessboard.js docs showing how to integrate it with another library called chess.js—“a JavaScript chess library that is used for chess move generation/validation, piece placement/movement, and check/checkmate/stalemate detection—basically everything but the AI”. A short time later, I had it working! Stretch goal #1 completed.Where’s what a couple of game moves look like:Moving the pawn from D2 to D4 in a new game—https://chessmsgs.com/?fen=rnbqkbnr%2Fpppppppp%2F8%2F8%2F3P4%2F8%2FPPP1PPPP%2FRNBQKBNR+b+KQkq+d3+0+1&to=d4&from=d2&gid=mOhlhRlMboYsHLqBF1f7IBlack countering with a similar move of pawn from D7 to D5—https://chessmsgs.com/?fen=rnbqkbnr%2Fppp1pppp%2F8%2F3p4%2F3P4%2F8%2FPPP1PPPP%2FRNBQKBNR+w+KQkq+d6+0+2&to=d5&from=d7&gid=mOhlhRlMboYsHLqBF1f7IThe URL has the following data:fen—the new board positionfrom and to—indicating what move occurred (I use this to highlight the squares)gid—a unique game ID (I used nanoid)—I’ll use this to connect moves to a single game in the future. For example, I could add a feature that lets the user request the entire game transcript). Done! Except…At this point, there were no server requirements other than simple HTML static hosting. But after playing it with some friends and family, I decided that I really wanted to accomplish the other stretch goal—dynamically create a png/jpg of the chessboard that I can use as an Open Graph and Twitter card image.  With this capability, an image of the board will automatically display when a player sends the link. Without it, the game is a series of ugly URLs.Dynamically creating the Open Graph imageThis requirement introduced some server-side requirements. I needed two things to happen on the server.First, I needed to dynamically generate a board image from a FEN. Once again, open source to the rescue (almost). I found chess-image-generator, a JavaScript library that creates a png from a FEN. I wrapped this in a bit of Node.js/Express code so that I could access the image as if it were static. For example, here’s a demo of the real endpoint: https://chessmsgs.com/fenimg/v1/rnbqkb1r/ppp1pppp/5n2/3p4/3P4/2N5/PPP1PPPP/R1BQKBNR w KQkq – 2 3.png. This link results in this image:Second, I needed to dynamically inject this FEN-embedded URL into the content attribute of the meta tag in the main HTML. Like me, you might be thinking that you could just do some DOM manipulation in JavaScript and avoid having to dynamically change HTML on the server. But, the Open Graph image is retrieved by a bot from whatever service you use for messaging. These bots don’t execute any client-side JavaScript and expect all values to be static. So, that led to additional server-side work.I needed to dynamically convert this:Into something like this:I could have used one of many Node templating engines to do this, but they all seemed like overkill for this simple substitution requirement, so I just wrote a few lines of code for some string.replace() calls in my Node server. With this functionality added, a game on Twitter (and other services) now looks much better:Check out the codeThe source for chessmsgs.com is available on GitHub at https://github.com/gregsramblings/chessmsgs. Deciding where to host itThe hosting requirements are simple. I needed support for Node.js/Express, domain mapping, and SSL. There are several options on Google Cloud including Compute Engine (VMs), App Engine, and Kubernetes Engine. For this app, however, I wanted to go completely serverless, which quickly led me to Cloud Run. Cloud Run is a managed platform that enables you to run stateless containers that are invocable via web requests or Pub/Sub events. Cloud Run is also basically free for this type of project because the always-free-tier includes 180,000 vCPU-seconds, 360,000 GiB-seconds, and 2 million requests per month (as of this writing—see the Cloud Run pricing page for the latest details). Even beyond the free tier, it’s very inexpensive for this type of app because you only pay while a request is being handled on your container instance, and my code is simple and fast.Lastly, deploying this on Cloud Run brings a lot of added benefits such as continuous deployment via Cloud Build, and log management and analysis via Cloud Logging, both of which are super easy to set up.What’s next?If this suddenly becomes the most popular site of the day, I’m actually in good shape from a scalability point of view because of my decision to use Cloud Run. If I really wanted to engineer this for extreme loads, I could easily deploy it to multiple regions throughout the globe and set up a load balancer and possibly a CDN. I also could separate the web hosting functionality from the image generation functionality to allow each to scale as needed.When I first started thinking about the image generation, I naturally thought about caching the images in Google Cloud Storage. This would be easy to do and storage is crazy cheap. But, then I did a bit of research and learned the following fun facts. After two moves (one move for each player), there are 400 different distinct board positions. After each player moves again (two moves each), this number is now 71,782 distinct positions. After each player moves again (three moves each), the number is now 9,132,484 distinct positions! I could gain a bit of performance by caching the most popular openings, but each game would quickly go beyond the cached images so it didn’t seem worth it. By the way, to cache every possible board position would be about 1046 positions, which is a massive number that doesn’t even have a name.ConclusionThis was a fun project – almost therapeutic for me since my “day job” doesn’t allow much time for writing code. If this becomes popular, I’m sure others will have ideas on how to improve it. This was my first hands-on with Cloud Run beyond the excellent Quick Starts (examples for Go, Node.js, Python, Java, C#, C++, PHP, Ruby, Shell, etc.). Because of my role in developer advocacy at Google, I was aware of most Cloud Run capabilities and features but after using it for something real, I now understand why developers love it!Where to learn moreCloud Run Product PageCloud Run DocsHello Cloud Run QwiklabThe Cloud Run unofficial FAQ (created by co-worker Ahmet Alp Balkan and community maintained)The Cloud Run Button—Add a click-to-deploy button to your git reposList of Cloud Run videos from our YouTube channelNEW O’Reilly Book: Building Serverless Applications with Google Cloud Run by Wietse VenemaAwesome Cloud Run—massive curated list of resources by Steren Giannini‎ (Cloud Run PM)Related Article3 cool Cloud Run features that developers loveCloud Run developers enjoy pay-per-use pricing, multiple concurrency and secure event processing.Read Article
Quelle: Google Cloud Platform

Baking recipes made by AI

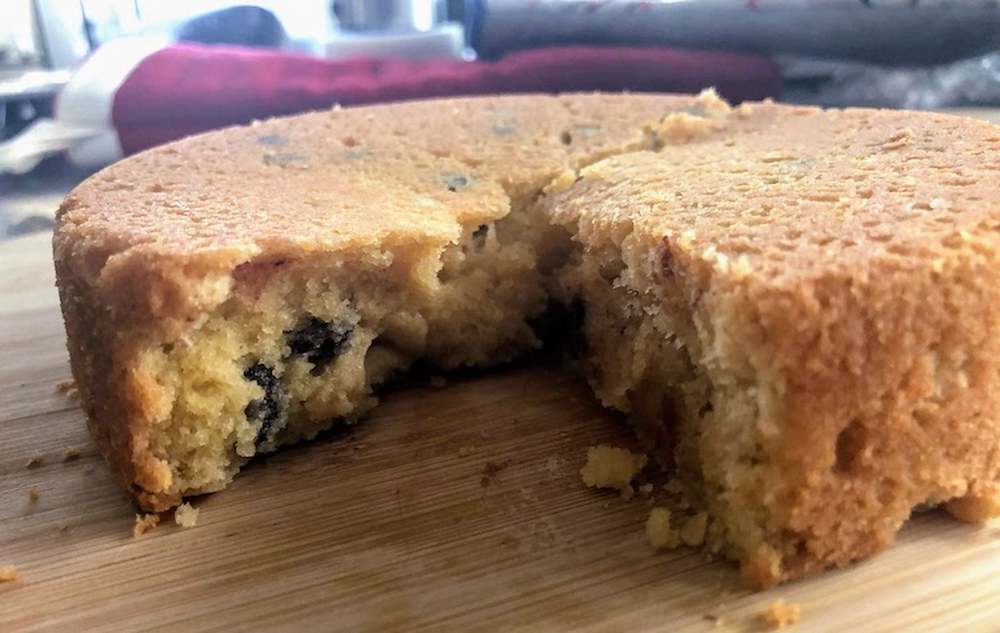
Have you ever wondered what, fundamentally, scientifically, makes a piece of cake different from a slice of bread or a cookie? Me neither. But now this important, controversial question finally has an answer, thanks to explainable machine learning. (Sort of.)In machine learning, explainability is the study of how we can make models more interpretable, so that we can understand, at least to some extent, why they make the predictions they do–an improvement from taking the predictions of a deep neural net at face value without understanding what contributed to the model output. In this post, we’ll show you how to build an explainable machine learning model that analyzes baking recipes, and we’ll even use it to come up with our own, new recipes–no data science expertise required.This project idea comes from Sara Robinson, who works on AI for Google Cloud. In April, she started a storm of pandemic baking, and like any good machine-learning-practitioner-baker, soon turned her modeling skills to baking. She collected a dataset of recipes and then built a TensorFlow model that took in lists of ingredients and spit out predictions, like:“97% bread, 2% cake, 1% cookie”Sara’s model could accurate classify recipes by type, but she also used it to come up with a completely new recipe: something her model deemed to be about 50% cookie and 50% cake–a “cakie.”Sara Robinson’s original cakie-cookie hybrid, the “cakie.”Results were promising:“It is yummy. And it strangely tastes like what I’d imagine would happen if I told a machine to make a cake cookie hybrid.”You can find her cakie recipe on her original blog.This December, Dale and Sara teamed up to build a baking 2.0 model–using a bigger dataset, new tools, and an explainabile model, one which would give insight into what makes cakes cakes and cookies cookies and breads breads. Plus, we came up with a new hybrid recipe: the “breakie,” a bread-cookie hybrid (we wanted to call it a brookie, but that name was already taken).Dale’s first bite of a “cakie”Keep reading to learn how we did it, or scroll to the end to see our brookie recipe.Build an Explainable No-Code Model with MLFor this project, we decided to use a Google Cloud tool called AutoML Tables. It’s a no-code way to build machine learning models on tabular data, like the kind you’d find in a spreadsheet or database. We chose AutoML Tables because it’s both easy to use and just got an upgrade of new, built-in explainability tools like Feature Attribution (more on that in a bit).Collecting and Preparing DataTo start, we collected a dataset of about 600 baking recipes for cookies, cakes, and breads from the web. (We can’t share the dataset here because we don’t own it, but you can definitely find your own recipe datasets online.) Next, we whittled down each of those 600 recipes to 16 core ingredients:YeastFlourSugarEggFat (sum of any type of oil)MilkBaking SodaBaking PowderApple Cider VinegarButtermilkBananaPumpkin PureeAvocadoWaterButterSaltWe didn’t include anything else, like cinnamon, chocolate chips, or nutmeg, in our model. The choice of these 16 ingredients was slightly arbitrary, but mainly we were trying to include ingredients that affect texture and consistency and exclude ingredients that don’t affect texture and that might even let the model “cheat.” For example, you could theoretically add chocolate chips to any recipe, but they’re almost never found in bread, a hint we didn’t want our model to learn from.Oh, speaking of bread: we also made the executive decision to move sweet breads (like pumpkin bread, banana bread, zucchini bread, etc) from the “bread” category to the “cake” category, based mostly on the wisdom of Great British Bake Off judge Paul Hollywood, who said on Instagram that banana bread is most definitely not a bread.Because recipes give ingredients in all different measurement units–butter could be written in sticks or tablespoons or ounces–we converted all measurement units to ounces (using a very long and unsophisticated if statement).And finally, for our last step of preprocessing, we used a little data augmentation trick. Data augmentation is a method for creating new training examples (in this case, rows) from data you already have. We wanted our model to be insensitive to the serving size of a recipe, so we decided randomly double and triple ingredient amounts. Since a recipe for 2x or 3x a cake should be more or less identical to the original cake recipe, we were able to generate new recipe examples for free (woohoo!).Building a ModelNext we built a classification model using AutoML Tables, which was the easiest part of this project. You can find Tables under the “Artificial Intelligence” section of the GCP console:Once you create a new Tables model, you can import data directly from a csv, Google Sheets, or a BigQuery database.Once your data is imported, you’ll be able to see it in the “Train” tab:AutoML Tables automatically computes some useful metrics about your data for you, like what percent of each column has missing values or how many distinct values it contains. It also computes the handy metric “Correlation with Target.” “Target” in this case is what we’re trying to predict–cookie, cake, or bread. You can set it in the drop down up top, which in our case is the column labeled “type”:Once “target” is set, AutoML will calculate, for each ingredient in isolation, how correlated it is with the target. In the data above, you can see that baking soda has the highest correlation with recipe type (0.615), meaning that if you had to only pick one ingredient to base your decision off of, baking soda would be a good bet.But in reality, baked goods are defined by complex interactions between ingredients, and looking at just baking powder alone is not accurate enough for us. So, we’ll build a machine learning model to predict recipe type by clicking on that “Train Model” button in the top right of the UI. From there, you’ll be given a dialog that lets you name your model, specify for how long you want your model to train, and indicate what columns you want to use for training (these are called “input features”).Since we only want our model to look at ingredients, I’ll select only ingredient columns from the “Input feature selection” drop down:Next hit “Train model” and wait. In the background, AutoML will train and compare a slew of machine learning models to find one that’s accurate. This could take a few hours.When your model is done training, you can view it in the “Evaluate” tab, which gives you lots of useful stats of model quality. As you can see, our model was pretty accurate:Model Explainability with Feature ImportanceIf you scroll down on the “Evaluate” tab, we can start to gain more insight into our model through “Feature Importance” scores:These scores highlight how heavily our model depends on each ingredient when making a prediction. In our case, it seems like butter, sugar, yeast, and egg are important predictors of whether a recipe is a cookie, cake, or bread.The feature importance scores above show the overall importance of each ingredient to the model, which AutoML calculates by looking at aggregate feature importance across our test set But we can also look at feature importance through the lens of a single prediction, which might be different.For example, maybe milk isn’t in general an important model feature, but when sugar and butter values are low, milk becomes more important. In other words, we’d like to know, what features did the model depend on when it made one particular prediction?In the Test and Use tab, we can make predictions about individual recipes and see those local feature importance scores. For example, when I feed my model a recipe for cake, it correctly predicts the category is “cake” (0.968 confidence). Meanwhile, the local feature importance scores tell me that egg, fat, and baking soda were the ingredients that most contributed to that prediction. Coming Up with a Breakie RecipeThanks to those feature importance scores, we were able to figure out what made the model think a recipe was for a cookie, cake, or bread, and we used that knowledge to come up with a breakie–something our model thought was roughly 50% cookie, 50% bread.Of course, once we found our breakie recipe, we had to experimentally verify it in the lab:Sara’s breakies, fresh out of the oven.Success! We wound up with something that tasted like a cookie but that was more airy, like a bread. Machine learning–it works!We should caveat that while our model gave us ingredients, it didn’t spit out any baking directions, so we had to improvise those ourselves. And, we added chocolate chips and cinnamon for good measure.If you want to verify our results (for science), try our breakie recipe for yourself. And if you still have an appetite for ML, find more project ideas from Making with ML on YouTube.BreakieMakes ~16 bread-inspired cookies.Ingredients2 teaspoons active dry yeast¼ cup warm milk2 cups flour1 egg, lightly beaten1 teaspoon baking soda½ teaspoon salt¼ teaspoon cinnamon½ cup white sugar¼ cup brown sugar1 and ¼ stick unsalted butter, room temperature⅓ cup chocolate chipsInstructionsPreheat oven to 350 degrees Fahrenheit. Line a baking sheet with parchment paper and lightly grease it with cooking spray.Make the bread part: Heat milk in microwave until it is warm to the touch, but not hot. Dissolve yeast in warm milk and set aside. In a large bowl, combine flour, baking soda, salt, and cinnamon. Add the milk and yeast mixture to the flour mixture and stir until combined. Add the lightly beaten egg to the flour mixture until combined. When you’re done mixing it may seem like there is too much flour. That’s ok, set this mixture aside for now.Make the cookie part: In a stand mixer fitted with a paddle attachment, combine room temperature butter with both sugars on medium speed until smooth. Slowly incorporate flour mixture into butter mixture, about a cup at a time. Stir in chocolate chips.Form dough into balls (in our recipe test the cookie dough balls were 2.5 tablespoons, or 50 grams if you have a kitchen scale) and place a few inches apart on your baking sheet. Bake 13 – 15 minutes until breakies are golden brown on the outside and start to crack slightly on top. Let cool on a wire rack. Enjoy, and let us know what you think the bread to cookie ratio of these are!Related ArticleIncreasing transparency with Google Cloud Explainable AIWe’re working to build AI that’s fair, responsible and trustworthy, and we’re excited to introduce the latest developments.Read Article
Quelle: Google Cloud Platform

Our heads are in the clouds at the Museum of Borgmon Modern Art

As humans, we look to nature for inspiration, and much of our appreciation of beauty comes from natural forms. Who among us hasn’t lain on a hillside, looking for familiar shapes in the clouds?As engineers, many of our interactions take place with a built environment that is entirely separate from nature. Still, we have deep connections with nature, and we might find images in unexpected places—even in the midst of a grim outage. To celebrate this, we are pleased to share with you a selection of images from Google’s ‘Museum of Borgmon Abstract Art.’Borgmon, as you’ll recall from Chapter 10 of the SRE Book, is a system for alerting based on time-series data. For over a decade, it has provided Google SRE teams insight into system behavior and trends. It has also brought art and joy amidst our travails.  To wit, consider these images that we have found in our very monitoring systems:Fig. 1: Three-dimensional booksThese bring us delight:Fig. 2: A skein of yarn unravelsand, with the aid of our imagination, even some amusement:Fig. 3: Can you spot the elephant in the room ^W graph?Fig. 4: A tapestry formed of per-task request ratesand—with a little added flourish—invent some creatures. With this, we present to you… the Borgmonster:Fig. 5: The BorgmonsterWe like this alot.You can see our gallery online at sre.google/mobaa.When you come back to earth, read more about monitoring and observability in the Monitoring Distributed Systems chapter of the SRE Book and in the Monitoring chapter of the SRE Workbook. Then, ask yourself: What do the shapes, color palettes, and patterns of your monitoring say to you? Share them with @googlesre on Twitter using #SREArt.Visit sre.google to learn more about SRE and industry-leading practices for service reliability.
Quelle: Google Cloud Platform

Deploying to serverless platforms with GitHub Actions

Join us on December 16, 2020, 11am PT / 2pm ET to learn more about Automating CI/CD pipelines with GitHub Actions and Google Cloud.Serverless computing hides away infrastructure allowing for developers to focus on building great applications. Google Cloud Platform offers 3 serverless compute platforms—Cloud Functions, App Engine, and Cloud Run—with the benefits of zero server management, no up-front provisioning, auto-scaling, and only paying for the resources used. Serverless applications are quick and easy to spin up, but a system for continuous integration and continuous delivery (CI/CD) is key for long-term operability. However, CI/CD systems tend to be known for their complexity, so GitHub Actions aim to reduce the overhead by abstracting away the test infrastructure and creating a developer-centric CI/CD system. You can get started quickly by adding a configuration file to your repo to automate your builds, testing, and deployments. Google wants to meet you on GitHub and provides Google Cloud Platform integrated GitHub actions.Let’s walk through how to deploy to Google Cloud Platform’s serverless options using the integrated GitHub actions. Learn more about Google’s serverless hosting options orGoogle Cloud Platform full range of hosting options to find which platform is right for you.Cloud FunctionsCloud Functions is Google Cloud’s Function-as-a-Service platform that allows users to create single-purpose, stand-alone functions that respond to events and HTTP requests. Cloud Functions are great for pieces of code like sending notification emails, performing database sanitization and maintenance, integrating with webhooks, and processing background tasks.Use the google-github-actions/deploy-cloud-functions to deploy an HTTP function by specifying the function name and runtime:Or deploy a background function that can be triggered by events, such as Pub/Sub messages, Firebase events, or changes in a Cloud Storage bucket, by specifying trigger type and resource:A function triggered when a new object is created in Cloud Storage would be deployed with inputs like:Learn more about specifying event triggers.App EngineApp Engine is the original serverless platform for hosting modern web applications. App Engine allows you to deploy from source by selecting a runtime from a set of popular programming languages.Deploy your source code with the google-github-actions/deploy-appengine action by specifying a service account key with permissions to deploy and the path to App Engine app’s settings file, app.yaml which sits next to your application to define the service for the deployment.The project ID is also set to ensure deployment to the correct project, since service accounts can be given permissions to separate projects.Cloud RunCloud Run hosts stateless containers with any choice of language, library, or binary. Cloud Run is a great choice for REST API backends, lightweight data processing, and automated services like webhooks and scheduled tasks.Use the google-github-actions/deploy-cloudrun action to deploy a container image hosted in Google Container Registry or Artifact Registry to Cloud Run to create a new service or a revision.Need to build your image too? Use the built-in Docker tool to build and push your image or utilize the setup-gcloud action (below) to submit a Cloud Build using the gcloud CLI tool.Setup Cloud SDKThe Cloud SDK, also known as the gcloud CLI tool, is commonly used to interact with Google Cloud Platform. Use the setup-gcloud action to add the gcloud CLI tool to the path to interact with many Google Cloud services. This action can be used to authenticate other Google Cloud Platform actions by utilizing export_default_credentials. This exports the path to Default Application Credentials as the environment variable GOOGLE_APPLICATION_CREDENTIALS for services to be automatically authenticated in later steps. The credentials input in the other actions, then can be omitted.Try it for yourself!Google and GitHub are excited to make it easier for you to set up CI/CD pipelines. Try Google Cloud GitHub actions today:Explore Google’s GitHub actions and give us feedback on your experience.Try out one of the example workflows.If you need control of your test environment, try setting up GitHub Actions self-hosted runners on Google Cloud.Join us on December 16, 2020, 11am PT / 2pm ET to learn more about Automating CI/CD pipelines with GitHub Actions and Google Cloud. Save your seat!Related ArticleCloud Build brings advanced CI/CD capabilities to GitHubTighter integration between Cloud Build and GitHub opens up advanced CI/CD workflows for DevOps shops.Read Article
Quelle: Google Cloud Platform