Introducing Apache Spark Structured Streaming connector for Pub/Sub Lite

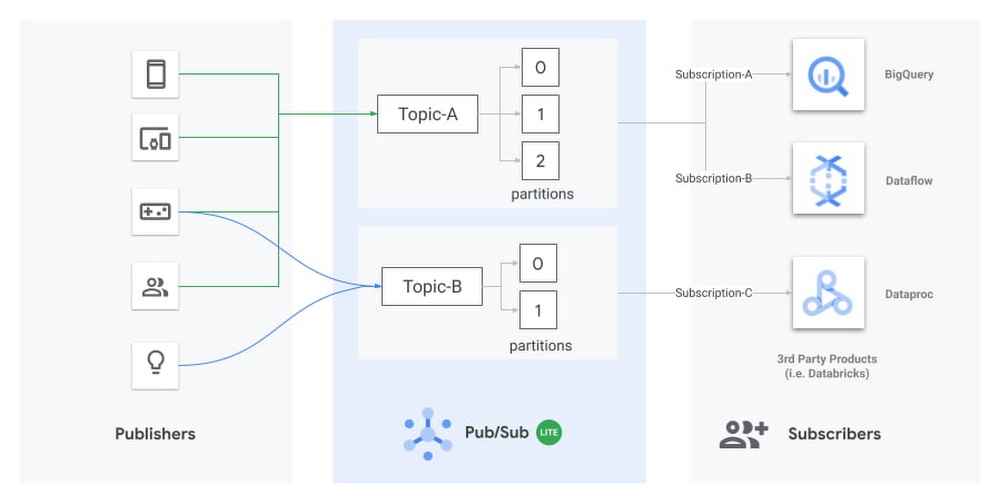
Today we’re excited to announce the release of an open source connector to read streams of messages from Pub/Sub Lite into Apache Spark. Pub/Sub Lite is a scalable, managed messaging service for Spark users on GCP who are looking for an exceptionally low-cost ingestion solution. The connector allows you to use Pub/Sub Lite as a replayable source for Structured Streaming’s processing engine with exactly-once guarantees1 and ~100ms processing latencies. The connector works in all Apache Spark 2.4.X distributions, including Dataproc, Databricks, or manual Spark installations. What is Pub/Sub Lite?Pub/Sub Lite is a recently released, horizontally scalable messaging service that lets you send and receive messages asynchronously between independent applications. Publisher applications publish messages to a Pub/Sub Lite topic, and subscriber applications (like Apache Spark) read the messages from the topic.Pub/Sub Lite is a zonal service. While you can connect to Pub/Sub Lite from anywhere on the internet, running publisher and subscriber applications in the same zone as the topic they connect to will help minimize networking egress cost and latency.Diagram showing publishers sending messages to Topic-A and Topic-B, which consist of multiple partitions. Subscribers reading the messages can include BigQuery, Dataflow, Dataproc (with Spark), or third-party products like Databricks.A Lite topic consists of a pre-configured number of partitions. Each partition is an append-only timestamped log of messages. Each message is an object with several fields, including message body, a user-configurable event_timestamp, and an automatically set publish_timestamp based on when Pub/Sub Lite stores the incoming message. A topic has a throughput and storage capacity that the user configures. To configure the topic capacity, you will have to consider a handful of properties, such as the number of partitions, storage/throughput capacity for each partition, and message retention period.The Pub/Sub Lite pricing model is based on provisioned topic throughput and storage capacity. Plan to provision enough capacity to accommodate peaks in traffic; then, as your traffic changes, you can adjust the throughput and storage capacity of your topics. Pub/Sub Lite’s Monitoring metrics let you easily detect conditions when you need to increase your capacity. Start by creating alerting policies that will notify you when your backlog is growing unexpectedly: subscription/backlog_quota_bytes should be comfortably lower than topic/storage_quota_byte_limit. If a subscription exceeds the storage capacity, the Pub/Sub Lite service removes the oldest message from the partition, regardless of the message retention period for the oldest message. You should also set up alerts for topic/publish_quota_utilization and topic/subscribe_quota_utilization to make sure publish/subscribe throughputs are comfortably below limit.Pub/Sub Lite scales vertically by allowing you to increase the throughput capacity of each partition in increments of 1MiB/s. You can increase the number of partitions in a topic as well, but this will not preserve the order of messages. The connector v0.1.0 will require you to restart with a new subscription on repartitioning, but we plan to remove this limitation soon—please keep an eye on the release notes. When starting with Pub/Sub Lite, it’s best practice to slightly overprovision the number of partitions so that the per-partition publishing and subscribing throughput capacities can be set to the lower bounds of 4 MiB/s and 8 MiB/s, respectively. As the application traffic increases, you can update the Lite topic to increase both the publishing and subscribing capacities up to 16 MiB/s and 32 MiB/s per partition, respectively. You can adjust publish and subscribe throughput capacity of a partition independently. For more details on how your application can interact with Pub/Sub Lite, review the publishing and subscribing messages guides.Architecture for Pub/Sub Lite + Structured StreamingThree-tier architecture showing Publishers writing to Pub/Sub Lite’s Topic-A, which contains three partitions that are read by Spark’s Structured Streaming.Pub/Sub Lite is only a part of a stream processing system. While Pub/Sub Lite solves the problem of message ingestion and delivery, you’ll still need a message processing component. Apache Spark is a popular processing framework that’s commonly used as a batch processing system. Streaming processing was introduced in Spark 2.0 using a micro-batch engine. The Spark micro-batch engine processes data streams as small batch jobs that periodically read new data from the streaming source, then run a query or computation on it. The time period for each micro-batch can be configured via triggers to run at fixed intervals. The number of tasks in each Spark job will be equal to the number of partitions in the subscribed Pub/Sub Lite topic. Each Spark task will read the new data from one Pub/Sub Lite partition, and together create a streaming DataFrame or Dataset. Each Different Structure Streaming pipeline must have its own independent subscription. Note that all subscriptions attached for one topic share the subscribing throughput capacity of that topic.The connector also supports Spark’s experimental continuous processing mode. In this mode, the connector is designed to map each topic partition to a long-running Spark task. Once the job is submitted, the Spark driver will instruct the executors to create long-running tasks, each with a streaming connection to a different partition within the topic. Note that this mode is not yet considered production-ready; it only supports limited queries and provides only at-least-once guarantees.Using Pub/Sub Lite with Spark Structured StreamingProcessing streams of data in Pub/Sub Lite with Spark is as simple as the Python script below. For a detailed guide to run a full Java end-to-end word count sample in Dataproc, please refer to the GitHub Readme.First, instantiate a Spark Session object and read in a Dataframe from the Pub/Sub Lite subscription:The following snippet processes the stream in two-second-long batches and prints the resulting messages to the terminal:In practice, you’ll perform transformations on this data. To do this, you will need to consider the schema of the DataFrame: A common transformation from BinaryType to StringType is as follows:Benchmarks for throughput performanceTo get a sense of the throughput performance of the connector, as well as Pub/Sub Lite itself, we turned up an example pipeline in a Dataproc YARN cluster. In the example, the pipeline consumed backlogs from Pub/Sub Lite with no further processing. The Dataproc YARN cluster consisted of one master node and two worker nodes. All nodes were n1-standard-4 machines (4 vCPUs, 15GB memory). All messages were 1 KiB. The total spark process throughput was calculated using processedRowsPerSecond per batch, and spark process throughput per partition was calculated with total spark process throughput divided by the number of partitions.Note that for 25 partitions, the workers were overloaded, and since the processing wall time per batch was determined by the slowest partition, the processedRowsPerSecond dropped dramatically. We can see that this drop is correlated with CPU saturation by looking at CPU utilization:For basic read operation as a baseline, it’s recommended to have 12 partitions (8 MiB/s subscribe throughput each) in a cluster with 8 CPUs. This suggests an approximate rule of thumb: a single n1-standard-series vCPU can handle 12 MiB/s of read throughput. Any significant processing of messages will decrease this capacity.The benchmark above did not consider memory allocation. In practice, long trigger time or spiky traffic could lead to large micro batches, requiring more memory. Also, complex queries such as aggregation and extended watermarks would require more memory. Next StepsWe hope you’ll find Pub/Sub Lite to be a useful service for your streaming applications. Please give the connector and Pub/Sub Lite a try following the full set of directions here. We would be grateful for feedback and bug reports submitted as GitHub Issues. We also welcome code contributions to this open source project.1. Pub/Sub Lite connector as source is compatible with exactly-once guarantee. It needs an idempotent sink to ensure exactly-once guarantee.
Quelle: Google Cloud Platform

How to use Packet Mirroring for IDS in different VPC designs

When migrating from on-premises to the cloud, many Google Cloud customers want scalable solutions to detect and alert on higher-layer network anomalies, keeping the same level of network visibility they have on-prem. The answer may be to combine Packet Mirroring with an Intrusion Detection System (IDS) such as the open-source Suricata, or some other preferred threat detection system. This type of solution can provide the visibility you need in the cloud to detect malicious activity, alert, and perhaps even implement security measures to help prevent subsequent intrusions. However, design strategies for Packet Mirroring plus IDS can be confusing, considering the number of available VPC design options. For instance, there’s Google’s global VPC, Shared VPCs and VPC Peerings. In this blog, we’ll show you how to use Packet Mirroring and virtual IDS instances in a variety of VPC designs, so you can inspect network traffic while keeping the ability to use the supported VPC options that Google Cloud provides. Packet Mirroring basicsBut first, let’s talk some more about Packet Mirroring, one of the key tools for security and network analysis in a Google Cloud networking environment. Packet Mirroring is functionally similar to a network tap or a span session in traditional networking: Packet Mirroring captures network traffic (ingress and egress) from select “mirrored sources,” copies the traffic, and forwards the copy to “collectors.” Packet Mirroring captures the full payload of each packet, not just the headers. Also, because Packet Mirroring is not based on any sampling period, you can use it for in-depth packet-level troubleshooting, security solutions, and application-layer network analysis.Packet Mirroring relies on a “Packet Mirroring policy” with five attributes:RegionVPC network(s)Mirrored source(s)Collector (destination)Mirrored traffic (filter)Here’s a sample Packet Mirroring policy:Click to enlargeWhen creating a Packet Mirroring policy, consider these key points:Mirrored sources and collectors must be in the same region, but can be in different zones—or even different VPCs or projects.Collectors must be placed behind an Internal Load Balancer (ILB).Mirrored traffic consumes additional bandwidth on the mirrored sources. Size your instances accordingly.The collectors see network traffic at Layer 3 and above the same way that the mirrored VMs see the traffic. This includes any NATing and/or SSL decryption that may occur at a higher layer within Google Cloud.There are two user roles that are especially relevant for creating and managing Packet Mirroring:“compute.packetMirroringUser” – This role allows users rights to create, update, and delete Packet Mirroring policies. This role is required in the project where the Packet Mirroring Policy will live.“compute.packetMirroringAdmin” – This role allows users to mirror the desired targets to collect their traffic. Using Packet Mirroring to power IDSAn IDS needs to see traffic to be able to inspect it. You can use Packet Mirroring to feed traffic to a group of IDSs; this approach has some significant benefits over other methods of steering traffic to an IDS instance. For example, some cloud-based IDS solutions require special software (i.e., an agent) to run on each source VM, and that agent duplicates and forwards traffic to the IDS. With Packet Mirroring, you don’t need to deploy any agents on VMs and traffic is mirrored to IDS in a cloud-native way. And while an agent-based solution is fully distributed and prevents network bottlenecks, it requires that the guest operating system support the software. Furthermore, with an agent-based solution, CPU utilization and network traffic on the VM will most certainly increase because the guest VM and its resources are tasked with duplicating traffic. High CPU utilization related to network throughput is a leading contributor to poor VM performance.Another common approach is to place a virtual appliance “in-line” between the network source and destination. The benefit of this design is that the security appliance can act as an Intrusion Prevention System (IPS) and actually block or deny malicious traffic between networks. However, an in-line solution, where traffic is routed through security appliances, doesn’t capture east-west traffic within VMs in the same VPC. Because subnet routes are preferred in a VPC, in-line solutions which are fed traffic via static routes, can’t alert on intra-VPC traffic. Thus, a large portion of network traffic is left unanalyzed; a traditional in-line IDS/IPS solution only inspects traffic at a VPC or network boundary. Packet Mirroring solves both these problems. It doesn’t require any additional software on the VMs, it’s fully distributed across each mirrored VM, and traffic duplication happens transparently at the SDN layer. The Collector IDS is placed out-of-path behind a load balancer and receives both north-south traffic and east-west traffic.Using Packet Mirroring in various VPC configurationsPacket Mirroring works across a number of VPC designs, including:Single VPC with a single regionSingle VPC with multiple regionsShared VPCPeered VPCHere are a few recommendations that apply to each of these scenarios:Use a unique subnet for the mirrored instances and collectors. This means if the mirrored sources and the collectors are in the same VPC, create multiple subnets in each region. Place the resources that need to be mirrored in one subnet and place the collectors in the other. There is no default recommended size for the collector subnet, but make sure to allocate enough space for all the collectors that might be in that region plus a little more. Remember, you can always add additional subnets to a region in Google Cloud.Don’t assign public IPs to virtual IDS instances. Rather, use CloudNAT to provide egress Internet access. Not assigning a public IP to your instances helps them from being exposed externally to traffic from the internet.If possible, use redundant collectors (IDS instances) behind the ILB for high availability.Now, let’s take a look at these designs one by one. Single VPC with a single regionThis is the simplest of all the supported designs. In this design, all mirrored sources exist in one region in a standard VPC. This is most suitable for small test environments or VPCs where network management is not dedicated to a networking team. Note that the mirrored sources, Packet Mirroring policy, collector ILB and the IDS instances, are all contained to the same region and same VPC. Lastly, CloudNAT is configured to allow the IDS instances internet access. Everything is contained in a single region, single VPC, and single project.Click to enlargeSingle VPC with multiple regionsBecause mirrored instances and collectors must be in the same region, it stands to reason that a VPC that contains subnets in multiple regions needs multiple collectors, multiple ILBs and multiple Packet Mirroring policies. To account for multiple regions, simply stamp out a similar deployment to the one above multiple times. We still recommend using CloudNAT. The following example shows a single VPC that spans two different regions, however, a similar architecture can be used for a VPC with any number of regions.Click to enlargeShared VPCPacket Mirroring also supports Shared VPC. In this example, the collectors (IDSs), ILB and the Packet Mirroring policy all exist inside the host project. The collectors use their own non-shared subnet. The mirrored sources (WebServers), however, exist inside their service project using a shared subnet from the Shared VPC. This allows the deployment of an IDS solution to be left up to the organization’s cloud network operations group, freeing application developers to focus on application development. CloudNAT is configured to allow the IDS instances Internet access.Click to enlargePeered VPCPacket Mirroring also supports when collectors and mirrored sources are in different VPCs that are peered together, such as in a hub-and-spoke design. The same requirements for mirroring traffic between VPCs are applicable. For example, the collector and mirrored sources must be in the same region. In the below example, the mirrored sources (WebServers) and the Packet Mirroring policy exist in VPC_DM_20 in the DM_20 project. On the other side, the ILB and collectors (IDSs) exist in the peered VPC named VPC_SECURITY in the DM_IDS project. This allows the users in the source VPC to selectively choose what traffic is forwarded to the collector across the VPC peering. CloudNAT is configured to allow the IDS instances internet access. Keep in mind the Packet Mirroring role requirements between the different projects. Proper IAM permissions must be configured.Click to enlargeDon’t sacrifice network visibilityUsing Packet Mirroring to power a cloud IDS solution, whether it’s open-source or proprietary, is a great option that many Google Cloud customers use. The key is where to place your collectors, ILBs and the Packet Mirroring policy itself—especially when you use a more advanced VPC design. Once multiple VPCs and GCP projects get introduced into the deployment, the implementation only becomes more complex. Hopefully, this blog has shown you how to use Packet Mirroring with an IDS in some of the more common VPC designs. For a hands-on tutorial, check out QwikLabs’ Google Cloud Packet Mirroring with OpenSource IDS, which walks you through creating a VPC, building an IDS instance, installing Suricata and deploying Packet Mirroring.
Quelle: Google Cloud Platform

5-ish ways to get your data into Cloud Storage

Would you rather listen than read? Check out our new tech blog podcast.So you’ve created your buckets, and now you want to use the power of the cloud to serve your content. With a can-do attitude and the details of this post, you’ll learn how to get your data into Cloud Storage with a variety of upload methods. Let’s go!When you upload an object to your Cloud Storage bucket, it will consist of the data you want to store, along with any associated metadata. When it comes to the actual uploading, you’ve got a few different options to choose from, which we’ll go over below. For more detail, check out the documentation. And for general, conceptual information on uploads and downloads, read this.Cloud consoleFirst, we’ll cover the Cloud Console. This provides you with an in-browser experience where you can easily click to create buckets and folders, and then choose, or drag and drop the files from your local machine to upload.Pro-Tip:folder uploads are also supported if you’re using the Chrome browser.gsutilFor production environments, you may want an automated, command line solution. For this, we provide the gsutil tool. gsutil is a Python application that lets you access Cloud Storage from the command line, providing you with the ability to do all sorts of things like creating buckets, moving objects, or even editing metadata.To use it, run the gsutil program with a variety of command line options. For example, this command uploads a directory of files from your local machine to your Cloud Storage bucket using parallel upload.And this command lists out specific objects that have a version-specific URL using a wildcard. More cool stuff you can do with the gsutil tool can be found inthis documentation.Client librariesAt some point, you might need to interface with Cloud Storage directly from your code, rather than going out to a command line option. You can include the client libraries into your code and call a simple api to get data into a bucket or folder. And before you even ask about language, with options in C++, C#, Go, Java, Node.js, PHP, Python, and Ruby—we’ve got you covered. For example, check out this Python code to upload an object to a Cloud Storage bucket:Check out even more code samples here.JSON and XMLAnd finally, if none of that does the trick, there’s always the JSON and XML APIs, which can let you kick off an HTTP POST request to upload data directly to a bucket or folder. It’s a bit more complex, but it’s there if you need it.Cloud Storage Transfer ApplianceNow, for you folks with LOTS of data, it’s worth noting that it might not be feasible to upload all of that data directly from your on-prem systems to Google Cloud—for that you can use the Cloud Storage Transfer Appliance. We ship you a fancy device, you connect it, add your data, and send it back to us. Plus you get this cool looking box on your desk for a while, which can be a great conversation starter, if you’re into that kind of thing. More details here.More clouds, more problems? Not so!Don’t worry if your data is in another cloud, we’ve got easy-to-use guides to help you get up and running with supporting a multicloud environment, and getting that data over to Cloud Storage.Now what?Of course, now that the data is in Cloud Storage, you’ve got to figure out the best ways to serve it to your users worldwide. Stay tuned for best practices around getting that data out into the world in our next post.Learn more about your storage options in Cloud Storage Bytes, or check out the documentationfor more information, including tutorials.Related ArticleOptimizing your bucket options in Cloud StorageIn this post, we’ll review why buckets are the cornerstone of everything you’ll do in Cloud Storage, and go over some of the options you’…Read Article
Quelle: Google Cloud Platform

Captains Take 5 – Nick Janetakis

Docker Captains are select members of the community that are both experts in their field and are passionate about sharing their Docker knowledge with others. “Docker Captains Take 5” is a regular blog series where we get a closer look at our Captains and ask them the same broad set of questions ranging from what their best Docker tip is to whether they prefer cats or dogs (personally, we like whales and turtles over here). Today, we’re interviewing Nick Janetakis who has been a Docker Captain since 2016. He is a freelance full stack developer / teacher and is based in New York, United States.

How/when did you first discover Docker?

I was doing freelance web development work and kept running into situations where it was painful to set up my development environment for web apps created with Ruby on Rails. Different apps had different Ruby version requirements as well as needing different PostgreSQL and Redis versions too.

I remember running a manually provisioned Linux VM on my Windows dev box and did most of my development there. I even started to use LXC directly within that Linux VM.

That wasn’t too bad after investing a lot of time to automate things but then it was always a song and dance to get everything running on my client’s machines as well as production.

In 2014 I first discovered Docker. I think it was around version 1.4 at the time. I remember reading about Docker and deciding it was stable enough to give it a shot and I’ve been using it ever since.

What is your favorite Docker command?

It’s for sure docker-compose up. It’s by far my most used command.

There’s what drew me into using Docker in the first place. It’s the promise that all I have to do is run 1 or 2 commands and my whole tech stack will be up and running on all major platforms.

Sure back in 2014 it was called fig up and perhaps in the future docker-compose up will be replaced by a native docker command, but the same concept has applied for all these years. 

What is your top tip you think other people don’t know for working with Docker?

You can use the same docker-compose.yml file in development and production and still have the flexibility to run different containers in each environment by using a docker-compose.override.yml file and then ignoring it from version control.

This comes in very handy for running a local copy of PostgreSQL or a Webpack dev server in development but then in production use a managed PostgreSQL database from your cloud provider while serving your pre-compiled assets from nginx or a CDN.

I made a video about this a while back on my blog. Speaking of which, there’s 100+ assorted Docker related posts and videos on my site. I tend to post everything I’ve learned there.

What’s the coolest Docker demo you have done/seen?

The very first time I ran a docker-compose up to bring up a web server, background worker, PostgreSQL and Redis in about 5 seconds I knew things were going to be good.

This wasn’t part of a specific presentation or recorded demo. It was demonstrating to myself that Docker has legs and wasn’t just the next hyped up technology that’s going to fizzle out in 6 months.

I’m usually not interested in watching toy demos or seeing one sliver of something applied in a non-real world use case to make it look appealing. I’m all about practical examples that help me in my day-to-day. That’s why I think something as basic as seeing a fully Dockerized / production-ready web app being started up with docker-compose up is cool.

What have you worked on in the past 6 months that you’re particularly proud of?

Helping some of my freelance clients deploy their web applications in production-ready ways. It’s very satisfying to convert ideas and code into solutions that help folks do what they want to do.

I really enjoy learning new things but to me, code has always been a means to an end. The journey is fun and truly enjoyable but at the end of the day going from A to B is the goal and it always makes me happy to see others be able to fulfill their goals.

I also released 26 episodes of my Running in Production podcast.

It’s a show where a new guest comes on every week and we talk about how they built and deployed a web app they’ve created, what tech stack they used, best tips and lessons learned. As a side note, quite a lot of folks ranging from solo developers to massively popular companies are using Docker in their day-to-day.

What do you anticipate will be Docker’s biggest announcement this year?

I have no idea what’s coming but I hope layer diffing and smart layer updates becomes a thing because one of the biggest time sinks of using Docker in development is having your application’s package dependency layer get invalidated from 1 change. That would be changing something like Python’s requirements.txt file, Ruby’s Gemfile or Node’s package.json file.

Changing a dependency usually involves having to wait 5-10 minutes for all dependencies to get rebuilt but without Docker, that same process would likely finish in 10 seconds or less. If layer diffing and updates were possible that could get things down to 10 seconds with Docker too.

That would be a very welcome change to have layer diffing and smart updates. Especially in new projects where you’re changing your dependencies on a regular basis.

What do you think is going to be Docker’s biggest challenge this year?

It’s hard to say but with Docker’s new primary focus on the developer experience, I’m optimistic because over the last few years it felt like Docker was a bit scattered trying to figure out who their target customer is and how to generate revenue.

I’m happy Docker finally figured out what they want to do. I don’t mean that in a condescending way either. I know how hard it is to find your true calling and target audience.

The biggest challenge would probably be figuring out how to make Docker a sustainable business. I hope it becomes one of those things where Docker transforms from an 80% upgrade / 10% sidegrade / 10% downgrade on some things to a 100% upgrade to the point where for something like web development it becomes a no brainer to always use Docker with no compromises.

Maybe I’m living in a fantasy world but I like to think that if things ever got to that point then the business problem would solve itself through either public funding or getting bought out by a company that will let everyone continue doing what they’re doing and make the best possible developer experience conceived on planet Earth.

What are some personal goals for the next year with respect to the Docker community?

I’d like to ship my next course which focuses on deploying web applications with Docker. This has been a long time coming and I’ve written and rewritten the course twice now over the last 2 years.

On the bright side, I’ve got everything I want to include in the course all put together. It’s everything I’ve learned from building and deploying Dockerized web apps since 2014.

If anyone wants to sign up to get notified with a launch discount when it’s released you can do so at https://nickjanetakis.com/courses/deploy-to-production.

Besides courses, I’ll continue blogging and creating YouTube videos about Docker and other web development topics just as I have for the last 5+ years.

Most of the blog posts, videos and courses I create come from real-world experience so I’m also looking forward to working with more folks this year as a part of my freelance business.

What talk would you most love to see at DockerCon 2021?

If I had to pull a request out of thin air I’d like to see assorted use case demos or presentations on how developers and companies are using Docker out in the wild.

Maybe some type of collaboration video where 5-6 people spend ~10 minutes going over their setups. Perhaps even have 2 of these videos. One with larger companies and one with solo developers or small teams. This way we can see usage patterns from multiple perspectives.

Looking to the distant future, what is the technology that you’re most excited about and that you think holds a lot of promise?

If you asked me this question 6 years ago I would have said Docker.

And I’m still going with Docker today because I can see a future where there’s a zero compromise development experience that’s lightning fast with flawless code editor integration in all editors.

That would be a wonderful place to be in.

Rapid fire questions…

What new skill have you mastered during the pandemic?

I’ve never been more confident in my ability to wash my hands.

Salty, sour or sweet?

Can I pick sweet and sour?

Dogs, cats, neither, both?

Turtles all the way down.

Beach or mountains?

Probably mountains because I really like hiking and you can escape the sun. But at the same time there’s something super relaxing about seeing and hearing the ocean. Tough question!

Your most often used emoji?

is what I commonly reach for on GitHub when leaving a reaction to something.
The post Captains Take 5 – Nick Janetakis appeared first on Docker Blog.
Quelle: https://blog.docker.com/feed/

How to Use Your Own Registry

One of the things that makes the Docker Platform so powerful is how easy it is to use images from a central location. Docker Hub is the premier Image Repository with thousands of Official Images ready for use. It’s also just as easy to push your own images to the Docker Hub registry so that everyone can benefit from your Dockerized applications.

But in certain scenarios, you might not want to push your images outside of your firewall. In this case you can set up a local registry using the open source software project Distribution. In this article we’ll take a look at setting up and configuring a local instance of the Distribution project where your teams can share images with docker commands they already know: docker push and docker pull.

Prerequisites

To complete this tutorial, you will need the following:

Free Docker Account You can sign-up for a free Docker account and receive free unlimited public repositoriesDocker running locallyInstructions to download and install Docker

Running the Distribution service

The Distribution project has been packaged as an Official Image on Docker Hub. To run a version locally, execute the following command:

$ docker run -d -p 5000:5000 –name registry registry:2.7

The -d flag will run the container in detached mode. The -p flag publishes port 5000 on your local machine’s network. We also give our container a name using the –name flag. Check out our documentation to learn more about these and all the flags for the docker run command.

Pushing and Pulling from a local registry

Now that we have our registry running locally, let’s tail the container’s logs so we can verify that our image is being pushed and pulled locally:

$ docker logs -f registry

Open another terminal and grab the Official Ubuntu Image from Docker Hub. We’ll use this image in our example below:

$ docker pull ubuntu

To push to or pull from our local registry, we need to add the registry’s location to the repository name. The format is as follows: my.registry.address:port/repositoryname.

In our example, we need to replace my.registry.address.port with localhost:5000 because our registry is running on our localhost and is listening on port 5000. Here is the full repository name: localhost:500/ubuntu. To do this, we’ll run the docker tag command:

$ docker tag ubuntu localhost:5000/ubuntu

Now we can push to our local registry.

$ docker push localhost:5000/ubuntu

NOTE:

Docker looks for either a “.” (domain separator) or “:” (port separator) to learn that the first part of the repository name is a location and not a user name. If you just had localhost without either .localdomain or :5000 (either one would do) then Docker would believe that localhost is a username, as in localhost/ubuntu or samalba/hipache. It would then try to push to the default Registry which is Docker Hub. Having a dot or colon in the first part tells Docker that this name contains a hostname and that it should push to your specified location instead.

Switch back to the terminal where our registry logs are being tailed. If you review the logs, you will see entries displaying the request to save our ubuntu image:


172.17.0.1 – – [26/Feb/2021:18:10:57 +0000] “POST /v2/ubuntu/blobs/uploads/ HTTP/1.1″ 202 0 “” “docker/20.10.2 go/go1.13.15 git-commit/8891c58 kernel/4.19.121-linuxkit os/linux arch/amd64 UpstreamClient(Docker-Client/20.10.2 (darwin))”

172.17.0.1 – – [26/Feb/2021:18:10:57 +0000] “POST /v2/ubuntu/blobs/uploads/ HTTP/1.1″ 202 0 “” “docker/20.10.2 go/go1.13.15 git-commit/8891c58 kernel/4.19.121-linuxkit os/linux arch/amd64 UpstreamClient(Docker-Client/20.10.2 (darwin))”

172.17.0.1 – – [26/Feb/2021:18:10:57 +0000] “POST /v2/ubuntu/blobs/uploads/ HTTP/1.1″ 202 0 “” “docker/20.10.2 go/go1.13.15 git-commit/8891c58 kernel/4.19.121-linuxkit os/linux arch/amd64 UpstreamClient(Docker-Client/20.10.2 (darwin))”

Now let’s remove our localhost:5000/ubuntu image and then pull the image from our local repository to make sure everything is working properly.

First print a list of images we have locally:

$ docker images
REPOSITORY  TAG   IMAGE ID     CREATED    SIZE
registry    2.7       5c4008a25e05 40 hours ago   26.2MB
ubuntu      latest    f63181f19b2f 5 weeks ago    72.9MB
localhost:5000/ubuntu latest f63181f19b2f 5 weeks ago 72.9MB

Now remove the localhost:5000/ubuntu:latest image from our local machine:

$ docker rmi localhost:5000/ubuntu
Untagged: localhost:5000/ubuntu:latest
Untagged: localhost:5000/ubuntu@sha256:3093096ee188f8…8c091c8cb4579c39cc4e

Let’s double check the image has been removed:

$ docker images
REPOSITORY TAG IMAGE ID CREATED SIZE
registry 2.7 5c4008a25e05 40 hours ago 26.2MB
ubuntu latest f63181f19b2f 5 weeks ago 72.9MB

Finally pull the image from our local registry and verify that it is now pulled to our local instance of Docker.

$ docker pull localhost:5000/ubuntu
Using default tag: latest
latest: Pulling from ubuntu
Digest: sha256:sha256:3093096ee188f8…8c091c8cb4579c39cc4e
Status: Downloaded newer image for localhost:5000/ubuntu:latest
localhost:5000/ubuntu:latest

$ docker images
REPOSITORY TAG IMAGE ID CREATED SIZE
registry 2.7 5c4008a25e05 40 hours ago 26.2MB
ubuntu latest f63181f19b2f 5 weeks ago 72.9MB
localhost:5000/ubuntu latest f63181f19b2f 5 weeks ago 72.9MB

Summary

In this article, we took a look at running an image registry locally. We also pulled an image for Docker Hub, tagged the image with our local registry and then pushed that image to our local registry running Distribution.

If you would like to learn more about the Distribution project, head on over to the open source project homepage on GitHub and be sure to check out the documentation. 
The post How to Use Your Own Registry appeared first on Docker Blog.
Quelle: https://blog.docker.com/feed/

How to Write a Great Talk Proposal for DockerCon LIVE 2021

First off, a big thank you to all those who have already submitted a talk proposal for DockerCon LIVE 2021. We’re seeing some really excellent proposals and we look forward to reviewing many more! We opened the CFP on February 8th and with a few more weeks to go before we close the CFP on March 15th there’s still lots of time to submit a talk. 

If you’re toying with the idea of submitting a talk but you’re still not sure whether or not your topic is interesting enough, or how to approach your topic, or if you just need a little push in the right direction to write up your proposal and click on “Send”, below are a few resources we thought you might find interesting. 

Amanda Sopkin wrote a great article a few years ago that has now become a reference for conference organizers sharing tips on how to get a technical talk accepted for a conference.  We also like Todd Lewis’ 13 tips on how to write an awesome talk proposal for a tech conference. Other interesting articles include: 

How to write a successful conference proposal by Karolina SzczurTips for your next tech conference by Rob ReillyHow to prepare and write a tech conference talk by Lena Reinhard

The Audience at DockerCon

As you prepare to write your proposal, perhaps the most important thing to keep in mind is the audience you’ll be speaking to. Remember that the people in the audience will be a lot like you – keen to discover new ways to simplify and accelerate their workflow, and exploring the right choice tools, application stacks, and deployment environments for each project. You should also expect a broad spectrum of companies and organizations attending DockerCon, large and small, for-profit and non-profit, and from a plethora of industries (eg. aviation, education, retail, health, aerospace, finance, robotics, etc..)

What we are looking for 

The theme of this year’s DockerCon is developer team collaboration in the new remote-first world.

Before submitting a talk proposal, please make sure that your topic falls under one or several of the following thematic buckets:

Team CollaborationConfiguring and managing teams in Docker Hub; Configuring and sharing local development environments;Secure DevelopmentSecurity best practices; Shifting security concerns left; Finding and fixing vulnerabilities;Best PracticesDockerfiles and build best practices; Setting up local development environments;Case Studies / Lessons LearnedLessons learned when starting with Docker toolchain; Case studies around streamlining and delivering features faster; Lessons learned as you matured your SDLC and Docker;Contributing to DockerHow to get started contributing; Understanding open source software and how Docker is developed;App Modernization and MigrationBest practices in refactoring monolithic applications to cloud-first using Docker; Moving your applications to the cloud;

First timer? Fantastic! 

Everyone has to start somewhere and a virtual conference makes it a lot less intimidating to share your knowledge. If you aren’t sure what to talk about, think about an interesting problem you’ve solved, details of your day-to-day workflow, and ask a friend what they think you should talk about. Sometimes the best topics are things that a coworker finds interesting about your skills or role. 

How DockerCon LIVE works

To allow for conversation and ensure a stress-free delivery for the speaker, session talks for DockerCon LIVE will be pre-recorded and played at a specific time during the conference. Speakers will be in chat with the audience during their session and be available to answer questions. Worry not– the Docker team will help speakers prepare, record and review their content. We love the virtual format of DockerCon LIVE and we are super excited about all the improvements we will bring to our conference platform which will provide an even better experience for speakers (new and seasoned) and attendees alike.

We’re here to help

We’re always happy to chat about your ideas or answer any questions you may have so make sure to join the DockerCon’s channel #dockercon2021 on our Community slack and drop us a line or just ping @Peter (Mckee) or @William (Quiviger) directly. 

Last but not least don’t forget to pre-register here to receive notifications about when registrations for DockerCon LIVE 2021 officially open!
The post How to Write a Great Talk Proposal for DockerCon LIVE 2021 appeared first on Docker Blog.
Quelle: https://blog.docker.com/feed/

Join Us Next Week for Docker’s Community All-Hands

Next week, on Thursday March 11th, 2021 (8am PST/5pm CET) we’ll be hosting our next quarterly Docker Community All-Hands. This free virtual event, open to everyone, is a unique opportunity for Docker staff and the broader Docker community to come together for company and product updates, live demos, community presentations and a live Q&A. 

As luck would have it, this All-Hands will coincide almost to the day with Docker’s 8th birthday (yay!). To mark the occasion, we’re going to make this event extra special by introducing : 

a longer format (ie. 3 hours instead of 1 hour)lots more content (ie. demos, community lightning talks and workshops)regional content in French, Spanish and Portuguese! 

We’re also really excited about the new video platform we’ll be using that makes it much easier for attendees to engage/connect/share with each other.

Who will be presenting

Members of Docker’s leadership team including Scott Johnston (CEO), Justin Cormack (CTO), Donnie Berkholz (VP of Products) and Jean-Laurent de Morlhon (VP of Engineering)Members of Docker’s product, engineering and community teamDocker Captains and Community Leaders

What we’ll cover

Company vision and product roadmap for 2021 and beyondHigh-level overview of Docker’s technology strategy Product updates and live demos of new features and integrationsCommunity news and updatesHands-on workshops and lightning talks presented by Docker CaptainsRegional workshops in French, Spanish and Portuguese by the community

Click here to register for the event and to view the detailed agenda.
The post Join Us Next Week for Docker’s Community All-Hands appeared first on Docker Blog.
Quelle: https://blog.docker.com/feed/

AWS Certificate Manager bietet jetzt eine Überwachung des Zertifikatsablaufs durch Amazon CloudWatch

AWS Certificate Manager (ACM) veröffentlicht jetzt Zertifikatsmetriken und Ereignisse über Amazon CloudWatch und Amazon EventBridge. Secure Sockets Layer/Transport Layer Security (SSL/TLS)-Zertifikate werden verwendet, um die Netzwerkkommunikation zu sichern und die Identität von Websites über das Internet festzustellen. Zertifikate haben eine definierte Lebensdauer und müssen zur weiteren Verwendung vor Ablauf erneuert werden. Diese neuen Metriken und Ereignisse helfen Administratoren, den Überblick über die Ablaufdaten von Zertifikaten zu behalten und die notwendigen Maßnahmen zu ergreifen oder eine Automatisierung zu konfigurieren, um den Ablauf von Zertifikaten und damit verbundene Ausfälle zu verhindern.
Quelle: aws.amazon.com

AWS Systems Manager OpsCenter zeigt jetzt eine aggregierte Ansicht aller betrieblichen Probleme für eine bestimmte Ressource an

Ab heute können Sie alle betrieblichen Probleme (OpsItems) für eine betroffene Ressource in AWS Systems Manager OpsCenter anzeigen. OpsCenter ermöglicht es Betriebsingenieuren und IT-Experten, betriebliche Probleme im Zusammenhang mit AWS-Ressourcen von einem zentralen Ort aus zu untersuchen, zu diagnostizieren und zu beheben. Dies ermöglicht es Ihnen, den größeren Zusammenhang zu verstehen, während Sie ein Problem, z. B. einen Instance-Fehler, beheben, und hilft Ihnen, Probleme schneller zu lösen.
Quelle: aws.amazon.com

Neues Beratungsangebot für AWS-Lösungen – Digitale Transformation mit Sitecore vorantreiben

Digitale Transformation mit Sitecore vorantreiben ist ein AWS-Lösungsberatungsangebot, das über einen Beratungsauftrag von Slalom, einem Partner mit den Kompetenzen AWS DevOps AWS Digital Experience, bereitgestellt wird. Mit dem Beratungsangebot „Digitale Transformation mit Sitecore vorantreiben“ nutzt Slalom Sitecores Kombination aus Content Management, Commerce und Customer Insights, um eine komplette, kundenzentrierte Strategie und Lösung zu entwerfen und umzusetzen. Kunden, die dieses Beratungsangebot in Anspruch nehmen, nehmen an einem Projekt teil, das eine maßgeschneiderte Sitecore-Konfiguration und -Einführung sowie eine Kundenerlebnisstrategie, Training und Support liefert.
Quelle: aws.amazon.com