Netflix-Konkurrent: Disney+ erreicht Marke von 100 Millionen Abos
Pro Jahr sollen künftig auf Disney+ mehr als 100 neue Titel erscheinen. (Disney+, Disney)
Quelle: Golem

Pro Jahr sollen künftig auf Disney+ mehr als 100 neue Titel erscheinen. (Disney+, Disney)
Quelle: Golem

Die vermeintlich sicheren Smartphones mit verschlüsseltem Messenger konnten von der Polizei geknackt und mitgelesen werden. (Polizei, Smartphone)
Quelle: Golem

Lorawan ist eine kostengünstige Übertragungstechnik für das Internet der Dinge. In Berlin engagiert sich der Mediziner Gerhard Peter als “Community Happiness Manager” für ein flächendeckendes Netz. Ein Interview von Friedhelm Greis (Lora, Technologie)
Quelle: Golem
What can be said about 2020 that hasn’t been said already? It definitely was a year where things happened and there certainly were several of those things that involved security. Looking across the vulnerability landscape, we see that more than 176,447 CVEs were reported.
Quelle: CloudForms
One of the key considerations of a high availability setup for Cloud SQL is its ability to failover from a primary instance to a standby instance if the primary instance becomes unresponsive. It might be a paradigm shift to think about purposely initiating a failover and watching what happens, but it can be tremendously helpful to do this sort of testing for your database to ensure that your application is resilient in the event of a zonal failover, whether for general performance testing or specific preparations for a peak event. Additionally, Regional Persistent Disks (RePD) used with your Cloud SQL instance will synchronously replicate data at the block level between two zones in a region, which means that all writes are automatically made to the standby instance in addition to the primary instance. This allows for reduced downtime and higher availability, but also brings an additional need to test failover recovery times and resiliency to ensure that your application connects to the backup instance as smoothly as possible. Let’s examine some of the key metrics to monitor when testing failover to optimize your application’s performance, including the number of database connections, queries per second, CPU and memory utilization of the instance, read/write IOPS, and peak replication lag.How do I actually failover test my Cloud SQL instance?Step 1: Select an instance for testingTake an inventory of your Cloud SQL instances and start with an instance that reflects your average workload. Don’t start out by testing your largest instance. Instead, choose an instance that is indicative of your environment’s most typical machine size and specifications, including number of tables and records.Use an instance that will be able to simulate production loads so that your testing results are meaningful.Make note of the instance’s region location as well — it is a good idea to repeat the failover testing process in all of your key regions. Step 2: Decide how you will run your testIt’s important to understand the specific data inputs and scenarios you want to test during failover. For example, you will probably want to test failover with different load sizes to understand any variations in behavior.It may help to think of it in terms of T-shirt sizing — consider your average workload, and test failover with a small, medium and large load comparative to that. While failover testing is different from load testing, it is important to make sure that you observe failover behavior under a range of different loads.Examples of variations to failover test:Non-peak loadPeak loadInstances in different regionsA range of machine sizesDifferent workloads, e.g., varying reads, writes, inserts, or updates Step 3: Conduct the failover test and get ready to observeSet aside enough time to conduct the failover test from start to finish and observe the results. It would be best to allow for several hours to fully capture important behaviors and resulting metrics leading up to, during, and post-failover tests.Capture baselines for your key metrics before testing failover so that you know what to compare.You can initiate manual failover from the GCP console or from the command line.Example metrics to capture:General:Number of database connections – you can control the number of connections, such as by automatically shutting down certain processes before initiating failover (e.g., database/network/connections)Queries per second (QPS)CPU utilization of the instance (e.g., database/cpu/utilization)Memory utilization of the instance (e.g., database/memory/utilization)Read/write IOPS (e.g., database/disk/read_ops_count, database/disk/write_ops_count)Peak replication lag (e.g., MySQL Seconds_Behind_Master metric or Postgres replica_byte_lag)MySQL:MySQL global statisticsMySQL undo spaceInnoDB dirty pages (e.g., database/mysql/innodb_buffer_pool_pages_dirty)InnoDB free pages (e.g., database/mysql/innodb_buffer_pool_pages_free)MySQL slow query log countsPostgres:Partitioned tables, tablespacesShared blocks cache access (e.g., database/postgresql/insights/aggregate/shared_blk_access_coun)Effective cache sizeVACUUM operationsOverall results:Time duration of failoverTime duration of recoveryOverall database/application performance (e.g., for both failover and failback) Step 4: Consider your lessons learnedWhat logs or metrics were useful to have? Are there any additional logs or metrics that could be set up in Google Cloud’s operations suite that would enhance your understanding of your database instance or application’s behavior?How did your read replica handle the failover traffic overflow? Could you create additional read replicas to handle load from the primary instance?Do you observe any differences in your application’s behavior for automatic failover compared to manual failover?Zonal failover in a high-availability instance from the primary to a standby instance is different from cross-regional disaster recovery. Consider testing regional failover as part of your DR strategy as well.Additional general performance tipsInternal database caching can be crucial for read performance. Whether using Cloud SQL for MySQL or Postgres, be sure you understand how your instance is caching data and reading from that cached data. For example, the way MySQL’s innodb engine caches the buffer pool.Generally, choose an instance size that allows for plenty of breathing room for CPU, RAM, and disk. The larger the disk size, the higher the IOPS capability.Similarly, if you are running a lot of CPU-intensive queries on your instance, such as sorting, regexes, etc, you will need to utilize a larger machine size.Understand how your application responds to lost connections. You can also test this by restarting your instance.Try this out on Cloud SQL in the console or read the documentation for the Cloud SQL insights that can help you troubleshoot performance issues in such scenarios.
Quelle: Google Cloud Platform

Data is the lifeblood of the modern business and you simply cannot afford to lose it: Downtime and data loss are costly and risky, and end users expect 24×7 access to their applications and data. As such, every organization needs a comprehensive business continuity (BC) and disaster recovery (DR) strategy that ensures uptime, minimizes data loss and maintains productivity in the face of a disruption. This is especially true in today’s climate when BC & DR plans are being tested by travel restrictions and remote work.However, traditional approaches to disaster recovery are often expensive because they require you to provision spare idle IT infrastructure at a DR site. And while using on-demand capacity in the cloud has long promised to deliver significant economic efficiencies for DR, it’s only an option if the DR environment is similar to your on-prem infrastructure. What you need is an on-demand, easy-to-stand-up solution that mimics your primary environment, and that lets you pay for capacity only during a disaster or a test. In this post, we’ll discuss how you use Google Cloud VMware Engine, our fully managed VMware platform delivered as a service, with Actifio enterprise data management software to create a ‘Zero Footprint’ DR solution. The service delivers a fully managed VMware Cloud Foundation stack, making it easy for you to replicate your on-prem environment in Google Cloud. And because you only pay for usage during failover / test time, it lowers your total cost of ownership (TCO). Let’s take a closer look. What is Google Cloud VMware Engine?Google Cloud VMware Engine is a first-party offering, fully owned, operated and supported by Google Cloud, that lets you run your VMware environment natively in Google Cloud. The service delivers a fully managed VMware Cloud Foundation hybrid cloud platform, including VMware vSphere, vCenter, vSAN, NSX-T, and HCX technologies, all in a dedicated environment on Google Cloud’s high performance and reliable infrastructure. The service lets you seamlessly migrate production workloads to the cloud without the cost or complexity of refactoring applications, and manage workloads consistently with your on-prem environment. Additionally, you can reduce your operational burden by moving to an on-demand, self-service model, while maintaining continuity with your existing tools, processes and skill sets, while also taking advantage of Google Cloud services to supercharge your VMware environment.What is Actifio?Actifio is a leading backup and disaster recovery software provider that lets you protect virtual copies of data in their native format, manage these copies throughout their entire lifecycle, and use these copies for scenarios like development and test. Recently acquired by Google Cloud, Actifio lets you:Increase business availability by simplifying and accelerating backup and DR at scale, across cloud-native, and hybrid environments Automatically back up and protect a variety of workloads, including enterprise databases like SAP HANA, Oracle, Microsoft SQL Server, PostgreSQL, and MySQL, as well as virtual machines (VMs) in VMware, physical servers, and Compute Engine environments.Bring significant efficiencies to data storage, transfer, and recoveryGoogle Cloud VMware Engine, meet ActifioSo, how can you combine Actifio with Google Cloud VMware Engine to create a cost-effective DR solution for your VMware workloads?If you have a recovery time objective (RTO) of a few hours, you can back up your data from on-prem to Cloud Storage using Actifio, and perform test, failover and failback operations. During a test or a failover, you can dynamically create a VMware environment using Google Cloud VMware Engine and restore your applications to this environment from the backup copy stored in Cloud Storage.With this solution, you don’t need to keep a running VMware Private Cloud in Google Cloud VMware Engine to protect your on-prem environments—you can create the DR VMware environment on-demand during failover / test time and restore your on-prem VMware applications as needed in the service, enabling like-for-like recoverability. Furthermore, as there is no network egress traffic, there are no associated costs during application recovery, making DR much more affordable.. And because this solution leverages an environment and tools that you’re already familiar with, it’s much easier to get your DR environment up and running.Actifio + Google Cloud VMware Engine under the hood The Google Cloud VMware Engine + Actifio solution drives down the cost of DR by rapidly and dynamically creating a VMware SDDC and enabling instant data access directly from Cloud Storage via Actifio. The solution uses a GCP Project as the DR site for an on-premises VMware environment. It requires a pair of Actifio Sky appliances—one of them is installed in your on-prem VMware environment and another (DR-Sky) in a GCP project as a Compute Engine instance that is part of the DR environment. The VMware SDDC and the DR-sky are started only at DR test/failover time, thus keeping zero ongoing compute on the DR site when it is not in use. The on-prem Sky appliance takes a snapshot of the VM’s disks and stores them as a recoverable image in Cloud Storage. At the time of a failover or a DR test, a VMware SDDC is dynamically created along with the DR-Sky in Compute Engine. The new SDDC is registered to Actifio. The backup images stored in Cloud Storage are imported by the Sky appliance into VMware Engine SDDC, letting VMs be instantly created from the backup images. The VMs boot directly from Cloud Storage and continue to run while its vmdk’s are still backed by Cloud Storage. This is a cost-effective approach when running DR tests, as you don’t necessarily need to run on performance-optimized infrastructure. You can then subsequently use storage vMotion to move your recovered VMs to a local vSAN datastore to complete the recovery process and run the VMs in production configuration.Architectural diagram showing steady-state “zero footprint” (i.e. no DR-specific cloud-based compute required) protection.Architectural diagram showing a post-failover recovery deployment. Google Cloud VMware Engine and Actifio have been deployed to facilitate VM recovery from Cloud Storage.Next stepsTogether, the combination of VMware Engine and Actifio makes it easy and cost-effective to use Google Cloud as a DR target, ensuring that data doesn’t get lost in the event of an outage, and that your users don’t lose access to their applications. If you’re interested in trying this zero-footprint solution, please fill out this form and we will reach out to you with next steps.Related ArticleGoogle enters agreement to acquire ActifioAs organizations sharpen their disaster preparedness strategies, Actifio’s business continuity solutions will help Google Cloud customers…Read Article
Quelle: Google Cloud Platform
Last fall, weannounced the Public Previewof the Google Cloud Healthcare Consent Management API, which gives healthcare application developers and clinical researchers a simple way to manage individuals’ consent over use of health data. Since then, early adopters have used the API to do things like create personalized patient portals, securely integrate data into clinical workflows based on patient consent, and develop virtual clinical trials. Today, we’re pleased to announce that the Healthcare Consent Management API is generally available, giving customers the ability to greatly scale the management of consents to meet increasing need, particularly amidst the emerging task of managing health data for new care and research scenarios. During the COVID-19 pandemic, healthcare organizations have quickly embraced concepts like virtual care and remote trials. As a result, healthcare application developers and researchers have needed easy and secure ways to manage patient consent. Further, the explosion of rich data generated by devices such as glucose monitors, wearables, and other sources have emphasized the importance of patient consent and privacy, as patients and caregivers look to safely incorporate data from more sources into their care plans.The Healthcare Consent Management API helps by making it easier to satisfy the requirements of existing and emerging privacy and consent frameworks, while supporting the transparent and responsible incorporation of digital health data into patient care and research. The flow of consent and privacy information can work as follows:Administrators within a provider or research organization configure a unique instance of the Healthcare Consent Management API with the privacy concepts and terminology that their organizations use.When a provider or researcher application offers privacy options to a user, the application creates or revises a corresponding consent record within the Healthcare Consent Management API to reflect that user’s selected option.As provider or researcher applications write data to their datastores, those applications inform the organization’s Healthcare Consent Management API instance about the relevant privacy characteristics of that data.When providers, researchers or their applications need to determine whether data can be accessed for a particular purpose, a query is sent to the Healthcare Consent Management API, which quickly determines if there is a valid consent record permitting that access. The Healthcare Consent Management API adds to Google Cloud’s efforts to bring innovative technologies to the healthcare and life sciences industries—particularly in data security, privacy, and interoperability. For example, our Healthcare API facilitates construction of cloud-native applications that work with industry-standard data like HL7v2, FHIR and DICOM; our Life Sciences API is accelerating genomics research; our Healthcare Interoperability Readiness Program helps organizations achieve secure interoperability among healthcare data sources; and Cloud Data Loss Prevention provides a fully managed service designed to help discover, classify, and protect sensitive data. We’re pleased to add the Healthcare Consent Management API to our portfolio of solutions, and to support healthcare and life sciences professionals as healthcare data begins to span a variety of devices, scenarios, and locations. To learn more about the Consent Management API, and to get started with your own healthcare project, visit theconcept articles andhow-to guides.Related ArticleAdvancing telehealth with AmwellOur new partnership with Amwell helps the healthcare industry transform for a world that is more reliant on telehealth.Read Article
Quelle: Google Cloud Platform
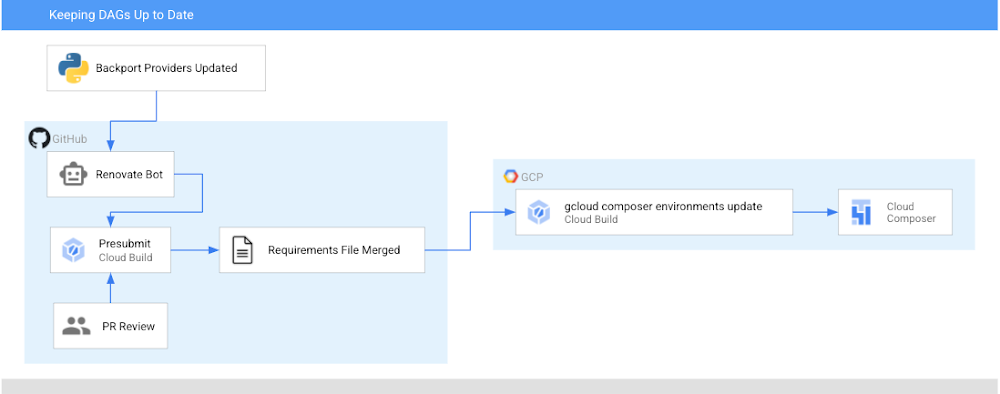
Before 2020, keeping your Airflow operators up to date meant either upgrading to the most recent version of Airflow, or bringing newer versions of the operators in as plugins. Now (if you’re using Airflow 1.10.6 or later), the latest versions of operators are packaged as PyPI modules that can be installed in your Airflow environment! In this post, I’m going to show you how to automatically keep your operators (and any other PyPI packages) up to date in your Cloud Composer environment utilizing Cloud Build and GitHub automation. Note: in Cloud Composer some backport packages come pre-installed in your environment – see the versions list for more details about what is installed in the version you are running.After this walkthrough, this is how your development flow will look when a new version of the operators you are using is released:Step 0: There is an update to operatorsStep 1: Renovate Bot opens up a PR to a requirements-composer.txt file to make this updateStep 2: Cloud build runs unit tests to make sure none of your DAGs immediately breakStep 3: PR is approved and merged to mainStep 4: Cloud Build updates your dev environmentStep 5: You, a human, look at your DAGs in dev to make sure all is well. If there is a problem, you need to resolve this manually and revert your requirements file. Step 6: You, a human, manually update your prod PyPI packagesIn this post, we will first:Create a requirements file that Cloud Build will use to unit test your DAGs with a new version of the operators and eventually to update your Composer EnvironmentSet up the Cloud Build job to unit test your DAGsSet up the Cloud Build job to update your composer environmentsSet up Renovate Bot to automatically check for updates to the Airflow operators (and other dependencies)Repo StructureThis blog post assumes that you have your DAGs and their tests stored in a GitHub repository. In this directory, which contains the contents of an example repository, DAGs and tests are stored in a dags folder, with requirements files and configuration files living at the top level. Setting up Cloud BuildThere will be two Cloud Build steps – one that runs on a pull request to unit test your DAGs, and one that runs when a PR is merged to the “main” branch that updates your Composer environment with the latest PyPI dependency. Job #1 – Unit Testing Your DAGsCreating a requirements fileTo keep track of the PyPI modules installed in my Composer environment, I have been using a special requirements-composer.txt file that lives in the GitHub repository where I store my dags. Create this file now—it’s just like a regular requirements.txt file, only with a special name. In it, I’ve added the most recent version of the operator package I’m using – in this case, apache-airflow-backport-providers-google. I specifically pin the operators to a specific version so it is always clear what version is installed in my environment. requirements-composer.txtapache-airflow-backport-providers-google==2020.11.23Creating Your DockerfileIn order to run the unit tests, create a Dockerfile so that we can make a container image to run in Cloud Build. This Dockerfile installs all relevant dependencies and runs the test command. Creating your cloudbuild.yaml fileCreate a YAML file to configure your Cloud Build job named test-dags.cloudbuild.yaml. In it, there are two steps:The first step builds the Docker image from the Dockerfile you just created. The Docker image is taggedusing default substitutions with the tag cicd and the commit SHA, which acts as a UUID.The second step is to run the container image, executing the DAG testsNote: You can additionally choose to store your image in Container Registry as part of your workflow.Create the Cloud Build TriggerFollowing this guide, create a GitHub app based trigger with the following configurations:Name: test-dagsEvent: Pull RequestSource – Repository: choose your repositorySource – Base branch: ^main$ (or whatever the name of your base branch is)Source – Comment Control: not required (this means that any user can submit a PR that triggers the build)Build Configuration – Cloud build configuration file: /test-dags.cloudbuild.yaml (the path to your build file)To test your build, create a pull request to your main branch – you will see your check, and if you click “Details” and choose “View more details on Google Cloud Build”, you can see your build logs in the Cloud Console.Job #2 – Updating Your Composer EnvironmentNow that you are successfully using Cloud Build to unit test your DAGs against any requirements changes, let’s automate the updating of your Composer environment.Creating a cloudbuild.yaml fileCreate a YAML file to configure your Cloud Build job and name it update-composer.cloudbuild.yaml. In it, there is one step, which invokes the gcloud composer environments update command, passing the requirements-composer.txt file to install the Python dependencies. ${_COMPOSER_NAME} and ${_COMPOSER_REGION} are user-defined substitutions you will define in the next section. This configuration file also includes a timeout – the default Cloud Build timeout is too short to accommodate long running Composer Environment update operations – this timeout ensures the operation can finish and send its end status back to Cloud Build.Create the Cloud Build TriggerFollowing this guide, create a GitHub app based trigger with the following configurations:Name: update-composer-envEvent: Push to a branchSource – Repository: choose your repositorySource – Base branch: ^main$ (or whatever the name of your base branch is)Source – Included files filter (glob): requirements-composer.txt (this means the build should only run if this file is changed)Build Configuration – Cloud build configuration file: /update-composer.cloudbuild.yaml (the path to your build file)In the Advanced configuration, add two substitution variables _COMPOSER_NAME – the name of your composer environment_COMPOSER_REGION – the Compute engine region where your environment is locatedTo test your build, you can manually trigger it from the Triggers page by pressing “RUN” next to your newly created trigger. Additionally, you can create a pull request to your main branch specifically updating the requirements-composer.txt file – you will see your first check, and once you merge the PR to main, you should see the build start in your Build historyTo automate this even further, let’s have a robot keep our dependencies up to date.Setting up a Dependency BotThere are multiple options for bots that keep your dependencies up to date, but I personally prefer WhiteSource renovate bot. Not only does it do what I need, but I have found that the folks who work on it are very responsive and kind when I’ve opened issues and I really appreciate that. First, you’ll need to install the Renovate GitHub App and give it the appropriate access to your repository. You’ll then need to add a configuration file called renovate.json to the GitHub repository. Renovate will automatically look for changes in a regular requirements.txt file, but you can also configure it to watch additional requirements files. In our case, we want to watch the requirements-composer.txt file, so we add it to the pip_requirements filematch object. There are many additional configuration options that you can explore in addition to the ones shown here. Experiment and see what fits your needs!Putting it all togetherWhen there is an update to the packages in requirements-composer.txt, renovate bot will open up a PR to the repo. When that PR is merged to master (either by the bot, if you have automerge set to true in your config, or by a human), it will trigger the cloud build job, which will update your Cloud Composer environment. From now on, this automation will ensure you never miss an update to the Airflow operators!CaveatsIf your update composer environment operation fails, you need to resolve that failure manually, and you will need to make sure your requirements-composer.txt file is reverted to match the dependencies used in your Composer environmentYou will need to verify your DAGs using the Airflow UI as well, and if you’re using a two environment setup (Dev + Prod), it is recommended to use this automation with your dev environment, and only update the production environment once you verify that everything is functioning as expected.ConclusionBy following this process you can automatically keep your operators (and any other PyPI packages) up to date in your Cloud Composer environment utilizing Cloud Build and GitHub automation.Was this so fun that you want to continue automating this process? Check out how to add notifications to your Cloud Build status.Related ArticleGoogle Cloud and GitHub collaborate to make CI fast and easyToday, Google Cloud and GitHub are delivering a new integrated experience that connects GitHub with Google’s Cloud Build, our new CI/CD p…Read Article
Quelle: Google Cloud Platform

The latest Docker Desktop release, 3.2, includes support for iTerm2 which is a terminal emulator that is highly popular with macOS fans. From the Containers/Apps Dashboard, for a running container, you can click `CLI` to open a terminal and run commands on the container. With this latest release of Docker Desktop, if you have installed iTerm2 on your Mac, the CLI option opens an iTerm2 terminal. Otherwise, it opens the Terminal app on Mac or a Command Prompt on Windows.
Of note, this feature request to support additional terminals started from the Docker public roadmap. Daniel Rodriguez, one of our community members, submitted the request to the public roadmap. 180 people upvoted that request and we added it and prioritized it on our public roadmap.
The public roadmap is our source of truth for community feedback on prioritizing product updates and feature enhancements. Not everything submitted to the public roadmap will end up as a delivered feature, but the support for M1 chipsets, image vulnerability scanning and audit logging – all delivered within the last year – all started as issues submitted via the roadmap.
This is the easiest way for you to let us know about your pain points and what we can do to make Docker work better for your use cases. If you haven’t seen the public roadmap yet, check out the issues already submitted by others.
If any of the submitted issues resonate with you, provide your comments, and/or add your vote. If you do not see an issue that you want to be addressed, go ahead and submit your own. We regularly review the new entries and the roadmap updates. If you have never done this before, please review the contributing guidelines. We have created these guidelines to make sure that we understand your needs and your use cases.
Check out the public roadmap, take a look at what’s already on there and please give us your feedback!
The post Desktop Support for iTerm2 – A Feature Request from the Docker Public Roadmap appeared first on Docker Blog.
Quelle: https://blog.docker.com/feed/

Mittels SMS-TAN müssen Konten sich auf Ebay Kleinanzeigen verifizieren. Das dient wohl zunächst dem Schutz Minderjähriger. (eBay, SMS)
Quelle: Golem