2025 SC79: Asteroid umrundet die Sonne in nur 128 Tagen
Damit ist dieser Himmelskörper der zweitschnellste Asteroid in unserem Sonnensystem. (Asteroid, Astronomie)
Quelle: Golem

Damit ist dieser Himmelskörper der zweitschnellste Asteroid in unserem Sonnensystem. (Asteroid, Astronomie)
Quelle: Golem

Remember when owning software meant you bought a CD, installed it, and it was yours until your computer died? Even if you got a new computer, you could install that same software on the new one. Only “serious” software packages had strict licensing restrictions.
These days, most of our tools live in the cloud, guarded by login screens and monthly invoices. That does sound more convenient—until the subscription fee increases, the features change, or the service shuts down overnight.
If you’ve ever thought, “There must be a better way”, you’re not alone. Self-hosting is on the rise, and it’s not just because people enjoy tinkering with servers in their basements (though some do). Whether you only want a way to store your family photos and documents or you want to do your own password management, there’s probably an open-source option you can host yourself.
In this article, I dig into why self-hosting is growing, the different ways to host your own services (from a Raspberry Pi to a rented server), and some beginner-friendly software to get started with.
Something to keep in mind: self-hosting and open-source software often go hand in hand, but they’re not the same thing. Many popular self-hosted apps are open-source, but you can also self-host closed-source tools, just as there are open-source apps that only run in someone else’s cloud. In other words, self-hosting is about who controls the infrastructure, not necessarily how the software is licensed.
What Motivates People to Try Self-Hosting?
Here are some of the biggest reasons you might decide to run things yourself:
Privacy and Data Sovereignty
When you use a third-party service, your data often lives on their servers under their rules. That means trusting them to keep it secure, private, and not to sell it to advertisers or hand it over at the drop of a subpoena. With self-hosting, you decide where your data lives and who can see it.
There’s also something inherently creepy about providers like Google Photos wanting to normalize the idea of deepfaking your family photos to create memories that never happened. These are *your* photos, not training data for Google’s AI models.
Escaping Subscription Fatigue
Five dollars here, ten dollars there… and suddenly you’re paying more for cloud services than for your actual internet connection. To make matters worse, subscription tiers are often set up so that the one feature you actually need sits behind the premium option.
Self-hosted software is often free, or it might carry a one-time cost; you only need to provide the hardware and electricity.
For a home user, that can lead to serious savings over time.
Avoiding Platform Lock-in
Have you ever tried to switch from one cloud service to another, only to find your data is trapped in a weird file format or missing entirely? That’s platform lock-in, and it’s as fun as it sounds.
With self-hosted, open-source tools, you control the formats, backups, and migration process, making it easier to change things later.
When you’re in control of your data, you can move it to a new platform in an afternoon instead of spending days untangling exported files—or worse, discovering that some of your data is simply gone for good.
The Joy of Customization and Independence
Many self-hosted open-source projects let you tweak things to your liking, from the frontend color scheme to adding features no commercial platform offers. There’s something satisfying about knowing your setup runs exactly how you want it to.
Updates can still cause trouble even in self-hosted setups, but at least you decide when you want to upgrade. Unlike when OpenAI recently “upgraded” to ChatGPT 5, and users were clamoring to get ChatGPT 4 back!
It also means you decide how often you update, which features to enable, and how your data is organized. Your server won’t suddenly rearrange your photos or change its interface just because someone in a corporate boardroom decided it was time for a “fresh new look.”
A mainstream cloud service usually has to adopt a one-size-fits-all policy, but if you try self-hosting, you’ve got the time to try out a custom-fitted solution.
What Is Self-Hosting?
At its core, self-hosting simply means running software on infrastructure you control: your own hardware, a rented server, or some mix of the two. Instead of trusting a third-party provider to store your files, stream your media, or manage your notes, you’re the one who’s in charge.
There’s no one “right” way to self-host. The best option for you depends on how much control you want, how hands-on you’re willing to be, and what kind of hardware you have access to.
Running Your Own Hardware
This could be anything from a powerful (network-attached storage (NAS)) box, an old laptop you’ve repurposed, or a Raspberry Pi quietly humming in the corner. You get maximum control and keep your data entirely in your own hands, without relying on an outside company to keep it safe.
You might even be brave enough to go the route of a refurbished enterprise server for more horsepower. But be aware: those older machines can be noisy and surprisingly power-hungry. Your electricity bill might notice before you do. You’ll also most likely be running Linux as an operating system because most self-hosted projects are built and supported for Linux first. This opens up a world of possibilities—but it also comes with a bit of a learning curve if you’ve never worked with Linux before.
Of course, you’re also in control of your own backups, which can be a double-edged sword. You should be fine if you follow the 3-2-1 rule of backups, which advocates for keeping three copies of your data on at least two different mediums, with at least one copy being stored off-site.
Remember, RAID is good, but RAID is not a backup!
Using a VPS or Rented Server
A VPS, or virtual private server, is basically a small slice of someone else’s much larger computer in a data center, rented on a month-to-month basis. It can provide excellent uptime, stable internet speeds, and the ability to run almost anything you could run at home, without worrying about power cuts or router failures.
Depending on the provider and the pricing tier, there might also be some extras included: automated backups, easy scaling if you need more resources, and sometimes even built-in security tools.
The trade-off is that you’re still trusting the hosting provider, who has full control over the physical host machine your VPS runs on, which in turn gives them the ability to access or manage your virtual server if they choose. If you have particularly strong privacy concerns, then the VPS route might not be for you.
Oh, and you’ll probably still be running Linux.
The Hybrid Approach
Many people prefer to use a mix of these two approaches: maybe your photo library runs on a VPS for easy access anywhere in the world, while your media server lives at home to stream movies directly over your local network.
Hybrid setups can give you the best of both worlds in terms of convenience and control, without putting all your eggs in one basket.
Popular Self-Hosted Alternatives
Once you decide to give self-hosting a try, the next question is: what should you run first? The good news is there’s a huge range of open-source software that’s not only powerful, but also easy to set up—especially if they’re available to run as a [container](https://www.docker.com/resources/what-container/).
Containers are tightly packaged software delivery mechanisms that contain all the necessary pieces for running a particular application, like software libraries and configuration. And while you’d typically run different services (like a web server and database) as separate containers, tools like Docker Compose lets you start them all together with a single command, instead of manually configuring everything one piece at a time.
Below are some popular self-hosted options to get started with. They’re sourced from recommendations that are mentioned again and again on communities like r/selfhosted or r/homelab.
Photos
If you’ve been looking for a Google Photos replacement, Immich is worth consideration. It can automatically back up your photos and videos from your phone, offers popular Google-esque features like facial recognition, and has a slick web interface for browsing your library.
It’s open-source, and you can download the source code directly from their Github repository. They also ask that users support the project by buying a support license. The license does not change anything about the product; it’s simply a way for fans of the project to contribute to a great, open-source application.
Productivity
Everyone needs a word processor, and even though Google Docs is free to use with a Google account, it’s not really free: you’re still paying with your data and privacy.
LibreOffice is a fully-featured, open-source office productivity suite with applications for word processing, spreadsheets, and presentations, to mention a few. It is also compatible with most of the new Microsoft Office document formats like *.docx* and *.pptx*.
You can also try “Collabora Online Development Edition” (CODE for short), an online, collaborative editing platform built on top of LibreOffice. Its Docker image makes running it rather effortless.
File Storage
Seafile is a file storage application for hosting and sharing any file from your own servers. While they do have a Pro edition with more features, the completely free Community Edition can run on your own hardware.
Another option is Nextcloud, an open-source content collaboration platform with a rich app ecosystem for features like file storage, calendars, contacts, and more, all running on infrastructure you control.
Media
If you’ve ever dreamed of running your own Netflix-style media library, Jellyfin can make it happen. It streams your movies, TV shows, and music to any device you own: no ads, no data tracking, and no sudden content removals.
Supporting Tools
If you’re considering running a self-hosted setup, there are a few supporting tools you should almost always include.
One of these is Vaultwarden, a lightweight, self-hosted password manager that syncs across devices and works with the Bitwarden browser extensions and apps.
Another is Netbird. When you start hosting your own hardware and software, one of the more common challenges is securing your network access to your infrastructure. Netbird is a zero-configuration networking platform that makes setting up VPNs to your various devices a much less daunting task.
Taking Back Control of Your Digital Life
Self-hosting isn’t just for enterprise sysadmins anymore. Whether you want to protect your privacy, cut down on subscriptions, avoid lock-in, or just build something that works exactly the way you want it, there’s never been an easier time to take control of your digital life.
As you’ve seen in this article, there’s more than one way to do it: running a quiet little server in your home, renting a VPS with built-in backups, or mixing the two options in a hybrid setup. And with so many great open-source tools available—from Immich and Nextcloud to Jellyfin and Vaultwarden—you can build your own digital toolkit without sacrificing convenience or features.
Container platforms like Docker make it even easier to get started. Many self-hosted projects provide official Docker images, so you can deploy apps consistently on almost any machine. With a little time and patience, you could be running powerful, private, and subscription-free services in no time.
If you’ve ever felt like the cloud has taken a little too much control over your data (and your wallet), maybe it’s time to explore the idea of owning your own little piece of cloud.
Quelle: https://blog.docker.com/feed/
This is an abridged version of the interview we had in AI Guide to the Galaxy, where host Oleg Šelajev spoke with Jim Clark, Principal Software Engineer at Docker, to unpack Docker’s MCP Toolkit and MCP Gateway.
TL;DR
What they are: The MCP Toolkit helps you discover, run, and manage MCP servers; the MCP Gateway unifies and securely exposes them to your agent clients.
Why Docker: Everything runs as containers with supply-chain checks, secret isolation, and OAuth support.
How to use: Pick servers from the MCP Catalog, start the MCP Gateway, and your client (e.g., Claude) instantly sees the tools.
First things first: if you want the official overview and how-tos, start with the Docker MCP Catalog and Toolkit.
A quick origin story (why MCP and Docker?)
Oleg: You’ve been deep in agents for a while. Where did this all start?
Jim: When tool calling arrived, we noticed something simple but powerful: tools look a lot like containers. So we wrapped tools in Docker images, gave agents controlled “hands,” and everything clicked. That was even before the Model Context Protocol (MCP) spec landed. When Anthropic published MCP, it put a name to what we were already building.
What the MCP Toolkit actually solves
Oleg: So, what problem does the Toolkit solve on day one?
Jim: Installation and orchestration. The Toolkit gives you a catalog of MCP servers (think: YouTube transcript, Brave search, Atlassian, etc.) packaged as containers and ready to run. No cloning, no environment drift. Just grab the image, start it, and go. As Docker builds these images and publishes them to Hub, you get consistency and governance on pull.
Oleg: And it presents a single, client-friendly surface?
Jim: Exactly. The Toolkit can act as an MCP server to clients, aggregating whatever servers you enable so clients can list tools in one place.
How the MCP Gateway fits in
Oleg: I see “Toolkit” inside Docker Desktop. Where does the MCP Gateway come in?
Jim: The Gateway is a core piece inside the Toolkit: a process (and open source project) that unifies which MCP servers are exposed to which clients. The CLI and UI manage both local containerized servers and trusted remote MCP servers. That way you can attach a client, run through OAuth where needed, and use those remote capabilities securely via one entry point.
Oleg: Can we see it from a client’s perspective?
Jim: Sure. Fire up the Gateway, connect Claude, run mcp list, and you’ll see the tools (e.g., Brave Web Search, Get Transcript) available to that session, backed by containers the Gateway spins up on demand.
Security: provenance, secrets, and OAuth without drama
Oleg: What hardening happens before a server runs?
Jim: On pull/run, we do provenance verification, ensuring Docker built the image, checking for an SBOM, and running supply-chain checks (via Docker Scout) so you’re not executing something tampered with.
Oleg: And credentials?
Jim: Secrets you add (say, for Atlassian) are mounted only into the target container at runtime, nothing else can see them. For remote servers, the Gateway can handle OAuth flows, acquiring or proxying tokens into the right container or request path. It’s two flavors of secret management: local injection and remote OAuth, both controlled from Docker Desktop and the CLI.
Profiles, filtering, and “just the tools I want”
Oleg: If I have 30 servers, can I scope what a given client sees?
Jim: Yes. Choose the servers per Gateway run, then filter tools, prompts, and resources so the client only gets the subset you want. Treat it like “profiles” you can version alongside your code; compose files and config make it repeatable for teams. You can even run multiple gateways for different configurations (e.g., “chess tools” vs. “cloud ops tools”).
From local dev to production (and back again)
Oleg: How do I move from tinkering to something durable?
Jim: Keep it Compose-first. The Gateway and servers are defined as services in your compose files, so your agent stack is reproducible. From there, push to cloud: partners like Google Cloud Run already support one-command deploys from Compose, with Azure integrations in progress. Start locally, then graduate to remote runs seamlessly.
Oleg: And choosing models?
Jim: Experiment locally, swap models as needed, and wire in the MCP tools that fit your agent’s job. The pattern is the same: pick models, pick tools, compose them, and ship.
Getting started with MCP Gateway (in minutes)
Oleg: Summarize the path for me.
Jim:
Pick servers from the catalog in Docker Desktop (or CLI).
Start the MCP Gateway and connect your client.
Add secrets or flow through OAuth as needed.
Filter tools into a profile.
Capture it in Compose and scale out.
Why the MCP Toolkit and Gateway improve team workflows
Fast onboarding: No glue code or conflicting envs, servers come containerized.
Security built-in: Supply-chain checks and scoped secret access reduce risk.
One workflow: Local debug, Compose config, cloud deploys. Same primitives, fewer rewrites.
Try it out
Spin up your first profile and point your favorite client at the Gateway. When you’re ready to expand your agent stack, explore tooling like Docker Desktop for local iteration and Docker Offload for on-demand cloud resources — then keep everything declarative with Compose.
Ready to build? Explore the Docker MCP Catalog and Toolkit to get started.
Learn More
Watch the rest of the AI Guide to the Galaxy series
Explore the MCP Catalog: Discover containerized, security-hardened MCP servers
Open Docker Desktop and get started with the MCP Toolkit (Requires version 4.48 or newer to launch the MCP Toolkit automatically)
Check out our latest guide on how to setup Claude Code with Docker’s MCP Toolkit
Quelle: https://blog.docker.com/feed/
I’m Mike Coleman, a staff solutions architect at Docker. In this role, I spend a lot of time talking to enterprise customers about AI adoption. One thing I hear over and over again is that these companies want to ensure appropriate guardrails are in place when it comes to deploying AI tooling.
For instance, many organizations want tighter control over which tools developers and AI assistants can access via Docker’s Model Context Protocol (MCP) tooling. Some have strict security policies that prohibit pulling images directly from Docker Hub. Others simply want to offer a curated set of trusted MCP servers to their teams or customers.
In this post, we walk through how to build your own MCP catalog. You’ll see how to:
Fork Docker’s official MCP catalog
Host MCP server images in your own container registry
Publish a private catalog
Use MCP Gateway to expose those servers to clients
Whether you’re pulling existing MCP servers from Docker’s MCP Catalog or building your own, you’ll end up with a clean, controlled MCP environment that fits your organization.
Introducing Docker’s MCP Tooling
Docker’s MCP ecosystem has three core pieces:
MCP Catalog
A YAML-based index of MCP server definitions. These describe how to run each server and what metadata (description, image, repo) is associated with it. The MCP Catalog hosts over 220+ containerized MCP servers, ready to run with just a click.
The official docker-mcp catalog is read-only. But you can fork it, export it, or build your own.
MCP Gateway
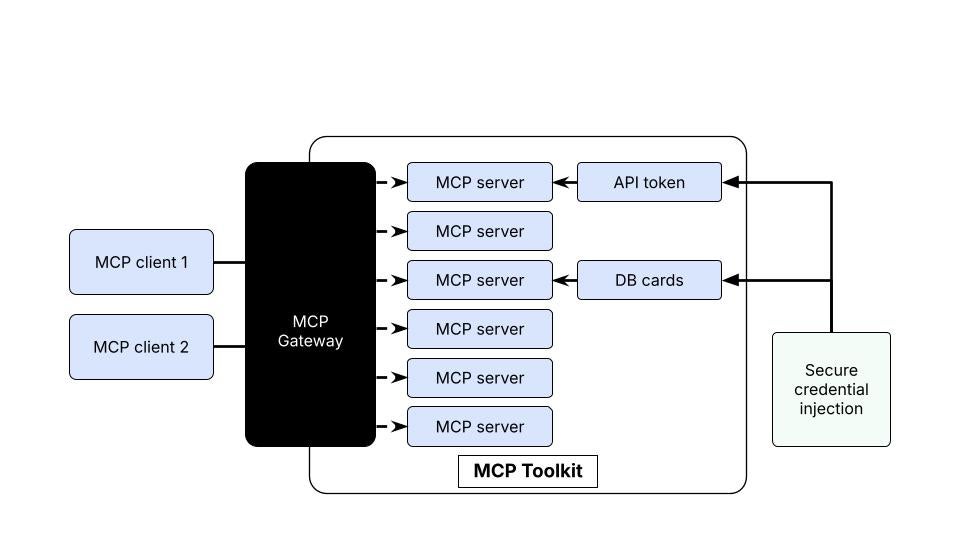
The MCP Gateway connects your clients to your MCP servers. It doesn’t “host” anything — the servers are just regular Docker containers. But it provides a single connection point to expose multiple servers from a catalog over HTTP SSE or STDIO.
Traditionally, with X servers and Y clients, you needed X * Y configuration entries. MCP Gateway reduces that to just Y entries (one per client). Servers are managed behind the scenes based on your selected catalog.
You can start the gateway using a specific catalog:
docker mcp gateway run –catalog my-private-catalog
MCP Gateway is open source: https://github.com/docker/mcp-gateway
Figure 1: The MCP Gateway provides a single connection point to expose multiple MCP servers
MCP Toolkit (GUI)
Built into Docker Desktop, the MCP Toolkit provides a graphical way to work with the MCP Catalog and MCP Gateway. This allows you to:
Access to Docker’s MCP Catalog via a rich GUI
Secure handling of secrets (like GitHub tokens)
Easily enable MCP servers
Connect your selected MCP servers with one click to a variety of clients like Claude code, Claude Desktop, Codex, Cursor, Continue.dev, and Gemini CLI
Workflow Overview
The workflow below will show you the steps necessary to create and use a custom MCP catalog.
The basic steps are:
Export the official MCP Catalog to inspect its contents
Fork the Catalog so you can edit it
Create your own private catalog
Add specific server entries
Pull (or rebuild) images and push them to your registry
Update your catalog to use your images
Run the MCP Gateway using your catalog
Connect clients to it
Step-by-Step Guide: Creating and Using a Custom MCP Catalog
We start by setting a few environment variables to make this process repeatable and easy to modify later.For the purpose of this example, assume we are migrating an existing MCP server (DuckDuckGo) to a private registry (ghcr.io/mikegcoleman). You can also add your own custom MCP server images into the catalog, and we mention that below as well.
export MCP_SERVER_NAME="duckduckgo"
export GHCR_REGISTRY="ghcr.io"
export GHCR_ORG="mikegcoleman"
export GHCR_IMAGE="${GHCR_REGISTRY}/${GHCR_ORG}/${MCP_SERVER_NAME}:latest"
export FORK_CATALOG="my-fork"
export PRIVATE_CATALOG="my-private-catalog"
export FORK_EXPORT="./my-fork.yaml"
export OFFICIAL_DUMP="./docker-mcp.yaml"
export MCP_HOME="${HOME}/.docker/mcp"
export MCP_CATALOG_FILE="${MCP_HOME}/catalogs/${PRIVATE_CATALOG}.yaml"
Step 1: Export the official MCP Catalog
Exporting the official Docker MCPCatalog gives you a readable local YAML file listing all servers. This makes it easy to inspect metadata like images, descriptions, and repository sources outside the CLI.
docker mcp catalog show docker-mcp –format yaml > "${OFFICIAL_DUMP}"
Step 2: Fork the official MCP Catalog
Forking the official catalog creates a copy you can modify. Since the built-in Docker catalog is read-only, this fork acts as your editable version.
docker mcp catalog fork docker-mcp "${FORK_CATALOG}"
docker mcp catalog ls
Step 3: Create a new catalog
Now create a brand-new catalog that will hold only the servers you explicitly want to support. This ensures your organization runs a clean, controlled catalog that you fully own.
docker mcp catalog create "${PRIVATE_CATALOG}"
Step 4: Add specific server entries
Export your forked catalog to a file so you can copy over just the entries you want. Here we’ll take only the duckduckgo server and add it to your private catalog.
docker mcp catalog export "${FORK_CATALOG}" "${FORK_EXPORT}"
docker mcp catalog add "${PRIVATE_CATALOG}" "${MCP_SERVER_NAME}" "${FORK_EXPORT}"
Step 5: Pull (or rebuild) images and push them to your registry
At this point you have two options:
If you are able to pull from Docker Hub, find the image key for the server you’re interested in by looking at the YAML file you exported earlier. Then pull that image down to your local machine. After you’ve pulled it down, retag it for whatever repository it is you want to use.
Example for duckduckgo
vi "${OFFICIAL_DUMP}" # look for the duckduck go entry and find the image: key which will look like this:
# image: mcp/duckduckgo@sha256:68eb20db6109f5c312a695fc5ec3386ad15d93ffb765a0b4eb1baf4328dec14f
# pull the image to your machine
docker pull
mcp/duckduckgo@sha256:68eb20db6109f5c312a695fc5ec3386ad15d93ffb765a0b4eb1baf4328dec14f
# tag the image with the appropriate registry
docker image tag mcp/duckduckgo@sha256:68eb20db6109f5c312a695fc5ec3386ad15d93ffb765a0b4eb1baf4328dec14f ${GHCR_IMAGE}
# push the image
docker push ${GHCR_IMAGE}
At this point you can move on to editing the MCP Catalog file in the next section.
If you cannot download from Docker Hub you can always rebuild the MCP server from its GitHub repo. To do this, open the exported YAML and look for your target server’s GitHub source repository. You can use tools like vi, cat, or grep to find it — it’s usually listed under a source key.
Example for duckduckgo:
source: https://github.com/nickclyde/duckduckgo-mcp-server/tree/main
export SOURCE_REPO="https://github.com/nickclyde/duckduckgo-mcp-server.git"
Next, you’ll rebuild the MCP server image from the original GitHub repository and push it to your own registry. This gives you full control over the image and eliminates dependency on Docker Hub access.
echo "${GH_PAT}" | docker login "${GHCR_REGISTRY}" -u "${GHCR_ORG}" –password-stdin
docker buildx build
–platform linux/amd64,linux/arm64
"${SOURCE_REPO}"
-t "${GHCR_IMAGE}"
–push
Step 6: Update your catalog
After publishing the image to GHCR, update your private catalog so it points to that new image instead of the Docker Hub version. This step links your catalog entry directly to the image you just built.
vi "${MCP_CATALOG_FILE}"
# Update the image line for the duckduckgo server to point to the image you created in the previous step (e.g. ghcr.io/mikegcoleman/duckduckgo-mcp)
Remove the forked version of the catalog as you no longer need it
docker mcp catalog rm "${FORK_CATALOG}"
Step 7: Run the MCP Gateway
Enabling the server activates it within your MCP environment. Once enabled, the gateway can load it and make it available to connected clients. You will get warnings about “overlapping servers” that is because the same servers are listed in two places (your catalog and the original catalog)
docker mcp server enable "${MCP_SERVER_NAME}"
docker mcp server list
Step 8: Connect to popular clients
Now integrate the MCP Gateway with your chosen client. The raw command to run the gateway is:
docker mcp gateway run –catalog "${PRIVATE_CATALOG}"
But that just runs an instance on your local machine, when what you probably want is to integrate with some client application.
To do this you need to format the raw command so that it works for the client you wish to use. For example, with VS Code you’d want to update the mcp.json as follows:
"servers": {
"docker-mcp-gateway-private": {
"type": "stdio",
"command": "docker",
"args": [
"mcp",
"gateway",
"run",
"–catalog",
"my-private-catalog"
]
}
}
Finally, verify that the gateway is using your new GHCR image and that the server is properly enabled. This quick check confirms everything is configured as expected before connecting clients.
docker mcp server inspect "${MCP_SERVER_NAME}" | grep -E 'name|image'
Summary of Key Commands
You might find the following CLI commands handy:
docker mcp catalog show docker-mcp –format yaml > ./docker-mcp.yaml
docker mcp catalog fork docker-mcp my-fork
docker mcp catalog export my-fork ./my-fork.yaml
docker mcp catalog create my-private-catalog
docker mcp catalog add my-private-catalog duckduckgo ./my-fork.yaml
docker buildx build –platform linux/amd64,linux/arm64 https://github.com/nickclyde/duckduckgo-mcp-server.git
-t ghcr.io/mikegcoleman/duckduckgo:latest –push
docker mcp server enable duckduckgo
docker mcp gateway run –catalog my-private-catalog
Conclusion
By using Docker’s MCP Toolkit, Catalog, and Gateway, you can fully control the tools available to your developers, customers, or AI agents. No more one-off setups, scattered images, or cross-client connection headaches.
Your next steps:
Add more servers to your catalog
Set up CI to rebuild and publish new server images
Share your catalog internally or with customers
Docs:
https://docs.docker.com/ai/mcp-catalog-and-toolkit/
https://github.com/docker/mcp-gateway/
Happy curating.
We’re working on some exciting enhancements to make creating custom catalogs even easier. Stay tuned for updates!
Learn more
Explore the MCP Catalog: Discover containerized, security-hardened MCP servers
Open Docker Desktop and get started with the MCP Toolkit (Requires version 4.48 or newer to launch the MCP Toolkit automatically)
Read about How Open Source Genius Cut Entropy Debt with Docker MCP Toolkit and Claude Desktop
Quelle: https://blog.docker.com/feed/
Amazon Connect now provides granular permissions to access conversation recordings and transcripts in the UI, giving administrators greater flexibility and security control. Contact center administrators can now separately configure access to recordings and transcripts, allowing users to listen to calls while preventing unauthorized copying of transcripts. The system also provides flexible download controls, enabling users to download redacted recordings while restricting downloads of unredacted versions. Administrators can also create sophisticated permission scenarios, providing access to redacted recordings of sensitive conversations while granting unredacted recording access for other conversations. This feature is available in all regions where Amazon Connect is offered. To learn more, please visit our documentation and our webpage.
Quelle: aws.amazon.com
Data engineers and data analysts using Amazon SageMaker Unified Studio can now connect to and run queries with pre-existing Amazon Athena workgroups. This feature enables data teams to run SQL queries in SageMaker Unified Studio with the default settings and properties from existing Athena workgroups. Since Athena workgroups are used to manage query access and control costs, data engineers and data analysts can save time by reusing Athena workgroups as their SQL analytics compute while maintaining data usage limits and tracking query usage by team or project. When choosing a compute for SQL analytics within SageMaker Unified Studio, customers can create a new Athena compute connection or choose to connect to an existing Athena workgroup. To get started, navigate to SageMaker Unified Studio, select “Add compute” and choose “Connect to existing compute resources”. Then create a connection to your pre-existing Athena workgroups and save. This new compute is now available within the SageMaker Unified Studio query editor to run SQL queries. Connecting to Athena workgroups within SageMaker Unified Studio is available in all regions where SageMaker Unified Studio is supported. To learn more, refer to the SageMaker Unified Studio Guide and Athena Workgroups Guide.
Quelle: aws.amazon.com
Today, Amazon announced two new Amazon CloudWatch metrics that provide insight into when your application exceeds the I/O performance limits for your EC2 instance with attached EBS volumes. These two metrics, Instance EBS IOPS Exceeded Check and Instance EBS Throughput Exceeded Check, monitor if the driven IOPS or throughput is exceeding the maximum EBS IOPS or throughput that your instance can support. With these two new metrics at the instance level, you can quickly identify and respond to application performance issues stemming from exceeding the EBS-Optimized limits of your instance. These metrics will return a value of 0 (performance not exceeded) or a 1 (performance exceeded) when your workload is exceeding the EBS-Optimized IOPS or throughput limit of the EC2 instance. With Amazon CloudWatch, you can use these new metrics to create customized dashboards and set alarms that notify you or automatically perform actions based on these metrics, such as moving to a larger instance size or a different instance type that supports higher EBS-Optimized limits. The Instance EBS IOPS Exceeded Check and Instance EBS Throughput Exceeded Check metrics are available by default at a 1-minute frequency at no additional charges, for all Nitro-based Amazon EC2 instances with EBS volumes attached. You can access these metrics via the EC2 console, CLI, or CloudWatch API in all Commercial AWS Regions, including the AWS GovCloud (US) Regions and China Regions. To learn more about these CloudWatch metrics, please visit the EC2 CloudWatch Metrics documentation.
Quelle: aws.amazon.com
Amazon Aurora DSQL now supports resource-based policies, enabling you to simplify access control for your Aurora DSQL resources. With resource-based policies, you can specify Identity and Access Management (IAM) principals and the specific IAM actions they can perform against your Aurora DSQL resources. Resource-based policies also enable you to implement Block Public Access (BPA), which helps to further restrict access to your Aurora DSQL public or VPC endpoints. Aurora DSQL support for resource-based policies is available in the following AWS Regions: US East (N. Virginia), US East (Ohio), US West (Oregon), Asia Pacific (Osaka), Asia Pacific (Tokyo), Asia Pacific (Seoul), Europe (Ireland), Europe (London), Europe (Paris), and Europe (Frankfurt). To get started, visit the Aurora DSQL resource-based policies documentation.
Quelle: aws.amazon.com
Customers can now enable predictive scaling for their Auto Scaling groups (ASGs) in six more regions: Asia Pacific (Hyderabad), Asia Pacific (Melbourne), Israel (Tel Aviv), Canada West (Calgary), Europe (Spain), and Europe (Zurich). Predictive Scaling can proactively scale out your ASGs to be ready for upcoming demand. This allows you to avoid the need to over-provision capacity, resulting in lower EC2 cost, while ensuring your application’s responsiveness. To see the list of all supported AWS public regions and AWS GovCloud (US) regions, click here. Predictive Scaling is appropriate for applications that experience recurring patterns of steep demand changes, such as early morning spikes when business resumes. It learns from the past patterns and launches instances in advance of predicted demand, giving instances time to warm up. Predictive scaling enhances existing Auto Scaling policies, such as Target Tracking or Simple Scaling, so that your applications scale based on both real-time metrics and historic patterns. You can preview how Predictive Scaling works with your ASG by using the “Forecast Only” mode. Predictive Scaling is available as a scaling policy type through AWS Command Line Interface (CLI), EC2 Auto Scaling Management Console, AWS CloudFormation and AWS SDKs. To learn more, visit the Predictive Scaling page in the EC2 Auto Scaling documentation.
Quelle: aws.amazon.com

In einer Umfrage können Kunden Microsoft mitteilen, was sie von Copilot in lokalen Exchange-Servern halten würden. (Exchange, Microsoft)
Quelle: Golem






