Streaming analytics now simpler, more cost-effective in Cloud Dataflow

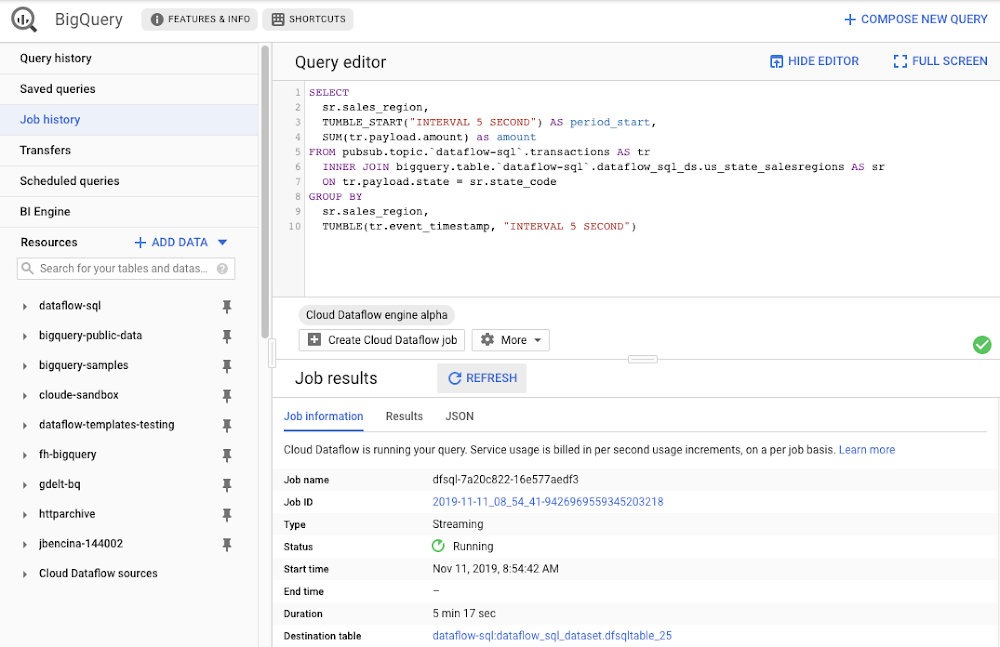
Streaming analytics helps businesses to understand their customers in real time and adjust their offerings and actions to better serve customer needs. It’s an important part of modern data analytics, and can open up possibilities for faster decisions. For streaming analytics projects to be successful, the tools have to be easy to use, familiar, and cost-effective. Since its launch in 2015, Cloud Dataflow, Google’s fully managed streaming analytics service, has been known for its powerful API available in Java and Python. Businesses have almost unlimited customization capabilities for their streaming pipelines when they use these two languages, but these capabilities come at the cost of needing programming skills that are sometimes hard to find.To advance Google Cloud’s streaming analytics further, we’re announcing new features available in the public preview for Cloud Dataflow SQL, as well as the general availability of Cloud Dataflow Flexible Resource Scheduling (FlexRS) for a very cost-effective way of batch processing of events. These new features make streaming analytics easier and more accessible to data engineers, particularly those with database experience. Here’s more detail about each of these new features:Cloud Dataflow SQL to create streaming (and batch) pipelines using SQLWe know that SQL is the standard for defining data transformations, and that you want more GUI-based tools for creating pipelines. With that in mind, several months ago we launched a public preview of Cloud Dataflow SQL, an easy way to use SQL queries to develop and run Cloud Dataflow jobs from the BigQuery web UI. Today, we are launching several new features in Cloud Dataflow SQL, including Cloud Storage file support and a visual schema editor.Cloud Dataflow SQL allows you to join Cloud Pub/Sub streams with BigQuery tables and Cloud Storage files. It also provides several additional features:Using Streaming SQL extensions for defining time windows and calculating window-based statistics;Integration with Cloud Data Catalog for storing the schema of Cloud Pub/Sub topics and Cloud Storage file sets—a key enabler for using SQL with streaming messages;A simple-to-use graphical editor available in the BigQuery web UI. If you are familiar with BigQuery’s SQL editor, you can create Cloud Dataflow SQL jobs. To switch the BigQuery web UI to Cloud Dataflow SQL editing mode, open the BigQuery web UI, go to More>Query settings and select “Cloud Dataflow” as the query engine.As an example, let’s say you have a Cloud Pub/Sub stream of sales transactions, and you want to build a real-time dashboard for the sales managers of your organization showing them the up-to-date stats of the sales in their regions. You can accomplish this in a few steps: write a SQL statement like the following one, launch a Cloud Dataflow SQL job, direct the output to a BigQuery table, then use one of the many supported dashboarding tools, including Google Sheets, Data Studio, and others, to visualize the results.In this example, we are joining the “transactions” Cloud Pub/Sub topic in the “dataflow-sql” project with a metadata table in BigQuery called “us_state_salesregions.” This table contains a mapping between the state codes (present in the “transactions” Cloud Pub/Sub topic) and the sales regions “Region_1”, “Region_2”, .., “Region_N” that are relevant to the sales managers in our example organization. In addition to the join, we’ll do a streaming aggregation of our data, using one of the several windowing functions supported by Cloud Dataflow. In our case, we will use TUMBLE windows, which will divide our stream into fixed five-second time intervals, group all the data in those time windows by the sales_region field, and calculate the sum of sales in the sales region. We also want to preserve the start of each time window, via TUMBLE_START(“INTERVAL 5 SECOND”), to plot sales amounts as a time series. To start a Cloud Dataflow job, click on “Create Cloud Dataflow job” in the BigQuery web UI.When data starts flowing into the destination table, it will contain three fields: the sales_region, the timestamp of the period start, and the amount of sales. In the next step, we will create a BigQuery Connected Sheet that shows a column chart of sales in “Region_1” over time. Select the destination BigQuery table in the nav tree. In our case, it’s the dfsqltable_25 table.Then, select Export>Explore with Sheets to chart your data. Do it from the tab where your BigQuery table is shown, and not from the tab where your original Cloud Dataflow SQL was. In Sheets, create the column chart using the data connection to BigQuery, and choose period_start for the X-axis, amount as your data series, and add a sales_region filter. This is all you have to do to build a chart in Sheets that visualizes streaming data.Mixing and joining data in Cloud Pub/Sub and BigQuery helps solve many real-time dashboarding cases, but quite a few customers have also asked for support of their Cloud Storage files to join those files with events in Cloud Pub/Sub or with tables in BigQuery. This is now possible in Dataflow SQL, enabled by our integration with Data Catalog’s Cloud Storage file sets. In the following example, you’ll see an archive of transactions stored in CSV files in the “transactions_archive” Cloud Storage bucket.Two gcloud commands can define a Cloud Storage file set and entry group in Data Catalog.Notice how we defined the file pattern “gs://dataflow-sql/inputs/transactions_archive/*.csv” as part of the file set entry definition. This pattern is what will allow Cloud Dataflow to find the CSV files once we write the SQL statement that references this file set.We can even specify the schema of this transactions_archive_fs file set using a GUI editor. For that, go to the BigQuery web UI (make sure it is running in Cloud Dataflow mode), select “Add Data” in the left navigation and choose “Cloud Dataflow sources.” Search for your newly added Cloud Storage file set and add it to your active datasets in the BigQuery UI.This will allow you to edit the schema of your file set after you select it in the nav tree. The “Edit schema” button is right there on the “Schema” tab. The visual schema editor is new and works for both Cloud Storage file sets as well as for Cloud Pub/Sub topics.Once you’ve registered the file set in Data Catalog and defined a schema for it, you can query it in Cloud Dataflow SQL. In the next example, we’ll join the transactions archive in Cloud Storage with the metadata mapping table in BigQuery.Notice how similar this SQL statement is to the one that queries Cloud Pub/Sub. The TUMBLE window function even works on Cloud Storage files, although we will define the windows based on a field “tr_time_str” that is inside the files (the Cloud Pub/Sub SQL statement used the tr.event_timestamp attribute of the Cloud Pub/Sub stream). The only other difference is the reference to the Cloud Storage file set. We accomplish this by specifying datacatalog.entry.`dataflow-sql`.`us-central1`.transactions_archive_eg.transactions_archive_fs AS trBecause both of the job inputs are bounded (batch) sources, Cloud Dataflow SQL will create a batch job (instead of a streaming job created for the first SQL statement using a Cloud Pub/Sub source) which will join your Cloud Storage files with the BigQuery table, and write the results back to BigQuery.And now you have both a streaming pipeline feeding your real-time dashboard from a Cloud Pub/Sub topic, as well as a batch pipeline capable of onboarding historical data from CSV files. Check out the SQL Pipelines tutorial to start applying your SQL skills for developing streaming (and batch) Cloud Dataflow pipelines.FlexRS for cost-effective batch processing of eventsWhile real-time streaming processing is an exciting use case that’s growing rapidly, many streaming practitioners know that every stream processing system needs a sprinkle of batch processing (as you saw in the SQL example). When you bootstrap a streaming pipeline, you usually need to onboard historical data, and this data tends to reside in files stored in Cloud Storage. When streaming events need to be reprocessed due to changes in business logic (i.e., time windows get readjusted, or new fields are added), this reprocessing is also better done in batch mode.The Apache Beam SDK and the Cloud Dataflow managed service are well-known in the industry for their unified API approach to batch and streaming analytics. The same Cloud Dataflow code can run in either mode with just minimal changes (usually replacing the data source from Cloud Pub/Sub to Cloud Storage). Remember our SQL example, where switching the SQL statement from a streaming source to a batch source was no trouble at all? And while it’s easy to go back and forth between streaming and batch processing in Cloud Dataflow, an important factor influencing the processing choice is cost. Customers who gravitate to batch processing have always looked to find the right balance between the speed of execution and costs. In many cases, that may mean you can be flexible with the amount of time it takes to process a dataset if the overall cost of processing is reduced in a significant fashion. Our new Cloud Dataflow FlexRS feature reduces batch processing costs by up to 40% using advanced resource scheduling techniques and a mix of different virtual machine (VM) types (including the preemptible VM instances) to decrease processing costs while providing the same job completion guarantees as regular Cloud Dataflow jobs. FlexRS uses the Cloud Dataflow Shuffle service, which allows it to handle the preemption of worker VMs better because the Cloud Dataflow service does not have to redistribute unprocessed data to the remaining workers.Using FlexRS requires no code changes in your pipeline and can be accomplished by simply specifying the following pipeline parameter:–flexRSGoal=COST_OPTIMIZEDRunning Cloud Dataflow jobs with FlexRS requires autoscaling, a regional endpoint in the intended region, and specific machine types, so you should review the recommendations for other pipeline settings. While Cloud Dataflow SQL does not yet support FlexRS, it will in the future.Simultaneously with launching FlexRS in general availability, we are also extending its availability to five additional regions, covering all regions now where we have regional endpoints and Cloud Dataflow Shuffle:us-central1us-east1us-west1europe-west1europe-west4asia-east1asia-northeast1To learn more about Cloud Dataflow SQL, check out our tutorial and try creating your SQL pipeline using the BigQuery web UI. Visit our documentation site for additional FlexRS usage and pricing information.Check out other recently launched streaming and batch processing features: We deployed Cloud Dataflow Shuffle and Cloud Dataflow Streaming Engine to three additional regions, bringing total availability to seven regions.We launched the ability to protect your pipeline state with customer-managed encryption keys.Python streaming support from Cloud Dataflow is now generally available.
Quelle: Google Cloud Platform

Mirantis Launches Kubernetes-as-a-Service (KaaS) Across Bare Metal, Public and Private Clouds

The post Mirantis Launches Kubernetes-as-a-Service (KaaS) Across Bare Metal, Public and Private Clouds appeared first on Mirantis | Pure Play Open Cloud.
New product enables a self-service experience for developers and app owners across a fleet of K8s clusters with automated management and upgrades
KubeCon North America, November 19, 2019 —
Mirantis, the open cloud infrastructure company, announced the availability of its Kubernetes-as-a-Service (KaaS) beta release this morning at KubeCon North America. The continuously-updated K8s platform enables developers to create and manage Kubernetes clusters on demand through APIs or UI and eliminates the burden of managing a full stack of K8s components.
“Kubernetes is creating the new way for enterprises to build and run software as they move to cloud. However, lifecycle management for a fleet of Kubernetes clusters with full stack support is an unsolved challenge,” said Dave Van Everen, SVP Marketing, Mirantis. “With Mirantis KaaS, enterprises get zero touch, self-service Kubernetes clusters with a consistent developer experience across public clouds and on-prem infrastructure.”
At the heart of Mirantis KaaS is an automated lifecycle management service. It enables continuous, automated updates of the Kubernetes stack and related components, without impacting workloads. Moreover, end users can decide when they’d like to upgrade their self-service clusters. Mirantis KaaS deploys clusters in an HA configuration by default and utilizes built-in K8s features for rolling updates; therefore applications running on Mirantis KaaS will not experience downtime during an upgrade.
With Mirantis KaaS enterprises can now:

Consume K8s as a service on any public clouds and on-prem, in either multi cloud or hybrid configuration

Create a consistent developer experience on any public cloud or on-prem infrastructure, with appropriate enterprise security and governance
Enable application portability from one cloud to another and on-prem
Dramatically reduce the burden and cost of operating a large fleet of K8s clusters

The Mirantis KaaS beta release supports:

Bare Metal
Public Cloud
Private Cloud

Mirantis KaaS will be generally available in early 2020. The beta software is available for download here: https://www.mirantis.com/kaas
Join Mirantis for a live demo of the KaaS solution on December 12 at 10 AM PST: https://info.mirantis.com/live-demo-kaas
If you’re at KubeCon, RSVP to the K8sOrDie! party for an unforgettable evening of intrigue and fun: https://k8sordie.com/party/.

The post Mirantis Launches Kubernetes-as-a-Service (KaaS) Across Bare Metal, Public and Private Clouds appeared first on Mirantis | Pure Play Open Cloud.
Quelle: Mirantis

Create and manage an OpenStack-based KaaS child cluster

The post Create and manage an OpenStack-based KaaS child cluster appeared first on Mirantis | Pure Play Open Cloud.
Once you’ve deployed your KaaS management cluster, you can begin creating actual Kubernetes child clusters. These clusters will use the same cloud provider type as the management cluster, so if you’ve deployed your management nodes on OpenStack, your child cluster will also run on OpenStack.
The general process looks like this:

Create an empty cluster.
Add machines to the cluster.  As part of this process, Kubernetes gets deployed on the machines.
Download the KUBECONFIG so that you can access the cluster.  

We’re going to cover all of those steps in this article.  Let’s start by creating the cluster.
Create a child cluster
We’ll start by creating a child cluster based on OpenStack.  The general process for using other cloud providers is similar.

The first thing we need to do is gather artifacts from the host cloud itself.  Log into your OpenStack Horizon dashboard and click API Access -> Download OpenStack RC file –> OpenStack clouds.yaml file.

Next we need the SSH key we’ll use to access the host machines.  If you haven’t already got one, you can create a new one from the command line. Make note of the file in which you store it:
$ ssh-keygen -t rsa -b 4096 -C “you@example.com”
Generating public/private rsa key pair.
Enter file in which to save the key (/Users/nchase/.ssh/id_rsa): kaas 
Enter passphrase (empty for no passphrase): 
Enter same passphrase again: 
Your identification has been saved in kaas.
Your public key has been saved in kaas.pub.
The key fingerprint is:
SHA256:DKSxJ6ChGJJwwBnUPd3kEAXxn4TmKpTTKObCd3vtAeo you@example.com
The key’s randomart image is:
+—[RSA 4096]—-+
|X=* o o=Bo       |
|=B o B .+..      |
|+   + + = .     |
|     o+oo o .    |
|   o = oS. o     |
|. o o o o        |
| o o + …       |
|  o o o. ..      |
|     E. ..       |
+—-[SHA256]—–+

Now log in to the KaaS web UI using credentials for a user with either operator or  writer permissions.  Your administrator will have set this up ahead of time.  (If you are the administrator, see the documentation for information on creating users.)

Select the required namespace.  Your administrator will have set this up ahead of time as well.  (Again, if you are the administrator, see the documentation.)

On the upper right side of the namespace page, click SSH keys -> Add SSH Key.
.
Name your key and click Upload Key to upload the public key file.  Make sure that you don’t upload the private key; for example, we named our key kaas, so the public key file is kaas.pub.

On the upper right side of the namespace page, click Credentials -> Add Credential.

You can add the cloud information manually, but it’s typically much easier to click the upload clouds.yaml link and upload the file we created in step 1. Uploading the file will auto-populate all of the required fields except the Password, which you’ll have to enter manually.  This is the same password you used to log into Horizon.

Scroll down and click the Create button to finish creating the credential.

Go back to the Clusters tab and click Create Cluster.

Name your cluster and decide what features you want to enable.  KaaS enables you to add create clusters with Istio service mesh, Harbor registries, and the Kubernetes dashboard by simply clicking checkboxes.  You can also enable the StackLight Logging, Monitoring and Alerting option, as well as configuring alerts. For the moment, however, we’re going to stick with a vanilla cluster — just Kubernetes. At the time of this writing, the most current version of Kubernetes available is 1.15.3, but you have the option to choose Kubernetes 14.6.  You always have the option to update your clusters, and as new versions are added to KaaS they will be made available in the UI.Click Create to create the empty cluster.
Now you’ve got a cluster. When the PENDING status disappears, you can add actual capacity to it.

Add Machines to your KaaS cluster
Now that you have a cluster, you need to add machines on which the cluster will actually run.  For a bare metal cluster, those machines will be actual servers, but for an OpenStack-based cluster, they will be OpenStack VMs.  (Note that you don’t create these VMs manually; KaaS will take care of it for you in the background.)
Once you add machines to a cluster through the UI, KaaS automatically provisions them and adds them to the actual Kubernetes cluster, so you can also use these instructions for scaling up your KaaS child cluster.

Choose the Machines tab, then click the Create Machine button.

Let’s start by creating the control plane.  Because we are deploying HA clusters by default, we want a minimum of 3 control plane nodes, so we’ll specify 3 and click the Control Plane checkbox.

Select the SSH key we added earlier and designate a username to associate with it, such as ubuntu.  In this case, the flavor and image are OpenStack parameters, as is the Availability Zone.Click Create to add the machines to the cluster.
KaaS will create the machines and assign them an IP address.  You can watch this progress from the Machines tab.

While we’re waiting on these servers, we can go ahead and add two compute nodes, the minimum a KaaS cluster.  The process is exactly the same, except that we don’t check the Control Plane box. You might also decide to use larger machines, since they are actually going to be hosting your workloads.

It will take a few minutes, but the machines will cycle through deployment status of Pending, then Updating, and finally to Ready.  If you check your OpenStack dashboard, you’ll gradually see these machines come online.

When the cluster is ready, we can try it out.
Testing the deployed Kubernetes cluster
Once the machines in the cluster show a status of READY you can test it out.  

Start by downloading the kubeconfig by going to the Clusters tab and clicking the arrow for the cluster you want to use.

Enter your KaaS password and click Download.

Make sure you have the kubectl client installed according to the instructions for your operating system.
Next you’ll need to go to the command line and point to the kubeconfig file you downloaded in steps 1 and 2:
$ export KUBECONFIG=~/Downloads/kubeconfig-kaasdemo.yml

Now you can go ahead and check what resources are available:
$ kubectl get nodes
NAME                                             STATUS ROLES AGE VERSION
kaas-node-3cd4e4eb-7832-4ef8-a1c6-d1cc8ffca8dd   Ready <none> 20m v1.15.3-8+d06f4e3032941e
kaas-node-5d541aac-c52c-4c21-a867-5bc621926e81   Ready master 21m v1.15.3-8+d06f4e3032941e
kaas-node-81df4422-8c99-4d00-9108-52a003b45bae   Ready master 18m v1.15.3-8+d06f4e3032941e
kaas-node-8917ae73-e715-49e1-8684-c11d3b4216b2   Ready master 25m v1.15.3-8+d06f4e3032941e
kaas-node-ee1f417d-9e57-4c0b-8952-7fc9c9363fa8   Ready <none> 20m v1.15.3-8+d06f4e3032941e
$ kubectl get namespaces
NAME              STATUS AGE
default           Active 25m
kube-node-lease   Active 25m
kube-public       Active 25m
kube-system       Active 25m

Now you have a fully functional Kubernetes cluster you can use like any other.  
What to try it out for yourself?  Download the Mirantis KaaS public beta!
The post Create and manage an OpenStack-based KaaS child cluster appeared first on Mirantis | Pure Play Open Cloud.
Quelle: Mirantis

Learn how to accelerate time to insight at the Analytics in Azure virtual event

The next wave of analytics is here with Azure Synapse Analytics! Simply unmatched and truly limitless, we're excited about this launch and want to share the highlights with you. Please join us for the Analytics in Azure virtual event on Tuesday, December 10, 2019 from 10:00 AM – 11:00 AM Pacific Time. Be among the first to see how Azure Synapse can accelerate your organization’s time to insight. Sign up for the live stream today for reminders, agenda updates, and instructions to tune in live.

Azure Synapse is a limitless analytics service that brings together enterprise data warehousing and Big Data analytics. It gives you the freedom to query data on your terms, using either serverless on-demand or provisioned resources at scale. Build end-to-end analytics solutions with a unified experience to ingest, prepare, manage, and serve data for immediate BI and machine learning needs, with blazing speed.

Join us for this virtual event and find out how to:

Query petabyte-scale data on demand from the data lake, or provision elastic compute resources for demanding workloads like data warehousing.
Build a modern data warehouse enhanced with streaming analytics, machine learning, BI, and AI capabilities.
Reduce project development time for machine learning, BI, and AI.
Easily optimize petabyte-scale workloads and automatically prioritize critical jobs.
Help safeguard data with Azure Active Directory integration, dynamic data masking, column-level and row-level security, and automated threat detection.

You’ll hear directly from Gayle Sheppard, Corporate Vice President of Microsoft Azure Data, and John Macintyre, Director of Product for Microsoft Azure Analytics, who will dive deep on Azure Synapse. Other Microsoft engineering and analytics experts will join the event with insights, demos, and answers to your questions in a live Q&A. Don’t miss your opportunity to ask how Azure Synapse can enable the growth and evolution of your business. 

There’s never been a better time to embrace technologies that allow you to unlock insights from all your data to stay competitive and fuel innovation with purpose. Register today for the Analytics in Azure virtual event on December 10th. We hope you can join us!
Quelle: Azure

Microsoft cloud in Norway opens with availability of Microsoft Azure

Today, we’re announcing the availability of Microsoft Azure from our new cloud datacenter regions in Norway, marking a major milestone as the first global cloud provider to deliver enterprise-grade services in country. These new regions demonstrate our ongoing investment to help enable digital transformation and advance intelligent cloud and intelligent edge computing technologies across both commercial and public sectors.

DNB, Equinor, Lånekassen, and Posten are just a few of the customers and partners leveraging our cloud services to accelerate innovation and increase computing resources. This new offering of Microsoft Azure delivers scalable, highly available, and resilient cloud services to Norwegian companies and organizations while meeting data residency, security, and compliance needs.

Our President, Brad Smith, recently visited Norway to celebrate this important launch and to discuss how vital trust is for those we serve, not only to help bring forth innovation but to ensure our customers are protected.

“Our customers have entrusted us to protect, operate, and develop our platform in a way that keeps their data private and secure. This is an immense responsibility that we can’t just claim, but a responsibility that we must earn every single day.” – Brad Smith, President, Microsoft

Accelerating digital transformation in Norway

As we further our expansion commitment, we consider the demand for locally delivered cloud services and the opportunity for digital transformation in the market. Azure enables our customers and partners to increase their utilization of public cloud services and accelerate investments into private and hybrid cloud solutions. Norwegian organizations can now embrace these benefits to further innovation and build digital businesses at scale. Below are just a few of the customers and partners embracing Microsoft Azure in Norway.

The Norwegian banking industry is recognized for its rapid technology adoption, digitalizing the services that build the best products for customers. As Norway’s largest financial services group, DNB Group is a major operator in several industries, for which they also have a Nordic or international strategy. With Microsoft Azure, DNB will be able to migrate to the cloud in accordance with Norwegian data handling regulations to modernize, gain operational efficiency, and secure the best experience for its customers. 

“The possibility of data residency was a decisive factor in choosing Microsoft’s datacenter regions. Now we are looking forward to using the cloud to modernize and achieve efficiency and agility in order to ensure the best experience for our customers.” – Alf Otterstad, Executive Vice President, Group IT, DNB

Equinor, a broad energy company developing oil, gas, wind, and solar energy in more than 30 countries worldwide, has chosen Microsoft Azure to enable its digital transformation journey through a seven-year consumption and development agreement. With this strategic partnership, anchored in cloud-enabled innovation, and by moving its whole system portfolio to Azure, Equinor is aiming to achieve a more cost-efficient, safer, and more reliable operation. Equinor will utilize a variety of cloud services like machine learning and advanced analytics to improve performance, decrease costs, and increase safety. Through the partnership with Microsoft and leveraging capabilities within Azure, Equinor seeks to be a leader in the transformation of the energy industry worldwide and a growing force in renewables.

“Equinor’s ambition is to become a global digital leader within our industry. We have a long history of innovation and technology development. The strategic partnership will, through cloud services, involve development of the next-generation IT workplace, extended business application platforms, and mixed-reality solutions.” – Åshild Hanne Larsen, CIO and SVP, Corporate IT Equinor

Lånekassen, the Norwegian State Educational Loan Fund, has over 1.1 million customers, composed of former and current students. By moving to Azure, it seeks to develop new and transformative citizen services, based on cognitive and analytical technologies. Lånekassen’s purpose is to make education possible, and to provide the Norwegian workforce with relevant competences. It aims to strengthen student funding as well as maintain and increase the already high level of automatized customer services and application processes.

“It has been a priority for Lånekassen to focus on how we can utilize new technology to deliver an even better service for our students and manage our student financing schemes even more efficiently. As we move our core solutions into the cloud, it will give us increased opportunities to innovate. We have already had great success with using machine learning, and we are now looking forward to optimizing our operations further.” – Nina Schanke Funnemark, CEO, Lånekassen

Posten Norge AS has chosen to use the Microsoft Azure platform to meet ever-changing market demands by modernizing some of its existing applications estate and creating new services for its customers and partners. Posten’s next-generation logistics system will provide its workforce with new digital toolsets to deliver even better customer experiences.

“Posten’s vision is to make everyday life simpler and the world smaller. With this vision, we aim to simplify and increase the value of trade and communication for people and businesses in the Nordic region. With the opening of Norwegian datacenter regions, we hope to accelerate and fuel our vision further.” – Arne Erik Berntzen, CIO, Posten AS

Bringing the complete cloud to Norway

The new cloud regions in Norway connect with Microsoft’s 54 regions via our global network, one of the largest and most innovative on the planet, spanning more than 130,000 miles of terrestrial fiber and subsea cable systems to deliver services to customers. Microsoft brings the global cloud closer to home for Norwegian organizations and citizens through our transatlantic system Marea, the highest-capacity subsea cable to cross the Atlantic.

The new cloud regions in Norway are targeted to expand in 2020 with Office 365, one of the world’s leading cloud-based productivity solutions, and Dynamics 365 and Power Platform, the next generation of intelligent business applications and tools.

Learn more about the new cloud services in Norway and the availability of Azure regions and services across the globe.
Quelle: Azure






