Konfigurieren des feinkörnigen Datenzugriffs mit Amazon Elasticsearch Service

Der Amazon Elasticsearch Service bietet jetzt eine feinkörnige Zugriffskontrolle, die mehrere Funktionen hinzufügt, um Ihnen eine detailliertere Kontrolle über Ihre Daten zu ermöglichen. Zu den neuen Funktionen gehört die Möglichkeit, Rollen zu verwenden, um granulare Berechtigungen für Indizes, Dokumente oder Felder zu definieren und Kibana um schreibgeschützte Ansichten und sichere Multi-Tenant-Unterstützung zu erweitern.
Quelle: aws.amazon.com

Einführung einer Multi-Region-Lösung für die asynchrone Replikation von Objekten

Die Multi-Region-Lösung für die asynchrone Replikation von Objekten stellt automatisch alle AWS-Services bereit und konfiguriert sie, die für die Einrichtung einer Multi-Region-Replikationskonfiguration mit Amazon S3-Buckets erforderlich sind. Sie können z.B. Objekte in Oregon anlegen, in Singapur umbenennen und in Dublin löschen, und die Änderungen werden in alle anderen Regionen repliziert. Diese Lösung ist für Arbeitsbelastungen konzipiert, die verlorene Ereignisse und Schwankungen in der Replikationsgeschwindigkeit tolerieren können.
Quelle: aws.amazon.com

How Udacity students succeed with Google Cloud

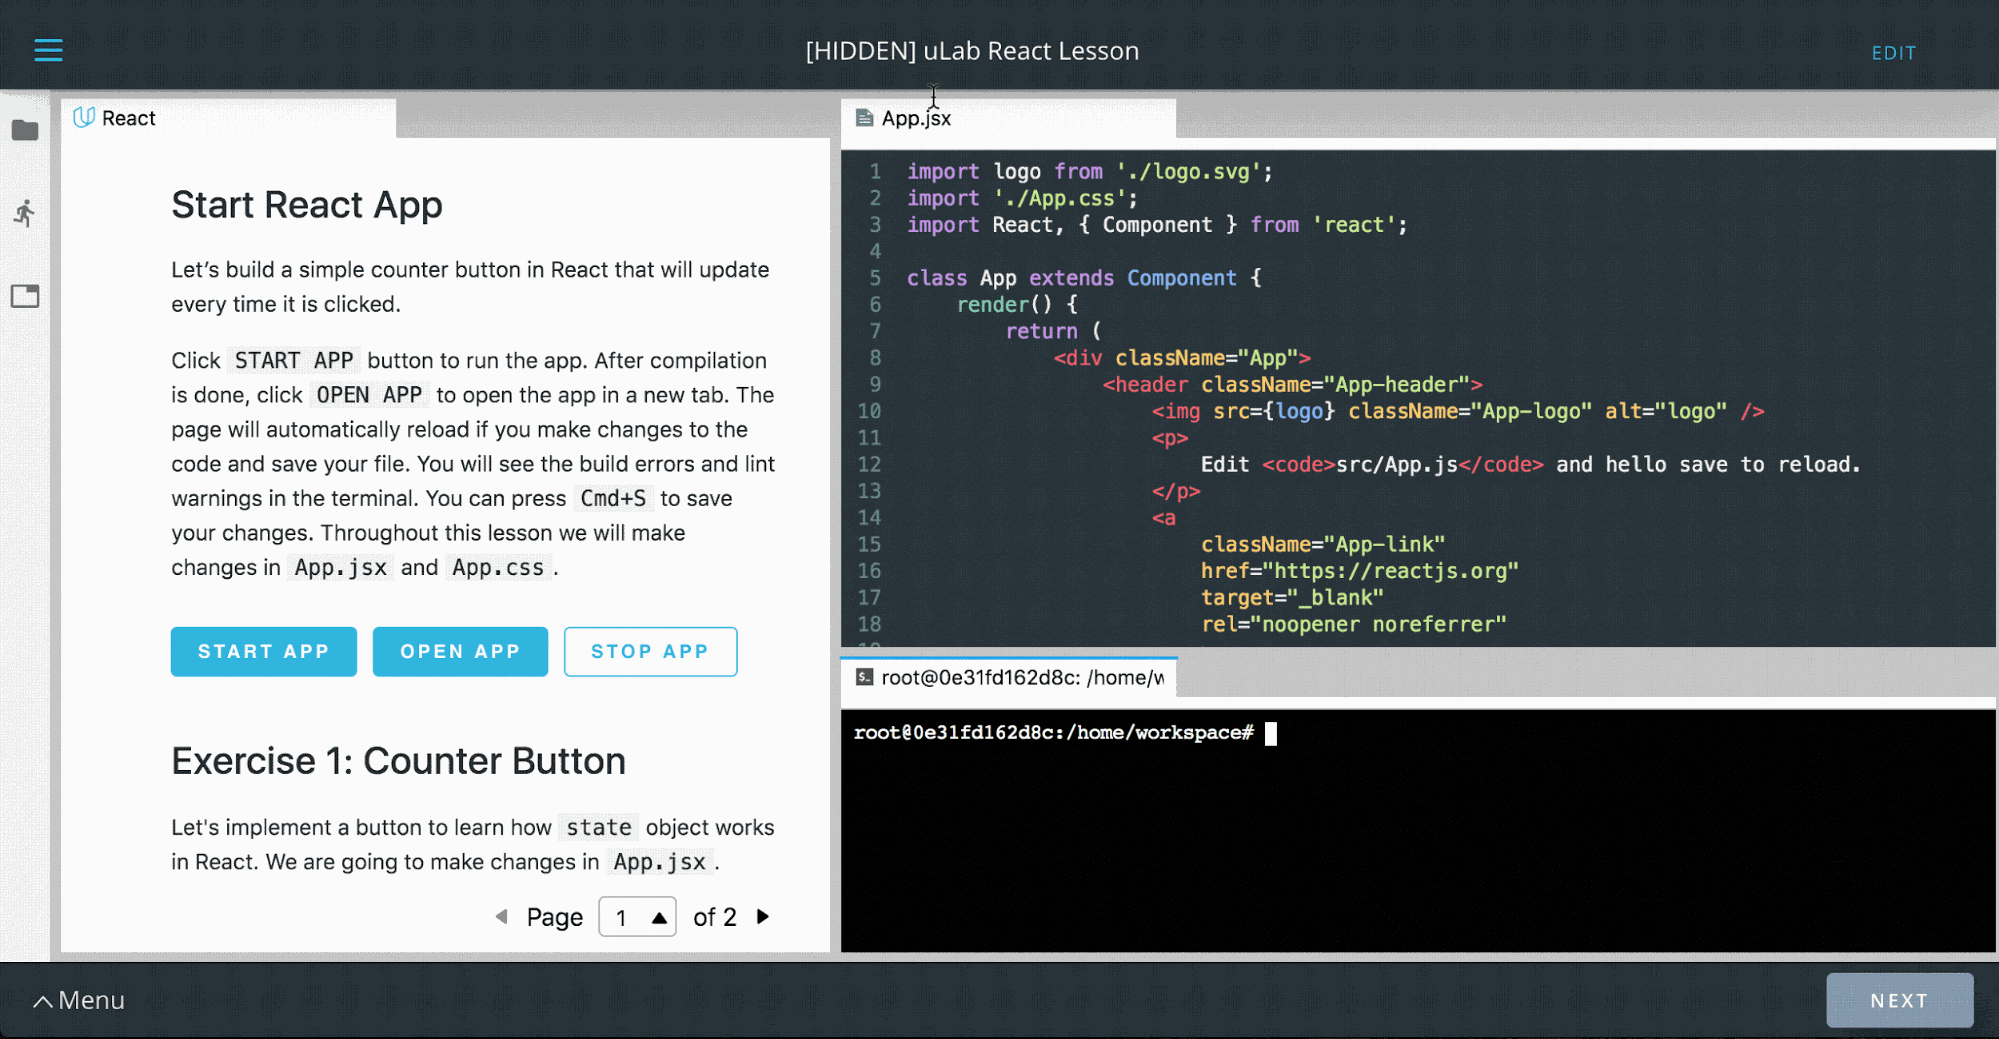
Editor’s note: Today we hear from Udacity, which uses a variety of Google Cloud technologies for its online learning platform. Read on to learn how they built online workspaces that give students immediate access to fast, isolated compute resources and private data sets. At Udacity, we use advanced technologies to teach about technology. One example is our  interactive “Workspaces,” which students use to gain hands-on experience with a variety of advanced topics like artificial intelligence, data science, programming and cloud. These online environments comprise everything from SQL interpreters to coding integrated development environments (IDEs), Jupyter Notebooks and even fully functional 3D graphical desktops—all accessible via an everyday browser.Udacity’s latest IDE environment, “uLab,” where “Learning Guides” can demonstrate skills interactively.To build these Workspaces, we relied heavily on Google Cloud Platform (GCP) in numerous interesting and novel ways. This article details our implementation and where we hope to take it in the future. Workspaces design goalsUdacity customers are smart, busy learners from all over the world, who access our courses remotely. To meet their needs, we designed Udacity Workspaces to:Be ready to use in under 15 secondsOffer advanced functionality directly inside the browser-based Udacity ClassroomInstantly furnish starter and example files to students in a new Workspace, and automatically save all student work and progress for the next sessionProvide quick access to large external datasetsFunction well with any session duration… from two minutes to four hours, or moreProvide reliable compute availability and GPU power wherever neededWe chose GCP for its ease of use, reliability, and cost-effectiveness. Let’s see how we used different GCP offerings to meet these goals.Fast, personalized access to Workspaces Students demand immediate access to their Workspaces, but booting up a full GCP host from an image can take awhile. That’s OK if a student plans on using their Workspace for an hour, but not if they’re using it for a two minute Workspace coding challenge.To address this, we built a custom server management tool (“Nebula”) that maintains pools of ready servers to assign to students immediately. To control costs, the pools are sized by a custom usage-pressure measurement algorithm to be fairly surge ready, but which also reduces the pools to as small as a single instance during idle periods. Pools are maintained in multiple data centers, to maximize access to GPUs.GCP’s by-the-second pricing and flexible reservations policy served us well here. Given the short usage windows of some student exercises, hourly billing or bulk billing might have proved cost prohibitive.Having ready-to-go server pools minimizes startup time, but we also needed to place “starter files,” or later on, the student’s own work from a previous session, onto the hosts as quickly as possible. After experimenting with several approaches, we decided to store these files as tarballs in Cloud Storage. We found that we can copy up to 3GB to and from Cloud Storage within our SLA time window, so we set a hard limit of 3GB for student drives.Every time a student’s session goes idle for half an hour, we deallocate the host, compress and copy the student’s files to Cloud Storage, then delete the host. In this manner we make time-stamped backups of each session’s files, that students can opt to restore any time they need to (via the Workspaces GUI). An alternative approach could be to leverage Cloud Storage’s version control, which provides access to GCP’slifecycle controls as well. However, at the time we built the student files storage system, this GCP feature was still in beta, so we opted for a home-grown facility.In addition, we take advantage of Cloud Functions to duplicate the student files in a second region to ensure against regional outages. Side note: if we were to build this feature today, we could take advantage of dual-region buckets to automatically save student files in two regions.Access to large datasetsFrom time to time, students need to access large datasets, e.g., in our machine learning courses. Rather than writing these datasets on server images, we mount read-only drives to share a single dataset across multiple student hosts. We can update these datasets on new shared drives, and Nebula can point new sessions at these new drives without interrupting existing session mounts. To date, we’ve never run into a concurrent read-only mount limit for these drives. However, we do see a need for quick-mount read-write dataset drives. One example could be a large SQL database that a student is expected to learn to modify in bulk. Duplicating a large drive on-the-fly isn’t feasible, so one approach could be to manage a pool of writeable drive copies to mount just-in-time, or to leverage Google Cloud’s Filestore. With the Filestore approach, you’d pre-create many copies of data drives in a folder tree, and mount a particular folder on the Filestore to a specific student’s container when access is needed; that copy would then never be assigned to anybody else, and asynchronously deleted/replaced with a fresh, unaltered copy when the student’s work is finished.Consistent compute powerIn a shared environment (e.g. Google Kubernetes Engine ), one student’s runaway process could affect the compute performance of another student’s entire container (on the same metal). To avoid that, we decided on a “one-server-per-student” model, where each students gets access to a single Compute Engine VM, running several Docker containers—one container for the student’s server, another for an auto-grading system, and yet another for handling file backups and restores. In addition to providing consistent compute power, this approach also has a security advantage: it allows us to run containers in privileged mode, say, to use specialized tools, without risking a breach beyond the single VM allocated to any one student.This architecture also ensures that GPU-equipped hosts aren’t shared either, so students benefit from all available performance. This is especially important as students fire up long-running, compute intensive jobs such as performing image recognition. As a cost control measure, we meter GPU host usage and display available remaining GPU time to students, so they  switch their GPUs on and off. This “switching” actually allocates a new host from our pools to the student (either GPU-enabled or not). Because we can do the switch in under 15 seconds, it feels approximately like a toggle switch, but some aspects of the session (such as open files) may be reset (e.g., in an IDE configuration). We encourage students to ration their GPU time and perform simpler tasks such as editing or file management in “CPU mode.”One of our GPU host configurations provides an in-browser Ubuntu desktop with pass-through Nvidia K80 GPUs for high-performance compute and graphics. This configuration is heavily employed by our Autonomous Systems students, who run graphics-intensive programs like Gazebo (shown), and run robot environment simulations. You can read more about this configuration here.Wanted: flexible and isolated imagesThis configuration has hit all our goals except for true image flexibility. For our large variety of courses we require many variations of software installations. Normally such needs would be satisfied with containers, but the requirement of isolated compute environments eliminates that as an option. In the past two years, we’ve empowered hundreds of thousands of Udacity students to advance their careers and learn new skills with powerful learning environments called Workspaces, built on top of GCP. Throughout, GCP has proven itself to be a robust platform and a supportive partner, and we look forward to future product launches on top of Google Cloud. If you’d like to learn more about the solutions we’ve built, feel free to reach out to me on Twitter, @Atlas3650.
Quelle: Google Cloud Platform
Low code programming with Node-RED comes to GCP

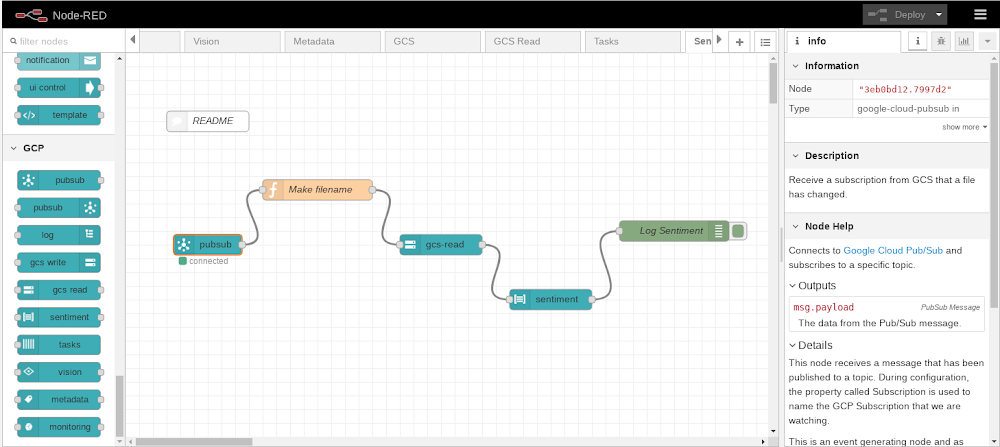
Wouldn’t it be great if building a new application were as easy as performing some drag and drop operations within your web browser? This article will demonstrate how we can achieve exactly that for applications hosted on Google Cloud Platform (GCP) with Node-RED, a popular open-source development and execution platform that lets you build a wide range of solutions using a visual programming style, while still leveraging GCP services.Through Node-RED, you create a program (called a flow) using supplied building blocks (called nodes). Within the browser, Node-RED presents a canvas area alongside a palette of available nodes. You then drag and drop nodes from the palette onto the canvas and link those nodes together by drawing connecting wires. The flow describes the desired logic to be performed by specifying the steps and their execution order, and can then be deployed to the Node-RED execution engine.One of the key features that has made Node-RED successful is its ability to be easily extended with additional custom nodes. Whenever a new API or technology becomes available, it can be encapsulated as a new Node-RED node and added to the list of available nodes found in the palette. From the palette, it can then be added into a flow for use in exactly the same way that the base supplied nodes are used. These additional nodes can then be published by their authors as contributions to the Node-RED community and made available for use in other  projects. There is a searchable and indexed catalog of contributed Node-RED nodes.A node hides how it internally operates and exposes a clean consumable interface allowing the new function to be used faster. Now, let’s take a look at how to run Node-RED on GCP and use it with GCP services.Installing Node-REDYou can use the Node Package Manager (npm) to install Node-RED on any environment that has a Node.JS runtime. For GCP, this includes Compute Engine, Google Kubernetes Engine (GKE), Cloud Run, Cloud Shell as well as other GCP environments. There’s also a publically available Docker image, which is what we’ll use for this example.Now, let’s create a Compute Engine instance using the Google Cloud Console and specify the public Node-RED docker image for execution.Visit the Cloud Console and navigate to Compute Engine. Create a new Compute Engine instance. Check the box labeled “Deploy a container image to this VM instance”.  Enter “nodered/node-red” for the name of the container image:You can leave all the other settings as their defaults and proceed to completing the VM creation.Once the VM has started, Node-RED is running. To work with Node-RED, you must connect to it from a browser. Node-RED listens on port 1880. The default VPC network firewall deliberately restricts incoming requests which means that requests to port 1880 will be denied. The next step will be to allow a connection into our network at the Node-RED port. We strongly discourage you from opening up Node-RED for development for unrestricted access. Instead, define the firewall rule to only allow ingress from the IP address that your browser presents. You can find your own browser address by performing a Google search on “my ip address”.Connecting to Node-REDNow that Node-RED is running on GCP, you can connect to it from a browser, by passing the external public IP address of the VM at port 1880.  For example:http://35.192.185.114:1880You can now see the Node-RED development environment within your browser:Working with GCP nodesAt this point, you have Node-RED running on GCP and can start constructing flows by dragging and dropping nodes from the palette onto the canvas and wiring them together. The nodes that come pre-supplied are merely a starter set—there are many more available that you can install and use in future flows. At Google, we’ve built a set of GCP nodes to illustrate how to extend Node-RED to interact with GCP functions. To install these nodes, navigate to the Node-RED system menu and select “Manage palette”:Switch to the Palette tab and then switch to the Install tab within Palette. Search for the node set called “node-red-contrib-google-cloud” and then click install.Once installed, scroll down through the list of available palette nodes and you’ll find a GCP section containing the currently available GCP building blocks.Here’s a list of currently available GCP nodes:PubSub in – The flow is triggered by the arrival of a new message associated with a named subscriptionPubSub out – A new message is published to a named topicGCS read – Reads the content of a Cloud Storage objectGCS write – Writes to a new Cloud Storage objectLanguage sentiment – Performs sentiment analysis on a piece of textVision – Analyzes an image for distinct attributesLog – Writes a log message to Stackdriver LoggingTasks – Initiates a Cloud Tasks instanceMonitoring – Writes a new monitoring record to StackdriverSpeech to Text – Converts audio input to a textual data representationTranslate – Converts textual data from one language to anotherDLP – Performs Data Loss Prevention processing on input dataBigQuery – Interacts with Google’s BigQuery databaseFireStore – Interacts with Google’s Firestore databaseMetadata – Retrieves the metadata for the Compute Engine upon which Node-RED is runningGoing forward, we hope to make additional GCP nodes available. It’s also not hard to create a custom node yourself—check out the public Github repository to see how easy it is to create one.A sample Node-RED flowHere is an example flow:At a high level, this flow listens on incoming REST requests and creates a new Google Cloud Storage object for each request received.This flow starts with an HTTP input node which causes Node-RED to listen on the /test URL path for an HTTP GET request. When an incoming REST request arrives, the incoming data undergoes some manipulations:Specifically, two fields are set: one called msg.filename, which is the name of a file to create in Cloud Storage, and the other called msg.payload, which is the content of the new file we are creating. In this example, the query parameters passed in the HTTP request are being logged.The next node in the flow is a GCP node that performs a Cloud Storage object write that writes/creates a new file. The final node sends a response back concluding the original HTTP request that triggered the flow.Securing Node-REDNode-RED is designed to get you up and running as quickly as possible. To that end, the default environment isn’t configured for security. We don’t recommend this. Fortunately, Node-RED provides security features that can be quickly enabled.  These features include authorization to be able to make flow changes and enablement of SSL/TLS for encryption of incoming and outgoing data. When initially studying Node-RED, define a firewall rule that only permits ingress from your browser’s IP address.Visual programming on GCP the Node-RED wayNode-RED has proven itself as a data flow and event processor for many years. Its extremely simple architectural model and low barrier to entry means that even a novice user can get value from it in a very short period of time. A quick Internet search reveals many tutorials on YouTube, the documentation is mature and polished, and the community active and vibrant. With the addition of the rich set of GCP nodes that we’ve contributed to the community, you can now incorporate GCP services into Node-Red whether it’s hosted on GCP, on another public cloud, or on-premises. ReferencesNode-RED – The Node-RED home pageGithub: Google Cloud Node-RED repositorySecuring Node-RED
Quelle: Google Cloud Platform

Amazon EC2 I3en- und C5-Instances sind jetzt in zusätzlichen Regionen verfügbar

Amazon EC2 I3en-Instances sind ab heute in der AWS-Region Asien-Pazifik (Mumbai) verfügbar. Darüber hinaus haben wir die Verfügbarkeit von C5-Instance-Größen in den AWS-Regionen Asien-Pazifik (Seoul) und GovCloud (USA-Ost) erweitert. Die Größen c5.12xlarge, c5.24xlarge und c5.metal sind nun in der AWS-Region GovCloud (USA-Ost) und C5.metal in der Region Asien-Pazifik (Seoul) verfügbar.
Quelle: aws.amazon.com

AWS Elastic Beanstalk führt Python 3.7 auf der AL2-Plattform (Beta) ein

Sie können jetzt Ihre Python-Anwendungen auf AWS Elastic Beanstalk mit Python 3.7 auf der Amazon Linux 2-Beta-Plattform ausführen. Die Beta-Plattform von Python 3.7 auf Amazon Linux 2 enthält mehrere Verbesserungen und wichtige neue Funktionen, unter anderem Support für Pipfile und Gunicorn. Eine vollständige Liste von Python 3.7-Funktionen finden Sie in der offiziellen Veröffentlichungsmitteilung für Python 3.7.
Quelle: aws.amazon.com






