How To Use the Official NGINX Docker Image

NGINX is one of the most popular web servers in the world. Not only is NGINX a fast and reliable static web server, it is also used by a ton of developers as a reverse-proxy that sits in front of their APIs. 

In this tutorial we will take a look at the NGINX Official Docker Image and how to use it. We’ll start by running a static web server locally then we’ll build a custom image to house our web server and the files it needs to serve. We’ll finish up by taking a look at creating a reverse-proxy server for a simple REST API and then how to share this image with your team.

Prerequisites

To complete this tutorial, you will need the following:

Free Docker Account You can sign-up for a free Docker account and receive free unlimited public repositoriesDocker running locallyInstructions to download and install DockerAn IDE or text editor to use for editing files. I would recommend VSCode

NGINX Official Image

The Docker Official Images are a curated set of Docker repositories hosted on Docker Hub that have been scanned for vulnerabilities and are maintained by Docker employees and upstream maintainers.

Official Images are a great place for new Docker users to start. These images have clear documentation, promote best practices, and are designed for the most common use cases.

Let’s take a look at the NGINX official image. Open your favorite browser and log into Docker. If you do not have a Docker account yet, you can create one for free.

Once you have logged into Docker, enter “NGINX” into the top search bar and press enter. The official NGINX image should be the first image in the search results. You will see the “OFFICIAL IMAGE” label in the top right corner of the search entry.

Now click on the nginx result to view the image details.

On the image details screen, you are able to view the description of the image and it’s readme. You can also see all the tags that are available by clicking on the “Tags” tab

Running a basic web server

Let’s run a basic web server using the official NGINX image. Run the following command to start the container.

$ docker run -it –rm -d -p 8080:80 –name web nginx

With the above command, you started running the container as a daemon (-d) and published port 8080 on the host network. You also named the container web using the –name option. 

Open your favorite browser and navigate to http://localhost:8080   You should see the following NGINX welcome page.

This is great but the purpose of running a web server is to serve our own custom html files and not the default NGINX welcome page.

Let’s stop the container and take a look at serving our own HTML files.

$ docker stop web

Adding Custom HTML

By default, Nginx looks in the /usr/share/nginx/html directory inside of the container for files to serve. We need to get our html files into this directory. A fairly simple way to do this is use a mounted volume. With mounted volumes, we are able to link a directory on our local machine and map that directory into our running container.

Let’s create a custom html page and then serve that using the nginx image.

Create a directory named site-content. In this directory add an index.html file and add the following html to it:

<!doctype html>
<html lang=”en”>
<head>
<meta charset=”utf-8″>
<title>Docker Nginx</title>
</head>
<body>
<h2>Hello from Nginx container</h2>
</body>
</html>

Now run the following command, which is the same command as above, but now we’ve added the -v flag to create a bind mount volume. This will mount our local directory ~/site-content locally into the running container at: /usr/share/nginx

$ docker run -it –rm -d -p 8080:80 –name web -v ~/site-content:/usr/share/nginx nginx

Open your favorite browser and navigate to http://localhost:8080 and you should see the above html rendered in your browser window.

Build Custom NGINX Image

Bind mounts are a great option for running locally and sharing files into a running container. But what if we want to move this image around and have our html files moved with it?

There are a couple of options available but one of the most portable and simplest ways to do this is to copy our html files into the image by building a custom image.

To build a custom image, we’ll need to create a Dockerfile and add our commands to it.

In the same directory, create a file named Dockerfile and paste the below commands.

FROM nginx:latest
COPY ./index.html /usr/share/nginx/html/index.html

We start building our custom image by using a base image. On line 1, you can see we do this using the FROM command. This will pull the nginx:latest image to our local machine and then build our custom image on top of it.

Next, we COPY our index.html file into the /usr/share/nginx/html directory inside the container overwriting the default index.html file provided by nginx:latest image.

You’ll notice that we did not add an ENTRYPOINT or a CMD to our Dockerfile. We will use the underlying ENTRYPOINT and CMD provided by the base NGINX image.

To build our image, run the following command:

$ docker build -t webserver .

The build command will tell Docker to execute the commands located in our Dockerfile. You will see a similar output in your terminal as below:

Now we can run our image in a container but this time we do not have to create a bind mount to include our html.

$ docker run -it –rm -d -p 8080:80 –name web webserver

Open your browser and navigate to http://localhost:8080 to make sure our html page is being served correctly.

Setting up a reverse proxy server

A very common scenario for developers, is to run their REST APIs behind a reverse proxy. There are many reasons why you would want to do this but one of the main reasons is to run your API server on a different network or IP then your front-end application is on. You can then secure this network and only allow traffic from the reverse proxy server.

For the sake of simplicity and space, I’ve created a simple frontend application in React.js and a simple backend API written in Node.js. Run the following command to pull the code from GitHub.

$ git clone https://github.com/pmckeetx/docker-nginx.git

Once you’ve cloned the repo, open the project in your favorite IDE. Take a look at Dockerfile in the frontend directory.

FROM node:12.18.2 as build

ARG REACT_APP_SERVICES_HOST=/services/m

WORKDIR /app

COPY ./package.json /app/package.json
COPY ./package-lock.json /app/package-lock.json

RUN yarn install
COPY . .
RUN yarn build

FROM nginx
COPY ./nginx/nginx.conf /etc/nginx/conf.d/default.conf
COPY –from=build /app/build /usr/share/nginx/html

The Dockerfile sets up a multi-stage build. We first build our React.js application and then we copy the nginx.conf file from our local machine into the image along with our static html and javascript files that were built in the first phase.

We configure the reverse proxy in the frontend/nginx/nginx.conf file. You can learn more about configuring Nginx in their documentation.

server {
listen 80;
server_name frontend;
location / {
# This would be the directory where your React app’s static files are stored at
root /usr/share/nginx/html;
try_files $uri /index.html;
}

location /services/m {
proxy_set_header X-Real-IP $remote_addr;
proxy_set_header X-Forwarded-For $proxy_add_x_forwarded_for;
proxy_set_header X-NginX-Proxy true;
proxy_pass http://backend:8080/services/m;
proxy_ssl_session_reuse off;
proxy_set_header Host $http_host;
proxy_cache_bypass $http_upgrade;
proxy_redirect off;
}
}

As you can see in the second location section thatall traffic targeted to /services/m will be proxy_pass to http://backend:8080/services/m

In the root of the project is a Docker Compose file that will start both our frontend and backend services. Let’s start up our application and test if the reverse proxy is working correctly.

$ docker-compose -up
Creating network “docker-nginx_frontend” with the default driver
Creating network “docker-nginx_backend” with the default driver
Creating docker-nginx_frontend_1 … done
Creating docker-nginx_backend_1 … done
Attaching to docker-nginx_backend_1, docker-nginx_frontend_1
frontend_1 | /docker-entrypoint.sh: Configuration complete; ready for start up
backend_1 | Listening on port 8080

You can see that our nginx web server has started and also our backend_1 service has started and is listening on port 8080.

Open your browser and navigate to http://localhost. You should see the following web page:

Open the developer tools window and click on the “network” tab. Now back in the browser, enter an entity name. This can be anything. I’m going to use “widgets”. Then click the “Submit” button.

Over in the developer tools window, click on the network request for widgets and see that the request was made to http://localhost and not to http://localhost:8080.

Open your terminal and notice that request that was made from the browser was proxied to the backend_1 service and handled correctly.

Shipping Our Image

Now let’s share our images on Docker so others on our team can pull the images and run them locally. This is also a great way to share your application with others outside of your team such as testers and business owners. 

To push your images to Docker’s repository run the docker tag and then the docker push commands. You will first need to login with your Docker ID. If you do not have a free account, you can create one here.

$ docker login
$ docker tag nginx-frontend <dockerid>/nginx-frontend
$ docker push <dockerid>/nginx-frontend

Conclusion

In this article we walked through running the NGINX official image, adding our custom html files, building a custom image based off of the official image and configuring the NGINX as a reverse proxy. We finished up by pushing our custom image to Docker so we could share with others on our team. 

If you have any questions, please feel free to reach out on Twitter @pmckee and join us in our community slack.
The post How To Use the Official NGINX Docker Image appeared first on Docker Blog.
Quelle: https://blog.docker.com/feed/

Introducing a New, Convenient Way for Your Customers to Contact You

The world is mobile, and your visitors and customers expect to be able to easily contact you using their mobile device. With WordPress.com’s new WhatsApp button, you can provide a one-click, secure way for people to open WhatsApp, with your phone number and a message pre-filled.

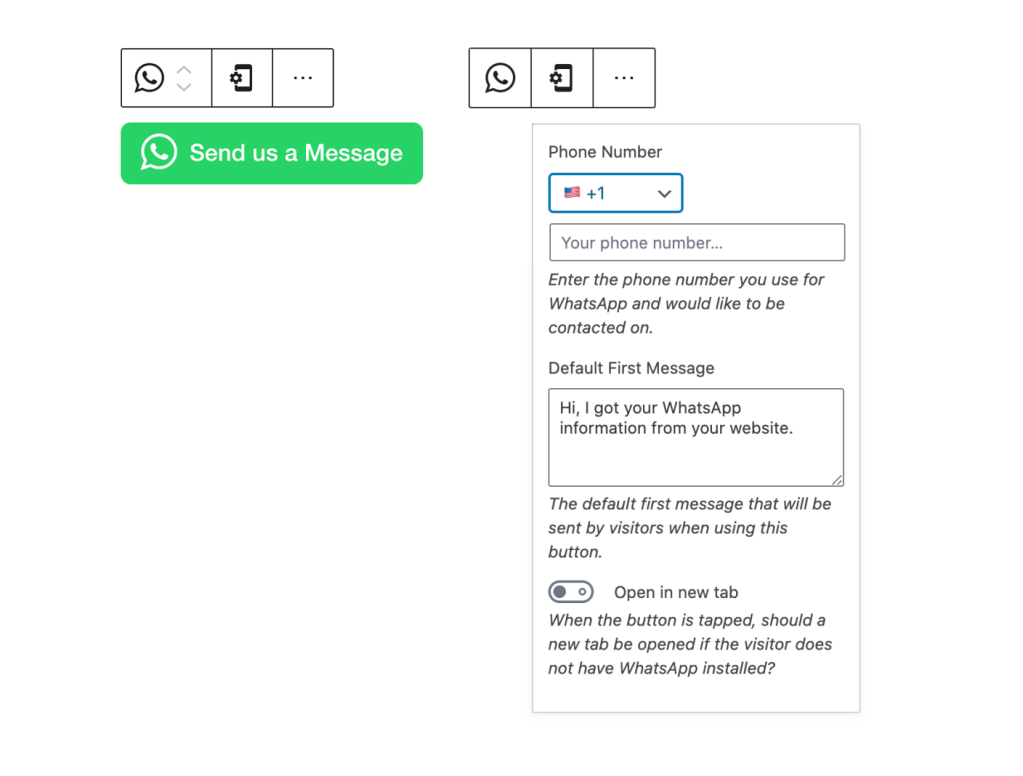
Insert the WhatsApp button with your phone number and a custom message pre-filled.

Adding the button is easy. In the block editor, create a new block and search for WhatsApp:

The WhatsApp button is available now to all WordPress.com sites on a Premium, Business, or eCommerce plan. You can upgrade your site to one of these plans, try it out for 30 days, and if you’re not satisfied with your upgrade we’ll grant you a full refund.

If you decide to cancel your paid plan after you’ve already accepted the free custom domain, the domain is yours to keep. We simply ask that you cover the costs for the domain registration.

We hope the WhatsApp button helps you connect with your customers and visitors in new ways. Give it a try today!
Quelle: RedHat Stack

The Classic editing experience is moving, not leaving

With the introduction of the Block editor, the WordPress.com Classic Editor was set for retirement at the beginning of June. We pushed that back a bit to make time for more changes that ease the transition to the Block editor — and now it’s time! With the new and improved Classic block, you have the best of both editors: the flexibility and stability of the Block editor, and the Classic editor interface you know.

From August 11 all WordPress.com accounts will switch from Classic editor to the new Block editor. It will happen in phases, and you’ll get an email to let you know to expect the change.

Here’s what you need to know if you’re a fan of the Classic editor experience.

Why the change?

There are exciting new features in the pipeline that require the new WordPress editor. It’s not technically possible to retrofit them into the older, Classic editor, and we want to make sure everyone can take advantage of them as they become available. With all WordPress.com users publishing with the Block editor, all WordPress.com users always have the latest and greatest.

Can I create simple blog posts the way I always have?

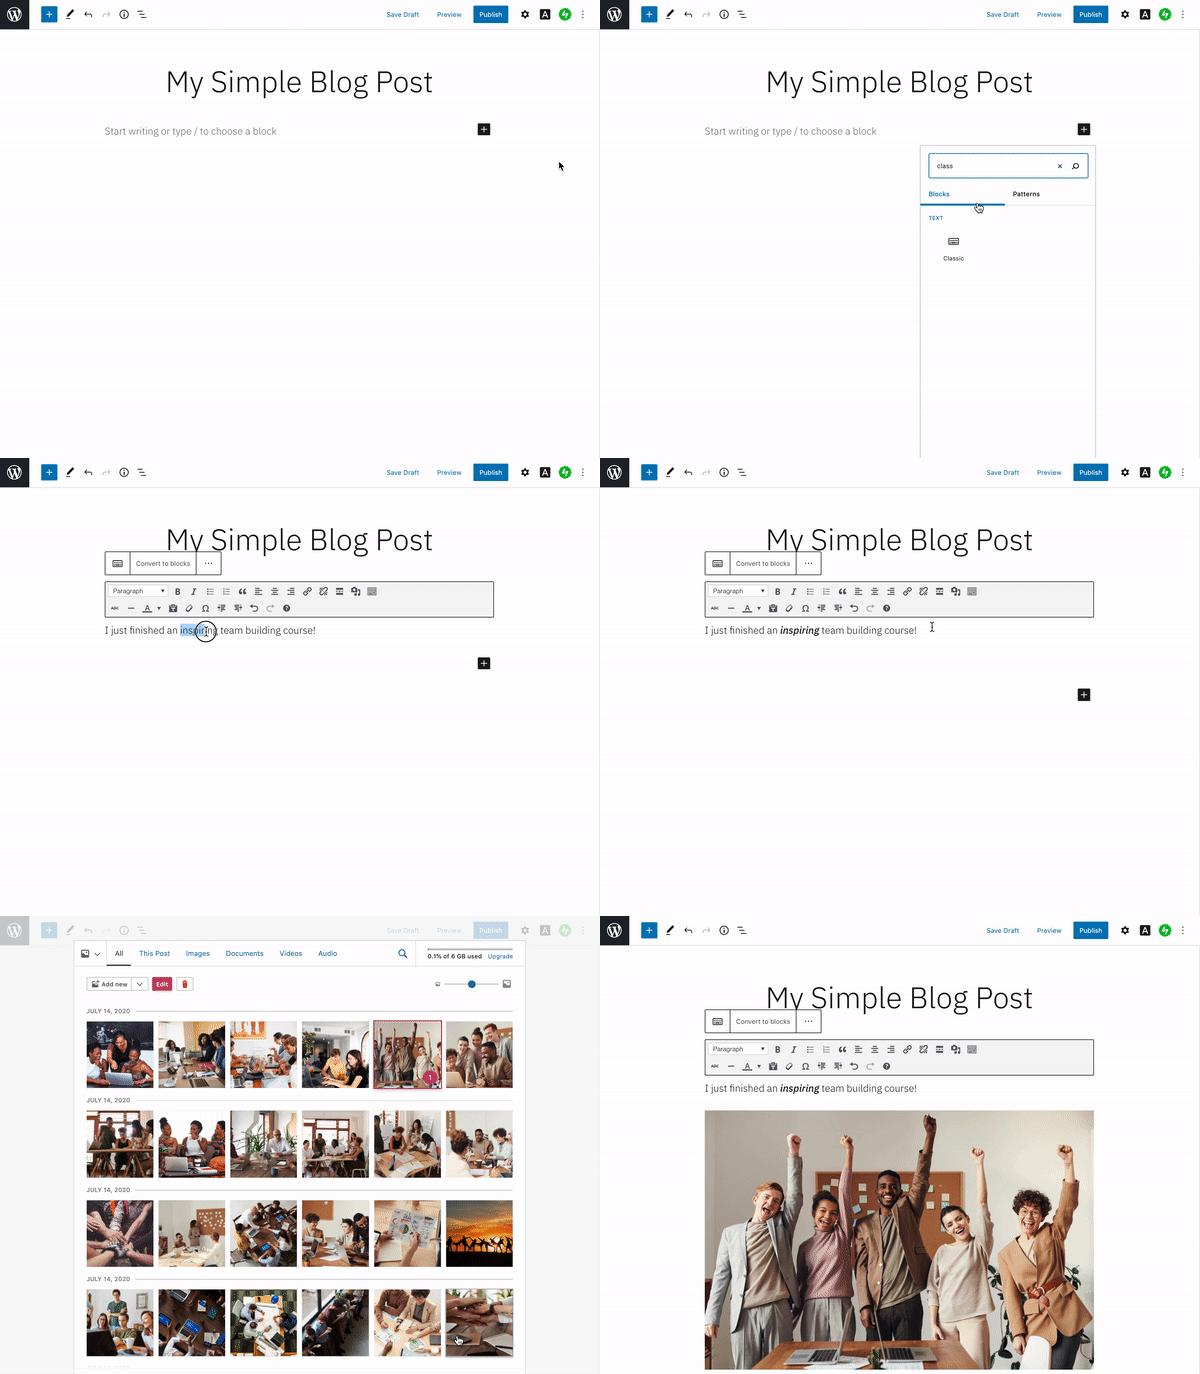
Yes, with the Classic block! It provides an editing experience that mimics the Classic editor — the same options and tools, in the same spot.

To use it, add a Classic block to your post or page, then add and edit both text and media right inside it.

What about editing posts and pages already created in the Classic editor?

Many of you have lots of pages and posts already created and published with the Classic editor. Previously, editing them in the Block editor led to a lot of prompts asking you to convert the content to blocks. Now there’s a single “Convert to blocks” menu item to take care of it in one go.

Use it to upgrade your posts and pages to block-based content at your leisure.

Can I combine the Classic block with other blocks?

The Classic block gives you the best of both worlds. You can continue writing and editing your posts with the simple Classic interface — but when you want to experiment with more complex layouts and functionality you can play with the flexibility of blocks. For example, have you ever wanted an easy way to show off your favorite podcast?

The Block editor also has updates to bring in some of your favorite classic features, like a clean editing screen. The Block editor displays pop-up options and menus as you type — they give you lots of control, but you might not always want them visible over your content. Turn on Top toolbar mode to keep them pinned to the top of the screen. It’s a great way to experience the full flexibility of the block editor while still allowing distraction-free writing.

Look out for the email letting you know when to expect the Block editor switch! In there meantime, learn more about working with the Block editor and the Classic block.
Quelle: RedHat Stack

Mirantis Acquires Lens, the World’s Most Popular Kubernetes IDE, to Simplify App Development for Amazon EKS, Google GKE, Microsoft AKS, and On-Prem Clouds

The post Mirantis Acquires Lens, the World’s Most Popular Kubernetes IDE, to Simplify App Development for Amazon EKS, Google GKE, Microsoft AKS, and On-Prem Clouds appeared first on Mirantis | Pure Play Open Cloud.
Lens has widespread adoption and is one of the top trending Kubernetes projects on GitHub
Campbell, CA, August 13, 2020 — Mirantis, the open cloud company, today announced the company has acquired Lens – the Kubernetes integrated development environment (IDE) open source project from its authors, bringing multi-cluster management into the mainstream and greatly simplifying the experience for developers working with Kubernetes and cloud-native applications. This follows the Mirantis acquisition of the team behind the product in February.
Available on Github under the MIT license, Lens has garnered widespread adoption since its launch as an open source project in March 2020. With a growing community of 35,000 users and 7,000 stargazers on GitHub, it has become one of the top trending open source projects in the cloud-native ecosystem. According to publicly available data, some of the largest companies in the world are using Lens to accelerate their Kubernetes efforts at scale, including Apple, Rakuten, Zendesk, TIM, and Adobe.
Lens eliminates the Kubernetes complexity that has hindered mainstream developer adoption since its inception. The tool unlocks situational awareness and enables users to easily manage, develop, debug, monitor, and troubleshoot their workloads across multiple clusters in real time. It supports any certified Kubernetes distribution on any infrastructure, providing freedom of choice for hundreds of enterprises around the world. Lens is a standalone desktop application and works with MacOS, Windows, and Linux operating systems. Users may download and install the software free of charge. 
“Lens has enabled our developers to be more productive by accelerating and simplifying the Kubernetes development workflow,” said Matti Paksula, CTO at Supervisor.com. “The best feature in my opinion is that when I do kubectl get pod in the terminal, the dashboard you are looking at is always in the right context. Additionally, I don’t need to worry about working with stale information because everything is real time.” 
With the acquisition, Mirantis will invest significantly in Lens future development while committing to continue working collaboratively with the Lens community and leading ecosystem players. Lens will remain free and open source.
“Just like Visual Studio was a breakthrough for software developers, Lens is a game changer for Kubernetes developers and operators. It makes writing, testing and running Kubernetes apps easy and simple on any public or private cloud.” said Adrian Ionel, co-founder and CEO, Mirantis. “Lens fills a major gap in moving people from being interested in Kubernetes to being productive with Kubernetes.”
Lens features include:

Immediate Situational Awareness in Context: Lens provides users the easiest and fastest path to situational awareness in real-time for Kubernetes applications and clusters. With a context-aware terminal, built-in Prometheus stats, and comprehensive logging Lens provides users with the easiest and fastest navigation through all layers in the stack, so they can view performance data and troubleshoot issues. 
Context-Aware Terminal: The built-in terminal includes a version of kubectl that is always API-compatible with your cluster and in the right context by automatically downloading and assigning the correct version in the background. As the user switches from one cluster to another, the terminal maintains the correct kubectl version and context.
Multi-Cluster Management on Any Cloud: Access and work with any number of Kubernetes clusters on any cloud, from a single unified IDE. The clusters may be local (e.g. minikube, Docker Desktop) or external (e.g. Docker Enterprise, EKS, AKS, GKE, Rancher, or OpenShift). Clusters may be added simply by importing the kubeconfig with cluster details.
Multiple Workspaces: Workspaces are used to organize any number of clusters into logical groups. They are useful for DevOps and SREs who need to manage multiple (even hundreds of) clusters. A single workspace contains a list of clusters and their full configuration.
Built-In Prometheus Stats: See real-time graphs and resource utilization charts integrated into the dashboard, always in the right context. Lens comes with a built-in and multi-tenant Prometheus setup that respects role-based access control (RBAC) for each user. Users will see visualizations for all the namespaces and resources to which they have access. 

“It’s been amazing to see the rapid adoption of Lens. User growth has been entirely organic so clearly there was a need for a developer-friendly Kubernetes IDE,” said Miska Kaipiainen, founder and principal of the Lens open source project. “With Mirantis, Lens will remain vendor neutral and open source, and maintain its independence. We’re excited to invest more in new feature development, community building, and cloud native technology integrations to make the product better for everybody in the ecosystem.”
A technical demo video of Lens will be available at the KubeCon EU virtual event August 17-20 in the Demo Theater. Visit the Mirantis booth in the Platinum Expo Hall to chat live with the Lens team.
Join the Lens movement on Slack: k8slens.slack.com.The post Mirantis Acquires Lens, the World’s Most Popular Kubernetes IDE, to Simplify App Development for Amazon EKS, Google GKE, Microsoft AKS, and On-Prem Clouds appeared first on Mirantis | Pure Play Open Cloud.
Quelle: Mirantis

Lens, the world’s most popular Kubernetes IDE, has found a new home at Mirantis

The post Lens, the world’s most popular Kubernetes IDE, has found a new home at Mirantis appeared first on Mirantis | Pure Play Open Cloud.
As you may have heard, Mirantis will oversee development of the open source Lens IDE for Kubernetes.  Lens brings multi-cluster management into the mainstream and simplifies the experience for developers working with Kubernetes and cloud-native applications. 

Lens is quickly becoming a Big Deal(TM). Available on Github under the MIT license, Lens has seen blistering widespread adoption since its launch as an open source project this March. With a growing community of 40,000+ users and 7,300+ stargazers on GitHub, it is one of the top trending open source projects in the cloud-native ecosystem. (According to publicly available data, some of the largest companies in the world are using Lens to accelerate their Kubernetes efforts at scale, including Apple, Rakuten, Zendesk, TIM, and Adobe.)

So what’s the big fuss?  Kubernetes has a dashboard, right?  Well, yes, but it’s not really designed to give you the functionality Lens does, including:

Multi-Cluster management on any cloud, whether local (e.g. minikube, Docker Desktop) or external (e.g. Docker Enterprise, EKS, AKS, GKE, Rancher, or OpenShift). Simply import the kubeconfig. You can even group clusters into workspaces.
Immediate situational awareness in context, with a context-aware terminal, built-in Prometheus stats, and comprehensive logging that lets you look at all layers in the stack. Imagine seeing a pod’s logs without having to jump through a million hoops! 
Context-aware terminal includes a version of kubectl that is always API-compatible with your cluster and in the right context, even as you switch from one cluster to another.
Built-In Prometheus stats lets you see real-time graphs and resource utilization charts integrated into the dashboard, always in the right context. 

That’s a lot of words.  Let’s see what Lens looks like:

Crazy that Kubernetes can be that easy, huh?  We’re hugely excited to be part of the Lens movement. Join us on the Lens Slack,  download Lens now and let us know what you think!  

 The post Lens, the world’s most popular Kubernetes IDE, has found a new home at Mirantis appeared first on Mirantis | Pure Play Open Cloud.
Quelle: Mirantis