Announcing API management for services that use Envoy

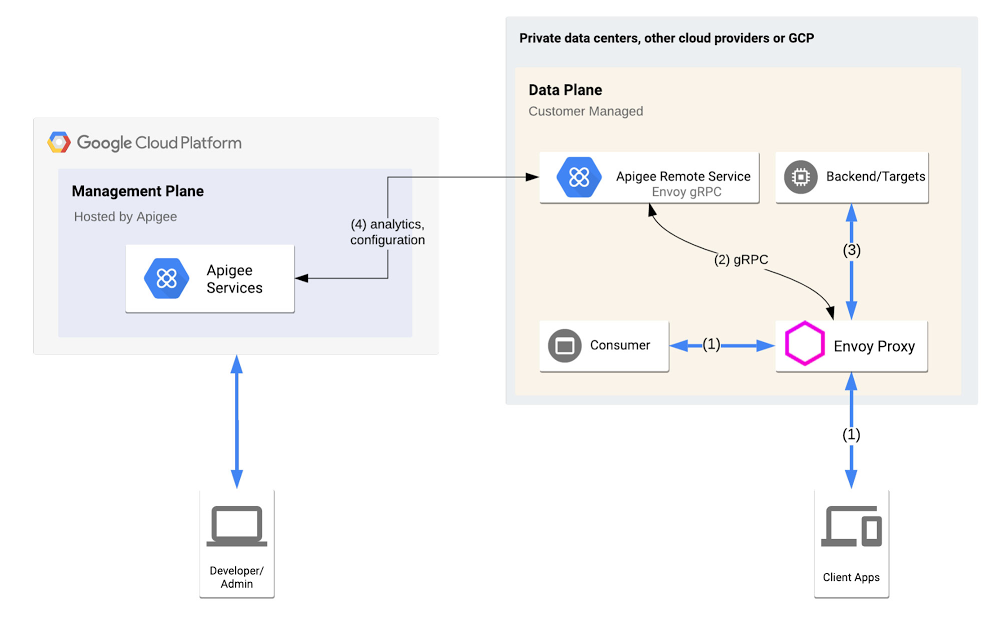
Among forward-looking software developers, Envoy has become ubiquitous as a high-performance pluggable proxy, providing improved networking and observability capability for increased services traffic. Built on the learnings of HAProxy and nginx, Envoy is now an official Cloud Native Computing Foundation project, and has many fans—including among users of our Apigee API management platform. To help you integrate Envoy-based services into your Apigee environment, we’re announcing the Apigee Adapter for Envoy in beta. Apigee lets you centrally govern or manage APIs that are consumed within your enterprise or exposed to partners and third parties, providing centralized API publishing, visibility, governance, and usage analytics. And now, with the Apigee Adapter for Envoy, you can extend Envoy’s capabilities to include API management, so developers can expose the services behind Envoy as APIs. Specifically, the Apigee Adapter for Envoy lets developers:Verify OAuth tokens or API KeysCheck API consumer based quota against API ProductsCollect API usage analyticsNow, with the availability of the Apigee Adapter for Envoy, organizations can deliver modern, Envoy-based services as APIs, expanding the reach of your applications. Let’s take a closer look.How does it work?Envoy supports a long list of filters—extensions that are written in C++ and compiled into Envoy itself. The Apigee Adapter for Envoy takes particular advantage of Envoy’s External Authorization filter, designed to allow Envoy to delegate authorization decisions for calls managed by Envoy to an external system.High level ArchitectureHere’s how the Apigee Adapter for Envoy works: The consumer or client app accesses an API endpoint exposed by Envoy (1),Envoy passes the security context (HTTP headers) to the Apigee Remote Service (2) The Apigee Remote Service acts as a Policy Decision Point and advises Envoy to allow or deny  the API consumer access to the requested API (3).A high-performance system may need to handle thousands of calls per second in this way. To accommodate that, the connection between Envoy and the Apigee Remote Service is based on gRPC, for speed and efficiency. Out of band, the Apigee Remote Service asynchronously polls and downloads its configuration (4), including API Products and API keys (after validation), from the remote Apigee control plane, which can be hosted in a different VPC than the Envoy cluster. Compatibility with Istio and AnthosThe Apigee Adapter for Envoy can be used by anyone who uses a standard Envoy proxy, including anyone who uses Istio or Google’s Anthos Service Mesh, getting the benefits of enforcing Apigee API management policies within a service mesh. Deploy in a MeshComparing Apigee API GatewaysIn addition to the Apigee Adapter for Envoy, Apigee also offers two other gateways:Apigee Message Processor, which powers Apigee public cloud, Apigee private cloud, and Apigee hybridApigee MicrogatewayHere’s a quick comparison to help you distinguish between these gateways and determine when to use which one or more than one together.Click to enlargeWhat’s next?Google Cloud’s Apigee is an industry-leading API management platform, and we’ve continued to expand its capabilities. Now, combining the Apigee Message Processor and Apigee Adapter for Envoy, you can get enterprise-grade API management capabilities . Do you use Envoy and want to up your API management game? To get started with the Apigee Adapter for Envoy, visit this page. 
Quelle: Google Cloud Platform

Announcing Azure Machine Learning scholarships and courses with Udacity

The demand for artificial intelligence (AI) and data science roles continues to rise. According to LinkedIn’s Emerging Jobs Report for 2020, AI specialist roles are most sought after with a 74 percent annual growth rate in hiring over the last four years. Additionally, the current global health pandemic has powered a shift towards remote working as well as an increased interest in professional training resources. To address this demand, we’re announcing our collaboration with Udacity to launch new machine learning courses for both beginners and advanced users, as well as a scholarship program.

Through these new offerings, Microsoft aims to help expand the talent pool of data scientists and improve access to education and resources to anyone interested. I recently sat down for a chat with Udacity CEO, Gabe Dalporto, to talk about this collaboration.

Udacity is a digital education platform with over 250,000 currently active students. Their students have expressed continued interest in introductory machine learning (ML) content that doesn’t require advanced programming knowledge. In response, Microsoft Azure and Udacity have created a unique free course based on Azure Machine Learning. This Introduction to machine learning on Azure course will help students learn the basics of ML through a low-code experience powered by Azure Machine Learning’s automated ML and drag-and-drop capabilities. Students will have the opportunity to learn using Azure Machine Learning hands-on labs directly within the Udacity classroom and develop the foundations for their data science skills.

For advanced users, we’re offering a new machine learning Nanodegree Program with Microsoft Azure. In this program, students will further enhance their skills by building and deploying sophisticated ML solutions using popular open source tools and frameworks such as PyTorch, TensorFlow, scikit-learn, and ONNX. Using Azure Machine Learning’s responsible ML and MLOps capabilities, students will gain experience in understanding their ML models, protecting people and their data, and controlling the end-to-end ML lifecycle at scale.

As part of this collaboration, we are offering the top 300 performers of the free introductory course with scholarships to the Nanodegree Program, so they can continue to develop their data science skills. These new courses will empower more students to gain proficiency in data science and AI. More details on the program can be found on the course page.

Sign up today!
Quelle: Azure

Containerize Your Go Developer Environment – Part 2

This is the second part in a series of posts where we show how to use Docker to define your Go development environment in code. The goal of this is to make sure that you, your team, and the CI are all using the same environment. In part 1, we explained how to start a containerized development environment for local Go development, building an example CLI tool for different platforms and shrinking the build context to speed up builds. Now we are going to go one step further and learn how to add dependencies to make the project more realistic, caching to make the builds faster, and unit tests.

Adding dependencies

The Go program from part 1 is very simple and doesn’t have any dependencies Go dependencies. Let’s add a simple dependency – the commonly used github.com/pkg/errors package:

package mainimport (   “fmt”   “os”   “strings”   “github.com/pkg/errors”)func echo(args []string) error {   if len(args) < 2 {       return errors.New(“no message to echo”)   }   _, err := fmt.Println(strings.Join(args[1:], ” “))   return err}func main() {   if err := echo(os.Args); err != nil {       fmt.Fprintf(os.Stderr, “%+vn”, err)       os.Exit(1)   }}

Our example program is now a simple echo program that writes out the arguments that the user inputs or “no message to echo” and a stack trace if nothing is specified.

We will use Go modules to handle this dependency. Running the following commands will create the go.mod and go.sum files:$ go mod init$ go mod tidy

Now when we run the build, we will see that each time we build, the dependencies are downloaded$ make[+] Building 8.2s (7/9) => [internal] load build definition from Dockerfile…0.0s => [build 3/4] COPY . . 0.1s => [build 4/4] RUN GOOS=darwin GOARCH=amd64 go build -o /out/example . 7.9s => => # go: downloading github.com/pkg/errors v0.9.1

This is clearly inefficient and slows things down. We can fix this by downloading our dependencies as a separate step in our Dockerfile:

FROM –platform=${BUILDPLATFORM} golang:1.14.3-alpine AS buildWORKDIR /srcENV CGO_ENABLED=0COPY go.* .RUN go mod downloadCOPY . .ARG TARGETOSARG TARGETARCHRUN GOOS=${TARGETOS} GOARCH=${TARGETARCH} go build -o /out/example .FROM scratch AS bin-unixCOPY –from=build /out/example / …

Notice that we’ve added the go.* files and download the modules before adding the rest of the source. This allows Docker to cache the modules as it will only rerun these steps if the go.* files change.

Caching

Separating the downloading of our dependencies from our build is a great improvement but each time we run the build, we are starting the compile from scratch. For small projects this might not be a problem but as your project gets bigger you will want to leverage Go’s compiler cache.

To do this, you will need to use BuildKit’s Dockerfile frontend (https://github.com/moby/buildkit/blob/master/frontend/dockerfile/docs/experimental.md). Our updated Dockerfile is as follows:

# syntax = docker/dockerfile:1-experimentalFROM –platform=${BUILDPLATFORM} golang:1.14.3-alpine AS buildARG TARGETOSARG TARGETARCHWORKDIR /srcENV CGO_ENABLED=0COPY go.* .RUN go mod downloadCOPY . .RUN –mount=type=cache,target=/root/.cache/go-build GOOS=${TARGETOS} GOARCH=${TARGETARCH} go build -o /out/example .FROM scratch AS bin-unixCOPY –from=build /out/example / …

Notice the # syntax at the top of the Dockerfile that selects the experimental Dockerfile frontend and the –mount option attached to the run command. This mount option means that each time the go build command is run, the container will have the cache mounted to Go’s compiler cache folder.

Benchmarking this change for the example binary on a 2017 MacBook Pro 13”, I see that a small code change takes 11 seconds to build without the cache and less than 2 seconds with it. This is a huge improvement!

Adding unit tests

All projects need tests! We’ll add a simple test for our echo function in a main_test.go file:

package mainimport (     “testing”    “github.com/stretchr/testify/require” )func TestEcho(t *testing.T) {    // Test happy path    err := echo([]string{“bin-name”, “hello”, “world!”})    require.NoError(t, err) }func TestEchoErrorNoArgs(t *testing.T) {    // Test empty arguments    err := echo([]string{})     require.Error(t, err) }

This test ensures that we get an error if the echo function is passed an empty list of arguments.

We will now want another build target for our Dockerfile so that we can run the tests and build the binary separately. This will require a refactor into a base stage and then unit-test and build stages:

# syntax = docker/dockerfile:1-experimentalFROM –platform=${BUILDPLATFORM} golang:1.14.3-alpine AS base WORKDIR /src ENV CGO_ENABLED=0 COPY go.* . RUN go mod download COPY . .FROM base AS build ARG TARGETOS ARG TARGETARCH RUN –mount=type=cache,target=/root/.cache/go-build GOOS=${TARGETOS} GOARCH=${TARGETARCH} go build -o /out/example .FROM base AS unit-test RUN –mount=type=cache,target=/root/.cache/go-build go test -v .FROM scratch AS bin-unix COPY –from=build /out/example / …

Note that Go test uses the same cache as the build so we mount the cache for this stage too. This allows Go to only run tests if there have been code changes which makes the tests run quicker.

We can also update our Makefile to add a test target:

all: bin/example test: lint unit-testPLATFORM=local.PHONY: bin/example bin/example:    @docker build . –target bin     –output bin/     –platform ${PLATFORM}.PHONY: unit-test unit-test:    @docker build . –target unit-test

What’s next?

In this post we have seen how to add Go dependencies efficiently, caching to make the build faster and unit tests to our containerized Go development environment. In the next and final post of the series, we are going to complete our journey and learn how to add a linter, set up a GitHub Actions CI, and some extra build optimizations.

You can find the finalized source this example on my GitHub: https://github.com/chris-crone/containerized-go-dev

You can read more about the experimental Dockerfile syntax here: https://github.com/moby/buildkit/blob/master/frontend/dockerfile/docs/experimental.md

If you’re interested in build at Docker, take a look at the Buildx repository: https://github.com/docker/buildx

Read the whole blog post series here.
The post Containerize Your Go Developer Environment – Part 2 appeared first on Docker Blog.
Quelle: https://blog.docker.com/feed/






