Setting Up Cloud Deployments Using Docker, Azure and Github Actions
A few weeks ago I shared a blog about how to use GitHub Actions with Docker, prior to that Guillaume has also shared his blog post on using Docker and ACI. I thought I would bring these two together to look at a single flow to go from your code in GitHub all the way through to deploying on ACI using our new Docker to ACI experience!
To start, let’s remember where we were with our last Github action. Last time we got to a point where our builds to master would be re-built and pushed to Docker Hub (and we used some caching to speed these up).
name: CI to Docker Hub
on:
push:
tags:
– “v*.*.*”
jobs:
build:
runs-on: ubuntu-latest
steps:
–
name: Checkout
uses: actions/checkout@v2
–
name: Set up Docker Buildx
id: buildx
uses: docker/setup-buildx-action@v1
–
name: Cache Docker layers
uses: actions/cache@v2
with:
path: /tmp/.buildx-cache
key: ${{ runner.os }}-buildx-${{ github.sha }}
restore-keys: |
${{ runner.os }}-buildx-
–
uses: docker/login-action@v1
with:
username: ${{ secrets.DOCKER_USERNAME }}
password: ${{ secrets.DOCKER_PASSWORD }}
–
name: Build and push
id: docker_build
uses: docker/build-push-action@v2
with:
context: ./
file: ./Dockerfile
builder: ${{ steps.buildx.outputs.name }}
push: true
tags: bengotch/simplewhale:latest
cache-from: type=local,src=/tmp/.buildx-cache
cache-to: type=local,dest=/tmp/.buildx-cache
–
name: Image digest
run: echo ${{ steps.docker_build.outputs.digest }}
Now we want to find out how we could take our image we have built and get that deployed onto ACI.
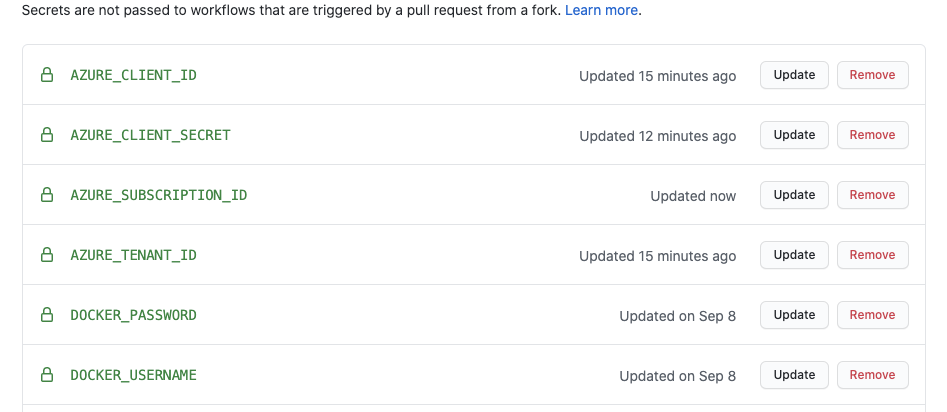
The first thing I will need to do is head over to my Github repository and add in a few more secrets which will be used to store my credentials for Azure. If you already have an Azure account and can grab your credentials that is great. If not, you will need to create your Azure credentials that we are going to use, but we cover that as well.
I will need to add in my tenant ID as the secret AZURE_TENANT_ID, I will then need to go and create an App in Azure to get a client and a secret. The easiest way to do this is to use the Azure console with the command
az ad sp create-for-rbac –name http://myappname –role contributor –sdk-auth
This will output your AZURE_CLIENT_ID and an AZURE_CLIENT_SECRET.
Lastly I will need to add my subscription ID, I can find this here and will add it as AZURE_SUBSCRIPTION_ID.
If this is the first time you have used Azure you will also need to create a resource group, this is the Azure way to group a set of resources for a single solution. You can set up new resource groups by going here and adding one, for example I created a new one called simplewhale in uk-south.
Now we can start to build out our action, we will want to put in a condition for when we want this workflow to trigger. I would like to be quite continuous so will deploy the image each time I have pushed it to Docker Hub:
on:
workflow_run:
workflows: [”CI to Docker Hub”]
branches: [main]
types:
– completed
With this in place, I will now setup on an Ubuntu box for my action:
jobs:
run-aci:
runs-on: ubuntu-latest
steps:
– name: Checkout code
uses: actions/checkout@v2
Next I will need to install the Docker Compose CLI onto the actions instance I am running on:
– name: Install Docker Compose CLI
run: >
curl -L https://raw.githubusercontent.com/docker/compose-cli/main/scripts/install/install_linux.sh | sh
With this installed, I can then log into Azure using the Compose CLI and making use of our secrets we entered earlier:
– name: “login azure”
run: “docker login azure –client-id $AZURE_CLIENT_ID –client-secret $AZURE_CLIENT_SECRET –tenant-id $AZURE_TENANT_ID”
env:
AZURE_TENANT_ID: ‘${{ secrets.AZURE_TENANT_ID }}’
AZURE_CLIENT_ID: ‘${{ secrets.AZURE_CLIENT_ID }}’
AZURE_CLIENT_SECRET: ‘${{ secrets.AZURE_CLIENT_SECRET }}’
Having logged in, I need to create an ACI context to use for my deployments:
– name: “Create an aci context”
run: ‘docker context create aci –subscription-id $AZURE_SUBSCRIPTION_ID –resource-group simplewhale –location uksouth acicontext’
env:
AZURE_SUBSCRIPTION_ID: ‘${{ secrets.AZURE_SUBSCRIPTION_ID }}’
Then I will want to deploy my container using my ACI context. I have added a curl it to make sure it exists:
– name: “Run my App”
run: ‘docker –context acicontext run -d –name simplewhale –domainname simplewhale -p 80:80 bengotch/simplewhale ‘
– name: “Test deployed server”
run: ‘curl http://simplewhale.uksouth.azurecontainer.io/’
And then we can just double check to be sure:
Great! Once again my Whale app has been successfully deployed! Now I have a CI that stores things in the Github Registry for minor changes, that ships my full numbered versions to Docker Hub and then re-deploys these to ACI for me!
To run through a deeper example using Compose as well, why not check out Karol’s example of using the ACI experience with his Compose application which also includes how to use mounts and connect to another registry.You can get started using the ACI experience locally using Docker Desktop today. Remember, you will also need to have your images in a repo to use them in ACI, which can easily be done with Docker Hub.
The post Setting Up Cloud Deployments Using Docker, Azure and Github Actions appeared first on Docker Blog.
Quelle: https://blog.docker.com/feed/