The New Jetpack Search Add-On

As your website grows, it becomes challenging for visitors to find exactly what they need. Being prolific and publishing lots of posts and pages is a net positive for engaging and growing your audience, but it also means visitors may be more likely to find content that isn’t relevant to their interests.

This is where Jetpack Search comes into the picture: It turns your website into a place where visitors can search, refine their results, and find the specific content and products that interest them. 

Built by the same team that created WordPress.com, Jetpack Search is a powerful search solution backed by Elasticsearch (an open source search platform), Jetpack Stats, and our globally distributed data centers — the very same ones that keep your WordPress.com website up, running, and secure day in and day out. Jetpack Search uses multiple technologies to build a modern search experience that improves website engagement. You can now add Jetpack Search to your WordPress.com site with just a few clicks.

What makes Jetpack Search better than regular search?

A modern search experience combines great result rankings with a fast and intuitive user interface. Most WordPress themes can’t do this yet, because the default WordPress search function offers only basic options to show the most relevant content to viewers.

Jetpack Search combines modern ranking algorithms with your traffic stats so that the best results will float to the top and engage your visitors. Our search algorithms work well with numerous languages and provide custom handling for 29 of the most widely used languages in the world. A large percentage of searches contain typos or spelling errors, but Jetpack Search instantly corrects the search query when there are no matches — so if a potential customer is looking for, say, collectables, they will still see the most popular collectibles you offer on your online store. Any changes you make to your site will be reflected in your search results within a few minutes.

Great algorithms are not enough, though. Jetpack Search displays results instantly, as your readers type into the search box. It does its magic equally well on both mobile devices and desktop computers, and in any theme — even those without widget areas. As the user refines their search terms or filters the results, Jetpack Search continues to update the results instantly. The user’s search terms will be highlighted in the results, which they will be able to narrow down further with displayed filters. 

Instant search, spelling correction, and filtering on TwentyTwenty theme.

All of these benefits come together to provide a compelling and beautiful user experience that will encourage people to stay on your site longer.

Get Started with Jetpack Search

We wanted to make Jetpack Search accessible for website owners of all stripes, from those who publish a personal blog to owners of thriving online stores. So we’re offering this new add-on at a price that takes into account how many searchable items — posts, pages, products, and custom post types — your site contains.

Record LimitPrice Per Month100$51,000$1010,000$25100,000$601,000,000$200Over one million$200 per million

All purchases are fully refundable for 30 days. Even better, when you add Jetpack Search to your site with an annual subscription, you get two months free — so you only pay for 10 months every year. When your purchase renews after a year, the price will automatically adjust based on the number of items in your search index.

We think you’ll love Jetpack Search — but more importantly, your site visitors will love it too.

Follow the link below to purchase your Jetpack Search subscription. Once you buy it, Jetpack Search will automatically be enabled for your site. You can then customize the colors, filtering, and other details if you’d like — though the out-of-the-box settings work great, too.

Get Jetpack Search

Read about how we made Jetpack Search
Quelle: RedHat Stack

Improve the Security of Hub Container Images with Automatic Vulnerability Scans

In yesterday’s blog about improvements to the end-to-end Docker developer experience, I was thrilled to share how we are integrating security into image development, and to announce the launch of vulnerability scanning for images pushed to the Hub. This release is one step in our collaboration with our partner Snyk where we are integrating their security testing technology into the Docker platform. Today, I want to expand on our announcements and show you how to get started with image scanning with Snyk. 

In this blog I will show you why scanning Hub images is important, how to configure the Hub pages to trigger Snyk vulnerability scans, and how to run your scans and understand the results. I will also provide suggestions incorporating vulnerability scanning into your development workflows so that you include regular security checkpoints along each step of your application deployment.  

Software vulnerability scanners have been around for a while to detect vulnerabilities that hackers use for software exploitation. Traditionally security teams ran scanners after developers thought that their work was done, frequently sending code back to developers to fix known vulnerabilities. In today’s “shift-left” paradigm, scanning is applied earlier during the development and CI cycles but most organizations have to build their own automation to connect the scan functions to the CI instruments. Yesterday’s release changes this equation and provides built in automated scanning as an integral step within the CI cycle.  

Now you decide which repos to configure for vulnerability scanning to trigger a scan every time you push an image into that repo, and when the scan is completed you can view the scan results in your Hub account. Vulnerability data is organized in the Hub in several different layers: vulnerability severity summary, list of all vulnerabilities, and detailed information about a specific security flaw. The scanning function is available for Pro and Team users, creating a simple method of validation for each image update.

How It Works

Step 1 – Enable Repo Scanning Functions

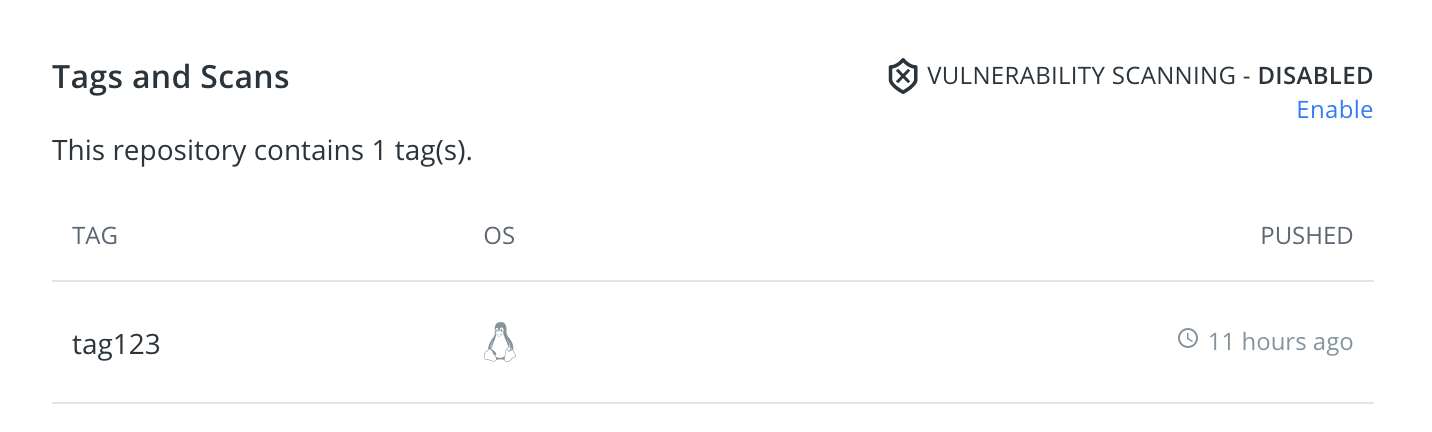
Enabling repo scanning is a simple, single-click process, but the default setting is for disabled scanning so make sure you turn it on.

Scanning is separately configurable for each repo so you can decide how you want to start incorporating scanning into your team collaboration cycles and application build steps. You can adopt these processes on a smaller scale and over time expand them to the rest of your organization. Conversely, if you decide that the repo that you have been scanning is no longer an active part of your development, you can use the same single-click option to disable scanning.

Step 2 – Run your scans

Once you enable scanning, each time that you push a tagged image into that repo you will automatically trigger a scan.  

Step 3 – View the Results

After vulnerability scanning is completed, you can go to the repo page in the Hub to view the scan results. General Tab of the Hub Repo page includes results summary for all the repo image scans which will show the number of high, medium and low vulnerabilities identified during each scan.  

Clicking on the Vulnerabilities section of a specific tag brings you to the Vulnerability Tab for that tag, which shows the total number of vulnerabilities identified during the scan. Vulnerabilities Tab includes the scan severities summary and shows you the full list of scan vulnerabilities.  

The vulnerability list is organized so that you will see the most critical vulnerabilities first. The higher severity issues are prioritized above the lower ones, and the same severity vulnerabilities are organized in the descending order for the Common Vulnerability Scoring System (CVSS) .  CVSS scores are a published standard for assigning numerical value to the severity of software vulnerabilities. Vulnerability list also includes Common Vulnerabilities and Exposures (CVEs), which are identification numbers for publicly known cybersecurity vulnerabilities as well as name and version of a package containing this vulnerability. If available, the ‘Fixed In’ column includes a higher version of the same package that has the vulnerability resolved. This is a very important part that gives you clear guidance on how to rebuild your image without the vulnerability.  

Next to the ‘Fixed In’ column is a pop-up link to a page on the Snyk website, presenting detailed information about that specific vulnerability.

The little arrow located next to the Severity rating indicates that this vulnerability has dependencies. Clicking on this arrow expands the vulnerability box and displays these dependencies:

Learn More and Try It For Yourself

Hub scanning is already available. Please check the Docker Doc section link below for more information on how to get started and give us feedback: 

https://docs.docker.com/docker-hub/vulnerability-scanning/

To learn more from experts about getting the most from Docker Hub vulnerability scanning, please plan on joining Docker’s Peter McKee and Snyk’s Jim Armstrong for a joint webinar on Wednesday, Oct 15.  Register now!
The post Improve the Security of Hub Container Images with Automatic Vulnerability Scans appeared first on Docker Blog.
Quelle: https://blog.docker.com/feed/

Deepen Engagement on Your Website with Loom Video Embeds

Video has quickly become one of the most engaging mediums on the internet. Whether you have a personal blog, virtual classroom, business vlog, collaboration website for your team, or something in between, there’s no doubt that you’ve come across video as a way to build and engage your following. By 2022, online videos will make up more than 82% of all consumer internet traffic – 15 times higher than in 2017! (Cisco)

Videos come in all shapes and sizes, and we know that the ability to easily add and embed them is important for engaging your audience. We’ve been hard at work making sure that you can add the video content you want to your WordPress.com website.

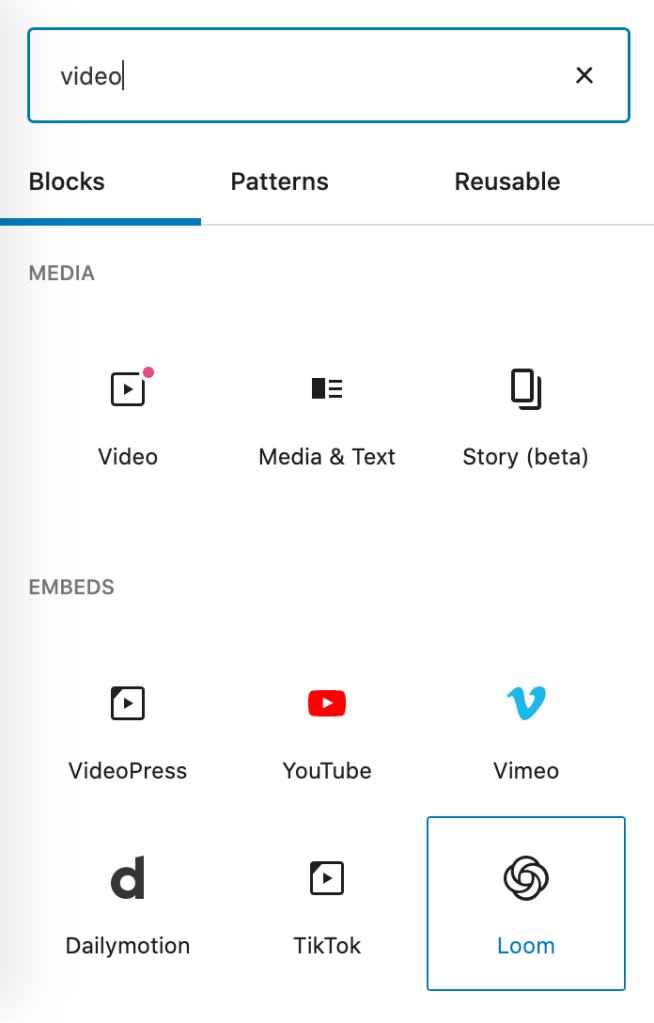
We’re pleased to share today a new Loom block that supports Loom video embeds on any page or post. Loom is a video messaging tool for work, and now all you need to do is copy and paste a Loom URL directly into a new block to embed it.

Embed videos with blocks

The new Loom block joins a number of other video embed features available to WordPress.com users—for instance, you can copy and paste a video URL from YouTube, TikTok, DailyMotion, or Vimeo, or you can use a Video block to upload your own video files.

3 Simple Steps to Embed a Loom Video on Your Website

Grab your Loom video URL – copy it.Paste that URL directly into the WordPress editor in a new block.Alternatively, you can search for “Loom” in the block selector or enter /loom and hit enter in a new line to add it quickly. Then paste the URL into the block interface from here.Publish!

Adding video content to your website is as easy as 1-2-3. Trying adding some to a page or post today to kick off deeper engagement with your site’s visitors.
Quelle: RedHat Stack

The Google Cloud Healthcare Consent Management API: protecting emerging data in digital care and research

The ongoing COVID-19 pandemic has accelerated trends across many industries; in health, it has created a need for new solutions to enable virtual care—and even run clinical trials remotely. This has, in turn, created the need for tools that help healthcare application developers and researchers easily manage and secure patient consent for the use of their data for medical care and research. That’s why we’re excited today to launch the Google Cloud Healthcare Consent Management API to Public Preview. The Healthcare Consent Management API gives healthcare application developers and clinical researchers a simple way to manage individuals’ consent of their health data. This is particularly important given the new and emerging virtual care and research scenarios related to COVID-19. For example, in healthcare, patients are using technologies like telemedicine to receive care from home. And, in life sciences, with so many in-person clinical trials put on hold, more researchers are conducting trials digitally to continue making strides in research and drug development. These “at home” clinical scenarios mean that healthcare systems and clinical researchers are increasingly relying on consumer data from new sources, such as wearables, medical devices (like blood pressure and glucose monitors), and other technologies. These new sources of data, while an encouraging step forward for the industry, also present new challenges, as both healthcare providers and researchers struggle with how to manage, protect, and obtain patient consent for their use. The Google Cloud Healthcare Consent Management API helps by making it easier to satisfy the requirements of existing and emerging privacy and consent frameworks while supporting the transparent and responsible incorporation of digital health data into patient care and research.“Responsibly managing health data is crucial to advancing healthcare and research outcomes, particularly as we explore new methods of delivering care and conducting research” said John Wilbanks, Chief Commons Officer at Sage Bionetworks. “For example, many people want to contribute to medical research or take advantage of new virtual care models, but they want assurances about how and by whom their information is accessed. Google Cloud’s Healthcare Consent Management API can simplify this technologically complex process. I look forward to leveraging the API in my own work, and to learning how to use tools like this to empower individuals with more granular control over their data.”  How the Google Cloud Healthcare Consent Management API worksThe Healthcare Consent Management API complements existing privacy frameworks and makes it easier for application developers to provide tools that empower patients to better track, modify, and revoke consent around the use of their data.To use the service, an organization creates their own isolated instance of the Healthcare Consent Management API, which includes that organization’s consent policies, executed consent agreements, and the metadata linking those policies and agreements to any relevant data. The actual user health and wellness data is then stored by the organization in their preferred datastores. As a part of the Google Cloud Healthcare service, the Healthcare Consent Management API supports HIPAA compliance, and data managed through its use is overseen by healthcare providers, application developers, and researchers under agreements between these organizations and their users.We are excited to introduce the Healthcare Consent Management API to complement existing frameworks, making data privacy and consent management easier to implement in emerging healthcare use cases. We invite you to explore the Public Preview today.Related ArticleAdvancing telehealth with AmwellOur new partnership with Amwell helps the healthcare industry transform for a world that is more reliant on telehealth.Read Article
Quelle: Google Cloud Platform