How to set up k0s Kubernetes: A quick and dirty guide

The post How to set up k0s Kubernetes: A quick and dirty guide appeared first on Mirantis | Pure Play Open Cloud.
For a couple of weeks now, we’ve been talking about the k0s project, a simple way to get Kubernetes up and running.  In this quick and dirty guide, we’ll give you all the background you need to get started.
The Kubernetes architecture of k0s consists of a single binary that includes everything you need to run Kubernetes on any system that includes the Linux kernel.  Putting it to use is straightforward:

Download the k0s binary
Create a server to instantiate the Kubernetes control plane
Create a Kubernetes worker
Access the cluster

Of course you can add additional controllers or servers, but let’s start with the very simplest version:  a single server running everything you need.
Create a single node Kubernetes cluster with k0s
The first thing we need to do is create a server that will act as the k0s controller.  Note that I didn’t say controller node; you can see Jussi Nummelin’s blog for an explanation of the particular way in which k0s implements the Kubernetes architecture, but the controller processes run directly on the host, and not in pods, so there’s no “master” node.
The host itself doesn’t have to be huge; for this blog I used an AWS t2.medium instance (2 CPUs, 4GB RAM) running Amazon Linux 2.  Just make sure that port 6443 is open so that you can contact the cluster later.
Now you can install k0s with a simple one line command:
sudo curl -sSLf k0s.sh | sudo sh
(Note that there’s no “magic” k0s.sh script you’re missing.  This is the same as sudo curl -sSLf http://k0s.sh | sudo sh)
Once the script downloads, all you need to do is start the server:
sudo k0s server –enable-worker &
That’s it.
You can avoid getting bowled over with logging messages by instead using:
sudo k0s server –enable-worker </dev/null &>/dev/null &
You could also start just the server and create the worker somewhere else, but we’ll talk more about that in a minute.  Now let’s access the new cluster.
Access the k0s cluster
Accessing the cluster is a matter of simply installing kubectl (if necessary) and pointing to the KUBECONFIG file.
When you create the server, k0s creates a KUBECONFIG file for you, so copy it to your working directory and point to it:
sudo cp /var/lib/k0s/pki/admin.conf ~/admin.conf
export KUBECONFIG=~/admin.conf
Now you can access the cluster itself:
kubectl get namespaces
NAME              STATUS   AGE
default           Active   5m32s
kube-node-lease   Active   5m34s
kube-public       Active   5m34s
kube-system       Active   5m34s
Notice that if you look for the nodes, there is no master node:. Remember, k0s implements the control plane as naked processes.
kubectl get nodes
NAME             STATUS   ROLES    AGE    VERSION
ip-172-31-8-33   Ready    <none>   5m1s   v1.19.3
But what happens if we try to access the cluster from another server, such as via a tool such as Lens?
Accessing k0s from outside the cluster: Customizing the k0s Kubernetes cluster
Now let’s look at accessing the cluster from an external server.  We can easily get the KUBECONFIG file:
scp -i k0s.pem ec2-user@<SERVER_IP>:~/admin.conf .
export KUBECONFIG=admin.conf
From there, we’ll want to use the public IP address of the server rather than localhost, so open the admin.conf file and edit the server address.  For example, in my case, the public IP of my server is 52.10.92.152:
apiVersion: v1
clusters:
– cluster:
server: https://52.10.92.152:6443
certificate-authority-data: LS0tLS1CRUdJTiBDRVJUSUZJQ0FURS0tLS0tCk1JSURBRENDQWVpZ0F3SUJBZ0lVRzhGakJZVVNZOFBrOWNjcTVhK3lFenNBNXAwd0RRWUpLb1pJaHZjTkFRRUwKQlFBd0dERVdNQlFHQTFVRUF4TU5hM1ZpWlhKdVpYUmxjeTFqWVRBZUZ3MHlNREV4TWpNd016TXpNREJhR…

Now if we were to test this connection, we’d see something odd.
kubectl version
Client Version: version.Info{Major:”1″, Minor:”19″, GitVersion:”v1.19.0″, GitCommit:”e19964183377d0ec2052d1f1fa930c4d7575bd50″, GitTreeState:”clean”, BuildDate:”2020-08-26T14:30:33Z”, GoVersion:”go1.15″, Compiler:”gc”, Platform:”windows/amd64″}
Unable to connect to the server: x509: certificate is valid for 127.0.0.1, 172.31.8.33, 172.31.8.33, 172.31.8.33, 10.96.0.1, not 52.10.92.152
So we’re making the connection, and Kubernetes is working, but the credentials are incorrect.  To solve this problem, we need to configure k0s to include the public IP address.
To start, we can export the actual configuration file k0s will use:
sudo k0s default-config > k0s.yaml
We can then edit that file to add the public IP, and any other address at which we want to call the server:
apiVersion: k0s.k0sproject.io/v1beta1
kind: Cluster
metadata:
name: k0s
spec:
api:
address: 172.31.8.33
sans:
– 172.31.8.33
– 172.31.8.33
– 52.10.92.152
extraArgs: {}
controllerManager:
extraArgs: {}
scheduler:
extraArgs: {}
storage:
type: etcd
kine: null
etcd:
peerAddress: 172.31.8.33
network:
podCIDR: 10.244.0.0/16
serviceCIDR: 10.96.0.0/12
provider: calico
calico:
mode: vxlan
vxlanPort: 4789
vxlanVNI: 4096

Next restart the k0s server. Because it’s running as a background process, the easiest way to do this is to simply restart the machine, then restart k0s:
sudo k0s server –enable-worker &
From here everything should Just Work; the KUBECONFIG file stays the same:
kubectl version
Client Version: version.Info{Major:”1″, Minor:”19″, GitVersion:”v1.19.0″, GitCommit:”e19964183377d0ec2052d1f1fa930c4d7575bd50″, GitTreeState:”clean”, BuildDate:”2020-08-26T14:30:33Z”, GoVersion:”go1.15″, Compiler:”gc”, Platform:”windows/amd64″}
Server Version: version.Info{Major:”1″, Minor:”19″, GitVersion:”v1.19.3″, GitCommit:”1e11e4a2108024935ecfcb2912226cedeafd99df”, GitTreeState:”clean”, BuildDate:”2020-11-11T20:21:36Z”, GoVersion:”go1.15.4″, Compiler:”gc”, Platform:”linux/amd64″}
You can also access the Kubernetes cluster with Lens by importing the KUBECONFIG.
Add additional nodes to the Kubernetes cluster
Scaling the cluster is just a matter of adding additional worker nodes or control planes. To do that, you’re going to need a token so the new server knows where to “phone home”. To generate that, go to the control plane:
k0s token create –role=worker
Obviously, in this case we’re creating a new worker node.  You’ll wind up with a really long string of text such as:
H4sIAAAAAAAC/2yV0Y7iOhKG7/speIGZYycwpxtpLyZgBwIxY8dlJ74LcYZAnBBCGtKs9t1XzcxIu9K5K1f9+n7Lsup/ybujKvvr8dzOJzf8Urj361D21/nLl8nvev4ymUwm17K/lf18Ug1Dd53/9Rf+2/vq46+vX31//m069Z+iouyH489jkQ/ll/x9qM79cfj4YvMhn0+2CRq2CV4IsJE8BkuhIkjARBxREM8ZGhY1jhIQgSBsybXqDKJ+AlFgkFPiUYV5HRmlmNnRoN9pdiqkqja+o2XLApZ+v1skhIZuu8ddlK/MSdZUCLhvuKOBRZYIZRl3dMUlVQLoVMKsirHptKs2VnUZNOOplPSilQgMGD9eOSaImkrdMYvwN5l2TJCoEm1xLw/dnxn935mEqC2JuXClFgbNNK8pU0SkdknNXplZ1mAd0y6TqTBxrXzjWZoDDmJil+DT1cKxKDsxAqAWXFHFgaAEImIRfWoTRG+fbwIgNuJUj4k2Yo/GSwzFQ5Ea21ZV3DdqJ6000rV5YxIFh41Br57Ba79MFTXSabuk5zxUZ5nG9xyGkyDTMVHfe1YrY0IcMXe4JSSiuXIKlhHOkIEyZKBSg8BxnD/Mujyc77BSjx3N+iKluVTnj3gVxBqmvvGpA1dgvXRLvYp7mYohTxnX4YjzU7RV3ut9j88986b3Ag0CMGNlas+2ji6LpvA2XpUomX2opTE2HJZlSo86XE/F8TruqHvfEZpmzYzJZjzHYOKSBlJoK/K22pQy7uNavPNH5vPU1SDXnsDFJoHDNCe4YvUbk+HhpkI+TaRI9aprdaN2GV57WetcDEWfLzOUeW871bzds1MQ5pDdWWqrzUPFWw/PRBtFW4+J/HsHVkbpHhSTsJ7tidMljQabKmN0NLNt8MOc3FWmNMlQtEjUYcz8SNnQcBMKynyC42X0zrVlvKaB8DqR11GwqHHAiA1ipWqxspQf33wAFVjkFrzpAiBRK51ZQ40XXGdTARFwEAHA4SZhfReIjEoLYjBNeR2B1vG0COtNvhIQO3HM0niqaJerlE/L5hWXZNorQne8sX2hqz6HYmYfwecffIiaBhKx4NM/98+ocGvPtsGuOA5Ek1mjDt2Ce+NHhkRrH8zFyjUK22P2MXgQ2ladTMZTty5OgnKotCbDKFJz2hM1JqvgaFD30ErdsjS7m4fd7pYCWczWi5MZEvJm2GIIslZxtjSyeAhPhfHNYuILNDttUYUV5ahsA1FqGPWK+rIRIDxbs1asi1YEpol6CKuLaSgkTbbJfSvLpR2s300zn8LeZzf5cLdd6pgO6WVP7h97sKMljoJUs7zmD4nED+1oLGp6grDok6UxQNmHQviy02tPfe9kTsa7BJtlaTHdNxneK/deoA52cL1tvegae2+UUbvereBum8IT8HaL26CRtUmVDC5GsiYmHS1klTJZjDtpr4vm9RajyN/iIGLp4WFOxlmCRrMUUxsO25KwXqRUJ83IchJhaCqyRdW3QkcO2i4FhO7xyhL14A+r3yIZWpw0fLMPVZVj5f+QaPN7N1NZ8wNHKlHEhQmwQBF47uUtP//rZTJp86acT2p0fSnO7VCOw6+Y+FX/iok/mfFUfTber8/T+7505fBlfz4P16HPu/+nvfd92Q5f/pCezfrY2vlkcW5/Hg8vXV/+LPuyLcrrfPLv/7x8Up/mvyH/gH8aP68wnOuynU9qN15n+Ovl56OyaLj8ffC+9f3x9PLfAAAA////I+m0AwcAAA==
This may seem excessive, but this is actually just a KUBECONFIG that’s been BASE64-encoded. The benefit here is that you can put the worker node anywhere, as long as it can access the control plane over the network.
To create the worker, instantiate a new server (if necessary) and install k0s:
sudo curl -sSLf k0s.sh | sudo sh
Then just go ahead and join the cluster:
sudo k0s worker “long-join-token”
As in:
k0s worker “H4sIAAAAAAAC/2yV0Y7i…”
Now if you were to go back to kubectl and check for nodes, you’d see the new node in your list, as in:
kubectl get nodes
NAME               STATUS   ROLES    AGE   VERSION
ip-172-31-14-157   Ready    <none>   81s   v1.19.3
ip-172-31-8-33     Ready    <none>   11h   v1.19.3
You can also increase the robustness of the cluster by creating an additional control plane.  Again, start by creating the token:
k0s token create –role=controller
And again, on your new server, install k0s and start the server just as you started the worker:
sudo curl -sSLf k0s.sh | sudo sh
sudo k0s server “long-join-token” &
As in:
sudo k0s server “H4sIAAAAAAAC/3RV0Y…” &
This time, though, if you check for nodes, you won’t see the addition, because there are no master nodes in the k0s Kubernetes architecture:
kubectl get nodes
NAME               STATUS   ROLES    AGE   VERSION
ip-172-31-14-157   Ready    <none>   23m   v1.19.3
ip-172-31-8-33     Ready    <none>   11h   v1.19.3
Note that until the community creates a command for leaving the cluster (currently in progress) if something happens to your second controller, the cluster itself will be borked, so don’t add this unless you need to.
Where to go from here
k0s is exciting, but it’s still pretty young, so work is simultaneously very fast but the community would very much like any feedback or contributions. Meanwhile, we’d like to hear when you’re doing with k0s, and what you’d like to see us talk about, so let us know in the comments!
The post How to set up k0s Kubernetes: A quick and dirty guide appeared first on Mirantis | Pure Play Open Cloud.
Quelle: Mirantis

Closing the gap: Migration completeness when using Database Migration Service

Database Migration Service (DMS) provides high-fidelity, minimal downtime migrations for MySQL (Preview) and PostgreSQL (available in Preview by request) workloads to Cloud SQL. Since DMS is serverless, you don’t have to worry about provisioning, managing, or monitoring any migration-specific resources. In this post, we’ll focus on what is and is not included in database migration for MySQL, and what you can do to ensure migration completeness when using DMS. The source database’s data, schema, and additional database features (triggers, stored procedures, and more) are replicated to the Cloud SQL destination reliably, and at scale, with no user intervention required. Due to the peculiarities of MySQL, there are a few things that won’t be migrated, though. Let’s look at what is and isn’t migrated with DMS in more detail.What’s included in MySQL database migrationDMS for MySQL uses the database’s own native replication technology to provide a high-fidelity way to migrate database objects from one database to another. The migration fidelity section of the documentation goes into detail about what is included in the migration. At the time of this Preview launch, all of the following data, schema, and metadata components are migrated as part of the database migration:Data Migration All tables from all databases and schemas, excluding the following default databases and schemas: sys, mysql, performance_schema, and information_schema.Schema MigrationNamingPrimary keyData typeOrdinal positionDefault valueNullabilityAuto-increment attributesSecondary indexesMetadata MigrationStored proceduresFunctionsTriggersViewsForeign key constraintsWhat’s not included in database migrationMySQLThere are certain things that are not migrated as part of a MySQL database migration, as well as some known limitations and quotas that you should be aware of. Users definitionWhen you’re migrating a MySQL database, the MySQL system database, which contains information about users and privileges, is not migrated. That means that user account and login information must be managed in the destination Cloud SQL instance directly. The root account will need to be set up before the instance can be used. You can add users to the Cloud SQL destination instance either from the Users tab in the UI, or from the mysql client. The Cloud SQL documentation contains more information about managing MySQL user accounts.Usage of Definer clauseSince a MySQL migration job doesn’t migrate users data, sources which contain metadata defined by users with the DEFINER clause will fail when invoked on the new Cloud SQL replica, as the users don’t yet exist there. To run a migration from a source that includes the DEFINER clause:Create a migration job without starting it (choose Create instead of Create & Start).Create the users on the new Cloud SQL destination instance using the Cloud SQL API or the Users tab in the UI.Start the migration job from the migration job list or the specific job’s page.Alternatively, you can update the DEFINER clause to INVOKER on the source prior to setting up the migration job. Note that if the metadata was created by ’root’@’localhost’,  the process will fail. Change the DEFINER before starting the migration job.Next Steps with DMSReady to learn more about migrating your MySQL or PostgreSQL database to Cloud SQL? These resources will help you gather the information you need to get started:This blog post announces the launch of DMS and provides an overview of the capabilities it supportsThe DMS documentation goes into more detail about requirements and steps to set up a MySQL database migrationAn in-depth look at configuring connectivity for DMSFill out this form to express interest in DMS for PostgreSQLRelated ArticleDatabase Migration Service Connectivity—A technical introspectiveMigrating your database is hard. So is network connectivity. See how Google’s Database Migration Service can make migration reliable, eas…Read Article
Quelle: Google Cloud Platform

Money matters: Automating your Cloud Billing budgets

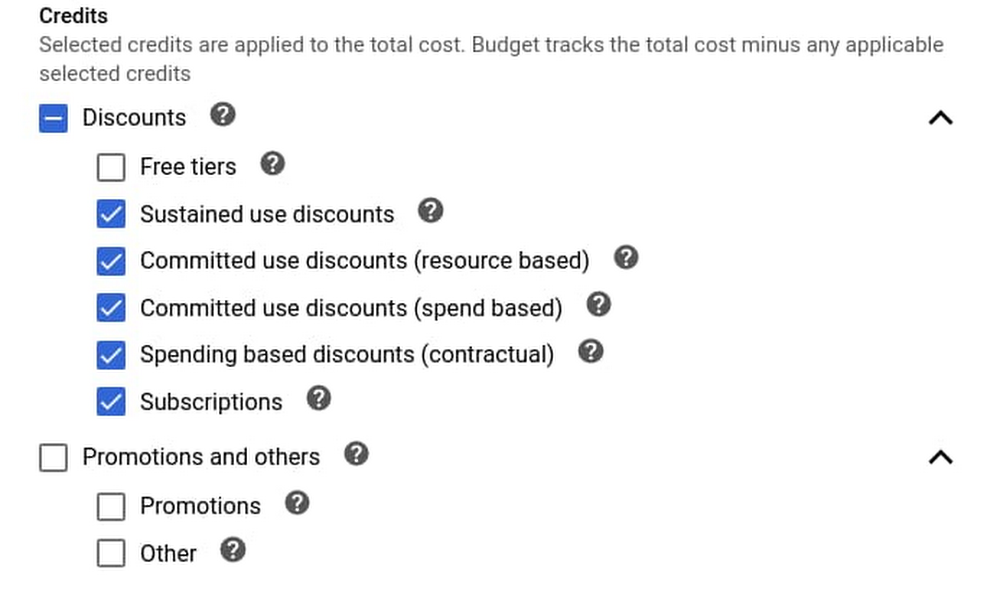
The bigger a cloud environment, the more important it is to have robust cost management tools, including budget automation capabilities. Budgeting tools can help you avoid unnecessary costs via proactive notifications of future (and actual) overages. Billing automation can help you support multiple budgets, each with very granular filters (we have customers with thousands of individual budgets!), and customize your budget notifications. Here on the Cloud Billing team, we’ve been working hard to improve these capabilities based on your feedback, and are excited to announce several enhancements: General availability (GA) of the Budgets API (learn more)Granular choice of credits – choose specific credits to include in your budget (learn more)Customized budget alert email recipients – send email notifications to whoever you want, as well as remove billing admins and users from the default list (learn more)Let’s take a look at these new features in greater depth. Cloud Billing’s latest budgeting featuresOur goal with Cloud Billing is to create an enterprise-grade cost management suite, complete with all the tools you need to manage the largest and most complex of cloud environments. Read on to learn more about Cloud Billing’s new budgeting and automation capabilities. Budgets APIEarlier this month we announced the general availability of the Budgets API. The Budgets API allows you to do almost everything from within the Cloud Billing UI: create, edit and delete budgets, as well as use its scoping and filtering capabilities. You can interact with the API directly through REST calls, or with our Java, Node.JS, Python, GO, and .NET client libraries. Where the UI and API capabilities differ, know that those differences will be short-lived—our goal is to ultimately deliver feature parity between the UI and the API. The Budgets API is especially useful when you want to automate budget creation, i.e., create a budget when a team spins up a new project. It’s also great for editing budgets en masse. For example, if you know you’re about to have a spike in sales, you could increase all related budgets by 20%. Another great use for the Budgets API is to obfuscate and simplify your end users’ permission model for budget creation and editing. If your company already has a self-managed portal for cloud resource management, you can integrate simple budget experiences there, and then use a Service Account to create or edit the budgets. This way, you don’t need to give your users budget-related IAM permissions to allow them to do more than they were originally set up to do. Learn more in our documentation.Previously, the credits setting was a simple checkbox that let you include available credits in your budget. Now, you can choose specific credit families, such as discounts or promotions, or even specific credit types (e.g., free tiers). For example, you can build a durable budget that excludes any one-time promotional credits that you may receive at the free tier level. Customized budget alert email recipientsCloud Billing is now integrated with Cloud Monitoring so you can send notification emails to up to five notification channels; in addition you can decide whether or not to send budget notifications to billing users and admins. With these two features together, you can ensure that notifications are sent to the appropriate recipients.Programmatic budget notificationsJust like the ability to automate budget creation, Cloud Billing can also alert Pub/Sub topics about changes to a budget. Unlike with email notifications, Cloud Billing notifies the Pub/Sub topics regardless of whether a budget threshold has been crossed, and that information can be easily incorporated into your business logic. You can see some examples of programmatic budget notifications here, including posting to a Slack channel.A sample processHow might you use these features together? Here’s a sample process that you could implement in your organization to create a budget for a project, monitor it, and automatically disable the project if it reaches a certain threshold.Initiate infrastructure deployment using your tool of choice, for example Terraform or another Infrastructure as Code tool.That in turn calls into Google Cloud Build to deploy your custom workflows across multiple environments, including VMs, serverless, Kubernetes, or Firebase.Using the Google Cloud Budget API, create an overall budget for the new project, using actual amounts, as well as forecasted thresholds.You can send notifications to: Billing admins and specific employees via Cloud Monitoring channelsA Pub/Sub topicCreate a cloud function to monitor the Pub/Sub topic, which automatically disables billing if spend is over 150% of budget. This happens if (and only if), this is a test environment, as determined by the environment label. For all other environments publish a message to the team Slack channel.Click to enlargeSee code examples here. Your budget, your wayEvery organization is different, and you need the ability to customize the rate at which you consume your cloud resources. We continue to add features to Cloud Billing that allow any organization—from the smallest business to the largest enterprise—to manage their budget how they want, with programmatic methods that enable granular budgets and automated cost controls. To learn more and get started with budgeting on Cloud Billing, check out the documentation.Related ArticleGiving you better cost analytics capabilities—and a simpler invoiceGoogle Cloud Console features cost management tools to help financial operations (FinOps) teams analyze and predict their organization’s …Read Article
Quelle: Google Cloud Platform

You do you: How to succeed in a distributed, multi-cloud world

Why do we use more than one thing to solve a particular need? Sometimes we don’t have a choice. All my financial assets aren’t in one place because my employer-provided retirement account is at a different financial institution than my personal account. Other times, we purposely diversify. I could buy all my clothes at one retailer, but whether it’s a question of personal taste, convenience, or just circumstance, I buy shoes at one store (and often different stores for different types of shoes), shirts at another store and outerwear somewhere else. Is it the same situation within your IT department? Based on organizational dynamics, past bets on technology, and current customer demands, I’d bet that you have a few solutions to any given problem. And it’s happening again with public clouds, as the statistics show that most of you are using more than one provider.But all public clouds aren’t the same. To be sure, there’s commonality amongst them: every public cloud provider offers virtual compute, storage, and networking along with middleware services like messaging. But each cloud offers novel services that you won’t find elsewhere. And each operates within different geographic regions. Some clouds offer different security, data sovereignty, and hybrid capabilities than others. And the user experience—developer tools, web portals, automation capabilities—isn’t uniform and may appeal to different teams within your company. Using multiple clouds may be becoming commonplace, but it’s not simple to do. There are different tools, skills, and paradigms to absorb. But don’t freak out. Don’t send your developers off to learn every nuance of every cloud, or take your attention away from delivering customer value. You do, however, need to prepare your technical teams, so that they’re prepared to make the most of multi-cloud. So what should you do, as a leader of technical teams? Here is some high-level advice to consider as you think about how to approach multi-cloud. And remember, there’s no universal right solution—only the right solution for your organization, right now. Keep your primary focus on portable skillsYour software isn’t defined by your choice of cloud. That’s probably blasphemous to say, coming from someone working for a public cloud provider, but it’s the truth. Most of what it takes to build great software transcends any given deployment target.What software development skills truly matter? Go deep on one or more programming languages. Really understand how to write efficient, changeable, and testable code. Optimize your dev environment, including your IDE, experimental sandboxes, and source control flow. Learn a frontend framework like Angular or Flutter. Grok the use cases for a relational database versus a schema-less database. Figure out the right ways to package up applications, including how to use containers. Invest in modern architectural knowledge around microservices, micro frontends, event stream processing, JAMstack, APIs, and service mesh. Know how to build a complete continuous integration pipeline that gives your team fast feedback. This is valuable, portable knowledge that has little to do with which cloud you eventually use.Don’t get me wrong, you’ll want to develop skills around novel cloud services. All clouds aren’t the same, and there are legitimate differences in how you authenticate, provision, and consume those powerful services. An app designed to run great on one cloud won’t easily run on another. Just don’t forget that it’s all about your software and your customers. The public clouds are here to serve you, not the other way around!Use the “thinnest viable platform” across environmentsToo often, organizations put heavyweight, opaque platforms in place, and hope developers will come and use them. That’s an anti-pattern and companies are noticing a better way.The authors of the book Team Topologies promote the idea of Thinnest Viable Platform (TVP) to accelerate development. In many organizations, Kubernetes is the start of their TVP. It offers a rich, consistent API for containerized workloads. It could make sense to layer Knative on top of that TVP to give developers an app-centric interface that hides the underlying complexity of Kubernetes. Then, you might introduce an embedded service mesh to the cluster so that developers don’t have to write infrastructure-centric code—client-side load balancing, service discovery, retries, circuit breaking and the like. (Note, if you combine those things, and mix in a few others, you get Anthos. Just sayin’).But what’s really powerful here is having a base platform made up of industry-standard open source. Not just open source, but standard open source. You know, the projects that a massive ecosystem supports and integrates with—think Kubernetes, Istio, Envoy, Tekton, and Cloud Native Buildpacks. This allows you to run an identical platform across your deployment targets and integrate with best-of-breed infrastructure and services. Your developers are free to take the foundational plumbing for granted, and steer their attention to all the value-adding capabilities available in each environment.Pick the right cloud (and services) based on your app’s needsLet’s recap. You’re focused on portable skills, and have a foundational platform that makes it easier to run software consistently on every environment. Now, you need to choose where the software actually runs.Your developers may write software that’s completely cloud-agnostic and can run anywhere. That’s hard to do, but assuming you’ve done it, then your developers don’t need to make any tough choices up front. When might you need upfront knowledge of the target environment? A few examples:Your app depends on unique capabilities for AI, data processing, IoT, or vertical-specific APIs—think media or healthcare.You need to host your application in a specific geography, and thus choose a specific cloud, datacenter, or partner facility.Your app must sit next to a specific data source—think SaaS systems, partner data centers, mobile users—and use whatever host is closest.Have a well-tested decision tree in place to help your teams decide when to use novel versus commodity services, and how to select the cloud that makes the most sense for the workload. Choosing the cloud and services to use may require expert help. Reach out toGoogle’s own experts for help, or work with our vast network of talented partners who offer proven guidance on your journey. The choice is yours.Related ArticleAnthos: one multi-cloud management layer for all your applicationsAnthos can be the foundation of current and future applications.Read Article
Quelle: Google Cloud Platform

What’s new in BigQuery ML: non-linear model types and model export

We launched BigQuery ML, an integrated part of Google Cloud’s BigQuery data warehouse, in 2018 as a SQL interface for training and using linear models. Many customers with a large amount of data in BigQuery started using BigQuery ML to remove the need for data ETL, since it brought ML directly to their stored data. Due to ease of explainability, linear models worked quite well for many of our customers.However, as many Kaggle machine learning competitions have shown, some non-linear model types like XGBoost and AutoML Tables work really well on structured data. Recent advances in Explainable AI based on SHAP values have also enabled customers to better understand why a prediction was made by these non-linear models. Google Cloud AI Platform already provides the ability to train these non-linear models, and we have integrated with Cloud AI Platform to bring these capabilities to BigQuery. We have added the ability to train and use three new types of regression and classification models: boosted trees using XGBoost, AutoML tables, and DNNs using Tensorflow. The models trained in BigQuery ML can also be exported to deploy for online prediction on Cloud AI Platform or a customer’s own serving stack. Furthermore, we expanded the use cases to include recommendation systems, clustering, and time series forecasting. We are announcing the general availability of the following: boosted trees using XGBoost, deep neural networks (DNNs) using Tensorflow, and model export for online prediction. Here are more details on each of them:Boosted trees using XGBoostYou can train and use boosted tree models using the XGBoost library. Tree-based models capture feature non-linearity well, and XGBoost is one of the most popular libraries for building boosted tree models. These models have been shown to work very well on structured data in Kaggle competitions without being as complex and obscure as neural networks, since they let you inspect the set of decision trees to understand the models. This should be one of the first models you build for any problem. Get started with the documentation to understand how to use this model type.Deep neural networks using TensorFlowThese are fully connected neural networks, of type DNNClassifier and DNNRegressor in TensorFlow. Using a DNN reduces the need for feature engineering, as the hidden layers capture a lot of feature interaction and transformations. However, the hyperparameters make a significant difference in performance, and understanding them requires more advanced data science skills. We suggest only experienced data scientists use this model type, and leverage a hyperparameter tuning service like Google Vizier to optimize the models. Get started with the documentation to understand how to use this model type.Model export for online predictionOnce you have built a model in BigQuery ML, you can export it for online prediction or further editing and inspection using TensorFlow or XGBoost tools. You can export all models except time series models. All models except boosted tree are exported as TensorFlow SavedModel, which can be deployed for online prediction or even inspected or edited further using TensorFlow tools. Boosted tree models are exported in Booster format for online deployment and further editing or inspection. Get started with the documentation to understand how to export models and use them for online prediction.We are building a set of notebooks for common patterns (use cases) for these models that we see in different industries. Check out all the tutorials and notebooks.Related ArticleAnnouncing our new Professional Machine Learning Engineer certificationLearn about the Google Cloud Professional Machine Learning Engineer certification.Read Article
Quelle: Google Cloud Platform