Migrating Apache Hadoop to Dataproc: A decision tree

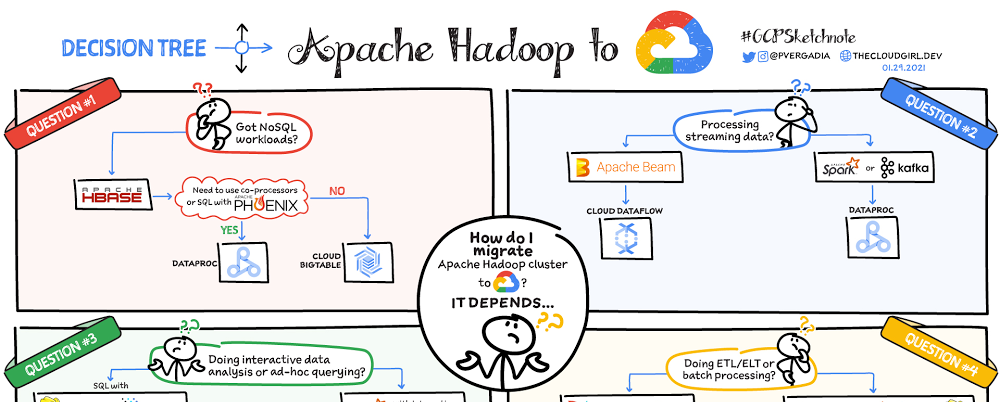
Are you using the Apache Hadoop ecosystem? Are you looking to simplify the management of resources while continuing to use your existing tools? If yes, then checkout Dataproc. In this blog post, we will briefly cover Dataproc and then highlight four scenarios for migrating your Apache Hadoop workflows to Google Cloud.What is Dataproc?Dataproc is a managed Apache Spark and Apache Hadoop service that lets you take advantage of open-source data tools for batch processing, querying, streaming, and machine learning. If you are using the Apache Hadoop ecosystem and looking for an easier option to manage it then Dataproc is your answer. Dataproc automation helps you create clusters quickly, manage them easily, and save money by turning clusters off when you don’t need them. With less time and money spent on administration, you can focus on what matters the most—your DATA!Key Dataproc FeaturesDataproc installs a Hadoop cluster on demand, making it a simple, fast, and cost-effective way to gain insights. It simplifies the traditional cluster management activities and creates a cluster in seconds. Key Dataproc features include:Support for open source tools in the Hadoop and Spark ecosystem including 30+ OSS tools Customizable virtual machines that scale up and down as neededOn-demand ephemeral clusters to save costTight integration with other Google Cloud analytics and security service. How does Dataproc work?To move your Hadoop/Spark jobs to Dataproc, simply copy your data into Google Cloud Storage, update your file paths from HDFS to GS and you are ready to go!Watch this video for more:What is Google Cloud Dataproc Youtube VideoWhat is Google Cloud Dataproc Youtube VideoDataproc disaggregates storage and compute. Say an external application is sending logs that you want to analyze, and you store them in a data source. From Cloud Storage the data is used for processing by Dataproc, which then stores it back into Cloud Storage, BigQuery, or Bigtable. You could also use the data for analysis in a notebook and send logs to Cloud Monitoring and Cloud Logging.Since storage is separate, for a long-lived cluster you could have one cluster per job. To save cost, however, you could also use ephemeral clusters that are grouped and selected by labels. And finally, you can also save costs by using just the right amount of memory, CPU, and disk to fit the needs of your application.What are the migration scenarios to consider?Here are four common scenarios that help you decide how to migrate a Hadoop cluster to Dataproc:Are you trying to migrate NoSQL workloads?Are you processing streaming data? Are you doing interactive data analysis or ad hoc querying?Are you doing ETL or batch processing?Question 1: Do you have NoSQL workloads?If you are using HBase then check if you need to use co-processors or SQL with Phoenix. If so, Dataproc is the best option. But if you don’t require a co-processor or SQL, then Bigtable is a good choice.Question 2: Are you processing streaming data?If you’re using Apache Beam it makes sense to use Dataflow because it is based on the Beam SDK. If you are using Spark or Kafka then Dataproc is a good option.Question 3: Are you doing interactive data analysis or ad hoc querying?If you are doing interactive data analysis in Spark with interactive notebooks then Dataproc is great in combination with Jupyter Notebook or Zeppelin. If instead you are doing data analysis with SQL in Hive or Presto AND want to keep it that way then Dataproc is a good fit. But if you are interested in a managed solution for your interactive data analysis then you’ll want to look at BigQuery. It is a fully managed data analysis and warehousing solution.Question 4: Are you doing ETL or batch processing?Use Dataproc if you are running ETL or batch processes using MapReduce, Pig, Spark, or Hive. If you’re using a workflow orchestration tool such as Apache Airflow or Oozie and want to keep the jobs as they are, then again Dataproc is great. However, if you prefer a managed solution then take a look at Cloud Composer, which is managed by Apache Airflow.ConclusionSo there you have it—four different scenarios to plan the migration of your Apache Hadoop cluster to Google Cloud.For more details, check out the Dataproc product page. And, for more #GCPSketchnote and similar cloud content follow me on Twitter and Instagram @pvergadia and keep an eye out on thecloudgirl.dev.Related ArticleCombining the power of Apache Spark and AI Platform Notebooks with Dataproc HubDataproc Hub: Administering Jupyter notebooks for Spark workloads on DataprocRead Article
Quelle: Google Cloud Platform

Compiling Qt with Docker Using Caching

This is a guest post from Viktor Petersson, CEO of Screenly.io. Screenly is the most popular digital signage product for the Raspberry Pi. Find Viktor on Twitter @vpetersson.

In the previous blog post, we talked about how we compile Qt for Screenly OSE using Docker’s nifty multi-stage and multi-platform features. In this article, we build on this topic further and zoom in on caching. 

Docker does a great job with caching using layers. Each command (e.g., RUN, ADD, etc.) generates a layer, which Docker then reuses in future builds unless something changes. As always, there are exceptions to this process, but this is generally speaking true. Another type of caching is caching for a particular operation, such as compiling source code, inside a container.

At Screenly, we created a Qt build environment inside a Docker container. We created this Qt build to ensure that the build process was reproducible and easy to share among developers. Since the Qt compilation process takes a long time, we leveraged ccache to speed up our Qt compilation. Implementing ccache requires volume mounting a folder from outside of the Docker environment. 

The above steps work well if you are the only developer working on the project. What happens if you want to be able to have a shared cache across a team?

There are a few ways to accomplish this style of caching in Docker. 

The easiest way to establish a shared cache is by following what we did in the previous article. We used disk cache along with some neat features for speeding up caching in BuildKit. We then compressed the cached files and distributed them to team members. The process is not very elegant, but it gets the job done. 

If we want to automate the process a bit further, we can include retrieving the cache as part of the build process. An example of this could looks like this:

RUN curl -o /tmp/build-cache.tgz https://some-domain.com/build-cache.tgz &&
tar xfz /tmp/build-cache.tgz -C /tmp &&
rm /tmp/build-cache.tgz

This process above is neat, but it does mean that someone will need to periodically upload the build cache in order to keep cache files fresh. In addition, you need somewhere to store the files (such as S3).

It would be nice if we could avoid manual tasks and use native Docker technologies to do the same thing, right? As it turns out, we can use Docker to improve the process. We just need to use our imagination. 

As we showed in the previous article, we can use multi-stage builds to copy data between different docker images. What if we move the cache to a dedicated Docker image? We can then push this image to Docker Hub and pull it into the build process. 

The process is straightforward. Start by creating two different images in Docker Hub. Call them screenly/build-cache and screenly/build-env. Building on the previous article, we use this Dockerfile as the basis for screenly/build-env.

In the Dockerfile, we set the environment variable CCACHE_DIR to /src/ccache. This step tells ccache that the cache resides in /src/ccache. In the previous post, the step was just a volume mount to the system. However, in this case, we want to alter this step so that the cache lives outside of /src, as this is used for volume mounting the code base, such as /usr/ccache.

We can now launch the container with:

$ docker run –rm -t
-v ~/tmp/qt-src:/src
-v ~/tmp/qt-build:/build
-v ~/tmp/ccache:/usr/ccache
screenly-build-env

After you have run through your compilation, you can now build and push our cache image. The final Dockerfile will look like this:

FROM scratch
COPY ccache /ccache

To build this image, use the following code:

$ cd ~/tmp
$ docker build
-f /path/to/Dockerfile
-t screenly/build-cache
$ docker push screenly/build-cache

Finally, you can now include this layer in the Dockerfile for screenly/build-env. Add the line:

COPY –from=screenly/build-cache /ccache /usr/ccache

Next time you rebuild screenly/build-env, Docker will automatically pull down the cache. Also, you only need to add volume mounting when you are refreshing the cache. 

About Screenly

Screenly is the most popular digital signage product for the Raspberry Pi. If you want to turn a physical screen into a secure, remote-managed device (over UI or digital signage API), Screenly makes setup a breeze. Users can display beautiful dashboards, images, videos, and web page content.

Screenly is available in two flavors: an open source version and a commercial version. You can try out our commercial version with a 14-day free trial.
The post Compiling Qt with Docker Using Caching appeared first on Docker Blog.
Quelle: https://blog.docker.com/feed/

Einen delegierten Administrator für die Verwaltung von AWS CloudFormation StackSets für Ihre AWS Organisation festlegen

AWS CloudFormation StackSets erweitert die Funktionalität von Stacks, indem das Erstellen, Aktualisieren und Löschen von Stacks über mehrere Konten und Regionen hinweg mittels einer einzigen Operation möglich wird. Im letzten Jahr haben wir StackSets-Integration mit AWS Organizations eingeführt. Dies erlaubt die Definition einer zentralen Vorlage zur Anwendung auf allen AWS-Konten. Somit brauchen Sie keine Berechtigungen, Netzwerkbedürfnisse und die Infrastruktur für jedes Konto einrichten und Sie können Änderungen leicht über die gesamte Organisation hinweg anwenden. Wir kündigen nun die Möglichkeit an, ein AWS-Mitgliederkonto in Ihrer Organisation als Administrator zu delegieren, um Stack Sets für Ihre gesamte Organisation zu erstellen und zu verwalten. Mit delegierter Administration brauchen Sie nicht mehr auf das Verwaltungskonto für die Stack Sets-Verwaltung der Organisation zugreifen. Die Verwendung dieser Funktion ermöglicht die Anwendung der Best Practices für Sicherheit von AWS. Diese empfehlen, dass Sie Verantwortungen außerhalb des Verwaltungskontos delegieren, wenn möglich.
Quelle: aws.amazon.com