Bidens Infrastrukturplan: 220 Milliarden Dollar für die Elektromobilität
Nicht kleckern, sondern klotzen: Der neue US-Präsident Joe Biden plant ein Infrastrukturprogramm in Billionenhöhe, auch für Elektroautos. (Elektroauto, Tesla)
Quelle: Golem

Nicht kleckern, sondern klotzen: Der neue US-Präsident Joe Biden plant ein Infrastrukturprogramm in Billionenhöhe, auch für Elektroautos. (Elektroauto, Tesla)
Quelle: Golem

Der neue iPhone-Ständer von Belkin ist mit einem Motor ausgerüstet. Mit einer Gesichtserkennung dreht sich das iPhone zum Anwender. (Belkin, iPhone)
Quelle: Golem

In der Informatik stoßen viele auf das Dragonbook zum Compiler-Bau von Aho und Ullman. Die beiden werden nun für ihre Leistung geehrt. (Compiler, Alan Turing)
Quelle: Golem

Elastic Stack ist das Mittel der Wahl, wenn es um die Sammlung und Auswertung von Daten von Servern und Anwendungen geht. Die Golem Akademie erleichtert den Einstieg in das Thema. (Golem Akademie, Server)
Quelle: Golem
Change is the one constant in computing and networking environments. It has now driven their evolution to encompass the telecommunications edge.
Quelle: CloudForms
Today, we’re pleased to announce the beta availability of Red Hat Enterprise Linux (RHEL) 8.4, the latest version of the world’s leading enterprise Linux platform. Engineered to help deliver enterprise-ready innovation and drive digital transformation from the datacenter to the edge and beyond, RHEL 8.4 Beta adds new capabilities and enhances existing features to further refine RHEL as a consistent foundation for the open hybrid cloud.
Key enhancements and new features for RHEL 8.4 Beta include:
Quelle: CloudForms
The successful shaping of an organization’s DevOps culture depends on a few key factors: leadership, technology, and investment in quality training resources. With Red Hat’s immersive DevOps curriculum—featuring courses on open practices to culture enablement—these critical concepts can help catalyze widespread transformation within your organization.
Quelle: CloudForms

Last November, we made relational database migration easier for MySQL users with our public preview of Database Migration Service (DMS). Today, we’ve officially made the product generally available, and bring the same easy-to-use migration functionality to PostgreSQL.The thing I’ve appreciated the most about diving deep with DMS has been that it just works. Once you get your source instance and database(s) prepared, and establish the connectivity between source and destination, doing the migration is all handled. When it’s all finished, cutting over to using your Cloud SQL instance as your application’s primary database is as simple as clicking a button in the DMS UI.Not to downplay the difficulty in database prep, or connectivity. I wrote a thorough blog post walking through the various connectivity options for DMS in great detail. Network topology can be incredibly complicated, and connecting two machines securely through the internet while serving an application with thousands or millions of users is anything but simple.Today, I want to take a moment with you to cover preparing your source PostgreSQL instance and database(s) for migration using DMS and some gotchas I found so you don’t have to.I’ll start by saying, the documentation and in-product UI guidance are both excellent for DMS. If you’re familiar with setting up replication infrastructure for PostgreSQL, you’re probably good to jump in, and check in on the documentation if needed. Having said that, it’s documentation, so here I’ll try to add a bit so it’s all in one place to get everything you need to prepare your source PostgreSQL instance and database(s).Step one, be sure your source instance version is supported. Current list of supported versions can be found on the documentation page I linked above.Next up is a schema piece: DMS doesn’t support migrating tables that don’t have a primary key. Starting a migration against a database that has tables without primary keys will still succeed, but it won’t bring over the data from a table that’s lacking a primary key, but the table will still be created. So if you want to bring the data over from a table that doesn’t have a primary key, you have a few options:You’ll have to add a primary key prior to starting the migration.You’ll need to bring the data over yourself after the initial migration. Keeping in mind of course that if you bring the data over yourself, even if you maintain the connection, DMS won’t replicate data for that table moving forward.You can export the table from the source instance and import it into the new instance.Finally, you can create a table with the same schema as the one you have that doesn’t have the primary key, give it a primary key (should use a sequence generator to autogenerate the key) and copy the source data into it. Then do the migration. DMS as part of doing the migration will create the non-PK table, it just doesn’t copy the data over. Then you can copy the data from the migrated primary key table, and finally delete the primary key table once you’ve verified the data. It sounds complicated, but it ensures you’re getting the same data at the point of migration as the rest of your data as long as you’ve got any new rows inserted into the non-primary key table also going into the primary key copy. If you’re worried about the data in that table changing during the migration, you can copy the data over right before promoting the destination instance to minimize that window.DMS relies on pglogical for the migration work. This means that the pglogical extension has to be installed on each of the databases you want to migrate. Instructions for installing pglogical on your instance and database(s) can be found here. If you’re running on Linux, the repo’s installation page is helpful. To be sure I took one for the team, I decided to see how bad it might be to migrate a PostgreSQL database installed with Homebrew from MacOS to Cloud SQL. Turns out, shockingly not too bad! Installing pglogical from source:1) Clone GitHub repo2) Run make2a) Get compilation error because postgres.h not found3) Find where Homebrew installed Postgres, find include folder, add all include folders to C_INCLUDE_PATH4) Run make again, built!5) Run sudo make install because pglogical documentation said I might need it (side note: don’t pre-optimize!)5a) Fails without any good messages6) Run make install7) Great success! Can’t quite test success yet, since now the instance and database(s) have to be configured to use pglogical and replication.The next piece is pretty straightforward if you’ve done replication in PostgreSQL before. There are some configuration variables on the instance you need to set in order for the replication to succeed. There are two main ways to change these values. You can either adjust them while the instance is running with the ALTER SYSTEM SET <variable> TO <value>; calls, or you can change them in the configuration file, posgresql.conf. Either way, you’ll need to restart the instance for the changes to take effect.If you want to change it in the configuration file, but don’t know where it lives, generally it lives in the data directory for the database. If you only have the credentials to log in to your database but don’t know where it lives, you can run SHOW data_directory once connected to the database and it’ll give you the location of the data directory.The variables you need to set are:wal_level = logical # Needs to be set to logicalmax_replication_slots = n # Number varies, see here for detailsmax_wal_senders = n # Should be max_replication_slots plust number of actively connected replicas.max_worker_processes = n # Should be set to how many databases that are being replicatedshared_preload_libraries = pglogicalNote that the shared_preload_libraries variable is a comma delimited list. You need to be careful when you set it to check first to see if there are other libraries that are being preloaded to include them, otherwise you could unload required libraries by your setup and cause issues with the database.Once you’ve restarted you can verify the changes by connecting and running SHOW <variable> e.g. SHOW wal_level should show logical.Quick example time:Note that these numbers are for the DMS load only. If you already have these values set for other reasons, you need to take that into account. For example, if you’ve got max_worker_processes set to 8 to handle higher parallel querying, then you may want to add more on top to accommodate the replication to avoid impacting performance.Case 1: You’re just doing a migration and immediately promoting the Cloud SQL instance. There aren’t any other replicas setup on the source, and you only have a single database you’re migrating over. Then you’d want to set the values to:# Technically we only need 1 for Cloud SQL subscriber and the default is# set to 10, so you could just leave it alone. This is just illustrating# that you could set it lower without any issuesmax_replication_slots = 3 # Equal to max_replication_slots + 1 because we’ll only have one # replica connected to the source instancemax_wal_senders = 4# Technically we only need 1 here because we’re only bringing over# one database, but always a good practice to have one as a buffer# just in case there’s an issue so it doesn’t rely on# only the one processor.max_worker_processes = 2Case 2: You have a setup where your on prem local instance is already set up with 5 replication slots to handle other replication you have in place, and there are 4 databases you want to migrate to the Cloud, you would want to set the variables up like:# 5 for existing subscribers + 4 for each of source databases since pglogical# requires 1 slot for each databasemax_replication_slots = 9# Equal to max_replication_slots + 6 because say we have 5 existing replicas,# and we’ll be adding one more replica for DMS doing the migrationmax_wal_senders = 15# 4 databases we’re migrating, plus and extra as a buffer just in casemax_worker_processes = 5Once you have your variables all set, if you changed them in the config file, now’s the time you need to restart your PostgreSQL instance.You can verify it worked by logging into the instance and running CREATE EXTENSION pglogical on one of the databases you’re planning on replicating over. As long as it works, you’ll need to connect to every database you want to be replicating and run that command on each one. And while you’re there on each database, you need to grant the user that you specified in the Define a source step creating the migration certain privileges. These grants need to happen on each database you’re replicating as well as the postgres database:# on all schemas (aside from the information schema and schemas starting with “pg_”) on each database to migrate, including pglogicalGRANT USAGE on SCHEMA <SCHEMA> to <USER># on all databases to get replication information from source databases.GRANT SELECT on ALL TABLES in SCHEMA pglogical to <USER># on all schemas (aside from the information schema and schemas starting with “pg_”) on each database to migrate, including pglogicalGRANT SELECT on ALL TABLES in SCHEMA <SCHEMA> to <USER># on all schemas (aside from the information schema and schemas starting with “pg_”) on each database to migrate, including pglogicalGRANT SELECT on ALL SEQUENCES in SCHEMA <SCHEMA> to <USER># We’re not handling it in this blog post, but if you happen to be trying to replicate# from RDS, it would be GRANT rds_replication TO USER.ALTER USER USER WITH REPLICATIONIf your source database is earlier than version 9.6, there’s an extra step to follow because before that, PostgreSQL didn’t have replication delay monitoring by default. This is needed because DMS uses this to be able to watch if replication lag becomes too high. I’m not going to cover it in detail here since all versions before 9.6 are currently end of life, but if you need to do this, there’s information on what you need to do here.Congratulations! Your PostgreSQL instance and database(s) are fully configured and ready for DMS! Another nicety of DMS, is when you’re all configured and ready to go, there’s a connectivity/configuration test in the UI that will tell you if everything is configured correctly or not before you hit the final “do it” button.Remember I mentioned that I cover a lot of the nitty gritty details around connectivity between your source database and the Cloud SQL instance in the blog post I linked at the top of this post. It covers MySQL there, so I’ll add a pitfall I ran into with PostgreSQL here before I leave you.Be sure to remember if you haven’t already, to enable your database to listen and accept connections from non-localhost locations. Two pieces to this, one, you need to change the listen_address variable in your postgresql.conf file. It defaults to localhost, which might work depending on how you’re managing connection to the database from your application, but won’t work for the migration. You also need to modify the pg_hba.conf file to grant your user for the migration access to your local database from the Cloud. If you don’t do either of these, DMS is really good about giving you clear error messages from the PostgreSQL instance telling you that you messed up. Ask me how I know.And there we have it. Everything in one place to get you ready to go bringing your PostgreSQL database into Cloud SQL. If you have any questions, suggestions or complaints, please reach out to me on Twitter, my DMs are open! Thanks for reading.Related ArticleMigrate your MySQL and PostgreSQL databases using Database Migration Service, now GACheck out how to migrate your on-premises databases to the cloud with Database Migration Service, now generally available for PostgreSQL …Read Article
Quelle: Google Cloud Platform
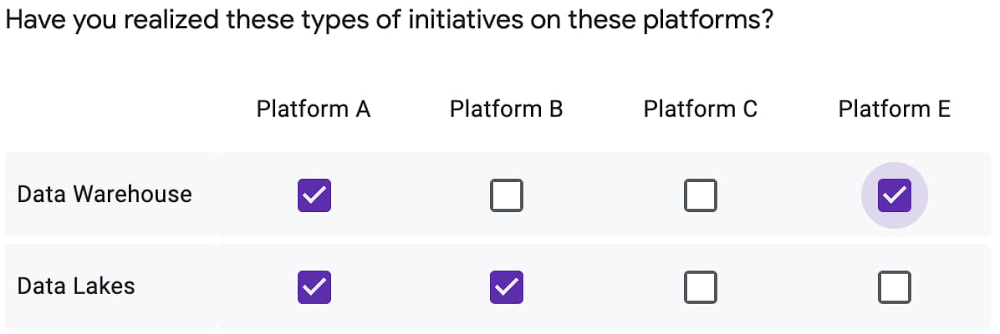
Organizations are realizing that experience management and analysis are important aspects of understanding needs and providing the best level of service to customers, employees, and vendors. Surveys are a powerful vehicle within the experience management space for data collection within organizations of all shapes and sizes. According to Verified Market Research, Experience Management, which includes tools like surveys, is a USD $17.5B market that is expected to grow 16.8% annually (CAGR) from 2020 to 2027 (Source). Tools like Google Forms, Survey Monkey, Qualtrics, and TypeForm allow companies to get answers fast from groups and organizations with whom they interact. The growth in technology options and the ease and effectiveness of survey platforms means that many companies create a lot of surveys. Oftentimes, these surveys are used once to solve a specific problem, the results are analyzed and shared, and then the survey and resultant data are forgotten. A natural opportunity exists for companies to instead capture and store those results in a place where they can be used for survey-over-survey analysis and comparison against other first and third party data to better understand cause and potential options for improvement. So, what barriers exist to creating this experience management data warehouse? Surveys by nature are flexible vehicles, and many survey systems provide data in a question-answer, column-row format, or as delimited results. This data shape, while good for human consumption, is not great for wide-scale analytics, and the process for getting it to a better format can be daunting. Over the course of this blog, we’ll demonstrate how Google Cloud and Trifacta have partnered to create a design pattern to easily shape, display, and use this data.Focusing on scale and flexibilitySurvey datasets often require pivoting or parsing of data so that questions can be compared, analyzed, and augmented in a more structured format. This survey analytics pattern walks through the process for transforming the data, putting it into a data warehouse, and using that warehouse to analyze and share findings. This pattern can be extended to a variety of survey types and different iterations of the surveys, providing you with a platform that can be used to do deeper and more consistent analysis.To illustrate this pattern, we’ll leverage Google Forms as our capture mechanism (Note: although we’re using Google Forms for this example, the concepts are transferable to other survey engines that have similar export schemas). Google Forms allows users to structure questions in a variety of ways, from multiple checkboxes to a ranked list of items to a single, freeform answer, each producing slightly a different output. Based on the question category, the survey analytics pattern provides a specific approach to structure the data and load it in BigQuery tables.For example, with multiple choice questions, the results may appear as a list of values with semicolon separator (e.g. “Resp 1; Resp 4; Resp 6”). Using Google Cloud Dataprep by Trifacta, a data preparation service found on the Google Platform, we can take those values and parse the extract into a cleaner format for analysis where each response is a new row.Starting QuestionOriginal ExportTransformed Export and Results in the Data WarehouseOn the Google Cloud Platform, your experience management data warehouse will leverage three main technologies: Cloud Dataprep by Trifacta, BigQuery, and Data Studio or Looker. As mentioned above, Cloud Dataprep is the key technology involved in normalizing, cleaning and enriching data for analytic use. BigQuery, Google Cloud’s enterprise data warehouse, will store your survey data alongside other data sources to allow stakeholders to dig deeper and uncover hidden trends. With Data Studio or Looker, users can explore and visualize the data, taking immediate action on the insights they uncover. You can also take your analysis further by combining this data preparation with AI/ML to more easily identify and respond to anomalies or trends in your data (to learn more, please take a look at Google Cloud’s AI Platform and some of our AI/ML reference patterns for analytics). The benefits of an Experience Management Data Warehouse Building an experience management data warehouse is one giant step toward a culture of more robust analytics. At a high level, an experience management data warehouse allows companies to: Compare multiple surveys or responses (without manual combination) Find new insights by isolating responses from a variety of surveys—for example, identifying a team’s satisfaction correlation to the size of teams or regions Enrich survey results with other data in your warehouse—for example, combining survey results on product usage with sales data to surface new marketing segments with high conversion probabilityRepresent and visualize the survey results in new ways using Looker, Data Studio, or another BI tool Share out survey results to a broader audience in a compelling and personalized visualization formatBuild a scalable survey practice, that allows for iterating and improving over timeApply more advanced analytics and decision making to survey data using Artificial Intelligence (AI) and Machine Learning (ML)Use cases for the survey analytics pattern So, how does this play out in the real world? Here’s a few ways companies can leverage an experience management data warehouse. Employee Experience: An HR department might normally send out quarterly surveys to get a pulse check on the general well-being of employees. Yet with the onset of the pandemic, HR decides to send out surveys with more frequency. With the results of these employee satisfaction results in one place, this HR department can now compare satisfaction levels to pre-pandemic times, as well as isolate the surveys taken during the pandemic to see if satisfaction levels have improved over time. Product Experience: A product team sends out surveys to track the use of specific products or features. With all of these surveys stored in a data warehouse, the product team may decide to enrich this data with sales data to understand if product usage correlates with sales success. Since sales data is already stored in BigQuery, it’s easy to access and combine this data. Customer Experience: A market research team would like to better understand customer journeys. These surveys can help analysts understand user sentiment, and they can also be a lead generation source. By joining the results of the survey with other insightful datasets like CRM tools, marketers can use analytics to create targeted campaigns for users with a high propensity to buy. Get startedReady to take your surveying to the next level and build an experience management data warehouse? Get started today by visiting our Codelab, digging into the technical guide, or checking out our video walkthrough. You can access all of our patterns on our Smart Analytics Reference Patterns page.
Quelle: Google Cloud Platform

Organizations are increasingly investing in digital businesses ecosystem strategies to foster innovation and operate efficiently. These ecosystems connect various stakeholders–such as partners, developers, and customers–via application programming interfaces, or APIs. APIs allow various software systems to interface, and are thus the primary mechanism of value exchange within these ecosystems. For example, Bank BRI, one of the largest banks in Indonesia, drove over $50 million in new revenue by creating an online marketplace with more than 50 monetized open APIs that let over 70 ecosystem partners leverage the bank’s credit scoring, business assessment, and risk management capabilities. Similarly, AccuWeather, the world’s leading weather media and big data company, makes APIs available to more than 70,000 registered developers who’ve used the company’s data and functionality to create over 30,000 apps.Scaling up digital business ecosystems can unlock new markets, grow regional partnerships, and connect distributed workforces–but all of this starts with scaling up the API program. To help customers globally scale API programs, we are pleased to bring the power of Google’s networking capabilities to API management. Expand global reach and deliver high performance with Apigee and Cloud CDNApigee X, the latest release of Google Cloud’s full lifecycle API management platform, makes it simple and easy to apply Cloud Content Delivery Network (CDN) to APIs. Working in tandem, the two solutions let enterprises not only secure and manage their APIs but also make them available across a global ecosystem of stakeholders. Specifically, Apigee lets enterprises apply security to APIs, control how and by whom they’re used, publish them for consumption, monitor and analyze their usage, monetize them, and perform other aspects of API product management. Cloud CDN helps these APIs and the services they support to be performant, regardless of how many ecosystem participants are calling the API or where those ecosystem participants are located. Cloud CDN runs on Google Cloud’s globally-distributed edge network and lets organizations serve content globally. This reduces latency both by leveraging Google’s massive network infrastructure, which supports services such as Gmail and Google Search, and by caching content closer to the users, improving performance and availability for peak traffic seasons. Because digital assets can be served from Google’s global edge instead of an organization’s backend systems, web pages and apps can run even faster and offer a smoother experience. By caching often-accessed data at the network edge, as close to the customers and end users, as quickly as possible, Cloud CDN also helps organizations seamlessly handle seasonal spikes in traffic, such as those that may occur during the holiday or back-to-school seasons. In addition to improving ecosystem experiences and reliability, this approach to caching can also minimize web server load, compute usage, and ultimately costs.Better digital experiences lead to bigger digital ecosystemsWhether it’s interacting with customers, partners, or third-party developers, an enterprise’s ability to expand its digital ecosystem is limited by the quality of the digital experiences it creates. If apps load too slowly or services are not consistently available, ecosystem participants will leave. If APIs and the apps they power are not secure, participants will leave. Each link in the digital ecosystem value chain relies on API management and network management to keep interactions flowing–and with the combined power of Apigee X and Cloud CDN, we’re pleased to help our customers meet these challenges and expand their businesses. To try Apigee X for free, click here, and to learn more about Cloud CDN, click here. Check out our latest demo of Apigee and Cloud CDN working together in the below video.Related ArticleThe time for digital excellence is here—Introducing Apigee XApigee X, the new version of Google Cloud’s API management platform, helps enterprises accelerate from digital transformation to digital …Read Article
Quelle: Google Cloud Platform






