The evolution of SDN: What service mesh offers telco

In the previous post we took a look at the evolution of Software Defined Networking (SDN) and the role it plays for communication service providers. We explored all the way up to the virtualization of network infrastructure, OpenStack, Open vSwitch (OVS) and more. In this post we’re going to look at networking, containers and container orchestration. 
Quelle: CloudForms

P2 Puts Easy, Flexible Project Tracking Tools In Your Hands

From to-do apps and day planners, to spreadsheets and full-blown subscription services, making your work trackable and visible can really help with productivity.

P2 is the tool we use at Automattic (the company behind WordPress.com), and today we’d love to share some ways you can do the same.

What sets P2 apart from other project tracking tools?

There is no shortage of project management tools out there, but the killer feature of P2 is its total flexibility.

Instead of having to adapt to a particular, fixed way of working, P2 adapts to the way you and your team work.

That’s made possible by the baked-in integration of the WordPress block editor, giving you a really flexible tool that can adapt to whatever you need to throw at it. 

P2 is your project tracking canvas

From a blank page upwards, P2 makes it easy to track and feature what’s most important to you, using any of the nearly 80 (and growing) blocks at your disposal.

In practice that means that any page can include images, Google Calendars, PDF embeds, Figma designs, checklists, and a wide spectrum of video players and social media integrations (just for starters). And of course, you can arrange them on the page any way that meets your needs.

Three project tracking blocks you can add to your P2 today

Among the options available to you on P2, three blocks in particular can be really useful for project tracking. Let’s take a look at those.

1. Task block

Tasks are the atomic unit of getting things done. 

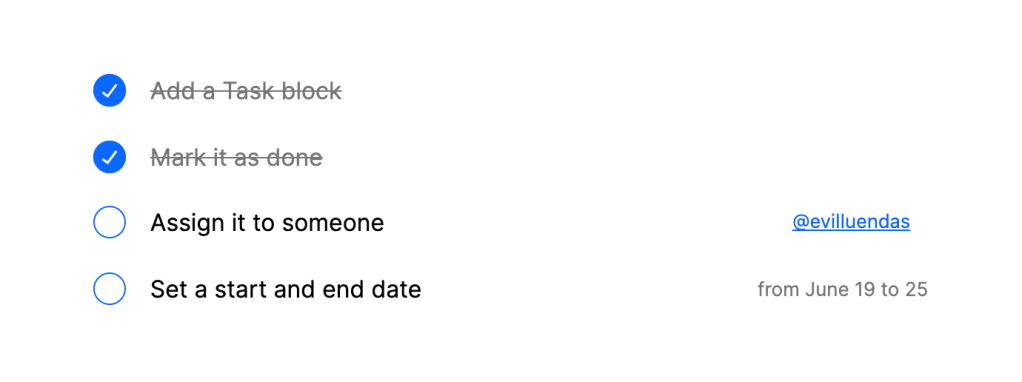
With the Task block, you can add your team to-dos and assign whoever’s responsible for them right from the editor. Clicking the “cog” button in the top right of the editor will open up further options to set start and end dates. 

Here’s an example of a Task block in action:

2. Project Status block

Tasks often add up to a bigger project. The Project Status block does what it says on the tin by tracking a group of tasks together.

Just add it to your post, optionally set a due date and assign tasks, and then update it as tasks are in progress and are completed:

Find advanced tips on the Task and Project Status blocks here. 

3. Changelog block

A changelog is a log or record of all notable changes made to a project. If you’d like to call out those changes visually, the Changelog block lets you assign colorful preset or custom labels, with a description for each:

At Automattic, we use the Changelog block to summarize the work status for a team or product. But P2’s Changelog block can really be used for any projects that you want to keep a record of.

Find advanced tips on the Changelog block here.

How to add project tracking blocks to your P2

Once you have a P2 up and running, you can add the Task, Project Status, or Changelog blocks to your post or page by either:

Using the “+” button on the top left of your editor and typing the first few letters of the block nameTyping “/” anywhere in the editor itself, and searching for the block that way by starting to type the name of the block

How do you P2?

Signing up for P2 is free. Take a look around our demo P2 to see some ways we use it at Automattic.

We’d love to hear how you use P2 and its project tracking blocks in your work. Let us know in the comments.
Quelle: RedHat Stack

Streamline your real-time data pipeline with Datastream and MongoDB

In our constantly evolving digital world, the companies that come out on top are those that can access the data they need, when they need it. Accessing data in real time enables your company to analyze, plan and improve continuously, so you can make better strategic decisions and reduce your overall risk. Whether the goal is to adjust demand forecasts, solve customer queries, or deliver analytics to end-users before they know they need them, the first step to securing the insights you need is gaining visibility into the relevant data as fast as possible. But any system can move only as fast as its slowest bottleneck. When data resides in many areas of an organization and within a variety of platforms, often-antiquated relational databases can create significant congestion. But companies still can — and must — unlock a tremendous amount of business insight from data stored in these relational data stores and from the applications that continually write to them. The question is how to make it happen.With Google Cloud’s Datastream, a serverless change data capture and replication service, and MongoDB Atlas, you can set up a real-time analytics pipeline that continually streams data from legacy relational data stores (like Oracle and MySQL) into MongoDB Atlas. There, your application can take advantage of the power of MongoDB to improve business decision-making.MongoDB Atlas is a global cloud database service available on Google Cloud. Atlas deploys a fully managed MongoDB cluster with seamless automation and proven practices that ensures up to 99.995% * availability, scalability, and compliance with the most demanding data security and privacy standards. MongoDB Atlas includes features such as Atlas Search to integrate full-text search capabilities into your applications and Atlas Charts to create insightful visualizations without the need for extra tools.Getting StartedPrerequisites MongoDB Atlas account (create your free-tier)Relational data sourceGoogle Cloud AccountCreating a MongoDB Atlas clusterFor a detailed guide on creating your own MongoDB Atlas cluster, see the Getting Started with Atlas tutorial. For the purposes of this blog post, we’ve created an M10 MongoDB Atlas cluster using Google Cloud. We recommend selecting the nearest GCP region when setting up your cluster.Once your cluster is created, you will need to configure two settings to make a connection: network access and database access.Network AccessBy default, a new MongoDB Atlas cluster does not accept any network connections. You have two options for allowing secure network access from Dataflow to MongoDB Atlas: You can use Google VPC network peering, or you can secure the connection by allowing only specific IP connections from Google Cloud to your Atlas cluster. In this blog, we’ll set up Atlas to allow connection from any IP (0.0.0.0). In a production environment, it’s recommended to use either VPC network peering or specify the allow list IPs. For information on MongoDB Atlas security check out Security Features and Setup.To accept external connections in MongoDB Atlas, launch the “IP Access List” entry dialog under the Network Access menu and choose, “Allow access from anywhere.”Once you’ve configured network access, you can configure the user account that will be used to connect from Google Cloud to MongoDB Atlas. Configure user authentication in the Database Access menu.Database AccessYou can authenticate to MongoDB Atlas using username/password, certificates, or identity and access management (IAM) authentication methods. To create a username and password that will be used for connection from Google Cloud, select the “+ Add new Database User” option from the Database Access menu.Provide a username and password, and make note of both. You will need these credentials for the Dataflow Flex template later in this post.Configure the source relational databaseDatastream supports a variety of databases, including MySQL and Oracle, as well as various secure connectivity methods. Before you begin, you will need toconfigure these databases for change data capture (CDC). Here, we’ll use MySQL as the data source, and we’ve enabled CDC per the online documentation.Configure Datastream connection profilesAfter your database is set up for change data capture, you can configure the Datastream MySQL source and Cloud Storage destination connection profiles. In our example, they’re called “source_mysql” and “dest_cloudstorage”.To configure the Datastream connection profiles, click on “Create Profile” on the Datastream connection profiles UI and select the relevant type for source or destination.MySQL connection profile configurationName your connection profile, choose the region where it will reside, and MySQL connection details.Cloud Storage connection profile configurationName your connection profile, choose the region where it will reside, and the bucket location. The region needs to be in the same region and the source connection profile and the stream where it will be used.Note:  For security purposes, you will need to set IAM permissions for Compute Service Account or the desired Dataflow worker Service Account. Make sure you perform the following steps:Grant Datastream Admin role to the service account in IAM (Owner will also grant req privileges)Grant objectReader IAM permissions to the Datastream bucketOnce the two connection profiles have been created, you can view them on the connection profiles list.Configure a stream Create a stream from source to destination by clicking on “Create Stream” from the Streams menu.Provide a stream name and ID. “Source type” will be your relational database source, in our example this is MySQL. Follow the wizard’s prompts and select the MySQL and Cloud Storage profiles we created earlier. Once configured properly, Datastream will pull data changes as they happen from MySQL and write them into the Cloud Storage bucket.At this point, we’re ready to configure the Dataflow MongoDB template. But, since we have files stored in Cloud Storage, it’s best to use Pub/Sub notifications for Cloud Storage. This feature makes Dataflow more efficient by alerting on the existence of new files as they become available  instead of relying on Dataflow to continuously scan Cloud Storage for new files across the entire bucket. Create a Pub/Sub notificationTo create a Pub/Sub notification, you need to use the gcloud and gsutil command line tools, since there is no UI available in the Google Cloud console. Let’s enable notifications by creating a Pub/Sub topic and subscription, and creating a notification on the Cloud Storage bucket. The following is an example configuration script:Note: Later you will supply this config in the —parameters section of the gcloud dataflow deploy command..gcsPubSubSubscription=”projects/${PROJECT_ID}/subscriptions/${PUBSUB_SUBSCRIPTION}”Notifications should be set up before Datastream is running. If Datastream is already running, you can create a copy of the files in Cloud Storage instead of recreating the stream. This will trigger the notification mechanism. You can delete the copy after Dataflow processes all the files.Create the Dataflow templateAt this point, we’ve created and configured Datastream and Cloud Storage, and now we’re ready to configure Dataflow. If you have not already done so, be sure to enable Dataflow via gcloud services enable dataflow.googleapis.com.Dataflow makes use of templates, which make it easier to define the source and target, as well as transformations and other logic that should be applied to the data. You can also plug in your own custom JavaScript function to perform custom transformations.  To leverage the Dataflow MongoDB template, go to the Github repository and follow the instructions in the README file. These will guide you through building a Dataflow flex template image and placing it in the Google Container registry. Next, it will tell you how to run this flex template with required parameters. Note that there are several parameters that should be considered in the script. After you work through the README instructions and execute the template, you can see a job created in the Dataflow jobs UI. Note that once you deploy the Dataflow MongoDB template, the job starts running.If you select a job, you can see more details — such as a detailed job graph, metrics and execution details.To see the flow in action, simply add some rows to your relational database and watch them show up in MongoDB Atlas!Better business decisions happen in real timeIn this post, we explored how to set up and configure components in Google Cloud and MongoDB Atlas so that you can stream data from MySQL into MongoDB. By streamlining your real-time data movement, you can gather business insights faster and make smarter, more strategic decisions. No matter your industry, MongoDB Atlas and Google Cloud can help you lead it.Learn more about how you can deploy, manage, and grow MongoDB on Google Cloud on our partner page.Related ArticleUnlock the power of change data capture and replication with new, serverless DatastreamIntroducing a new change data capture (CDC) and replication service that works across heterogeneous databases, cloud and on-premises, for…Read Article
Quelle: Google Cloud Platform

HTTP/3 gets your content there QUIC, with Cloud CDN and Load Balancing

When it comes to the performance of internet-facing applications, HTTP/3 is no small step over HTTP/2: Google’s own roll-out of HTTP/3 reduced Search latency by 2%, reduced video rebuffer times on YouTube by 9%, and improved throughput on mobile devices by 7%. So today, we’re excited to bring support for HTTP/3 to all Google Cloud customers using Cloud CDN and HTTPS Load Balancing. With HTTP/3 support, you’ll see real-world improvements to your streaming video, image serving and API scaling behind our global infrastructure—all without having to change your applications.What is HTTP/3?HTTP/3 is a next-generation internet protocol, and is built on top of QUIC, a protocol we developed and contributed to the IETF, the standards organization in charge of maintaining internet protocols. Together, HTTP/3 and QUIC address previous challenges with HTTP/2 around head-of-line-blocking, security (TLS 1.3 is foundational to QUIC), and reliability over unreliable connections. The original Google QUIC (we call it ‘gQUIC’) will be phased out at the end of 2021, as the number of IETF QUIC clients is quickly surpassing those that support gQUIC. Importantly, your end users can benefit from HTTP/3 today: the latest versions of Mozilla Firefox, Google Chrome, and Apple’s iOS Safari all support HTTP/3 and/or plan to enable it by default in the next couple of months, as do popular libraries such as Cronet and libcurl. Enabling HTTP/3To use HTTP/3 for your applications, you can enable it on your external HTTPS Load Balancers via the Cloud Console or the gcloud SDK with a single click.Clients that don’t yet support HTTP/3 such as older browsers or networking libraries won’t be negatively impacted: HTTP/3 uses the Alt-Svc HTTP header to allow clients to “opt in” if they support the protocol. Those clients will continue to negotiate HTTP/2 or HTTP/1.1 as appropriate.What’s next?In the coming weeks, we’ll bring HTTP/3 to more users when it’s enabled by default for all Cloud CDN and HTTPS Load Balancing customers: you won’t need to lift a finger for your end users to start enjoying improved performance.  If you want to learn more about how Cloud CDN works, check out our overview video, and keep an eye on our release notes to keep up with new features.
Quelle: Google Cloud Platform

Vida Health invigorates virtual healthcare with Google Cloud solutions

Editor’s note: In this guest blog, we look at how healthcare startup Vida Health built a virtual platform on Google Cloud that cut costs and overhead, saves healthcare providers valuable time, and delivers machine learning capabilities that operationalize their data for better patient health outcomes.  At Vida Health, our virtual healthcare platform is designed to deliver whole-person healthcare by treating multiple conditions and integrating both mind and body medicine. In choosing Google Cloud to help us with our digital transformation, we were able to reduce costs 60% by switching from a managed platform to Google Kubernetes Engine (GKE), and are using Google solutions like BigQuery ML to innovate new products that help our patients and empower our clinicians. Accelerating the heartbeat of digital transformationsTraditionally, healthcare has been a slow-moving industry with a bias toward risk aversion and maintaining the status quo. The COVID-19 pandemic challenged this mindset and encouraged many healthcare organizations to accelerate their plans for digital transformation. At the forefront of this transformation is virtual care/telehealth and the ability for providers to offer the same high-quality patient experience over the web and mobile as they do in person. During the pandemic, Vida Health faced challenges scaling our original infrastructure on another cloud provider to meet the growing demand. We also felt that this CSP’s suite of machine learning (ML) services didn’t provide the value add we were seeking. After performing research into competitive cloud technologies, we chose Google Cloud for their flexible, secure, and scalable solutions that integrated seamlessly, reduced our operational overhead, and gave us the tools to build innovative products powered by ML.A key differentiator of Vida in the healthcare marketplace is our platform. Where many competitors have solutions targeting single conditions, we took a horizontal approach, with a platform designed to treat multiple conditions and to integrate both mind and body. Nearly half of Americans have more than one chronic medical condition, and we want to help them with whole-person health solutions that acknowledge the reality of their situation. Our platform is powered by a spectrum of Google solutions, including Looker, an enterprise platform for business intelligence, data applications, and embedded analytics. With a unified dashboard experience, Looker helps us aggregate all of our data and gives us a holistic view of each patient. To take advantage of artificial intelligence (AI) and ML technologies, we were well situated by using BigQuery, Google’s serverless data warehouse, to store all of our data in one place. Even as our datasets in BigQuery grow more comprehensive, it remains easy for our ML engineers and data scientists to use and experiment on that data. We can then take that data into production with BigQuery ML, which allows us to build ML models with only SQL skills.Prescribing ML for new use casesIn our use and exploration of AI/ML in our platform, we go beyond pure AI tools by including human-in-the-loop programs and treatments. For example, we provide coaches, therapists, and dieticians that work with each individual patient, providing tips, strategies, and accountability. Our patient-provider interactions are digitized and stored, giving us a robust training dataset that we can now operationalize using all of the Google tools available. Using these provider interactions, we can track a patient’s progress to ensure they’ve improved their health outcomes, whether it’s weight loss, stress reduction, blood sugar management or beyond. We want to endow our providers with superhuman powers, which means using AI/ML to manage and automate all of the tasks that aren’t member-facing, freeing up the providers to focus their time and energy on their patients. We’re currently experimenting with our Google tools around transcribing the provider’s consultation notes and then applying data analysis to uncover insights that will lead to better health outcomes. Other time-saving solutions on our roadmap for providers include pre-filling standard fields in the chat function and managing end-of-day approvals. We’re currently using BigQuery ML for our “next action recommender,” a member-facing feature on our mobile app that recommends the next step a patient can take in their treatment, based on past datasets of information provided by the patient. At the start of their journey, the steps might be basic, such as scheduling a consultation, adding a health tracker, or watching a health video. But the longer a patient uses our platform, the more sophisticated the recommendation system gets. On the provider side, we have our Vidapedia, a comprehensive list of protocols for treatments that providers can follow. In the past year we’ve invested in Vidapedia cards, which are distinct sets of clinical protocols that have been codified. We’re up to 150 cards, and instead of providers needing to keep all of that information in their heads, we’re working on using BigQuery ML to extract the actions a patient has taken so far in their treatment. Using that data, we’ll then recommend to the provider the most relevant cards that apply to the specific conditions. Having that information at their fingertips reduces the amount of time they need to spend on each member offline, which helps us build efficiency and lower the cost of delivering care.  We’ve also used ML in our customer acquisition process, which has traditionally been a costly endeavor for healthcare startups. A company first needs to market and sell to payers and providers, and then understand the total addressable market (TAM) for their patient base before convincing that segment that their platform is the best decision. We’ve successfully applied ML to this process, sifting through hundreds of different data inputs to better predict who is likely to use our platform, saving us time and money.Invigorating virtual healthcare with Google Cloud solutions The rest of our current Google Cloud stack is robust, featuring BigQuery Slot Autoscaling, a preview feature that optimizes costs and scales for traffic spikes without a sacrifice in performance. We use Looker for data reporting and dashboarding, and Data Studio for quick, ad hoc data visualization. Our relational database is Cloud SQL for PostgreSQL, and we use Data Catalog for data discovery and search. Other Google services in our stack include GKE, Dataflow, Data Fusion, Cloud Scheduler, and AI Platform.  The seamless integration between Google products and services has been impressive and time-saving. Many of our clinical protocols were originally written in Google Docs, and the ability to import that data directly into BigQuery has saved us so much time and effort. Using Looker to then democratize access to that data internally across our organization, and BigQuery ML to build ML applications upon that data, feels like a secret weapon that puts us ahead of the competition. As the healthcare industry continues to adjust to the demands of a changing world, we’ll be working with Google Cloud to deliver cutting-edge solutions that exceed the needs of our patients and providers. Learn more about Vida Health, then apply for our Startup Program to get financial, business, and technical support for your startup. You can also read more about other organizations using Looker and BigQuery to modernize business intelligence.Related ArticleHow Lumiata democratizes AI in healthcare with Google CloudAs AI becomes essential in healthcare, Lumiata’s AI platform helps organizations starting using AI and ML easily to improve care, minimiz…Read Article
Quelle: Google Cloud Platform