Use R to train and deploy machine learning models on Vertex AI
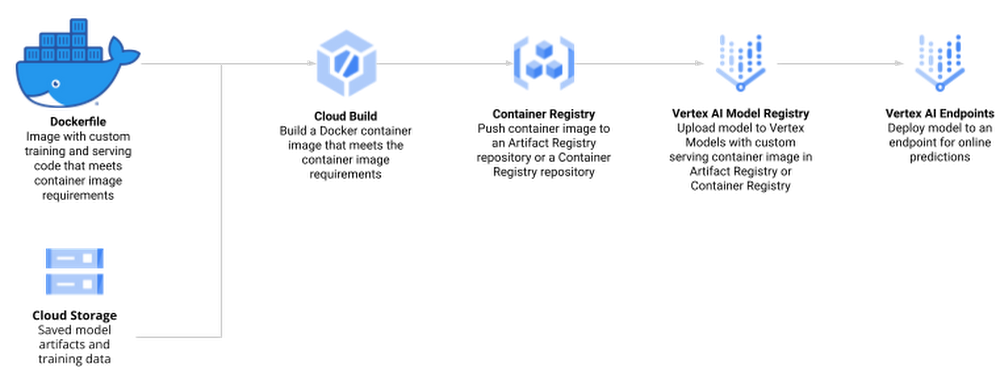
R is one of the most widely used programming languages for statistical computing and machine learning. Many data scientists love it, especially for the rich world of packages from tidyverse, an opinionated collection of R packages for data science. Besides the tidyverse, there are over 18,000 open-source packages on CRAN, the package repository for R. RStudio, available as desktop version or on theGoogle Cloud Marketplace, is a popular Integrated Development Environment (IDE) used by data professionals for visualization and machine learning model development.Once a model has been built successfully, a recurring question among data scientists is: “How do I deploy models written in the R language to production in a scalable, reliable and low-maintenance way?”In this blog post, you will walk through how to use Google Vertex AI to train and deploy enterprise-grade machine learning models built with R. OverviewManaging machine learning models on Vertex AI can be done in a variety of ways, including using the User Interface of the Google Cloud Console, API calls, or the Vertex AI SDK for Python. Since many R users prefer to interact with Vertex AI from RStudio programmatically, you will interact with Vertex AI through the Vertex AI SDK via the reticulate package. Vertex AI provides pre-built Docker containers for model training and serving predictions for models written in tensorflow, scikit-learn and xgboost. For R, you build a container yourself, derived from Google Cloud Deep Learning Containers for R.Models on Vertex AI can be created in two ways:Train a model locally and import it as a custom model into Vertex AI Model Registry, from where it can be deployed to an endpoint for serving predictions.Create a TrainingPipeline that runs a CustomJob and imports the resulting artifacts as a Model.In this blog post, you will use the second method and train a model directly in Vertex AI since this allows us to automate the model creation process at a later stage while also supporting distributed hyperparameter optimization.The process of creating and managing R models in Vertex AI comprises the following steps:Enable Google Cloud Platform (GCP) APIs and set up the local environmentCreate custom R scripts for training and servingCreate a Docker container that supports training and serving R models with Cloud Build and Container Registry Train a model using Vertex AI Training and upload the artifact to Google Cloud StorageCreate a model endpoint on Vertex AI Prediction Endpoint and deploy the model to serve online prediction requestsMake online predictionFig 1.0 (source)DatasetTo showcase this process, you train a simple Random Forest model to predict housing prices on the California housing data set. The data contains information from the 1990 California census. The data set is publicly available from Google Cloud Storage at gs://cloud-samples-data/ai-platform-unified/datasets/tabular/california-housing-tabular-regression.csvThe Random Forest regressor model will predict a median housing price, given a longitude and latitude along with data from the corresponding census block group. A block group is the smallest geographical unit for which the U.S. Census Bureau publishes sample data (a block group typically has a population of 600 to 3,000 people).Environment SetupThis blog post assumes that you are either using Vertex AI Workbench with an R kernel or RStudio. Your environment should include the following requirements:The Google Cloud SDKGitRPython 3VirtualenvTo execute shell commands, define a helper function:code_block[StructValue([(u’code’, u’library(glue)rnlibrary(IRdisplay)rnrnsh <- function(cmd, args = c(), intern = FALSE) {rn if (is.null(args)) {rn cmd <- glue(cmd)rn s <- strsplit(cmd, ” “)[[1]]rn cmd <- s[1]rn args <- s[2:length(s)]rn }rn ret <- system2(cmd, args, stdout = TRUE, stderr = TRUE)rn if (“errmsg” %in% attributes(attributes(ret))$names) cat(attr(ret, “errmsg”), “n”)rn if (intern) return(ret) else cat(paste(ret, collapse = “n”))rn}’), (u’language’, u”), (u’caption’, <wagtail.wagtailcore.rich_text.RichText object at 0x3eadaafa0290>)])]You should also install a few R packages and update the SDK for Vertex AI:code_block[StructValue([(u’code’, u’install.packages(c(“reticulate”, “glue”))rnsh(“pip install –upgrade google-cloud-aiplatform”)’), (u’language’, u”), (u’caption’, <wagtail.wagtailcore.rich_text.RichText object at 0x3ead93a419d0>)])]Next, you define variables to support the training and deployment process, namely:PROJECT_ID: Your Google Cloud Platform Project IDREGION: Currently, the regions us-central1, europe-west4, and asia-east1 are supported for Vertex AI; it is recommended that you choose the region closest to youBUCKET_URI: The staging bucket where all the data associated with your dataset and model resources are storedDOCKER_REPO: The Docker repository name to store container artifactsIMAGE_NAME: The name of the container imageIMAGE_TAG: The image tag that Vertex AI will useIMAGE_URI: The complete URI of the container imagecode_block[StructValue([(u’code’, u’PROJECT_ID <- “YOUR_PROJECT_ID”rnREGION <- “us-central1″rnBUCKET_URI <- glue(“gs://{PROJECT_ID}-vertex-r”)rnDOCKER_REPO <- “vertex-r”rnIMAGE_NAME <- “vertex-r”rnIMAGE_TAG <- “latest”rnIMAGE_URI <- glue(“{REGION}-docker.pkg.dev/{PROJECT_ID}/{DOCKER_REPO}/{IMAGE_NAME}:{IMAGE_TAG}”)’), (u’language’, u”), (u’caption’, <wagtail.wagtailcore.rich_text.RichText object at 0x3ead93a41550>)])]When you initialize the Vertex AI SDK for Python, you specify a Cloud Storage staging bucket. The staging bucket is where all the data associated with your dataset and model resources are retained across sessions.code_block[StructValue([(u’code’, u’sh(“gsutil mb -l {REGION} -p {PROJECT_ID} {BUCKET_URI}”)’), (u’language’, u”), (u’caption’, <wagtail.wagtailcore.rich_text.RichText object at 0x3ead93a41d90>)])]Next, you import and initialize the reticulate R package to interface with the Vertex AI SDK, which is written in Python.code_block[StructValue([(u’code’, u’library(reticulate)rnlibrary(glue)rnuse_python(Sys.which(“python3″))rnrnaiplatform <- import(“google.cloud.aiplatform”)rnaiplatform$init(project = PROJECT_ID, location = REGION, staging_bucket = BUCKET_URI)’), (u’language’, u”), (u’caption’, <wagtail.wagtailcore.rich_text.RichText object at 0x3ead93a41410>)])]Create Docker container image for training and serving R modelsThe docker file for your custom container is built on top of the Deep Learning container — the same container that is also used for Vertex AI Workbench. In addition, you add two R scripts for model training and serving, respectively.Before creating such a container, you enable Artifact Registry and configure Docker to authenticate requests to it in your region.code_block[StructValue([(u’code’, u’sh(“gcloud artifacts repositories create {DOCKER_REPO} –repository-format=docker –location={REGION} –description=”Docker repository””)rnsh(“gcloud auth configure-docker {REGION}-docker.pkg.dev –quiet”)’), (u’language’, u”), (u’caption’, <wagtail.wagtailcore.rich_text.RichText object at 0x3ead93a41d50>)])]Next, create a Dockerfile.code_block[StructValue([(u’code’, u’# filename: Dockerfile – container specifications for using R in Vertex AIrnFROM gcr.io/deeplearning-platform-release/r-cpu.4-1:latestrnrnWORKDIR /rootrnrnCOPY train.R /root/train.RrnCOPY serve.R /root/serve.Rrnrn# Install FortranrnRUN apt-get updaternRUN apt-get install gfortran -yyrnrn# Install R packagesrnRUN Rscript -e “install.packages(‘plumber’)”rnRUN Rscript -e “install.packages(‘randomForest’)”rnrnEXPOSE 8080′), (u’language’, u”), (u’caption’, <wagtail.wagtailcore.rich_text.RichText object at 0x3ead93a41450>)])]Next, create the file train.R, which is used to train your R model. The script trains a randomForest model on the California Housing dataset. Vertex AI sets environment variables that you can utilize, and since this script uses a Vertex AI managed dataset, data splits are performed by Vertex AI and the script receives environment variables pointing to the training, test, and validation sets. The trained model artifacts are then stored in your Cloud Storage bucket.code_block[StructValue([(u’code’, u’#!/usr/bin/env Rscriptrn# filename: train.R – train a Random Forest model on Vertex AI Managed Datasetrnlibrary(tidyverse)rnlibrary(data.table)rnlibrary(randomForest)rnSys.getenv()rnrn# The GCP Project IDrnproject_id <- Sys.getenv(“CLOUD_ML_PROJECT_ID”)rnrn# The GCP Regionrnlocation <- Sys.getenv(“CLOUD_ML_REGION”)rnrn# The Cloud Storage URI to upload the trained model artifact tornmodel_dir <- Sys.getenv(“AIP_MODEL_DIR”)rnrn# Next, you create directories to download our training, validation, and test set into.rndir.create(“training”)rndir.create(“validation”)rndir.create(“test”)rnrn# You download the Vertex AI managed data sets into the container environment locally.rnsystem2(“gsutil”, c(“cp”, Sys.getenv(“AIP_TRAINING_DATA_URI”), “training/”))rnsystem2(“gsutil”, c(“cp”, Sys.getenv(“AIP_VALIDATION_DATA_URI”), “validation/”))rnsystem2(“gsutil”, c(“cp”, Sys.getenv(“AIP_TEST_DATA_URI”), “test/”))rnrn# For each data set, you may receive one or more CSV files that you will read into data frames.rntraining_df <- list.files(“training”, full.names = TRUE) %>% map_df(~fread(.))rnvalidation_df <- list.files(“validation”, full.names = TRUE) %>% map_df(~fread(.))rntest_df <- list.files(“test”, full.names = TRUE) %>% map_df(~fread(.))rnrnprint(“Starting Model Training”)rnrf <- randomForest(median_house_value ~ ., data=training_df, ntree=100)rnrfrnrnsaveRDS(rf, “rf.rds”)rnsystem2(“gsutil”, c(“cp”, “rf.rds”, model_dir))’), (u’language’, u”), (u’caption’, <wagtail.wagtailcore.rich_text.RichText object at 0x3ead920dc110>)])]Next, create the file serve.R, which is used for serving your R model. The script downloads the model artifact from Cloud Storage, loads the model artifacts, and listens for prediction requests on port 8080. You have several environment variables for the prediction service at your disposal, including:AIP_HEALTH_ROUTE: HTTP path on the container that AI Platform Prediction sends health checks to.AIP_PREDICT_ROUTE: HTTP path on the container that AI Platform Prediction forwards prediction requests to.code_block[StructValue([(u’code’, u’#!/usr/bin/env Rscriptrn# filename: serve.R – serve predictions from a Random Forest modelrnSys.getenv()rnlibrary(plumber)rnrnsystem2(“gsutil”, c(“cp”, “-r”, Sys.getenv(“AIP_STORAGE_URI”), “.”))rnsystem(“du -a .”)rnrnrf <- readRDS(“artifacts/rf.rds”)rnlibrary(randomForest)rnrnpredict_route <- function(req, res) {rn print(“Handling prediction request”)rn df <- as.data.frame(req$body$instances)rn preds <- predict(rf, df)rn return(list(predictions=preds))rn}rnrnprint(“Staring Serving”)rnrnpr() %>%rn pr_get(Sys.getenv(“AIP_HEALTH_ROUTE”), function() “OK”) %>%rn pr_post(Sys.getenv(“AIP_PREDICT_ROUTE”), predict_route) %>%rn pr_run(host = “0.0.0.0”, port=as.integer(Sys.getenv(“AIP_HTTP_PORT”, 8080)))’), (u’language’, u”), (u’caption’, <wagtail.wagtailcore.rich_text.RichText object at 0x3ead920dcf10>)])]Next, you build the Docker container image on Cloud Build — the serverless CI/CD platform. Building the Docker container image may take 10 to 15 minutes.code_block[StructValue([(u’code’, u’sh(“gcloud builds submit –region={REGION} –tag={IMAGE_URI} –timeout=1h”)’), (u’language’, u”), (u’caption’, <wagtail.wagtailcore.rich_text.RichText object at 0x3ead920dcc90>)])]Create Vertex AI Managed DatasetYou create a Vertex AI Managed Dataset to have Vertex AI take care of the data set split. This is optional, and alternatively you may want to pass the URI to the data set via environment variables.code_block[StructValue([(u’code’, u’data_uri <- “gs://cloud-samples-data/ai-platform-unified/datasets/tabular/california-housing-tabular-regression.csv”rnrndataset <- aiplatform$TabularDataset$create(rn display_name = “California Housing Dataset”,rn gcs_source = data_urirn)’), (u’language’, u”), (u’caption’, <wagtail.wagtailcore.rich_text.RichText object at 0x3ead920dc650>)])]The next screenshot shows the newly created Vertex AI Managed dataset in Cloud Console.Train R Model on Vertex AIThe custom training job wraps the training process by creating an instance of your container image and executing train.R for model training and serve.R for model serving.Note: You use the same custom container for both training and serving.code_block[StructValue([(u’code’, u’job <- aiplatform$CustomContainerTrainingJob(rn display_name = “vertex-r”,rn container_uri = IMAGE_URI,rn command = c(“Rscript”, “train.R”),rn model_serving_container_command = c(“Rscript”, “serve.R”),rn model_serving_container_image_uri = IMAGE_URIrn)’), (u’language’, u”), (u’caption’, <wagtail.wagtailcore.rich_text.RichText object at 0x3ead93040050>)])]To train the model, you call the method run(), with a machine type that is sufficient in resources to train a machine learning model on your dataset. For this tutorial, you use a n1-standard-4 VM instance.code_block[StructValue([(u’code’, u’model <- job$run(rn dataset=dataset,rn model_display_name = “vertex-r-model”,rn machine_type = “n1-standard-4″rn)rnrnmodel$display_namernmodel$resource_namernmodel$uri’), (u’language’, u”), (u’caption’, <wagtail.wagtailcore.rich_text.RichText object at 0x3ead930402d0>)])]The model is now being trained, and you can watch the progress in the Vertex AI Console.Provision an Endpoint resource and deploy a ModelYou create an Endpoint resource using the Endpoint.create() method. At a minimum, you specify the display name for the endpoint. Optionally, you can specify the project and location (region); otherwise the settings are inherited by the values you set when you initialized the Vertex AI SDK with the init() method.In this example, the following parameters are specified:display_name: A human readable name for the Endpoint resource.project: Your project ID.location: Your region.labels: (optional) User defined metadata for the Endpoint in the form of key/value pairs.This method returns an Endpoint object.code_block[StructValue([(u’code’, u’endpoint <- aiplatform$Endpoint$create(rn display_name = “California Housing Endpoint”,rn project = PROJECT_ID,rn location = REGIONrn)’), (u’language’, u”), (u’caption’, <wagtail.wagtailcore.rich_text.RichText object at 0x3ead93040ed0>)])]You can deploy one of more Vertex AI Model resource instances to the same endpoint. Each Vertex AI Model resource that is deployed will have its own deployment container for the serving binary.Next, you deploy the Vertex AI Model resource to a Vertex AI Endpoint resource. The Vertex AI Model resource already has defined for it the deployment container image. To deploy, you specify the following additional configuration settings:The machine type.The (if any) type and number of GPUs.Static, manual or auto-scaling of VM instances.In this example, you deploy the model with the minimal amount of specified parameters, as follows:model: The Model resource.deployed_model_displayed_name: The human readable name for the deployed model instance.machine_type: The machine type for each VM instance.Due to the requirements to provision the resource, this may take up to a few minutes.Note: For this example, you specified the R deployment container in the previous step of uploading the model artifacts to a Vertex AI Model resource.code_block[StructValue([(u’code’, u’model$deploy(endpoint = endpoint, machine_type = “n1-standard-4″)’), (u’language’, u”), (u’caption’, <wagtail.wagtailcore.rich_text.RichText object at 0x3ead93040b50>)])]The model is now being deployed to the endpoint, and you can see the result in the Vertex AI Console.Make predictions using newly created EndpointFinally, you create some example data to test making a prediction request to your deployed model. You use five JSON-encoded example data points (without the label median_house_value) from the original data file in data_uri. Finally, you make a prediction request with your example data. In this example, you use the REST API (e.g., Curl) to make the prediction request.code_block[StructValue([(u’code’, u’library(jsonlite)rndf <- read.csv(text=sh(“gsutil cat {data_uri}”, intern = TRUE))rnhead(df, 5)rnrninstances <- list(instances=head(df[, names(df) != “median_house_value”], 5))rninstancesrnrnjson_instances <- toJSON(instances)rnurl <- glue(“https://{REGION}-aiplatform.googleapis.com/v1/{endpoint$resource_name}:predict”)rnaccess_token <- sh(“gcloud auth print-access-token”, intern = TRUE)rnrnsh(rn “curl”,rn c(“–tr-encoding”,rn “-s”,rn “-X POST”,rn glue(“-H ‘Authorization: Bearer {access_token}'”),rn “-H ‘Content-Type: application/json'”,rn url,rn glue(“-d {json_instances}”)rn ),rn)’), (u’language’, u”), (u’caption’, <wagtail.wagtailcore.rich_text.RichText object at 0x3ead93040b90>)])]The endpoint now returns five predictions in the same order the examples were sent.CleanupTo clean up all Google Cloud resources used in this project, you can delete the Google Cloud project you used for the tutorial or delete the created resources.code_block[StructValue([(u’code’, u’endpoint$undeploy_all()rnendpoint$delete()rndataset$delete()rnmodel$delete()rnjob$delete()’), (u’language’, u”), (u’caption’, <wagtail.wagtailcore.rich_text.RichText object at 0x3ead93078150>)])]SummaryIn this blog post, you have gone through the necessary steps to train and deploy an R model to Vertex AI. For easier reproducibility, you can refer to this Notebook on GitHubAcknowledgementsThis blog post received contributions from various people. In particular, we would like to thank Rajesh Thallam for strategic and technical oversight, Andrew Ferlitsch for technical guidance, explanations, and code reviews, and Yuriy Babenko for reviews.
Quelle: Google Cloud Platform