Building a sustainable agricultural supply chain on Google Cloud

Working to put food on all of our tables, today’s farmers are facing a higher amount of instability from input supply chain issues to weather patterns. Adding to this challenge are problems farmers face when trying to correctly time grain purchases, sales and transport. Farmers have always been stewards of the land, but now the demand for sustainable products has them needing to better prove their regenerative practices. AtBushel, we understand these problems can’t be solved overnight or by a single company. We focus on empowering agribusinesses and farmers to work even more closely together to build a more sustainable agricultural supply chain by rapidly responding to market changes. With Bushel, farmers can track market prices in real time, instantly buy and sell grain, analyze inventory and transactions, and securely share verified information with grain operators and other producers. We provide the digital tools to streamline how farmers buy and sell commodities throughout the agricultural industry’s supply chain to help address market inefficiencies that can lead to waste, and have the information and resources to help them flex and adapt as complexity increases in farming operations. Approximately 40% to 50% of all U.S. grain transactions now pass through the Bushel platform. As we continue to grow, Bushel continues to focus on what digital tools can support each point in the supply chain. Many focus on the first mile at the farm or last mile at the store. But Bushel is focused on modernizing the middle where grain purchasing and processing sit. We aim to help local grain industries and stabilize regional agricultural supply chains.Starting with a simple mobile app; now scaling into an agricultural ecosystem    Bushel began its journey in 2017 as a small-scale platform for farmers that delivered grain contracts, cash bids, and receipts. As Bushel evolved into a comprehensive agricultural ecosystem, we realized we needed knowledgeable technology partners to help us rapidly scale while saving time and administrative costs. That’s why we started partnering with theGoogle for Startups Cloud Program to get support from Google and work with Google Cloud Managed Services partner,DoiT International to help support our use of GKE and create a multi-regional deployment as well as migrate our CUDs to new Compute Engine families and continue to optimize our footprint. We’ll also use DoiT’s Flexsave technology to reduce the management overhead of CUDs in the future. In just one year, we expanded to over 1,200 live grain receiving locations and quickly grew our services portfolio with electronic signature capabilities, commodity balances, and web development. Because that relationship between farmer and agribusiness is so important, we provide more than 200 grain companies with white-labled digital experiences so each farmer sees their local grain facility they do business with on both desktop and mobile. To further our extension into the digital infrastructure of agriculture, we subsequently acquiredGrainBridge andFarmLogs to help farmers handle specific jobs and tasks, and provide the needed insights to improve their business operations. Over 2,000 grain receiving locations across the United States and Canada now use Bushel products. We accomplished all this onGoogle Cloud. We leverage thesecure-by-design infrastructure of Google Cloud to protect millions of financial transactions and keep sensitive customer data safe. Our data is processed and stored in Google’s secure data centers, which maintain adherence to a number of compliance frameworks. We utilize Google Kubernetes Engine extensively as it reduces operational overhead and offers auto scaling up to 15,000 nodes. Database provisioning, storage capacity management, and other time-consuming tasks are automated withour Cloud SQL usage.Query Insights for Cloud SQL streamlines database observability and seamlessly integrates with existing apps and Google Cloud services such as GKE andBigQuery. Empowering farmers and agribusinesses in North America The Google Cloud Account Team had been instrumental in helping Bushel build an expansive agricultural platform that powers APIs, apps, websites, and digital solutions. Google’s startup experts are incredibly responsive, with deep technical knowledge that can’t be found elsewhere. Google Cloud also has provided us credits to explore new ways of analyzing the vast amounts of data we generate, verify, and transfer with solutions such as BigQuery andPub/Sub.With BigQuery, we can run analytics at scale with 26%–34% lower three-year TCO than cloud data warehouse alternatives. BigQuery delivers actionable insights on a highly secure and scalable platform, includes built-inmachine learning capabilities, and integrates with Pub/Sub to ingest and stream analytic events viaDataflow.With Bushel, farmers across North America are rapidly responding to sudden market changes by tracking grain prices in real time and instantly buying and selling crops. We see a future where this business information becomes insights – where a farmer can not just know where to sell their grain, but when to sell. The burden right now to engage with carbon markets is high, full of paper-based binders and verification forms. We see a world where farming practices recorded digitally can be permissioned along the supply chain for a better picture of how our food is grown. With the Bushel platform, millions of farmers around the world will have the digital tools to modernize local grain industries, build more sustainable agricultural supply chains, and help to address global food inequity.If you want to learn more about how Google Cloud can help your startup, visit our pagehere to get more information about our program, and sign up for our communications to get a look at our community activities, digital events, special offers, and more. Related ArticleFounders and tech leaders share their experiences in “Startup Stories” podcastFounders and tech leaders share their experiences in Google Cloud’s “Startup Stories” podcast.Read Article
Quelle: Google Cloud Platform
Vertex AI Example-based Explanations improve ML via explainability

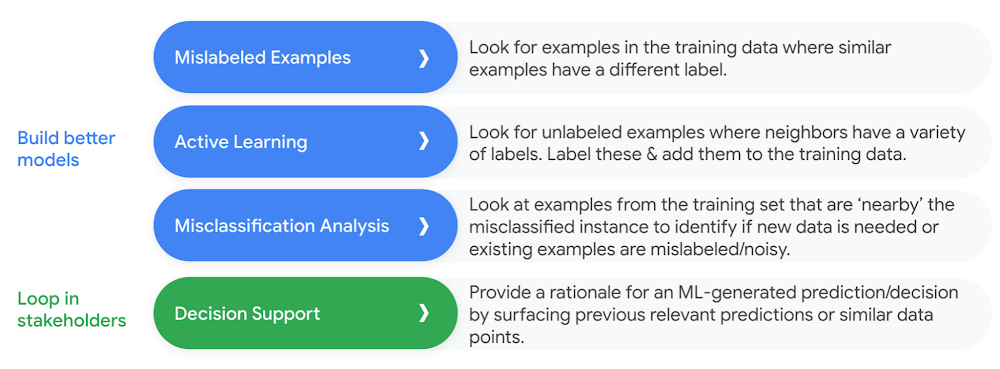
Artificial intelligence (AI) can automatically learn patterns that humans can’t detect, making it a powerful tool for getting more value out of data. A high-performing model starts with high-quality data, but in many cases, datasets have issues such as incorrect labels or unclear examples that contribute to poor model performance. Data quality is a constant challenge for enterprises—even some datasets used as machine learning (ML) benchmarks suffer from label errors. ML models are thus often notoriously difficult to debug and troubleshoot. Without special tools, it’s difficult to connect model failures to root causes and even harder to know the next step to resolve the problem. Today, we’re thrilled to announce the public preview of Vertex AI Example-based Explanations, a novel feature that provides actionable explanations to mitigate data challenges such as mislabeled examples. With Vertex AI Example-based Explanations, data scientists can quickly identify misclassified data, improve datasets, and more efficiently involve stakeholders in the decisions and progress. This new feature takes the guessing games out of model refinement, enabling you to identify problems faster and speed up time to value. How Examples-based Explanations create better modelsVertex AI Example-based Explanations can be used in numerous ways, from supporting users in building better models to closing the loop with stakeholders. Below, we describe some notable capabilities of the feature:Figure 1. Use case overview Example-based ExplanationsTo illustrate the use case of misclassification analysis, we trained an image classification model on a subset of the STL-10 dataset, using only images of birds and planes. We noted some images of birds being misclassified as planes. For one such image, we used Example-based Explanations to retrieve other images in the training data that appeared most similar to this misclassified bird image in the latent space. Examining those, we identified that both the misclassified bird image and the similar images were dark silhouettes. To take a closer look, we expanded the similar example search to show us the 20 nearest neighbors. From this, we identified that 15 examples were images of planes, and only five were images of birds. This signaled a lack of images of birds with dark silhouettes in the training data, as only one of the training data bird images was a dark-silhouetted one. The immediate actionable insight was to improve the model by gathering more data with images of silhouetted birds.Figure 2. Use Example-based Explanations for misclassification analysisBeyond misclassification analysis, Example-based Explanations can enable active learning, so that data can be selectively labeled when its Example-based Explanations come from confounding classes. For instance, if out of 10 total explanations for an image, five are from class “bird” and five are from class “plane,” the image can be a candidate for human annotation, further enriching the data. Example-based Explanations are not limited to images. They can generate embeddings for multiple types of data: image, text, tabular. Let’s look at an illustration of how to use Example-based Explanations with tabular data. Suppose we have a trained model that predicts the duration of a bike ride. When examining the model’s projected duration for a bike ride, Example-based Explanations can help us identify issues with the underlying data points. Looking at row #5 in the below image, the duration seems too long when compared with the distance covered. This bike ride is also very similar to the query ride, which is expected since Example-based Explanations are supposed to find similar examples. Given the distance, time of day, temperature, etc. are all very similar between the query ride and the ride in row #5, the duration label seems suspicious.The immediate next step is to examine this data point more closely and either remove it from the dataset or try to understand if there might be some missing features (say, whether the biker took a snack break) contributing to the difference in durations.Figure 3. Use Example-based Explanations for tabular dataGetting started with Examples-based Explanations in Vertex AIIt takes only three steps to set up Example-based Explanations. First, upload your model and dataset. The service will represent the entire dataset in a latent space (called embeddings). As a concrete example, let’s examine words in a latent space. The below visualizations show such word embeddings, where the position in the vector space encodes meaningful semantics of each word, such as the relation between verbs or between a country and its capital.Next, deploy your index and model, after which the Example-based API will be ready to query. Then, you can query for similar data points and only need to repeat steps 1 and 2 when you retrain the model or change your dataset.Figure 4. Embeddings can capture meaningful semantic informationUnder the hood, the Example-based Explanations API builds on cutting-edge technology developed by Google research organizations, described in this blog post and used at scale across a wide range of Google applications, such as Search, YouTube and Play Store. This technology, ScaNN, enables querying for similar examples significantly faster and with better recall, compared to other vector similarity search techniques. Learn how to use Example-based Explanations by following the instructions available in thisconfiguration documentation. To learn more about Vertex AI, visit our product page or explore this summary of tutorials and resources.Related ArticleVertex Matching Engine: Blazing fast and massively scalable nearest neighbor searchSome of the handiest tools in an ML engineer’s toolbelt are vector embeddings, a way of representing data in a dense vector space. An ear…Read Article
Quelle: Google Cloud Platform

Announcing public availability of Google Cloud Certificate Manager

Today we are pleased to announce that Cloud Certificate Manager is now in general availability. Cloud Certificate Manager enables our users to acquire, manage, and deploy public Transport Layer Security (TLS) certificates at scale for use with your Google Cloud workloads. TLS certificates are required to secure browser connections and transactions. Cloud Certificate Manager supports both self-managed and Google-managed certificates, as well as wildcard certificates, and has monitoring capabilities to alert for expiring certificates. Scale to support as many domains as you needSince our public preview announcement supporting the SaaS use cases, we have scaled the solution to serve millions of managed domains. Alon Kochba, head of web performance at Wix, shared how Certificate Manager’s scale and performance helped them lighten their workload.“As a SaaS product, we need to terminate SSL for millions of custom domains and certificates. Google Cloud’s Certificate Manager and External HTTPS Load Balancing lets us do this at the edge, close to the clients, without having to deploy our own custom solution for terminating SSL,” Kochba said. Streamline your migrationsYou can now deploy a new certificate globally in minutes and greatly simplify and accelerate the deployment of TLS for SaaS offerings. Coupled with support for DNS Authorizations, you can now streamline your workload migrations without major disruptions. James Hartig, co-founder of GetAdmiral.com, shared this with Google after the migration experience.“I just wanted to say thank you so much for the release of Certificate Manager and its support for SaaS use cases. We just completed our migration to using Google to terminate TLS and everything went really smoothly and we couldn’t be happier.” Automate with Kubernetes & self-service ACME certificate enrollmentWe have further introduced a number of automation and observability features including:Kubernetes integration in public preview with Cloud Certificate ManagerSelf-service ACME certificate enrollment, now in public previewThe ability to track Certificate Manager usage in the billing dashboardWe also have started work on incorporating Terraform automation with Cloud Certificate Manager, which will simplify your workload automation.During the certificate manager private preview of the ACME certificate enrollment capability, our users have acquired millions of certificates for their self-managed TLS deployments. Each of these certificates comes from Google Trust Services, which means our users get the same TLS device compatibility and scalability we demand for our own services. Our Cloud users get this benefit even when they manage the certificate and private key themselves–all for free. We look forward to you using Certificate Manager and these new capabilities to improve the reliability of your services and help encourage further adoption of TLS.Related ArticleHow Google Cloud blocked the largest Layer 7 DDoS attack at 46 million rpsBy anticipating a DDOS attack, a Google Cloud customer was able to stop it before it took down their site. They just weren’t expecting it…Read Article
Quelle: Google Cloud Platform

How to Use the Redis Docker Official Image

Maintained in partnership with Redis, the Redis Docker Official Image (DOI) lets developers quickly and easily containerize a Redis instance. It streamlines the cross-platform deployment process — even letting you use Redis with edge devices if they support your workflows. 

Developers have pulled the Redis DOI over one billion times from Docker Hub. As the world’s most popular key-value store, Redis helps apps concurrently access critical bits of data while remaining resource friendly. It’s highly performant, in-memory, networked, and durable. It also stands apart from relational databases like MySQL and PostgreSQL that use tabular data structures. From day one, Redis has also been open source. 

Finally, Redis cluster nodes are horizontally scalable — making it a natural fit for containerization and multi-container operation. Read on as we explore how to use the Redis Docker Official Image to containerize and accelerate your Redis database deployment.

In this tutorial:

What is the Redis Docker Official Image?How to run Redis in DockerUse a quick pull commandStart your Redis instanceSet up Redis persistent storageConnect with the Redis CLIConfigurations and modulesNotes on using Redis modulesGet up and running with Redis today

What is the Redis Docker Official Image?

The Redis DOI is a building block for Redis Docker containers. It’s an executable software package that tells Docker and your application how to behave. It bundles together source code, dependencies, libraries, tools, and other core components that support your application. In this case, these components determine how your app and Redis database interact.

Our Redis Docker Official Image supports multiple CPU architectures. An assortment of over 50 supported tags lets you choose the best Redis image for your project. They’re also multi-layered and run using a default configuration (if you’re simply using docker pull). Complexity and base images also vary between tags. 

That said, you can also configure your Redis Official Image’s Dockerfile as needed. We’ll touch on this while outlining how to use the Redis DOI. Let’s get started.

How to run Redis in Docker

Before proceeding, we recommend installing Docker Desktop. Desktop is built upon Docker Engine and packages together the Docker CLI, Docker Compose, and more. Running Docker Desktop lets you use Docker commands. It also helps you manage images and containers using the Docker Dashboard UI. 

Use a quick pull command

Next, you’ll need to pull the Redis DOI to use it with your project. The quickest method involves visiting the image page on Docker Hub, copying the docker pull command, and running it in your terminal:

Your output confirms that Docker has successfully pulled the :latest Redis image. You can also verify this by hopping into Docker Desktop and opening the Images interface from the left sidebar. Your redis image automatically appears in the list:

We can also see that our new Redis image is 111.14 MB in size. This is pretty lightweight compared to many images. However, using an alpine variant like redis:alpine3.16 further slims your image.

Now that you’re acquainted with Docker Desktop, let’s jump into our CLI workflow to get Redis up and running. 

Start your Redis instance

Redis acts as a server, and related server processes power its functionality. We need to start a Redis instance, or software server process, before linking it with our application. Luckily, you can create a running instance with just one command: 

docker run –name some-redis -d redis

We recommend naming your container. This helps you reference later on. It also makes it easier to run additional commands that involve it. Your container will run until you stop it. 

By adding -d redis in this command, Docker will run your Redis service in “detached” mode. Redis, therefore, runs in the background. Your container will also automatically exit when its root process exits. You’ll see that we’re not explicitly telling the service to “start” within this command. By leaving this verbiage out, our Redis service will start and continue running — remaining usable to our application.

Set up Redis persistent storage

Persistent storage is crucial when you want your application to save data between runs. You can have Redis write its data to a destination like an SSD. Persistence is also useful for keeping log files across restarts. 

You can capture every Redis operation using the Redis Database (RDB) method. This lets you designate snapshot intervals and record data at certain points in time. However, that running container from our initial docker run command is using port 6379. You should remove (or stop) this container before moving on, since it’s not critical for this example. 

Once that’s done, this command triggers persistent storage snapshots every 60 seconds: 

docker run –name some-redis -d redis redis-server –save 60 1 –loglevel warning

The RDB approach is valuable as it enables “set-and-forget” persistence. It also generates more logs. Logging can be useful for troubleshooting, yet it also requires you to monitor accumulation over time. 

However, you can also forego persistence entirely or choose another option. To learn more, check out Redis’ documentation. 

Redis stores your persisted data in the VOLUME /data location. These connected volumes are shareable between containers. This shareability becomes useful when Redis lives within one container and your application occupies another. 

Connect with the Redis CLI

The Redis CLI lets you run commands directly within your running Redis container. However, this isn’t automatically possible via Docker. Enter the following commands to enable this functionality: 

docker network create some-network

​​docker run -it –network some-network –rm redis redis-cli -h some-redis

Your Redis service understands Redis CLI commands. Numerous commands are supported, as are different CLI modes. Read through the Redis CLI documentation to learn more. 

Once you have CLI functionality up and running, you’re free to leverage Redis more directly!

Configurations and modules

Finally, we’ve arrived at customization. While you can run a Redis-powered app using defaults, you can tweak your Dockerfile to grab your pre-existing redis.conf file. This better supports production applications. While Redis can successfully start without these files, they’re central to configuring your services. 

You can see what a redis.conf file looks like on GitHub. Otherwise, here’s a sample Dockerfile: 

FROM redis
COPY redis.conf /usr/local/etc/redis/redis.conf
CMD [ "redis-server", "/usr/local/etc/redis/redis.conf" ]

You can also use docker run to achieve this. However, you should first do two things for this method to work correctly. First, create the /myredis/config directory on your host machine. This is where your configuration files will live. 

Second, open Docker Desktop and click the Settings gear in the upper right. Choose Resources > File Sharing to view your list of directories. You’ll see a grayed-out directory entry at the bottom, which is an input field for a named directory. Type in /myredis/config there and hit the “+” button to locally verify your file path:

You’re now ready to run your command! 

docker run -v /myredis/conf:/usr/local/etc/redis –name myredis redis redis-server /usr/local/etc/redis/redis.conf

The Dockerfile gives you more granular control over your image’s construction. Alternatively, the CLI option lets you run your Redis container without a Dockerfile. This may be more approachable if your needs are more basic. Just ensure that your mapped directory is writable and exists locally. 

Also, consider the following: 

If you edit your Redis configurations on the fly, you’ll have to use CONFIG REWRITE to automatically identify and apply any field changes on the next run.You can also apply configuration changes manually.

Remember how we connected the Redis CLI earlier? You can now pass arguments directly through the Redis CLI (ideal for testing) and edit configs while your database server is running. 

Notes on using Redis modules

Redis modules let you extend your Redis service, and build new services, and adapt your database without taking a performance hit. Redis also processes them in memory. These standard modules support querying, search, JSON processing, filtering, and more. As a result, Docker Hub’s redislabs/redismod image bundles seven of these official modules together: 

RedisBloomRedisTimeSeriesRedisJSONRedisAIRedisGraphRedisGearsRedisearch

If you’d like to spin up this container and experiment, simply enter docker run -d -p 6379:6379 redislabs/redismod in your terminal. You can open Docker Desktop to view this container like we did earlier on. 

You can view Redis’ curated modules or visit the Redis Modules Hub to explore further.

Get up and running with Redis today

We’ve explored how to successfully Dockerize Redis. Going further, it’s easy to grab external configurations and change how Redis operates on the fly. This makes it much easier to control how Redis interacts with your application. Head on over to Docker Hub and pull your first Redis Docker Official Image to start experimenting. 

The Redis Stack also helps extend Redis within Docker. It adds modern, developer-friendly data models and processing engines. The Stack also grants easy access to full-text search, document store, graphs, time series, and probabilistic data structures. Redis has published related container images through the Docker Verified Publisher (DVP) program. Check them out!
Quelle: https://blog.docker.com/feed/

AWS-Well-Architected-Tool ist jetzt in AWS GovCloud-Regionen (USA) verfügbar

AWS gibt mit Freude bekannt, dass das AWS-Well-Architected-Tool jetzt in den AWS GovCloud-Regionen (USA) verfügbar ist. Bei AWS GovCloud (USA) handelt es sich um eine isolierte Region, die darauf ausgelegt ist, vertrauliche Daten und regulierte Workloads in der Cloud aufzubewahren. Mit dem AWS-Well-Architected-Tool können Kunden den Status ihrer Anwendungen und Workloads im Vergleich zu bewährten Architekturmethoden prüfen. Außerdem können sie damit ihre Entscheidungsfindung verbessern, Risiken minimieren und Kosten reduzieren. Durch diese Regionserweiterung können Kunden mit spezifischen gesetzlichen und Compliance-Anforderungen und AWS-Partner im öffentlichen sowie im gewerblichen Sektor jetzt Well-Architected-Prüfungen im Self-Service durchführen.
Quelle: aws.amazon.com

Ankündigung des Supports von Platzhaltern in Fargate-Profil-Selektoren von Amazon EKS

Amazon Elastic Kubernetes Service (Amazon EKS) ermöglicht dir jetzt, Workloads von verschiedenen Kubernetes-Namespaces einfacher im Serverless-Computing von AWS Fargate mit einem einzigen EKS-Fargate-Profil auszuführen. Die Verwendung von Amazon EKS in AWS Fargate gibt dir die Möglichkeit, Kubernetes zu verwenden, ohne dich um die Konfiguration und Wartung der Compute-Infrastruktur sorgen zu müssen. Bisher musstest du alle Namespaces bei der Erstellung des EKS-Fargate-Profils festlegen und warst auf fünf Namespace-Selektoren oder Beschreibungspaare beschränkt.
Quelle: aws.amazon.com

Amazon Rekognition Custom Labels ermöglicht jetzt das Kopieren von trainierten Computer-Vision-Modellen zwischen AWS-Konten

Bei Amazon Rekognition Custom Labels handelt es sich um einen Service für automatisiertes Machine Learning (AutoML). Damit können Kunden eigene Computer-Vision-Modelle entwickeln, mit denen sie Objekte in für ihr Geschäft spezifischen und einzigartigen Bildern klassifizieren und identifizieren können. Für die Verwendung von Custom Labels benötigen Kunden keine Fachkenntnisse oder Vorwissen im Bereich Computer Vision.
Quelle: aws.amazon.com

AWS Lambda unterstützt jetzt benutzerdefinierte Verbrauchergruppe-IDs für Amazon MSK und selbstverwaltetes Kafka als Ereignisquellen

AWS Lambda unterstützt jetzt benutzerdefinierte Verbrauchergruppe-IDs, wenn Amazon Managed Streaming für Apache Kafka (MSK) oder selbstverwaltetes Kafka als eine Ereignisquellen verwendet wird. Kafka verwendet die Verbrauchergruppe-ID, um die Verbrauchermitgliedschaft zu identifizieren und Verbraucher-Checkpoints aufzuzeichnen. Die Verwendung einer benutzerdefinierten Verbrauchergruppe-ID ist ideal für Kunden, deren Workloads eine Notfallwiederherstellung oder einen Failover-Support erfordern.
Quelle: aws.amazon.com

Amazon SageMaker Canvas ermöglicht schnelleres Onboarding mit automatischem Datenimport von lokalen Datenträgern

Amazon SageMaker Canvas ermöglicht jetzt schnelleres Onboarding, bei dem Benutzer Daten von lokalen Datenträgern ohne zusätzliche Schritte automatisch importieren. Amazon SageMaker Canvas ist eine visuelle Point-and-Click-Benutzeroberfläche, mit der Geschäftsanalysten selbst genaue ML-Prognosen erstellen können – ohne Erfahrung mit Machine Learning zu haben oder eine einzige Zeile Code schreiben zu müssen. Mit SageMaker Canvas ist es einfach, auf Daten aus verschiedenen Quellen zuzugreifen und diese zu kombinieren, Daten automatisch zu bereinigen und ML-Modelle zu entwickeln, um mit wenigen Klicks präzise Vorhersagen zu treffen.
Quelle: aws.amazon.com





