E-Book-Reader: Amazons Basis-Kindle erhält besseres Display
Amazon bringt eine neue Version des Basis-Kindle auf den Markt. Der neue E-Book-Reader bekommt ein besseres Display und mehr Speicher. (Kindle, Amazon)
Quelle: Golem

Amazon bringt eine neue Version des Basis-Kindle auf den Markt. Der neue E-Book-Reader bekommt ein besseres Display und mehr Speicher. (Kindle, Amazon)
Quelle: Golem

Seit fast 70 Jahren wacht eine Behörde über den Jugendschutz. Wir haben uns mit ihren Vertretern unterhalten. (Jugendschutz, Applikationen)
Quelle: Golem

Das neue iOS 16 ist seit kurzem für alle freigegeben – ersten Nutzerberichten zufolge gibt es nur kleinere Probleme nach dem Upgrade. (iOS, Apple)
Quelle: Golem

Bei einem Gewinnspiel erklärt die Bahn, dass GMX E-Mails nicht annimmt. Doch auf Nachfrage von Golem.de wird das Problem umgehend gelöst. Von Moritz Tremmel (Deutsche Bahn, Spam)
Quelle: Golem

Nach der Ankündigung von USB 4 Version 2.0 zeigt Intel erstmals einen Prototyp. Möglicherweise wird dies auch Thunderbolt 5. (USB4, Thunderbolt)
Quelle: Golem
Quelle: <a href="Your iPhone Can Now Edit Texts. Enjoy The Chaos.“>BuzzFeed
As enterprises look to accelerate cloud adoption, it is critical to not only upskill your technical talent, but to focus on skilling your non-technical teams too. Investing in your collective workforce’s cloud proficiency helps ensure you fully embrace everyone’s potential, and make the most of your cloud investment.According to research shared in a recent IDC paper1, comprehensively trained organizations saw a bigger impact vs. narrowly trained organizations, with 133% greater improvement in employee retention, a 47% reduction in business risk and a 22% increase in innovation. This is where Cloud Digital Leader training and certification comes in. Most cloud training and certification is geared toward technical cloud practitioners, leaving non-technical (tech-adjacent) teams with little understanding of cloud technologies. Cloud Digital Leader bridges this gap, providing easy-to-understand training that enables everyone to understand the capabilities of cloud so that they can contribute to digital transformation in their organizations.In a recent fireside chat with Google Cloud Partner Kyndryl, who have achieved over 1,000 Cloud Digital Leader certifications across their organization, they shared how the Cloud Digital Leader training and certification has led to significant time reduction within their pre-sales cycle:“Our sales teams who work with customers and learn about their challenges were able to apply the know-how from their Cloud Digital Leader education and certification. They can now guide the technical solution teams in the right direction, without having to pull them into the discovery phases of their customer interactions. As a result, we operated more quickly and efficiently, as the sales teams were able to speak to the Google Cloud solutions very early on in the sales cycle. This accelerated the sales process, as the sales teams were therefore more confident in their Google Cloud knowledge, saving time and money for us, and the customer.” — Christoph Schwaiger, Google Cloud Business Development Executive, Global Strategic Alliances, Kyndryl.Empower your team’s cloud fluency, and discover your next phase of digital transformation. Invite your teams to jump start their cloud journey with no-cost Cloud Digital Leader training on Google Cloud Skills Boost.Join our live webinar to access a time-limited certification offerRegister for our upcoming webinar, “Getting started with Google Cloud Digital Leader training and certification” to learn more. Those that register for the webinar before broadcast on September 15, 9am PT will get access to a time-limited discount voucher for the Cloud Digital Leader certification exam. That’s an offer that you won’t want to miss.1. IDC Paper, sponsored by Google Cloud Learning: “To Maximize Your Cloud Benefits, Maximize Training” – Doc #US48867222, March 2022Related ArticleTrain your organization on Google Cloud Skills BoostTo help more than 40 million people build cloud skills, Google Cloud has launched new enterprise level features on Google Cloud Skills Bo…Read Article
Quelle: Google Cloud Platform
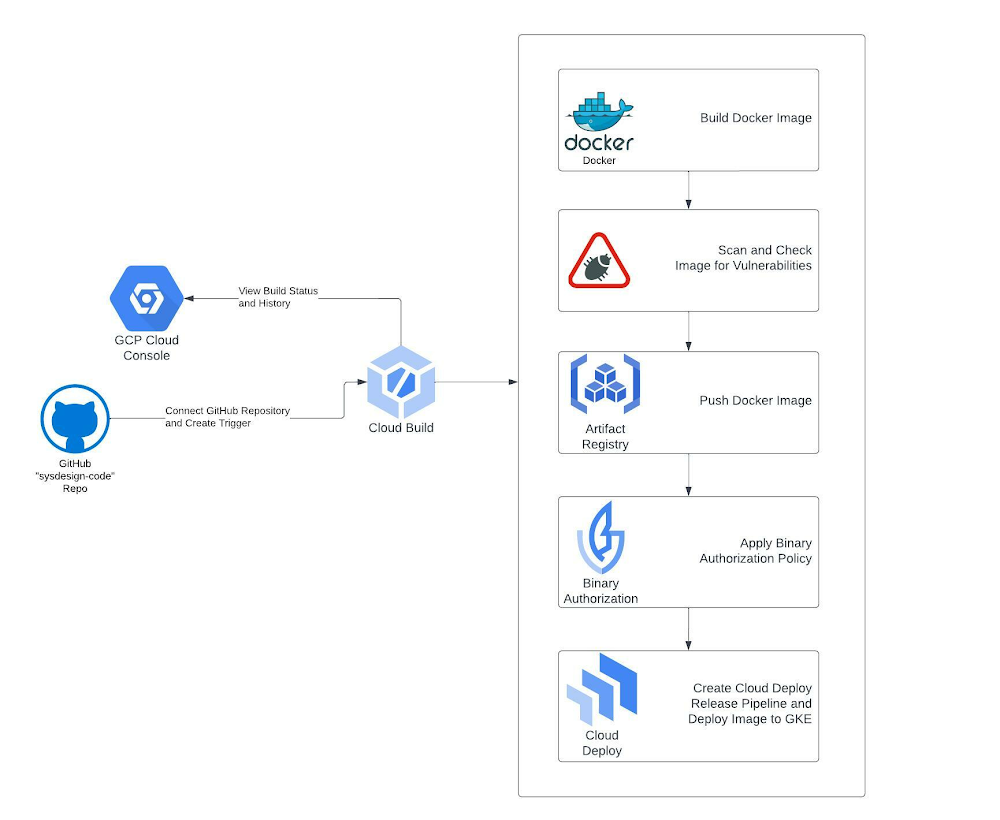
DevOps is a concept that allows software development teams to release software in an automated and stable manner. DevOps itself is not just one thing; it’s a combination of culture and technology, which together make the implementation of DevOps successful.In this blog, we will be focusing on the tools and technology side of DevOps. At the core of the technical aspect of DevOps, the concept is Continuous Integration and Continuous Delivery (CI/CD). The idea behind CI/CD concept is to create an automated software delivery pipeline that continuously deploys the new software releases in an automated fashion.The flow begins with the developers committing the code changes to a source code repository, which automatically triggers the delivery pipeline (henceforth called CI/CD pipeline) by building and deploying the code changes into various environments, from non-prod environments to production environments.Also, as we build the CI/CD pipelines for faster and more reliable software delivery, the security aspect should not be ignored and must be incorporated into the pipeline right from the beginning. When we build our source code, we typically use various open-source libraries and container images. Having some security safeguards within the CI/CD pipeline is imperative to ensure that the software we are building and deploying is free from any vulnerability. Additionally, it’s equally important to control what type of code/container image should be allowed to be deployed on your target runtime environment.Security is everyone’s responsibility. Shifting left on security is a DevOps practice that allows you to address security concerns early in the software development lifecycle. Vulnerability scanning of container images, putting security policies in place through Binary Authorization, and allowing approved/trusted images to be deployed on GKE are a couple of ways to implement this policy to make your CI/CD pipelines more secure.What are we building?This blog post will show how to build a secure CI/CD pipeline using Google Cloud’s built-in services. We will create a secure software delivery pipeline that builds a sample Node.js application as a container image and deploys it on GKE clusters.How are we building the CI/CD pipeline?We’re going to use the following Google Cloud built-in services to build the pipeline:Cloud Build – Cloud Build is an entirely serverless CI/CD platform that allows you to automate your build, test, and deploy tasks.Artifact Registry – Artifact Registry is a secure service to store and manage your build artifacts.Cloud Deploy – Cloud Deploy is a fully managed Continuous Delivery service for GKE and Anthos.Binary Authorization – Binary Authorization provides deployment time security controls for GKE and Cloud Run deployments.GKE – GKE is a fully managed Kubernetes platform.Google Pub/Sub – Pub/Sub is a serverless messaging platform.Cloud Functions – Cloud Functions is a serverless platform to run your code.We use GitHub as a source code repository and Sendgrid APIs to send email notifications for approval and error logging.The CI/CD pipeline is set up so that a Cloud Build trigger is configured to sense any code pushed to a particular repository and branch in a GitHub repository and automatically starts the build process.Below is the flow of how the CI/CD pipeline is set up without any security policy enforcement:Developer checks in the code to a GitHub repo.A Cloud Build trigger is configured to sense any new code pushed to this GitHub repo and starts the ‘build’ process. A successful build results in a docker container image.The container image is stored in the Artifact Registry.The Build process kicks off a Cloud Deploy deployment process that deploys the container image to three different GKE clusters, pre-configured as the deployment pipeline mimicking the test, staging, and production environments.Cloud Deploy is configured to go through an approval step before deploying the image to the Production GKE cluster.A Cloud Function sends an email to a pre-configured email id, notifying you that a Cloud Deploy rollout requires your approval. The email receiver can approve or reject the deployment to the production GKE cluster. Cloud Function code can be found hereTo secure this CI/CD pipeline, we will use a couple of Google Cloud’s built-in features and services. First, we will enable vulnerability scans on Artifact Registry, an out-of-the-box feature. Then finally, we will create a security policy using the Binary Authorization service, which only allows a specific image to be deployed to your GKE cluster.Below is the flow when we try to build and deploy a container image that has vulnerabilities present:Developer checks in the code to a GitHub repo.A Cloud Build trigger is configured to sense any new code pushed to this GitHub repo and start the ‘build’ process.The build process fails with the error message that vulnerabilities were found in the image.Below is the flow when we try to deploy a container image to GKE, which violates a Binary Authorization policy:Developer checks in the code to a GitHub repo.A Cloud Build trigger is configured to sense any new code pushed to this GitHub repo and start the ‘build’ process. A successful build results in a docker container image.The container image is stored in Artifact Registry.The Build process kicks off a Cloud Deploy deployment process that deploys the container image to three different GKE clusters, pre-configured as the deployment pipeline mimicking the test, staging, and production environments.Cloud Deploy fails as the GKE clusters reject the incoming image as it violates the existing Binary Authorization policy. Please note that an approval email is still triggered before the production deployment via the Cloud Function; the email receiver is expected to reject this release based on the failures in the previous stages.Once the deployment fails due to the Binary Authorization policy violation, Cloud Function sends an email to a pre-configured email id about the deployment failure. Cloud Function code can be found here.Note: The deployment fails after the timeout value is exceeded, set for Cloud Deploy, which is 10 minutes by default, but you can change this value according to your requirements, see here for more details.Note: The Cloud Function code provided for the rollout approval email and deployment failure notification is under the folder cloud-functions in this repo. You will still have to create these cloud functions with this code in your Google Cloud project to receive email notifications.Solution ArchitectureThe CI/CD pipeline is constructed by combining the aforementioned Google Cloud services. Cloud Build is at the center of automating the pipeline, which contains all the steps we need to build and deploy our container image. Cloud Build executes the steps defined in a YAML file sequentially. It’s quite flexible in terms of how you want to define your ‘build’ and ‘deploy’ process, and the service ensures to execute those steps reliably every time.Below are solution diagrams of how the CI/CD pipeline is set up :As the last step of our CI process, the Cloud Build YAML triggers the Cloud Deploy service, and the container image is deployed to three different GKE clusters. Cloud Deploy automatically emits multiple notifications to pub/Sub topics throughout the deployment process. We are using Cloud Functions to listen to these Pub/Sub topics to send appropriate email notifications about the deployment status and required approvals.Step-by-Step instructions for creating the CI/CD pipelineI. PrerequisitesThese steps are required to set up and prepare your GCP environment. We highly recommend you create a new GCP Project as you will run multiple cloud services within the region “us-central1″.Fork the following GitHub Repo: https://github.com/sysdesign-code/dev-sec-ops-demoCreate a new GCP Project, follow the steps here around how to provision and create one: https://cloud.google.com/resource-manager/docs/creating-managing-projectsOnce your new project is created, enable Cloud SDK to allow CLI access for gcloud either in Cloud Shell or your local workstation. Follow the steps here: https://cloud.google.com/sdk/docs/installOnce you’ve enabled CLI access, either through your Cloud Shell or local workstation, validate or set your project ID:gcloud config set project YOUR_PROJECT_IDRun the following one-time script /scripts/gcp_env_setup.sh, which creates and provisions the necessary GCP cloud services required to create the DevSecOps CI/CD pipeline for deploying a sample docker application.Here are all the service deployments that will occur once the script finishes:a) Enables all the required cloud service APIs such as Cloud Build, Binary Authorization, Kubernetes Service, Artifact Registry, Cloud Deploy, and many more.b) Create three (3) GKE clusters for test, staging, and production to show image rollout deployments across these clusters using Cloud Deploy.c) Bind all the necessary IAM roles and permissions for Cloud Build and Cloud Deploy.d) Create a Binary Authorization attestor, associated container note, cryptographic KMS key, and all the associated IAM roles and permissions to allow container note access for the attestor.By default, the binary authorization policy allows for all images to be deployed to GCP. Later, we will update this policy only to allow attestor-approved images to be deployed to specific GKE clusters.e) Create the Artifact Registry repository where the docker image will be stored.f) Finally, create two Pub/Sub topics and Cloud Functions which will allow for email approvals for any GKE deployment to production and error reporting if a release fails.NOTEBefore you run the script, please validate if your new GCP project already contains a “default” VPC and subnetwork. If you already have a “default” VPC, please go through the script and COMMENT out lines 53-55 which reference the creation of a default VPC and subnetwork. If you already have one, this step is not needed.By default, the creation of GKE clusters uses the “default” VPC subnetwork. If you prefer to use a non-default VPC, update the GKE cluster creation commands, starting at line 157, and update the –subnetwork value for all 3 GKE clusters.6. To execute the script, run the following command: sh /scripts/gcp_env_setup.shg) This script will approximately take 20-22 minutes to complete. Once finished, the output should look similar to something like this.7. Create a SendGRID API Key. Follow the instructions: https://app.sendgrid.com/guide/integrate to create a free “Web API” email integration for cURL and its associated API key. Take note and save your key value and verify the integration. The key details will be needed when you create the Cloud Deploy approval process later in this blog. Note: Using SendGRID APIs DOES require you to create a user account.II. Configure Cloud BuildThis step requires integrating your git repository (from Pre-Requisites, Step 1) as a managed repository to GCP’s cloud build service and creating the necessary Trigger. The goal of this integration is that any updates you make to your application within your GitHub repository will automatically kick off a Cloud Build deployment which will create, enable and deploy your application to GKE.Create the GitHub Repository Integration for Cloud Build :To start, from your GCP Console homepage, type “Cloud Build” within the search bar and select this service.From the left-hand panel, click on “Triggers”. And click on “Connect Repository.”Select the source as “GitHub (Cloud Build GitHub App)Authenticate the connection with your GitHub credentials, select the forked repository, and click “Connect”.Once the integration is done, you will see your newly added repository under “Triggers” -> “Manage Repositories.”Create a Trigger for Cloud BuildFrom the “Triggers” page, click on “+ Create Trigger”Enter/Select the following values for the Trigger:Name: CI/CD-blog-triggerRegion: us-central1Description: Deploy Docker Image using GCP CI/CD cloud services.Event: Push to a branch.Repository: Select your forked repositoryBranch: ^main$Configuration: Cloud Build Configuration File (YAML or JSON)Location: RepositoryCloud Build configuration file location: / cloudbuild.yamlUnder “Advanced”, add the following TWO environment variables and their values: _CONTAINER_REPO_NAME: test-repo _SEVERITY: CRITICAL NOTE: The value of these env variables is case sensitive.3. After the environment values are entered/selected, click “Create”.Once the Trigger is created, it will look like the following:III. Create Cloud Deploy PipelineNow that we have created GitHub integration and Cloud Build Trigger, the next step is to create the Cloud Deploy pipeline. This will deploy the container image to the three GKE environments: “test,” “staging,” and “prod” once the image release for all three environments is created through Cloud Build. The requirement for image release requires a Cloud Deploy pipeline.Edit the clouddeploy.yaml file with your GCP project ID.Within the file, update lines 22, 32, and 42 with your respective GCP project ID3. Once this is updated, save the file.4. Either through Cloud Shell or your local workstation, run the following GCP command to create the environment variables and the Cloud Deploy pipeline called ci-cd-test:code_block[StructValue([(u’code’, u’$ PROJECT_ID=<<YOUR_PROJECT_ID>>rn$ LOCATION=us-central1rn$ gcloud deploy apply –file clouddeploy.yaml –region=$LOCATION –project=$PROJECT_ID’), (u’language’, u”), (u’caption’, <wagtail.wagtailcore.rich_text.RichText object at 0x3ee4e8ede710>)])]NOTE: If you run into issues with a failed Cloud Deploy pipeline creation, delete the pipeline using the following gcloud command:code_block[StructValue([(u’code’, u’gcloud deploy delivery-pipelines delete ci-cd-test –region=us-central1 –force’), (u’language’, u”), (u’caption’, <wagtail.wagtailcore.rich_text.RichText object at 0x3ee4e8ede350>)])]5. Once the pipeline is created, here is what the output will look like:code_block[StructValue([(u’code’, u’$ gcloud deploy apply –file clouddeploy.yaml –region=$LOCATION –project=$PROJECT_IDrnWaiting for the operation on resource projects/<<YOUR_PROJECT_ID>>/locations/us-central1/deliveryPipelines/ci-cd-test…done. rnCreated Cloud Deploy resource: projects/<<YOUR_PROJECT_ID>>/locations/us-central1/deliveryPipelines/ci-cd-test.rnWaiting for the operation on resource projects/<<YOUR_PROJECT_ID>>/locations/us-central1/targets/test…done. rnCreated Cloud Deploy resource: projects/<<YOUR_PROJECT_ID>>/locations/us-central1/targets/test.rnWaiting for the operation on resource projects/<<YOUR_PROJECT_ID>>/locations/us-central1/targets/staging…done. rnCreated Cloud Deploy resource: projects/<<YOUR_PROJECT_ID>>/locations/us-central1/targets/staging.rnWaiting for the operation on resource projects/<<YOUR_PROJECT_ID>>/locations/us-central1/targets/prod…done. rnCreated Cloud Deploy resource: projects/<<YOUR_PROJECT_ID>>/locations/us-central1/targets/prod.’), (u’language’, u”), (u’caption’, <wagtail.wagtailcore.rich_text.RichText object at 0x3ee4ea052850>)])]6. From your GCP Console homepage, type “Cloud Deploy” within the search bar and select this service. From the main page, you will see the newly created pipeline.IV. Configure email notifications for GKE production cluster deploymentAs part of a typical CI/CD process, any deployment of production workloads requires some form of approval process by DevOps engineers. Cloud Deploy allows you to inject an ‘approval’ step before deploying a rollout to the next target. We have created this approval check in our pipeline before the deployment to the ‘prod’ GKE cluster. Once the pipeline reaches the step to deploy the rollout to the ‘prod’ GKE cluster, it emits a message in the clouddeploy-approvals Pub/Sub topic. We have created a Cloud Function to listen to this topic and implement logic to send email notifications via Sendgrid. You can use any other library to send emails via Cloud Functions.The one-time script has created a Pub/Sub topic and Cloud Function, allowing your cloud build release to send an approver email.To validate that the Pub/Sub topics and Cloud Function was created, go to those respective services and ensure they were created.From your GCP Console homepage, type “Pub/Sub” within the search bar and select this service. There will be two Pub/Sub topics, and they’re called clouddeploy-approvals and clouddeploy-operations.From your GCP Console homepage, type “Cloud Functions” within the search bar and select this service. There will be two Cloud Functions, called cd-approval and cd-deploy-notification.Click on cd-approval and select “Variables”.Click the “Edit” button and expand the `Runtime, build, connections and security settings.Scroll down until you get to the “Runtime environment variables.” Here you will update the following three variables.For FROM_EMAIL, enter a secondary email account; it could be @gmail or any other domain of your choice. For TO_EMAIL, select a primary email. For instance, the email of a DevOps Engineer who will be the approver of all production workload deployments to GKE. For SENDGRID_API_KEY, you will enter your API Key, starting with “SG.”. If you haven’t already, refer to the Prerequisites section above, step 6, around creating this key.6. After you’ve updated the cloud function environment variables, click “Next” and “Deploy” the updated function. It will take about 1-2 minutes. Once completed, the function will have a green check mark to validate its running.7. Repeat steps 4-6 from above for the other cloud function of cd-approval.Step-by-step instructions of testing and validating the GCP CI/CD pipelineNow that all the GCP prerequisites and environment setup is complete for Cloud Build, Cloud Deploy, and Email approvals, we’ll next deploy the image to GKE and initiate the pipeline testing.A couple of items to note during this test, we’re going to show a “Happy” and “Vulnerable” Image deployment path to GKE.The “Happy” path will show a successful deployment of the end-to-end pipeline across nine steps for a clean image deployment to GKE. “Clean” refers to the docker image with non-critical vulnerabilities. This path will also update the Binary Authorization policy that allows only the “Happy” image to be deployed to GKE’s “test”, “staging”, and eventually “production” environments, which a DevOps engineer will approve.The “Vulnerable” docker path will show a failed deployment of the end-to-end pipeline across seven steps. The pipeline will fail in 2 of these steps because the image has:Certain vulnerabilities must be addressed before the image can be stored in the Artifact Registry.A failed deployment to GKE because this is a non-approved image without attestation, violating the updated Binary Authorization policy from the “Happy” path.When Binary Authorization is enabled, its default policy allows all images to be deployed to the GKE target environments without attestation. In the “Happy” path, we will update the default Binary Authorization policy where only a specific docker image is approved for deployment to GKE. GKE will reject any other image not approved by the Binary Authorization policy at the deployment time.To allow other images to be deployed to GKE through an active binary authorization policy, update the following script /scripts/create_binauthz_policy.sh where you can sign the image digest to the existing attestor and allow for that image deployment to GKE.In the following sections, we’ll go into further detail describing both paths of image deployment to GKE.I. Run Cloud Build configuration file for “Happy” pathEnsure your GitHub repo is connected as a repository in Cloud Build. Refer to the “Create the GitHub Repository Integration for Cloud Build” section on how to do this.Ensure your Cloud Build trigger called CI/CD-blog-trigger is created. Refer to the section “Create a Trigger for Cloud Build” on how to do this.Since the Trigger is already enabled, any updates to your repository will trigger this Cloud Build deployment.Open up the cloudbuild.yaml from your GitHub repo. This is the cloud build configuration file for the “Happy” Docker path.To kick off the build, make any update to your codebase such as update the /src/static/js file for any cosmetic change.After you’ve made the change, push the changes to your GitHub repo.From the GCP Console, go to the Cloud Build service and click on “History”.Since the Trigger is enabled and integrated with your GitHub page, the build is automatically kicked off, and you can click the custom build number to see the log details.II. Validate image deployment for “Happy” pathWithin that build, steps 7-9 highlight the image deployment to GKE through Cloud Deploy. If you click on step 9, the result of the build states that the deployment to “prod” is awaiting approval.2. Go to the Cloud Deploy homepage from the GCP Console and click on the ci-cd-test pipeline.3. Within the pipeline, click on the release associated with the latest cloud build deployment. Here you see that the “Happy” image is deployed successfully to both “test” and “staging”, but there’s an approval process required for the “prod” cluster.4. From the GCP Console, search for Kubernetes Engine; from the left-hand navigation, click on “Workloads.” Here you can see that the image deployment is successful in the two “test” and “staging” GKE environments.5. Now that the deployment is queued for production, check your primary email and validate that you received a notification for approval. It will look something like this.6. From the email, click the here hyperlink and it will take you to the Cloud deploy pipeline page.7. From the Pipeline page, approve or reject the release so the deployment can be pushed to “prod” in GKE. In this case, we will approve.7. If you go back to the Kubernetes workload page, you’ll see that the image rollout to prod was successful.In parallel, validate your Cloud Deploy, continuous deployment pipeline also confirms a successful rollout.III. Run Cloud Build configuration file for “Vulnerable” path (container image has vulnerabilities)We will show two failure paths with this deployment: image vulnerabilities and Binary Authorization policy enforcement.A. First, failed deployment to push docker image to Artifact Registry because of severity-specific vulnerabilities -1. Ensure your GitHub Repo is connected as a repository in Cloud Build. Refer to the “Create the GitHub Repository Integration for Cloud Build” section on how to do this.2. Ensure your Cloud Build Trigger called CI/CD-blog-trigger is created. Refer to the section “Create a Trigger for Cloud Build” on how to do this.3. Since the Trigger is already enabled, any updates to your repository will trigger this cloud build deployment.4. View the cloudbuild-vulnerable.yaml file from your GitHub repo. This is the cloud build configuration file for the “Vulnerable” Docker path.5. Edit the existing Trigger with the following:Click on the ellipses next to “RUN” and update the “Cloud Build configuration file location” to be: cloudbuild-vulnerable.yamlUpdate the “_SEVERITY” environment variable value to be HIGH. We’re changing the severity of the vulnerabilities because the vulnerability check will either PASS or FAIL a cloud build deployment if the image contains ANY HIGH vulnerabilities.Save the Trigger and validate its status as “Enabled”.6. To kick off the build, make any update to your codebase, such as updating the /src/static/js file for any cosmetic change. After you’ve made the change, push the changes to your GitHub repo.7. From the GCP Console, go to the Cloud Build service and click on “History”.8. The build will fail in Step 2: Check For Vulnerabilities within the Image because this image contains HIGH vulnerabilities, and cloud build will NOT push this image to be stored in the artifact registry.B. Second, a failed image deployment to GKE because of Binary Authorization policy enforcement -Go back to the Trigger configuration for this build and change the “_SEVERITY” environment variable value to CRITICAL instead of “HIGH”.To kick off the build, make any update to your codebase such as update the /src/static/js file for any cosmetic change. After you’ve made the change, push the changes to your GitHub repo.From the GCP Console, go to the Cloud Deploy pipeline ci-cd-test and check the results of this latest release.From the Cloud Deploy pipeline page, approximately 10 minutes later, the build for “test” and “staging” will eventually fail because the Kubernetes manifest file for this docker image timed out.You can change the timeout period to be shorter; additional details can be found here5. From the GCP Console, go to the GKE page and click on “Workloads”. Here you will see the image deployments to both the “test” and “staging” GKE environments failed. The reason being is binary authorization policy enforcement. The “vulnerable” docker image is not approved for deployment.6. In parallel to a failed deployment to any of the GKE staging environments, Cloud Function cd-deploy-notification will send the following email to check the logs for the pipeline.7. From the email, click on here to see deployment logs, and it will take you to the log files within cloud build around additional details on the failure of the release rollout to GKE.Conclusion and further readingIn this blog post, we built a secure CI/CD pipeline using Google Cloud’s built-in services.We learned how we can secure a CI/CD pipeline using Google Cloud’s built-in services, such as Binary Authorization and Vulnerability scanning of the container images. We only saw one way to put some control on specific images that can be deployed to a GKE cluster. Binary Authorization also offers Build Verification, in which Binary Authorization uses attestations to verify that an image was built by a specific build system or continuous integration (CI) pipeline such as Cloud Build.Additionally, Binary Authorization also writes all the events where the deployment of a container image is blocked due to the constraints defined by the security policy to the audit logs. You can create alerts on these log entries and notify the appropriate team members about the blocked deployment events.Lastly, all of the services used to build and secure the CI/CD pipelines are serverless, which makes it very easy to spin up the whole infrastructure within a few minutes without worrying about maintaining or managing it, so that your teams can focus on building and releasing software in a faster, reliable and cost efficient manner.Related ArticleRead Article
Quelle: Google Cloud Platform

You’re working on a new machine learning problem, and the first environment you use is a notebook. Your data is stored on your local machine, and you try out different model architectures and configurations, executing the cells of your notebook manually each time. This workflow is great for experimentation, but you quickly hit a wall when it comes time to elevate your experiments up to production scale. Suddenly, your concerns are more than just getting the highest accuracy score.Sound familiar?Developing production applications or training large models requires additional tooling to help you scale beyond just code in a notebook, and using a cloud service provider can help. But that process can feel a bit daunting. To make things a little easier for you, we’ve created the Prototype to Productionvideo series, which covers all the foundational concepts you’ll need in order to build, train, scale, and deploy machine learning models on Google Cloud using Vertex AI.Let’s jump in and see what it takes to get from prototype to production!Getting started with Notebooks for machine learningEpisode one of this series shows you how to create a managed notebook using Vertex AI Workbench. With your environment set up, you can explore data, test different hardware configurations, train models, and interact with other Google Cloud services.Storing data for machine learningWhen working on machine learning problems, it’s easy to be laser focused on model training. But the data is where it all really starts.If you want to train models on Vertex AI, first you need to get your data into the cloud. In episode 2, you’ll learn the basics of storing unstructured data for model training and see how to access training data from Vertex AI Workbench.Training custom models on Vertex AIYou might be wondering, why do I need a training service when I can just run model training directly in my notebook? Well, for models that take a long time to train, a notebook isn’t always the most convenient option. And if you’re building an application with ML, it’s unlikely that you’ll only need to train your model once. Over time, you’ll want to retrain your model to make sure it stays fresh and keeps producing valuable results. Manually executing the cells of your notebook might be the right option when you’re getting started with a new ML problem. But when you want to automate experimentation at scale, or retrain models for a production application, a managed ML training option will make things much easier.Episode 3 shows you how to package up your training code with Docker and run a custom container training job on Vertex AI. Don’t worry if you’re new to Docker! This video and the accompanying codelab will cover all the commands you’ll need.CODELAB: Training custom models with Vertex AIHow to get predictions from an ML model Machine learning is not just about training. What’s the point of all this work if we don’t actually use the model to do something? Just like with training, you could execute predictions directly from a notebook by calling model.predict. But when you want to get predictions for lots of data, or get low latency predictions on the fly, you’re going to need something more than a notebook. When you’re ready to use your model to solve a real world problem with ML, you don’t want to be manually executing notebook cells to get a prediction.In episode 4, you’ll learn how to use the Vertex AI prediction service for batch and online predictions.CODELAB: Getting predictions from custom trained modelsTuning and scaling your ML modelsBy this point, you’ve seen how to go from notebook code, to a deployed model in the cloud. But in reality, an ML workflow is rarely that linear. A huge part of the machine learning process is experimentation and tuning. You’ll probably need to try out different hyperparameters, different architectures, or even different hardware configurations before you figure out what works best for your use case.Episode 5, covers the Vertex AI features that can help you with tuning and scaling your ML models. Specifically, you’ll learn abouthyperparameter tuning, distributed training, and experiment tracking.CODELAB: Hyperparameter tuning on Vertex AICODELAB: Distributed Training on Vertex AIWe hope this series inspires you to create ML applications with Vertex AI! Be sure to leave a comment on the videos if you’d like to see any of the concepts in more detail, or learn how to use the Vertex AI MLOps tools. If you’d like try all the code for yourself, check out the following codelabs:Training custom models with Vertex AIGetting predictions from custom trained modelsHyperparameter tuning on Vertex AIDistributed training on Vertex AIRelated ArticleRead Article
Quelle: Google Cloud Platform

There’s an explosion in the number of digital images generated and used for both personal and business needs. On e-commerce platforms and online marketplaces for example, product images and visuals heavily influence the consumer’s perception, decision making and ultimately conversion rates. In addition, there’s been a rapid shift towards user-generated visual content for ecommerce — think seller-generated product imagery, host-generated rental property photos and influencer-generated social media content. The challenge? These user-generated images are often captured using mobile cameras and vary greatly in terms of their size, quality, compression ratios and resolution, making it difficult for companies to provide consistent high-quality product images on their platforms.That’s exactly the problem that Let’s Enhance, a computer vision startup with teams across the US and Ukraine, set out to solve with AI. The Let’s Enhance platform improves the quality of any user-generated photo automatically using AI-based features to enhance images through automatic upscaling, pixelation and blur fixes, color and low-light correction, and removing compression artifacts — all with a single click and no professional equipment or photo-editing chops. “Let’s Enhance.io is designed to be a simple platform that brings AI-powered visual technologies to everyone — from marketers and entrepreneurs to photographers and designers,” said Sofi Shvets, CEO and Co-founder of Let’s Enhance.To date, Let’s Enhance has processed more than 100M photos for millions of customers worldwide for use-cases ranging from digital art galleries, real estate agencies, digital printing, ecommerce and online marketplaces. With the introduction of Claid.ai, their new API to automatically enhance and optimize user-generated content at scale for digital marketplaces, they needed to process millions of images every month and manage sudden peaks in user demand.However, building and deploying an AI-enabled service at scale for global use is a huge technical challenge that spans model building, training, inference serving and resource scaling. It demands an infrastructure that’s easy to manage and monitor, can deliver real-time performance to end customers wherever they are and can scale as user-demand peaks, all while optimizing costs. To support their growing user-base, Let’s Enhance chose to deploy their AI-powered platform to production on Google Cloud and NVIDIA . But before diving into their solution, let’s take a close look at the technical challenges they faced in meeting their business goals. Architecting a solution to fuel the next wave of growth and innovationTo deliver the high-quality enhanced images that end-customers see, Let’s Enhance products are powered by cutting-edge deep neural networks (DNNs) that are both compute- and memory-intensive. While building and training these DNN models in itself is a complex, iterative process, application performance — when processing new user-requests, for instance — is crucial to delivering a quality end user experience and reducing total deployment costs. A single inference or processing request i.e., from user-generated image, which can vary widely in size, at the input to the AI-enhanced output image, requires combining multiple DNN models within an end-to-end pipeline. The key inference performance metrics to optimize for included latency (the time it takes from providing an input image to the enhanced image being available) and throughput ( the number of images that can be processed per second).. Together, Google Cloud and NVIDIA technologies provided all the elements that the Let’s Enhance team needed to set themselves up for growth and scale. There were three main components in the solution stack:Compute resources: A2 VMs, powered by NVIDIA A100 Tensor Core GPUsInfrastructure management: Google Kubernetes Engine (GKE)Inference serving: NVIDIA Triton Inference ServerImproved throughput and lower costs with NVIDIA A100 Multi-Instance GPUs (MIG) on Google CloudTo meet the computational requirements of the DNN models and deliver real-time inference performance to their end-users, Let’s Enhance chose Google Cloud A2 VMs powered by NVIDIA A100 Tensor Core GPUs as their compute infrastructure. A100 GPU’s Multi-Instance GPU (MIG) capability offered them the unique ability to partition a single GPU into two independent instances and simultaneously process two user-requests at a time, making it possible to service a higher volume of user requests while reducing the total costs of deployment.The A100 MIG instances delivered a 40% average throughput improvement compared to the NVIDIA V100 GPUs, with an increase of up to 80% for certain image enhancement pipelines using the same number of nodes for deployment. With improved performance from the same sized node pools, Let’s Enhance observed a 34% cost savings using MIG-enabled A100 GPUs.Simplified infrastructure management with GKETo offer a guaranteed quality-of-service (QoS) to their customers and manage user demand, Let’s Enhance needed to provision, manage and scale underlying compute resources while keeping utilization high and costs low. GKE offers industry-leading capabilities for training and inference such as support for 15,000 nodes per cluster, auto-provisioning, auto-scaling and various machine types (e.g. CPU, GPU and on-demand, spot), making it the perfect choice for Let’s Enhance.With support for NVIDIA GPUs and NVIDIA GPU sharing capabilities, GKE can provision multiple A100 MIG instances to process user requests in parallel and maximize utilization. As the compute required for the deployed ML pipelines increases (e.g., a sudden surge in inference requests to service), GKE can automatically scale to additional node-pools with MIG partitions — offering finer granularity to provision the right-sized GPU acceleration for workloads of all sizes.“Our total averaged throughput varied between 10 and 80 images / sec. Thanks to support for NVIDIA A100 MIG and auto scaling mechanisms in GKE we can now scale that up to 150 images/sec and more, based on user-demand and GPU availability,” said Vlad Pranskevičius, Co-founder and CTO, Let’s Enhance. In addition, GKE’s support for dynamic scheduling, automated maintenance and upgrades, high availability, job API, customizability and fault tolerance simplified managing a production deployment environment, allowing the Let’s Enhance team to focus on building advanced ML pipelines.High-performance inference serving with NVIDIA Triton Inference ServerTo optimize performance and simplify the deployment of their DNN models onto the GKE-managed node pools of NVIDIA A100 MIG instances, Let’s Enhance chose the open-source NVIDIA Triton Inference Server, which deploys, runs and scales AI models from any framework onto any GPU- or CPU-based infrastructure. NVIDIA Triton’s support for multiple frameworks enabled the Let’s Enhance team to serve models trained in both TensorFlow and PyTorch, eliminating the need to set up and maintain multiple serving solutions for different framework backends. In addition, Triton’s ensemble model and shared memory features helped maximize performance and minimize data transfer overhead for their end-to-end image processing pipeline, which consists of multiple models and large amounts of raw image data transferring between them.“We saw over 20% performance improvement with Triton vs. custom inference serving code, and were also able to fix several errors during deployment due to Triton’s self-healing features”, said Vlad. “Triton is packed with cool features, and as I was watching its progress from the very beginning, the pace of product development is just amazing.”To further enhance end-to-end inference performance, the team is adopting NVIDIA TensorRT, an SDK to optimize trained models for deployment with the highest throughput and lowest latency while preserving the accuracy of predictions.“With the subset of our models which we converted from Tensorflow to NVIDIA TensorRT we observed a speedup of anywhere between 10% and 42%, depending on the model, which is impressive,” said Vlad. “For memory-intensive models like ours, we were also able to achieve predictable memory consumption, which is another great benefit of using TensorRT, helping prevent any unexpected memory-related issues during production deployment.”Teamwork makes the dream workBy using Google Cloud and NVIDIA, Let’s Enhance addressed the real-time inference serving and infrastructure management challenges of taking their AI-enabled service to production at scale in a secure Google Cloud infrastructure. GKE, NVIDIA AI software and A2 VMs powered by NVIDIA A100 GPUs brought together all the elements they needed to deliver the desired user experience and build a solution that can dynamically scale their end-to-end pipelines based on user demand.The close collaboration with the Google Cloud and NVIDIA team, every step of the way, also helped Let’s Enhance get their solution to market fast. “The Google Cloud and NVIDIA teams are incredible to work with. They are highly professional, always responsive and genuinely care about our success,” said Vlad. “We were able to get technical advice and recommendations directly from Google Cloud product and engineering teams, and also have a channel to share our feedback about Google Cloud products, which was really important to us.”With a solid foundation and solution architecture that can meet their growing business needs, Let’s Enhance is marching towards their goal of bringing AI-enhanced digital images to everyone. “Our vision is to help businesses effectively manage user-generated content and increase conversion rates with next-gen AI tools,” said Sofi. ”Our next step towards that is to expand our offerings to completely replace manual work for photo preparation, including as well as cover pre-stages as image quality assessment and moderation.”To learn more about the Let’s Enhance products and services, check out their blog here.Related ArticleRead Article
Quelle: Google Cloud Platform