How to Build and Deploy a Django-based URL Shortener App from Scratch

At Docker, we are incredibly proud of our vibrant, diverse and creative community. From time to time, we feature cool contributions from the community on our blog to highlight some of the great work our community does. Are you working on something awesome with Docker? Send your contributions to Ajeet Singh Raina (@ajeetraina) on the Docker Community Slack and we might feature your work!
URL shortening is a widely adopted technique that’s used to create short, condensed, and unique aliases for long URL links. Websites like tinyurl.com, bit.ly and ow.ly offer online URL shortener services, while social media sites integrate shorteners right into their product, like Twitter with its use of t.co. This is especially important for Twitter, where shortened links allow users to share long URLs in a Tweet while still fitting in the maximum number of characters for their message.
Why are URL shortener techniques so popular? First, the URL shortener technique allows you to create a short URL that is easy to remember and manage. Say, if you have a brand name, a short URL just consisting of a snippet of your company name is easier to identify and remember.

Second, oversized and hard-to-guess URLs might sometimes look too suspicious and clunky. Imagine a website URL link that has UTM parameters embedded. UTMs are snippets of text added to the end of a URL to help marketers track where website traffic comes from if users click a link to this URL. With too many letters, backslashes and question marks, a long URL might look insecure. Some users might still think that there is a security risk involved with a shortened URL as you cannot tell where you’re going to land, but there are services like Preview mode that allows you to see a preview version of long URL before it instantly redirects you to the actual site.
How do they actually work? Whenever a user clicks a link (say, https://tinyurl.com/2p92vwuh), an HTTP request is sent to the backend server with the full URL. The backend server reads the path part(2p92vwuh) that maps to the database that stores a description, name, and the real URL. Then it issues a redirect, which is an HTTP 302 response with the target URL in the header.

Building the application
In this blog tutorial, you’ll learn how to build a basic URL shortener using Python and Django.
First, you’ll create a basic application in Python without using Docker. You’ll see how the application lets you shorten a URL. Next, you’ll build a Docker image for that application. You’ll also learn how Docker Compose can help you rapidly deploy your application within containers. Let’s jump in.
Key Components
Here’s what you’ll need to use for this tutorial:

Git
GitHub account
Python 3.8+ and virtualenv
Django
Microsoft Visual Studio Code
Docker Desktop

Getting Started
Once you have Python 3.8+ installed on your system, follow these steps to build a basic URL shortener clone from scratch.
Step 1. Create a Python virtual environment
Virtualenv is a tool for creating isolated virtual python environments. It’s a self-contained directory tree that contains a Python installation from a particular version of Python, as well as a number of additional packages.
The venv module is used to create and manage virtual environments. In most of the cases, venv is usually the most recent version of Python. If you have multiple versions of Python, you can create a specific Python version.
Use this command to create a Python virtual environment to install packages locally
mkdir -p venv
python3 -m venv venv
The above command will create a directory if it doesn’t exist and also create sub-directories that contain a copy of the Python interpreter and a number of supporting files.
$ tree venv -L 2
venv
├── bin
│ ├── Activate.ps1
│ ├── activate
│ ├── activate.csh
│ ├── activate.fish
│ ├── easy_install
│ ├── easy_install-3.8
│ ├── pip
│ ├── pip3
│ ├── pip3.8
│ ├── python -> python3
│ └── python3 -> /usr/bin/python3
├── include
├── lib
│ └── python3.8
├── lib64 -> lib
└── pyvenv.cfg

5 directories, 12 files

Once you’ve created a virtual environment, you’ll need to activate it:
source ./venv/bin/activate
Step 2. Install Django
The easiest way to install Django is to use the standalone pip installer. PIP(Preferred Installer Program) is the most popular package installer for Python and is a command-line utility that helps you to manage your Python 3rd-party packages. Use the following command to update the pip package and then install Django:
pip install -U pip
pip install Django
You’ll see the following results:
Collecting django
Downloading Django-4.0.4-py3-none-any.whl (8.0 MB)
━━━━━━━━━━━━━━━━━━━━━━━━━━━━━━━━━━━━━━━━ 8.0/8.0 MB 15.9 MB/s eta 0:00:00
Collecting asgiref<4,>=3.4.1
Downloading asgiref-3.5.2-py3-none-any.whl (22 kB)
Collecting sqlparse>=0.2.2
Downloading sqlparse-0.4.2-py3-none-any.whl (42 kB)
━━━━━━━━━━━━━━━━━━━━━━━━━━━━━━━━━━━━━━━━ 42.3/42.3 kB 1.7 MB/s eta 0:00:00
Collecting backports.zoneinfo
Downloading backports.zoneinfo-0.2.1.tar.gz (74 kB)
━━━━━━━━━━━━━━━━━━━━━━━━━━━━━━━━━━━━━━━━ 74.1/74.1 kB 3.0 MB/s eta 0:00:00
Installing build dependencies … done
…..
Step 3. Create a Django project
The django-admin is Django’s command-line utility for administrative tasks. The utility helps you automatically create manage.py in each Django project.
mkdir -p src/ && cd src
django-admin startproject url shortener

Django Project Structure:
$ tree urlshortener/
urlshortener/
├── manage.py
└── urlshortener
├── __init__.py
├── asgi.py
├── settings.py
├── urls.py
└── wsgi.py

1 directory, 6 files

In this directory tree:

manage.py is Django’s CLI
settings.py is where all of the global Django project’s settings reside
urls.py is where all the URL mappings reside
wsgi.py is an entry-point for WSGI-compatible servers to serve the project in production

Step 4. Creating a Django app for shortening the URL
Change directory to src/urlshortener and run the following command:
cd src/urlshortener
python manage.py startapp main

It will create a new subdirectory called “main” under src/urlshortener as shown below:
src
└── urlshortener
├── main
│ ├── admin.py
│ ├── apps.py
│ ├── __init__.py
│ ├── migrations
│ ├── models.py
│ ├── tests.py
│ └── views.py
├── manage.py
└── urlshortener

In this directory tree:

admin.py is where Django’s built-in admin configuration resides
migrations is where all of the database migrations reside
models.py is where all of the database models for this Django app exist
tests.py is self-explanatory
views.py is where “controller” functions reside, the functions that are in charge of creating the views

For this tutorial, you’ll only leverage the last one.
Step 5. Create the URL Shortener
pyshorteners is a simple URL shortening API wrapper Python library. With pyshorteners , you can generate a short url or expand another one is as easy as typing
Run the following command to install the package pyshorteners:
pip install pyshorteners
Run the following command to save all your python libraries with current version into requirements.txt file:
pip freeze > requirements.txt
Once the command is successfully run, the requirements.txt gets created with the following entries:
asgiref==3.5.2
backports.zoneinfo==0.2.1
certifi==2022.5.18.1
charset-normalizer==2.0.12
Django==4.0.5
idna==3.3
pyshorteners==1.0.1
requests==2.27.1
sqlparse==0.4.2
urllib3==1.26.9
Head to main/views.py and edit it accordingly:
from django.shortcuts import render
from django.http import HttpResponse
import pyshorteners

# Create your views here.
def shorten(request, url):
shortener = pyshorteners.Shortener()
shortened_url = shortener.chilpit.short(url)
return HttpResponse(f’Shortened URL: <a href=”{shortened_url}”>{shortened_url}</a>’)

In this code listing:

In line 1, the render function is imported by default. You won’t remove it now, as you’re going to use it later.
In line 2, you’ve imported the class name HttpResponse. This is the type returned with an HTML text.
In line 3, the library pyshorteners is imported, which you use to shorten the given URLs.
In line 7, the function gets two parameters; a request that is mandatory, and a url that is set by Django. We’ll get to it in the next file.
In line 8, you initialized the shortener object.
In line 9, the shortened URL is generated by sending a request to chilp.it.
In line 10, the shortened URL is returned as a minimal HTML link.

Next, let’s assign a URL to this function.
Create a urls.py under main:
touch main/urls.py
Add the below code:
from django.urls import path

from . import views

urlpatterns = [
path(‘shorten/<str:url>’, views.shorten, name=’shorten’),
]

The URL mapping specifies which function to use and which path parameters there are. In this case, the URL is mapped to the function shorten and with a string parameter named url.
Now head back to the urlshortener/ directory and include the newly created urls.py file:
from django.contrib import admin
from django.urls import include, path

urlpatterns = [
path(”, include(‘main.urls’)),
path(‘admin/’, admin.site.urls),
]
Now, run the development server:
python manage.py runserver
Open http://127.0.0.1:8000/shorten/google.com in your browser and type Enter. It will show you a shortened URL as shown in the following screenshot.

Step 6. Creating the form
In this section, you’ll see how to create a landing page.
mkdir -p main/templates/main
touch main/templates/main/index.html

Open the index.html and fill it up the with following content:
<form action=”{% url ‘main:shorten_post’ %}” method=”post”>
{% csrf_token %}
<fieldset>
<input type=”text” name=”url”>
</fieldset>
<input type=”submit” value=”Shorten”>
</form>

In this file:

The form action which the URL form sends the request to, is defined by Django’s template tag url. The tag in use is the one created in the URL mappings. Here, the URL tag main:shorten_post doesn’t exist yet. You’ll create it later.
The CSRF token is a Django security measure that works out-of-the-box.

Head over to main/views.py under the project directory src/urlshortener/ and add two functions, namely index and shorten_post at the end of the file.
from django.shortcuts import render
from django.http import HttpResponse
import pyshorteners

def index(request):
return render(request, ‘main/index.html’)

def shorten_post(request):
return shorten(request, request.POST[‘url’])

. . .

Here,

The function index renders the HTML template created in the previous step, using the render function.
The function shorten_post is a function created to be used for the post requests. The reason for its creation (and not using the previous function) is because Django’s URL mapping only works with path parameters and not post request parameters. So, here, the parameter url is read from the post request and passed to the previously available shorten function.

Now go to the main/urls.py to bind the functions to URLs:
from django.urls import path

from . import views

urlpatterns = [
path(”, views.index, name=’index’),
path(‘shorten’, views.shorten_post, name=’shorten_post’),
path(‘shorten/<str:url>’, views.shorten, name=’shorten’),
]

Next, head over to urlshortener/settings.py under src/urlshortener/urlshortener directory and add ‘main.apps.MainConfig’ to the beginning of the list INSTALLED_APPS:
. . .

INSTALLED_APPS = [
‘main.apps.MainConfig’,
‘django.contrib.admin’,
‘django.contrib.auth’,
‘django.contrib.contenttypes’,
‘django.contrib.sessions’,
‘django.contrib.messages’,
‘django.contrib.staticfiles’,
]

. . .

Step 7. Creating a Database Models
Now, to save the URLs and their short versions locally, you should create database models for them. Head to main/models.py under src/urlshortener/main and create the following model:
from django.db import models

# Create your models here.
class Question(models.Model):
original_url = models.CharField(max_length=256)
hash = models.CharField(max_length=10)
creation_date = models.DateTimeField(‘creation date’)

We’ll assume that the given URLs fit in 256 characters and the short version are less than 10 characters (usually 7 characters would suffice).
Now, create the database migrations:
python manage.py makemigrations
It will show the following results:
Migrations for ‘main':
main/migrations/0001_initial.py
– Create model Question

A new file will be created under main/migrations.
main % tree migrations
migrations
├── 0001_initial.py
├── __init__.py
└── __pycache__
└── __init__.cpython-39.pyc

1 directory, 3 files

Now to apply the database migrations to the default SQLite DB, run:
python manage.py migrate
It shows the following results:
urlshortener % python3 manage.py migrate
Operations to perform:
Apply all migrations: admin, auth, contenttypes, main, sessions
Running migrations:
Applying contenttypes.0001_initial… OK
Applying auth.0001_initial… OK
Applying admin.0001_initial… OK
Applying admin.0002_logentry_remove_auto_add… OK
Applying admin.0003_logentry_add_action_flag_choices… OK
Applying contenttypes.0002_remove_content_type_name… OK
Applying auth.0002_alter_permission_name_max_length… OK
Applying auth.0003_alter_user_email_max_length… OK
Applying auth.0004_alter_user_username_opts… OK
Applying auth.0005_alter_user_last_login_null… OK
Applying auth.0006_require_contenttypes_0002… OK
Applying auth.0007_alter_validators_add_error_messages… OK
Applying auth.0008_alter_user_username_max_length… OK
Applying auth.0009_alter_user_last_name_max_length… OK
Applying auth.0010_alter_group_name_max_length… OK
Applying auth.0011_update_proxy_permissions… OK
Applying auth.0012_alter_user_first_name_max_length… OK
Applying main.0001_initial… OK
Applying sessions.0001_initial… OK

Now that you have the database models, it’s time to create a shortener service. Create a Python file main/service.py and add the following functionality:
import random
import string
from django.utils import timezone

from .models import LinkMapping

def shorten(url):
random_hash = ”.join(random.choice(string.ascii_uppercase + string.ascii_lowercase + string.digits) for _ in range(7))
mapping = LinkMapping(original_url=url, hash=random_hash, creation_date=timezone.now())
mapping.save()
return random_hash

def load_url(url_hash):
return LinkMapping.objects.get(hash=url_hash)

In this file, in the function shorten, you create a random 7-letter hash, assign the entered URL to this hash, save it into the database, and finally return the hash.
In load_url, you load the original URL from the given hash.
Now, create a new function in the views.py for redirecting:
from django.shortcuts import render, redirect

from . import service

. . .

def redirect_hash(request, url_hash):
original_url = service.load_url(url_hash).original_url
return redirect(original_url)

Then create a URL mapping for the redirect function:
urlpatterns = [
path(”, views.index, name=’index’),
path(‘shorten’, views.shorten_post, name=’shorten_post’),
path(‘shorten/<str:url>’, views.shorten, name=’shorten’),
path(‘<str:url_hash>’, views.redirect_hash, name=’redirect’),
]

You create a URL mapping for the hashes directly under the main host, e.g. example.com/xDk8vdX. If you want to give it an indirect mapping, like example.com/r/xDk8vdX, then the shortened URL will be longer.
The only thing you have to be careful about is the other mapping example.com/shorten. We made this about the redirect mapping, as otherwise it would’ve resolved to redirect as well.
The final step would be changing the shorten view function to use the internal service:
from django.shortcuts import render, redirect
from django.http import HttpResponse
from django.urls import reverse

from . import service

. . .

def shorten(request, url):
shortened_url_hash = service.shorten(url)
shortened_url = request.build_absolute_uri(reverse(‘redirect’, args=[shortened_url_hash]))
return HttpResponse(f’Shortened URL: <a href=”{shortened_url}”>{shortened_url}</a>’)

You can also remove the third-party shortener library from requirements.txt, as you won’t use it anymore.
Using PostgreSQL
To use PostgreSQL instead of SQLite, you change the config in settings.py:
import os

. . .

DATABASES = {
‘default': {
‘ENGINE': ‘django.db.backends.sqlite3′,
‘NAME': BASE_DIR / ‘db.sqlite3′,
}
}

if os.environ.get(‘POSTGRES_NAME’):
DATABASES = {
‘default': {
‘ENGINE': ‘django.db.backends.postgresql’,
‘NAME': os.environ.get(‘POSTGRES_NAME’),
‘USER': os.environ.get(‘POSTGRES_USER’),
‘PASSWORD': os.environ.get(‘POSTGRES_PASSWORD’),
‘HOST': ‘db’,
‘PORT': 5432,
}
}

The if statement means it only uses the PostgreSQL configuration if it exists in the environment variables. If not set, Django will keep using the SQLite config.
Create a base.html under main/templates/main:
<!DOCTYPE html>
<html lang=”en”>
<head>
<meta charset=”UTF-8″>
<title>Link Shortener</title>
<link href=”https://unpkg.com/material-components-web@latest/dist/material-components-web.min.css” rel=”stylesheet”>
<script src=”https://unpkg.com/material-components-web@latest/dist/material-components-web.min.js”></script>
</head>
<style>
#main-card {
margin:0 auto;
display: flex;
width: 50em;
align-items: center;
}
</style>
<body class=”mdc-typography”>
<div id=”main-card”>
{% block content %}
{% endblock %}
</div>
</body>

Alter the index.html to use material design:
{% extends ‘main/base.html’ %}

{% block content %}
<form action=”{% url ‘shorten_post’ %}” method=”post”>
{% csrf_token %}
<label class=”mdc-text-field mdc-text-field–outlined”>
<span class=”mdc-notched-outline”>
<span class=”mdc-notched-outline__leading”></span>
<span class=”mdc-notched-outline__notch”>
<span class=”mdc-floating-label” id=”my-label-id”>URL</span>
</span>
<span class=”mdc-notched-outline__trailing”></span>
</span>
<input type=”text” name=”url” class=”mdc-text-field__input” aria-labelledby=”my-label-id”>
</label>
<button class=”mdc-button mdc-button–outlined” type=”submit”>
<span class=”mdc-button__ripple”></span>
<span class=”mdc-button__label”>Shorten</span>
</button>
</form>
{% endblock %}

Create another view for the response, namely link.html:
{% extends ‘main/base.html’ %}

{% block content %}
<div class=”mdc-card__content”>
<p>Shortened URL: <a href=”{{shortened_url}}”>{{shortened_url}}</a></p>
</div>
{% endblock %}

Now, get back to views.py and change the shorten function to render instead of returning a plain HTML:
. . .

def shorten(request, url):
shortened_url_hash = service.shorten(url)
shortened_url = request.build_absolute_uri(reverse(‘redirect’, args=[shortened_url_hash]))
return render(request, ‘main/link.html’, {‘shortened_url': shortened_url})

Click here to access the code previously developed for this example. You can directly clone the repository and try executing the following commands to bring up the application.
git clone https://github.com/aerabi/link-shortener
cd link-shortener/src/urlshortener
python manage.py migrate
python manage.py runserver

Step 8. Containerizing the Django App
Docker helps you containerize your Django app, letting you bundle together your complete Django application, runtime, configuration, and OS-level dependencies. This includes everything needed to ship a cross-platform, multi-architecture web application.
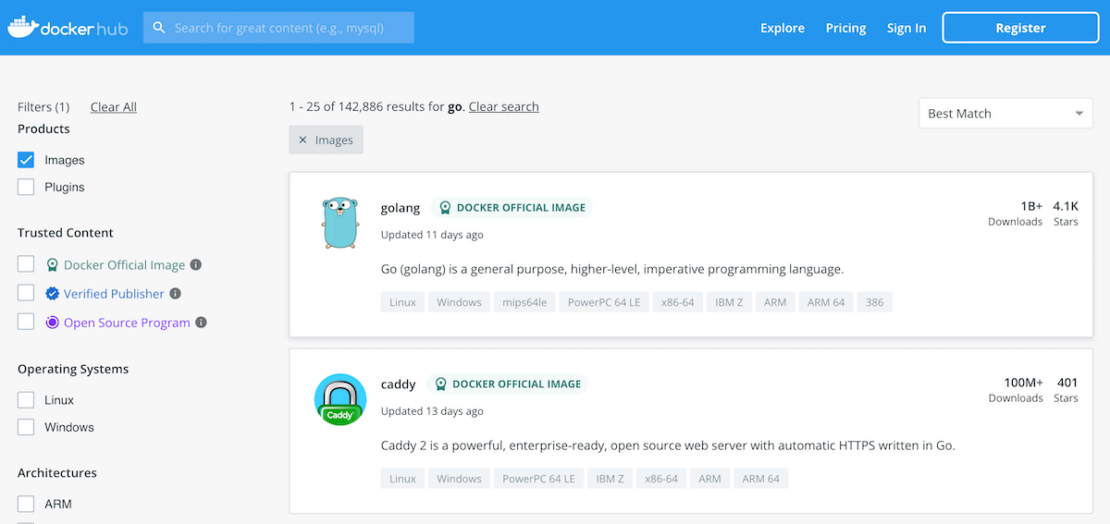
Let’s look at how you can easily run this app inside a Docker container using a Docker Official Image. First, you’ll need to download Docker Desktop. Docker Desktop accelerates the image-building process while making useful images more discoverable. Complete the installation process once your download is finished.
You’ve effectively learned how to build a sample Django app. Next, let’s see how to create an associated Docker image for this application.
Docker uses a Dockerfile to specify each image’s “layers.” Each layer stores important changes stemming from the base image’s standard configuration. Create the following empty Dockerfile in your Django project.
touch Dockerfile
Use your favorite text editor to open this Dockerfile. You’ll then need to define your base image.
Whenever you’re creating a Docker image to run a Python program, it’s always recommended to use a smaller base image that helps in speeding up the build process and launching containers at a faster pace.
FROM python:3.9
Next, let’s quickly create a directory to house our image’s application code. This acts as the working directory for your application
RUN mkdir /code
WORKDIR /code
It’s always recommended to update all the packages using the pip command.
RUN pip install –upgrade pip
The following COPY instruction copies the requirements.txt file from the host machine to the container image and stores it under /code directory.
COPY requirements.txt /code/
RUN pip install -r requirements.txt
Next, you need to copy all the directories of the Django project. It includes Django source code and pre-environment configuration files of the artifact.
COPY . /code/
Next, use the EXPOSE instruction to inform Docker that the container listens on the specified network ports at runtime. The EXPOSE instruction doesn’t actually publish the port. It functions as a type of documentation between the person who builds the image and the person who runs the container, about which ports are intended to be published.
EXPOSE 8000
Finally, in the last line of the Dockerfile, specify CMD so as to provide defaults for an executing container. These defaults include Python executables. The runserver command is a built-in subcommand of Django’s manage.py file that will start up a development server for this specific Django project.
CMD [“python”, “manage.py”, “runserver”, “0.0.0.0:8000″]
Here’s your complete Dockerfile:
FROM python:3.9

RUN mkdir /code
WORKDIR /code
RUN pip install –upgrade pip
COPY requirements.txt /code/

RUN pip install -r requirements.txt
COPY . /code/

EXPOSE 8000

CMD [“python”, “manage.py”, “runserver”, “0.0.0.0:8000″]

Step 9. Building Your Docker Image
Next, you’ll need to build your Docker image. Enter the following command to kickstart this process, which produces an output soon after:
docker build -t urlshortener .
Step 10. Run Your Django Docker Container
Docker runs processes in isolated containers. A container is a process that runs on a host, which it’s either local or remote. When an operator executes docker run, the container process that runs is isolated with its own file system, networking, and separate process tree from the host.
The following docker run command first creates a writeable container layer over the specified image, and then starts it.
docker run -p 8000:8000 -t urlshortener
Step 11. Running URL Shortener app using Docker Compose
Finally, it’s time to create a Docker Compose file. This single YAML file lets you specify your frontend app and your PostgreSQL database:
services:
web:
build:
context: ./src/urlshortener/
dockerfile: Dockerfile
command: gunicorn urlshortener.wsgi:application –bind 0.0.0.0:8000
ports:
– 8000:8000
environment:
– POSTGRES_NAME=postgres
– POSTGRES_USER=postgres
– POSTGRES_PASSWORD=postgres
depends_on:
– db
db:
image: postgres
volumes:
– postgresdb:/var/lib/postgresql/data
environment:
– POSTGRES_DB=postgres
– POSTGRES_USER=postgres
– POSTGRES_PASSWORD=postgres

volumes:
postgresdb:

Your example application has the following parts:

Two services backed by Docker images: your frontend web app and your backend database
The frontend, accessible via port 8000
The depends_on parameter, letting you create the backend service before the frontend service starts
One persistent volume, attached to the backend
The environmental variables for your PostgreSQL database

You’ll then start your services using the docker-compose up command.
docker-compose up -d -—build
Note: If you’re using Docker Compose v1, the command line name is docker-compose, with a hyphen. If you’re using v2, which is shipped with Docker Desktop, you should omit the hyphen: docker compose.
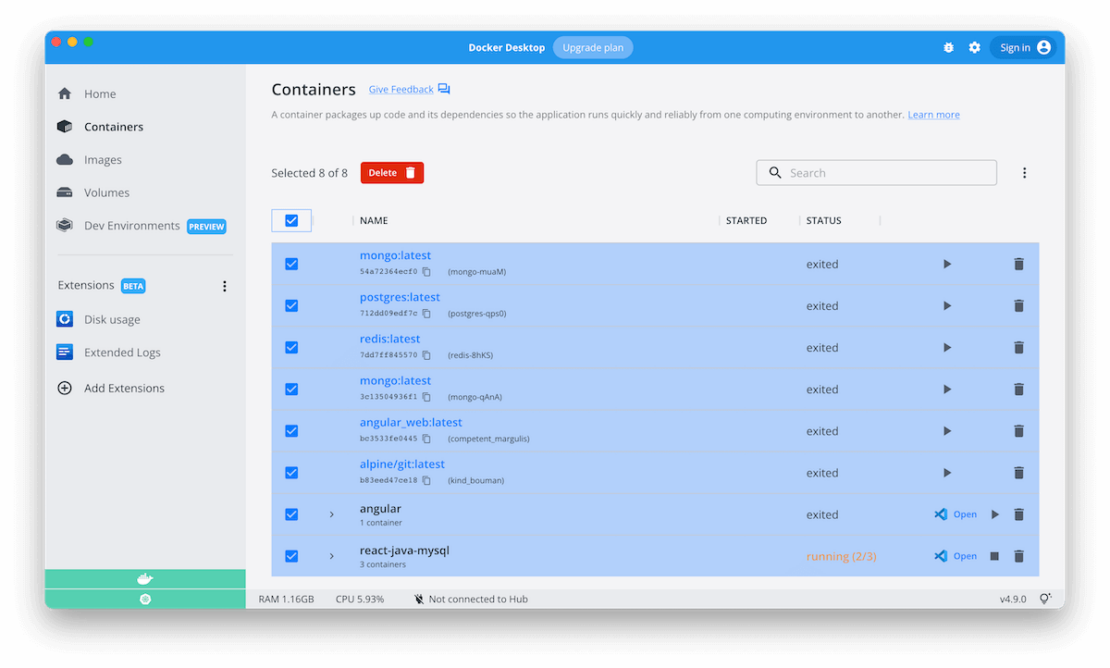
docker-compose ps
NAME COMMAND SERVICE STATUS PORTS
link-shortener-db-1 “docker-entrypoint.s…” db running 5432/tcp
link-shortener-web-1 “gunicorn urlshorten…” web running 0.0.0.0:8000->8000/tcp
Now, it’s time to perform the migration:
docker-compose exec web python manage.py migrate

Just like that, you’ve created and deployed your Django URL-shortener app! This is usable in your browser, like before:

You can get the shortened URL by adding the URL as shown below:

Conclusion
Docker helps accelerate the process of building, running, and sharing modern applications. Docker Official Images help you develop your own unique applications, no matter what tech stack you’re accustomed to. With a single YAML file, we demonstrated how Docker Compose helps you easily build and deploy a Django-based URL shortener app in a matter of seconds. With just a few extra steps, you can apply this tutorial while building applications with much greater complexity.
Happy coding.
Quelle: https://blog.docker.com/feed/

From Edge to Mainstream: Scaling to 100K+ IoT Devices

Developers are builders at heart. Many have also ventured into the IoT — an evolving space ruled by microcontrollers, sensors, and various other software-driven microelectronics. Accordingly, the Raspberry Pi has become a favorite “command center” for developers running simple applications. We’ll discuss how these applications have steadily grown more dynamic, and how containerized deployments have solved multi-industry complexities. You’ll also learn what exciting possibilities await for Pi-driven IoT projects.
 
Image courtesy of Harrison Broadbent, via Unsplash.
 
Unlocking Sophisticated Deployments
These Pi devices can support powerful data-driven workloads — like tracking global vaccination rates, or monitoring weather changes (among others). And while running tasks on a few devices is manageable, complexity does grow with scale. This challenge was once pretty mighty across numerous devices.
Marc Pous recently showcased how containers can enable deployments of 100,000+ IoT devices. He also demonstrated that the Raspberry Pi can readily replicate and distribute containers. Consequently, it’s possible — with a little help from your desktop — to pull an image and push containerized services to your IoT fleet.
Luckily, you can also secure a base Raspberry Pi 4 Model B for about $30 USD — though current shortages might make it tricky. Nonetheless, the financial barrier to entry is low, and developers like Marc have now unraveled the technical mystery. Technology that was once complicated has become much more accessible to developers.


Marc’s example leveraged the Kerberos Agent (install it yourself here) — a free and open-source project that transforms IoT devices into security cameras. Typically, each Kerberos Agent requires its own separate host. Marc’s streamlined deployment method, alternatively, leveraged multiple Docker containers linked to a single Docker host. Kerberos outlines this process within its documentation.
You can use Docker Desktop to efficiently manage these containers. Installing Desktop equips your machine with core dependencies and enables Docker CLI commands. By entering docker run –name camera -p 80:80 -p 8889:8889 -d kerberos/kerberos, Marc pulled the Kerberos official image from Docker Hub and quickly spun up his container.
Did you know? Docker Desktop 4.9 recently added powerful new Container interface enhancements. Be sure to check it out!Tooltip Text
From there, he described how to harmoniously use Balena Cloud, Docker Compose, and more to scale your IoT deployment. You can do this from any machine. This solution also works with numerous device types, brands, and deployments. While that use case is interesting, how does it fit into the bigger picture?
Expanding to Other Real-World Applications
IoT applications span countless industries. Manufacturing, agriculture, energy, logistics, healthcare, urban planning, and transportation (among others) rely on IoT devices daily. Each device can generate significant amounts of real-time data. Developers can help companies capture it and uncover insights or form new strategies. Meanwhile, hobbyists can continue to explore exciting new use cases without needing elaborate setups or resources.
Users have purchased over 40 million Raspberry Pi units since launch. Just imagine if even a fraction of those users focused on IoT development. We could see countless, horizontally-scalable solutions emerge.
Over 14.4 billion active IoT endpoints may exist by the end of 2022. Additionally, some expect IoT adoption to surpass 75 billion by 2025. If you’re a developer in this space, you have to feel really good about the possibilities — especially as chipset supplies recover. The capacity needed to scale is, and will be, there.
Investments into “Pi-oT”
Developers from the world’s largest organizations have already embraced Raspberry Pi computing. Back in 2019, Oracle unveiled the world’s largest Pi supercomputer, made using 1,060 clustered Pi boards. NASA’s Jet Propulsion Laboratory (JPL) has also used these boards during Mars missions. If developers entrust this hardware with such critical workloads, then we’ll likely see expanded usage across varied, large-scale deployments.
Massive vendors like AWS have also embraced containerized IoT. In December 2019, AWS IoT Greengrass v1.10 added support for Docker container images. This lets you use Docker to scale to edge devices. AWS still actively maintains Greengrass (now v2+), and has documented how to use IoT-centric Docker containers.
Solving the Puzzle
Overall, IoT uptake is rising quickly. Containers give developers a platform-agnostic way to expand IoT deployments, minus the obstacles from previous years. Marc’s earlier example proved something important: that IoT development and positive developer experiences can go hand-in-hand.
The right tools and workflows are crucial for helping you manage IoT complexity at scale. You can then focus on innovating, instead of grappling with every piece of your deployment. Want to dig deeper? Discover how to harness Docker alongside Microsoft Azure IoT Edge, or learn about containerized deployment via balenaOS.
Quelle: https://blog.docker.com/feed/

Kickstart Your Spring Boot Application Development

At Docker, we are incredibly proud of our vibrant, diverse and creative community. From time to time, we feature cool contributions from the community on our blog to highlight some of the great work our community does. Are you working on something awesome with Docker? Send your contributions to Ajeet Singh Raina (@ajeetraina) on the Docker Community Slack and we might feature your work!
Choosing the right application framework and technology is critical to successfully building a robust, highly responsive web app. Enterprise developers regularly struggle to identify the best application build practices. According to the 2021 Java Developer Productivity Report, 62% of surveyed developers use Spring Boot as their main framework technology. The ever-increasing demand for microservices within the Java community is driving this significant adoption.
Source ~ The 2021 Java Developer productivity Report
 
Spring Boot is the world’s leading Java web framework. It’s open source, microservices-based, and helps developers to build scalable Java apps. Developers love Spring because of its auto-configuration, embedded servers, and simplified dependency management. It helps development teams create services faster and more efficiently. Accordingly, users spend very little time on initial setup. That includes downloading essential packages or application servers.
The biggest challenge that developers face with Spring Boot is concurrency — or the need to do too many things simultaneously. Spring Boot may also unnecessarily increase the deployment binary size with unused dependencies. This creates bloated JARs that may increase your overall application footprint while impacting performance. Other challenges include a high learning curve and complexity while building a customized logging mechanism.
How can you offset these drawbacks? Docker simplifies and accelerates your workflows by letting you freely innovate with your choice of tools, application stacks, and deployment environments for each project. You can run your Spring Boot artifact directly within Docker containers. This is useful when you need to quickly create microservices. Let’s see this process in action.
Building Your Application
This walkthrough will show you how to accelerate your application development using Spring Boot.
First, we’ll create a simple web app with Spring Boot, without using Docker. Next, we’ll build a Docker image just for that application. You’ll also learn how Docker Compose can help you rapidly deploy your application within containers. Let’s get started.
Key Components

JDK 17+
Spring Boot CLI (optional)
Microsoft Visual Studio Code
Docker Desktop

Getting Started
Once you’ve installed the Maven and OpenJDK package in your system, follow these steps to build a simple web application using Spring Boot.
Starting with Spring Initializr
Spring Initializr is a quickstart generator for Spring projects. It provides an extensible API to generate JVM-based projects with implementations for several common concepts — like basic language generation for Java, Kotlin, and Groovy. Spring Initializr also supports build-system abstraction with implementations for Apache Maven and Gradle. Additionally, It exposes web endpoints to generate an actual project and serve its metadata in a well-known format. This lets third-party clients provide assistance where it’s needed.
Open this pre-initialized project in order to generate a ZIP file. Here’s how that looks:

 
For this demonstration, we’ve paired Maven build automation with Java, a Spring Web dependency, and Java 17 for our metadata.


Click “Generate” to download “spring-boot-docker.zip”. Use the unzip command to extract your files.
Project Structure
Once you unzip the file, you’ll see the following project directory structure:

tree spring-boot-docker
spring-boot-docker
├── HELP.md
├── mvnw
├── mvnw.cmd
├── pom.xml
└── src
├── main
│ ├── java
│ │ └── com
│ │ └── example
│ │ └── springbootdocker
│ │ └── SpringBootDockerApplication.java
│ └── resources
│ ├── application.properties
│ ├── static
│ └── templates
└── test
└── java
└── com
└── example
└── springbootdocker
└── SpringBootDockerApplicationTests.java

 
The src/main/java  directory contains your project’s source code, the src/test/java directory contains the test source, and the pom.xml file is your project’s Project Object Model (POM).
The pom.xml file is the core of a Maven project’s configuration. It’s a single configuration file that contains most of the information needed to build a customized project. The POM is huge and can seem daunting. Thankfully, you don’t yet need to understand every intricacy to use it effectively. Here’s your project’s POM:

<?xml version="1.0" encoding="UTF-8"?>
<project xmlns="http://maven.apache.org/POM/4.0.0" xmlns:xsi="http://www.w3.org/2001/XMLSchema-instance"
xsi:schemaLocation="http://maven.apache.org/POM/4.0.0 https://maven.apache.org/xsd/maven-4.0.0.xsd">
<modelVersion>4.0.0</modelVersion>
<parent>
<groupId>org.springframework.boot</groupId>
<artifactId>spring-boot-starter-parent</artifactId>
<version>2.5.13</version>
<relativePath/> <!– lookup parent from repository –>
</parent>
<groupId>com.example</groupId>
<artifactId>spring-boot-docker</artifactId>
<version>0.0.1-SNAPSHOT</version>
<name>spring-boot-docker</name>
<description>Demo project for Spring Boot</description>
<properties>
<java.version>17</java.version>
</properties>
<dependencies>
<dependency>
<groupId>org.springframework.boot</groupId>
<artifactId>spring-boot-starter-web</artifactId>
</dependency>

<dependency>
<groupId>org.springframework.boot</groupId>
<artifactId>spring-boot-starter-test</artifactId>
<scope>test</scope>
</dependency>
</dependencies>

<build>
<plugins>
<plugin>
<groupId>org.springframework.boot</groupId>
<artifactId>spring-boot-maven-plugin</artifactId>
</plugin>
</plugins>
</build>

</project>

 
The SpringbootDockerApplication.java file starts by declaring your com.example.springbootdocker package and importing necessary Spring frameworks. Many Spring Boot developers like their apps to use auto-configuration, component scanning, and extra configuration definitions to their “application class.” You can use a single @SpringBootApplication  annotation to enable those features. That same annotation also triggers component scanning for your current package and its sub-packages. You can configure this and even move it elsewhere by manually specifying the base package.
Let’s create a simple RESTful web service that displays “Hello World!” by annotating classic controllers as shown in the following example:.

package com.example.springbootdocker;

import org.springframework.boot.SpringApplication;
import org.springframework.boot.autoconfigure.SpringBootApplication;
import org.springframework.web.bind.annotation.RequestMapping;
import org.springframework.web.bind.annotation.RestController;

@RestController
@SpringBootApplication
public class SpringBootDockerApplication {

@RequestMapping("/")
public String home() {
return "Hello World!";
}

public static void main(String[] args) {
SpringApplication.run(SpringBootDockerApplication.class, args);
}

}

 
@RestControler and @RequestMapping are two other popular annotations. The @RestController annotation simplifies the creation of RESTful web services. It conveniently combines @Controller and @ResponseBody — which eliminates the need to annotate every request-handling method of the controller class with the @ResponseBody annotation. Meanwhile, the @RequestMapping annotation maps web requests to Spring Controller methods.
First, we can flag a class as a @SpringBootApplication and as a @RestController, letting Spring MVC harness it for web requests. @RequestMapping maps / to the home() method, which sends a Hello World response.  The main() method uses Spring Boot’s SpringApplication.run() method to launch an application.
The following command takes your compiled code and packages it into a distributable format, like a JAR:
./mvnw package

[INFO] Scanning for projects…
[INFO]
[INFO] ——————-&amp;lt; com.example:spring-boot-docker &amp;gt;——————-
[INFO] Building spring-boot-docker 0.0.1-SNAPSHOT
[INFO] ——————————–[ jar ]———————————
[INFO]
[INFO] — maven-resources-plugin:3.2.0:resources (default-resources) @ spring-boot-docker —
[INFO] Using ‘UTF-8′ encoding to copy filtered resources.
[INFO] Using ‘UTF-8′ encoding to copy filtered properties files.
[INFO] Copying 1 resource
[INFO] Copying 0 resource
[INFO]
[INFO] — maven-compiler-plugin:3.8.1:compile (default-compile) @ spring-boot-docker —
[INFO] Nothing to compile – all classes are up to date
[INFO]
[INFO] — maven-resources-plugin:3.2.0:testResources (default-testResources) @ spring-boot-docker —
[INFO] Using ‘UTF-8′ encoding to copy filtered resources.
[INFO] Using ‘UTF-8′ encoding to copy filtered properties files.
[INFO] skip non existing resourceDirectory /Users/johangiraldohurtado/Downloads/spring-boot-docker/src/test/resources
[INFO]
[INFO] — maven-compiler-plugin:3.8.1:testCompile (default-testCompile) @ spring-boot-docker —
[INFO] Changes detected – recompiling the module!
[INFO] Compiling 1 source file to /Users/johangiraldohurtado/Downloads/spring-boot-docker/target/test-classes
[INFO]
[INFO] — maven-surefire-plugin:2.22.2:test (default-test) @ spring-boot-docker —


[INFO] Tests run: 1, Failures: 0, Errors: 0, Skipped: 0, Time elapsed: 4.37 s – in com.example.springbootdocker.SpringBootDockerApplicationTests
[INFO]
[INFO] Results:
[INFO]
[INFO] Tests run: 1, Failures: 0, Errors: 0, Skipped: 0
[INFO]
[INFO]
[INFO] — maven-jar-plugin:3.2.2:jar (default-jar) @ spring-boot-docker —
[INFO] Building jar: /Users/johangiraldohurtado/Downloads/spring-boot-docker/target/spring-boot-docker-0.0.1-SNAPSHOT.jar
[INFO]
[INFO] — spring-boot-maven-plugin:2.5.13:repackage (repackage) @ spring-boot-docker —
[INFO] Replacing main artifact with repackaged archive
[INFO] ——
[INFO] BUILD SUCCESS
[INFO] ————————————————————————
[INFO] Total time: 11.461 s
[INFO] Finished at: 2022-05-12T12:50:12-05:00
[INFO] ————————————————————————

Running app Packages as a JAR File
After successfully building your JAR, it’s time to run the app package as a JAR file:
java -jar target/spring-boot-docker-0.0.1-SNAPSHOT.jar
Here are the results:

. ____ _ __ _ _
/ / ___’_ __ _ _(_)_ __ __ _
( ( )___ | ‘_ | ‘_| | ‘_ / _` |
/ ___)| |_)| | | | | || (_| | ) ) ) )
‘ |____| .__|_| |_|_| |___, | / / / /
=========|_|==============|___/=/_/_/_/
:: Spring Boot :: (v2.5.13)

2022-05-12 13:02:35.591 INFO 3594 — [ main] c.e.s.SpringBootDockerApplication : Starting SpringBootDockerApplication v0.0.1-SNAPSHOT using Java 17.0.2 on Johans-MacBook-Air.local with PID 3594 (/Users/johangiraldohurtado/Downloads/spring-boot-docker/target/spring-boot-docker-0.0.1-SNAPSHOT.jar started by johangiraldohurtado in /Users/johangiraldohurtado/Downloads/spring-boot-docker)
2022-05-12 13:02:35.597 INFO 3594 — [ main] c.e.s.SpringBootDockerApplication : No active profile set, falling back to 1 default profile: "default"
2022-05-12 13:02:37.958 INFO 3594 — [ main] o.s.b.w.embedded.tomcat.TomcatWebServer : Tomcat initialized with port(s): 8080 (http)
2022-05-12 13:02:37.979 INFO 3594 — [ main] o.apache.catalina.core.StandardService : Starting service [Tomcat]
2022-05-12 13:02:37.979 INFO 3594 — [ main] org.apache.catalina.core.StandardEngine : Starting Servlet engine: [Apache Tomcat/9.0.62]
2022-05-12 13:02:38.130 INFO 3594 — [ main] o.a.c.c.C.[Tomcat].[localhost].[/] : Initializing Spring embedded WebApplicationContext
2022-05-12 13:02:38.130 INFO 3594 — [ main] w.s.c.ServletWebServerApplicationContext : Root WebApplicationContext: initialization completed in 2351 ms
2022-05-12 13:02:39.015 INFO 3594 — [ main] o.s.b.w.embedded.tomcat.TomcatWebServer : Tomcat started on port(s): 8080 (http) with context path ”
2022-05-12 13:02:39.050 INFO 3594 — [ main] c.e.s.SpringBootDockerApplication : Started SpringBootDockerApplication in 4.552 seconds (JVM running for 5.486)

 
You can now access your “Hello World” page through your web browser at http://localhost:8080, or via this curl command:

curl localhost:8080
Hello World

 
Click here to access the code previously developed for this example.
Containerizing the Spring Boot Application
Docker helps you containerize your Java app — letting you bundle together your complete Spring application, runtime, configuration, and OS-level dependencies. This includes everything needed to ship a cross-platform, multi-architecture web application.
Let’s assess how you can easily run this app inside a Docker container using a Docker Official Image. First, you’ll need to download Docker Desktop. Docker Desktop accelerates the image-building process while making useful images more discoverable. Complete the installation process once your download is finished.
Docker uses a Dockerfile to specify each image’s “layers.” Each layer stores important changes stemming from the base image’s standard configuration. Create the following empty Dockerfile in your Spring Boot project.
touch Dockerfile
Use your favorite text editor to open this Dockerfile. You’ll then need to define your base image.
Whenever you are creating a Docker image to run a Java program, it’s always recommended to use a smaller base image that helps in speeding up the build process and launching containers at a faster pace. Also, for executing a simple program, we just need to use JRE instead of JDK since there is no development or compilation of the code required.
The upstream Java JDK doesn’t distribute an official JRE package. Hence, we will leverage the popular  eclipse-temurin:17-jdk-focal Docker image available in Docker Hub. The Eclipse Temurin project provides code and processes that support the building of runtime binaries and associated technologies that are high performance, enterprise-caliber & cross-platform.
FROM eclipse-temurin:17-jdk-focal
Next, let’s quickly create a directory to house our image’s application code. This acts as the working directory for your application:
WORKDIR /app
The following COPY instruction copies the Maven wrappers and pom file from the host machine  to the container image.The pom.xml file contains information of project and configuration information for the maven to build the project such as dependencies, build directory, source directory, test source directory, plugin, goals etc.
COPY .mvn/ ./mvn
COPY mvnw pom.xml ./
The following RUN instructions trigger a goal that resolves all project dependencies including plugins and reports and their dependencies.
RUN ./mvnw dependency:go-offline
Next, we need to copy the most important directory of the maven project – /src. It includes java source code and pre-environment configuration files of the artifact.
COPY src ./src
The Spring Boot Maven plugin includes a run goal which can be used to quickly compile and run your application. The last line tells Docker to compile and run your app packages.
CMD [“./mvnw”, “spring-boot:run”]
Here’s your complete Dockerfile:

FROM eclipse-temurin:17-jdk-focal

WORKDIR /app

COPY .mvn/ .mvn
COPY mvnw pom.xml ./
RUN ./mvnw dependency:go-offline

COPY src ./src

CMD ["./mvnw", "spring-boot:run"]

Building Your Docker Image
Next, you’ll need to build your Docker image. Enter the following command to kickstart this process, which produces an output soon after:
docker build –platform linux/amd64 -t spring-helloworld .

docker image ls
REPOSITORY TAG IMAGE ID CREATED SIZE
spring-helloworld latest 4cf762a7b96d 4 minutes ago 124MB

 
Docker Desktop’s intuitive dashboard lets you manage your containers, applications, and images directly from within Docker Desktop. The GUI enables this with only a few clicks. While still possible, you won’t need to use the CLI to perform these core actions.
Select Dashboard from the top whale menu icon to access the Docker Dashboard:

Click on Images. The Images view displays a list of your Docker images, and lets you run images as functional containers.

Additionally, you can push your images directly to Docker Hub for easy sharing and collaboration.

The Image view also includes the Inspect option. This unveils environmental variables, port information, and more. Crucially, the Image view lets you run your container directly from your image. Simply specify the container’s name, exposed ports, and mounted volumes as required.

Run Your Spring Boot Docker Container
Docker runs processes in isolated containers. A container is a process that runs on a host, which is either local or remote. When an operator executes docker run, the container process that runs is isolated with its own file system, networking, and separate process tree from the host.
The following docker run command first creates a writeable container layer over the specified image, and then starts it.
docker run -p 8080:8080 -t spring-helloworld
Here’s your result:

. ____ _ __ _ _
/ / ___’_ __ _ _(_)_ __ __ _
( ( )___ | ‘_ | ‘_| | ‘_ / _` |
/ ___)| |_)| | | | | || (_| | ) ) ) )
‘ |____| .__|_| |_|_| |___, | / / / /
=========|_|==============|___/=/_/_/_/
:: Spring Boot :: (v2.5.13)

2022-05-12 18:31:38.770 INFO 1 — [ main] c.e.s.SpringBootDockerApplication : Starting SpringBootDockerApplication v0.0.1-SNAPSHOT using Java 17.0.2 on 3196593a534f with PID 1 (/app.jar started by root in /)
2022-05-12 18:31:38.775 INFO 1 — [ main] c.e.s.SpringBootDockerApplication : No active profile set, falling back to 1 default profile: "default"
2022-05-12 18:31:39.434 INFO 1 — [ main] o.s.b.w.embedded.tomcat.TomcatWebServer : Tomcat initialized with port(s): 8080 (http)
2022-05-12 18:31:39.441 INFO 1 — [ main] o.apache.catalina.core.StandardService : Starting service [Tomcat]
2022-05-12 18:31:39.442 INFO 1 — [ main] org.apache.catalina.core.StandardEngine : Starting Servlet engine: [Apache Tomcat/9.0.62]
2022-05-12 18:31:39.535 INFO 1 — [ main] o.a.c.c.C.[Tomcat].[localhost].[/] : Initializing Spring embedded WebApplicationContext
2022-05-12 18:31:39.535 INFO 1 — [ main] w.s.c.ServletWebServerApplicationContext : Root WebApplicationContext: initialization completed in 682 ms
2022-05-12 18:31:39.797 INFO 1 — [ main] o.s.b.w.embedded.tomcat.TomcatWebServer : Tomcat started on port(s): 8080 (http) with context path ”
2022-05-12 18:31:39.805 INFO 1 — [ main] c.e.s.SpringBootDockerApplication : Started SpringBootDockerApplication in 1.365 seconds (JVM running for 1.775)

 
Go to Docker Dashboard and open your app in your browser:

Next, click Logs to observe your app’s behavior:

Docker Dashboard’s Stats tab lets you view CPU consumption, memory usage, disk read vs. write, and network use:

You can also confirm your containerized application’s functionality via the URL http://localhost:8080:

curl localhost:8080
Hello Developers From Docker!

 
Want to explore alternative ways to get started with Spring Boot? Check out this Docker image built for developers like you.
Building Multi-Container Spring Boot Apps with Docker Compose
We’ve effectively learned how to build a sample Spring Boot app and create associated Docker images. Next, let’s build a multi-container Spring Boot app using Docker Compose.
For this demonstration, you’ll leverage the popular awesome-compose repository.
Cloning the Repository

git clone https://github.com/docker/awesome-compose

 
Change your directory to match the spring-postgres project and you’ll see the following project directory structure:

.
├── README.md
├── backend
│ ├── Dockerfile
│ ├── pom.xml
│ └── src
│ └── main
│ ├── java
│ │ └── com
│ │ └── company
│ │ └── project
│ │ ├── Application.java
│ │ ├── controllers
│ │ │ └── HomeController.java
│ │ ├── entity
│ │ │ └── Greeting.java
│ │ └── repository
│ │ └── GreetingRepository.java
│ └── resources
│ ├── application.properties
│ ├── data.sql
│ ├── schema.sql
│ └── templates
│ └── home.ftlh
├── db
│ └── password.txt
└── docker-compose.yaml

13 directories, 13 files

 
Let’s also take a peak at our docker compose file:

services:
backend:
build: backend
ports:
– 8080:8080
environment:
– POSTGRES_DB=example
networks:
– spring-postgres
db:
image: postgres
restart: always
secrets:
– db-password
volumes:
– db-data:/var/lib/postgresql/data
networks:
– spring-postgres
environment:
– POSTGRES_DB=example
– POSTGRES_PASSWORD_FILE=/run/secrets/db-password
expose:
– 5432
volumes:
db-data:
secrets:
db-password:
file: db/password.txt
networks:
spring-postgres:

 
The compose file defines an application with two services: backend and db. While deploying the application, docker compose maps port 8080 of the backend service container to port 8080 of the host, per your file. Make sure port 8080 on the host isn’t already in use.
Through your compose file, it’s possible to determine environment variables. For example, you can specify connected databases in the backend service. With a database, you can define the name, password, and parameters of your database.
Thanks to our compose file’s behavior — which lets us recreate containers from indicated services — it’s important to define volumes that store critical information.
Start your application by running docker compose command:
docker compose up -d
Your container list should show two containers running and their port mappings, as seen below:

docker compose ps
Name Command State Ports
——————————————————————————————-
spring-postgres_backend_1 java -cp app:app/lib/* com … Up 0.0.0.0:8080-&amp;gt;8080/tcp
spring-postgres_db_1 docker-entrypoint.sh postgres Up 5432/tcp

 
After the application starts, navigate to http://localhost:8080 in your web browser. You can also run the following curl to form your webpage:

$ curl localhost:8080
<!DOCTYPE HTML>
<html>
<head>
<title>Getting Started: Serving Web Content</title>
<meta http-equiv="Content-Type" content="text/html; charset=UTF-8" />
</head>
<body>
<p>Hello from Docker!</p>
</body>

Stop and Remove Your Containers
You’ve successfully built your sample application—congratulations! However, it’s now time to take things offline. You can do this quickly and easily with the following command:

$ docker compose down
Stopping spring-postgres_db_1 … done
Stopping spring-postgres_backend_1 … done
Removing spring-postgres_db_1 … done
Removing spring-postgres_backend_1 … done
Removing network spring-postgres_default

 
Alternatively, navigate to the Containers / Apps section from Docker Desktop’s sidebar, hover over each active container, and click the square Stop button. The process takes roughly 10 seconds — shutting your containers down elegantly.
Conclusion
We’ve demonstrated how to containerize our Spring Boot application, and why that’s so conducive to smoother deployment. We’ve also harnessed Docker Compose to construct a simple, two-layered web application. This process is quick and lets you devote precious time to other development tasks — especially while using Docker Desktop. No advanced knowledge of containers or even Docker is needed to succeed.
References:

Getting Started with Java
Build your Java image
Spring Boot development with Docker

 
Quelle: https://blog.docker.com/feed/

Deploying Web Applications Quicker and Easier with Caddy 2

Follow along as we dissect an awesome method for accelerating your web application server deployment. Huge thanks to Chris Maki for his help in putting this guide together!
 
Today’s web applications — and especially enterprise variants — have numerous moving parts that need continual upkeep. These tasks can easily overwhelm developers who already have enough on their plates. You might have to grapple with:

TLS certificate management and termination
Web server setup and maintenance
Application firewalls and proxies
API gateway integration
Caching
Logging

 
Consequently, the task of building, deploying, and maintaining a web application has become that much more complicated. Developers must worry about performance, access delegation, and security.
Lengthy development times reflect this. It takes 4.5 months on average to build a complete web app — while creating a viable backend can take two to three months. There’s massive room for improvement. Web developers need simpler solutions that dramatically reduce deployment time.
First, we’ll briefly highlight a common deployment pipeline. Second, we’ll explore an easier way to get things up and running with minimal maintenance. Let’s jump in.
Cons of Server Technologies Like NGINX
There are many ways to deploy a web application backend. Upwards of 60% of the web server market is collectively dominated by NGINX and Apache. While these options are tried and true, they’re not 100% ready to use out of the box.
Let’s consider one feature that’s becoming indispensable across web applications: HTTPS. If you’re accustomed to NGINX web servers, you might know that these servers are HTTP-enabled right away. However, If SSL is required for you and your users, you’ll have to manually configure your servers to support it. Here’s what that process looks like from NGINX’s documentation:

server {
listen 443 ssl;
server_name www.example.com;
ssl_certificate www.example.com.crt;
ssl_certificate_key www.example.com.key;
ssl_protocols TLSv1 TLSv1.1 TLSv1.2;
ssl_ciphers HIGH:!aNULL:!MD5;

}

 
Additionally, NGINX shares that “the ssl parameter must be enabled on listening sockets in the server block, and the locations of the server certificate and private key files should be specified.”
You’re tasked with these core considerations and determining best practices through your configurations. Additionally, you must properly optimize your web server to handle these HTTPS connections — without introducing new bottlenecks based on user activity, resource consumption, and timeouts. Your configuration files slowly grow with each customization:

worker_processes auto;

http {
ssl_session_cache shared:SSL:10m;
ssl_session_timeout 10m;

server {
listen 443 ssl;
server_name www.example.com;
keepalive_timeout 70;

ssl_certificate www.example.com.crt;
ssl_certificate_key www.example.com.key;
ssl_protocols TLSv1 TLSv1.1 TLSv1.2;
ssl_ciphers HIGH:!aNULL:!MD5;

 
It’s worth remembering this while creating your web server. Precise, finely-grained control over server behavior is highly useful but has some drawbacks. Configurations can be time consuming. They may also be susceptible to coding conflicts introduced elsewhere. On the certificate side, you’ll often have to create complex SSL certificate chains to ensure maximum cross-browser compatibility:

$ openssl s_client -connect www.godaddy.com:443

Certificate chain
0 s:/C=US/ST=Arizona/L=Scottsdale/1.3.6.1.4.1.311.60.2.1.3=US
/1.3.6.1.4.1.311.60.2.1.2=AZ/O=GoDaddy.com, Inc
/OU=MIS Department/CN=www.GoDaddy.com
/serialNumber=0796928-7/2.5.4.15=V1.0, Clause 5.(b)
i:/C=US/ST=Arizona/L=Scottsdale/O=GoDaddy.com, Inc.
/OU=http://certificates.godaddy.com/repository
/CN=Go Daddy Secure Certification Authority
/serialNumber=07969287
1 s:/C=US/ST=Arizona/L=Scottsdale/O=GoDaddy.com, Inc.
/OU=http://certificates.godaddy.com/repository
/CN=Go Daddy Secure Certification Authority
/serialNumber=07969287
i:/C=US/O=The Go Daddy Group, Inc.
/OU=Go Daddy Class 2 Certification Authority
2 s:/C=US/O=The Go Daddy Group, Inc.
/OU=Go Daddy Class 2 Certification Authority
i:/L=ValiCert Validation Network/O=ValiCert, Inc.
/OU=ValiCert Class 2 Policy Validation Authority
/CN=http://www.valicert.com//emailAddress=info@valicert.com

 
Spinning up your server therefore takes multiple steps. You must also take these tasks and scale them to include proxying, caching, logging, and API gateway setup. The case is similar for module-based web servers like Apache.
We don’t say this to knock either web server (in fact, we maintain official images for both Apache and NGINX). However — as a backend developer — you’ll want to weigh those development-and-deployment efforts vs. their collective benefits. That’s where a plug-and-play solution comes in handy. This is perfect for those without deep backend experience or those strapped for time. 
Pros of Using Caddy 2
Written in Go, Caddy 2 (which we’ll simply call “Caddy” throughout this guide) acts as an enterprise-grade web server with automatic HTTPS. Other servers don’t share this same feature out of the box.
Additionally, Caddy 2 offers some pretty cool benefits:

Automatic TLS certificate renewals
OCSP stapling, to speed up SSL handshakes through request consolidation
Static file serving for scripts, CSS, and images that enrich web applications
Reverse proxying for scalability, load balancing, health checking, and circuit breaking
Kubernetes (K8s) ingress, which interfaces with K8s’ Go client and SharedInformers
Simplified logging, caching, API gateway, and firewall support
Configurable, shared Websocket and proxy support with HTTP/2

 
This is not an exhaustive list, by any means. However, these baked-in features alone can cut deployment time significantly. We’ll explore how Caddy 2 works, and how it makes server setup more enjoyable. Let’s hop in.
Here’s How Caddy Works
One Caddy advantage is its approachability for developers of all skill levels. It also plays nicely with external configurations.
Have an existing web server configuration that you want to migrate over to Caddy? No problem. Native adapters convert NGINX, TOML, Caddyfiles, and other formats into Caddy’s JSON format. You won’t have to reinvent the wheel nor start fresh to deploy Caddy in a containerized fashion.
Here’s how your Caddyfile structure might appear:

example.com

# Templates give static sites some dynamic features
templates

# Compress responses according to Accept-Encoding headers
encode gzip zstd

# Make HTML file extension optional
try_files {path}.html {path}

# Send API requests to backend
reverse_proxy /api/* localhost:9005

# Serve everything else from the file system
file_server

 
Note that this Caddyfile is even considered complex by Caddy’s own standards (since you’re defining extra functionality). What if you want to run WordPress with fully-managed HTTPS? The following Caddyfile enables this:

example.com

root * /var/www/wordpress
php_fastcgi unix//run/php/php-version-fpm.sock
file_server

 
That’s it! Basic files can produce some impressive results. Each passes essential instructions to your server and tells it how to run. Caddy’s reference documentation is also extremely helpful should you want to explore further.
Quick Commands
Before tackling your image, Caddy has shared some rapid, one-line commands that perform some basic tasks. You’ll enter these through the Caddy CLI:
 
To create a quick, local file server:
$ caddy file-server
To create a public file server over HTTPS:
$ caddy file-server –domain yoursampleapp.com
To perform an HTTPS reverse proxy:
​​$ caddy reverse-proxy –from example.com –to localhost:9000
To run a Caddyfile-backed server in an existing working directory:
$ caddy run
 
Caddy notes that these commands are tested and approved for production deployments. They’re safe, easy, and reliable. Want to learn many more useful commands and subcommands? Check out Caddy’s CLI documentation to streamline your workflows.
Leveraging the Caddy Container Image
Caddy bills itself as a web-server solution with fewer moving parts, and therefore fewer management demands. Its static binary compiles for any platform. Since Caddy has no dependencies, it can run practically anywhere — and within containers. This makes it a perfect match for Docker, which is why developers have downloaded Caddy’s Docker Official Image over 100 million times. You can find our Caddy image on Docker Hub.


We’ll discuss how to use this image to deploy your web applications faster, and share some supporting Docker mechanisms that can help streamline those processes. You don’t even need libc, either.
Prerequisites

A free Docker Hub account – for complete push/pull registry access to our Caddy Official Image
The latest version of Docker Desktop, tailored to your OS and CPU (for macOS users)
Your preferred IDE, though VSCode is popular

Docker Desktop unlocks greater productivity around container, image, and server management. Although the CLI remains available, we’re leveraging the GUI while running important tasks.
Pull Your Caddy Image
Getting started with Docker’s official Caddy image is easy. Enter the docker pull caddy:latest command to download the image locally on your machine. You can also specify a Caddy image version using a number of available tags.
Entering docker pull caddy:latest grabs Caddy’s current version, while docker pull caddy:2.5.1 requests an image running Caddy v2.5.1 (for example).
Using :latest is okay during testing but not always recommended in production. Ideally, you’ll aim to thoroughly test and vet any image from a security standpoint before using it. Pulling caddy:latest (or any image tagged similarly) may invite unwanted gremlins into your deployment.
Since Docker automatically grabs the newest release, it’s harder to pre-inspect that image or notice that changes have been made. However, :latest images can include the most up-to-date vulnerability and bug fixes. Image release notes are helpful here.
You can confirm your successful image pull within Docker Desktop:


After pulling caddy:latest, you can enter the docker image ls command to view its size. Caddy is even smaller than both NGINX and Apache’s httpd images:


Need to inspect the contents of your Caddy image? Docker Desktop lets you summon a Docker Software Bill of Materials (SBOM) — which lists all packages contained within your designated image. Simply enter the docker sbom caddy:latest command (or use any container image:tag):


You’ll see that your 43.1MB caddy:latest image contains 129 packages. These help Caddy run effectively cross-platform.
Run Your Caddy Image
Your image is ready to go! Next, run your image to confirm that Caddy is working properly with the following command:
docker run –rm -d -p 8080:80 –name web caddy
 
Each portion of this command serves a purpose:

–rm removes the container when it exits or when the daemon exits (whichever comes first)
-d runs your Caddy container in the background
-p designates port connections between host and container
–name lets you assign a non-random name to your image
web is an argument to the –name flag, and is the descriptive name of your running container
caddy is your image’s name, which was automatically assigned during your initial docker pull command

 
Since you’ve established a port connection, navigate to localhost:8080 in your browser. Caddy should display a webpage:


You’ll see some additional instructions for setting up Caddy 2. Scrolling further down the page also reveals more details, plus some handy troubleshooting tips.
Time to Customize
These next steps will help you customize your web application and map it into the container. Caddy uses the /var/www/html path to store your critical static website files.
Here’s where you’ll store any CSS or HTML — or anything residing within your index.html file. Additionally, this becomes your root directory once your Caddyfile is complete.
Locate your Caddyfile at /etc/caddy/Caddyfile to make any important configuration changes. Caddy’s documentation provides a fantastic breakdown of what’s possible, while the Caddyfile Tutorial guides you step-by-step.
The steps mentioned above describe resources that’ll exist within your Caddy container, not those that exist on your local machine. Because of this, it’s often necessary to reload Caddy to apply any configuration changes, or otherwise. You can apply any new changes by entering systemctl reload caddy in your CLI, and visiting your site as confirmation. Running your Caddy server within a Docker container requires just one extra shell command:
$ docker exec -w /etc/caddy web caddy reload
 
This gracefully reloads your content without a complete restart. That process is otherwise time consuming and disruptive.
Next, you can serve your updated index.html file by entering the following. You’ll create a working directory and run the following commands from that directory:

$ mkdir docker-caddy
$ cd docker-caddy
$ echo "hello world" > index.html
$ docker run -d -p 8080:80
-v $PWD/index.html:/usr/share/caddy/index.html
-v caddy_data:/data
caddy

$ curl http://localhost/
hello world

 
Want to quickly push new configurations to your Caddy server? Caddy provides a RESTful JSON API that lets you POST sets of changes with minimal effort. This isn’t necessary for our tutorial, though you may find this config structure useful in the future:

POST /config/

{
"apps": {
"http": {
"servers": {
"example": {
"listen": ["127.0.0.1:2080"],
"routes": [{
"@id": "demo",
"handle": [{
"handler": "file_server",
"browse": {}
}]
}]
}
}
}
}
}

 
No matter which route you take, any changes made through Caddy’s API are persisted on disk and continually usable after restarts. Caddy’s API docs explain this and more in greater detail.
Building Your Caddy-Based Dockerfile
Finally, half the magic of using Caddy and Docker rests with the Dockerfile. You don’t always want to mount your files within a container. Instead, it’s often better to COPY files or directories from a remote source and base your image on them:

FROM caddy:<version>

COPY Caddyfile /etc/caddy/Caddyfile
COPY site /srv

 
This adds your Caddyfile in using an absolute path. You can even add modules to your Caddy Dockerfile to extend your server’s functionality. Caddy’s :builder image streamlines this process significantly. Just note that this version is much larger than the standard Caddy image. To reduce bloat, the FROM instruction uses a binary overlay to save space:

FROM caddy:builder AS builder

RUN xcaddy build
–with github.com/caddyserver/nginx-adapter
–with github.com/hairyhenderson/caddy-teapot-module@v0.0.3-0

FROM caddy:<version>

COPY –from=builder /usr/bin/caddy /usr/bin/caddy

 
You’re also welcome to add any of Caddy’s available modules, which are free to download. Congratulations! You now have all the ingredients needed to deploy a functional Caddy 2 web application.
Quick Notes on Docker Compose
Though not required, you can use docker compose to run your Caddy-based stack. As a side note, Docker Compose V2 is also written in Go. You’d store this Compose content within a docker-compose.yml file, which looks like this:

version: "3.7"

services:
caddy:
image: caddy:<version>
restart: unless-stopped
ports:
– "80:80"
– "443:443"
volumes:
– $PWD/site:/srv
– caddy_data:/data
– caddy_config:/config

volumes:
caddy_data:
caddy_config:

 
Stopping and Reviving Your Containers
Want to stop your container? Simply enter docker stop web to shut it down within 10 seconds. If this process stalls, Docker will kill your container immediately. You can customize and extend this timeout with the following command:
docker stop –time=30 web
 
However, doing this is easier using Docker Desktop — and specifically the Docker Dashboard. In the sidebar, navigate to the Containers pane. Next, locate your Caddy server container titled “web” in the list, hover over it, and click the square Stop icon. This performs the same task from our first command above:


You’ll also see options to Open in Browser, launch the container CLI, Restart, or Delete.
Stop your Caddy container by accident, or want to spin up another? Navigate to the Images pane, locate caddy in the list, hover over it, and click the Run button that appears. Once the modal appears, expand the Optional Settings section. Next, do the following:

Name your new container something meaningful
Designate your Local Host port as 8080 and map it Container Port 80
Mount any volumes you want, though this isn’t necessary for this demo
Click the Run button to confirm


Finally, revisit the Containers pane, locate your new container, and click Open in Browser. You should see the very same webpage that your Caddy server rendered earlier, if things are working properly.
Conclusion
Despite the popularity of Apache and NGINX, developers have other server options at their disposal. Alternatives like Caddy 2 can save time, effort, and make the deployment process much smoother. Reduced dependencies, needed configurations, and even Docker integration help simplify each management step. As a bonus, you’re also supporting an open-source project.
Are you currently using Caddy 1 and want to upgrade to Caddy 2? Follow along with Caddy’s official documentation to understand the process.
Quelle: https://blog.docker.com/feed/

6 Development Tool Features that Backend Developers Need

Application development is seemingly getting more and more complex every day. While those complexities can lead to better end-user experiences, they can also hamper your overall productivity. Without a doubt, effective tooling helps you tackle these challenges much more easily. Good tools are user-friendly, work cross-platform, and have multi-language support.


Additionally, the best tools are actually enjoyable to use while keeping you seamlessly engaged. This is what makes integrated platforms so valuable to application development — but, how do you recognize a good solution when you see it?
Here’s what you should look for while evaluating tools and platforms.
1) Collaborative and User-Friendly Environments
Whether you’re working within one unified workspace or many, fostering strong collaboration is essential. Development projects have many stakeholders. They also — for individual features and especially entire products — rely on contributions from numerous team members.
This is where development environments come in handy. Environments help teams transition cohesively between tasks, projects, and milestones along their roadmaps. They also help developers manage application source code end-to-end. Your search for an ideal development environment should include those that bundle development, staging, and production servers. Additionally, look for all-encompassing environments that can reduce your overall tooling footprint. Prioritize the following environment features:

Task automation 
Writing
Testing
Debugging
Patching
Updating
Code compiling
Code merging
Viewing of in-progress code and peer review

 
Each snippet of application code is vital, which makes sharing so helpful. Additionally, environments that can support multiple repositories like GitHub, GitLab, or Bitbucket help teams code more effectively. You might also leverage different technologies with their own requirements. Wouldn’t it be great if numerous functions could be integrated within single solutions (like an IDE, for example)?
Overall, you’ll want an environment that helps you tackle your day-to-day tasks. It should welcome all technical stakeholders. It should also be something that you enjoy using on a daily basis. Great tools reduce friction — and the idea that environments can bring a smile to your face isn’t so far fetched. Remember to first create a “needs” checklist and evaluate your workflows before committing (no pun intended).
2) Kubernetes Compatibility
What makes Kubernetes (K8s) so important? Currently, there are over 3.9 million global K8s developers worldwide. This adoption is growing in lockstep with microservices and containerization. It’s not surprising that Kubernetes is the world’s leading container-orchestration platform.
In fact, 67% of respondents from last year’s Cloud Native Computing Foundation (CNCF) survey use K8s in production. Globally, 31% of backend developers also leverage K8s, so there’s a pretty good chance you do, too. If you need Kubernetes integration, you’ll want tools or platforms with it baked in.
3) Wide-Ranging OS and Hardware Support
It seems obvious, but any development tool must be compatible with your machine to be useful. You’ll need to choose the correct download package for your desktop OS — whether you’re running Windows, macOS, or a Linux distro.
From a collaborative standpoint, any application that supports all major operating systems is much more valuable. That flexibility means that developers with varied workstation setups can use it — and it even helps drive adoption. It’s much easier to lobby for your favorite developer tool when everyone can use it. Plus, working alongside other developers on one platform is much easier than building a “bridge” between two radically different, OS-specific tools.
OS aside, many apps have binaries tailored to specific hardware components — like Apple’s M-series Arm processors. Alternative packages may favor x86 architectures. These customized installs can deliver performance optimizations that you wouldn’t get from a universal install. They’re also integral to granting applications low-level permissions and system access needed to work effectively.
4) Multi-Language Support
Before containers, you had to install your desired language or framework locally on your development machine. This often entailed proprietary package managers unique to each language. Unfortunately, failed version upgrades could leave a particular language unusable and hard to remove. This can bloat any OS over time — and eventually require a fresh install.
Today, there are hundreds of programming languages of varied popularity. No tool can support all of them, but the right tool should support the heaviest hitters — like JavaScript, Python, Java, C, C++, C#, PHP, and others. Even five years ago, many developers reported using seven languages on average per project.
The most important language is the one you’re currently using. And that can change quickly! Consider that Swift and Rust are highly-desired languages, while Kotlin is also gaining steam. Your tools should let you grow and expand your development skill set, instead of being restrictive. Development is often an exploratory process, after all.
5) Easy Debugging
Writing functional code is challenging, but writing “clean” code can be even harder. Even the best developers make mistakes, and those little gremlins become increasingly harder to uncover as source code expands. Software bugs can take a massive amount of time to pinpoint (and fix) as development progresses — consuming up to 50% of a developer’s total bandwidth.
You also have to keep your users in mind, as coding issues can adversely affect your core services. Unfortunately, a missed bug can cause outages and impact people in very real ways. It’s therefore important to remember that bugs can have serious consequences, which makes debugging so critical for all users.
The right tooling should streamline this process. Shift-left testing and real-time linting are good approaches for catching pre-production issues. Devs are doing a better job here overall, but there’s still room for improvement. For example, a developer typically creates 70 bugs per 1,000 lines of code. Fifteen bugs reach end users in production, from there.
Since fixing a bug can take 30 times longer than writing a line of code, automation, collaboration, and targeted debugging features are crucial. You can pour every bit of debugging time you get back into other development tasks. Then, you can focus on shipping new features and improving user experiences.
6) Seamless Tech-Stack Integration
In this bring-your-own-stack (BYOS) world, it’s easy to encounter fragmentation while using platforms and applications in a piecemeal manner. These approaches often require workarounds or, at best, make you hop between windows to get work done.
In that sense, integration doesn’t just mean that one tool or technology meshes well with another. Complete integration describes a scenario where multi-platform functionality is possible through one single interface.
Bouncing between apps for even mundane tasks is frustrating. That’s why API-driven services platforms have become so popular — and why major vendors have opened up their ecosystems to partners or community developers. Your platform should boost your productivity and welcome external integrations with open arms. Similarly, they should fit into your internal and production environments.
This is important if you’re an indie developer or open-source contributor. However, it’s become essential for those working within larger companies — which deploy upwards of 187 applications on average. Consequently, you’ll want your tools to play nicely with numerous technologies.
Know Your Requirements
Building a needs-based tooling strategy is key. Whether you’re a lone developer or a member of a larger development team, take the time to sit down and assess your current situation. What’s working? Where could your tooling strategy improve? Gather feedback and apply those lessons while making decisions.
We’ve heard plenty of feedback ourselves, and have considered the needs of backend developers while developing Docker Desktop. Our goal is to make it easy for you and your team to build, share, and run your applications — and we’re always trying to make Desktop better for you. Make sure to check out our public roadmap and share your suggestions for features you’d love to see most.
Docker Desktop (for Windows, macOS, and now Linux) bundles together local K8s support, the Docker CLI, Docker Extensions (Beta), container management, Dev Environments (Preview), and more to keep you productive. Check out our documentation to learn how Docker Desktop makes development more enjoyable.
Quelle: https://blog.docker.com/feed/

New Extensions and Container Interface Enhancements in Docker Desktop 4.9

We’re excited to announce the launch of Docker Desktop 4.9, and we’re looking forward to you trying it! Here’s what’s coming in our latest launch. 
Manage your containers easily with table view and bulk remove
We’ve made a few user experience enhancements to the containers tab based on all of your awesome feedback. We’re excited to announce that on the Containers tab you can now:

Easily clean up multiple containers simultaneously with multi-select checkboxes

Resize columns to view your complete container and image names. Just drag the dividers in the table header.
Quickly copy your image id and easily paste it elsewhere, like in your terminal


Easily sort columns using header attributes. You can also hide columns to create more space and reduce clutter.

Navigate away from your tab and back to it, without disturbing either sorting and search results. These now remain in place thanks to state persistence!

 
Are you looking for more easy ways to tidy up your resources? Check out our Disk Usage extension in the Extensions Marketplace!
New extensions are joining the lineup
We’re happy to announce the addition of two new extensions to the Extensions Marketplace:

Lens Kubernetes – helps you access and take control of your Kubernetes clusters. Read more about it on the Mirantis website.
Slim.ai – gives you the power to create secure containers faster. Dive deeply into the construction of your images and discover what’s in your containers. Read more about this exciting extension here.

 
Information at a glance with the Docker Dashboard Footer
We’ve revamped the Docker Dashboard Footer to readily display key information about Docker Desktop’s current state, including:

Virtual Machine memory usage
Virtual Machine CPU usage
Docker Desktop version
A quick way to view the tip of the week

 
What else can we improve?
Please share your feedback and suggestions for what we should work on next! You can upvote, comment, or submit new ideas to our public roadmap. To learn more about the contents of Docker Desktop 4.9, check out our release notes.
Looking to get started as a new Docker Desktop user? View our Get Started page and read through our Docker Desktop Overview. 
 
Quelle: https://blog.docker.com/feed/

Automating Your Containers’ Security Scanning

Application development is complex. Teams must juggle numerous processes, gather all dependencies, and package everything together into a performant application. On top of this, each containerized application must satisfy strict security requirements, to protect your users and systems against intrusion.
When it comes to maintaining container security, software bugs are inevitable. They’re often harmless glitches, but some can pose serious security risks — letting bad actors access your systems. Whenever someone discovers a vulnerability within commercial or open-source software, they must register it within the Common Vulnerability and Exposure (CVE) database. There are currently more than 170,000 recorded CVEs, and engineers discovered over 2,083 new ones in March 2022 alone.
In this article, we’ll explore how vulnerabilities impact containers and how using images from trusted sources helps. We’ll then discuss how to use Docker’s native Snyk integration to secure your software supply chain.
The State of Software Security
Developers have increasingly turned to third-party code and applications while building their services. Unfortunately, using third-party software may also expose your code to risk. It’s absolutely essential that you leverage trusted images and secure your containers through ongoing vigilance.
This is why image scanning is so critical — not just early on in development, but throughout an application’s life. Thankfully, Docker customers have access to continuous security scanning that’s integrated into their workflows via Snyk — so you can find and fix vulnerabilities more easily. Whether you’re running conventional containers or Kubernetes applications, our native Snyk integration is valuable throughout the software development lifecycle.
How Vulnerabilities Affect Containers
A Docker container starts with a base image, typically from an online source. Teams then add layers to incorporate the functionality they need. These layers might just be simple commands that perform actions like creating a folder, yet they often pull in additional packages.
Here’s a basic Dockerfile example called good-nodejs:

FROM node:lts-alpine3.15
WORKDIR /workdir
RUN npm i express-openid-connect

 
This file has three layers:

FROM: This instruction initializes a new build stage and prepares the base image for upcoming instructions. Any valid Dockerfile starts with a FROM expression. Our example above uses an official Node.js image built atop Alpine Linux. This image contains everything needed to get up and running with Node. It has multiple layers, which you can see from the size of its Dockerfile. Each layer — from the Alpine Linux OS layer and those that make up Alpine — is a potential vulnerability source.
WORKDIR: This layer sets a working directory. Risks here are minimal or non-existent, since WORKDIR doesn’t introduce any new, external software packages.
RUN: This instructional layer installs another third-party package. It may introduce additional vulnerabilities via the package code, its dependencies, and any other requisite packages.

 
These above layers have a knack for concealing vulnerabilities deep inside an image, where they’re inconspicuous. You may need to perform extensive penetration testing to find them.
Using Trusted Sources
Trusted images that follow image best practices are your most powerful allies when securing your supply chain. Docker Hub provides access to Docker Official Images and Verified Publisher images — denoted by the color-coded badges displayed prominently beside their names.


Docker’s internal teams curate Docker Official Images. We frequently update, scan, and patch these images to galvanize security. Every essential operating system, programming language, middleware, and database is represented.
Docker’s external partners supply Docker Verified Publisher images. When you use these images, you know that they’re sourced authentically and actively maintained. Our program helps ensure that these components are trustworthy. You’ll also find resources from Snyk, similar to those above:


Developers don’t need to have an advanced security background or read CVE reports to fix container issues. This partnership gives Docker developers access to the industry’s most comprehensive, timely, and accurate database of open source and container-vulnerability intelligence.
Our security coverage goes far beyond CVE vulnerabilities and other public databases. Snyk’s in-house research team maintains its database and combines public sources, community contributions, proprietary research, and machine learning to continuously adapt to dynamic security threats.
Identifying Vulnerabilities
Trusted images are great starting points for development, yet they may not be fully functional. You may choose to leverage community-sourced images or those from outside developers instead. Luckily, you can use Docker Hub’s Snyk integration to detect any threats hidden within any images and code. More importantly, our Snyk integration also arms developers with base image fix recommendations and identifies any Dockerfile lines that introduce vulnerabilities.
Automated vulnerability scanning can detect CVEs that find their way into your container images. It’s an essential tool for securing your software supply chain — acting as a front-line defense mechanism as you integrate third-party code into their projects.
This scan works by examining all packages and dependencies defined in your Dockerfile, and checks them against a list of recorded vulnerabilities.
You can enable a repository’s vulnerability scanning in its respective Settings tab.


With scanning enabled, Snyk will automatically analyze any new tags pushed to the repository (like a specific image version or variant).
Consider our basic Dockerfile from earlier. To demonstrate how image scanning works, you can pull an older version of your base image (with known vulnerabilities), and do the same for your npm package:

FROM node:15.9.0-alpine3.13
WORKDIR /workdir
RUN npm i express-openid-connect@2.7.1

 
We can test Snyk’s functionality from here. If you build and push this code to your Docker Hub repository — with the test tag bad-nodejs (alongside good-nodejs from earlier) — you’ll see that Snyk has automatically scanned it. This scan has found 22 high-severity and eight medium-severity vulnerabilities:


You can then dive into the bad-nodejs results to get a breakdown of all vulnerabilities discovered, showing:

Severity
Priority score
CVE number
Package introducing the issue
Package versions with the bug and the fix


When you drill further into a vulnerability, Snyk presents information within a tree-like structure. You can see which package is responsible for introducing the vulnerability. In the example below, apk-tools is importing zlib, which contains an out-of-bounds write vulnerability:


Enabling Continuous Monitoring
Using older image versions to replicate legacy systems is a common practice; it ensures that your applications are backwards compatible. Your workflows might also prioritize stability over new features. Finally, licensing new software versions can be cost-prohibitive for your company, therefore keeping you on an older version.
Building an image with bleeding-edge technologies — and deploying it into production — does introduce some risk. If product development stagnates for an extended period, there’s a high chance that someone will find vulnerabilities in public releases. You wouldn’t know about these vulnerabilities before deployment, since you chose the newest versions.
Using Snyk’s technology, Docker Hub mitigates these risks by periodically re-scanning all repository images. Your Docker Hub subscription grants you Docker Desktop as a local UI. This lets you view recent scan results for images across your organization.
 

Fixing the Container Image via a Web UI
When you push your Dockerfiles to publicly-accessible source control — like GitHub, GitLab, and Bitbucket — you can integrate the code with a free Snyk account and get detailed remediation recommendations. The web UI prompts you to automatically fix vulnerabilities with a pull request into the source code.
 

Fixing the Container Image via the Command Line
Docker Desktop also provides powerful CLI scanning locally. This alternative method lets Snyk examine your Dockerfile and provide detailed recommendations based on its findings. It’s also an essential tool if you’ve embraced a shift-left testing philosophy.
When you scan that aforementioned bad-nodejs image via the command line, you’ll uncover the same vulnerabilities found within Docker Hub:

✗ Critical severity vulnerability found in apk-tools/apk-tools
Description: Out-of-bounds Read
Info: https://snyk.io/vuln/SNYK-ALPINE313-APKTOOLS-1533754
Introduced through: apk-tools/apk-tools@2.12.1-r0
From: apk-tools/apk-tools@2.12.1-r0
Image layer: Introduced by your base image (node:15.9-alpine3.13)
Fixed in: 2.12.6-r0

 
This output shows how the vulnerability was introduced and links to Snyk, where more information is available.
By linking your Dockerfile on the CLI scan, you’ll receive the same upgrade recommendations for your base image as you had earlier.


You’ll find another vulnerability if you scroll further down. Your added npm package introduced the vulnerability after intentionally grabbing an older version. Crucially, Snyk tells you how to fix this.


Next Steps
Security discussions can be both headache inducing and complex in a traditional development environment. Process fragmentation impacts security from one team to the next, and the onus is often on leaders to form a cohesive strategy. However, you should never have to wonder if your teams are building, running, and sharing secure applications.
Accordingly, automated vulnerability scanning helps your organization secure its software supply chain. Docker’s native Snyk integration provides broad oversight of your organization’s image security — detecting vulnerabilities inside dependency layers. Our Docker Extension for Snyk helps you better follow development best practices, while also meeting your compliance requirements. Learn more about getting started with Snyk scanning, and our Docker Extension for Snyk, here.
The integration reduces the time and effort needed to boost security. Your development teams can instead spend their time improving your services. To learn more about Docker’s vulnerability scanning integrations — and how to start securing your images —  browse our documentation.
Quelle: https://blog.docker.com/feed/

Kubernetes Best Practices

spacelift.io – As the most popular container orchestration system, K8s is the de-facto standard for the modern cloud engineer to get to grips with. K8s is a notoriously complex system to use and maintain, so…
Quelle: news.kubernauts.io