Docker Online Meetup #42: Docker Captains Share Tips & Tricks for Using Docker 1.12

For this week’s Online Meetup, Docker Captains Ajeet Singh Raina, Viktor Farcic and Bret Fisher shared their tips and tricks for built In Docker orchestration.
Ajeet talked about the best ways to use Docker 1.12 Service Discovery and shared key takeaways. Viktor talked about best practices for setting a Swarm cluster and integrating it with HAProxy. Bret concluded the meetup with a presentation on Docker 1.12 command options and aliases including cli aliases for quick container management; the shortest path to secure production-ready swarm; how to use cli filters for easier management of larger swarms; and docker remote cli security setup.


Best ways to use Docker 1.12 Service Discovery by Docker Captain Ajeet Raina

Scaling and clustering with Docker Swarm by Docker Captain Viktor Farcic
Docker cli Tips and Tricks by Docker Captain Bret Fisher

Want to learn more about Docker 1.12 and orchestration? Check out these resources:

Docker 1.12.1 on Raspberry Pi 3 in 5 minutes by Docker Captain Ajeet Singh Raina
Docker Docs: Understand Docker container network
Docker 1.12 Release Notes
Docker Blog: Docker 1.12: Now With Built-In Orchestration!
Scale a real microservice with Docker 1.12 Swarm Mode by Docker Captain Alex Ellis
Docker 1.12 orchestration built-in by Docker Captain Gianluca Arbezzano

@BretFisher @ajeetsraina @vfarcic share Tips & Tricks for Using Docker 1.12Click To Tweet

The post Docker Online Meetup : Docker Captains Share Tips &; Tricks for Using Docker 1.12 appeared first on Docker Blog.
Quelle: https://blog.docker.com/feed/
Security Best Practices for Kubernetes Deployment

Editor’s note: today’s post is by Amir Jerbi and Michael Cherny of Aqua Security, describing security best practices for Kubernetes deployments, based on data they’ve collected from various real-life use-cases, in both on-premises and cloud deployments. Kubernetes provides many controls that can greatly improve your application security. Configuring them requires intimate knowledge with Kubernetes and the deployment’s security requirements. The best practices we highlight here are aligned to the container lifecycle: build, ship and run, and are specifically tailored to Kubernetes deployments. We adopted these best practices in our own SaaS deployment that runs Kubernetes on Google Cloud Platform.The following are our recommendations for deploying a secured Kubernetes application:Ensure That Images Are Free of Vulnerabilities Having running containers with vulnerabilities opens your environment to the risk of being easily compromised. Many of the attacks can be mitigated simply by making sure that there are no software components that have known vulnerabilities.Implement Continuous Security Vulnerability Scanning — Containers might include outdated packages with known vulnerabilities (CVEs). This cannot be a ‘one off’ process, as new vulnerabilities are published every day. An ongoing process, where images are continuously assessed, is crucial to insure a required security posture. Regularly Apply Security Updates to Your Environment — Once vulnerabilities are found in running containers, you should always update the source image and redeploy the containers. Try to avoid direct updates (e.g. ‘apt-update’) to the running containers, as this can break the image-container relationship. Upgrading containers is extremely easy with the Kubernetes rolling updates feature – this allows gradually updating a running application by upgrading its images to the latest version.Ensure That Only Authorized Images are Used in Your EnvironmentWithout a process that ensures that only images adhering to the organization’s policy are allowed to run, the organization is open to risk of running vulnerable or even malicious containers. Downloading and running images from unknown sources is dangerous. It is equivalent to running software from an unknown vendor on a production server. Don’t do that.Use private registries to store your approved images – make sure you only push approved images to these registries. This alone already narrows the playing field, reducing the number of potential images that enter your pipeline to a fraction of the hundreds of thousands of publicly available images. Build a CI pipeline that integrates security assessment (like vulnerability scanning), making it part of the build process.  The CI pipeline should ensure that only vetted code (approved for production) is used for building the images. Once an image is built, it should be scanned for security vulnerabilities, and only if no issues are found then the image would be pushed to a private registry, from which deployment to production is done. A failure in the security assessment should create a failure in the pipeline, preventing images with bad security quality from being pushed to the image registry.There is work in progress being done in Kubernetes for image authorization plugins (expected in Kubernetes 1.4), which will allow preventing the shipping of unauthorized images. For more info see this pull request.Limit Direct Access to Kubernetes NodesYou should limit SSH access to Kubernetes nodes, reducing the risk for unauthorized access to host resource. Instead you should ask users to use “kubectl exec”, which will provide direct access to the container environment without the ability to access the host.You can use Kubernetes Authorization Plugins to further control user access to resources. This allows defining fine-grained-access control rules for specific namespace, containers and operations.Create Administrative Boundaries between ResourcesLimiting the scope of user permissions can reduce the impact of mistakes or malicious activities. A Kubernetes namespace allows you to partition created resources into logically named groups. Resources created in one namespace can be hidden from other namespaces. By default, each resource created by a user in Kubernetes cluster runs in a default namespace, called default. You can create additional namespaces and attach resources and users to them. You can use Kubernetes Authorization plugins to create policies that segregate access to namespace resources between different users.For example: the following policy will allow ‘alice’ to read pods from namespace ‘fronto’.{  “apiVersion”: “abac.authorization.kubernetes.io/v1beta1″,  “kind”: “Policy”,  “spec”: {    “user”: “alice”,    “namespace”: “fronto”,    “resource”: “pods”,    “readonly”: true  }}Define Resource QuotaAn option of running resource-unbound containers puts your system in risk of DoS or “noisy neighbor” scenarios. To prevent and minimize those risks you should define resource quotas. By default, all resources in Kubernetes cluster are created with unbounded CPU and memory requests/limits. You can create resource quota policies, attached to Kubernetes namespace, in order to limit the CPU and memory a pod is allowed to consume.The following is an example for namespace resource quota definition that will limit number of pods in the namespace to 4, limiting their CPU requests between 1 and 2 and memory requests between 1GB to 2GB.compute-resources.yaml:apiVersion: v1kind: ResourceQuotametadata:  name: compute-resourcesspec:  hard:    pods: “4”    requests.cpu: “1”    requests.memory: 1Gi    limits.cpu: “2”    limits.memory: 2GiAssign a resource quota to namespace:kubectl create -f ./compute-resources.yaml –namespace=myspaceImplement Network SegmentationRunning different applications on the same Kubernetes cluster creates a risk of one compromised application attacking a neighboring application. Network segmentation is important to ensure that containers can communicate only with those they are supposed to. One of the challenges in Kubernetes deployments is creating network segmentation between pods, services and containers. This is a challenge due to the “dynamic” nature of container network identities (IPs), along with the fact that containers can communicate both inside the same node or between nodes.Users of Google Cloud Platform can benefit from automatic firewall rules, preventing cross-cluster communication. A similar implementation can be deployed on-premises using network firewalls or SDN solutions. There is work being done in this area by the Kubernetes Network SIG, which will greatly improve the pod-to-pod communication policies. A new network policy API should address the need to create firewall rules around pods, limiting the network access that a containerized can have.The following is an example of a network policy that controls the network for “backend” pods, only allowing inbound network access from “frontend” pods:POST /apis/net.alpha.kubernetes.io/v1alpha1/namespaces/tenant-a/networkpolicys{  “kind”: “NetworkPolicy”,  “metadata”: {    “name”: “pol1″  },  “spec”: {    “allowIncoming”: {      “from”: [{        “pods”: { “segment”: “frontend” }      }],      “toPorts”: [{        “port”: 80,        “protocol”: “TCP”      }]    },    “podSelector”: {      “segment”: “backend”    }  }}Read more about Network policies here.Apply Security Context to Your Pods and ContainersWhen designing your containers and pods, make sure that you configure the security context for your pods, containers and volumes. A security context is a property defined in the deployment yaml. It controls the security parameters that will be assigned to the pod/container/volume. Some of the important parameters are:Security Context SettingDescriptionSecurityContext->runAsNonRootIndicates that containers should run as non-root userSecurityContext->CapabilitiesControls the Linux capabilities assigned to the container.SecurityContext->readOnlyRootFilesystemControls whether a container will be able to write into the root filesystem.PodSecurityContext->runAsNonRootPrevents running a container with ‘root’ user as part of the podThe following is an example for pod definition with security context parameters:apiVersion: v1kind: Podmetadata:  name: hello-worldspec:  containers:  # specification of the pod’s containers  # …  securityContext:    readOnlyRootFilesystem: true    runAsNonRoot: trueReference here. In case you are running containers with elevated privileges (–privileged) you should consider using the “DenyEscalatingExec” admission control. This control denies exec and attach commands to pods that run with escalated privileges that allow host access. This includes pods that run as privileged, have access to the host IPC namespace, and have access to the host PID namespace. For more details on admission controls, see the Kubernetes documentation. Log EverythingKubernetes supplies cluster-based logging, allowing to log container activity into a central log hub. When a cluster is created, the standard output and standard error output of each container can be ingested using a Fluentd agent running on each node into either Google Stackdriver Logging or into Elasticsearch and viewed with Kibana.SummaryKubernetes supplies many options to create a secured deployment. There is no one-size-fit-all solution that can be used everywhere, so a certain degree of familiarity with these options is required, as well as an understanding of how they can enhance your application’s security.We recommend implementing the best practices that were highlighted in this blog, and use Kubernetes flexible configuration capabilities to incorporate security processes into the continuous integration pipeline, automating the entire process with security seamlessly “baked in”.–Michael Cherny, Head of Security Research, and Amir Jerbi, CTO and co-founder Aqua SecurityDownload KubernetesGet involved with the Kubernetes project on GitHub Post questions (or answer questions) on Stack Overflow Connect with the community on SlackFollow us on Twitter @Kubernetesio for latest updates
Quelle: kubernetes

New Dockercast episode with Avi Cavale from Shippable

In case you missed it, we launched , the official Docker Podcast earlier this month including all the DockerCon 2016 sessions available as podcast episodes.

In this podcast episode, we catch up with Avi Cavale the Co-founder & CEO at Shippable. We start off with a conversation where I ask him why he thinks there has been such an explosion of Docker adoption.  This leads us into the the ideas behind immutable infrastructure and immutable delivery models. Avi discusses how Shippable has focused on making the delivery pipeline easier for developers.
We also discuss some anti-patterns he calls Frankenstein Continuous Integration (CI) where, although Jenkins is awesome, the glue to put a robust CI system together can be reasonably complex. What Shippable tried to do is abstract away some of those complexities for developers.  We end up talking about different Docker patterns Shippable is seeing in the industry.
You can find the latest Dockercast episodes on the Itunes Store or via the SoundCloud RSS feed.


New dockercast episode w/ host @botchagalupe & @avinci from @beshippable as a guest!Click To Tweet

The post New Dockercast episode with Avi Cavale from Shippable appeared first on Docker Blog.
Quelle: https://blog.docker.com/feed/

Scaling Stateful Applications using Kubernetes Pet Sets and FlexVolumes with Datera Elastic Data Fabric

Editor’s note: today’s guest post is by Shailesh Mittal, Software Architect and Ashok Rajagopalan, Sr Director Product at Datera Inc, talking about Stateful Application provisioning with Kubernetes on Datera Elastic Data Fabric. IntroductionPersistent volumes in Kubernetes are foundational as customers move beyond stateless workloads to run stateful applications. While Kubernetes has supported stateful applications such as MySQL, Kafka, Cassandra, and Couchbase for a while, the introduction of Pet Sets has significantly improved this support. In particular, the procedure to sequence the provisioning and startup, the ability to scale and associate durably by Pet Sets has provided the ability to automate to scale the “Pets” (applications that require consistent handling and durable placement). Datera, elastic block storage for cloud deployments, has seamlessly integrated with Kubernetes through the FlexVolume framework. Based on the first principles of containers, Datera allows application resource provisioning to be decoupled from the underlying physical infrastructure. This brings clean contracts (aka, no dependency or direct knowledge of the underlying physical infrastructure), declarative formats, and eventually portability to stateful applications.While Kubernetes allows for great flexibility to define the underlying application infrastructure through yaml configurations, Datera allows for that configuration to be passed to the storage infrastructure to provide persistence. Through the notion of Datera AppTemplates, in a Kubernetes environment, stateful applications can be automated to scale. Deploying Persistent StoragePersistent storage is defined using the Kubernetes PersistentVolume subsystem. PersistentVolumes are volume plugins and define volumes that live independently of the lifecycle of the pod that is using it. They are implemented as NFS, iSCSI, or by cloud provider specific storage system. Datera has developed a volume plugin for PersistentVolumes that can provision iSCSI block storage on the Datera Data Fabric for Kubernetes pods.The Datera volume plugin gets invoked by kubelets on minion nodes and relays the calls to the Datera Data Fabric over its REST API. Below is a sample deployment of a PersistentVolume with the Datera plugin:  apiVersion: v1  kind: PersistentVolume  metadata:    name: pv-datera-0  spec:    capacity:      storage: 100Gi    accessModes:      – ReadWriteOnce    persistentVolumeReclaimPolicy: Retain    flexVolume:      driver: “datera/iscsi”      fsType: “xfs”      options:        volumeID: “kube-pv-datera-0″        size: “100″        replica: “3”        backstoreServer: “tlx170.tlx.daterainc.com:7717”This manifest defines a PersistentVolume of 100 GB to be provisioned in the Datera Data Fabric, should a pod request the persistent storage.[root@tlx241 /]# kubectl get pvNAME          CAPACITY   ACCESSMODES   STATUS      CLAIM     REASON    AGEpv-datera-0   100Gi        RWO         Available                       8spv-datera-1   100Gi        RWO         Available                       2spv-datera-2   100Gi        RWO         Available                       7spv-datera-3   100Gi        RWO         Available                       4sConfigurationThe Datera PersistenceVolume plugin is installed on all minion nodes. When a pod lands on a minion node with a valid claim bound to the persistent storage provisioned earlier, the Datera plugin forwards the request to create the volume on the Datera Data Fabric. All the options that are specified in the PersistentVolume manifest are sent to the plugin upon the provisioning request.Once a volume is provisioned in the Datera Data Fabric, volumes are presented as an iSCSI block device to the minion node, and kubelet mounts this device for the containers (in the pod) to access it.Using Persistent StorageKubernetes PersistentVolumes are used along with a pod using PersistentVolume Claims. Once a claim is defined, it is bound to a PersistentVolume matching the claim’s specification. A typical claim for the PersistentVolume defined above would look like below:kind: PersistentVolumeClaimapiVersion: v1metadata:  name: pv-claim-test-petset-0spec:  accessModes:    – ReadWriteOnce  resources:    requests:      storage: 100GiWhen this claim is defined and it is bound to a PersistentVolume, resources can be used with the pod specification:[root@tlx241 /]# kubectl get pvNAME          CAPACITY   ACCESSMODES   STATUS      CLAIM                            REASON    AGEpv-datera-0   100Gi      RWO           Bound       default/pv-claim-test-petset-0             6mpv-datera-1   100Gi      RWO           Bound       default/pv-claim-test-petset-1             6mpv-datera-2   100Gi      RWO           Available                                              7spv-datera-3   100Gi      RWO           Available                                              4s[root@tlx241 /]# kubectl get pvcNAME                     STATUS    VOLUME        CAPACITY   ACCESSMODES   AGEpv-claim-test-petset-0   Bound     pv-datera-0   0                        3mpv-claim-test-petset-1   Bound     pv-datera-1   0                        3mA pod can use a PersistentVolume Claim like below:apiVersion: v1kind: Podmetadata:  name: kube-pv-demospec:  containers:  – name: data-pv-demo    image: nginx    volumeMounts:    – name: test-kube-pv1      mountPath: /data    ports:    – containerPort: 80  volumes:  – name: test-kube-pv1    persistentVolumeClaim:      claimName: pv-claim-test-petset-0The result is a pod using a PersistentVolume Claim as a volume. It in-turn sends the request to the Datera volume plugin to provision storage in the Datera Data Fabric.[root@tlx241 /]# kubectl describe pods kube-pv-demoName:       kube-pv-demoNamespace:  defaultNode:       tlx243/172.19.1.243Start Time: Sun, 14 Aug 2016 19:17:31 -0700Labels:     <none>Status:     RunningIP:         10.40.0.3Controllers: <none>Containers:  data-pv-demo:    Container ID: docker://ae2a50c25e03143d0dd721cafdcc6543fac85a301531110e938a8e0433f74447    Image:   nginx    Image ID: docker://sha256:0d409d33b27e47423b049f7f863faa08655a8c901749c2b25b93ca67d01a470d    Port:    80/TCP    State:   Running      Started:  Sun, 14 Aug 2016 19:17:34 -0700    Ready:   True    Restart Count:  0    Environment Variables:  <none>Conditions:  Type           Status  Initialized    True  Ready          True  PodScheduled   TrueVolumes:  test-kube-pv1:    Type:  PersistentVolumeClaim (a reference to a PersistentVolumeClaim in the same namespace)    ClaimName:   pv-claim-test-petset-0    ReadOnly:    false  default-token-q3eva:    Type:        Secret (a volume populated by a Secret)    SecretName:  default-token-q3eva    QoS Tier:  BestEffortEvents:  FirstSeen LastSeen Count From SubobjectPath Type Reason Message  ——— ——– —– —- ————- ——– —— ——-  43s 43s 1 {default-scheduler } Normal Scheduled Successfully assigned kube-pv-demo to tlx243  42s 42s 1 {kubelet tlx243} spec.containers{data-pv-demo} Normal Pulling pulling image “nginx”  40s 40s 1 {kubelet tlx243} spec.containers{data-pv-demo} Normal Pulled Successfully pulled image “nginx”  40s 40s 1 {kubelet tlx243} spec.containers{data-pv-demo} Normal Created Created container with docker id ae2a50c25e03  40s 40s 1 {kubelet tlx243} spec.containers{data-pv-demo} Normal Started Started container with docker id ae2a50c25e03The persistent volume is presented as iSCSI device at minion node (tlx243 in this case):[root@tlx243 ~]# lsscsi[0:2:0:0]    disk    SMC      SMC2208          3.24  /dev/sda [11:0:0:0]   disk    DATERA   IBLOCK           4.0   /dev/sdb[root@tlx243 datera~iscsi]# mount | grep sdb/dev/sdb on /var/lib/kubelet/pods/6b99bd2a-628e-11e6-8463-0cc47ab41442/volumes/datera~iscsi/pv-datera-0 type xfs (rw,relatime,attr2,inode64,noquota)Containers running in the pod see this device mounted at /data as specified in the manifest:[root@tlx241 /]# kubectl exec kube-pv-demo -c data-pv-demo -it bashroot@kube-pv-demo:/# mount | grep data/dev/sdb on /data type xfs (rw,relatime,attr2,inode64,noquota)Using Pet SetsTypically, pods are treated as stateless units, so if one of them is unhealthy or gets superseded, Kubernetes just disposes it. In contrast, a PetSet is a group of stateful pods that has a stronger notion of identity. The goal of a PetSet is to decouple this dependency by assigning identities to individual instances of an application that are not anchored to the underlying physical infrastructure.A PetSet requires {0..n-1} Pets. Each Pet has a deterministic name, PetSetName-Ordinal, and a unique identity. Each Pet has at most one pod, and each PetSet has at most one Pet with a given identity. A PetSet ensures that a specified number of “pets” with unique identities are running at any given time. The identity of a Pet is comprised of:a stable hostname, available in DNSan ordinal indexstable storage: linked to the ordinal & hostnameA typical PetSet definition using a PersistentVolume Claim looks like below:# A headless service to create DNS recordsapiVersion: v1kind: Servicemetadata:  name: test-service  labels:    app: nginxspec:  ports:  – port: 80    name: web  clusterIP: None  selector:    app: nginx—apiVersion: apps/v1alpha1kind: PetSetmetadata:  name: test-petsetspec:  serviceName: “test-service”  replicas: 2  template:    metadata:      labels:        app: nginx      annotations:        pod.alpha.kubernetes.io/initialized: “true”    spec:      terminationGracePeriodSeconds: 0      containers:      – name: nginx        image: gcr.io/google_containers/nginx-slim:0.8        ports:        – containerPort: 80          name: web        volumeMounts:        – name: pv-claim          mountPath: /data  volumeClaimTemplates:  – metadata:      name: pv-claim      annotations:        volume.alpha.kubernetes.io/storage-class: anything    spec:      accessModes: [ “ReadWriteOnce” ]      resources:        requests:          storage: 100GiWe have the following PersistentVolume Claims available:[root@tlx241 /]# kubectl get pvcNAME                     STATUS    VOLUME        CAPACITY   ACCESSMODES   AGEpv-claim-test-petset-0   Bound     pv-datera-0   0                        41mpv-claim-test-petset-1   Bound     pv-datera-1   0                        41mpv-claim-test-petset-2   Bound     pv-datera-2   0                        5spv-claim-test-petset-3   Bound     pv-datera-3   0                        2sWhen this PetSet is provisioned, two pods get instantiated:[root@tlx241 /]# kubectl get podsNAMESPACE     NAME                        READY     STATUS    RESTARTS   AGEdefault       test-petset-0               1/1       Running   0          7sdefault       test-petset-1               1/1       Running   0          3sHere is how the PetSet test-petset instantiated earlier looks like:[root@tlx241 /]# kubectl describe petset test-petsetName: test-petsetNamespace: defaultImage(s): gcr.io/google_containers/nginx-slim:0.8Selector: app=nginxLabels: app=nginxReplicas: 2 current / 2 desiredAnnotations: <none>CreationTimestamp: Sun, 14 Aug 2016 19:46:30 -0700Pods Status: 2 Running / 0 Waiting / 0 Succeeded / 0 FailedNo volumes.No events.Once a PetSet is instantiated, such as test-petset below, upon increasing the number of replicas (i.e. the number of pods started with that PetSet), more pods get instantiated and more PersistentVolume Claims get bound to new pods:[root@tlx241 /]# kubectl patch petset test-petset -p'{“spec”:{“replicas”:”3″}}'”test-petset” patched[root@tlx241 /]# kubectl describe petset test-petsetName: test-petsetNamespace: defaultImage(s): gcr.io/google_containers/nginx-slim:0.8Selector: app=nginxLabels: app=nginxReplicas: 3 current / 3 desiredAnnotations: <none>CreationTimestamp: Sun, 14 Aug 2016 19:46:30 -0700Pods Status: 3 Running / 0 Waiting / 0 Succeeded / 0 FailedNo volumes.No events.[root@tlx241 /]# kubectl get podsNAME                        READY     STATUS    RESTARTS   AGEtest-petset-0               1/1       Running   0          29mtest-petset-1               1/1       Running   0          28mtest-petset-2               1/1       Running   0          9sNow the PetSet is running 3 pods after patch application.When the above PetSet definition is patched to have one more replica, it introduces one more pod in the system. This in turn results in one more volume getting provisioned on the Datera Data Fabric. So volumes get dynamically provisioned and attached to a pod upon the PetSet scaling up.To support the notion of durability and consistency, if a pod moves from one minion to another, volumes do get attached (mounted) to the new minion node and detached (unmounted) from the old minion to maintain persistent access to the data.ConclusionThis demonstrates Kubernetes with Pet Sets orchestrating stateful and stateless workloads. While the Kubernetes community is working on expanding the FlexVolume framework’s capabilities, we are excited that this solution makes it possible for Kubernetes to be run more widely in the datacenters. Join and contribute: Kubernetes Storage SIG.Download KubernetesGet involved with the Kubernetes project on GitHub Post questions (or answer questions) on Stack Overflow Connect with the community on the k8s SlackFollow us on Twitter @Kubernetesio for latest updates
Quelle: kubernetes

Weekly Roundup | Docker

Here’s the buzz from this week we think you should know about! We shared a preview of Microsoft&;s container monitoring, reviewed the Docker Engine security feature set, and delivered a quick tutorial for getting 1.12.1 running on Raspberry Pi 3. As we begin a new week, let’s recap our top five most-read stories for the week of August 21, 2016:


Docker security: the Docker Engine has strong security default for all containerized applications.

1.12.1 on Raspberry Pi 3: five minute guide for getting Docker 1.12.1 running on Raspberry Pi 3 by Docker Captain Ajeet Singh Raina.

Securing the Enterprise: how Docker’s security features can be used to provide active and continuous security for a software supply chain.

Docker + NATS for Microservices: building a microservices control plane using NATS and Docker v1.12 by Wally Quevedo.

Container Monitoring: Microsoft previews open Docker container monitoring. Aimed at users who want a simplified view of containers’ usage, to diagnose issues whether containers are running in the cloud or on-premises by Sam Dean.  

Weekly roundup: Top 5 Docker stories of the weekClick To Tweet

The post Weekly Roundup | Docker appeared first on Docker Blog.
Quelle: https://blog.docker.com/feed/

Docker Labs Repo Continues to Grow

Back in May, we launched the Docker Labs repo in an effort to provide the community with a central place to both learn from and contribute to Docker tutorials. We now have 16 separate labs and tutorials, with 16 different contributors, both from Docker and from the community. And it all started with a birthday party.
Back in March, Docker celebrated it’s third birthday with more than 125 events around the world to teach new users how to use Docker. The tutorial was very popular, and we realized people would like this kind of content. So we migrated it to the labs repository as a beginner tutorial. Since then, we’ve added tutorials on using .NET and Windows containers, Docker for Java developers, our DockerCon labs and much more.
 
 
Today we wanted to call out a new series of tutorials on developer tools. We’re starting with three tutorials for Java Developers on in-container debugging strategies. Docker for Mac and Docker for Windows introduced improved volume management, which allows you to debug live in a container while using your favorite IDE.
We try our best to continuously update these tutorials and add new ones but definitely welcome external contributions. What’s your favorite language, IDE, text editor, or CI/CD platform? Any specific steps or configuration needed? Don&;t hesitate to submit a pull request and share your knowledge with the community.
The post Docker Labs Repo Continues to Grow appeared first on Docker Blog.
Quelle: https://blog.docker.com/feed/

Docker Online Meetup #41: Deep Dive into Docker 1.12 Networking

For this week’s Online Meetup, Sr. Director, Networking at Docker, Madhu Venugopal, joined us to talk about Docker 1.12 Networking and answer questions.
Starting with Docker 1.12, Docker has added features to the core Docker Engine to make multi-host and multi-container orchestration simple to use and accessible to everyone. Docker 1.12 Networking plays a key role in enabling these orchestration features.
In this online meetup, we learned all the new and exciting networking features introduced in Docker 1.12:

Swarm-mode networking
Routing Mesh
Ingress and Internal Load-Balancing
Service Discovery
Encrypted Network Control-Plane and Data-Plane
Multi-host networking without external KV-Store
MACVLAN Driver

 
The number of questions Madhu got at the end of the online meetup was amazing and because he did not have time to answer all of them, we&;ve added the rest of the Q&A below:
Q: Will you address the DNS configuration in Docker? We have two apps created with docker compose and would like to enable communication and DNS resolution from containers in one of the apps to containers in the other app.
Check out the PTAL external network feature in docker compose in the Docker docs to get started. If that does not satisfy your requirement, please raise an issue in docker/docker.
Q: What mechanism is used to register the different docker instances with each other so that they recognize a shared network between hosts, please?
Docker swarm-mode uses Raft and GRPC to communicate between docker instances. That’s how the nodes in the cluster exchange data and recognize shared network. At the data-plane, overlay driver uses VXLAN tunnels to provide per-network multi-host connectivity and isolation.
Q: Does it work with NSX?
This question is related to network plugins and the community has developed OVS & OVN plugins.  We are not sure if NSX integration is feasible through that.  Typically vendor plugin are created and maintained by the vendor directly.
Q: Is there a way to see all records registered in Docker internal DNS?  Is it exposed via API so it can be queried?
The Internal DNS is not exposed but network inspect and service inspect APIs can be used to gather this information.
Q: Has swarm mode created dependency of docker-engine on iptables?
Docker Engines has been using iptables since 1.0 for the bridge driver. Swarm mode merely makes use of iptables to provide functionality like the routing mesh.
Q: Can I have only 2 nodes in swarm and both are managers and node themselves as well?
Docker recommends an odd number of manager nodes as the Raft consensus requires majority consensus and to take full advantage of the fault tolerance features of swarm mode.  Please read through https://docs.docker.com/engine/swarm/raft/ for more information.
Q: Wil making ports into a cluster wide resources limit the number of total services whereas using public VIPs is expandable?
Yes.  Docker does not control public VIP so it needs to be managed external to the docker cluster. However, only front-end services require port-publishing & only those services that requires port-publishing will be participating in the Routing Mesh. Back-end services do not reserve cluster-wide ports.
Q: Can I plumb more than one IP per container while only using one network?
At the moment, libnetwork supports one routable IP per endpoint (per network). But users can configure many more link-local ip-addresses to the same endpoint. If you are interested in discussing this capability further, please open an enhancement request in docker/docker.
Q: Can you insert records into DNS to cause static IPs to be used?
Docker doesn’t expose embedded DNS APIs externally. Users can provide external DNS using the –dns option and one can insert custom name-lookup entries in the external DNS server which will be used by the containers.
Q: Can you talk more about automatic key rotation for secure networks? How often does it occur and is the interval configurable? What process(es) are responsible for key rotation?  How are the keys circulated throughout the cluster?
Please read the Overlay Security Model on the Docker Docs. Currently this is not configurable, but we are working on the configurability of this and other swarm mode features. Key-rotation is entirely handled by manager node process (swarmkit) and is distributed in the secured grpc channel established between the manager and workers.
Q: Regarding front end ports, is there a limitation on the number of port 80&8217;s you can listen on?
Yes. The best way to mitigate that is to run a global nginx or haproxy or other reverse-proxy service and back the backend services by the host-header.
Have a question that wasn’t answered or a specific requirement? Check out the Docker Forums or open an issue on GitHub.

Watch @MadhuVenugopal to learn about the new networking features introduced in docker 1.12Click To Tweet

Want to learn more about Docker 1.12 and networking? Check out these resources:

Docker 1.12 Networking Model Overview by Docker Captain Ajeet Singh Raina
Docker Docs: Understand Docker container network
Docker 1.12 Release Notes
Docker Blog: Docker 1.12: Now With Built-In Orchestration!
Scale a real microservice with Docker 1.12 Swarm Mode by Docker Captain Alex Ellis
Docker 1.12 orchestration built-in by Docker Captain Gianluca Arbezzano

The post Docker Online Meetup : Deep Dive into Docker 1.12 Networking appeared first on Docker Blog.
Quelle: https://blog.docker.com/feed/
The Dockerizing of VMworld 2016

Containers have landed&;in VMs in the enterprise.

Docker’s adoption continues to grow in the enterprise. There have been over 5 billion images pulls, and 60% of users are running Docker in production environments. Today Docker is run everywhere &; from development to production; in the cloud, on virtual machines and bare-metal servers. Enterprise application teams around the world are seeing the value of Docker containers and how they help them containerize their existing applications to save money and better utilize infrastructure resources.
To get the latest with Docker and vms stop by our Docker booth at VMworld. Containers and vms are different but are complementary when it comes to application deployment. With their ability to optimize infrastructure resources, accelerate deployment and provide additional security, Docker containers bring some serious benefits to virtualized workloads within enterprise environments. Additionally, a Dockerized workload gains portability as containers move from VMs or bare metal systems, on prem or in the cloud. That same platform serves as the foundation for your new microservices applications as well.
 
The Docker booth experience you won’t want to miss:
Live demos &8211; Three live  demos will be featured in the booth, including:

Deploy your very first Docker container with a quick hands on tutorial
The latest Docker 1.12 with built in orchestration for intelligent host clustering and application scheduling
Witness how Docker delivers security and manageability at scale for the Enterprise with Docker Datacenter

Onsite Docker wizards from the Docker team to answer questions and provide 1:1 whiteboard session
Docker T-shirts and Swag (while supplies last) &8211; We think Moby Dock is pretty cool and have some great new t-shirts to share with you&8230;but you’re going to have to take a !
To get you prepped for Docker at VMworld 2016 we’ve included a reading list of three blogs. These will teach you about the technical differences between containers and VMs, and how you can leverage Docker containers and vms together to achieve better resource utilization.
Here are the reads:

Containers are not VMs &8211; This blog explains the technical difference between Docker containers and virtual machines
Containers and VMs Together &8211; This blog explains how containers and VMs can be used together to help you optimize your infrastructure.
Containerization for the Virtualization Admin &8211; This blog includes a replay of the Containers for The Virtualization Admin webinar.

Take a look at the image below. On the left side you’ll see containerization without vms. Notice how the Docker engine installs directly on the host OS, and how the three containerized applications running are completely isolated. On the right side you’ll see containerization combined with virtualization. Multiple docker containers can run within VMs. This enables you to better utilize your infrastructure resources.

But it’s more than just Docker containers…
Enterprise needs include security, scalability and application management. To meet these needs our customers have turned to Docker Datacenter, our commercial platform for Containers as a Service. This integrated platform is designed to take containerized applications from development to production.  With everything from built in cluster/application orchestration to integrated end-to-end security, Docker Datacenter provides the enterprise grade controls IT ops need without sacrificing the agility and portability that the business requires in order to outpace competition.
We’re looking forward to seeing you at VMworld 2016 at booth 2362!
 
Additional Docker Resources

Watch How ADP uses Docker Datacenter
Download the Docker Datacenter Datasheet
Learn more about Infrastructure Optimization with Docker

The post The Dockerizing of VMworld 2016 appeared first on Docker Blog.
Quelle: https://blog.docker.com/feed/
Your Software is Safer in Docker Containers

The security philosophy is Secure by Default. Meaning security should be inherent in the platform for all applications and not a separate solution that needs to be deployed, configured and integrated.
Today, Docker Engine supports all of the isolation features available in the Linux kernel. Not only that, but we’ve supported a simple user experience by implementing default configurations that provide greater protection for applications running within the Docker Engine, making strong security default for all containerized applications while still leaving the controls with the admin to change configurations and policies as needed.
But don’t take our word for it.  Two independent groups have evaluated Docker Engine for you and recently released statements about the inherent security value of Docker.
Gartner analyst Joerg Fritsch recently published a new paper titled How to Secure Docker Containers in Operation on this blog post.  In it Fritsch states the following:
“Gartner asserts that applications deployed in containers are more secure than applications deployed on the bare OS” because even if a container is cracked “they greatly limit the damage of a successful compromise because applications and users are isolated on a per-container basis so that they cannot compromise other containers or the host OS”.
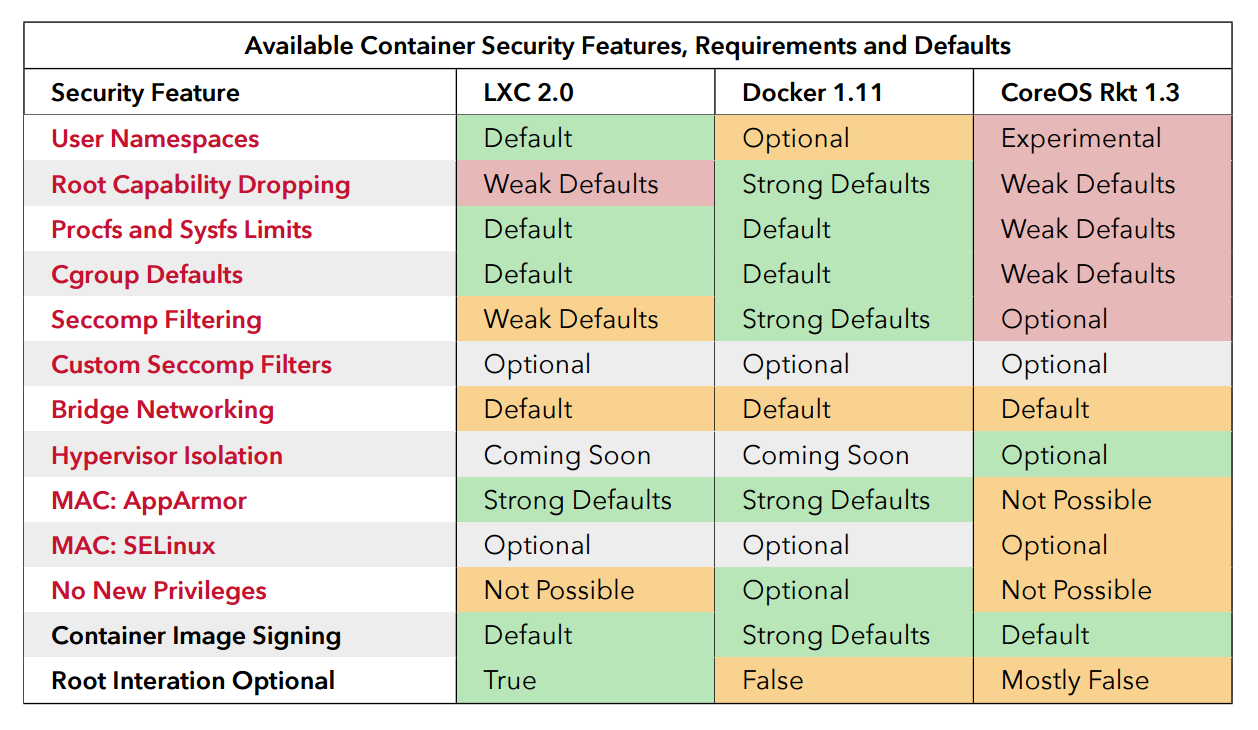
Additionally, NCC Group contrasted the security features and defaults of container platforms and published the findings in the paper “Understanding and Hardening Linux Containers.” Included is an examination of attack surfaces, threats, related hardening features, a contrast of different defaults and recommendations across different container platforms. A key takeaway from this examination is the recommendation that applications are more secure by running in some form of Linux container than without.
“Containers offer many overall advantages. From a security perspective, they create a method to reduce attack surfaces and isolate applications to only the required components, interfaces, libraries and network connections.”
“In this modern age, I believe that there is little excuse for not running a Linux application in some form of a Linux container, MAC or lightweight sandbox.”
– Aaron Grattafiori, NCC Group

The chart below depicts the outcome of the security evaluation of three container platforms.  Docker Engine was found to have a more comprehensive feature set with strong defaults.
 

Source: Understanding and Hardening Linux Containers

The Docker security philosophy of “Secure by Default” spans across the concepts of secure platform, secure content and secure access to deliver a modern software supply chain for the enterprise that is fundamentally secure.  Built on a secure foundation with support for every Linux isolation feature, Docker Datacenter delivers additional features like application scanning, signing, role based access control (RBAC) and secure cluster configurations for complete lifecycle security. Leading enterprises like ADP trust Docker Datacenter to help harden the containers that process paychecks, manage benefits and store the most sensitive data for millions of employees across thousands of employers.

Your apps are safer and more secure in Docker containers To Tweet

More Resources:

Read the Container Isolation White Paper
Learn how Docker secures your software supply chain
ADP hardens enterprise containers with Docker Datacenter
Try Docker Datacenter free for 30 days

The post Your Software is Safer in Docker Containers appeared first on Docker Blog.
Quelle: https://blog.docker.com/feed/
Securing the Enterprise Software Supply Chain Using Docker

At we have spent a lot of time discussing runtime security and isolation as a core part of the container architecture. However that is just one aspect of the total software pipeline. Instead of a one time flag or setting, we need to approach security as something that occurs at every stage of the application lifecycle. Organizations must apply security as a core part of the software supply chain where people, code and infrastructure are constantly moving, changing and interacting with each other.
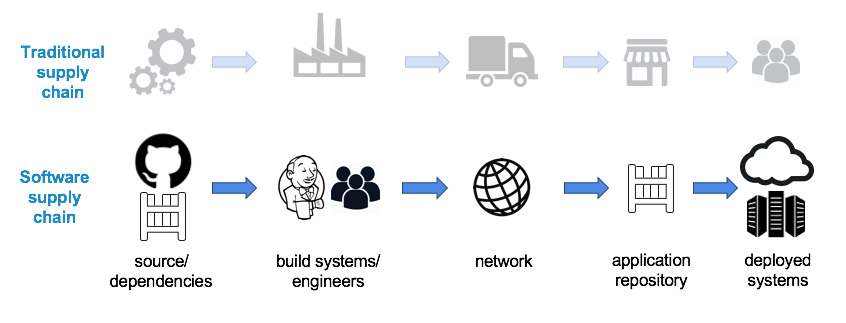
If you consider a physical product like a phone, it’s not enough to think about the security of the end product. Beyond the decision of what kind of theft resistant packaging to use, you might want to know  where the materials are sourced from and how they are assembled, packaged, transported. Additionally it is important to ensure that  the phone is not tampered with or stolen along the way.

The software supply chain maps almost identically to the supply chain for a physical product. You have to be able to identify and trust the raw materials (code, dependencies, packages), assemble them together, ship them by sea, land, or air (network) to a store (repository) so the item (application) can be sold (deployed) to the end customer.
Securing the software supply chain is also also quite similar.  You have to:

Identify all the stuff in your pipeline; from people, code, dependencies, to infrastructure
Ensure a consistent and quality build process
Protect the product while in storage and transit
Guarantee and validate the final product at delivery against a bill of materials

In this post we will explain how Docker’s security features can be used to provide active and continuous security for a software supply chain.
Identity
The foundation of the entire pipeline is built on identity and access. You fundamentally need to know who has access to what assets and can run processes against them. The Docker architecture has a distinct identity concept that underpins the security strategy for securing your software supply chain: cryptographic keys allows the publisher to sign images to ensure proof-of-origin, authenticity, and provenance for Docker images.
Consistent Builds: Good Input = Good Output
Establishing consistent builds allow you to create a repeatable process and get control of your application dependencies and components to make it easier to test for defects and vulnerabilities. When you have a clear understanding of your components, it becomes easier to identify the things that break or are anomalous.

To get consistent builds, you have to ensure you are adding good components:

Evaluate the quality of the dependency, make sure it is the most recent/compatible version and test it with your software
Authenticate that the component comes from a source you expect and was not corrupted or altered in transit
Pin the dependency ensuring subsequent rebuilds are consistent so it is easier to uncover if a defect is caused by a change in code or dependency
Build your image from a trusted, signed base image using Docker Content Trust

Application Signing Seals Your Build
Application signing is the step that effectively “seals” the artifact from the build. By signing the images, you ensure that whomever verifies the signature on the receiving side (docker pull) establishes a secure chain with you (the publisher).  This relationship assures that the images were not altered, added to, or deleted from while stored in a registry or during transit. Additionally, signing indicates that the publisher “approves” that the image you have pulled is good.

Enabling Docker Content Trust on both build machines and the runtime environment sets a policy so that only signed images can be pulled and run on those Docker hosts.  Signed images signal to others in the organization that the publisher (builder) declares the image to be good.
Security Scanning and Gating
Your CI system and developers verify that your build artifact works with the enumerated dependencies, that operations on your application have expected behavior in both the success path and failure path, but have they vetted the dependencies for vulnerabilities?  Have they vetted subcomponents of the dependencies or bundled system libraries for dependencies?  Do they know the licenses for their dependencies? This kind of vetting is almost never done on a regular basis, if at all, since it is a huge overhead on top of already delivering bugfixes and features.

Docker Security Scanning assists in automating the vetting process by scanning the image layers.  Because this happens as the image is pushed to the repo, it acts as a last check or final gate before are deployed into production. Currently available in Docker Cloud and coming soon to Docker Datacenter, Security Scanning creates a Bill of Materials of all of the image’s layers, including packages and versions. This Bill of Materials is used to continuously monitor against a variety of CVE databases.  This ensures that this scanning happens more than once and notifies the system admin or application developer when a new vulnerability is reported for an application package that is in use.
Threshold Signing &; Tying it all Together
One of the strongest security guarantees that comes from signing with Docker Content Trust is the ability to have multiple signers participate in the signing process for a container. To understand this, imagine a simple CI process that moves a container image through the following steps:

Automated CI
Docker Security Scanning
Promotion to Staging
Promotion to Production

This simple 4 step process can add a signature after each stage has been completed and verify the every stage of the CI/CD process has been followed.

Image passes CI? Add a signature!
Docker Security Scanning says the image is free of vulnerabilities? Add a signature!
Build successfully works in staging? Add a signature!
Verify the image against all 3 signatures and deploy to production

Now before a build can be deployed to the production cluster, it can be cryptographically verified that each stage of the CI/CD process has signed off on an image.
Conclusion
The Docker platform provide enterprises the ability to layer in security at each step of the software lifecycle.  From establishing trust with their users, to the infrastructure and code, our model gives both freedom and control to the developer and IT teams. From building secure base images to scanning every image to signing every layer, each feature allows IT to layer in a level of trust and guarantee into the application.  As applications move through their lifecycle, their security profile is actively managed, updated and finally gated before it is finally deployed.

Docker secure beyond containers to your entire app pipeline To Tweet

More Resources:

Read the Container Isolation White Paper
ADP hardens enterprise containers with Docker Datacenter
Try Docker Datacenter free for 30 days
Watch this talk from DockerCon 2016

The post Securing the Enterprise Software Supply Chain Using Docker appeared first on Docker Blog.
Quelle: https://blog.docker.com/feed/