Google Cloud establishes European Advisory Board

Customers around the globe turn to Google Cloud as their trusted partner to digitally transform, enable growth, and solve their most critical business problems. To help inform Google Cloud on how it can continually improve the value and experience it delivers for its customers in Europe, the company has set up a European advisory board comprising accomplished leaders from across industries. Rather than representing Google Cloud, the European Advisory Board serves as an important feedback channel and critical voice to the company in Europe, helping ensure its products and services meet European requirements. The group also helps Google Cloud accelerate the understanding of key challenges enterprises across industries and the public sector face and helps further drive the company’s expertise and differentiation in the region.Members of the European Advisory Board offer proven expertise and distinct understanding of key market dynamics in Europe. Google Cloud’s European Advisory Board Members are:Michael Diekmann Michael Diekmann is currently Chairman of the Supervisory Board of Allianz SE, having served as Chairman of the Board of Management and CEO from 2003 to 2015. He is also Vice Chairman of the Supervisory Board of Fresenius SE & Co. KGaA, and a member of the Supervisory Board of Siemens AG. Mr. Diekmann presently holds seats at various international Advisory Boards and is an Honorary Chairman of the International Business Leaders Advisory Council for the Mayor of Shanghai (IBLAC).Brent HobermanBrent Hoberman is Co-Founder and Executive Chairman of Founders Factory (global venture studios, seed programmes and accelerator programmes), Founders Forum (global community of founders, corporates and tech leaders), and firstminute capital ($300m seed fund with global remit, backed by over 100+ unicorn founders). Previously, he co-foundedMade.com in 2010, which went public in 2021 with a valuation of $1.1bn, andlastminute.com in 1998 where he was CEO from its inception and sold it in 2005 to Sabre for $1.1bn. Mr. Hoberman has backed nine unicorns at Seed stage, and technology businesses he has co-founded have raised over $1bn and include Karakuri.Anne-Marie Idrac Anne-Marie Idrac is former Minister of French State for Foreign Trade, Minister of State for Transport, and member of the Assemblée Nationale. Ms. Idrac’s other roles include chair and CEO of RATP and of French Railways SNCF, as well as chair of Toulouse–Blagnac Airport. She is currently a director of Saint Gobain, Total, and Air France KLM. Ms. Idrac also chairs the advisory board of the public affairs school of Sciences Po in Paris, as well as France’s Logistics Association. She is also a special senior representative to the French autonomous vehicles strategy group.Julia Jaekel Julia Jaekel served for almost ten years as CEO of Gruner + Jahr, a leading media and publishing company and held various leadership positions in Bertelsmann SE & Co KGaA, including on the Bertelsmann’s Group Management Committee. She is currently on the Board of Adevinta ASA and Holtzbrinck Publishing Group.Jim Snabe (Lead Advisor) Jim Snabe currently serves as Chairman at Siemens and board member at C3.ai. He is also a member of the World Economic Forum Board of Trustees and Adjunct Professor at Copenhagen Business School. Mr. Snabe was previously co-CEO of SAP and Chairman of A. P. Moller Maersk. Delphine Geny StephannDelphine Gény-Stephann is the former Secretary of State to the Minister of the Economy and Finance in France. She held various leadership positions in Saint-Gobain, including on the group’s General Management Committee. She is currently on the Board of Eagle Genomics, EDF and Thales.Jos WhiteJos White is a founding partner at Notion Capital, a venture capital firm focused on SaaS and Cloud. Jos is a pioneer in Europe’s Internet and SaaS industry having co-founded Star, one of the UK’s first Internet providers and MessageLabs, one of the world’s first SaaS companies, and through Notion who have made more than 70 investments in European SaaS companies including Arqit, CurrencyCloud, Dixa, GoCardless, Mews, Paddle, Unbabel and Yulife.
Quelle: Google Cloud Platform

GKE workload rightsizing — from recommendations to action

Do you know how to rightsize a workload in Kubernetes? If you’re not 100% sure, we have some great news for you! Today, we are launching a fully embedded, out-of-the-box experience to help you with that complex task. When you run your applications on Google Kubernetes Engine (GKE), you now get an end-to-end workflow that helps you discover optimization opportunities, understand workload specific resource request suggestions and, most importantly, act on those recommendations — all in a matter of seconds.This workload optimization workflow helps rightsize applications by looking at Kubernetes resource requests and limits, which are often one of the largest sources of resource waste. Correctly configuring your resource requests can be the difference between an idle cluster and a cluster that has been downscaled in response to actual resource usage.If you’re new to GKE, you can save time and money by following the rightsizer’s recommended resource request settings. If you’re already running workloads on GKE, you can also use it to quickly assess optimization opportunities for your existing deployments.Then, to optimize your workloads even more, combine these new workload rightsizing capabilities with GKE Autopilot, which is priced based on Pod resource requests. With GKE Autopilot, any optimizations you make to your Pod resource requests (assuming they are over the minimum) are directly reflected on your bill.We’re also introducing a new metric for Cloud Monitoring that provides resource requests suggestions for each individual eligible workload, based on its actual usage over time.Seamless workload rightsizing with GKEWhen you run a workload on GKE, you can use cost optimization insights to discover your cluster and workload rightsizing opportunities right in the console.Here, you can see your workload’s actual usage and get signals for potentially undersized workloads that are at risk of either reliability or performance impact because they have low resource requests.However, taking the next step and correctly rightsizing those applications has always been a challenge — especially at scale. Not anymore with GKE’s new workload rightsizing capability.Start by picking up the workload you want to optimize. Usually, the best candidates are the ones where there’s a considerable divergence between resource requests and limits and actual usage. In the cost optimization tab of the GKE workloads console, just look for the workloads with a lot of bright green.Once you pick a workload, go to workload details and choose “Actions” => “Scale” => “Edit resource requests” to get more step-by-step optimization guidance.The guidance you receive relies heavily on new “Recommended per replica request cores” and “Recommended per replica request bytes” metrics (the same metrics that are available in Cloud Monitoring), which are both based on actual workload usage. You can access this view for every eligible GKE deployment, with no configuration on your part.Once you confirm the values that are best for your deployment, you can edit the resource requests and limits directly in the GKE console, and they will be directly applied to your workloads.Note: Suggestions are based on the observed usage patterns of your workloads and might not always be the best fit for your application. Each case might have its corner cases and specific needs. We advise a comprehensive check and understanding of values that are best for your specific workload.Note: Due to limited visibility into the way Java workloads use memory, we do not support memory recommendations for JVM-based workloads.Optionally, if you’d rather set the resource requests and limits from outside the GKE console, you can generate a YAML file with the recommended settings that you can use to configure your deployments.Note: Workloads with horizontal pod autoscaling enabled will not receive suggested values on the same metric for which horizontal pod autoscaling is configured. For instance, if your workload has HPA configured for CPU, only memory suggestions will be displayed.For more information about specific workload eligibility and compatibility with other scaling mechanisms such as horizontal pod autoscaling, check out the feature documentation here.Next-level efficiency with GKE Autopilot and workload rightsizingWe’ve talked extensively about GKE Autopilot as one of GKE’s key cost optimization mechanisms. GKE Autopilot provides a fully managed infrastructure offering that eliminates the need for nodepool and VM-level optimization, thus removing the bin-packing optimization challenges related to operating VMs, as well as unnecessary resource waste and day-two operations efforts. In GKE Autopilot, you pay for the resources you request. Combined with workload rightsizing, which primarily targets resource request optimization, you can easily now address two out of three main issues that lead to optimization gaps: app right-sizing and bin-packing. By running eligible workloads on GKE Autopilot and improving their resource requests, you should start to see a direct, positive impact on your bill right away!Rightsizing metrics and more resources for optimizing GKETo support the new optimization workflow we also launched two new metrics called “Recommended per replica request cores” and “Recommended per replica request bytes”. Both are available in the Kubernetes Scale metric group in Cloud Monitoring under “Kubernetes Scale” => “Autoscaler” => “Recommended per replica request”. You can also use these metrics to  build your own customization and ranking views and experiences, and export latest optimization opportunities.Excited about the new optimization opportunities? Ready for a recap of many other things you could do to run GKE more optimally? Check our Best Practices for Running Cost Effective Kubernetes Applications, the Youtube series, and have a look at the GKE best practices to lessen overprovisioning.Related ArticleGoogle Cloud at KubeCon EU: New projects, updated services, and how to connectEngage with experts and learn more about Google Kubernetes Engine at KubeCon EU.Read Article
Quelle: Google Cloud Platform

Unlock real-time insights from your Oracle data in BigQuery

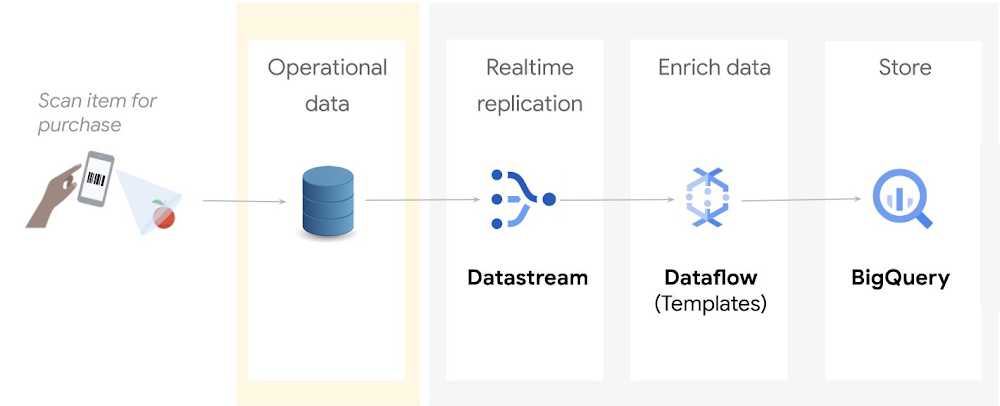
Relational databases are great at processing transactions, but they’re not designed to run analytics at scale. If you’re a data engineer or a data analyst, you may want to continuously replicate your operational data into a data warehouse in real time, so you can make timely, data driven business decisions.In this blog,  we will show you a step by step tutorial on how to replicate and process operational data from an Oracle database into Google Cloud’s BigQuery so that you can keep multiple systems in sync – minus the need for bulk load updating and inconvenient batch windows.The operational flow shown in the preceding diagram is as follows:Incoming data from an Oracle source is captured and replicated into Cloud Storage through Datastream.This data is processed and enriched by Dataflow templates, and is then sent to BigQuery for analytics and visualizationGoogle does not provide licenses for Oracle workloads. You are responsible for procuring licenses for the Oracle workloads that you choose to run on Google Cloud, and you are responsible for complying with the terms of these licenses. CostsThis tutorial uses the following billable components of Google Cloud:DatastreamCloud StoragePub/SubDataflowBigQueryCompute EngineTo generate a cost estimate based on your projected usage, use the pricing calculator.When you finish this tutorial, you can avoid continued billing by deleting the resources you created. For more information, see Clean up.Before you begin1. In the Google Cloud Console, on the project selector page, select or create a Google Cloud project.Note: If you don’t plan to keep the resources that you create in this procedure, create a project instead of selecting an existing project. After you finish these steps, you can delete the project, removing all resources associated with the project.2. Make sure that billing is enabled for your Cloud project. Learn how to check if billing is enabled on a project.3. Enable the Compute Engine, Datastream, Dataflow, and Pub/Sub APIs. 4. You must also have the role of Project owner or Editor.Step 1: Prepare your environment1. In Cloud Shell, define the following environment variables:code_block[StructValue([(u’code’, u’export PROJECT_NAME=”YOUR_PROJECT_NAME”rnexport PROJECT_ID=”YOUR_PROJECT_ID”rnexport PROJECT_NUMBER=”YOUR_PROJECT_NUMBER”rnexport BUCKET_NAME=”${PROJECT_ID}-oracle_retail”‘), (u’language’, u”)])]Replace the following:YOUR_PROJECT_NAME: The name of your projectYOUR_PROJECT_ID: The ID of your projectYOUR_PROJECT_NUMBER: The number of your project2. Enter the following:code_block[StructValue([(u’code’, u’gcloud config set project ${PROJECT_ID}’), (u’language’, u”)])]3. Clone the GitHub tutorial repository which contains the scripts and utilities that you use in this tutorial:code_block[StructValue([(u’code’, u’git clone \rnhttps://github.com/caugusto/datastream-bqml-looker-tutorial.git’), (u’language’, u”)])]4. Extract the comma-delimited file containing sample transactions to be loaded into Oracle:code_block[StructValue([(u’code’, u’bunzip2 \rndatastream-bqml-looker-tutorial/sample_data/oracle_data.csv.bz2′), (u’language’, u”)])]5. Create a sample Oracle XE 11g docker instance on Compute Engine by doing the following:a. In Cloud Shell, change the directory to build_docker:code_block[StructValue([(u’code’, u’cd datastream-bqml-looker-tutorial/build_docker’), (u’language’, u”)])]b. Run the following build_orcl.sh script:code_block[StructValue([(u’code’, u’./build_orcl.sh \rn-p <YOUR_PROJECT_ID> \rn-z <GCP_ZONE> \rn-n <GCP_NETWORK_NAME> \rn-s <GCP_SUBNET_NAME> \rn-f Y \rn-d Y’), (u’language’, u”)])]Replace the following:YOUR_PROJECT_ID: Your Cloud project IDGCP_ZONE: The zone where the compute instance will be createdGCP_NETWORK_NAME= The network name where VM and firewall entries will be createdGCP_SUBNET_NAME= The network subnet where VM and firewall entries will be createdY or N= A choice to create the FastFresh schema and ORDERS table (Y or N). Use Y for this tutorial.Y or N= A choice to configure the Oracle database for Datastream usage (Y or N). Use Y for this tutorial.The script does the following:Creates a new Google Cloud Compute instance.Configures an Oracle 11g XE docker container.Pre-loads the FastFresh schema and the Datastream prerequisites.After the script executes, the build_orcl.sh script gives you a summary of the connection details and credentials (DB Host, DB Port, and SID). Make a copy of these details because you use them later in this tutorial.After the script executes, the build_orcl.sh script gives you a summary of the connection details and credentials (DB Host, DB Port, and SID). Make a copy of these details because you use them later in this tutorial. 6. Create a Cloud Storage bucket to store your replicated data:code_block[StructValue([(u’code’, u’gsutil mb gs://${BUCKET_NAME}’), (u’language’, u”)])]Make a copy of the bucket name because you use it in a later step.7. Configure your bucket to send notifications about object changes to a Pub/Sub topic. This configuration is required by the Dataflow template. Do the following:a. Create a new topic called oracle_retail:code_block[StructValue([(u’code’, u’gsutil notification create -t projects/${PROJECT_ID}/topics/oracle_retail -f \rnjson gs://${BUCKET_NAME}’), (u’language’, u”)])]b. Create a Pub/Sub subscription to receive messages which are sent to the oracle_retail topic:code_block[StructValue([(u’code’, u’gcloud pubsub subscriptions create oracle_retail_sub \rn–topic=projects/${PROJECT_ID}/topics/oracle_retail’), (u’language’, u”)])]8. Create a BigQuery dataset named retail:code_block[StructValue([(u’code’, u’bq mk –dataset ${PROJECT_ID}:retail’), (u’language’, u”)])]9. Assign the BigQuery Admin role to your Compute Engine service account:code_block[StructValue([(u’code’, u”gcloud projects add-iam-policy-binding ${PROJECT_ID} \rn–member=serviceAccount:${PROJECT_NUMBER}-compute@developer.gserviceaccount.com \rn–role=’roles/bigquery.admin'”), (u’language’, u”)])]Step 2: Replicate Oracle data to Google Cloud with DatastreamDatastream supports the synchronization of data to Google Cloud databases and storage solutions from sources such as MySQL and Oracle.In this section, you use Datastream to backfill the Oracle FastFresh schema and to replicate updates from the Oracle database to Cloud Storage in real time.Create a stream1. In Cloud Console, navigate to Datastream and click Create Stream. A form appears. Fill in the form as follows, and then click Continue:Stream name: oracle-cdcStream ID: oracle-cdcSource type: OracleDestination type: Cloud StorageAll other fields: Retain the default value2. In the Define & Test Sourcesection, select Create new connection profile. A form appears. Fill in the form as follows, and then click Continue:Connection profile name: orcl-retail-sourceConnection profile ID: orcl-retail-sourceHostname: <db_host>Port: 1521Username: datastreamPassword: tutorial_datastreamSystem Identifier (SID): XEConnectivity method: Select IP allowlisting3. Click Run Test to verify that the source database and Datastream can communicate with each other, and then click Create & Continue.You see the Select Objects to Include page, which defines the objects to replicate, specific schemas, tables, and columns and be included or excluded.If the test fails, make the necessary changes to the form parameters and then retest.4. Select the following: FastFresh > Orders, as shown in the following image:5. To load existing records, set the Backfill mode to Automatic, and then click Continue. 6. In the Define Destination section, select Create new connection profile. A form appears. Fill in the form as follows, and then click Create & Continue:Connection Profile Name: oracle-retail-gcsConnection Profile ID: oracle-retail-gcsBucket Name: The name of the bucket that you created in the Prepare your environment section.7. Keep the Stream path prefix blank, and for Output format, select JSON. Click Continue.8. On the Create new connection profile page, click Run Validation, and then click Create.The output is similar to the following:Step 3: Create a Dataflow job using the Datastream to BigQuery templateIn this section, you deploy Dataflow’s Datastream to BigQuery streaming template to replicate the changes captured by Datastream into BigQuery.You also extend the functionality of this template by creating and using UDFs.Create a UDF for processing incoming dataYou create a UDF to perform the following operations on both the backfilled data and all new incoming data:Redact sensitive information such as the customer payment method.Add the Oracle source table to BigQuery for data lineage and discovery purposes.This logic is captured in a JavaScript file that takes the JSON files generated by Datastream as an input parameter.1. In the Cloud Shell session, copy and save the following code to a file named retail_transform.js:code_block[StructValue([(u’code’, u’function process(inJson) {rnrn var obj = JSON.parse(inJson),rn includePubsubMessage = obj.data && obj.attributes,rn data = includePubsubMessage ? obj.data : obj;rnrn data.PAYMENT_METHOD = data.PAYMENT_METHOD.split(‘:’)[0].concat(“XXX”);rnrn data.ORACLE_SOURCE = data._metadata_schema.concat(‘.’, data._metadata_table);rnrn return JSON.stringify(obj);rn}’), (u’language’, u”)])]2. Create a Cloud Storage bucket to store the retail_transform.js file and then upload the JavaScript file to the newly created bucket:code_block[StructValue([(u’code’, u’gsutil mb gs://js-${BUCKET_NAME}rnrngsutil cp retail_transform.js \rngs://js-${BUCKET_NAME}/utils/retail_transform.js’), (u’language’, u”)])]Create a Dataflow job1. In Cloud Shell, create a dead-letter queue (DLQ) bucket to be used by Dataflow:code_block[StructValue([(u’code’, u’gsutil mb gs://dlq-${BUCKET_NAME}’), (u’language’, u”)])]2. Create a service account for the Dataflow execution and assign the account the following roles: Dataflow Worker, Dataflow Admin, Pub/Sub Admin, BigQuery Data Editor,BigQuery Job User, Datastream Admin and Storage Admin.code_block[StructValue([(u’code’, u’gcloud iam service-accounts create df-tutorial’), (u’language’, u”)])]code_block[StructValue([(u’code’, u’gcloud projects add-iam-policy-binding ${PROJECT_ID} \rn–member=”serviceAccount:df-tutorial@${PROJECT_ID}.iam.gserviceaccount.com” \rn–role=”roles/dataflow.admin”rnrngcloud projects add-iam-policy-binding ${PROJECT_ID} \rn–member=”serviceAccount:df-tutorial@${PROJECT_ID}.iam.gserviceaccount.com” \rn–role=”roles/dataflow.worker”rnrngcloud projects add-iam-policy-binding ${PROJECT_ID} \rn–member=”serviceAccount:df-tutorial@${PROJECT_ID}.iam.gserviceaccount.com” \rn–role=”roles/pubsub.admin”rnrngcloud projects add-iam-policy-binding ${PROJECT_ID} \rn–member=”serviceAccount:df-tutorial@${PROJECT_ID}.iam.gserviceaccount.com” \rn–role=”roles/bigquery.dataEditor”rnrngcloud projects add-iam-policy-binding ${PROJECT_ID} \rn–member=”serviceAccount:df-tutorial@${PROJECT_ID}.iam.gserviceaccount.com” \rn–role=”roles/bigquery.jobUser”rnrngcloud projects add-iam-policy-binding ${PROJECT_ID} \rn–member=”serviceAccount:df-tutorial@${PROJECT_ID}.iam.gserviceaccount.com” \rn–role=”roles/datastream.admin”rnrnrngcloud projects add-iam-policy-binding ${PROJECT_ID} \rn–member=”serviceAccount:df-tutorial@${PROJECT_ID}.iam.gserviceaccount.com” \rn–role=”roles/storage.admin”‘), (u’language’, u”)])]3. Create a firewall egress rule to let Dataflow VMs communicate, send, and receive network traffic on TCP ports 12345 and 12346 when auto scaling is enabled:code_block[StructValue([(u’code’, u’gcloud compute firewall-rules create fw-allow-inter-dataflow-comm \rn–action=allow \rn–direction=ingress \rn–network=GCP_NETWORK_NAME \rn–target-tags=dataflow \rn–source-tags=dataflow \rn–priority=0 \rn–rules tcp:12345-12346′), (u’language’, u”)])]4. Create and run a Dataflow job:code_block[StructValue([(u’code’, u’export REGION=us-central1rnrngcloud dataflow flex-template run orders-cdc-template –region ${REGION} \rn–template-file-gcs-location “gs://dataflow-templates/latest/flex/Cloud_Datastream_to_BigQuery” \rn–service-account-email “df-tutorial@${PROJECT_ID}.iam.gserviceaccount.com” \rn–parameters \rninputFilePattern=”gs://${BUCKET_NAME}/”,\rngcsPubSubSubscription=”projects/${PROJECT_ID}/subscriptions/oracle_retail_sub”,\rninputFileFormat=”json”,\rnoutputStagingDatasetTemplate=”retail”,\rnoutputDatasetTemplate=”retail”,\rndeadLetterQueueDirectory=”gs://dlq-${BUCKET_NAME}”,\rnautoscalingAlgorithm=”THROUGHPUT_BASED”,\rnmergeFrequencyMinutes=1,\rnjavascriptTextTransformGcsPath=”gs://js-${BUCKET_NAME}/utils/retail_transform.js”,\rnjavascriptTextTransformFunctionName=”process”‘), (u’language’, u”)])]Check the Dataflow console to verify that a new streaming job has started.5. In Cloud Shell, run the following command to start your Datastream stream:code_block[StructValue([(u’code’, u’gcloud datastream streams update oracle-cdc \rn–location=us-central1 –state=RUNNING –update-mask=state’), (u’language’, u”)])]6. Check the Datastream stream status:code_block[StructValue([(u’code’, u’gcloud datastream streams list –location=us-central1′), (u’language’, u”)])]Validate that the state shows as Running. It may take a few seconds for the new state value to be reflected.Check the Datastream console to validate the progress of the ORDERS table backfill.The output is similar to the following:Because this task is an initial load, Datastream reads from the ORDERS object. It writes all records to the JSON files located in the Cloud Storage bucket that you specified during the stream creation. It will take about 10 minutes for the backfill task to complete.Final step: Analyze your data in BigQueryAfter a few minutes, your backfilled data replicates into BigQuery. Any new incoming data is streamed into your datasets in (near) real time. Each record is processed by the UDF logic that you defined as part of the Dataflow template.The following two new tables in the datasets are created by the Dataflow job:ORDERS: This output table is a replica of the Oracle table and includes the transformations applied to the data as part of the Dataflow template.ORDERS_log: This staging table records all the changes from your Oracle source. The table is partitioned, and stores the updated record alongside some metadata change information, such as whether the change is an update, insert, or delete.BigQuery lets you see a real-time view of the operational data. You can also run queries such as a comparison of the sales of a particular product across stores in real time, or combining sales and customer data to analyze the spending habits of customers in particular stores.Run queries against your operational data1. In BigQuery, run the following SQL to query the top three selling products:code_block[StructValue([(u’code’, u’SELECT product_name, SUM(quantity) as total_salesrnFROM `retail.ORDERS`rnGROUP BY product_namernORDER BY total_sales descrnLIMIT 3;’), (u’language’, u”)])]The output is similar to the following:2. In BigQuery, run the following SQL statements to query the number of rows on both the ORDERS and ORDERS_log tables:code_block[StructValue([(u’code’, u’SELECT count(*) FROM `hackfast.retail.ORDERS_log`;rnSELECT count(*) FROM `hackfast.retail.ORDERS`;’), (u’language’, u”)])]With the backfill completed, the last statement should return the number 520217.Congratulations! Now you just completed the change data capture of Oracle data in BigQuery, real-time!Clean upTo avoid incurring charges to your Google Cloud account for the resources used in this tutorial, either delete the project that contains the resources, or keep the project and delete the individual resources. To remove the project:In the Cloud console, go to the Manage resources page.In the project list, select the project that you want to delete, and then click Delete.In the dialog, type the project ID, and then click Shut down to delete the project.What’s next?If you’re looking to further build on this foundation, wonder how to forecast future demand, and how to visualize this forecast data as it arrives, explore this tutorial: Build and visualize demand forecast predictions using Datastream, Dataflow, BigQuery ML, and Looker.Related ArticleSecurely exchange data and analytics assets at scale with Analytics Hub, now available in previewEfficiently and securely exchange valuable data and analytics assets across organizational boundaries with Analytics Hub. Start your free…Read Article
Quelle: Google Cloud Platform

Announcing PSP's cryptographic hardware offload at scale is now open source

Almost a decade ago, we started encrypting traffic between our data centers to help protect user privacy. Since then, we gradually rolled out changes to encrypt almost all data in transit. Our approach is described in our Encryption in Transit whitepaper. While this effort provided invaluable privacy and security benefits, software encryption came at significant cost: it took ~0.7% of Google’s processing power to encrypt and decrypt RPCs, along with a corresponding amount of memory. Such costs spurred us to offload encryption to our network interface cards (NICs) using PSP (a recursive acronym for PSP Security Protocol), which we are open sourcing today.Google’s production machines are shared among multiple tenants that have strict isolation requirements. Hence, we require per-connection encryption and authentication, similar to Transport Layer Security (TLS). At Google’s scale, the implication is that the cryptographic offload must support millions of live Transmission Control Protocol (TCP) connections and sustain 100,000 new connections per second at peak. Before inventing a new offload-friendly protocol, we investigated existing industry-standards: Transport Layer Security (TLS) and Internet Protocol Security (IPsec). While TLS meets our security requirements, it is not an-offload friendly solution because of the tight coupling between the connection state in the kernel and the offload state in hardware. TLS also does not support non-TCP transport protocols, such as UDP. IPsec protocol, on the other hand, is transport independent and can be offloaded to hardware. However, a limitation of IPSec offload solutions is that they cannot economically support our scale partly because they store the full encryption state in an associative hardware table with modest update rates. Assuming the size of an entry is 256B in either direction, transmit or receive, the total memory requirement for 10M connections is 5GB (256B x 2 x 10M) – which is well beyond the affordable capacity of commodity offload engines. Existing IPsec offload engines are designed to support encryption for a small number of site-to-site tunnels. Ultimately, we decided that IPsec does not meet our security requirements as it lacks support for keys per layer-4 connection.To address these challenges, we developed PSP (a recursive acronym for PSP Security Protocol,) a TLS-like protocol that is transport-independent, enables per-connection security, and is offload-friendly.At Google, we employ all of these protocols depending on the use case. For example, we use TLS for our user-facing connections, we use IPsec for site-to-site encryption where we need interoperability with 3rd party appliances, and we use PSP for intra- and inter- data center traffic.PSP is intentionally designed to meet the requirements of large-scale data-center traffic. It does not mandate a specific key exchange protocol and offers few choices for the packet format and the cryptographic algorithms. It enables per-connection security by allowing an encryption key per layer-4 connection (such as a TCP connection.) It supports stateless operation because the encryption state can be passed to the device in the packet descriptor when transmitting packets and can be derived when receiving packets using a Security Parameter Index (SPI) and an on-device master key. This enables us to maintain minimal state in the hardware, avoiding hardware state explosion compared to typical stateful encryption technologies maintaining large on-device tables.PSP supports both stateful and stateless modes of operation: In the stateless mode, encryption keys are stored in the transmit packet descriptors and derived for received packets, using a master key stored on the device. In contrast, stateful technologies typically maintain the actual encryption keys in a table per connection.PSP uses User Datagram Protocol (UDP) encapsulation with a custom header and trailer. A PSP packet starts with the original IP header, followed by a UDP header on a prespecified destination port, followed by a PSP header containing the PSP information, followed by the original TCP/UDP packet (including header and payload), and ends with a PSP trailer that contains an Integrity Checksum Value (ICV). The layer-4 packet (header and payload) can be encrypted or authenticated, based on a user-provided offset called Crypt Offset. This field can be used to, for example, leave part of the TCP header authenticated yet unencrypted in transit while keeping the rest of the packet encrypted to support packet sampling and inspection in the network if necessary.  This is a critical visibility feature for us enabling proper attribution of traffic to applications, and is not feasible to achieve with IPsec. Of note, the UDP header is protected by the UDP checksum and the PSP header is always authenticated.PSP packet format for encrypting a simple TCP/IP packet in the Linux TCP/IP stack.We support PSP in our production Linux kernel, Andromeda (our network virtualization stack), and Snap (our host networking system), enabling us to use PSP for both internal communication and for Cloud customers. As of 2022, PSP cryptographic offload saves 0.5% of Google’s processing power. Similar to any other cryptographic protocol, we need both ends of a connection to support PSP. This can be prohibitive in brownfield deployments with a mix of old and new (PSP-capable) NICs. We built a software implementation of PSP (SoftPSP) to allow PSP-capable NICs to communicate with older machines, dramatically increasing coverage among pairwise server connections.PSP delivers multiplicative benefits when combined with zero-copy techniques. For example, the impact of TCP zero-copy for both sending and receiving was limited by extra reads and writes of the payloads for software encryption. Since PSP eliminates these extra loads and stores, RPC processing no longer requires touching the payload in the network stack. For large 1MB RPCs, for example, we see a 3x speed up from combining PSP and zero-copy.PSP and ZeroCopy have multiplicative impact, enabling us to send and receive RPCs without touching the payload. For large 1MB RPCs, using PSP alongside Zero-copy increases the throughput of TCP channels by 3x.We believe that PSP can provide a number of significant security benefits for the industry. Given its proven track record in our production environment, we hope that it can become a standard for scalable, secure communication across a wide range of settings and applications. To support this, we are making PSP open source to encourage broader adoption by the community and hardware implementation by additional NIC vendors. For further information, please refer to http://github.com/google/psp which includes:The PSP Architecture Specification.A reference software implementation.A suite of test cases.For further questions and discussions, please join the PSP discussion Google Group or contact the group here: psp-discuss@googlegroups.com.Acknowledgements: We are thankful to a large number of colleagues from Technical Infrastructure and Cloud who contributed to PSP since its inception, including but not limited to Platforms, Security, Kernel Networking, RPCs, Andromeda, and other Network Infrastructure teams.Related ArticleIntroducing Google Cloud’s new Assured Open Source Software serviceAnnouncing Google Cloud’s new Assured Open Source Software Service, which can help organizations add the same software that Google uses i…Read Article
Quelle: Google Cloud Platform

New Research shows Google Cloud Skill Badges build in-demand expertise

We live in a digital world, and the future of work is in the cloud. In fact, 61% of HR professionals believe hiring developers will be their biggest challenge in the years ahead.1During your personal cloud journey, it’s critical to build and validate your skills in order to evolve with the rapidly changing technology and business landscape.That is why we created skill badges – a micro-credential issued by Google Cloud to demonstrate your cloud competencies and your commitment to staying on top of the latest Google Cloud solutions and products. To better understand the value of skills badges to holders’ career goals, we commissioned a third-party research firm, Gallup, to conduct a global study on the impact of Google Cloud skill badges. Skill badge earners overwhelmingly gain value from and are satisfied with Google Cloud skill badges.Skill badge holders state that they feel well equipped with the variety of skills gained through skill badge attainment, that they are more confident in their cloud skills, are excited to promote their skills to their professional network, and are able to leverage skill badges to achieve future learning goals, including a Google Cloud certification. 87% agree skill badges provided real-world, hands-on cloud experience286% agree skill badges helped build their cloud competencies2 82% agree skill badges helped showcase growing cloud skills290% agree that skill badges helped them in their Google Cloud certification journey274% plan to complete a Google Cloud certification in the next six months2Join thousands of other learners and take your career to the next level with Google Cloud skill badges.To learn more, download the Google Cloud Skills Badge Impact Report at no cost.1. McKinsey Digital,Tech Talent Technotics: Ten new realities for finding, keeping, and developing talent , 20222. Gallup Study, sponsored by Google Cloud Learning: “Google Cloud Skill Badge Impact report”, May 2022Related ArticleHow to prepare for — and ace — Google’s Associate Cloud Engineer examThe Cloud Engineer Learning Path is an effective way to prepare for the Associate.Read Article
Quelle: Google Cloud Platform

Equifax data fabric uses Google Cloud to spin faster innovation

Editor’s note: Here, we look at how Equifax used Google Cloud’s Bigtable as a foundational tool to reinvent themselves through technology.Identifying stolen identities, evaluating credit scores, verifying employment and income for  processing credit requests requires data—truckloads of data—galaxies of data! But it’s not enough to just have the most robust data assets; you have to protect, steward and manage them with precision. As one of the world’s largest fintechs, operating in a highly regulated space, our business at Equifax revolves around extracting unique insights from data and delivering them in real-time so our customers can make smarter decisions. Back in 2018, our leadership team made the decision to rebuild our business in the cloud. We had been more than a traditional credit bureau for years, but we knew we had to reinvent our technology infrastructure to become a next-generation data, analytics and technology company. We wanted to create new ways to integrate our data faster, scale our reach with automation and empower employees to innovate new products versus a “project” mindset. The result of our transformation is the Equifax Cloud™, our unique mix of public cloud infrastructure with industry-leading security, differentiated data assets and AI analytics that only Equifax can provide. The first step involved migrating our legacy data ecosystem to Google Cloud to build a data fabric. We set out to shut down all 23 global data centers and bring everything on the data fabric for improved collaboration and insights. With help from the Google Cloud team, we’re already well underway.Building data fabric on Cloud Bigtable From the start, we knew we wanted a single, fully managed platform that would allow us to focus on innovating our data and insights products. Instead of trying to build our own expertise around infrastructure, scaling and encryption, Google Cloud offers these capabilities right out of the box, so we can focus on what drives value for our customers.   We designed our data fabric with Google Cloud’s NoSQL database, Bigtable, as a key component of the data architecture. As a fully managed service, Bigtable allows us to increase the speed and scale of our innovation. It supports the Equifax Cloud data fabric by rapidly ingesting data from suppliers, capturing and organizing the data, and serving it to users so they can build new products. Our proprietary data fabric is packaged as Equifax-in-a-Box, and it includes integrated platforms and tools that provide 80-90 percent of the foundation needed for a new Equifax business in a new geography. This allows our teams to rapidly deploy in a new region and comply with local regulations.Bigtable hosts the financial journals—the detailed history of observations across data domains such as Consumer Credit, Employment & Utility and more — for the data fabric, which play a role in nearly all our solutions. One of our largest journals, which hosts the US credit data, consists of about 3 billion credit observations along with other types of observations. When we run our proprietary Keying and Linking services to determine the identity of the individual to whom these datasets belong to, Bigtable handles keying and linking the repository to help us scale up instantly and get answers quickly. Innovating with the Equifax Cloud From everyday activities to new innovative offerings, we’re using the data fabric to transform our industry. Bigtable has been the bedrock of our platform, delivering the capabilities we need. For example, when a consumer goes into a store to finance a cellphone, we provide the retailer a credit file, which requires finding, farming, building, packaging and returning that file in short order. By moving to Google Cloud and Bigtable, we will be able to do all that now in under 100 milliseconds. Likewise, we’re using the data fabric to create a global fraud prevention product platform. Our legacy stack made it challenging to pull out and shape the data the way we wanted on a quick turn. However, with managed services like Bigtable, we have been able to build seven distinct views of the data for our fraud platform within four weeks—versus the few months it might have taken without the data fabric. Greater impact with Google Cloud We’ve made tremendous progress transforming into a cloud-native, next-generation data, analytics and technology company. With a global multi-region architecture, the data fabric runs in seven Google Cloud regions and eventually will support all 25 countries where Equifax operates. Our Equifax Cloud, leveraging key capabilities from Google Cloud, has given us additional speed, security and flexibility to focus on building powerful data products for the future. Learn more about Equifax and Cloud Bigtable. And check out our recent blog and graphics that answer the question, How BIG is Cloud Bigtable?Related ArticleCloud Bigtable launches Autoscaling plus new features for optimizing costs and improved manageabilityCloud Bigtable launches autoscaling that automatically adds or removes capacity in response to the changing demand for your applications.Read Article
Quelle: Google Cloud Platform

Announcing policy guardrails for Terraform on Google Cloud CLI preview

Terraformis a popular open source Infrastructure as Code (IaC) tool today and is used by organizations of all sizes across the world. Whether you use Terraform locally as a developer or as a platform admin managing complex CI/CD pipelines, Terraform makes it easy to deploy infrastructure on Google Cloud. Today, we are pleased to announce gcloud beta terraform vet, which is a client-side tool, available at no charge which enables policy validation for your infrastructure deployments and existing infrastructure pipelines. With this release, you can now write policies on any resource from Terraform’s google and google-beta providers. If you’re already using Terraform Validator on GitHub today, follow the migration instructions to leverage this new capability. The challengeInfrastructure automation with Terraform increases agility and reduces errors by automating the deployment of infrastructure and services that are used together to deliver applications.Businesses implement continuous delivery to develop applications faster and to respond to changes quickly. Changes to infrastructure are common and in many cases occur often. It can become difficult to monitor every change to your infrastructure, especially across multiple business units to help process requests quickly and efficiently in an automated fashion. As you scale Terraform within your organization, there is an increased risk for misconfigurations and human error. Human authored configuration changes can extend infrastructure vulnerability periods which expose organizations to compliance or budgetary risks. Policy guardrails are necessary to allow organizations to move fast at scale, securely, and in a cost effective manner – and the earlier in the development process, the better to avoid problems with audits down the road. The solutiongcloud beta terraform vet provides guardrails and governance for your Terraform configurations to help reduce misconfigurations of Google Cloud resources that violate any of your organization’s policies.These are some of the benefits of using gcloud beta terraform vet:  Enforce your organization’s policy at any stage of application developmentPrevent manual errors by automating policy validationFail fast with pre-deployment checksNew functionalityIn addition to creating CAI based constraints, you can now write policies on any resource from Terraform’s google and google-beta providers. This functionality was added after receiving feedback from our existing users of terraform validator on github. Migrate to gcloud beta terraform vet today to take advantage of this new functionality. Primary use cases for policy validationPlatform teams can easily add guardrails to infrastructure CI/CD pipelines (between the plan & apply stages) to ensure all requests for infrastructure are validated before deployment to the cloud. This limits platform team involvement by providing failure messages to end users during their pre-deployment checks which tell them which policies they have violated. Application teams and developers can validate their Terraform configurations against the organization’s central policy library to identify misconfigurations early in the development process. Before submitting to a CI/CD pipeline, you can easily ensure your Terraform configurations are in compliance with your organization’s policies, thus saving time and effort.Security teams can create a centralized policy library that is used by all teams across the organization to identify and prevent policy violations. Depending on how your organization is structured, the security team (or other trusted teams) can add the necessary policies according to the company’s needs or compliance requirements. Getting startedThe quickstart provides detailed instructions on how to get started. Let’s review the simple high-level process:1. First, clone the policy library. This contains sample constraint templates and bundles to get started. These constraint templates specify the logic to be used by constraints.2. Add your constraints to the policies/constraints folder. This represents the policies you want to enforce. For example, the IAM domain restriction constraint ensures all IAM policy members are in the “gserviceaccount.com” domain. See sample constraints for more samples.code_block[StructValue([(u’code’, u’apiVersion: constraints.gatekeeper.sh/v1alpha1rnkind: GCPIAMAllowedPolicyMemberDomainsConstraintV2rnmetadata:rn name: service_accounts_onlyrn annotations:rn description: Checks that members that have been granted IAM roles belong to allowlistedrn domains.rnspec:rn severity: highrn match:rn target: # {“$ref”:”#/definitions/io.k8s.cli.setters.target”}rn – “organizations/**”rn parameters:rn domains:rn – gserviceaccount.com’), (u’language’, u”)])]3. Generate a Terraform plan and convert it to JSON format$ terraform show -json ./test.tfplan > ./tfplan.json4. Install the gcloud component, terraform-tools$ gcloud components update$ gcloud components install terraform-tools5. Run gcloud beta terraform vet$ gcloud beta terraform vet tfplan.json –policy-library=.6. Finally, view the results. If you violated any policy checks, you will see the following outputs. Pass:code_block[StructValue([(u’code’, u'[]’), (u’language’, u”)])]Fail: The output is much longer, here is a snippet:code_block[StructValue([(u’code’, u'[rn{rn “constraint”: rnu2026 rnrn”message”: “IAM policy for //cloudresourcemanager.googleapis.com/projects/PROJECT_ID contains member from unexpected domain: user:user@example.com”,rnu2026rn]’), (u’language’, u”)])]FeedbackWe’d love to hear how this feature is working for you and your ideas on improvements we can make.Related ArticleEnsuring scale and compliance of your Terraform deployment with Cloud BuildThe best way to run Terraform on Google Cloud is with Cloud Build and Cloud Storage. This article explains why, covering scale, security …Read Article
Quelle: Google Cloud Platform

Google Cloud VMware Engine: Optimize application licensing costs with custom core counts

Customers are increasingly migrating their workloads to the cloud, including applications that are licensed and charged based on the number of physical CPU cores on the underlying node or in the cluster. To help customers manage and optimize their application licensing costs on Google Cloud VMware Engine, we introduced a capability called custom core counts — giving you the flexibility to configure your clusters to help meet your application-specific licensing requirements and reduce costs.You can set the required number of CPU cores for your workloads at the time of cluster creation, thereby effectively reducing the number of cores you may have to license for that application. You can set the number of physical cores per node in multiples of 4 — such as 4, 8, 12, and so on up to 36. VMware Engine also creates any new nodes added to that cluster with the same number of cores per node, including when replacing a failed node. Custom core counts are supported for both the initial cluster and for subsequent clusters created in a private cloud.It’s easy to get started, with just three or fewer steps depending on whether you’re creating a new private cloud and customizing cores in a cluster or adding a custom core count cluster to an already existing private cloud. Let’s take a quick look at how you can start using custom core counts:1. During private cloud creation, select the number of cores you want to set per node. The image below shows the selection process.2. Provide network information for the management components.3. Review the inputs and create a private cloud with custom cores per cluster node.That’s it. We’ve created a private cloud with a cluster that has 3 nodes and each node has 24 cores enabled (48 vCPUs). This gives a total of 72 cores enabled in the cluster. With this feature, you can right-size your cluster to meet your application licensing needs. If you’re running an application that is licensed on a per-core basis, you’ll only need to license 72 cores with custom core count, as opposed to 108 cores (36 cores X 3 nodes). For additional clusters in an already running private cloud, you just need 1 step to activate custom core counts.Stay tuned for more updates and bookmark our release notes for the latest update on Google Cloud VMware Engine. And if you’re interested in taking your first step, sign up for this no-cost discovery and assessment with Google Cloud!Related ArticleRunning VMware in the cloud: How Google Cloud VMware Engine stacks upLearn how Google Cloud VMware Engine provides unique capabilities to migrate and run VMware workloads natively in Google Cloud.Read Article
Quelle: Google Cloud Platform

Introducing the latest Slurm on Google Cloud scripts

Google Cloud is a great home for your high performance computing (HPC) workloads. As with all things Google Cloud, we work hard to make complex tasks seem easy. For HPC, a big part of user friendliness is support for popular tools such as schedulers.If you run high performance computing (HPC) workloads, you’re likely familiar with the Slurm workload manager. Today, with SchedMD, we’re announcing the newest set of features for Slurm running on Google Cloud, including one-click hybrid configuration, Google Cloud Storage data migration support, real-time configuration updates, Bulk API support, improved error handling, and more. You can find these new features today in the Slurm on Google Cloud GitHub repository and on the Google Cloud Marketplace.Slurm is one of the leading open-source HPC workload managers used in TOP 500 supercomputers around the world. Over the past five years, we’ve worked with SchedMD, the company behind Slurm, to release ever-improving versions of Slurm on Google Cloud. Here’s more information about our newest features:Turnkey hybrid configurationYou can now use a simple hybrid Slurm configuration setup script for enabling Google Cloud partitions in an existing Slurm controller, allowing Slurm users to connect an on-premise cluster to Google Cloud quickly and easily.Google Cloud Storage data migration supportSlurm now has a workflow script that supports Google Cloud Storage, allowing users to define data movement actions to and from storage buckets as part of their job. Note that Slurm can handle jobs with input and output data pointing to different Google Cloud Storage locations.Real-time Configuration UpdatesSlurm now supports post-deployment reconfiguration of partitions, with responsive actions taken as needed, allowing users to make changes to their HPC environment on-the-fly.Bulk API supportBuilding on the Bulk API integration completed in the Slurm scripts released last year, the newest scripts now support Bulk API’s Regional Endpoint calls, Spot VMs, and more.Clearer error handlingThis latest version of Slurm on Google Cloud will indicate the specific place (e.g. job node, node info, filtered log file, etc.) where an API error has occurred, and expose any underlying Google API errors directly to users. The scripts also add an “installing” animation and guidance on how to check for errors during the installation process if it takes a longer time than expected.Billing tracking in BigQuery and StackdriverYou can now access usage data in BigQuery, which you can merge with Google Cloud billing data to compute the costs of individual jobs, and track and display custom metrics for Stackdriver jobs.Adherence to Terraform and Image Creation best practicesThe Slurm image creation process has now been converted to a Packer-based solution. The necessary scripts are incorporated into an image and then parameters are provided via metadata to define the Ansible configuration, all of which follows Terraform and Image Creation best practices. All new Terraform resources now use Cloud Foundation Toolkit modules where available, and you can use bootstrap scripts to configure and deploy Terraform modules.Authentication ConfigurationYou can now enable or disable oslogin and install LDAP libraries (e.g. OSLogin, LDAP, Disabled, etc) across your Slurm cluster. Note that the admin must manually configure non-oslogin auth across the cluster.Support for Instance TemplatesFollowing on the Instance Template support launched in last year’s Slurm on Google Cloud version, you can now use additional Instance Template features launched in the intervening year (e.g. hyperthreading, Spot VM).Enhanced customization of partitionsThe latest version of Slurm on Google Cloud adds multiple ways to customize your deployed partitions including: Injection of custom prolog and epilog scripts, pre-partition startup scripts, and the ability to configure more Slurm capabilities on compute nodes.Getting startedThe Slurm experts at SchedMD built this new release. You can download this release in SchedMD’s GitHub repository. For more information, check out the included README. If you need help getting started with Slurm check out the quick start guide, and for help with the Slurm features for Google Cloud check out the Slurm Auto-Scaling Cluster codelab and the Deploying a Slurm cluster on Google Compute Engine and Installing apps in a Slurm cluster on Compute Engine solution guides. If you have further questions, you can post on the Slurm on Google Cloud Google discussion group, or contact SchedMD directly.Related ArticleIntroducing the latest Slurm on GCP scriptsThe latest version of Slurm for Google Cloud includes support for Terraform, the HPC VM Image, placement policies, Bulk API and instance …Read Article
Quelle: Google Cloud Platform

Cutting-edge disaster recovery for critical enterprise applications

Enterprise data backup and recovery has always been one of the most compelling and widely adopted public cloud use cases. That’s still true today, as businesses leverage the cloud to protect increasingly critical applications with stricter RTO/RPO requirements.Veeam and Google Cloud have long been leaders at providing reliable, verifiable, cloud-based recovery solutions across any environment or application. And now, we’re taking another step in that direction with the introduction of Continuous Data Protection (CDP) disaster recovery for business-critical Tier One applications. Veeam Backup & Replication (VBR) and Veeam Backup for Google Cloud (VBG), available on Google Cloud Marketplace, offer enterprises a faster, simpler, and more cost-effective way to level up your company’s backup and recovery capabilities. Enterprise customers can take control and craft a backup and storage strategy based on their SLA requirements and RTO/RPO goals, rather than cost, capacity, or scalability constraints. And with Google Cloud, enterprises get the secure, global cloud infrastructure and applications they need to achieve value with digital transformation.3 ways Veeam and Google Cloud elevate your company’s backup and recovery gameMore than ever, businesses are adopting cloud migration and modernization strategies to cut costs, simplify and streamline IT overhead, and enable innovation. And with four out of five organizations planning to use either cloud storage or a managed backup service within the next two years¹, many will be looking to understand just how and why the cloud can help them protect their businesses and serve their big-picture cloud objectives.There are a lot of different ways to tackle these questions when it comes to leveraging VBR and VBG on Google Cloud infrastructure. We’ll focus here on a few that appear to be top of mind with many of our customers.Cloud-based CDP for business-critical applications. Disaster recovery (DR) for critical Tier One applications doesn’t leave much room for error: Many of these applications will measure RTOs and RPOs in minutes or even seconds to avoid a major business disruption.In some cases, these applications use dedicated, high-availability infrastructure to maintain independent disaster recovery capabilities. In many others, however, it falls upon IT to maintain an on-prem CDR solution, running on dedicated DR infrastructure, to ensure near real-time RTOs/RPOs for enterprise Tier One applications.VBR on Google Cloud gives these enterprises a complete and fully managed CDR solution delivering RPOs measured in seconds. And by running VBR on Google Cloud’s highly secure, global cloud infrastructure, even the most advanced enterprise IT organizations can deploy a DR environment that will match or exceed their on-prem capabilities — with none of the CapEx, overhead costs, or management headaches.Right-sizing your enterprise backup strategy. Of course, many enterprise applications don’t require this level of protection, especially in terms of RPOs. In many cases, snapshot-based replication, typically with 6-12-hour RPOs, is enough for a business to recover less critical systems without suffering a major business setback.Veeam customers get the flexibility they need to choose the right type of protection for their applications and business data. They can easily store both VM replicas and an unlimited number of Veeam backups in Google Cloud, and restore from either source. Google’s Archive tier of object storage gives VBG customers one of the industry’s most cost-effective long-term storage solutions—while still achieving relatively fast RTOs.Running Veeam on Google Cloud also solves the scalability challenges that so many enterprises face when they manage on-prem systems. With Veeam and Google Cloud, an organization’s DR and backup capabilities will always align seamlessly with business needs.For example, resizing a Google Cloud VMware Engine (GCVE) cluster or spinning up additional clusters is something that can happen on the fly to accommodate restores and migrations. There’s no need to worry about overprovisioning and, with Veeam’s Universal Licensing, no additional licenses are required to migrate to the cloud. Customers can make DR and backup decisions based entirely on risk and business considerations, rather than on budget constraints or arbitrary resource limitations.Getting out of the data center game. Finally, running VBR on Google Cloud can be a major step towards retiring costly, resource-intensive, on-prem IT assets. Most enterprises today are moving aggressively to retire data centers and migrate applications to the public cloud; virtually all of them are now managing hybrid cloud environments that make it easier to move workloads between on-prem and public cloud infrastructure.By leveraging the cloud as a DR target, Veeam on Google Cloud reduces some of the costs and IT resources associated with maintaining on-prem data centers, servers, storage, and network infrastructure. Setting the stage for digital transformationDisaster recovery has always been a frustrating initiative for enterprise IT. It’s a demanding, expensive, resource-intensive task, yet it’s also one where dropping the ball can be a catastrophic mistake. We can’t take DR — or backup and recovery in general — off an IT organization’s list of priorities. But Veeam and Google Cloud can make it much simpler, easier, and less expensive for our customers to maintain world-class backup and recovery capabilities while putting themselves in a great position to achieve their broader digital transformation goals.Google Cloud Marketplace makes procurement easier, too: Buying VBR and VBG on Google Cloud Marketplace helps fast-track corporate technology purchases by allowing you to purchase from an approved vendor, Google. All Marketplace purchases are included in your single Google Cloud bill, while drawing down any monthly spend commitment you may already have with Google Cloud. To learn more about how Veeam and Google Cloud work together to help you keep your critical applications protected, visit veeam.com/google-cloud-backup.Related ArticleCIS hardening support in Container-Optimized OS from GoogleOur latest Container-Optimized OS release supports CIS benchmark compliance and can provide continuous CIS scanning capabilities.Read Article
Quelle: Google Cloud Platform