Migrate your most demanding enterprise PostgreSQL databases to AlloyDB for PostgreSQL with Database Migration Service

Earlier this year, we announced the launch of AlloyDB for PostgreSQL, a fully-managed, PostgreSQL-compatible database for demanding, enterprise-grade transactional and analytical workloads. Companies across industries are already looking to AlloyDB to free themselves from traditional legacy proprietary databases and scale existing PostgreSQL workloads with no application changes.AlloyDB unlocks better scale, higher availability, and faster performance. In our performance tests, AlloyDB was more than four times faster than open-source PostgreSQL for transactional performance and up to 100 times faster for analytical queries. Full PostgreSQL compatibility makes it easy to take advantage of this technology. However, as our customers look to standardize on AlloyDB, they need a migration path that is easy to set up and use, requires no management overhead, and one they can trust to move data accurately and securely. In addition, it needs to run with minimal disruption to their applications.PostgreSQL to AlloyDB supportToday, we’re excited to announce the preview of Database Migration Service (DMS) support for AlloyDB. With this announcement, you can use Database Migration Service to complete your migrations to AlloyDB from any PostgreSQL database – including on premises databases, self-managed databases on Google Cloud, and cloud databases such as Amazon Aurora or Azure Database for PostgreSQL – in an easy-to-use, secure, and serverless manner. Several Google Cloud customers are looking to DMS as their path to AlloyDB adoption. For example, SenseData is a platform created to improve the relationship between companies and customers, and is a market leader in Latin America in the field of Customer Success. “At Sensedata, we’ve built our customer success platform on PostgreSQL, and are looking to increase our platform performance and scale for the next phase of our growth,” said Paulo Souza, Co-Founder & CTO, SenseData. “We have a mixed database workload, requiring both fast transactional performance and powerful analytical processing capabilities, and our initial testing of AlloyDB for PostgreSQL has given impressive results, with more than a 350% performance improvement in our initial workload, without any application changes. We’re looking forward to using Database Migration Service for an easy migration of multiple terabytes of data to AlloyDB.”Database Migration Service has helped countless Google Cloud customers migrate their PostgreSQL, MySQL and Oracle workloads to the cloud. Now, customers can use the same proven technology and user experience to migrate to AlloyDB.With DMS, migrations are:Fast and easy: Because AlloyDB is a fully PostgreSQL-compatible database, migrations from PostgreSQL are considered “homogeneous”, with no schema conversions or other pre-migration steps required. Today, more than 85% of migrations using Database Migration Service are underway in less than an hour. Reliable and complete: Database Migration Service migrations to AlloyDB utilize the native replication capabilities of PostgreSQL to maximize security, fidelity, and reliability. Minimal downtime: DMS allows you to continuously replicate database changes from your source to AlloyDB and perform the cutover whenever you feel comfortable to ensure minimal downtime and disruption to your applications. Serverless: The serverless architecture of DMS means you don’t need to maintain or provision any migration-specific resources to support this migration, and the migration will auto-scale with your data.Migrating to AlloyDB using Database Migration ServiceYou can start your migration to AlloyDB by navigating to the Database Migration page in your Google Cloud console and creating a new migration job.Migrating is easy with five simple steps:Choose the database type you want to migrate, and see what actions you need to take to set up your source for successful migration.Create your source connection profile, which can later be used for additional migrationsCreate an AlloyDB for PostgreSQL destination cluster that fits your business needsDefine a connectivity method; DMS offers a guided connectivity path to help you achieve connectivity.Test your migration job and get started whenever you’re ready.Once the migration job starts, DMS begins the migration with an initial snapshot of your data, then proceeds to continuously replicate new changes as they happen, and there you go, you have an AlloyDB cluster ready with all your source data.Learn more and start your database journey Get started with the new Database Migration Service for PostgreSQL to AlloyDB migrations. You can also get started with the previously-announced Oracle to PostgreSQL migration previews; to see them in action, you can request access now.For more information to help get you started on your migration journey, head over to the documentation or start training with this Database Migration Service Qwiklab.Related ArticleBest practices for homogeneous database migrationsHomogeneous database migrations—across compatible database engines—helps improve app performance. See how to migrate databases to Google …Read Article
Quelle: Google Cloud Platform

Register for Google Cloud Next

Google Cloud Next ‘22 kicks off on October 11 at 9AM PDT with a 24-hour “follow the sun” global digital broadcast featuring live keynotes from five locations across the globe — New York, Sunnyvale, Tokyo, Bengaluru, and Munich. You’ll hear from the people shaping the future of computing and have the opportunity to learn from Google Cloud leaders and community influencers about ways they are solving the biggest challenges facing organizations today.You can experience Next ‘22 digitally and in-person. Here’s how: Join us digitally through the Google Cloud Next website to learn about the latest news, products, and Google Cloud technology and to access technical and training content.  Visit us locally at one of 200 physical events across six continents. In conjunction with our Partner and Developer Communities, we are excited to bring a series of small physical events around the world. Be sure to register for Next ‘22 so we can alert you about physical events in your area soon. At Next ‘22, you’ll find knowledge and expertise to help for whatever you’re working on with content tracks personalized for application developers, data scientists, data engineers, system architects, and low/no-code developers.To make Google Cloud Next as inclusive as possible, it is free for all attendees. Here’s more about Next ‘22 for you to get excited:Experience content in your preferred language. The Next ‘22 web experience will be translated into nine languages using Cloud Translate API. For Livestream and session content, you can turn on YouTube for CC (closed captions), which supports 180+ languages.Engineer your own playlist. Create, build, explore, and share your own custom playlists and discover playlists curated by Google Cloud.Hang with fellow developers. Gain access to dedicated developer zones through Innovators Hive livestreams, in-person event registration, a developer badging experience, challenges, curated resources and more fun with drone racing.Engage with your community. Use session chats to engage with other participants and ask questions to presenters, so you can fully immerse yourself in the content.Register for Next ‘22Connect with experts, get inspired, and boost your skills.There’s no cost to join any of the Next ‘22 experience. We can’t wait to see you and we’ll be sure to keep you posted about ways to engage locally with the Google Cloud community in your area. Say hello to tomorrow. It’s here today, at Next.Register today.Related ArticleRead Article
Quelle: Google Cloud Platform

How Einride scaled with serverless and re-architected the freight industry

Industry after industry being transformed by software. It started with industries such as music, film and finance, whose assets lent themselves to being easily digitized. Fast forward to today, and we see a push to transform industries that have more physical hardware and require more human interaction, for example healthcare, agriculture and freight. It’s harder to digitize these industries – but it’s arguably more important. At Einride, we’re doing just that. Our mission is to make Earth a better place through intelligent movement, building a global autonomous and electric freight network that has zero dependence on fossil fuel. A big part of this is Einride Saga, the software platform that we’ve built on Google Cloud. But transforming the freight industry is a formidable technical task that goes far beyond software. Still, observing the software transformations of other industries has shown us a powerful way forward.So, what lessons have we learned from observing the industries that led the charge?The Einride Pod, an autonomous, all-electric freight vehicle designed and developed by Einride – here shown in pilot operations at GEA Appliance Park in Louisville, KY.Lessons from re-architecting software systemsMost of today’s successful software platforms started in co-located data centers, eventually moving into the public cloud, where engineers could focus more on product and less on compute infrastructure. Shifting to the cloud was done using a lift-and-shift approach: one-to-one replacements of machines in datacenters with VMs in the cloud. This way, the systems didn’t require re-architecting, but it was also incredibly inefficient and wasteful. Applications running on dedicated VMs often had, at best, 20% utilization. The other 80% was wasted energy and resources. Since then, we’ve learned that there are better ways to do it.Just as the advent of shipping containers opened up the entire planet for trade by simplifying and standardizing shipping cargo, containers have simplified and standardized shipping software. With containers, we can leave management of VMs to container orchestration systems like Kubernetes, an incredibly powerful tool that can manage any containerized application. But that power comes at the cost of complexity, often requiring dedicated infrastructure teams to manage clusters and reduce cognitive load for developers. That is a barrier of entry to new tech companies starting up in new industries — and that is where serverless comes in. Serverless offerings like Cloud Run abstract away cluster management and make building scalable systems simple for startups and established tech companies alike.Serverless isn’t a fit for all applications, of course. While almost any application can be containerized, not all applications can make use of serverless. It’s an architecture paradigm that must be considered from the start. Chances are, an application designed with a VM-focused mindset won’t be fully stateless, and this prevents it from successfully running on a serverless platform. Adopting a serverless paradigm for an existing system can be challenging and will often require redesign.Even so, the lessons from industries that digitized early are many: by abstracting away resource management, we can achieve higher utilization and more efficient systems. When resource management is centralized, we can apply algorithms like bin packing, and we can ensure that our workloads are efficiently allocated and dynamically re-allocated to keep our systems running optimally. With centralization comes added complexity, and the serveless paradigm enables us to shift complexity away from developers, as well as from entire companies.Opportunities in re-architecting freight systemsAt Einride, we have taken the lessons from software architecture and applied them to how we architect our freight systems. For example, the now familiar “lift-and-shift” approach is frequently applied in the industry for the deployment of electric trucks – but attempts at one-to-one replacements of diesel trucks lead to massive underutilization.With our software platform, Einride Saga, we address underutilization by applying serverless patterns to freight, abstracting away complexity from end-customers and centralizing management of resources using algorithms. With this approach, we have been able to achieve near-optimal utilization of the electric trucks, chargers and trailers that we manage. But to get these benefits, transport networks need to be re-architected. Flows in the network need to be reworked to support electric hardware and more dynamic planning, meaning that shippers will need to focus more on specifying demand and constraints, and less on planning out each shipment by themselves.We have also found patterns in the freight industry that influence how we build our software. Managing electric trucks has made us aware of the differences in availability of clean energy across the globe, because – much like electric trucks – Einride Saga relies on clean energy to operate in a sustainable way. With Google Cloud, we can run the platform on renewable energy, worldwide.The core concepts of serverless architecture — raising the abstraction level, and centralizing resource management — have the potential to revolutionize the freight industry. Einride’s success has sprung from an ability to realize ideas and then quickly bring them to market. Speed is everything, and the Saga platform – created without legacy in Google Cloud – has enabled us to design from the ground up and leverage the benefits of serverless.Advantages of a serverless architectureEinride’s architecture supports a company that combines multiple groundbreaking technologies — digital, electric and autonomous — into a transformational end-to-end freight service. The company culture is built on transparency and inclusivity, with digital communication and collaboration enabled by the Google Workspace suite. The technology culture promotes shared mastery of a few strategically selected technologies, enabling developers to move seamlessly up and down the tech stack — from autonomous vehicle to cloud platform.If a modern autonomous vehicle is a data center on wheels, then Go and gRPC are fuels that make our vehicle services and cloud services run. We initially started building our cloud services in GKE, but when Google Cloud announced gRPC support for Cloud Run (in September 2019), we immediately saw the potential to simplify our deployment setup, spend less time on cluster management, and increase the scalability of our services. At the time, we were still very much in startup mode, making Cloud Run’s lower operating costs a welcome bonus. When we migrated from GKE to Cloud Run and shut down our Kubernetes clusters, we even got a phone call from our reseller who noticed that our total spend had dropped dramatically. That’s when we knew we had stumbled on game-changing technology!Einride serverless architecture showing a gRPC-based microservice platform, built on Cloud Run and the full suite of Google Cloud serverless productsIn Identity Platform, we found the building blocks we needed for our Customer Identity and Access Management system. The seamless integration with Cloud Endpoints and ESPv2 enabled us to deploy serverless API gateways that took care of end-user authentication and provided transcoding from HTTP to gRPC. This enabled us to get the performance and security benefits of using gRPC in our backends, while keeping things simple with a standard HTTP stack in our frontends.For CI/CD, we adopted Cloud Build, which gave all our developers access to powerful build infrastructure without having to maintain our own build servers. With Go as our language for backend services, ko was an obvious choice for packaging our services into containers. We have found this to be an excellent tool for achieving both high security and performance, providing fast builds of distro-less containers with an SBOM generated by default.One of our challenges to date has been to provide seamless and fully integrated operations tooling for our SREs. At Einride, we apply the SRE-without-SRE approach: engineers who develop a service also operate it. When you wake up in the middle of the night to handle an alert, you need the best possible tooling available to diagnose the problem. That’s why we decided to leverage the full Cloud Operations suite, giving our SREs access to logging, monitoring, tracing, and even application profiling. The challenge has been to build this into each and every backend service in a consistent way. For that, we developed the Cloud Runner SDK for Go – a library that automatically configures the integrations and even fills in some of the gaps in the default Cloud Run monitoring, ensuring we have all four golden signals available for gRPC services.For storage, we found that the Go library ecosystem around Cloud Spanner provided us with the best end-to-end development experience. We chose Spanner for its ease of use and low management overhead – including managed backups, which we were able to automate with relative ease using Cloud Scheduler. Building our applications on top of Spanner has provided high availability for our applications, as well as high trust for our customers and investors.Using protocol buffers to create schemas for our data has allowed us to build a data lake on top of BigQuery, since our raw data is strongly typed. We even developed an open-source library to simplify storing and loading protocol buffers in BigQuery. To populate our data lake, we stream data from our applications and trucks via Pub/Sub. In most cases, we have been able to keep our ELT pipelines simple by loading data through stateless event handlers on Cloud Run.The list of serverless technologies we’ve leveraged at Einride goes on, and keeping track of them is a challenge of its own – especially for new developers joining the team who don’t have the historical context of technologies we’ve already assessed. We built our tech radar tool to curate and document how we develop our backend services, and perform regular reviews to ensure we stay on top of new technologies and updated features.Einride’s backend tech radar, a tool used by Einride to curate and document their serverless tech stack.But the journey is far from over. We are constantly evolving our tech stack and experimenting with new technologies on our tech radar. Our future goals include increasing our software supply chain security and building a fully serverless data mesh. We are currently investigating how to leverage ko and Cloud Build to achieve SLSA level 2 assurance in our build pipelines and how to incorporate Dataplex in our serverless data mesh.A freight industry reimagined with serverlessFor Einride, being at the cutting edge of adopting new serverless technologies has paid off. It’s what’s enabled us to grow from a startup to a company scaling globally without any investment into building our own infrastructure teams.Industry after industry is being transformed by software, including complex industries that have more physical hardware and require more human interaction. To succeed, we must learn from the industries that came before us, recognize the patterns, and apply the most successful solutions. In our case, it has been possible not just by building our own platform with a serverless architecture, but also by taking the core ideas of serverless and applying them to the freight industry as a whole.
Quelle: Google Cloud Platform

Drive digital transformation, get Cloud Digital Leader certified

As enterprises look to accelerate cloud adoption, it is critical to not only upskill your technical talent, but to focus on skilling your non-technical teams too. Investing in your collective workforce’s cloud proficiency helps ensure you fully embrace everyone’s potential, and make the most of your cloud investment.According to research shared in a recent IDC paper1, comprehensively trained organizations saw a bigger impact vs. narrowly trained organizations, with 133% greater improvement in employee retention, a 47% reduction in business risk and a 22% increase in innovation. This is where Cloud Digital Leader training and certification comes in. Most cloud training and certification is geared toward technical cloud practitioners, leaving non-technical (tech-adjacent) teams with little understanding of cloud technologies. Cloud Digital Leader bridges this gap, providing easy-to-understand training that enables everyone to understand the capabilities of cloud so that they can contribute to digital transformation in their organizations.In  a recent fireside chat with Google Cloud Partner Kyndryl, who have achieved over 1,000 Cloud Digital Leader certifications across their organization, they shared how the Cloud Digital Leader training and certification has led to significant time reduction within their pre-sales cycle:“Our sales teams who work with customers and learn about their challenges were able to apply the know-how from their Cloud Digital Leader education and certification. They can now guide the technical solution teams in the right direction, without having to pull them into the discovery phases of their customer interactions. As a result, we operated more quickly and efficiently,  as the sales teams were able to speak to the Google Cloud solutions very early on in the sales cycle. This accelerated the sales process, as the sales teams were therefore more confident in their Google Cloud knowledge, saving time and money for us, and the customer.” — Christoph Schwaiger, Google Cloud Business Development Executive, Global Strategic Alliances, Kyndryl.Empower your team’s cloud fluency, and discover your next phase of digital transformation. Invite your teams to jump start their cloud journey with no-cost Cloud Digital Leader training on Google Cloud Skills Boost.Join our live webinar to access a time-limited certification offerRegister for our upcoming webinar, “Getting started with Google Cloud Digital Leader training and certification” to learn more. Those that register for the webinar before broadcast on September 15, 9am PT will get access to a time-limited discount voucher for the Cloud Digital Leader certification exam. That’s an offer that you won’t want to miss.1. IDC Paper, sponsored by Google Cloud Learning: “To Maximize Your Cloud Benefits, Maximize Training” – Doc #US48867222, March 2022Related ArticleTrain your organization on Google Cloud Skills BoostTo help more than 40 million people build cloud skills, Google Cloud has launched new enterprise level features on Google Cloud Skills Bo…Read Article
Quelle: Google Cloud Platform

Building a secure CI/CD pipeline using Google Cloud built-in services

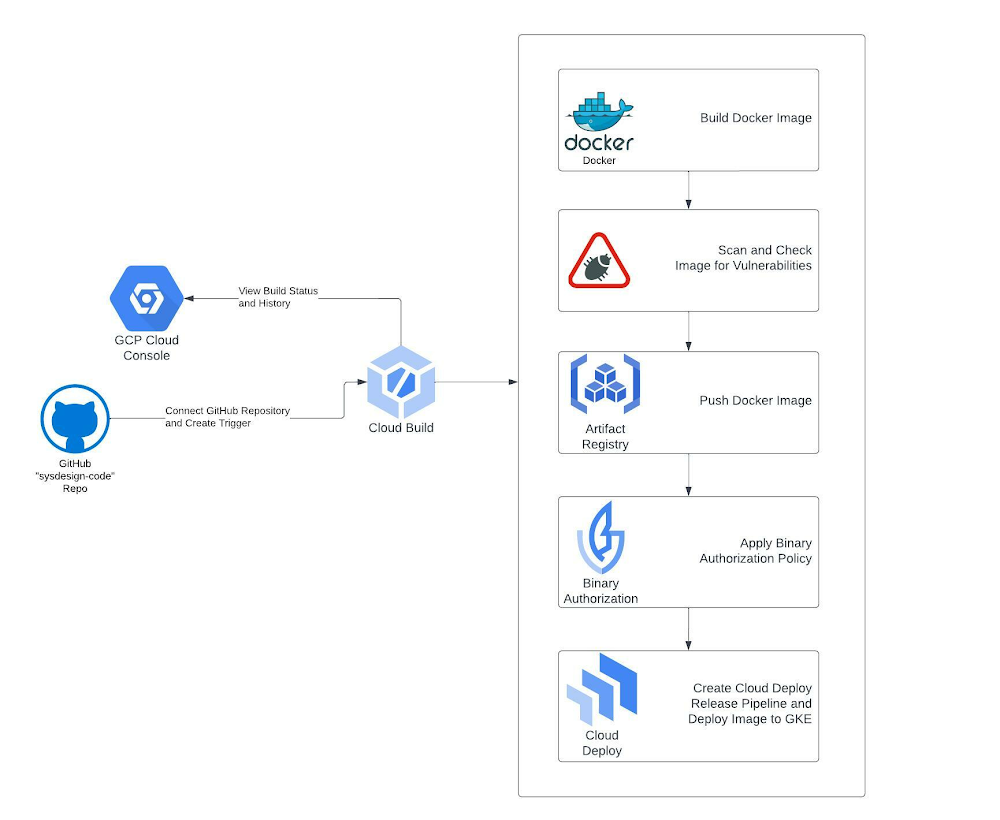
DevOps is a concept that allows software development teams to release software in an automated and stable manner. DevOps itself is not just one thing; it’s a combination of culture and technology, which together make the implementation of DevOps successful.In this blog, we will be focusing on the tools and technology side of DevOps. At the core of the technical aspect of DevOps, the concept is Continuous Integration and Continuous Delivery (CI/CD). The idea behind CI/CD concept is to create an automated software delivery pipeline that continuously deploys the new software releases in an automated fashion.The flow begins with the developers committing the code changes to a source code repository, which automatically triggers the delivery pipeline (henceforth called CI/CD pipeline) by building and deploying the code changes into various environments, from non-prod environments to production environments.Also, as we build the CI/CD pipelines for faster and more reliable software delivery, the security aspect should not be ignored and must be incorporated into the pipeline right from the beginning. When we build our source code, we typically use various open-source libraries and container images. Having some security safeguards within the CI/CD pipeline is imperative to ensure that the software we are building and deploying is free from any vulnerability. Additionally, it’s equally important to control what type of code/container image should be allowed to be deployed on your target runtime environment.Security is everyone’s responsibility. Shifting left on security is a DevOps practice that allows you to address security concerns early in the software development lifecycle. Vulnerability scanning of container images, putting security policies in place through Binary Authorization, and allowing approved/trusted images to be deployed on GKE are a couple of ways to implement this policy to make your CI/CD pipelines more secure.What are we building?This blog post will show how to build a secure CI/CD pipeline using Google Cloud’s built-in services. We will create a secure software delivery pipeline that builds a sample Node.js application as a container image and deploys it on GKE clusters.How are we building the CI/CD pipeline?We’re going to use the following Google Cloud built-in services to build the pipeline:Cloud Build – Cloud Build is an entirely serverless CI/CD platform that allows you to automate your build, test, and deploy tasks.Artifact Registry – Artifact Registry is a secure service to store and manage your build artifacts.Cloud Deploy – Cloud Deploy is a fully managed Continuous Delivery service for GKE and Anthos.Binary Authorization – Binary Authorization provides deployment time security controls for GKE and Cloud Run deployments.GKE – GKE is a fully managed Kubernetes platform.Google Pub/Sub – Pub/Sub is a serverless messaging platform.Cloud Functions – Cloud Functions is a serverless platform to run your code.We use GitHub as a source code repository and Sendgrid APIs to send email notifications for approval and error logging.The CI/CD pipeline is set up so that a Cloud Build trigger is configured to sense any code pushed to a particular repository and branch in a GitHub repository and automatically starts the build process.Below is the flow of how the CI/CD pipeline is set up without any security policy enforcement:Developer checks in the code to a GitHub repo.A Cloud Build trigger is configured to sense any new code pushed to this GitHub repo and starts the ‘build’ process. A successful build results in a docker container image.The container image is stored in the Artifact Registry.The Build process kicks off a Cloud Deploy deployment process that deploys the container image to three different GKE clusters, pre-configured as the deployment pipeline mimicking the test, staging, and production environments.Cloud Deploy is configured to go through an approval step before deploying the image to the Production GKE cluster.A Cloud Function sends an email to a pre-configured email id, notifying you that a Cloud Deploy rollout requires your approval. The email receiver can approve or reject the deployment to the production GKE cluster. Cloud Function code can be found hereTo secure this CI/CD pipeline, we will use a couple of Google Cloud’s built-in features and services. First, we will enable vulnerability scans on Artifact Registry, an out-of-the-box feature. Then finally, we will create a security policy using the Binary Authorization service, which only allows a specific image to be deployed to your GKE cluster.Below is the flow when we try to build and deploy a container image that has vulnerabilities present:Developer checks in the code to a GitHub repo.A Cloud Build trigger is configured to sense any new code pushed to this GitHub repo and start the ‘build’ process.The build process fails with the error message that vulnerabilities were found in the image.Below is the flow when we try to deploy a container image to GKE, which violates a Binary Authorization policy:Developer checks in the code to a GitHub repo.A Cloud Build trigger is configured to sense any new code pushed to this GitHub repo and start the ‘build’ process. A successful build results in a docker container image.The container image is stored in Artifact Registry.The Build process kicks off a Cloud Deploy deployment process that deploys the container image to three different GKE clusters, pre-configured as the deployment pipeline mimicking the test, staging, and production environments.Cloud Deploy fails as the GKE clusters reject the incoming image as it violates the existing Binary Authorization policy. Please note that an approval email is still triggered before the production deployment via the Cloud Function; the email receiver is expected to reject this release based on the failures in the previous stages.Once the deployment fails due to the Binary Authorization policy violation, Cloud Function sends an email to a pre-configured email id about the deployment failure. Cloud Function code can be found here.Note: The deployment fails after the timeout value is exceeded, set for Cloud Deploy, which is 10 minutes by default, but you can change this value according to your requirements, see here for more details.Note: The Cloud Function code provided for the rollout approval email and deployment failure notification is under the folder cloud-functions in this repo. You will still have to create these cloud functions with this code in your Google Cloud project to receive email notifications.Solution ArchitectureThe CI/CD pipeline is constructed by combining the aforementioned Google Cloud services. Cloud Build is at the center of automating the pipeline, which contains all the steps we need to build and deploy our container image. Cloud Build executes the steps defined in a YAML file sequentially. It’s quite flexible in terms of how you want to define your ‘build’ and ‘deploy’ process, and the service ensures to execute those steps reliably every time.Below are solution diagrams of how the CI/CD pipeline is set up :As the last step of our CI process, the Cloud Build YAML triggers the Cloud Deploy service, and the container image is deployed to three different GKE clusters. Cloud Deploy automatically emits multiple notifications to pub/Sub topics throughout the deployment process. We are using Cloud Functions to listen to these Pub/Sub topics to send appropriate email notifications about the deployment status and required approvals.Step-by-Step instructions for creating the CI/CD pipelineI. PrerequisitesThese steps are required to set up and prepare your GCP environment. We highly recommend you create a new GCP Project as you will run multiple cloud services within the region “us-central1″.Fork the following GitHub Repo: https://github.com/sysdesign-code/dev-sec-ops-demoCreate a new GCP Project, follow the steps here around how to provision and create one: https://cloud.google.com/resource-manager/docs/creating-managing-projectsOnce your new project is created, enable Cloud SDK to allow CLI access for gcloud either in Cloud Shell or your local workstation. Follow the steps here: https://cloud.google.com/sdk/docs/installOnce you’ve enabled CLI access, either through your Cloud Shell or local workstation, validate or set your project ID:gcloud config set project YOUR_PROJECT_IDRun the following one-time script /scripts/gcp_env_setup.sh, which creates and provisions the necessary GCP cloud services required to create the DevSecOps CI/CD pipeline for deploying a sample docker application.Here are all the service deployments that will occur once the script finishes:a) Enables all the required cloud service APIs such as Cloud Build, Binary Authorization, Kubernetes Service, Artifact Registry, Cloud Deploy, and many more.b) Create three (3) GKE clusters for test, staging, and production to show image rollout deployments across these clusters using Cloud Deploy.c) Bind all the necessary IAM roles and permissions for Cloud Build and Cloud Deploy.d) Create a Binary Authorization attestor, associated container note, cryptographic KMS key, and all the associated IAM roles and permissions to allow container note access for the attestor.By default, the binary authorization policy allows for all images to be deployed to GCP. Later, we will update this policy only to allow attestor-approved images to be deployed to specific GKE clusters.e) Create the Artifact Registry repository where the docker image will be stored.f) Finally, create two Pub/Sub topics and Cloud Functions which will allow for email approvals for any GKE deployment to production and error reporting if a release fails.NOTEBefore you run the script, please validate if your new GCP project already contains a “default” VPC and subnetwork. If you already have a “default” VPC, please go through the script and COMMENT out lines 53-55 which reference the creation of a default VPC and subnetwork. If you already have one, this step is not needed.By default, the creation of GKE clusters uses the “default” VPC subnetwork. If you prefer to use a non-default VPC, update the GKE cluster creation commands, starting at line 157, and update the –subnetwork value for all 3 GKE clusters.6. To execute the script, run the following command: sh /scripts/gcp_env_setup.shg) This script will approximately take 20-22 minutes to complete. Once finished, the output should look similar to something like this.7. Create a SendGRID API Key. Follow the instructions: https://app.sendgrid.com/guide/integrate to create a free “Web API” email integration for cURL and its associated API key. Take note and save your key value and verify the integration. The key details will be needed when you create the Cloud Deploy approval process later in this blog. Note: Using SendGRID APIs DOES require you to create a user account.II. Configure Cloud BuildThis step requires integrating your git repository (from Pre-Requisites, Step 1) as a managed repository to GCP’s cloud build service and creating the necessary Trigger. The goal of this integration is that any updates you make to your application within your GitHub repository will automatically kick off a Cloud Build deployment which will create, enable and deploy your application to GKE.Create the GitHub Repository Integration for Cloud Build :To start, from your GCP Console homepage, type “Cloud Build” within the search bar and select this service.From the left-hand panel, click on “Triggers”. And click on “Connect Repository.”Select the source as “GitHub (Cloud Build GitHub App)Authenticate the connection with your GitHub credentials, select the forked repository, and click “Connect”.Once the integration is done, you will see your newly added repository under “Triggers” -> “Manage Repositories.”Create a Trigger for Cloud BuildFrom the “Triggers” page, click on “+ Create Trigger”Enter/Select the following values for the Trigger:Name: CI/CD-blog-triggerRegion: us-central1Description: Deploy Docker Image using GCP CI/CD cloud services.Event: Push to a branch.Repository: Select your forked repositoryBranch: ^main$Configuration: Cloud Build Configuration File (YAML or JSON)Location: RepositoryCloud Build configuration file location: / cloudbuild.yamlUnder “Advanced”, add the following TWO environment variables and their values: _CONTAINER_REPO_NAME: test-repo _SEVERITY: CRITICAL NOTE: The value of these env variables is case sensitive.3. After the environment values are entered/selected, click “Create”.Once the Trigger is created, it will look like the following:III. Create Cloud Deploy PipelineNow that we have created GitHub integration and Cloud Build Trigger, the next step is to create the Cloud Deploy pipeline. This will deploy the container image to the three GKE environments: “test,” “staging,” and “prod” once the image release for all three environments is created through Cloud Build. The requirement for image release requires a Cloud Deploy pipeline.Edit the clouddeploy.yaml file with your GCP project ID.Within the file, update lines 22, 32, and 42 with your respective GCP project ID3. Once this is updated, save the file.4. Either through Cloud Shell or your local workstation, run the following GCP command to create the environment variables and the Cloud Deploy pipeline called ci-cd-test:code_block[StructValue([(u’code’, u’$ PROJECT_ID=<<YOUR_PROJECT_ID>>rn$ LOCATION=us-central1rn$ gcloud deploy apply –file clouddeploy.yaml –region=$LOCATION –project=$PROJECT_ID’), (u’language’, u”), (u’caption’, <wagtail.wagtailcore.rich_text.RichText object at 0x3ee4e8ede710>)])]NOTE: If you run into issues with a failed Cloud Deploy pipeline creation, delete the pipeline using the following gcloud command:code_block[StructValue([(u’code’, u’gcloud deploy delivery-pipelines delete ci-cd-test –region=us-central1 –force’), (u’language’, u”), (u’caption’, <wagtail.wagtailcore.rich_text.RichText object at 0x3ee4e8ede350>)])]5. Once the pipeline is created, here is what the output will look like:code_block[StructValue([(u’code’, u’$ gcloud deploy apply –file clouddeploy.yaml –region=$LOCATION –project=$PROJECT_IDrnWaiting for the operation on resource projects/<<YOUR_PROJECT_ID>>/locations/us-central1/deliveryPipelines/ci-cd-test…done. rnCreated Cloud Deploy resource: projects/<<YOUR_PROJECT_ID>>/locations/us-central1/deliveryPipelines/ci-cd-test.rnWaiting for the operation on resource projects/<<YOUR_PROJECT_ID>>/locations/us-central1/targets/test…done. rnCreated Cloud Deploy resource: projects/<<YOUR_PROJECT_ID>>/locations/us-central1/targets/test.rnWaiting for the operation on resource projects/<<YOUR_PROJECT_ID>>/locations/us-central1/targets/staging…done. rnCreated Cloud Deploy resource: projects/<<YOUR_PROJECT_ID>>/locations/us-central1/targets/staging.rnWaiting for the operation on resource projects/<<YOUR_PROJECT_ID>>/locations/us-central1/targets/prod…done. rnCreated Cloud Deploy resource: projects/<<YOUR_PROJECT_ID>>/locations/us-central1/targets/prod.’), (u’language’, u”), (u’caption’, <wagtail.wagtailcore.rich_text.RichText object at 0x3ee4ea052850>)])]6. From your GCP Console homepage, type “Cloud Deploy” within the search bar and select this service. From the main page, you will see the newly created pipeline.IV. Configure email notifications for GKE production cluster deploymentAs part of a typical CI/CD process, any deployment of production workloads requires some form of approval process by DevOps engineers. Cloud Deploy allows you to inject an ‘approval’ step before deploying a rollout to the next target. We have created this approval check in our pipeline before the deployment to the ‘prod’ GKE cluster. Once the pipeline reaches the step to deploy the rollout to the ‘prod’ GKE cluster, it emits a message in the clouddeploy-approvals Pub/Sub topic. We have created a Cloud Function to listen to this topic and implement logic to send email notifications via Sendgrid. You can use any other library to send emails via Cloud Functions.The one-time script has created a Pub/Sub topic and Cloud Function, allowing your cloud build release to send an approver email.To validate that the Pub/Sub topics and Cloud Function was created, go to those respective services and ensure they were created.From your GCP Console homepage, type “Pub/Sub” within the search bar and select this service. There will be two Pub/Sub topics, and they’re called clouddeploy-approvals and clouddeploy-operations.From your GCP Console homepage, type “Cloud Functions” within the search bar and select this service. There will be two Cloud Functions, called cd-approval and cd-deploy-notification.Click on cd-approval and select “Variables”.Click the “Edit” button and expand the `Runtime, build, connections and security settings.Scroll down until you get to the “Runtime environment variables.” Here you will update the following three variables.For FROM_EMAIL, enter a secondary email account; it could be @gmail or any other domain of your choice. For TO_EMAIL, select a primary email. For instance, the email of a DevOps Engineer who will be the approver of all production workload deployments to GKE. For SENDGRID_API_KEY, you will enter your API Key, starting with “SG.”. If you haven’t already, refer to the Prerequisites section above, step 6, around creating this key.6. After you’ve updated the cloud function environment variables, click “Next” and “Deploy” the updated function. It will take about 1-2 minutes. Once completed, the function will have a green check mark to validate its running.7. Repeat steps 4-6 from above for the other cloud function of cd-approval.Step-by-step instructions of testing and validating the GCP CI/CD pipelineNow that all the GCP prerequisites and environment setup is complete for Cloud Build, Cloud Deploy, and Email approvals, we’ll next deploy the image to GKE and initiate the pipeline testing.A couple of items to note during this test, we’re going to show a “Happy” and “Vulnerable” Image deployment path to GKE.The “Happy” path will show a successful deployment of the end-to-end pipeline across nine steps for a clean image deployment to GKE. “Clean” refers to the docker image with non-critical vulnerabilities. This path will also update the Binary Authorization policy that allows only the “Happy” image to be deployed to GKE’s “test”, “staging”, and eventually “production” environments, which a DevOps engineer will approve.The “Vulnerable” docker path will show a failed deployment of the end-to-end pipeline across seven steps. The pipeline will fail in 2 of these steps because the image has:Certain vulnerabilities must be addressed before the image can be stored in the Artifact Registry.A failed deployment to GKE because this is a non-approved image without attestation, violating the updated Binary Authorization policy from the “Happy” path.When Binary Authorization is enabled, its default policy allows all images to be deployed to the GKE target environments without attestation. In the “Happy” path, we will update the default Binary Authorization policy where only a specific docker image is approved for deployment to GKE. GKE will reject any other image not approved by the Binary Authorization policy at the deployment time.To allow other images to be deployed to GKE through an active binary authorization policy, update the following script /scripts/create_binauthz_policy.sh where you can sign the image digest to the existing attestor and allow for that image deployment to GKE.In the following sections, we’ll go into further detail describing both paths of image deployment to GKE.I. Run Cloud Build configuration file for “Happy” pathEnsure your GitHub repo is connected as a repository in Cloud Build. Refer to the “Create the GitHub Repository Integration for Cloud Build” section on how to do this.Ensure your Cloud Build trigger called CI/CD-blog-trigger is created. Refer to the section “Create a Trigger for Cloud Build” on how to do this.Since the Trigger is already enabled, any updates to your repository will trigger this Cloud Build deployment.Open up the cloudbuild.yaml from your GitHub repo. This is the cloud build configuration file for the “Happy” Docker path.To kick off the build, make any update to your codebase such as update the /src/static/js file for any cosmetic change.After you’ve made the change, push the changes to your GitHub repo.From the GCP Console, go to the Cloud Build service and click on “History”.Since the Trigger is enabled and integrated with your GitHub page, the build is automatically kicked off, and you can click the custom build number to see the log details.II. Validate image deployment for “Happy” pathWithin that build, steps 7-9 highlight the image deployment to GKE through Cloud Deploy. If you click on step 9, the result of the build states that the deployment to “prod” is awaiting approval.2. Go to the Cloud Deploy homepage from the GCP Console and click on the ci-cd-test pipeline.3. Within the pipeline, click on the release associated with the latest cloud build deployment. Here you see that the “Happy” image is deployed successfully to both “test” and “staging”, but there’s an approval process required for the “prod” cluster.4. From the GCP Console, search for Kubernetes Engine; from the left-hand navigation, click on “Workloads.” Here you can see that the image deployment is successful in the two “test” and “staging” GKE environments.5. Now that the deployment is queued for production, check your primary email and validate that you received a notification for approval. It will look something like this.6. From the email, click the here hyperlink and it will take you to the Cloud deploy pipeline page.7. From the Pipeline page, approve or reject the release so the deployment can be pushed to “prod” in GKE. In this case, we will approve.7. If you go back to the Kubernetes workload page, you’ll see that the image rollout to prod was successful.In parallel, validate your Cloud Deploy, continuous deployment pipeline also confirms a successful rollout.III. Run Cloud Build configuration file for “Vulnerable” path (container image has vulnerabilities)We will show two failure paths with this deployment: image vulnerabilities and Binary Authorization policy enforcement.A. First, failed deployment to push docker image to Artifact Registry because of severity-specific vulnerabilities -1. Ensure your GitHub Repo is connected as a repository in Cloud Build. Refer to the “Create the GitHub Repository Integration for Cloud Build” section on how to do this.2. Ensure your Cloud Build Trigger called CI/CD-blog-trigger is created. Refer to the section “Create a Trigger for Cloud Build” on how to do this.3. Since the Trigger is already enabled, any updates to your repository will trigger this cloud build deployment.4. View the cloudbuild-vulnerable.yaml file from your GitHub repo. This is the cloud build configuration file for the “Vulnerable” Docker path.5. Edit the existing Trigger with the following:Click on the ellipses next to “RUN” and update the “Cloud Build configuration file location” to be: cloudbuild-vulnerable.yamlUpdate the “_SEVERITY” environment variable value to be HIGH. We’re changing the severity of the vulnerabilities because the vulnerability check will either PASS or FAIL a cloud build deployment if the image contains ANY HIGH vulnerabilities.Save the Trigger and validate its status as “Enabled”.6. To kick off the build, make any update to your codebase, such as updating the /src/static/js file for any cosmetic change. After you’ve made the change, push the changes to your GitHub repo.7. From the GCP Console, go to the Cloud Build service and click on “History”.8. The build will fail in Step 2: Check For Vulnerabilities within the Image because this image contains HIGH vulnerabilities, and cloud build will NOT push this image to be stored in the artifact registry.B. Second, a failed image deployment to GKE because of Binary Authorization policy enforcement -Go back to the Trigger configuration for this build and change the “_SEVERITY” environment variable value to CRITICAL instead of “HIGH”.To kick off the build, make any update to your codebase such as update the /src/static/js file for any cosmetic change. After you’ve made the change, push the changes to your GitHub repo.From the GCP Console, go to the Cloud Deploy pipeline ci-cd-test and check the results of this latest release.From the Cloud Deploy pipeline page, approximately 10 minutes later, the build for “test” and “staging” will eventually fail because the Kubernetes manifest file for this docker image timed out.You can change the timeout period to be shorter; additional details can be found here5. From the GCP Console, go to the GKE page and click on “Workloads”. Here you will see the image deployments to both the “test” and “staging” GKE environments failed. The reason being is binary authorization policy enforcement. The “vulnerable” docker image is not approved for deployment.6. In parallel to a failed deployment to any of the GKE staging environments, Cloud Function cd-deploy-notification will send the following email to check the logs for the pipeline.7. From the email, click on here to see deployment logs, and it will take you to the log files within cloud build around additional details on the failure of the release rollout to GKE.Conclusion and further readingIn this blog post, we built a secure CI/CD pipeline using Google Cloud’s built-in services.We learned how we can secure a CI/CD pipeline using Google Cloud’s built-in services, such as Binary Authorization and Vulnerability scanning of the container images. We only saw one way to put some control on specific images that can be deployed to a GKE cluster. Binary Authorization also offers Build Verification, in which Binary Authorization uses attestations to verify that an image was built by a specific build system or continuous integration (CI) pipeline such as Cloud Build.Additionally, Binary Authorization also writes all the events where the deployment of a container image is blocked due to the constraints defined by the security policy to the audit logs. You can create alerts on these log entries and notify the appropriate team members about the blocked deployment events.Lastly, all of the services used to build and secure the CI/CD pipelines are serverless, which makes it very easy to spin up the whole infrastructure within a few minutes without worrying about maintaining or managing it, so that your teams can focus on building and releasing software in a faster, reliable and cost efficient manner.Related ArticleRead Article
Quelle: Google Cloud Platform

How Let’s Enhance uses NVIDIA AI and GKE to power AI-based photo editing

There’s an explosion in the number of digital images generated and used for both personal and business needs. On e-commerce platforms and online marketplaces for example, product images and visuals heavily influence the consumer’s perception, decision making and ultimately conversion rates. In addition, there’s been a rapid shift towards user-generated visual content for ecommerce — think seller-generated product imagery, host-generated rental property photos and influencer-generated social media content. The challenge? These user-generated images are often captured using mobile cameras and vary greatly in terms of their size, quality, compression ratios and resolution, making it difficult for companies to provide consistent high-quality product images on their platforms.That’s exactly the problem that Let’s Enhance, a computer vision startup with teams across the US and Ukraine, set out to solve with AI. The Let’s Enhance platform improves the quality of any user-generated photo automatically using AI-based features to enhance images through automatic upscaling, pixelation and blur fixes, color and low-light correction, and removing compression artifacts — all with a single click and no professional equipment or photo-editing chops. “Let’s Enhance.io is designed to be a simple platform that brings AI-powered visual technologies to everyone — from marketers and entrepreneurs to photographers and designers,” said Sofi Shvets, CEO and Co-founder of Let’s Enhance.To date, Let’s Enhance has processed more than 100M photos for millions of customers worldwide for use-cases ranging from digital art galleries, real estate agencies, digital printing, ecommerce and online marketplaces. With the introduction of Claid.ai, their  new API to automatically enhance and optimize user-generated content at scale for digital marketplaces, they needed to process millions of images every month and manage sudden peaks in user demand.However, building and deploying an AI-enabled service at scale for global use is a huge technical challenge that spans model building, training, inference serving and resource scaling. It demands an infrastructure that’s easy to manage and monitor, can deliver real-time performance to end customers wherever they are and can scale as user-demand peaks, all while optimizing costs. To support their growing user-base, Let’s Enhance chose to deploy their AI-powered platform to production on Google Cloud and NVIDIA . But before diving into their solution, let’s take a close look at the technical challenges they faced in meeting their business goals. Architecting a solution to fuel the next wave of growth and innovationTo deliver the high-quality enhanced images that end-customers see, Let’s Enhance products are powered by cutting-edge deep neural networks (DNNs) that are both compute-  and memory-intensive. While building and training these DNN models in itself is a complex, iterative process,   application performance — when processing new user-requests, for instance — is crucial to delivering a quality end user experience and reducing total deployment costs. A single inference or processing request i.e., from user-generated image, which can vary widely in size, at the input to the AI-enhanced output image, requires combining multiple DNN models within an end-to-end pipeline. The  key inference performance metrics to optimize for included latency (the time it takes from providing an input image to the enhanced image being available) and throughput ( the number of images that can be processed per second).. Together, Google Cloud and NVIDIA technologies provided all the elements that the Let’s Enhance team needed to set themselves up for growth and scale. There were three main components in the solution stack:Compute resources: A2 VMs, powered by NVIDIA A100 Tensor Core GPUsInfrastructure management: Google Kubernetes Engine (GKE)Inference serving: NVIDIA Triton Inference ServerImproved throughput and lower costs with NVIDIA A100 Multi-Instance GPUs (MIG) on Google CloudTo meet the computational requirements of the DNN models and deliver real-time inference performance to their end-users, Let’s Enhance chose Google Cloud A2 VMs powered by NVIDIA A100 Tensor Core GPUs as their compute infrastructure. A100 GPU’s Multi-Instance GPU (MIG) capability offered them the unique ability to partition a single GPU into two independent instances and simultaneously process two user-requests at a time, making it possible  to service a higher volume of user requests while reducing the total costs of deployment.The A100 MIG instances delivered a 40% average throughput improvement compared to the NVIDIA V100 GPUs, with an increase of up to 80% for certain image enhancement pipelines using the same number of nodes for deployment. With improved performance from the same sized node pools, Let’s Enhance observed a 34% cost savings using MIG-enabled A100 GPUs.Simplified infrastructure management with GKETo offer a guaranteed quality-of-service (QoS) to their customers and manage user demand, Let’s Enhance needed to provision, manage and scale underlying compute resources while keeping utilization high and costs low. GKE offers industry-leading capabilities for training and inference such as support for 15,000 nodes per cluster, auto-provisioning, auto-scaling and various machine types (e.g. CPU, GPU and on-demand, spot), making it the perfect choice for Let’s Enhance.With support for NVIDIA GPUs and NVIDIA GPU sharing capabilities, GKE can provision multiple A100 MIG instances to process user requests in parallel and maximize utilization. As the compute required for the deployed ML pipelines increases (e.g., a sudden surge in inference requests to service), GKE can automatically scale to additional node-pools with MIG partitions — offering finer granularity to provision the right-sized GPU acceleration for workloads of all sizes.“Our total averaged throughput varied between 10 and 80 images / sec. Thanks to support for NVIDIA A100 MIG and auto scaling mechanisms in GKE we can now scale that up to 150 images/sec and more, based on user-demand and GPU availability,” said Vlad Pranskevičius, Co-founder and CTO, Let’s Enhance. In addition, GKE’s support for dynamic scheduling, automated maintenance and upgrades, high availability, job API, customizability and fault tolerance simplified managing a production deployment environment, allowing the Let’s Enhance team to focus on building advanced ML pipelines.High-performance inference serving with NVIDIA Triton Inference ServerTo optimize performance and simplify the deployment of their DNN models onto the GKE-managed node pools of NVIDIA A100 MIG instances, Let’s Enhance chose the open-source NVIDIA Triton Inference Server, which deploys, runs and scales AI models from any framework onto any GPU- or CPU-based infrastructure. NVIDIA Triton’s support for multiple frameworks enabled the Let’s Enhance team to serve models trained in both TensorFlow and PyTorch, eliminating the need to set up and maintain multiple serving solutions for different framework backends. In addition, Triton’s ensemble model and shared memory features helped maximize performance and minimize data transfer overhead for their end-to-end image processing pipeline, which consists of multiple models and large amounts of raw image data transferring between them.“We saw over 20% performance improvement with Triton vs. custom inference serving code, and were also able to fix several errors during deployment due to Triton’s self-healing features”, said Vlad. “Triton is packed with cool features, and as I was watching its progress from the very beginning, the pace of product development is just amazing.”To further enhance end-to-end inference performance, the team is adopting NVIDIA TensorRT, an SDK to optimize trained models for deployment with the highest throughput and lowest latency while preserving the accuracy of predictions.“With the subset of our models which we converted from Tensorflow to NVIDIA TensorRT we observed a speedup of anywhere between 10% and 42%, depending on the model, which is impressive,” said Vlad. “For memory-intensive models like ours, we were also able to achieve predictable memory consumption, which is another great benefit of using TensorRT, helping prevent any unexpected memory-related issues during production deployment.”Teamwork makes the dream workBy using Google Cloud and NVIDIA, Let’s Enhance addressed the real-time inference serving and infrastructure management challenges of taking their AI-enabled service to production at scale in a secure Google Cloud infrastructure.  GKE, NVIDIA AI software and A2 VMs powered by NVIDIA A100 GPUs brought together all the elements they needed to deliver the desired user experience and build a solution that can dynamically scale their end-to-end pipelines based on user demand.The close collaboration with the Google Cloud and NVIDIA team, every step of the way, also helped Let’s Enhance get their  solution to market fast. “The Google Cloud and NVIDIA teams are incredible to work with. They are highly professional, always responsive and genuinely care about our success,” said Vlad. “We were able to get technical advice and recommendations directly from Google Cloud product and engineering teams, and also have a channel to share our feedback about Google Cloud products, which was really important to us.”With a solid foundation and solution architecture that can meet their growing business needs, Let’s Enhance is marching towards their goal of bringing AI-enhanced digital images to everyone. “Our vision is to help businesses effectively manage user-generated content and increase conversion rates with next-gen AI tools,” said Sofi. ”Our next step towards that is to expand our offerings to completely replace manual work for photo preparation, including as well as cover pre-stages as image quality assessment and moderation.”To learn more about the Let’s Enhance products and services, check out their blog here.Related ArticleRead Article
Quelle: Google Cloud Platform

Take your ML models from prototype to production with Vertex AI

You’re working on a new machine learning problem, and the first environment you use is a notebook. Your data is stored on your local machine, and you try out different model architectures and configurations, executing the cells of your notebook manually each time. This workflow is great for experimentation, but you quickly hit a wall when it comes time to elevate your experiments up to production scale. Suddenly, your concerns are more than just getting the highest accuracy score.Sound familiar?Developing production applications or training large models requires additional tooling to help you scale beyond just code in a notebook, and using a cloud service provider can help. But that process can feel a bit daunting. To make things a little easier for you, we’ve created the Prototype to Productionvideo series, which covers all the foundational concepts you’ll need in order to build, train, scale, and deploy machine learning models on Google Cloud using Vertex AI.Let’s jump in and see what it takes to get from prototype to production!Getting started with Notebooks for machine learningEpisode one of this series shows you how to create a managed notebook using Vertex AI Workbench. With your environment set up, you can explore data, test different hardware configurations, train models, and interact with other Google Cloud services.Storing data for machine learningWhen working on machine learning problems, it’s easy to be laser focused on model training. But the data is where it all really starts.If you want to train models on Vertex AI, first you need to get your data into the cloud. In episode 2, you’ll learn the basics of storing unstructured data for model training and see how to access training data from Vertex AI Workbench.Training custom models on Vertex AIYou might be wondering, why do I need a training service when I can just run model training directly in my notebook? Well, for models that take a long time to train, a notebook isn’t always the most convenient option. And if you’re building an application with ML, it’s unlikely that you’ll only need to train your model once. Over time, you’ll want to retrain your model to make sure it stays fresh and keeps producing valuable results. Manually executing the cells of your notebook might be the right option when you’re getting started with a new ML problem. But when you want to automate experimentation at scale, or retrain models for a production application, a managed ML training option will make things much easier.Episode 3 shows you how to package up your training code with Docker and run a custom container training job on Vertex AI. Don’t worry if you’re new to Docker! This video and the accompanying codelab will cover all the commands you’ll need.CODELAB: Training custom models with Vertex AIHow to get predictions from an ML model Machine learning is not just about training. What’s the point of all this work if we don’t actually use the model to do something? Just like with training, you could execute predictions directly from a notebook by calling model.predict. But when you want to get predictions for lots of data, or get low latency predictions on the fly, you’re going to need something more than a notebook. When you’re ready to use your model to solve a real world problem with ML, you don’t want to be manually executing notebook cells to get a prediction.In episode 4, you’ll learn how to use the Vertex AI prediction service for batch and online predictions.CODELAB: Getting predictions from custom trained modelsTuning and scaling your ML modelsBy this point, you’ve seen how to go from notebook code, to a deployed model in the cloud. But in reality, an ML workflow is rarely that linear. A huge part of the machine learning process is experimentation and tuning. You’ll probably need to try out different hyperparameters, different architectures, or even different hardware configurations before you figure out what works best for your use case.Episode 5, covers the Vertex AI features that can help you with tuning and scaling your ML models. Specifically, you’ll learn abouthyperparameter tuning, distributed training, and experiment tracking.CODELAB: Hyperparameter tuning on Vertex AICODELAB: Distributed Training on Vertex AIWe hope this series inspires you to create ML applications with Vertex AI! Be sure to leave a comment on the videos if you’d like to see any of the concepts in more detail, or learn how to use the Vertex AI MLOps tools. If you’d like try all the code for yourself, check out the following codelabs:Training custom models with Vertex AIGetting predictions from custom trained modelsHyperparameter tuning on Vertex AIDistributed training on Vertex AIRelated ArticleRead Article
Quelle: Google Cloud Platform

Thank you Partners for three years of growth and winning together

Congratulations to our fast growing ecosystem of global partners for three years of commitment to Partner Advantage, underscored by great collaboration, high energy, innovative ideas, and transformative impact. Together we’ve leveraged our program to drive growth and customer satisfaction. Year to date, there has been more than a 140% year-over-year increase in experts at our partner organizations trained (devs, technical, certifications, solutions) for 2022. This has translated into thousands of happy customers, many of whose stories are available to read in our Partner Directory. Each of you continue to inspire our shared customers and all of us at Google Cloud. And we are only getting started!We are hard at work making sure every aspect of your business with Google Cloud is smooth running, easy to navigate, and profitable. So what’s in store for 2023? Here’s a sneak peak: Expect to see more activity and focus around our Differentiation Journey as a vehicle for driving your growth and success. This includes encouraging partners to offer more in the area of high value and repeatable services, where the opportunity is large and growing fast. You can learn more about the global economic impact our partners are having in this blog post.You’ll also see Partner Advantage focusing more on solutions and customer transformation. All of which will include corresponding incentives, new benefits, and more features.Thank you again for your commitment and hard work. It’s been a fantastic three years of amazing opportunity and growth. Not a partner yet? Start your journey today!The best is yet to come!-Nina HardingRelated ArticleRead Article
Quelle: Google Cloud Platform

Google + Mandiant: Transforming Security Operations and Incident Response

Over the past two decades, Google has innovated to build some of the largest and most secure computing systems in the world. This scale requires us to deliver pioneering approaches to cloud security, which we pass on to our Google Cloud customers. We are committed to solving hard security problems like only Google can, as the tip of the spear of innovation and threat intelligence.Today we’re excited to share the next step in this journey with the completion of our acquisition of Mandiant, a leader in dynamic cyber defense, threat intelligence and incident response services. Mandiant shares our cybersecurity vision and will join Google Cloud to help organizations improve their threat, incident and exposure management.Combining Google Cloud’s existing security portfolio with Mandiant’s leading cyber threat intelligence will allow us to deliver a security operations suite to help enterprises globally stay protected at every stage of the security lifecycle. With the scale of Google’s data processing, novel analytics approaches with AI and machine learning, and a focus on eliminating entire classes of threats, Google Cloud and Mandiant will help organizations reinvent security to meet the requirements of our rapidly changing world.We will retain the Mandiant brand and continue Mandiant’s mission to make every organization secure from cyber threats and confident in their readiness.Context and threat intelligence from the frontlinesOur goal is to democratize security operations with access to the best threat intelligence and built-in threat detections and responses. Ultimately, we hope to shift the industry to a more proactive approach focused on modernizing Security Operations workflows, personnel, and underlying technologies to achieve an autonomic state of existence – where threat management functions can scale as customers’ needs change and as threats evolve.Today Google Cloud security customers use our cloud infrastructure to ingest, analyze and retain all their security telemetry across multicloud and on-premise environments. By leveraging our sub-second search across petabytes of information combined with security orchestration, automation and response capabilities, our customers can spend more time defending their organizations. The addition of Mandiant Threat Intelligence—which is compiled by their team of security and intelligence individuals spread across 22 countries, who serve customers located in 80 countries—will give security practitioners greater visibility and expertise from the frontlines. Mandiant’s experience detecting and responding to sophisticated cyber threat actors will offer Google Cloud customers actionable insights into the threats that matter to their businesses right now. We will continue to share groundbreaking Mandiant threat research to help support organizations, even for those who don’t run on Google Cloud.Advancing shared fate for security operationsGoogle Cloud operates in a shared fate model, taking an active stake in the security posture of our customers. For security operations that means helping organizations find and validate potential security issues before they become an incident. Detecting, investigating and responding to threats is only part of better cyber risk management. It’s also crucial to understand what an organization looks like from an attacker’s perspective and if an organization’s cybersecurity controls are as effective as expected. By adding Mandiant’s attack surface management capabilities to Google Cloud’s portfolio, organizations will be able to continually monitor assets for exposures, enabling intelligence and red teams to move security programs from reactive to proactive to understand what’s vulnerable, misconfigured and exposed. Once an organization’s attack surface is understood, validating existing security controls is critical. With Mandiant Security Validation, organizations will be able to continuously validate and measure the effectiveness of their cybersecurity controls across cloud and on-premise environments.Transforming security operations and incident response Security leaders and their teams often lack the resources and expertise required to keep pace with today’s ever changing threats. Organizations already harness Google’s security tools, expert advice and rich partner ecosystem to evolve their security program. Google’s Autonomic Security Operations also serves as a prescriptive solution to guide our customers through this modernization journey. With the addition of Mandiant to the Google Cloud family, we can now offer proven global expertise in comprehensive incident response, strategic readiness and technical assurance to help organizations mitigate threats and reduce business risk before, during and after an incident.In addition, Google Cloud’s security operations suite will continue to provide a central point of intelligence, analysis and operations across on-premise environments, Google Cloud and other cloud providers. Google Cloud is also deeply committed to supporting our technology and solution partners, and this acquisition will enable system integrators, resellers and managed security service providers to offer broader solutions to customers.Comments on the news“The power of stronger partnerships across the cybersecurity ecosystem is critical to driving value for clients and protecting industries around the globe. The combination of Google Cloud and Mandiant and their commitment to multicloud will further support increased collaboration, driving innovation across the cybersecurity industry and augmenting threat research capabilities. We look forward to working with them on this mission.” – Paolo Dal Cin, Global Lead, Accenture Security“Google’s acquisition of Mandiant, a leader in security advisory, consulting and incident response services will allow Google Cloud to deliver an end-to-end security operations suite with even greater capabilities and services to support customers in their security transformation across cloud and on-premise environments.” – Craig Robinson, Research VP, Security Services, IDC “Bringing together Mandiant and Google Cloud, two long-time cybersecurity leaders, will advance how companies identify and defend against threats. We look forward to the impact of this acquisition, both for the security industry and the protection of our customers.” – Andy Schworer, Director, Cyber Defense Engineering, UberWe welcome Mandiant to the Google Cloud team, and together we look forward to helping security teams achieve so much more in defense of their organizations. You can read our release and Kevin Mandia’s blog for more on this exciting news.
Quelle: Google Cloud Platform

How Google scales ad personalization with Bigtable

Cloud Bigtable is a popular and widely used key-value database available on Google Cloud. The service provides scale elasticity, cost efficiency, excellent performance characteristics, and 99.999% availability SLA. This has led to massive adoption with thousands of customers trusting Bigtable to run a variety of their mission-critical workloads.Bigtable has been in continuous production usage at Google for more than 15 years now. It processes more than 5 billion requests per second at peak and has more than 10 exabytes of data under management. It’s one of the largest semi-structured data storage services at Google. One of the key use cases for Bigtable at Google is ad personalization. This post describes the central role that Bigtable plays within ad personalization.Ad personalizationAd personalization aims to improve user experience by presenting topical and relevant ad content. For example, I often watch bread-making videos on YouTube. If ads personalization is enabled in my ad settings, my viewing history could indicate to YouTube that I’m interested in baking as a topic and would potentially be interested in ad content related to baking productsAd personalization requires large-scale data processing in near real-time for timely personalization with strict controls for user data handling and retention. System availability needs to be high, and serving latencies need to be low due to the narrow window within which decisions need to be made on what ad content to retrieve and serve. Sub-optimal serving decisions (e.g. falling back to generic ad content) could potentially impact user experience. Ad economics requires infrastructure costs to be kept as low as possible.Google’s ad personalization platform provides frameworks to develop and deploy machine learning models for relevance and ranking of ad content. The platform supports both real-time and batch personalization. The platform is built using Bigtable, allowing Google products to access data sources for ads personalization in a secure manner that is both privacy and policy compliant, all while honoring users’ decisions about what data they want to provide to GoogleThe output from personalization pipelines, such as advertising profiles are stored back in Bigtable for further consumption. The ad serving stack retrieves these advertising profiles to drive the next set of ad serving decisions.Some of the storage requirements of the personalization platform include:Very high throughput access for batch and near real-time personalizationLow latency (<20 ms at p99) lookup for reads on the critical path for ad servingFast (i.e. in the order of seconds) incremental update of advertising models in order to reduce personalization delayBigtable Bigtable’s versatility in supporting both low-cost, high-throughput access to data for offline personalization as well as consistent low-latency access for online data serving makes it an excellent fit for the ads workloads. Personalization at Google-scale requires a very large storage footprint. Bigtable’s scalability, performance consistency and low cost required to meet a given performance curve are key differentiators for these workloads. Data modelThe personalization platform stores objects in Bigtable as serialized protobufs keyed by Object ids. Typical data sizes are less than 1 MB and serving latency is less than 20 ms at p99. Data is organized as corpora, which correspond to distinct categories of data. A corpus maps to a replicated Bigtable.Within a corpus, data is organized as DataTypes, logical groupings of data. Features, embeddings, and different flavors of advertising profiles are stored as DataTypes, which map to Bigtable column families. DataTypes are defined in schemas which describe the proto structure of the data and additional metadata indicating ownership and provenance. SubTypes map to Bigtable columns and are free-form. Each row of data is uniquely identified by a RowID, which is based on the Object ID. The personalization API identifies individual values by RowID (row key), DataType (column family), SubType (column part), and Timestamp.ConsistencyThe default consistency mode for operations is eventual. In this mode, data from the Bigtable replica nearest to the user is retrieved, providing the lowest median and tail latency.Reads and writes to a single Bigtable replica are consistent. If there are multiple replicas of Bigtable in a region, traffic spillover across regions is more likely. To improve the likelihood of read-after-write consistency, the personalization platform uses a notion of row affinity. If there are multiple replicas in a region, one replica is preferentially selected for any given row, based on a hash of the Row ID. For lookups with stricter consistency requirements, the platform first attempts to read from the nearest replica and requests that Bigtable return the current low watermark (LWM) for each replica. If the nearest replica happens to be the replica where the writes originated, or if the LWMs indicate that replication has caught up to the necessary timestamp, then the service returns a consistent response. If replication has not caught up, then the service issues a second lookup—this one targeted at the Bigtable replica where writes originated. That replica could be distant and the request could be slow. While waiting for a response, the platform may issue failover lookups to other replicas in case replication has caught up at those replicas.Bigtable replicationThe Ads personalization workloads use a Bigtable replication topology with more than 20 replicas, spread across four continents. Replication helps address the high availability needs for ad serving. Bigtable’s zonal monthly uptime percentage is in excess of 99.9%, and replication coupled with a multi-cluster routing policy allows for availability in excess of 99.999%.A globe-spanning topology allows for data placement that is close to users, minimizing serving latencies. However, it also comes with challenges such as variability in network link costs and throughputs. Bigtable uses Minimum Spanning Tree-based routing algorithms and bandwidth-conserving proxy replicas to help reduce network costs. For ads personalization, reducing Bigtable replication delay is key to lowering the personalization delay (the time between a user’ action and when that action has been incorporated into advertising models to show more relevant ads to the user). Faster replication is preferred but we also need to balance serving traffic against replication traffic and make sure low-latency user-data serving is not disrupted due to incoming or outgoing replication traffic flows. Under the hood, Bigtable implements complex flow control and priority boost mechanisms to manage global traffic flows and to balance serving and replication traffic priorities. Workload IsolationAd personalization batch workloads are isolated from serving workloads by pinning a given set of workloads onto certain replicas; some Bigtable replicas exclusively drive personalization pipelines while others drive user-data serving. This model allows for a continuous and near real-time feedback loop between serving systems and offline personalization pipelines, while protecting the two workloads from contending with each other.For Cloud Bigtable users, AppProfiles and cluster-routing policies provide a way to confine and pin workloads to specific replicas to achieve coarse-grained isolation. Data residencyBy default, data is replicated to every replica—often spread out globally—which is wasteful for data that is only accessed regionally. Regionalization saves on storage and replication costs by confining data to the region where it is most likely to be accessed. Compliance with regulations mandating that data pertaining to certain subjects are physically stored within a given geographical area is also vital.The location of data can be either implicitly determined by the access location of requests or through location metadata and other product signals. Once the location for a user is determined, it is stored in a location metadata table which points to the Bigtable replicas that read requests should be routed to. Migration of data based on row-placement policies happens in the background, without downtime or serving performance regressions.ConclusionIn this blog post, we looked at how Bigtable is used within Google to support an important use case—modeling user intent for ad personalization. Over the past decade, Bigtable has scaled as Google’s personalization needs have scaled by orders of magnitude. For large-scale personalization workloads, Bigtable offers low cost storage with excellent performance characteristics. It seamlessly handles global traffic flows with simple user configurations. Its ease at handling both low-latency serving and high-throughput batch computations make it an excellent option for lambda-style data processing pipelines.We continue to drive high levels of investment to further lower costs, improve performance, and bring new features to make Bigtable an even better choice for personalization workloads.Learn moreTo get started with Bigtable, try it out with a Qwiklab and learn more about the product here.AcknowledgementsWe’d like to thank Ashish Awasthi, Ashish Chopra, Jay Wylie, Phaneendhar Vemuru, Bora Beran, Elijah Lawal, Sean Rhee and other Googlers for their valuable feedback and suggestions.Related ArticleMoloco handles 5 million+ ad requests per second with Cloud BigtableMoloco uses Cloud Bigtable to build their ad tech platform and process 5+ million ad requests per second.Read Article
Quelle: Google Cloud Platform