Experimente: Youtuber erzeugt 150.000 Ampere in der Garage
Der Youtuber Styropyro nutzt 400 Autobatterien für Extrem-Experimente. Mit 150.000 Ampere verdampft er Metall und erzeugt Plasma-Effekte. (Physik, Video-Community)
Quelle: Golem

Der Youtuber Styropyro nutzt 400 Autobatterien für Extrem-Experimente. Mit 150.000 Ampere verdampft er Metall und erzeugt Plasma-Effekte. (Physik, Video-Community)
Quelle: Golem
Docker Sandboxes is a new primitive in the Docker’s ecosystem that allows you to run AI agents or any other workloads in isolated micro VMs. It provides strong isolation, convenient developer experience and a strong security boundary with a network proxy configurable to deny agents connecting to arbitrary internet hosts. The network proxy will also conveniently inject the API keys, like your ANTHROPIC_API_KEY, or OPENAI_API_KEY in the network proxy so the agent doesn’t have access to them at all and cannot leak them.
In a previous article I showed how Docker Sandboxes lets you install any tools an AI agent might need, like a JDK for Java projects or some custom CLIs, into a container that’s isolated from the host. Today we’re going a step further: we’ll run OpenClaw, an open-source AI coding agent, on a local model via Docker Model Runner.
No API keys, no cloud costs, fully private. And you can do it in 2-ish commands.
Quick Start
Make sure you have Docker Desktop and that Docker Model Runner is enabled (Settings → Docker Model Runner → Enable), then pull a model:
docker model pull ai/gpt-oss:20B-UD-Q4_K_XL
Now create and run the sandbox:
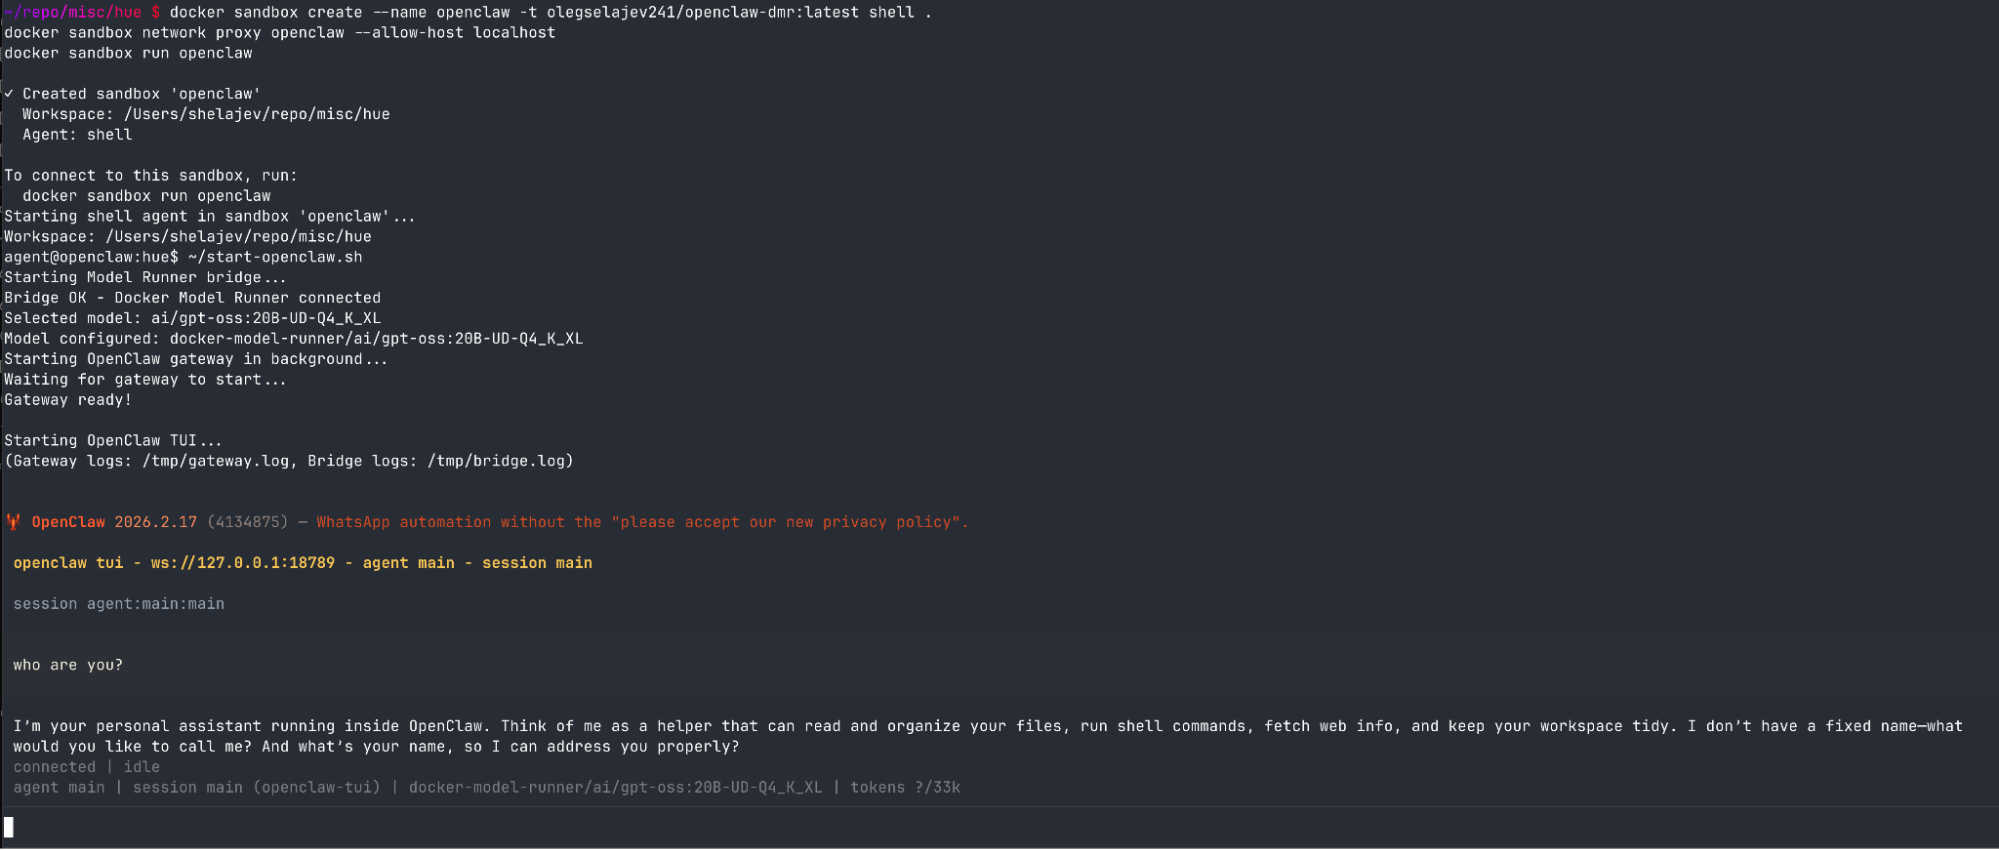
docker sandbox create –name openclaw -t olegselajev241/openclaw-dmr:latest shell .
docker sandbox network proxy openclaw –allow-host localhost
docker sandbox run openclaw
Inside the sandbox:
~/start-openclaw.sh
And that’s it. You’re in OpenClaw’s terminal UI, talking to a local gpt-oss model on your machine. The model runs in Docker Model Runner on your host, and OpenClaw runs completely isolated in the sandbox: it can only read and write files in the workspace you give it, and there’s a network proxy to deny connections to unwanted hosts.
Cloud models work too
The sandbox proxy will automatically inject API keys from your host environment. If you have ANTHROPIC_API_KEY or OPENAI_API_KEY set, OpenClaw can run cloud models, just specify them in OpenClaw settings. The proxy takes care of credential injection, so your keys will never be exposed inside the sandbox.
This means you can use free local models for experimentation, then switch to cloud models for serious work all in the same sandbox. With cloud models you don’t even need to allow to proxy to host’s localhost, so don’t run docker sandbox network proxy openclaw –allow-host localhost.
Choose Your Model
The startup script automatically discovers models available in your Docker Model Runner. List them:
~/start-openclaw.sh list
Use a specific model:
~/start-openclaw.sh ai/qwen2.5:7B-Q4_K_M
Any model you’ve pulled with docker model pull is available.
How it works (a bit technical)
The pre-built image (olegselajev241/openclaw-dmr:latest) is based on the shell sandbox template with three additions: Node.js 22, OpenClaw, and a tiny networking bridge.
The bridge is needed because Docker Model Runner runs on your host and binds to localhost:12434. But localhost inside the sandbox means the sandbox itself, not your host. The sandbox does have an HTTP proxy, at host.docker.internal:3128, that can reach host services, and we allow it to reach localhost with docker sandbox network proxy –allow-host localhost.
The problem is OpenClaw is Node.js, and Node.js doesn’t respect HTTP_PROXY environment variables. So we wrote a ~20-line bridge script that OpenClaw connects to at 127.0.0.1:54321, which explicitly forwards requests through the proxy to reach Docker Model Runner on the host:
OpenClaw → bridge (localhost:54321) → proxy (host.docker.internal:3128) → Model Runner (host localhost:12434)
The start-openclaw.sh script starts the bridge, starts OpenClaw’s gateway (with proxy vars cleared so it hits the bridge directly), and runs the TUI.
Build Your Own
Want to customize the image or just see how it works? Here’s the full build process.
1. Create a base sandbox and install OpenClaw
docker sandbox create –name my-openclaw shell .
docker sandbox network proxy my-openclaw –allow-host localhost
docker sandbox run my-openclaw
Now let’s install OpenClaw in the sandbox:
# Install Node 22 (OpenClaw requires it)
npm install -g n && n 22
hash -r
# Install OpenClaw
npm install -g openclaw@latest
# Run initial setup
openclaw setup
2. Create the Model Runner bridge
This is the magic piece — a tiny Node.js server that forwards requests through the sandbox proxy to Docker Model Runner on your host:
cat > ~/model-runner-bridge.js << 'EOF'
const http = require("http");
const { URL } = require("url");
const PROXY = new URL(process.env.HTTP_PROXY || "http://host.docker.internal:3128");
const TARGET = "localhost:12434";
http.createServer((req, res) => {
const proxyReq = http.request({
hostname: PROXY.hostname,
port: PROXY.port,
path: "http://" + TARGET + req.url,
method: req.method,
headers: { …req.headers, host: TARGET }
}, proxyRes => {
res.writeHead(proxyRes.statusCode, proxyRes.headers);
proxyRes.pipe(res);
});
proxyReq.on("error", e => { res.writeHead(502); res.end(e.message); });
req.pipe(proxyReq);
}).listen(54321, "127.0.0.1");
EOF
3. Configure OpenClaw to use Docker Model Runner
Now merge the Docker Model Runner provider into OpenClaw’s config:
python3 -c "
import json
p = '$HOME/.openclaw/openclaw.json'
with open(p) as f: cfg = json.load(f)
cfg['models'] = cfg.get('models', {})
cfg['models']['mode'] = 'merge'
cfg['models']['providers'] = cfg['models'].get('providers', {})
cfg['models']['providers']['docker-model-runner'] = {
'baseUrl': 'http://127.0.0.1:54321/engines/llama.cpp/v1',
'apiKey': 'not-needed',
'api': 'openai-completions',
'models': [{
'id': 'ai/qwen2.5:7B-Q4_K_M',
'name': 'Qwen 2.5 7B (Docker Model Runner)',
'reasoning': False, 'input': ['text'],
'cost': {'input': 0, 'output': 0, 'cacheRead': 0, 'cacheWrite': 0},
'contextWindow': 32768, 'maxTokens': 8192
}]
}
cfg['agents'] = cfg.get('agents', {})
cfg['agents']['defaults'] = cfg['agents'].get('defaults', {})
cfg['agents']['defaults']['model'] = {'primary': 'docker-model-runner/ai/qwen2.5:7B-Q4_K_M'}
cfg['gateway'] = {'mode': 'local'}
with open(p, 'w') as f: json.dump(cfg, f, indent=2)
"
4. Save and share
Exit the sandbox and save it as a reusable image:
docker sandbox save my-openclaw my-openclaw-image:latest
Push it to a registry so anyone can use it:
docker tag my-openclaw-image:latest yourname/my-openclaw:latest
docker push yourname/my-openclaw:latest
Anyone with Docker Desktop (with the modern sandboxes includes) can spin up the same environment with:
docker sandbox create –name openclaw -t yourname/my-openclaw:latest shell .
What’s next
Docker Sandboxes make it easy to run any AI coding agent in an isolated, reproducible environment. With Docker Model Runner, you get a fully local AI coding setup: no cloud dependencies, no API costs, and complete privacy.
Try it out and let us know what you think.
Quelle: https://blog.docker.com/feed/
AI agents are moving from demos to daily workflows. They write code, run commands, and complete multi-step tasks without constant hand-holding. But general-purpose agents don’t know Docker. They don’t understand your containers, your images, or your specific setup.
Gordon does. Just run docker ai in your terminal or try it in Docker Desktop.
Available today in Docker Desktop 4.61, still in beta, Gordon is an AI agent purpose-built for Docker. It has shell access, Docker CLI access, your filesystem, and deep knowledge of Docker best practices. Point it at a problem, approve its actions, and watch it work.
Figure 1: docker ai command launching Gordon in terminal interface
Figure 2: Gordon in Docker Desktop sidebar
Why Docker Needs Its Own Agent
When your container exits with code 137, Claude or ChatGPT will explain what OOM means. Gordon checks your container’s memory limit, inspects the logs, identifies the memory-hungry process, and proposes a fix. One approval, and it’s done.When you need to containerize a Next.js app, Copilot might suggest a Dockerfile. Gordon examines your project structure, detects your dependencies, generates a production-ready Dockerfile with multi-stage builds, creates docker-compose.yml with the right services, and sets up your environment configs.The difference is context and execution. Gordon knows what’s running on your machine. It can read your Docker state, access your filesystem, and take action. It’s not guessing – it’s working with your actual environment.
What Gordon Does
Debug and fix – Container won’t start. Service is unhealthy. Something is consuming all the memory. Gordon inspects logs, checks container status, identifies root cause, and proposes fixes. You approve, it executes.Build and containerize – Take this application and make it run in Docker. Gordon examines your project, generates production-ready Dockerfiles with multi-stage builds, creates docker-compose.yml with the right services, handles environment configs and dependencies.Execute and manage – Clean up disk space. Stop all containers. Pull and run specific images. Routine Docker operations should be conversational, not a trip to the docs.Develop and optimize – Add health checks. Implement multi-stage builds. Apply security best practices. Reduce image sizes. Make existing Docker setups production-ready.Gordon handles all of it.
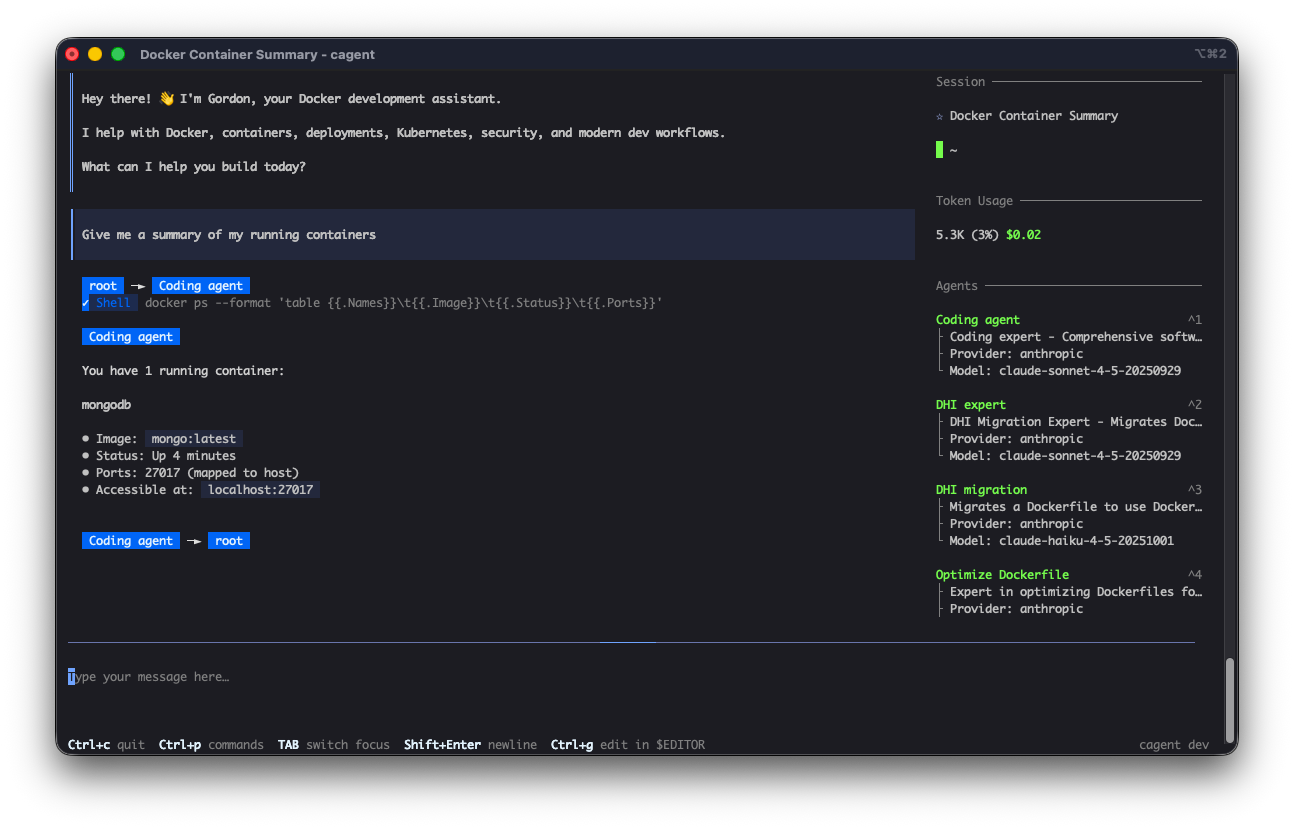
Figure 3: Split screen showing Gordon debugging a mongodb container
How Gordon Works
Gordon is built on cagent, Docker’s agent framework included with Docker Desktop, and runs locally within Docker Desktop. It has access to:
Your shell – Can execute commands after approval
Your filesystem – Reads project structure, configs, logs
Docker CLI – Full access to Docker operations
Docker knowledge base – Documentation, best practices, common patterns
You can configure Gordon’s working directory to point to a specific codebase. This gives Gordon full context on your project structure, dependencies, and existing Docker setup.
The permission model is straightforward: Gordon shows you what it wants to do, you approve or reject, then it executes. Every command. Every file update. Every Docker operation. You’re not watching passively – you’re directing an agent that knows Docker inside and out.
Figure 4: Permissions request
Where to Find Gordon
Docker Desktop: Look for the Gordon icon in the left sidebarCLI: Run docker ai from your terminalGordon is included with all Docker subscriptions:
Personal: Included
Pro: 3x usage capacity
Team: 3x usage capacity
Business: 6x usage capacity
Note for Business users: If you don’t see Gordon, your admin needs to request enablement for your organization. Reach out to your Docker account team or contact support.
Get started today
Download Docker Desktop 4.61+
Log in with your Docker account
Click the Gordon icon, select a project directory, and ask “Optimize my Dockerfile”
Explore the full documentation in Docker Docs
Gordon is available now in Docker Desktop 4.61 and later
Quelle: https://blog.docker.com/feed/

Wenn sich Lithium-Akkus entzünden, kann es zu starken Bränden kommen. Das soll bei Transport und Lagerung besser berücksichtigt werden. (Elektroauto, Auto)
Quelle: Golem

Bei Amazon gibt es bis Sonntag ein 1 Meter langes USB4-Kabel zum Preis eines 0,5 Meter langen Kabels. (USB4, Amazon)
Quelle: Golem

Amazon hat einen Bluetooth-Tracker von Ugreen im Angebot, der mit seinem Kartenformat in Geldbeutel und Brieftasche passt. (Tracking, iPhone)
Quelle: Golem

145 W, 25.000 mAh, drei Anschlüsse, Display: Eine leistungsstarke Ugreen-Nexode-Powerbank gibt es bei Amazon für unter 50 Euro. (Technik/Hardware, Amazon)
Quelle: Golem

Bei Amazon wurde ein bifaziales Balkonkraftwerk nie günstiger angeboten als jetzt. Doch die Aktion ist befristet. (Balkonkraftwerk, Technik/Hardware)
Quelle: Golem

Von Juli bis Dezember 2025 konnten Angreifer Daten einiger Paypal-Business-Kunden abgreifen. Auch unbefugte Transaktionen wurden beobachtet. (Datenleck, Datenschutz)
Quelle: Golem

Satelliten, Raumgleiter, Laserwaffen: Deutschlands Pläne fürs All klingen vernünftig. Die gescheiterten Projekte der Vergangenheit lassen aber ernsthaft fragen: Wie soll das gehen? Ein IMHO von Friedrich List (Militär, Politik)
Quelle: Golem