AWS Clean Rooms now supports parameters in PySpark analysis templates

AWS Clean Rooms announces support for parameters in PySpark analysis templates, offering increased flexibility for organizations and their partners to scale their privacy-enhanced data collaboration use cases. With this launch, you can create a single PySpark analysis template that allows different values to be provided by the Clean Rooms collaborator running a job at submission time without modifying the template code. With parameters in PySpark analysis templates, the code author creates a PySpark template with parameters support, and if approved to run, the job runner submits parameter values directly to the PySpark job. For example, a measurement company running attribution analysis for advertising campaigns can input time windows and geographic regions dynamically to surface insights that drive campaign optimizations and media planning accelerating time-to-insights.
With AWS Clean Rooms, customers can create a secure data clean room in minutes and collaborate with any company on AWS or Snowflake to generate unique insights about advertising campaigns, investment decisions, and research and development. For more information about the AWS Regions where AWS Clean Rooms is available, see the AWS Regions table. To learn more about collaborating with AWS Clean Rooms, visit AWS Clean Rooms.
Quelle: aws.amazon.com

Amazon S3 on Outposts is now available on second-generation AWS Outposts racks

Amazon S3 on Outposts is now available on second-generation AWS Outposts racks for your data residency, low latency, and local data processing use cases on-premises. S3 on Outposts on second-generation Outposts racks offers three storage tiers: 196 TB, 490 TB, and 786 TB. Choose the storage tier that matches your workload, whether for production workloads, backups, or archival workloads. With S3 on Outposts, you can store, secure, retrieve, and control access to your data using familiar S3 APIs and features. AWS Outposts is a fully managed service that extends AWS infrastructure, services, and tools to virtually any data center, co-location space, or on-premises facility for a consistent hybrid experience. S3 on Outposts on second-generation Outposts racks is available in all AWS Regions and countries/territories where these racks are available. To learn more, visit the S3 on Outposts page or read our documentation.
Quelle: aws.amazon.com

OpenCode with Docker Model Runner for Private AI Coding

AI-powered coding assistants are becoming a core part of modern development workflows. At the same time, many teams are increasingly concerned about where their code goes, how it’s processed, and who has access to it.

By combining OpenCode with Docker Model Runner, you can build a powerful AI-assisted coding experience while keeping full control over your data, infrastructure and spend.

This post walks through how to configure OpenCode to use Docker Model Runner and explains why this setup enables a privacy-first and cost-aware approach to AI-assisted development.

What Are OpenCode and Docker Model Runner?

OpenCode is an open-source coding assistant designed to integrate directly into developer workflows. It supports multiple model providers and exposes a flexible configuration system that makes it easy to switch between them.

Docker Model Runner (DMR) allows you to run and manage large language models easily. It exposes an OpenAI-compatible API, making it straightforward to integrate with existing tools that already support OpenAI-style endpoints.

Together, they provide a familiar developer experience backed by models running entirely within infrastructure you control.

Modifying the OpenCode Configuration

OpenCode can be customized using a configuration file that controls how providers and models are defined.

You can define this configuration in one of two places:

Global configuration: ~/.config/opencode/opencode.json

Project-specific configuration: opencode.json in the root of your project

When a project-level configuration is present, it takes precedence over the global one.

Using OpenCode with Docker Model Runner

Docker Model Runner (DMR) exposes an OpenAI-compatible API, which makes integrating it with OpenCode straightforward. To enable this integration, you simply need to update your opencode.json file to point to the DMR server and declare the locally available models.

Assuming Docker Model Runner is running at: http://localhost:12434/v1

your opencode.json configuration could look like this:

{
"$schema": "https://opencode.ai/config.json",
"provider": {
"dmr": {
"npm": "@ai-sdk/openai-compatible",
"name": "Docker Model Runner",
"options": {
"baseURL": "http://localhost:12434/v1",
},
"models": {
"qwen-coder3": {
"name": "qwen-coder3"
},
"devstral-small-2": {
"name": "devstral-small-2"
}
}
}
}
}

This configuration allows OpenCode to utilize locally hosted models through DMR, providing a powerful and private coding assistant.Note for Docker Desktop users:

If you are running Docker Model Runner via Docker Desktop, make sure TCP access is enabled. OpenCode connects to Docker Model Runner over HTTP, which requires the TCP port to be exposed:

docker desktop enable model-runner –tcp

Once enabled, Docker Model Runner will be accessible at http://localhost:12434/v1.

Figure 1: Enabling OpenCode to utilize locally hosted models through Docker Model Runner

Figure 2: Models like qwen3-coder, devstral-small-2, gpt-oss are good for coding use cases.

Benefits of using OpenCode with Model Runner

Privacy by Design

Using OpenCode with Docker Model Runner enables a privacy-first approach to AI-assisted development by keeping all model inference within the infrastructure you control.

Docker Model Runner runs models behind an OpenAI-compatible API endpoint. OpenCode sends prompts, source code, and context only to that endpoint, and nowhere else.

This means:

No third-party AI providers are involved

No external data sharing or vendor-side retention

No training on your code by external services

From OpenCode’s perspective, the provider is simply an API endpoint. Where that endpoint runs, on a developer machine, an internal server, or a private cloud, is entirely up to you.

Cost Control

Beyond privacy, running models with Docker Model Runner provides a significant cost advantage over hosted AI APIs.

Cloud-hosted coding assistants, can become expensive very quickly, especially when:

Working with large repositories

Passing long conversational or code context

Running frequent iterative prompts during development

With Docker Model Runner, inference runs on your own hardware. Once the model is pulled, there are no per-token fees, no request-based pricing, and no surprise bills. Teams can scale usage freely without worrying about escalating API costs.

Recommended Models for Coding

When using OpenCode with Docker Model Runner, model choice has a direct impact on both quality and developer experience. While many general-purpose might models work reasonably well, coding-focused models are optimized for long context windows and code-aware reasoning, which is especially important for real-world repositories.

The following models are well suited for use with OpenCode and Docker Model Runner:

qwen3-coder

devstral-small-2

gpt-oss

Each of these models can be served through Docker Model Runner and exposed via its OpenAI-compatible API.

You can pull these models by simply running:

docker model pull qwen3-coder

Pulling Models from Docker Hub and Hugging Face

Docker Model Runner can pull models not only from Docker Hub, but also directly from Hugging Face and automatically convert them into OCI artifacts that can be run and shared like any other Docker model.

For example, you can pull a model directly from Hugging Face with:

docker model pull huggingface.co/unsloth/Ministral-3-14B-Instruct-2512-GGUF

This gives teams access to the broader open model ecosystem without sacrificing consistency or operability.

Context Length Matters

For coding tasks, context length is often more important than raw parameter count. Large repositories, multi-file refactors, and long conversational histories all benefit from being able to pass more context to the model.

By default:

qwen3-coder → 128K context

devstral-small-2 → 128K context

gpt-oss → 4,096 tokens

The difference comes down to model intent.

qwen3-coder and devstral-small-2 are coding-focused models, designed to ingest large amounts of source code, project structure, and related context in a single request. A large default context window is critical for these use cases.

gpt-oss, on the other hand, is a general-purpose model. Its default context size reflects a broader optimization target, where extremely long inputs are less critical than they are for code-centric workflows.

Increasing Context Size for GPT-OSS

If you want to use gpt-oss for coding tasks that benefit from a larger context window, Docker Model Runner makes it easy to repackage the model with an increased context size.

For example, to create a version of gpt-oss with a 128K context window, you can run:

docker model pull gpt-oss # In case it's not pulled
docker model package –from gpt-oss –context-size 128000 gpt-oss:128K

This creates a new model artifact with an expanded context length that can be served by Docker Model Runner like any other model.Once packaged, you can reference this model in your opencode.json configuration:

{
"$schema": "https://opencode.ai/config.json",
"provider": {
"dmr": {
"npm": "@ai-sdk/openai-compatible",
"name": "Docker Model Runner",
"options": {
"baseURL": "http://localhost:12434/v1"
},
"models": {
"gpt-oss:128K": {
"name": "gpt-oss (128K)"
}
}
}
}
}

Sharing Models Across Your Team

Packaging models as OCI Artifacts has an additional benefit: the resulting model can be pushed to Docker Hub or a private registry.

This allows teams to:

Standardize on specific model variants (including context size)

Share models across developers without local reconfiguration

Ensure consistent behavior across environments

Version and roll back model changes explicitly

Instead of each developer tuning models independently, teams can treat models as first-class artifacts, built once and reused everywhere.

Putting It All Together: Using the Model from the CLI

With Docker Model Runner configured and the gpt-oss:128K model packaged, you can start using it immediately from OpenCode.

This section walks through selecting the model and using it to generate an agents.md file directly inside the Docker Model project.

Step 1: Verify the Model Is Available

First, confirm that the packaged model is available locally:

docker model ls

You should see gpt-oss:128K listed among the available models. If not, make sure the packaging step is completed successfully.

Step 2: Configure OpenCode to Use the Model

Ensure your project’s opencode.json includes the packaged model:

{
"$schema": "https://opencode.ai/config.json",
"provider": {
"dmr": {
"npm": "@ai-sdk/openai-compatible",
"name": "Docker Model Runner",
"options": {
"baseURL": "http://localhost:12434/v1"
},
"models": {
"gpt-oss": {
"name": "gpt-oss:128K"
}
}
}
}
}

This makes the model available to OpenCode under the dmr provider.

Step 3: Start OpenCode in the Project

From the root of the Docker Model project, start OpenCode:

opencode

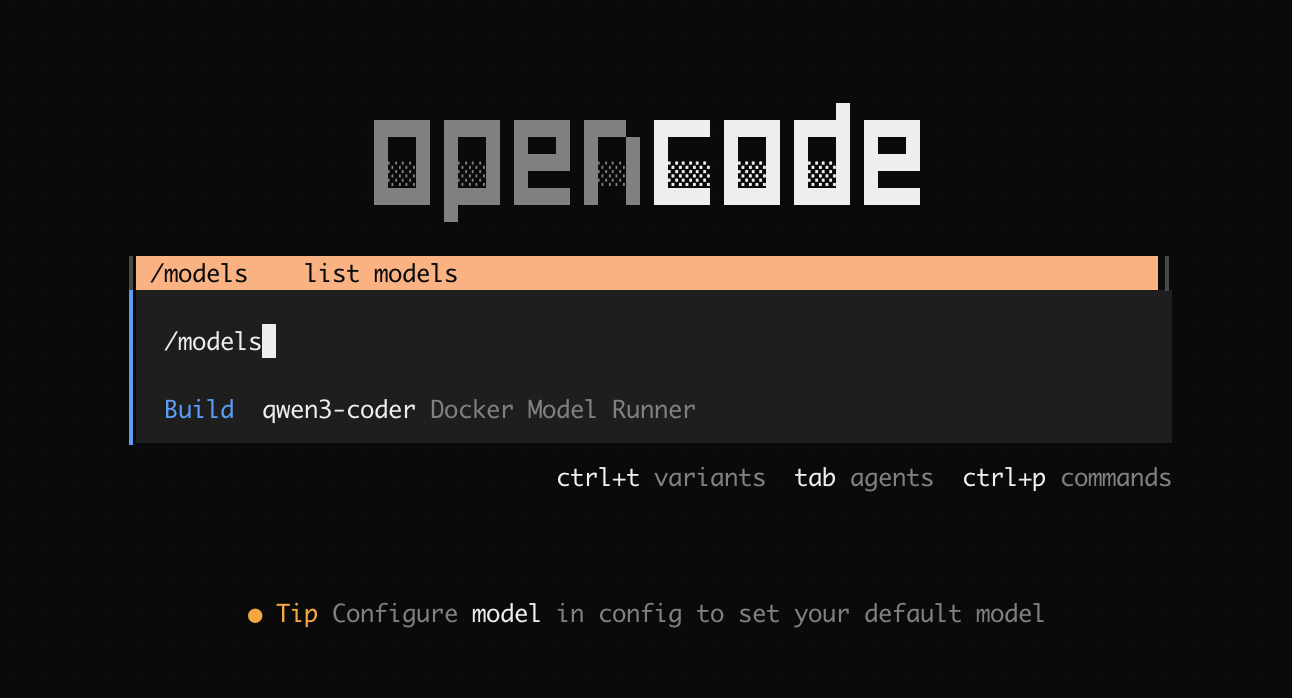
Select the model from the list by running:

/models

Figure 3: Selecting gpt-oss model powered by Docker Model Runner in OpenCode

Step 4: Ask OpenCode to Generate agents.md

Once OpenCode is running, prompt the model to generate an agents.md file using the repository as context:

Generate an agents.md file in the project root following the agents.md specification and examples.

Use this repository as context and include sections that help an AI agent work effectively with this project, including:
– Project overview
– Build and test commands
– Code style guidelines
– Testing instructions
– Security considerations

Base the content on the actual structure, tooling, and conventions used in this repository.
Keep the file concise, practical, and actionable for an AI agent contributing to the project.

Because OpenCode is connected to Docker Model Runner, it can safely pass repository structure and relevant files to the model without sending any data outside your infrastructure.

The expanded 128K context window allows the model to reason over a larger portion of the project, resulting in a more accurate and useful agents.md.

Figure 4: The resulting agents.md file

Step 5: Review and Contribute to Docker Model Runner

Once the file is generated:

cat agents.md

Make any necessary adjustments so it accurately reflects the project, then commit it like any other project artifact:

git add agents.md
git commit -m "Add agents documentation"

At this point, you’re ready to open your first Docker Model Runner pull request.

Using OpenCode with Docker Model Runner makes it easy to contribute high-quality documentation and project artifacts, while keeping all model inference and repository context within the infrastructure you control.

How You Can Get Involved

The strength of Docker Model Runner lies in its community and there’s always room to grow. We need your help to make this project the best it can be. To get involved, you can:

Star the repository: Show your support and help us gain visibility by starring the Docker Model Runner repo.

Contribute your ideas: Have an idea for a new feature or a bug fix? Create an issue to discuss it. Or fork the repository, make your changes, and submit a pull request. We’re excited to see what ideas you have!

Spread the word: Tell your friends, colleagues, and anyone else who might be interested in running AI models with Docker.

We’re incredibly excited about this new chapter for Docker Model Runner, and we can’t wait to see what we can build together. Let’s get to work!

Learn more

Check out the Docker Model Runner General Availability announcement

Visit our Model Runner GitHub repo! Docker Model Runner is open-source, and we welcome collaboration and contributions from the community!

Get started with Docker Model Runner with a simple hello GenAI application

Quelle: https://blog.docker.com/feed/

Permission-Aware RAG: End-to-End Testing with the SpiceDB Testcontainer

We use GenAI in every facet of technology now – internal knowledge bases, customer support systems, and code review bots, to name just a few use cases. And in nearly every one of these, someone eventually asks:

What stops the model from returning something the user shouldn’t see?”

This is a roadblock that companies building RAG features or AI Agents eventually hit – the moment where an LLM returns data from a document that the user was not authorized to access, introducing potential legal, financial, and reputational risk to all parties. Unfortunately, traditional methods of authorization are not suited for the hierarchical, dynamic nature of access control in RAG. This is exactly where modern authorization permissioning systems such as SpiceDB shine: in building fine-grained authorization for filtering content in your AI-powered applications.

In fact, OpenAI uses SpiceDB to secure 37 Billion documents for 5 Million users who use ChatGPT Connectors – a feature where you bring your data from different sources such as Google Drive, Dropbox, GitHub etc. into ChatGPT.

This blog post shows how you can pair SpiceDB with Testcontainers to give you the ability to test your permission logic inside your RAG pipeline, end-to-end, automatically, with zero infrastructure dependencies.The example repo can be found here.

Quick Primer on Authorization

Before diving into implementation, let’s clarify two foundational concepts: Authentication (verifying who a user is) and Authorization (deciding what they can access).

Authorization is commonly implemented via techniques such as:

Access Control Lists (ACLs)

Role-Based Access Control (RBAC)

Attribute-Based Access Control (ABAC)

However, for complex, dynamic, and context-rich applications like RAG pipelines, traditional methods such as RBAC or ABAC fall short. The new kid on the block – ReBAC (Relationship-Based Access Control) is ideal as it models access as a graph of relationships rather than fixed rules, providing the necessary flexibility and scalability required.

ReBAC was popularized in Google Zanzibar, the internal authorization system Google built to manage permissions across all its products (e.g., Google Docs, Drive). Zanzibar systems are optimized for low-latency, high-throughput authorization checks, and global consistency – requirements that are well-suited for RAG systems.

SpiceDB is the most scalable open-source implementation of Google’s Zanzibar authorization model. It stores access as a relationship graph, where the fundamental check reduces to: 

Is this actor allowed to perform this action on this resource?

For a Google Docs-style example:

definition user {}
definition document {
relation reader: user
relation writer: user

permission read = reader + writer
permission write = writer
}

This schema defines object types (user and document), explicit Relations between the objects (reader, writer), and derived Permissions (read, write). SpiceDB evaluates the relationship graph in microseconds, enabling real-time authorization checks at massive scale.

Access Control for RAG 

RAG (Retrieval-Augmented Generation) is an architectural pattern that enhances Large Language Models (LLMs) by letting them consult an external knowledge base, typically involving a Retriever component finding document chunks and the LLM generating an informed response.

This pattern is now used by businesses and enterprises for apps like chatbots that query sensitive data such as customer playbooks or PII – all stored in a vector database for performance. However, the fundamental risk in this flow is data leakage: the Retriever component ignores permissions, and the LLM will happily summarize unauthorized data. In fact, OWASP has a Top 10 Risks for Large Language Model Applications list which includes Sensitive Information Disclosure, Excessive Agency & Vector and Embedding Weaknesses. The consequences of this leakage can be severe, ranging from loss of customer trust to massive financial and reputational damage from compliance violations.

This setup desperately needs fine-grained authorization, and that’s where SpiceDB comes in. SpiceDB can post-filter retrieved documents by performing real-time authorization checks, ensuring the model only uses data the querying user is permitted to see. The only requirement is that the documents have metadata that indicates where the information came from.But testing this critical permission logic without mocks, manual Docker setup, or flaky Continuous Integration (CI) environments is tricky. Testcontainers provides the perfect solution, allowing you to spin up a real, production-grade, and disposable SpiceDB instance inside your unit tests to deterministically verify that your RAG pipeline respects permissions end-to-end.

Spin Up Real Authorization for Every Test

Instead of mocking your authorization system or manually running it on your workstation, you can add this line of code in your test:

container, _ := spicedbcontainer.Run(ctx, "authzed/spicedb:v1.47.1")

And Testcontainers will:

Pull the real SpiceDB image

Start it in a clean, isolated environment

Assign it dynamic ports

Wait for it to be ready

Hand you the gRPC endpoint

Clean up afterwards

Because Testcontainers handles the full lifecycle – from pulling the container, exposing dynamic ports, and tearing it down automatically, you eliminate manual processes such as running Docker commands, and writing cleanup scripts. This isolation ensures that every single test runs with a fresh, clean authorization graph, preventing data conflicts, and making your permission tests completely reproducible in your IDE and across parallel Continuous Integration (CI) builds.

Suddenly you have a real, production-grade, Zanzibar-style permissions engine inside your unit test. 

Using SpiceDB & Testcontainers

Here’s a walkthrough of how you can achieve end-to-end permissions testing using SpiceDB and Testcontainers. The source code for this tutorial can be found here.

1. Testing Our RAG 

For the sake of simplicity, we have a minimal RAG and the retrieval mechanism is trivial too. 

We’re going to test three documents which have doc_ids (doc1 doc2 ..) that act as metadata. 

doc1: Internal roadmap

doc2: Customer playbook

doc3: Public FAQ

And three users:

Emilia owns doc1

Beatrice can view doc2

Charlie (or anyone) can view doc3

This SpiceDB schema defines a user and a document object type. A user has read permission on a document if they are the direct viewer or the owner of the document.

definition user {}

definition document {
relation owner: user
relation viewer: user | owner
permission read = owner + viewer
}

2. Starting the Testcontainer 

Here’s how a line of code can start a test to launch the disposable SpiceDB instance:

container, err := spicedbcontainer.Run(ctx, "authzed/spicedb:v1.47.1")
require.NoError(t, err)

Next, we connect to the running containerized service:

host, _ := container.Host(ctx)
port, _ := container.MappedPort(ctx, "50051/tcp")
endpoint := fmt.Sprintf("%s:%s", host, port.Port())

client, err := authzed.NewClient(
endpoint,
grpc.WithTransportCredentials(insecure.NewCredentials()),
grpcutil.WithInsecureBearerToken("somepresharedkey"),
)

This is now a fully-functional SpiceDB instance running inside your test runner.

3. Load the Schema + Test Data

The test seeds data the same way your application would:

_, err := client.WriteSchema(ctx, &apiv1.WriteSchemaRequest{Schema: schema})
require.NoError(t, err)

Then:

rel("document", "doc1", "owner", "user", "emilia")
rel("document", "doc2", "viewer", "user", "beatrice")
rel("document", "doc3", "viewer", "user", "emilia")
rel("document", "doc3", "viewer", "user", "beatrice")
rel("document", "doc3", "viewer", "user", "charlie")

We now have a predictable, reproducible authorization graph for every test run.

4. Post-Filtering With SpiceDB

Before the LLM sees anything, we check permissions with SpiceDB which acts as the source of truth of the permissions in the documents.

resp, err := r.spiceClient.CheckPermission(ctx, &apiv1.CheckPermissionRequest{
Resource: docObject,
Permission: "read",
Subject: userSubject,
})

If SpiceDB says no, the doc is never fed into the LLM, thereby ensuring the user gets an answer to their query only based on what they have permissions to read.

This avoids:

Accidental data leakage

Overly permissive vector search

Compliance problems

Traditional access controls break down when data becomes embeddings hence having guardrails prevents this from happening. 

End-to-End Permission Checks in a Single Test

Here’s what the full test asserts:

Emilia queries “roadmap” → gets doc1 Because they’re the owner.

Beatrice queries “playbook” → gets doc2 Because she’s a viewer.

Charlie queries “public” → gets doc3 Because it’s the only doc he can read, as it’s a public doc

If there is a single failing permission rule, the end-to-end test will immediately fail, which is critical given the constant changes in RAG pipelines (such as new retrieval modes, embeddings, document types, or permission rules). 

What If Your RAG Pipeline Isn’t in Go?

First, a shoutout to Guillermo Mariscal for his original contribution to the SpiceDB Go Testcontainers module. 

What if your RAG pipeline is written in a different language such as Python? Not to worry, there’s also a community Testcontainers module written in Python that you can use similarly. The module can be found here.

Typically, you would integrate it in your integration tests like this:

# Your RAG pipeline test
def test_rag_pipeline_respects_permissions():
with SpiceDBContainer() as spicedb:
# Set up permissions schema
client = create_spicedb_client(
spicedb.get_endpoint(),
spicedb.get_secret_key()
)

# Load your permissions model
client.WriteSchema(your_document_permission_schema)

# Write test relationships
# User A can access Doc 1
# User B can access Doc 2

# Test RAG pipeline with User A
results = rag_pipeline.search(query="…", user="A")
assert "Doc 1" in results
assert "Doc 2" not in results # Should be filtered out!

Similar to the Go module, this container gives you a clean, isolated SpiceDB instance for every test run.

Why This Approach Matters

Authorization testing in RAG pipelines can be tricky, given the scale and latency requirement and it can get trickier in systems handling sensitive data. By integrating the flexibility and scale of SpiceDB with the automated, isolated environments of Testcontainers, you shift to a completely reliable, deterministic approach to authorization. 

Every time your code ships, a fresh, production-grade authorization engine is spun up, loaded with test data, and torn down cleanly, guaranteeing zero drift between your development machine and CI. This pattern can ensure that your RAG system is safe, correct, and permission-aware as it scales from three documents to millions.

Try It Yourself

The complete working example in Go along with a sample RAG pipeline is here:https://github.com/sohanmaheshwar/spicedb-testcontainer-ragClone it.Run go test -v.Watch it spin up a fresh SpiceDB instance, load permissions, and assert RAG behavior.Also, find the community modules for the SpiceDB testcontainer in Go and Python.

Quelle: https://blog.docker.com/feed/

Amazon Redshift Serverless adds queue-based query resource management

Amazon Redshift Serverless introduces queue-based query resource management. You can create dedicated query queues with customized monitoring rules for different workloads. This feature provides granular control over resource usage. Queues let you set metrics-based predicates and automated responses. For example, you can configure rules to automatically abort queries that exceed time limits or consume too many resources. Previously, Query Monitoring Rules (QMR) were applied only at the Redshift Serverless workgroup level, affecting all queries run in this workgroup uniformly. The new queue-based approach lets you create queues with distinct monitoring rules. You can assign these queues to specific user roles and query groups. Each queue operates independently, with rules affecting only the queries within that queue. The available monitoring metrics can be found in Query monitoring metrics for Amazon Redshift Serverless. This feature is available in all AWS regions that support Amazon Redshift Serverless. You can manage QMR with queues through the AWS Console and Redshift APIs. For implementation details, see the documentation in the Amazon Redshift management guide.
Quelle: aws.amazon.com