Getting Started with Offload: Automating Everyday Workflows with Docker

Every developer eventually hits a wall with their local machine. Maybe it’s training an AI model that drains your CPU, compiling a massive codebase that makes your fan sound like a jet engine, or simply trying to run GPU workloads on a laptop that doesn’t have one. The result is the same: slow builds, limited resources, and wasted time.

Docker Offload was built to solve exactly that problem. Instead of forcing you to upgrade your hardware or spend days setting up cloud infrastructure, Offload extends your existing Docker workflow into the cloud. You keep using the same docker build and docker run commands you already know — but behind the scenes, the heavy lifting happens on powerful, cloud-hosted machines (including GPUs).

Think of it as a turbo button for Docker: the same developer experience, just supercharged.

Docker Offload is a fully managed service that lets you execute Docker builds and run containers in the cloud while maintaining your familiar local development experience.It provides on-demand cloud infrastructure for fast, consistent builds and compute-intensive workloads like running LLMs, machine learning pipelines, and GPU-accelerated applications.This is ideal if you want to leverage cloud resources or if your local machine doesn’t meet the hardware requirements to run the model locally.

Why use Docker Offload

Docker Offload is designed to support modern development teams working across local and cloud environments. It helps you:

Offload heavy builds and runs to fast, scalable infrastructure

Accelerate feedback loops in development and testing

Run containers that require more resources than your local setup can provide

Use Docker Compose to manage complex, multi-service apps that need cloud resources

Docker Offload is ideal for high-velocity development workflows that need the flexibility of the cloud without sacrificing the simplicity of local tools.

How to get started

Step 1: Sign up and subscribe to Docker Offload for access

To access Docker Offload, you must sign up and subscribe.

Step 2: Start Docker Offload

Start Docker Desktop and sign in with your account.

Open a terminal and run the following command to start Docker Offload:

$ docker offload start

When prompted, select your Docker account to use for Docker Offload. This account will consume credits for your Docker Offload usage.

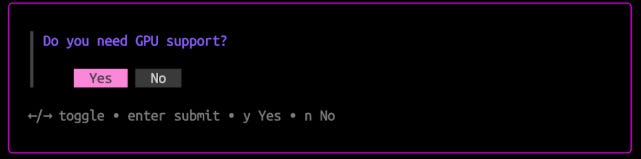
When prompted, select whether to enable GPU support. If you choose to enable GPU support, Docker Offload will run in an instance with an NVIDIA L4 GPU, which is useful for machine learning or compute-intensive workloads.

NoteEnabling GPU support consumes more budget. For more details, see Docker Offload usage.

Step 3: Run a container with Docker Offload

After starting Docker Offload, Docker Desktop connects to a secure cloud environment that mirrors your local experience. When you run builds or containers, they execute remotely, but behave just like local ones.

To verify that Docker Offload is working, run a container:

$ docker run –rm hello-world

If you enabled GPU support, you can also run a GPU-enabled container:

$ docker run –rm –gpus all hello-world

If Docker Offload is working, you’ll see Hello from Docker! in the terminal output.

Step 4: Stop Docker Offload

When you’re done using Docker Offload, you can stop it, which will stop a budget consumption, however after a few minutes the offload worker will be completely disposed. When stopped, you get back to  building images and running containers locally.

$ docker offload stop

To start Docker Offload again, run the docker offload start command.

Save money

Docker Offload runs your builds remotely, not on the machine where you invoke the build. This means that files must be transferred from your local system to the cloud over the network.

Transferring files over the network introduces higher latency and lower bandwidth compared to local transfers. To reduce these effects, Docker Offload includes several performance optimizations:

It uses attached storage volumes for build cache, which makes reading and writing cache fast.

When pulling build results back to your local machine, it only transfers files that changed since the previous build.

Even with these optimizations, large projects or slower network connections can lead to longer transfer times. Here are several ways to optimize your build setup for Docker Offload:

Use .dockerignore files

Choose slim base images

Use multi-stage builds

Fetch remote files during the build

Leverage multi-threaded tools

For general Dockerfile tips, see Building best practices.
Quelle: https://blog.docker.com/feed/

Amazon Redshift auto-copy is now available in 4 additional AWS regions

Amazon Redshift auto-copy is now available in the AWS Asia Pacific (Malaysia), Asia Pacific (Thailand), Mexico (Central), and Asia Pacific (Taipei) regions. With Auto-Copy, you can set up continuous file ingestion from your Amazon S3 prefix and automatically load new files to tables in your Amazon Redshift data warehouse without the need for additional tools or custom solutions. Previously, Amazon Redshift customers had to build their data pipelines using COPY commands to automate continuous loading of data from S3 to Amazon Redshift tables. With auto-copy, you can now setup an integration which will automatically detect and load new files in a specified S3 prefix to Redshift tables. The auto-copy jobs keep track of previously loaded files and exclude them from the ingestion process. You can monitor auto-copy jobs using system tables. To learn more, see the documentation or check out the AWS Blog.
Quelle: aws.amazon.com

Amazon DCV releases version 2025.0 with enhanced keyboard handling and WebAuthn support

AWS announces Amazon DCV 2025.0, the latest version of the high-performance remote display protocol that enables customers to securely access remote desktops and application sessions. This release focuses on enhancing user productivity and security while expanding platform compatibility for diverse use cases. Amazon DCV 2025.0 includes the following key features and improvements:

Enhanced WebAuthn redirection on Windows and standard browser-based WebAuthn support on Linux, enabling security key authentication (like Yubikeys, Windows Hello) in native Windows and SaaS applications within virtual desktop sessions
Linux client support for ARM architecture, further broadening compatibility and performance
Windows Server 2025 support, delivering latest security standards and enhanced performance on DCV hosts
Server side keyboard layout support and layout alignment for Windows clients, enhancing input reliability and consistency
Scroll wheel optimizations for smoother navigation

For more information about the new features and enhancements in Amazon DCV 2025.0, see the release notes or visit the Amazon DCV webpage to learn more and get started.
Quelle: aws.amazon.com

Amazon U7i instances now available in AWS US East (Ohio) Region

Starting today, Amazon EC2 High Memory U7i instances with 6TB of memory (u7i-6tb.112xlarge) are now available in the US East (Ohio) region. U7i-6tb instances are part of AWS 7th generation and are powered by custom fourth generation Intel Xeon Scalable Processors (Sapphire Rapids). U7i-6tb instances offer 6TB of DDR5 memory, enabling customers to scale transaction processing throughput in a fast-growing data environment. U7i-6tb instances offer 448 vCPUs, support up to 100Gbps Elastic Block Storage (EBS) for faster data loading and backups, deliver up to 100Gbps of network bandwidth, and support ENA Express. U7i instances are ideal for customers using mission-critical in-memory databases like SAP HANA, Oracle, and SQL Server. To learn more about U7i instances, visit the High Memory instances page.
Quelle: aws.amazon.com

Amazon CloudWatch introduces interactive incident reporting

Amazon CloudWatch now offers interactive incident report generation, enabling customers to create comprehensive post-incident analysis reports in minutes. The new capability, available within CloudWatch investigations, automatically gathers and correlates your telemetry data, as well as your input and any actions taken during an investigation, and produces a streamlined incident report. Using the new feature you can automatically capture critical operational telemetry, service configurations, and investigation findings to generate detailed reports. Reports include executive summaries, timeline of events, impact assessments, and actionable recommendations. These reports help you better identify patterns, implement preventive measures, and continuously improve your operational posture through structured post incident analysis. The incident report generation feature is available in US East (N. Virginia), US East (Ohio), US West (Oregon), Asia Pacific (Hong Kong), Asia Pacific (Mumbai), Asia Pacific (Singapore), Asia Pacific (Sydney), Asia Pacific (Tokyo), Europe (Frankfurt), Europe (Ireland), Europe (Spain), and Europe (Stockholm). You can create their first incident report by first creating a CloudWatch investigation and then clicking “Incident report”. To learn more about this new feature, visit the CloudWatch incident reports documentation.
Quelle: aws.amazon.com