Big Sleep: Google-KI findet eigenständig 20 Sicherheitslücken
Die Sicherheitslücken sind auf mehrere freie Softwareprojekte verteilt. Googles Big Sleep soll sie ohne menschliches Zutun gefunden haben. (KI, Google)
Quelle: Golem

Die Sicherheitslücken sind auf mehrere freie Softwareprojekte verteilt. Googles Big Sleep soll sie ohne menschliches Zutun gefunden haben. (KI, Google)
Quelle: Golem

Der neue Name soll laut dem Unternehmen vor allem Klarheit schaffen. Die Marke Fritz sei schließlich bekannter als AVM. (AVM, Netzwerk)
Quelle: Golem

Cloudflare wirft Perplexity vor, getarnte Crawler zu nutzen, um trotz expliziter robots.txt-Verbote an Inhalte zu gelangen. (KI, Chrome)
Quelle: Golem

Das als Shadowdrop gestartete Titan Quest 2 bietet rund 20 Stunden Spielzeit mit variablen Klassen, Bossen und regelmäßig geplanten Updates bis 2026. (Rollenspiel, Steam)
Quelle: Golem

Wie Blender enstand und was es mit dem Faible für die rechte Maustaste auf sich hatte, erklärt unser Podcast. (Besser Wissen, Podcast)
Quelle: Golem

When evaluating hardened image providers, don’t just look for buzzwords like “zero-CVE” or “minimal.” True security in a dynamic environment demands a nuanced understanding of their process, their commitment, and their flexibility. For platform, DevOps, and SecOps teams, these are the critical questions that reveal whether a provider offers genuine security that enhances your workflow, or one that will ultimately create more problems than it solves.
1. Update and Patch Management: The Reality of “Continuously Secure”
How quickly can you update the images in response to newly disclosed critical and high-severity CVEs? What are your Service Level Agreements (SLAs) for this?
Why it matters: This directly impacts your exposure window. A slow patching process, regardless of how “hardened” the image initially is, leaves you vulnerable.
What does your rebuild process look like (not just emergency patches)?
Why it matters: Each release of software you go through costs money, toil and introduces risk. So if you receive a nightly update and deploy every day for no reason then your increasing cost and risk. Instead, you want an intelligent approach to rebuilds. Your vendor should catalog all packages, monitor for CVES and fixes, and only when necessary. The rebuild should utilize an intelligent, event-driven systematic approach.
What is your process for notifying us of updates and changes? How can we consume these updates (e.g., through an API, a registry feed, direct notifications)?
Why it matters: You need an efficient way to integrate updates into your automated pipelines, not manual checks.
2. The Modification Process: Unpacking “Flexibility”
This section dives deep into how the provider handles the “snowflake” reality. It’s not enough to say “we’re flexible”; you need to understand the mechanics and implications.
What is the precise technical process for us to modify your hardened images (e.g., through a Dockerfile, a proprietary tool, specific build arguments)? Describe the steps involved.
Why it matters: Understand the actual workflow. Is it standard and open, or does it require learning a new, potentially restrictive ecosystem? Does it support multi-stage builds effectively for final image reduction?
How do you ensure that our modifications don’t inadvertently compromise the underlying hardening? What automated checks or gates are in place to validate these changes?
Why it matters: The value of the base image is lost if adding one package nullifies its security. Look for integrated security scanning, policy enforcement, and best practice checks (e.g., non-root user enforcement, no hardcoded secrets) after your modifications.
What mechanisms do you provide to verify that our specific modifications work as intended and haven’t introduced functional regressions? (e.g., integration with our testing frameworks, pre-configured health checks)?
Why it matters: Security should not break functionality. How does the provider’s ecosystem facilitate confidence in modified images before deployment? Are there test suites or validation tools available?
What is your typical turnaround time for a custom modification request or for applying a patch to a custom-modified image (if you handle the modifications)?
Why it matters: If you’re relying on the vendor to perform modifications, their speed directly impacts your agility. Slow turnaround can negate the benefits of automation.
For large organizations requiring many unique modifications across a diverse application portfolio, how do you manage and scale the modification process?
Why it matters: Is their system built for enterprise complexity? How do they handle versioning, conflict resolution, and consistent application of patches across potentially hundreds or thousands of modified images? Do they offer centralized management or just point solutions?
Do your modifications allow for easy SBOM generation and vulnerability scanning of the final modified image, including our additions?
Why it matters: Full transparency is crucial for your compliance and incident response. The SBOM should reflect everything in the image.
3. Supply Chain Security and Transparency: Trust, But Verify
What is the full provenance of your images? Can you provide verifiable Software Bill of Materials (SBOMs) that include all dependencies, including transitive ones?
Why it matters: You need to know exactly what’s inside the image and where it came from, from source to binary, at every layer.
What standards do you adhere to for supply chain security (e.g., SLSA, reproducible builds)? How can you demonstrate this?
Why it matters: Beyond just CVEs, how secure is the process by which the image is built and delivered?
How do you handle third-party components and open-source licenses within your images?
Why it matters: Compliance isn’t just about security; it’s about legal adherence.
What is your process for handling non-exploitable vulnerabilities and using VEX to clarify what vulnerabilities are reachable? Do you provide this information transparently?
Why it matters: You don’t want to chase every reported CVE if it’s not actually exploitable in the image’s context.
4. Support, Integration, and Ecosystem Compatibility: Beyond the Image Itself
How do your hardened images integrate with popular DevOps tools and CI/CD platforms (e.g., Kubernetes, Jenkins, GitLab CI, Argo CD)?
Why it matters: A secure image that doesn’t fit your existing toolchain creates friction and resistance.
What level of support do you provide for issues related to the hardened image itself versus issues related to our application running on it?
Why it matters: Clear lines of responsibility for troubleshooting can save significant time during incidents.
Do you offer dedicated support channels or expertise for security teams?
Why it matters: Security teams have specific needs and often require direct access to security experts.
What is your pricing model? Does it scale effectively with our usage and organizational growth, considering potential customization costs?
Why it matters: Understand the total cost of ownership beyond the sticker price, factoring in the complexity of managing many modified images.
By asking these hard questions, platform, DevOps, and SecOps teams can move beyond marketing claims and evaluate hardened image providers based on the real-world demands of secure, agile software delivery.
Quelle: https://blog.docker.com/feed/
In the rapidly evolving landscape of software development, integrating modern AI tools is essential to boosting productivity and enhancing the developer experience. One such advancement is the integration of Docker’s Model Context Protocol (MCP) Toolkit with Visual Studio Code’s GitHub Copilot Agent Mode.
This powerful combination transforms how developers interact with containerized applications, enabling autonomous coding workflows that seamlessly manage Docker environments with enhanced security, improved discoverability, and increased automation.As a Docker Captain, I’ve worked extensively with containerized development workflows. In this article, we’ll guide you through setting up and using the Docker MCP Toolkit with Copilot Agent Mode in VS Code, providing practical steps and examples.
What Is the Docker MCP Toolkit?
The Docker MCP Toolkit enables hosting and managing MCP servers—modular tool endpoints that run inside Docker containers. These servers expose APIs for specific development tasks, such as retrieving GitHub issue data or automating continuous integration (CI) workflows.
These tools are designed with the following goals:
Security: Run in isolated containers with strict access controls.
Reusability: Modular components can be reused across multiple projects.
Discoverability: Automatically discoverable by tools like GitHub Copilot.
Each MCP server adheres to a standard request-response specification, ensuring predictable and safe interactions with AI agents.
Prerequisites
Make sure you have the following before you begin:
Docker Desktop v4.43 (latest recommended)
Visual Studio Code
GitHub Copilot extension for VS Code
GitHub Copilot with Chat and Agent Mode enabled
GitHub Personal Access Token (optional, for GitHub-related tools)
Step-by-Step Integration Guide
1. Enable the MCP Toolkit in Docker Desktop
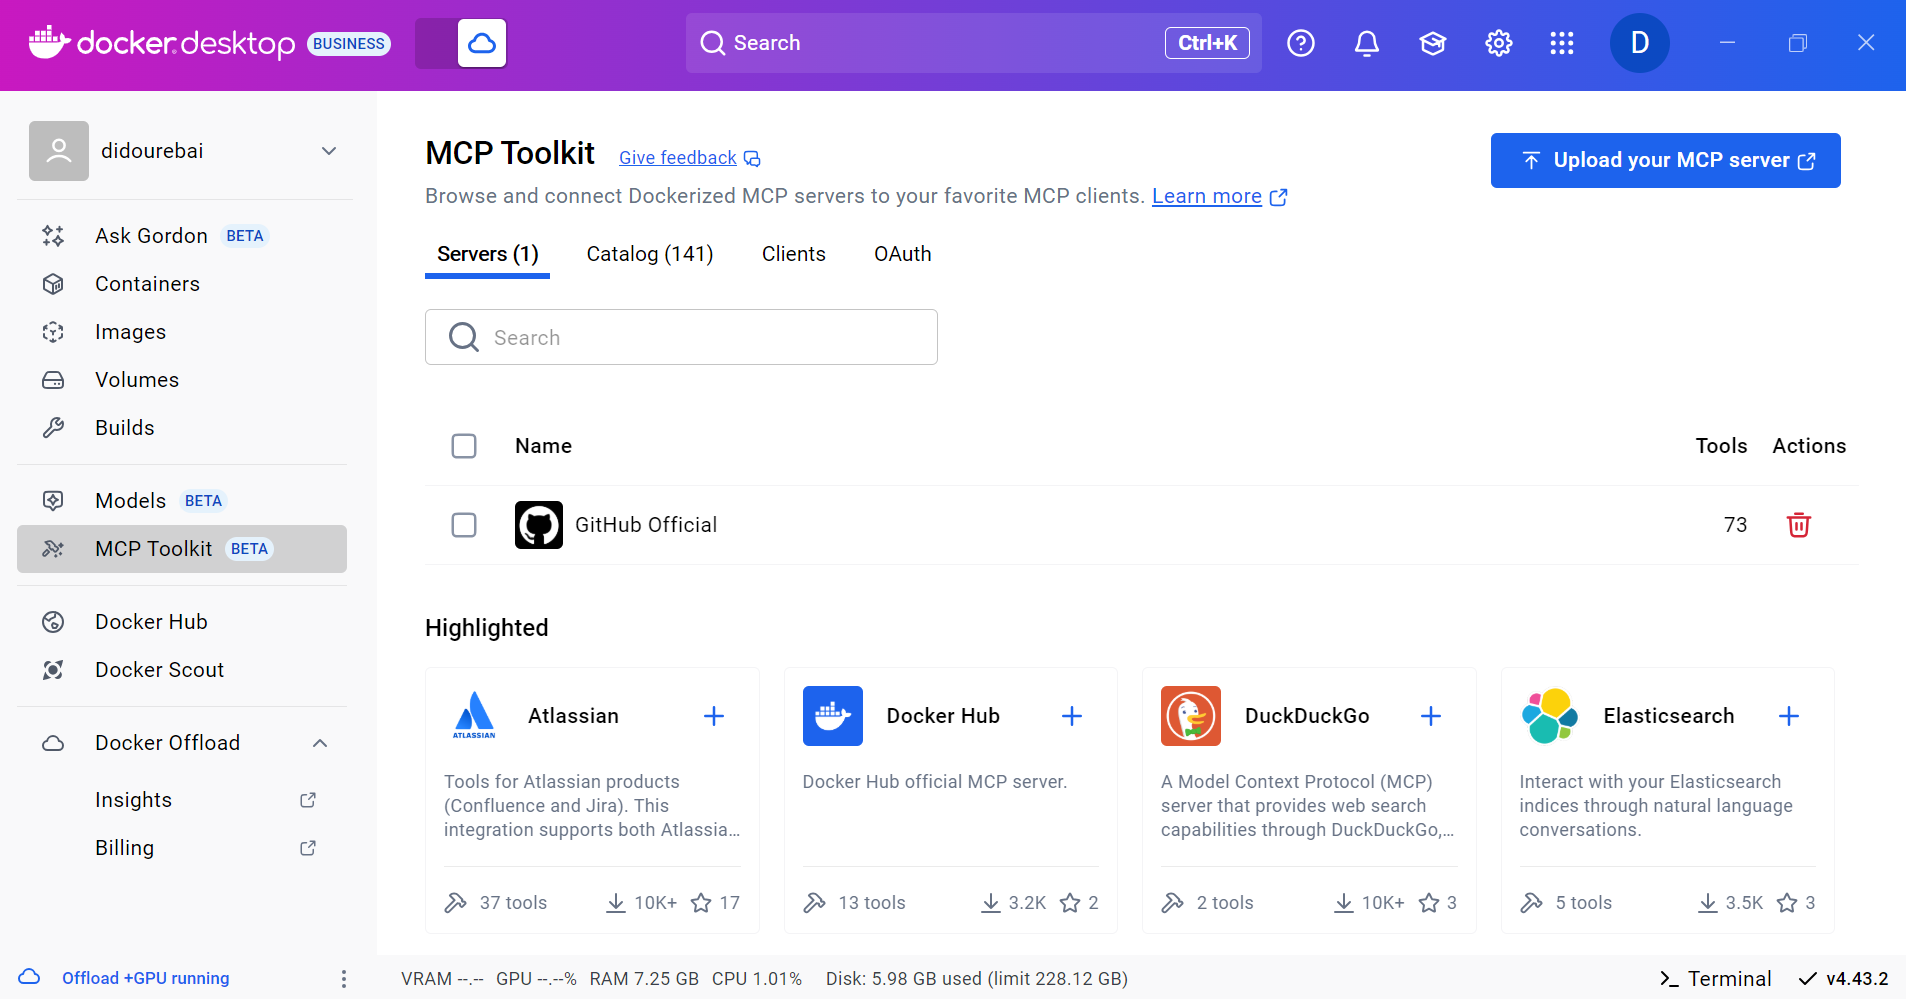
MCP Toolkit is now integrated with Docker Desktop. Open Docker Desktop and find it by navigating to the MCP Toolkit tab.
Figure 1: MCP Toolkit is now integrated with Docker Desktop
2. Start an MCP Server
You can launch an MCP server either from Docker Desktop’s UI or using the CLI. One common choice is the GitHub Official MCP server, which exposes tools for interacting with GitHub repositories. We will open Docker Desktop and start it from the user interface.
Open Docker Desktop > MCP Toolkit.
Select GitHub Official from the list.
Configure it with your GitHub token and start the server.
Figure 2: Docker Desktop showing the configuration of the GitHub Official MCP server
3. Start the MCP Gateway
Open Docker Desktop > MCP Toolkit (BETA).
Within the MCP Toolkit, locate the Clients tab.
Scroll to Other MCP Clients and copy the suggested command:
docker mcp gateway run
Figure 4: Docker Desktop showing how to enable MCP Gateway
This command initializes the gateway and makes your MCP server tools discoverable to clients like VS Code.
4. Connect MCP to Visual Studio Code
In VS Code, open the Command Palette and press Ctrl + Shift + P (or Cmd + Shift + P on macOS)
Select “Add MCP Server” and paste the gateway command.
Figure 5: VS Code command displaying how to add an MCP Server
Paste the previously copied docker mcp gateway run command when prompted.
Figure 6: VS Code displaying the Docker MCP gateway run command
This establishes a connection between your VS Code Copilot Agent Mode and the Docker MCP Toolkit (running through Docker Desktop). Once applied to your workspace, Copilot will register approximately 30 MCP tools, all running in containers.
5. Configure and Use Copilot Agent Mode
To configure Copilot Agent Mode, we have two options available:
Option 1: Enable via Copilot Chat Panel (GUI)
Ensure GitHub Copilot is installed and signed in.
Open the Copilot Chat panel, either through Copilot Labs or GitHub Copilot Chat.
Enable Agent Mode:
Use the dropdown or toggle in the chat panel to activate Agent Mode.
This mode allows Copilot to access external tools like those provided by the MCP Toolkit and intelligently reason over them.
Figure 7: GitHub Copilot activating Agent mode
Option 2: Enable via mcp CLI Commands (Manual Setup)
You can also configure Agent Mode by running mcp CLI commands directly in a terminal. This is useful for scripting, headless environments, or if you prefer a command-line setup.
Run the following command to start the gateway manually:
docker mcp gateway run
This procedure will facilitate the exposure of the gateway, thereby allowing Copilot in Visual Studio Code to establish a connection.
In Visual Studio Code, access the mcp.json configuration file to add the running gateway or confirm it is set to use the same endpoint. Restart Visual Studio Code or refresh the Copilot Agent connection to apply the changes.
6. Explore and Test
Try prompts like:
– “List open issues in this GitHub repo”
– “Trigger the CI pipeline for the latest commit”
Copilot routes these tasks to the correct containerized tool and returns results automatically.
Conclusion
Integrating the Docker MCP Toolkit with Copilot Agent Mode in Visual Studio Code offers developers a scalable, modular, and secure method for automating development tasks using containerized AI tools. This workflow represents a significant advancement in creating intelligent, context-aware development environments that simplify repetitive tasks and enhance efficiency.
Learn more
Review the official Docker MCP Toolkit Documentation
Review the capabilities and setup for GitHub Copilot in VS Code
Quelle: https://blog.docker.com/feed/

Im zeitlich befristeten Angebot kann man bei Amazon die smarte Stehleuchte eines Govee-Rivalen für nicht mal 29 Euro einpacken. (Technik/Hardware)
Quelle: Golem

Wer löten kann, spart auf Dauer Geld. Bei Amazon kann man sich einen kabellosen Lötkolben mit reichlich Zubehör stark vergünstigt sichern. (Technik/Hardware, Amazon)
Quelle: Golem

Ein Vorschlag des Bundesdigitalministeriums lässt die Interessen der Netzbetreiber deutlicher werden. Plötzlich ist der Ausbau der Glasfaser nicht mehr so wichtig. (Kabelnetz, Telekom)
Quelle: Golem