iOS 26: Airpods stoppen Musik automatisch beim Einschlafen
Eine neue iOS-Funktion erkennt schlafende Nutzer und pausiert die Wiedergabe bei Beats und Airpods, um den Akku nicht unnötig zu entleeren. (Airpods, Apple)
Quelle: Golem

Eine neue iOS-Funktion erkennt schlafende Nutzer und pausiert die Wiedergabe bei Beats und Airpods, um den Akku nicht unnötig zu entleeren. (Airpods, Apple)
Quelle: Golem
In the ever-evolving world of cloud-native technologies, PostgreSQL continues to solidify its position as a top-tier database choice among workloads running on Kubernetes. According to the Kubernetes in the Wild 2025 report, PostgreSQL now powers 36% of all database workloads running on Kubernetes—up 6 points since 2022—signaling its rising popularity and growing trust among the Kubernetes community1. However, running data-intensive PostgreSQL workloads on Kubernetes has its own set of challenges. These include managing Kubernetes primitives like StatefulSets and deployments, as well as achieving optimal performance by configuring storage, replication, and database settings, but this is fast evolving to a simplified experience.
We now provide two options for deploying stateful PostgreSQL workloads based on performance needs. To support databases with stringent latency and scalable transaction requirements, you can leverage Azure Container Storage to orchestrate Kubernetes volume deployment on local NVMe to scale up IOPS while maintaining extremely low sub-ms latency. For scenarios where optimized price-performance is a priority, Premium SSD v2 is the go-to choice. Additionally, working with CloudNativePG, we integrated a robust open-source operator for PostgreSQL to support a high availability database deployment model on Azure Kubernetes Service (AKS). Our advanced storage options combined with CloudNativePG make AKS a robust platform for high-performance PostgreSQL workloads.
Deploy PostgreSQL on AKS
Breakthrough PostgreSQL performance with local NVMe
For performance-critical PostgreSQL workloads, such as those handling massive concurrent transactions or demanding, low-latency data access, local NVMe directly attached to Azure Virtual Machine (VM) SKUs is your best bet. Using local NVMe drives with Kubernetes used to be complicated—it often required setting up RAID across the drives and manually managing static volume orchestrators. Azure Container Storage effectively addresses this challenge.
Azure Container Storage is a fully managed, container-native storage solution, designed specifically for Kubernetes. Developers can simply request a Kubernetes volume, and Azure will dynamically provision storage backed by the available local NVMe drives on AKS nodes. This gives PostgreSQL users direct attach block storage IOPS and latency within a managed, orchestrated cloud environment. Whether you’re powering payment systems, gaming backends, or real-time personalization engines, you get the best of both speed and simplicity. Azure Container Storage also supports Azure Disk and Elastic SAN (Preview), so you can choose backing storage with different durability, scale, or cost as your needs evolve—all under a consistent, Kubernetes-native control plane.
Our benchmark results have shown PostgreSQL achieving close to 15,000 transactions per second (TPS) with single-digit millisecond end-to-end query latency with the Standard_L16s_v3 VM. When scaling up to larger VM SKUs like Standard_L64s_v3, we observed TPS reaching up to 26,000 while maintaining low latency. For more details of our benchmark runs, refer to the comparison of storage options section below.
Optimize price-performance with Premium SSD v2
Azure Premium SSD v2 offers an optimal balance of price-performance and a flexible deployment model, making it especially well-suited for production environments that need to scale over time. With Premium SSD v2, you can configure IOPS, throughput, and size independently—enabling PostgreSQL deployments to scale dynamically with demand while minimizing upfront costs and avoiding resource overprovisioning.
Whether you’re running multi-tenant SaaS platforms, production systems that scale with business needs, or applications with spiky traffic, this flexibility leads to real savings without sacrificing performance. With up to 80,000 IOPS and 1,200 MB/s per volume, Premium SSD v2 supports highly demanding PostgreSQL workloads on an infrastructure that adapts to your app.
Comparison of storage options
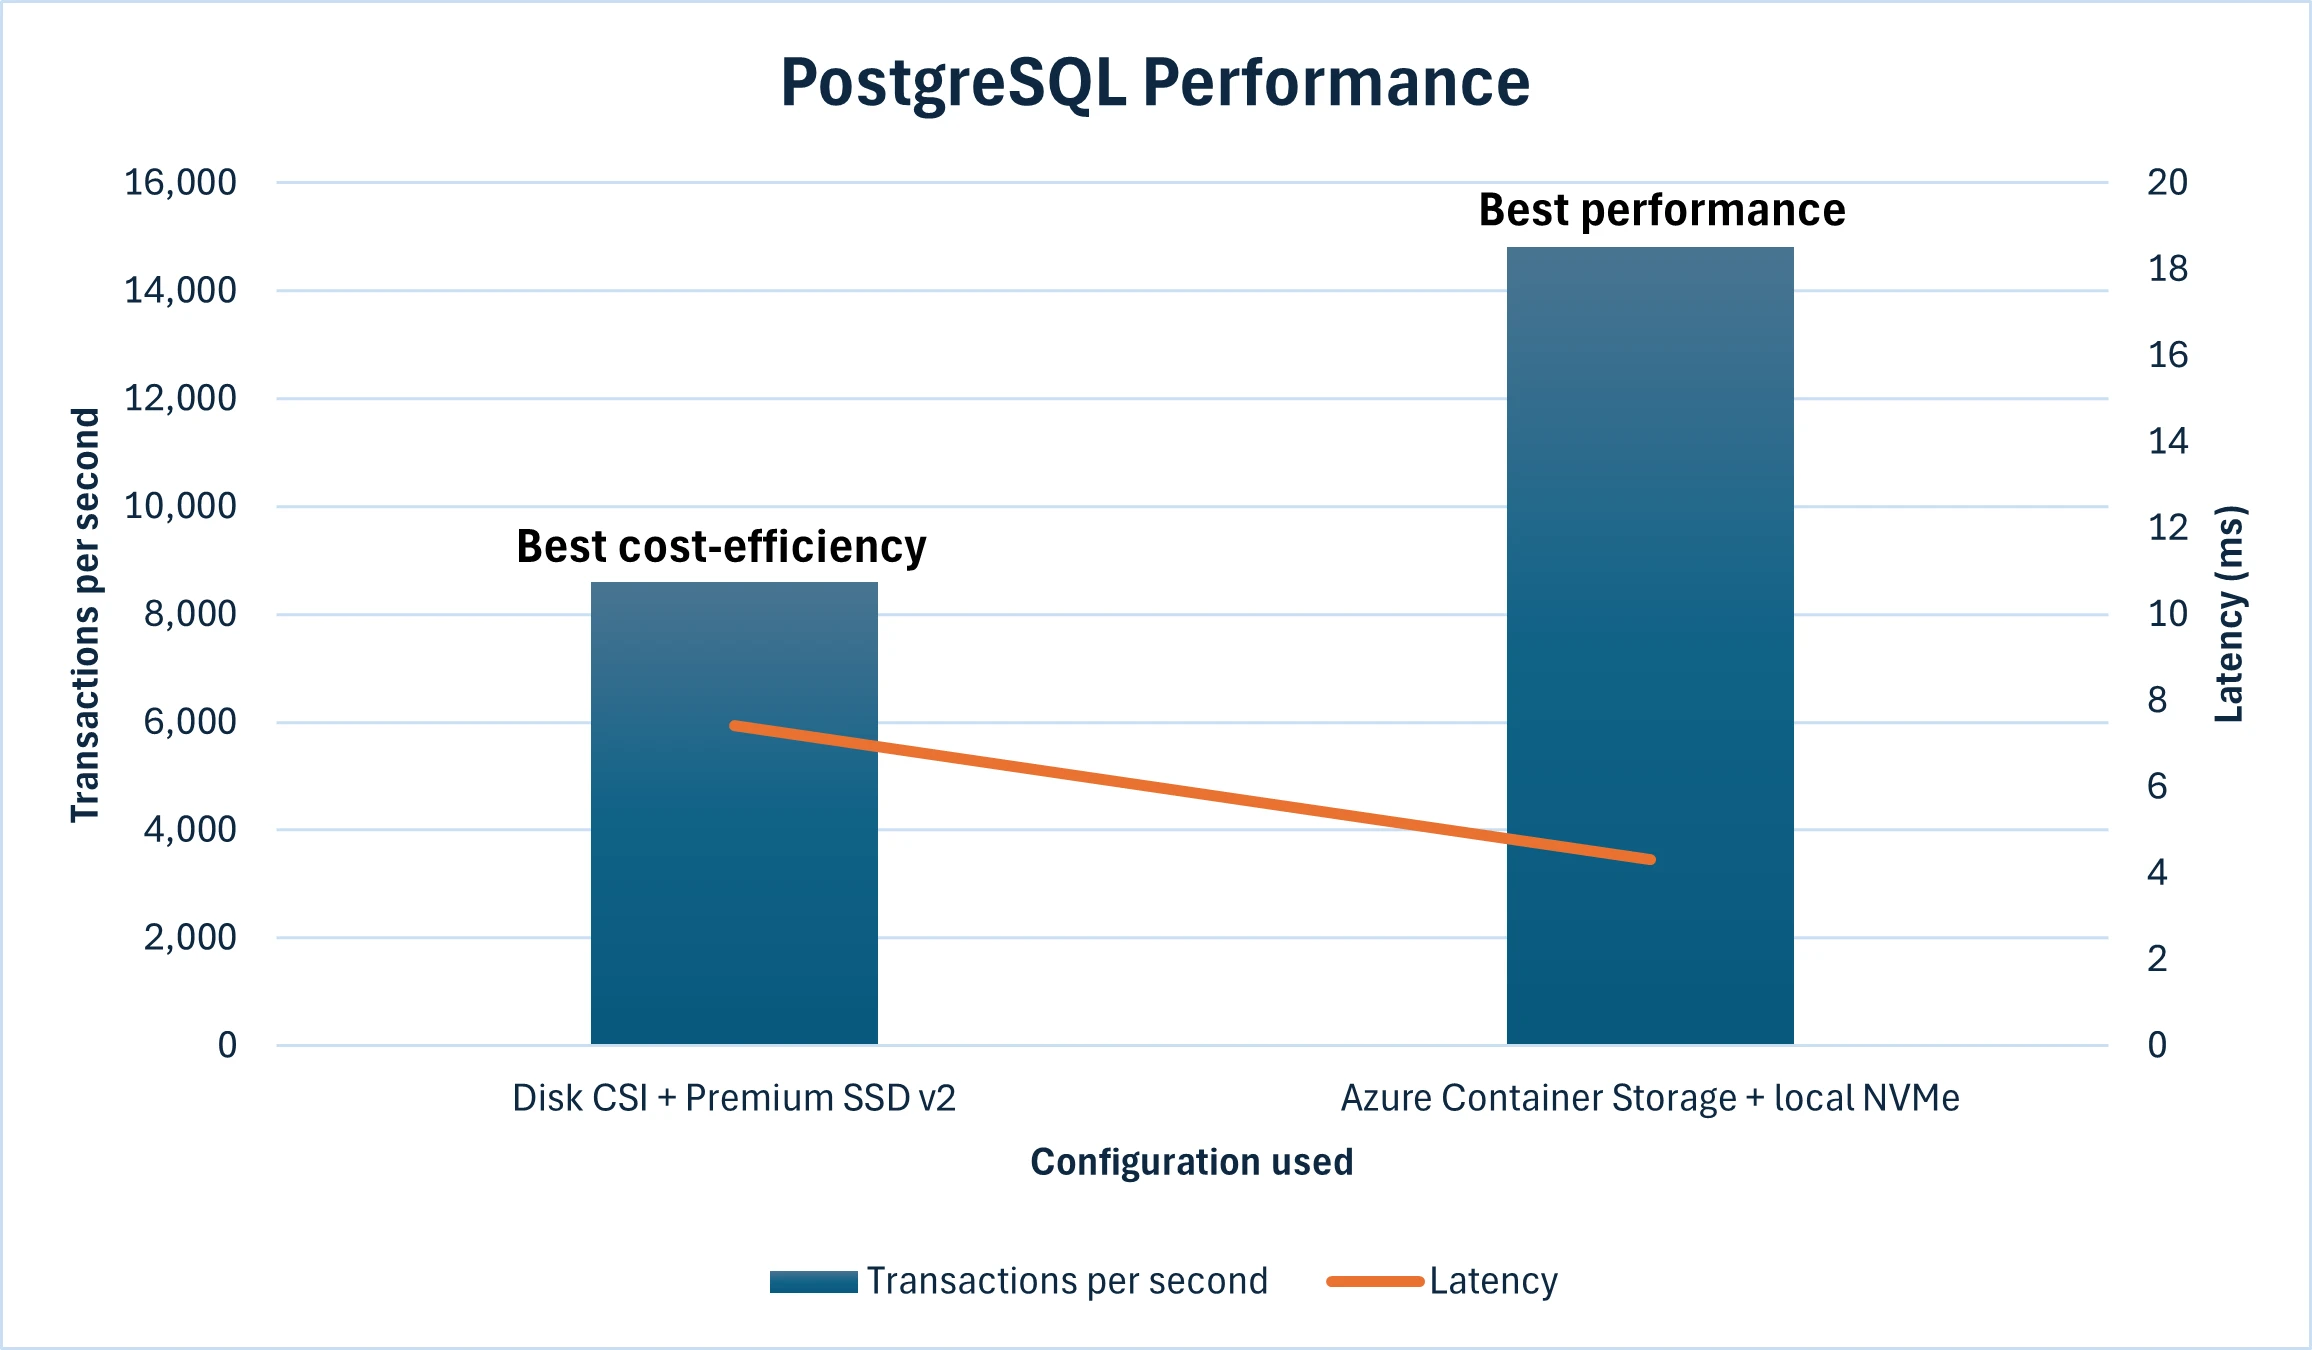
To help you assess the two storage options outlined above, we conducted benchmark runs using the CloudNativePG operator setups on AKS with similar core and memory consumption, with both backing storage options as the only variable: one leveraging local NVMe with Azure Container Storage, and the other using Premium SSD v2 with Disk CSI driver.
For the first configuration, we used Standard_D16d_v5 SKU and provisioned two Premium SSD v2 32 GiB disks each having 3000 IOPS and 125 MB/s throughput for log and data files. In the second setup, we ran on Standard_L16s_v3 nodes with local NVMe storage included. The test environment was configured to closely simulate a real-world production database scenario. TPS measures how many individual transactions (such as INSERT, UPDATE, DELETE, or SELECT) a system can handle per second. Latency refers to the time delay between issuing a request to the database and receiving a response, which is especially critical for applications requiring real-time or near-real-time responsiveness, such as financial systems, online gaming, or high-performance analytics.
Local NVMe on Standard_L16s_v3 delivered 14,812 TPS with an average latency of 4.321 milliseconds. PremiumV2_LRS on Standard_D16ds_v5 recorded 8,600 TPS at 7.417 milliseconds latency. See pricing comparison below:
*Monthly costs are based on the base 3000 IOPS and 125 MB/s throughput. You can adjust the performance (capacity, throughput, and IOPS) of Premium SSD v2 disks at any time, allowing workloads to be cost efficient while meeting workload size and performance requirements.
**With 3 VMs of L16s_v3, you get 11.52 TB of storage allocated by default that is used to serve the volumes created for PostgreSQL workload. For other VM sizes in the L-Series family, the price per month and allocated storage will vary.
For PostgreSQL workloads, the choice between using local NVMe and Premium SSD v2 depends on balancing performance, cost, and data durability. Local NVMe via Azure Container Storage offers extremely low latency and high throughput, making it suitable for performance-sensitive PostgreSQL deployments. The costs are higher with local NVMe, and there is less flexibility to scale independently of workload characteristics. Conversely, Premium SSD v2 provides better price-performance efficiency and flexible scalability, making it a viable option for PostgreSQL instances that require handling increased scale or applications having unpredictable surges in demand or usage. In terms of data durability, Premium SSD v2 offers locally redundancy by default, while for local NVMe, it is recommended to use a replica-based architecture managed by CloudNativePG operator and an object storage-based backup approach to prevent data loss.
Built for high availability with CloudNativePG on Azure Kubernetes Service
For teams deploying PostgreSQL in production, high availability and backups are non-negotiable. With the open-source CloudNativePG operator, a highly available PostgreSQL cluster on AKS can easily be deployed with:
Built-in replication and automated failover.
Application consistent backup with native integration with Azure Blob Storage.
Seamless integration with Azure Container Storage.
Flexible storage options: choose Premium SSD v2 or local NVMe based on workload needs.
Whether you’re supporting internal business apps or customer-facing platforms, this gives you peace of mind without the hassle of hand-building custom high availability logic and separate backup workflows. Get started with deploying highly available PostgreSQL on AKS with CloudNativePG operator using our step-by-step reference guide.
Ready for the future
PostgreSQL is just one of many stateful workloads that organizations are now confidently running on Azure Kubernetes Service. From databases to message queues, AI inferencing, and enterprise applications, AKS is evolving to meet the needs of persistent, data-heavy applications in production.
Whether you’re deploying Redis, MongoDB, Kafka, or even ML-serving pipelines with GPU-backed nodes, AKS provides the foundation to manage these workloads with performance, consistency, and operational ease, along with clear end-to-end guidance.
With innovations like Azure Container Storage for local NVMe and Premium SSD v2 for scalable persistent storage, we’re making it easier than ever to build stateful applications that are: reliable, performant, and cost efficient for mission critical workloads.
Modernize your data layer on Kubernetes today. Whether you’re running PostgreSQL or any stateful tier, Azure delivers the performance and manageability to make it happen. Explore proven patterns and deployment options in the AKS Stateful Workloads Overview.
1Kubernetes in the Wild 2025 report
The post Running high-performance PostgreSQL on Azure Kubernetes Service appeared first on Microsoft Azure Blog.
Quelle: Azure
Docker Desktop 4.43 just rolled out a set of powerful updates that simplify how developers run, manage, and secure AI models and MCP tools.
Model Runner now includes better model management, expanded OpenAI API compatibility, and fine-grained controls over runtime behavior. The improved MCP Catalog makes it easier to discover and use MCP servers, and now supports submitting your own MCP servers! Meanwhile, the MCP Toolkit streamlines integration with VS Code and GitHub, including built-in OAuth support for secure authentication. Gordon, Docker’s AI agent, now supports multi-threaded conversations with faster, more accurate responses. And with the new Compose Bridge, you can convert local compose.yaml files into Kubernetes configuration in a single command.
Together, these updates streamline the process of building agentic AI apps and offer a preview of Docker’s ongoing efforts to make it easier to move from local development to production.
New model management commands and expanded OpenAI API support in Model Runner
This release includes improvements to the user interface of the Docker Model Runner, the inference APIs, and the inference engine under the hood.
Starting with the user interface, developers can now inspect models (including those already pulled from Docker Hub and those available remotely in the AI catalog) via model cards available directly in Docker Desktop. Below is a screenshot of what the model cards look like:
Figure 1: View model cards directly in Docker Desktop to get an instant overview of all variants in the model family and their key features.
In addition to the GUI changes, the docker model command adds three new subcommands to help developers inspect, monitor, and manage models more effectively:
docker model ps: Show which models are currently loaded into memory
docker model df: Check disk usage for models and inference engines
docker model unload: Manually unload a model from memory (before its idle timeout)
For WSL2 users who enable Docker Desktop integration, all of the docker model commands are also now available from their WSL2 distros, making it easier to work with models without changing your Linux-based workflow.
On the API side, Model Runner now offers additional OpenAI API compatibility and configurability. Specifically, tools are now supported with {“stream”: “true”}, making agents built on Docker Model Runner more dynamic and responsive. Model Runner’s API endpoints now support OPTIONS calls for better compatibility with existing tooling. Finally, developers can now configure CORS origins in the Model Runner settings pane, offering better compatibility and control over security.
Figure 2: CORS Allowed Origins are now configurable in Docker Model Runner settings, giving developers greater flexibility and control.
For developers who need fine-grained control over model behavior, we’re also introducing the ability to set a model’s context size and even the runtime flags for the inference engine via Docker Compose, for example:
services:
mymodel:
provider:
type: model
options:
model: ai/gemma3
context-size: 8192
runtime-flags: "–no-prefill-assistant"
In this example, we’re using the (optional) context-size and runtime-flags parameters to control the behavior of the inference engine underneath. In this case, the associated runtime is the default (llama.cpp), and you can find a list of flags here. Certain flags may override the stable default configuration that we ship with Docker Desktop, but we want users to have full control over the inference backend. It’s also worth noting that a particular model architecture may limit the maximum context size. You can find information about maximum context lengths on the associated model cards on Docker Hub.
Under the hood, we’ve focused on improving stability and usability. We now have better error reporting in the event that an inference process crashes, along with more aggressive eviction of crashed engine processes. We’ve also enhanced the Docker CE Model Runner experience with better handling of concurrent usage and more robust support for model providers in Compose on Docker CE.
MCP Catalog & Toolkit: Secure, containerized AI tools at scale
New and redesigned MCP Catalog
Docker’s MCP Catalog now features an improved experience, making it easier to search, discover, and identify the right MCP servers for your workflows. You can still access the catalog through Docker Hub or directly from the MCP Toolkit in Docker Desktop, and now, it’s also available via a dedicated web link for even faster access.
Figure 3: Quickly find the right MCP server for your agentic app and use the new Catalog to browse by specific use cases.
The MCP Catalog currently includes over 100 verified, containerized tools, with hundreds more on the way. Unlike traditional npx or uvx workflows that execute code directly on your host, every MCP server in the catalog runs inside an isolated Docker container. Each one includes cryptographic signatures, a Software Bill of Materials (SBOM), and provenance attestations.
This approach eliminates the risks of running unverified code and ensures consistent, reproducible environments across platforms. Whether you need database connectors, API integrations, or development tools, the MCP Catalog provides a trusted, scalable foundation for AI-powered development workflows that move the entire ecosystem away from risky execution patterns toward production-ready, containerized solutions.
Submit your MCP Server to the Docker MCP Catalog
We’re launching a new submission process, giving developers flexible options to contribute by following the process here. Developers can choose between two options: Docker-Built and Community-Built servers.
Docker-Built Servers
When you see “Built by Docker,” you’re getting our complete security treatment. We control the entire build pipeline, providing cryptographic signatures, SBOMs, provenance attestations, and continuous vulnerability scanning.
Community-Built Servers
These servers are packaged as Docker images by their developers. While we don’t control their build process, they still benefit from container isolation, which is a massive security improvement over direct execution.
Docker-built servers demonstrate the gold standard for security, while community-built servers ensure we can scale rapidly to meet developer demand. Developers can change their mind after submitting a community-built server and opt to resubmit it as a Docker-built server.
Get your MCP server featured in the Docker MCP Catalog today and reach over 20 million developers. Learn more about our new MCP Catalog in our announcement blog and get insights on best practices on building, running, and testing MCP servers. Join us in building the largest library of secure, containerized MCP servers! .
MCP Toolkit adds OAuth support and streamlined Integration with GitHub and VS Code
Many MCP servers’ credentials are passed as plaintext environment variables, exposing sensitive data and increasing the risk of leaks. The MCP Toolkit eliminates that risk with secure credential storage, allowing clients to authenticate with MCP servers and third-party services without hardcoding secrets. We’re taking it a step further with OAuth support, starting with the most widely used developer tool, GitHub. This will make it even easier to integrate secure authentication into your development workflow.
Figure 4: OAuth is now supported for the GitHub MCP server.
To set up your GitHub MCP server, go to the OAuth tab, connect your GitHub account, enable the server, and authorize OAuth for secure authentication.
Figure 5: Go to the configurations tab of the GitHub MCP servers to enable OAuth for secure authentication
The MCP Toolkit allows you to connect MCP servers to any MCP client, with one-click connection to popular ones such as Claude and Cursor. We are also making it easier for developers to connect to VSCode with the docker mcp client connect vscode command. When run in your project’s root folder, it creates an mcp.json configuration file in your .vscode folder.
Figure 6: Connect to VS Code via MCP commands in the CLI.
Additionally, you can also configure the MCP Toolkit as a global MCP server available to VSCode by adding the following config to your user settings. Check out this doc for more details. Once connected, you can leverage GitHub Copilot in agent mode with full access to your repositories, issues, and pull requests.
"mcp": {
"servers": {
"MCP_DOCKER": {
"command": "docker",
"args": [
"mcp",
"gateway",
"run"
],
"type": "stdio"
}
}
}
Gordon gets smarter: Multi-threaded conversations and 5x faster performance
Docker’s AI Agent Gordon just got a major upgrade: multi-threaded conversation support. You can now run multiple distinct conversations in parallel and switch between topics like debugging a container issue in one thread and refining a Docker Compose setup in another, without losing context. Gordon keeps each thread organized, so you can pick up any conversation exactly where you left off.
Gordon’s new multi-threaded capabilities work hand-in-hand with MCP tools, creating a powerful boost for your development workflow. Use Gordon alongside your favorite MCP tools to get contextual help while keeping conversations organized by task. No more losing focus to context switching!
Figure 7: Gordon’s new multi-threaded support cuts down on context switching and boosts productivity.
We’ve also rolled out major performance upgrades, Gordon now responds 5x faster and delivers more accurate, context-aware answers. With improved understanding of Docker-specific commands, configurations, and troubleshooting scenarios, Gordon is smarter and more helpful than ever!
Compose Bridge: Seamlessly go from local Compose to Kubernetes
We know that developers love Docker Compose for managing local environments—it’s simple and easy to understand. We’re excited to introduce Compose Bridge to Docker Desktop. This new powerful feature helps you transform your local compose.yaml into Kubernetes configuration with a single command.
Translate Compose to Kubernetes in seconds
Compose Bridge gives you a streamlined, flexible way to bring your Compose application to Kubernetes. With smart defaults and options for customization, it’s designed to support both simple setups and complex microservice architectures.
All it takes is:
docker compose bridge convert
And just like that, Compose Bridge generates the following Kubernetes resources from your Compose file:
A Namespace to isolate your deployment
A ConfigMap for every Compose config entry
Deployments for running and scaling your services
Services for exposed and published ports—including LoadBalancer services for host access
Secrets for any secrets in your Compose file (encoded for local use)
NetworkPolicies that reflect your Compose network topology
PersistentVolumeClaims using Docker Desktop’s hostpath storage
This approach replicates your local dev environment in Kubernetes quickly and accurately, so you can test in production-like conditions, faster.
Built-in flexibility and upcoming enhancements
Need something more customized? Compose Bridge supports advanced transformation options so you can tweak how services are mapped or tailor the resulting configuration to your infrastructure.
And we’re not stopping here—upcoming releases will allow Compose Bridge to generate Kubernetes config based on your existing cluster setup, helping teams align development with production without rewriting manifests from scratch.
Get started
You can start using Compose Bridge today:
Download or update Docker Desktop
Open your terminal and run:
Review the documentation to explore customization options
docker compose bridge convert
Conclusion
Docker Desktop 4.43 introduces practical updates for developers building at the intersection of AI and cloud-native apps. Whether you’re running local models, finding and running secure MCP servers, using Gordon for multi-threaded AI assistance, or converting Compose files to Kubernetes, this release cuts down on complexity so you can focus on shipping. From agentic AI projects to scaling workflows from local to production, you’ll get more control, smoother integration, and fewer manual steps throughout.
Learn more
Learn more about our new MCP Catalog.
Submit your MCP servers to the MCP Catalog.
Authenticate and update today to receive your subscription level’s newest Docker Desktop features.
Subscribe to the Docker Navigator Newsletter.
Learn about our sign-in enforcement options.
New to Docker? Create an account.
Have questions? The Docker community is here to help.
Quelle: https://blog.docker.com/feed/
We recently launched a new, reimagined Docker MCP Catalog with improved discovery and a new submission process. Containerized MCP servers offer a secure way to run and scale agentic applications and minimize risks tied to host access and secret management. Developers can submit servers in two ways: Docker-built servers, which include our full security suite (signatures, SBOMs, attestations, and continuous scanning), or community-built servers, which are built and maintained by developers using their own Docker images.
In this blog, we’ll share 5 MCP server best practices for designing, testing, and packaging them for submission. These recommendations are based on our experience building and helping developers build over 100 MCP servers for the Docker MCP Catalog. They’ll help you streamline the submission process, reach over 20 million Docker developers, and deliver real utility to both agents and the developers who use them.
1. Manage your agent’s tool budget intentionally
“Tool Budget” is our internal term for the number of tools an agent can handle effectively. Like any budget, managing it well is key to a good user experience. As the creator of an MCP server, it’s important to consider that offering too many tools can make your server more complex and costly to use, potentially turning users away. Some AI agents now allow users to selectively enable tools, helping keep the experience streamlined. But the better strategy is to design your toolset around clear use cases and avoid mapping every API endpoint to a separate tool.
For example, when creating an MCP server to access your API, you might be tempted to make one tool for each of the API’s endpoints. While that’s a quick way to get started, it often results in an overloaded toolset that discourages adoption.
So, if one tool per endpoint isn’t ideal, how do you design a better MCP server?
This is where the MCP server prompts come in. Think of them like Macros. Instead of requiring users to call multiple tools, you can create a single prompt that chains multiple tools or endpoint calls behind the scenes. That way, a user can simply ask the agent to “fetch my user’s invoices,” and the agent can handle the complexity internally, calling two or three tools without exposing the overhead.
2. The end user of the tool is the agent/LLM
One important point often overlooked: it’s the agent or LLM, not the end user, that actually uses the tool. The user enables the tool, but the agent is the one calling it. Why does this matter? When you’re building an MCP server, you’re not interfacing directly with users. You’re building for the agent that acts on their behalf.
Error handling is one area where we’ve consistently seen developers run into issues. If your tool returns error messages meant for humans, you might not provide the user experience you think. The agent, not the user, is the one calling your tool, and there’s no guarantee it will pass the error message back to the user.
Agents are designed to complete tasks. When something fails, they’ll often try a different approach. That’s why your error handling should help the agent decide what to do next, not just flag what went wrong. Instead of “You don’t have access to this system”, return something along the lines of “To have access to this system, the MCP server needs to be configured with a valid API_TOKEN, the current API_TOKEN is not valid”.
What you’re doing here is informing the agent that access to the third-party system isn’t possible due to a misconfiguration, not because access is denied outright. The distinction matters: the lack of access is a result of the user not properly configuring the MCP server, not a hard permission issue.
3. Document for humans and agents!
This brings us to an equally important point: documentation!
When writing for your MCP server, remember you’re serving two audiences: the end users and the AI agent. As we saw with error handling, it’s critical to understand the needs of both.
Your documentation should address each audience clearly. End users want to know why they should use your MCP server, what problems it solves and how it fits into their workflow. Agents, on the other hand, rely on well-written tool names and descriptions to decide whether your server is the right fit for a given task.
Keep in mind: the agent is the one actually using the MCP server, but it’s the end user who decides which tools the agent has access to. Your documentation needs to support both!
4. Don’t just test functionality, test user interactions
One of the best ways to validate your documentation is to test your own MCP server. By far, the easiest way of interacting with your server when developing is to use the MCP inspector (type npx @modelcontextprotocol/inspector in your terminal and off you go!).
While it’s common to test whether your MCP server works, the inspector also helps you think from the end user’s perspective. It gives you a clearer sense of how users will interact with your server and whether your documentation supports that experience.
There are three key steps to testing a server:
Connecting to the MCP Server: This step will help you validate that your server is capturing all the necessary configuration to run properly.
List Tools: This is what AI agents see when they initialize your MCP server.
Tool Calling: Make sure that the tool behaves the way that it’s expected. This is where you can validate the failure modes.
One important design consideration is to think about the MCP Server lifecycle: Ask: What is necessary for the MCP Client to connect to the MCP Server? How should tools be listed and discovered? And what’s the process for invoking a specific tool?
For example, when you’re writing an MCP server for your database. In a typical API, you’d establish the database connection when the server starts. However, when writing an MCP server, you should aim to make each tool call as self-contained as possible. This means creating a connection for every tool call, not on server start. By doing this, you will allow users to connect and list tools even if the server is not configured correctly.
While this might feel like an anti-pattern at first, it actually makes more sense in this context. You’re trading a bit of latency for improved usability and reliability. In reality, the only moment your MCP will need a connection to a database (or a third-party system) is when a tool is invoked. The MCP Inspector is a great way to see this in action and gain a better understanding of how both users and agents will interact with your server.
If you are using the Docker MCP Toolkit, there are several ways to test whether your MCP server is behaving as expected.
Run the following command to call your tool using the configuration you defined in Docker Desktop.
`docker mcp tools call my-tool`
To test what the MCP clients see, you can run the following command:
`docker mcp gateway run –verbose –dry-run`
This command simulates the call from an MCP client to your MCP server, assuming it’s enabled in the Docker MCP Catalog.
5. Packaging your MCP servers with containers
Excellent, we have written and tested our MCP server, what’s next? Packaging!
Packaging an MCP server is not so much about creating the artifact but thinking about how the artifact is going to be used. We might be a bit biased here, but we truly believe that packaging your MCP server as a Docker Image is the way to go.
MCP servers come in many different flavours: Python, TypeScript, Java… Packaging as a Docker image makes your server truly portable and because of the nature of Docker images. You can ensure that the end user will be able to run your MCP server regardless of how their system is configured. Using Docker containers is the easiest way to avoid dealing with dependencies on other people’s machines. If they can run Docker, they can run your MCP server.
There are many resources available about how to create a good Dockerfile, but if you’re not sure if you have done the right thing, you can always use Gordon or `docker ai` command to improve it. Just type `docker ai improve my Dockerfile` and Gordon, the Docker AI agent, will help you with optimizing a Dockerfile for your MCP server.
How to submit your MCP server
Once you have a Dockerfile in your repository, we invite you to submit your MCP server to the Docker Official Registry! At the time of this writing, all submitted MCP servers must use the stdio transport mechanism, so be sure your server supports this when running as a container. We look forward to your submission!
Conclusion
The new Docker MCP Catalog makes it easier than ever to discover and scale MCP servers securely. Whether you’re submitting a Docker-built server with full security treatment or maintaining your own as a community contributor, following these five best practices for MCP servers; Managing tool budget, designing for the Agent, writing for both users and LLMs, thoroughly testing, and packaging with containers will help you create MCP servers that are reliable, easy to use, and ready for real-world agentic workloads.
Ready to share yours with the Docker community? Submit it to the Docker MCP Catalog and get it in front of millions of developers!
Learn more
Check out our new MCP Catalog announcement blog
Find documentation for Docker MCP Catalog and Toolkit.
Subscribe to the Docker Navigator Newsletter.
New to Docker? Create an account.
Have questions? The Docker community is here to help.
Quelle: https://blog.docker.com/feed/

Bei Amazon sind noch vor dem Prime Day die beliebten Lego-F1-Rennwagen zum Tiefstpreis verfügbar. (Lego, Amazon)
Quelle: Golem

Microsoft Copilot ermöglicht es, Arbeitsprozesse zu automatisieren und Entscheidungen datenbasiert zu treffen. Wie Copilot effizient in Microsoft 365 integriert werden kann, zeigt dieser Onlineworkshop. (Golem Karrierewelt, KI)
Quelle: Golem

Eine Metastudie zu den Auswirkungen der Photovoltaik zeigt: Sie kann sich vielfach positiv auswirken, aber auch Schaden anrichten. (Solarenergie, Umweltschutz)
Quelle: Golem

Die Esa fördert mit Scylight die Entwicklung der Laserkommunikation für ein eigenes Satelliten-Netzwerk mit 100 GBit/s. (Satelliten, Elon Musk)
Quelle: Golem

Die Bundesregierung will KI, Quantentechnologien, Fusionsenergie, klimaneutrale Energie und Mobilität und mehr fördern. (KI, Politik)
Quelle: Golem

Die Zugangsdaten lassen sich laut Cisco nicht manuell entfernen, sondern ausschließlich per Patch. Angreifer können sich über SSH als Root anmelden. (Sicherheitslücke, Cisco)
Quelle: Golem