Amazon Chime SDK unterstützt jetzt Video-Hintergrundersatz und -unschärfe auf iOS und Android

Mit dem Amazon Chime SDK können Entwickler ihren Webanwendungen eine intelligente Audio-, Video- und Bildschirmfreigabe in Echtzeit hinzufügen. Die Bibliotheken von Amazon Chime SDK für iOS und Android enthalten jetzt die Funktionen zur Ersetzung des Videohintergrunds und zur Einführung der Unschärfe. Diese Funktionen können von Entwickler verwendet werden, um visuelle Ablenkungen zu reduzieren und die visuelle Privatsphäre für mobile Benutzer zu verbessern.
Quelle: aws.amazon.com

Einführung von Amazon Connect Customer Profiles in der Region Asien-Pazifik (Seoul)

Amazon Connect ermöglicht es Ihnen jetzt, Amazon Connect Customer Profiles in der AWS-Region Asien-Pazifik (Seoul) zu verwenden. Sie können Ihren Kundendienstmitarbeitern nun interaktive Sprachdialogsysteme (IVR) mit aktuellen Informationen über den Kunden zur Verfügung stellen und so einen schnelleren und individuelleren Kundenservice ermöglichen. Customer Profiles führt Kundeninformationen (z. B. Adresse, Kaufhistorie, Kontakthistorie) aus verschiedenen Anwendungen wie Salesforce, Amazon S3 und ServiceNow in einem einheitlichen Kundenprofil zusammen.
Quelle: aws.amazon.com

Metrik-Unterstützung jetzt in AWS Distro for OpenTelemetry verfügbar

Heute kündigen wir die allgemeine Verfügbarkeit von AWS Distro for OpenTelemetry (ADOT) für Metriken an. Dabei handelt es sich um eine sichere, produktionsbereite und von AWS unterstützte Verteilung des OpenTelemetry-Projekts. Mit dieser Einführung können Kunden OpenTelemetry APIs und SDKs in Java, .Net und JavaScript verwenden, um Metriken zu sammeln und an Amazon CloudWatch, Amazon Managed Service für Prometheus und andere vom OpenTelemetry-Protokoll (OTLP) unterstützte Überwachungsziele zu senden. OpenTelemetry ist Teil der Cloud Native Computing Foundation (CNCF) und bietet Open-Source-APIs, -Bibliotheken und Kundendienstmitarbeiter zur Erfassung von verteilten Spuren und Metriken für die Überwachung von Anwendungen und Infrastrukturen. Mit ADOT brauchen Sie Ihre Anwendungen nur einmal zu instrumentieren, um Metriken und Spuren an mehrere Überwachungslösungen zu senden. Sie können auch automatische Instrumentierungs-Agenten verwenden, um Spuren und Metriken zu sammeln, ohne Ihren Code zu ändern. Benutzen Sie AWS Distro for OpenTelemetry, um Ihre Anwendungen zu instrumentieren, die in Amazon Elastic Compute Cloud (EC2), Amazon Elastic Container Service (ECS) und Amazon Elastic Kubernetes Service (EKS) laufen.
Quelle: aws.amazon.com

Cloud Native 5 Minutes at a Time: What is Kubernetes?

One of the biggest challenges for implementing cloud native technologies is learning the fundamentals—especially when you need to fit your learning into a busy schedule. In this series, we’ll break down core cloud native concepts, challenges, and best practices into short, manageable exercises and explainers, so you can learn five minutes at a time. These … Continued
Quelle: Mirantis

Radio Cloud Native – Week of May 18, 2022

Every Wednesday, Nick Chase and Eric Gregory from Mirantis go over the week’s cloud native and industry news. This week they discussed: Google Cloud’s Assured Open Source Software and Supply Chain Security Costa Rican government systems downed by ransomware Kubernetes security survey The Envoy Gateway project Juniper Contrail goes cloud native …and more. You can … Continued
Quelle: Mirantis

Built with BigQuery: Material Security’s novel approach to protecting email

Editor’s note: The post is part of a series highlighting our awesome partners, and their solutions, that are Built with BigQuery.Since the very first email was sent more than 50 years ago, the now-ubiquitous communication tool has evolved into more than just an electronic method of communication. Businesses have come to rely on it as a storage system for financial reports, legal documents, and personnel records. From daily operations to client and employee communications to the lifeblood of sales and marketing, email is still the gold standard for digital communications.But there’s a dark side to email, too: It’s a common source of risk and a preferred target for cybercriminals. Many email security approaches try to make it safer by blocking malicious emails, but leave the data in those mailboxes unguarded in case of a breach.Material Security takes a different approach. As an independent software vendor (ISV), we start with the assumption that a bad actor already has access to a mailbox, and tries to reduce the severity of the breach by providing additional protections for sensitive emails.For example, Material’s Leak Prevention solution finds and redacts sensitive content in email archives but allows for it to be reinstated with a simple authentication step when needed. The company’s other products include:ATO Prevention, which stops attackers from misusing password reset emails to hijack other services.Phishing Herd Immunity, which automates security teams’ response to employee phishing reports.Visibility and Control, which provides risk analytics, real-time search, and other tools for security analysis and management.Material’s products can be used with any cloud email provider, and allow customers to retain control over their data with a single-tenant deployment model. Powering data-driven SaaS apps with Google BigQueryEmail is a large unstructured dataset, and protecting it at scale requires quickly processing vast amounts of data — the perfect job for Google Cloud’s BigQuery data warehouse. “BigQuery is incredibly fast and highly scalable, making it an ideal choice for a security application like Material,” says Ryan Noon, CEO and co-founder of Material. “It’s one of the main reasons we chose Google Cloud.” BigQuery provides a complete platform for large-scale data analysis inside Google Cloud, from simplified data ingestion, processing, and storage to powerful analytics, AI/ML, and data sharing capabilities. Together, these capabilities make BigQuery a powerful security analytics platform, enabled via Material’s unique deployment model.Each customer gets their own Google Cloud project, which comes loaded with a BigQuery data warehouse full of normalized data across their entire email footprint. Security teams can query the warehouse directly to power internal investigations and build custom, real-time reporting — without the burden of building and maintaining large-scale infrastructure themselves. Material’s solutions are resonating with a diverse range of customers including leading organizations such as Mars, Compass, Lyft, DoorDash and Flexport. The Built with BigQuery advantage for ISVs Material’s story is about innovative thinking, skillful design, and strategic execution, but BigQuery is also a foundational part of the company’s success. Mimicking this formula is now easier for ISVs through Built with BigQuery, which was announced at the Google Data Cloud Summit in April.Through Built with BigQuery, Google is helping tech companies like Material build innovative applications on Google’s data cloud with simplified access to technology, helpful and dedicated engineering support, and joint go-to-market programs. Participating companies can: Get started fast with a Google-funded, pre-configured sandbox. Accelerate product design and architecture through access to designated experts from the ISV Center of Excellence who can provide insight into key use cases, architectural patterns, and best practices. Amplify success with joint marketing programs to drive awareness, generate demand, and increase adoption.BigQuery gives ISVs the advantage of a powerful, highly scalable data warehouse that’s integrated with Google Cloud’s open, secure, sustainable platform. And with a huge partner ecosystem and support for multicloud, open source tools and APIs, Google provides technology companies the portability and extensibility they need to avoid data lock-in. Click here to learn more about Built with BigQuery.Related ArticleHelping global governments and organizations adopt Zero Trust architecturesGoogle details how it helps governments embark on a Zero Trust journey as the anniversary of the Biden Zero Trust Executive Order approac…Read Article
Quelle: Google Cloud Platform

Get more insights with the new version of the Node.js library

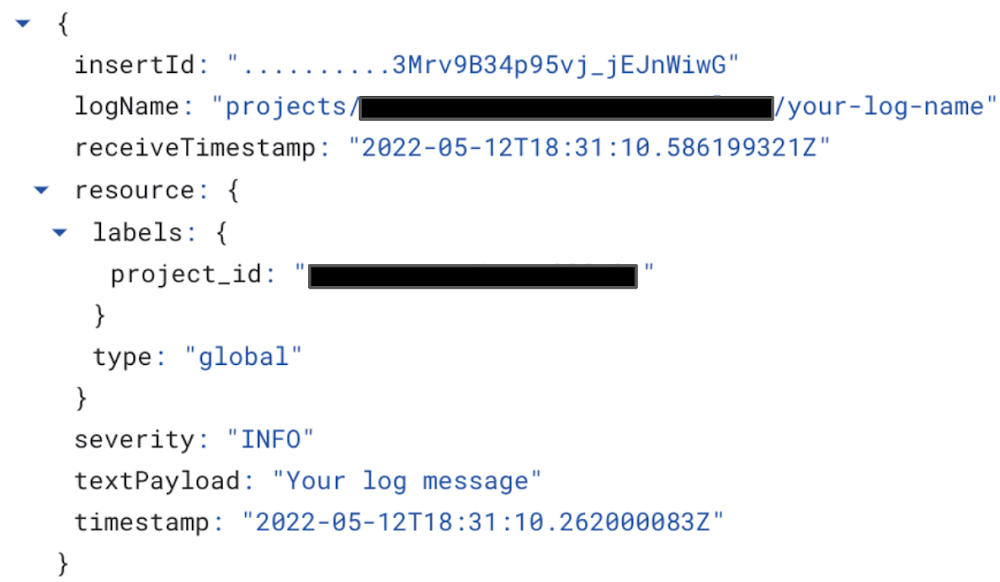
We’re thrilled to announce the release of a new update to the Cloud Logging Library for Node.js with the key new features of improved error handling and writing structured logging to standard output which becomes handy if you run applications in serverless environments like Google Functions!The latest v9.9.0 of Cloud Logging Library for Node.js makes it even easier for Node.js developers to send and read logs from Google Cloud providing real-time insight into what is happening in your application through comprehensive tools like Log Explorer. If you are a Node.js developer working with Google Cloud, now is a great time to try out Cloud Logging.The latest features of the Node.js library are also integrated and available in other packages which are based on Cloud Logging Library for Node.js:@google-cloud/logging-winston – this package integrates Cloud Logging with the Winston logging library. @google-cloud/logging-bunyan – this package integrates Cloud Logging with the Bunyan logging library. If you are unfamiliar with the Cloud Logging Library for Node.js, start by running following command to add the library to your project:code_block[StructValue([(u’code’, u’npm install @google-cloud/logging’), (u’language’, u”)])]Once the library is installed, you can use it in your project. Below, I demonstrate how to initialize the logging library, create a client assigned configured with a project ID,  and log a single entry ‘Your log message':code_block[StructValue([(u’code’, u”// Imports the Google Cloud client library rn const { Logging } = require(‘@google-cloud/logging’);rn // Creates a client with predefined project Id and a path torn // credentials JSON file to be used for auth with Cloud Loggingrn const logging = new Logging(rn {rn projectId: ‘your-project-id’,rn keyFilename: ‘/path/to/key.json’,rn }rn );rn // Create a log with desired log namern const log = logging.log(‘your-log-name’);rn // Create a simple log entry without any metadatarn const entry = log.entry({}, ‘Your log message’);rn // Log your record!!!rn log.info(entry);”), (u’language’, u”)])]Here’s the log message generated by this code in Log Explorer:Two critical features of the latest Cloud Logging Library for Node.js release are writing structured log entries to standard output and error handling with a default callback. Let’s dig in deeper. Writing structured log entries to standard outputThe LogSync class helps users write context-rich structured logs to stdout or any other Writable interface. This class extracts additional log properties like trace context from HTTP headers, and can be used to toggle between writing to the Cloud Logging endpoint or to stdout during local development.In addition, writing structured logging to stdout can be integrated with a Logging agent. Once a log is written to stdout, a Logging agent then picks up those logs and delivers those to Cloud Logging out-of-process. Logging agents can add more properties to each entry before streaming it to the Logging API.We recommend serverless applications (i.e. applications running in Cloud Functions and Cloud Run) to use the LogSync class as async logs delivery may be dropped due to lack of CPU or other environmental factors  preventing the logs from being sent immediately to the Logging API. Cloud Functions and Cloud Run applications by their nature are ephemeral and can have a short lifespan which will cause logging data drops when an instance is shut down before the logs have been sent to Cloud Logging servers. Today, Google Cloud managed services automatically install Logging agents for all Google serverless environments in the resources that they provision – this means that you can use LogSync in your application to seamlessly deliver logs to Cloud Logging through standard output.Below is a sample how to use LogSync class:code_block[StructValue([(u’code’, u”const { Logging } = require(‘@google-cloud/logging’);rn const logging = new Logging(rn {rn projectId: ‘your-project-id’,rn keyFilename: ‘/path/to/key.json’,rn }rn );rn// Create a LogSync transport, defaulting to `process.stdout`rnconst log = logging.logSync(‘Your-log-name’);rnconst entry = log.entry({}, ‘Your log message’);rnlog.write(entry);”), (u’language’, u”)])]If you use @google-cloud/logging-winston  or @google-cloud/logging-bunyan library, you can set the redirectToStdout parameter in LoggingWinston or LoggingBunyan constructor options respectively. Below is a sample code how to redirect structured logging output to stdout for LoggingWinston class:code_block[StructValue([(u’code’, u”// Imports the Google Cloud client library for Winstonrnconst {LoggingWinston} = require(‘@google-cloud/logging-winston’);rnrn// Creates a client that writes logs to stdoutrnconst loggingWinston = new LoggingWinston({rn projectId: ‘your-project-id’,rn keyFilename: ‘/path/to/key.json’,rn redirectToStdout: true,rn});”), (u’language’, u”)])]Error Handling with a default callbackThe Log class provides users the ability to write and delete logs asynchronously. However, there are cases when log entries cannot be written or deleted and an error is thrown – if the error is not handled properly, it can crash the application. One possible way to handle the error is to await the log write/delete calls and wrap it with try/catch. However, waiting for every write or delete call may introduce delays which could be avoided by simply adding a callback as shown below:code_block[StructValue([(u’code’, u”// Asynchronously write the log entry and handle response or rn // any errors in provided callbackrn log.write(entry, err => {rn if (err) {rn // The log entry was not written.rn console.log(err.message);rn } else {rn console.log(‘No error in write callback!’);rn }rn });”), (u’language’, u”)])]Adding a callback to each write or delete call is duplicate code and remembering to include it for each call may be toilsome, especially if  the code handling the error is always the same. To eliminate this burden, we introduced the ability to provide a default callback for the Log class which can be set through the LogOptions passed to the Log constructor as in example below:code_block[StructValue([(u’code’, u”const {Logging} = require(‘@google-cloud/logging’);rn const logging = new Logging();rn rn // Create options with default callback to be called on rn // every write/delete response or errorrn const options = {rn defaultWriteDeleteCallback: function (err) {rn if (err) {rn console.log(‘Error is: ‘ + err);rn } else {rn console.log(‘No error, all is good!’);rn }rn },rn };rnrn const log = logging.log(‘my-log’, options);”), (u’language’, u”)])]If you use @google-cloud/logging-winston  or @google-cloud/logging-bunyan library, you can set the callback through defaultCallback parameter in LoggingWinston or LoggingBunyan constructor options respectively. Here is an example of  how to set a default callback for LoggingWinston class:code_block[StructValue([(u’code’, u”// Imports the Google Cloud client library for Winstonrnconst {LoggingWinston} = require(‘@google-cloud/logging-winston’);rnrn// Creates a clientrnconst loggingWinston = new LoggingWinston({rn projectId: ‘your-project-id’,rn keyFilename: ‘/path/to/key.json’,rn defaultCallback: err => {rn if (err) {rn console.log(‘Error occurred: ‘ + err);rn }rn },rn});”), (u’language’, u”)])]Next StepsNow, when you integrate the Cloud Logging Library for Node.js in your project, you can start using the latest features. To try the latest Node.js library in Google Cloud you can follow this quickstart walkthrough guide:For more information on the latest check out for Cloud Logging Library for Node.js user guide.For any feedback or contributions, feel free to open issues in our Cloud Logging Library for Node.js GitHub repo. Issues can be also opened for bugs, questions about library usage and new feature requests.Related ArticleIntroducing a high-usage tier for Managed Service for PrometheusNew pricing tier for our managed Prometheus service users with over 500 billion metric samples per month. Pricing for existing tiers redu…Read Article
Quelle: Google Cloud Platform

Run your fault-tolerant workloads cost-effectively with Google Cloud Spot VMs, now GA

Available in GA today, you can now begin deploying Spot VMs in your Google Cloud projects to start saving now. For an overview of Spot VMs, see our Preview launch blog and for a deeper dive, check out our Spot VM documentation. Modern applications such as microservices, containerized workloads, and horizontal scalable applications are engineered to persist even when the underlying machine does not. This architecture allows you to leverage Spot VMs to access capacity and run applications at a low price. You will save 60 – 91% off the price of our on-demand VMs with Spot VMs.To make it even easier to utilize Spot VMs, we’ve incorporated Spot VM support in a variety of tools. Google Kubernetes Engine (GKE)Containerized workloads are often a good fit for Spot VMs as they are generally stateless and fault tolerant. Google Kubernetes Engine (GKE) provides container orchestration. Now with native support for Spot VMs, use GKE to manage your Spot VMs to get cost savings. On clusters running GKE version 1.20 and later, the kubelet graceful node shutdown feature is enabled by default, which allows the kubelet to notice the preemption notice, gracefully terminate Pods that are running on the node, restart Spot VMs, and reschedule Pods. As part of this launch, Spot VM support in GKE is now GA. For best practices on how to use GKE with Spot VMs, see our architectural walkthrough on running web applications on GKE using cost-optimized Spot VMs as well as our GKE Spot VM documentation.  GKE Autopilot Spot PodsKubernetes is a powerful and highly configurable system. However, not everyone needs that much control and choice. GKE Autopilot provides a new mode of using GKE which automatically applies industry best practices to help minimize the burden of node management operations. When using GKE Autopilot, your compute capacity is automatically adjusted and optimized based on your workload needs. To take your efficiency to the next level, mix in Spot Pods to drastically reduce the cost of your nodes. GKE Autopilot gracefully handles preemption events by redirecting requests away from nodes with preempted Spot Pods and manages autoscaling and scheduling to ensure new replacement nodes are created to maintain sufficient resources. Spot Pods for GKE Autopilot is now GA, and you can learn more through the GKE Autopilot and Spot Pods documentation.  TerraformTerraform makes managing infrastructure as code easy, and Spot VM support is now available for Terraform on Google Cloud. Using Terraform templates to define your entire environment, including networking, disks, and service accounts to use with Spot VMs, makes continuous spin-up and tear down of deployments a convenient, repeatable process. Terraform is especially important when working with Spot VMs as the resources should be treated as ephemeral. Terraform works even better in conjunction with GKE to define and manage a node poolseparately from the cluster control plane. This combination gives you the best of both worlds by using Terraform to set up your compute resources while allowing GKE to handle autoscaling and autohealing to make sure you have sufficient VMs after preemptions. SlurmSlurm is one of the leading open-source HPC workload managers used in TOP 500 supercomputers around the world. Over the past five years, we’ve worked with SchedMD, the company behind Slurm, to release ever-improving versions of Slurm on Google Cloud. SchedMD recently released the newest Slurm for Google Cloud scripts, available through the Google Cloud Marketplace and in SchedMD’s GitHub repository. This latest version of Slurm for Google Cloud includes support for Spot VMs via the Bulk API. You can read more about the release in the Google Cloud blog post.Related ArticleCloud TPU VMs are generally availableCloud TPU VMs with Ranking & Recommendation acceleration are generally available on Google Cloud. Customers will have direct access to TP…Read Article
Quelle: Google Cloud Platform