Partnering with Intel to accelerate cloud-native 5G

Communications service providers are increasingly adopting cloud-native technologies to harness the potential of 5G not only as a connectivity solution, but also as a business services platform for delivering applications to the network edge. We announced our telecommunications industry strategy last year to help Communication Service Providers address the growing demands of enterprise customers to take advantage of cloud capabilities with 5G connectivity.We believe that by partnering across the telecommunications stack—with application providers, carriers and communications service providers, hardware providers, and global telecoms—we can decrease the cost and time-to-market needed for the telecommunications industry to shift to cloud-native 5G, and open new lines of business for communications service providers as they deliver cloud-native 5G for enterprises.As we continue to grow cloud-native services for the telecommunications industry, we’re excited to announce a collaboration with Intel to develop reference architectures and integrated solutions for communications service providers to accelerate their deployment of 5G and edge network solutions.“The next wave of network transformation is fueled by 5G and is driving a rapid transition to cloud-native technologies,” said Dan Rodriguez, Intel corporate vice president and general manager of the Network Platforms Group. “As communications service providers build out their 5G network infrastructure, our efforts with Google Cloud and the broader ecosystem will help them deliver agile, scalable solutions for emerging 5G and edge use cases.” Under this partnership, we’ll work closely with Intel in three main areas: accelerating the ability of communications service providers to deploy their Virtualized RAN (vRAN) and Open Radio Access Network (ORAN) solutions by providing next-generation infrastructure and hardware, launching new lab environments to help communications service providers innovate on cloud-native 5G, and making it easier for them to deliver business applications to the network edge.5G vRAN on Google Cloud’s Anthos with Intel cloud-native platforms and solutionsWith the industry’s transition to 5G and growth in edge services, Google Cloud and Intel will also collaborate on vRAN solutions. vRAN can bring significant benefits for operators, including improved network performance and spectral efficiency, cost efficiencies, and flexible deployment models. At the same time, these solutions present communications service providers with stringent network, timing, and processing demands. The ability to deploy, manage, and upgrade network functions is critical to enable 5G vRAN deployments at scale.  To help communications service providers streamline the rollout of vRAN, and therefore 5G, we will leverage Google Cloud’s global infrastructure and capabilities alongside solutions from Intel, including:Intel’s FlexRAN reference software;Intel’s cloud-native Open Network Edge Service Software (OpenNESS) deployment model, and best practices applicable to Anthos;Data Plane Development Kit (DPDK) and hardware infrastructure based on Intel Xeon processors;New reference architecture and solutions to accelerate 5G vRAN with Anthos, an application platform.Network Functions Validation LabIn addition, Google Cloud will jointly launch a Network Functions Validation lab and collaborate with Intel to support vendors in testing, optimizing, and validating their core network functions running on Google Cloud’s Anthos for Telecom platform. This lab environment will expand to help customers conceive, plan, and validate their 5G and edge application strategies.Delivering ISV applications to the network edgeWith the rollout of 5G networks, communications service providers have an opportunity to transform the network edge into an enterprise services platform, opening up new lines of business by delivering enterprise applications to the edge. For example, we recently announced an initiative to deliver 200+ partner applications to the edge via Google Cloud’s network and 5G.In addition to network functions, to make it even easier for communications service providers to deliver applications to the edge, we will collaborate with Intel to develop edge solutions with Intel compute-optimized technology. We’ll also work closely with Intel to create blueprints and solutions to accelerate edge transformation in key industries, such as manufacturing or retail.To learn more about our telecommunications industry offerings and our partnership with Intel, reach out to your Google Cloud partner or representative.Related ArticleBringing partner applications to the edge with Google CloudGoogle Cloud’s Anthos for Telecom initiative plus the availability of 5G lets our partners run their apps on Anthos, at the edge.Read Article
Quelle: Google Cloud Platform

Scale model training in minutes with RAPIDS + Dask and NVIDIA GPUs on AI Platform

Python has solidified itself as one of the top languages for data scientists looking to prep, process, and analyze data for analytics and machine learning (ML) related use cases. However, base Python libraries are not designed for large-scale transformations, creating major obstacles for data scientists seeking to deploy their code in production environments. Increasingly, ML tasks must process massive amounts of data, requiring the processing to be distributed across multiple machines. Libraries like Dask and RAPIDS help data scientists manage that distributed processing in Python. Google Cloud’s AI Platform enables data scientists to easily provision extremely powerful virtual machines with those libraries pre-installed, and with a variety of speed-boosting GPUs to boot. RAPIDS is a suite of open-source libraries that let data scientists leverage NVIDIA GPUs in their ML pipelines.Dask is an open-source library for parallel computing in Python that helps data scientists scale their ML workloads.AI Platform is Google Cloud’s fully-managed platform that provides data scientists with automatically-provisioned environments to do data science and  ML.Put them together, and you can run scalable distributed training on a cluster of your specification, accelerated by NVIDIA GPUs. That is what we will be walking you through in this blog post.Overview Today, Dask is the most commonly used parallelism framework within the PyData and SciPy communities. Dask is designed to scale from parallelizing workloads on the CPUs in your laptop to thousands of nodes in a cloud cluster. In conjunction with the open-source RAPIDS framework developed by NVIDIA, you can utilize the parallel processing power of both CPUs and NVIDIA GPUs. GPUs can greatly accelerate all stages of an ML pipeline: pre-processing, training, and inference. In this blog, we will be focusing on the pre-processing and training stages, using Python in a Jupyter Notebook environment.First, we will use Dask/RAPIDS to read a dataset into NVIDIA GPU memory and execute some basic functions. Then, we’ll use Dask to scale beyond our GPU memory capacity.Next, we’ll scale XGBoost across multiple NVIDIA A100 Tensor Core GPUs, by submitting an AI Platform Training job with a custom container. Finally, you can deploy your model for online inference, accelerated by GPUs, using AI Platform Predictions.Find the accompanied Github repository for this blog here.How Dask is usedDask is being used by data science teams working on a wide range of problems, including high-performance computing, climate science, banking and imaging problems. Additionally, Dask is also well-suited for business intelligence problems. See here for a list of use cases that teams have made progress on using Dask.Why use Dask on AI PlatformDask supports data loads from many different sources such as Google Cloud Storage and HDFS, and many different data formats such as CSV, Parquet and Avro. These are supported by different open source libraries such as PyArrow, GCSFS, FastParquet, and FastAvro, all of which are included with AI Platform. AI Platform also collaborates closely with NVIDIA to ensure top-notch compatibility between AI Platform and NVIDIA GPUs. AI Platform Notebooks provides an easy way to spin up a Jupyterlab development environment to meet your exact needs, with the memory, CPUs or GPUs, and libraries you need. AI Platform Training allows you to submit your data processing and model training workloads as a job, using either hosted frameworks such as scikit-learn, TensorFlow or XGBoost, or bring your own frameworks via a custom container.Both AI Platform Notebooks and AI Platform Training give you the flexibility to design your compute clusters to match any workload, while also managing the bulk of the dependencies, networking and monitoring under the hood. This means you can spend your time developing in Python, and not worrying about infrastructure (but you can also play around with the machines if you want to!)Create Development Environment on AI NotebooksWe will be using AI Platform Notebooks to spin up an environment to work in. Before you begin, you must sign up for Google Cloud Platform, and enable the AI Platform Notebooks API (see instructions here). Please note that you will be charged when you create an AI Notebook instance. See pricing details here. AI Platform Notebooks provides monthly/hourly cost estimates for each machine type that you select. You can delete the instance when this tutorial is done, and you will only pay for the time it took you to complete the tutorial (if you keep the instance running for 3 hours, at current prices you’re spending less than $3). If you want to save your work, you can choose to stop the instance when you are not using it to only pay for the boot disk storage. By customizing our AI Notebook instance, we can create a development environment with all the packages and frameworks we need within a matter of minutes. These are the settings we chose:*Be sure to check the “install GPU driver” box or you will need to manually install it and restart your instance!** If you will be using the AI Notebook instance to generate the Higgs dataset (instructions to come in later section), then upload it to the cloud, you will want to increase your boot disk size to 200GB.Click “Create” to spin up your notebook environment. This will take a few minutes. Once it is finished, a button will appear next to your instance that reads “Open Jupyterlab”. Click this button to enter the Jupyterlab instance. Interacting with your AI NotebookMost data scientists will be familiar with Jupyter Notebook functionality. Most of the libraries we need have already been installed on your instance, but we will create a conda environment to ensure reproducibility. Execute the following code in the terminal:You can also issue terminal commands from within a Jupyter notebook. Select file > New > Notebook. Create a new code block, paste the following command in it, and execute it. This will clone the github repository for this tutorial into your Notebook instance. You can use the file navigator on the left of the Jupyter console to navigate through your folders and files. You can also manage  your own github repository from the Git page of the Jupyter console.Navigate to ~/ai-platform-samples/training/rapids/rapids_AIP. This will be the folder where you will find all the files needed for this tutorial. Start by opening dask_blog.ipynb.You can also install Dask into your local environment from scratch by following these instructions.Instantiate LocalCudaClusterNow we will instantiate a LocalCUDACluster, which will be used to assign the attached GPU to the Python processes. Note that it is not necessary to use Dask with a single node and a single GPU (cuDF and cuML will also work – and you can use more functions with those libraries), but we will need it once we scale up.Prepare DataThe dataset we will be using for this tutorial is simulated particle activity data that was released for the Higgs Boson Machine Learning Challenge. We will be replicating this public dataset, and using different subsets of Higgs (some larger, some smaller) to demonstrate the scaling ability of Dask on AI Platform. Executing makedataset.sh script in the repo will download the dataset, replicate it, and upload it to GCS in the github. You can execute this script in your AI Notebook, or run it in a separate GCE instance, or run it locally if you wish.There are many ways to ingest data into your Notebook instance, including uploading a local file. We will be reading the data from GCS (Google Cloud Storage), into a DataFrame that can be processed by GPUs.cuDFis a Python GPU DataFrame library (built on the Apache Arrow columnar memory format) for loading, joining, aggregating, filtering, and otherwise manipulating tabular data using a DataFrame style API.Dask-cuDF extends Dask where necessary to allow its DataFrame partitions to be processed by cuDF GPU DataFrames as opposed to Pandas DataFrames. For instance, when you call dask_cudf.read_csv(…), your cluster’s GPUs do the work of parsing the CSV file(s) with underlying cudf.read_csv().For faster performance, you can use Parquet format instead of CSV. You will also need to shard your data so that it can be distributed across the workers. There are multiple ways to do this. You can partition your data into multiple files before reading it in, then use the * decorator to read them in. This is the route we will take in this tutorial. You can also use the npartitions argument with read_csv(), or chunk size in Dask Array to set the partitions.A good rule of thumb is 1 GB partitions for an NVIDIA T4 GPU, and 2-3 GB is usually a good choice for a V100 GPU (with above 16GB of memory). Larger partitions will generally result in faster performance up to a point, but you need to be sure they will fit in your GPU memory.This will read in our first dataset, and show the number of partitions. Our dataset is 10GB, with ten 1GB partitions.Now we can execute some basic functions on the Dask Dataframe. This takes around a minute to run. As a note, this medium blog showed that these Dask functions execute 2-3x faster on GPUs than on CPUs. If you tried to do this group by on a pandas DataFrame of this size, your machine may very well error out, or take hours to complete the task.You can keep track of your GPU’s memory usage by executing nvidia-smi dmon in the terminal, within the rapids-0.17 conda environment. For more metrics, you can utilize Jupyterlab extensions like dask-labextension or  nvdashboard , which will visualize various charts and metrics like GPU memory use and utilization. Using dask-labextension, we can see that GPU utilization is spiky. The “Dask Gpu Memory” total is inaccurate as it’s measuring the total memory of the localCUDAcluster, which includes the CPU memory of the notebook instance.At present, using un-supported Jupyterlab extensions with AI Notebooks can be difficult (we’ve included instructions on how to do it in the git repo but there’s no guarantee that will work with other configurations). If this is a requirement, we recommend using Dask onGKEor Dataproc, and configuring your own Jupyter environment. In our next blog, we will explore how to visualize GPU metrics in greater detail.Scale to 20GBNow, we want to read in a 20 GB dataset, but our attached NVIDIA T4 GPU only has 16GB of memory. Luckily, Dask allows us to spill from GPU memory to host memory when the GPU runs out. To do this, we restart the Python kernel, and create a new LocalCUDACluster with a device_memory_limit set.  Dask will typically spill to disk by default, but setting device_memory_limit allows you to control when that will happen.Note that you can instantiate a new LocalCUDACluster by shutting down and restarting the kernel using the terminal and kernel session control page in jupyterlab. Make sure you choose the rapids-0.17 kernel.Execute the code again to run the functions. Dask manages the movement of the data so that it can execute despite the constraints. This takes ~2 minutes to execute.Scale to 100GB using AI Platform TrainingNow we would like to train an XGBoost model on our 100 GB dataset. However, even using Dask Dataframes, XGBoost executes completely in memory, meaning we can’t spill as dynamically from GPU to host memory. This means we need to beef up our GPUs.Note that it is easy to resize your AI Notebook instance with more GPUs or GPUs of a different kind. However, we want to take a more dynamic approach by using AI Platform Training with custom containers. AI Platform Training will spin up the resources we specify, run our code as a job, then spin them down when completed. And, we can easily package and submit our code from AI Notebooks.We will run the same libraries we used above, but on AI Platform Training with four NVIDIA A100 GPUs. A100s available in AI Platform have 40GB of GPU memory and you can scale up to 16 of them on a single machine without having to worry about multi-node distribution (As of the time this blog is published, GCP is the only Cloud Provider to support 16). This gives you a whopping 640GB GPU memory to play with. This both simplifies managing your environment and limits any networking issues that could pop up when dealing with multi-node setups.Training with ContainersBy using Containers, we can customize exactly how our training job is submitted, and on what machines. As you already cloned the entire Git repository, use the Jupyterlab navigation panel to navigate to the XGboost_training folder. Inside, you will find the files necessary to build the RAPIDS-based container, and deploy the AI Platform Training Job.Build the containerYou can see in the Dockerfile that we are using a base image from RAPIDS.To build the container and push it to your own GCR, open build.sh and update the path to match your repository. Then execute the script.XGBoost on AI Platform Training Open the rapids_dask.yaml file. This is how we configure the machines on which AI Platform Training will execute our XGBoost code. As you can see, we are using 4 GPUs of the type A100. See a full list of the GPUs available in each region, and with what machine types here.Update the bracketed variables, and change the imageURI if you build your own container. Save the file when you are done.Now we are ready to submit the training job. Do this by executing the following code in the AI Notebook terminal (also found in the README file).You can monitor your job by clicking on it from the list of jobs in AI Platform on Cloud Console (AI Platform > Jobs). On the job details page, you can see a variety of metrics, such as CPU and GPU utilization. In addition, you can click on the “View Logs” link to be taken to Cloud Logging, where you can see all logs generated by your job. Or, execute gcloud ai-platform jobs stream-logs $JOB_NAME to stream the logs in your terminal.It will take around 11 minutes to spin up the training environment and begin executing the code. You can follow along with the steps by watching the logs. The usage metrics will take a few minutes to propagate as well. When we ran this job using a 100GB dataset, it completed in 19 minutes (including training environment spin up time), with the XGBoost training portion taking only 56 seconds!By making a few minor changes to the YAML file, we can run the same code on 4 NVIDIA T4 GPUs. Dask recognizes that it cannot be executed completely in GPU memory, and therefore spills to disk when necessary. This results in an overall job time of 20 minutes, and a training time of 124 seconds. With 8 V100 GPUs, we saw a training time of 28 seconds! We encourage you to play around with different resource configurations and data sizes, as AI Platform makes it easy to do so.Deploy Model for Online PredictionNow that you have a trained model in your GCS bucket, you can deploy that model on AI Platform Predictions for online inference. Once again, you can leverage GPUs to increase the inference speed.Clean UpDelete the AI Notebook instance to prevent any further charges. If you want to save your work, you can choose to stop the instance instead.Delete the GCS bucket.ConclusionDask is an exciting framework that has seen tremendous growth over the past few years. RAPIDS + Dask allows you to leverage the power of NVIDIA GPUs, which can greatly decrease your data processing and training time. We saw that using NVIDIA A100 GPUs resulted in a lower training time compared to NVIDIA T4 GPUs, even with twice the data. Dask is also handy in its ability to automatically tailor its method of execution based on the resources you have available. We saw that Dask will automatically revert to using CPU memory when GPU memory is exhausted, and that you can control this mechanism. AI Platform allows you to quickly get started with Dask. You can develop in Jupyterlab with any number of GPUs in AI Notebook. You can then scale up your code to execute on souped-up machines on-demand with AI Platform Training. Imagine what you could do with 16 A100 GPUs at your disposal?  Need more proof that NVIDIA GPUs can speed up your XGBoost training,check out this blog. Find out more fun ways to use A100s here.Big thanks to Mikhail Chrestkha, Winston Chiang, Guoqing Xu, Ethem Can, Dong Meng, Arun Raman, Rajesh Thallam, Michael Thomas, Rajan Arora and Subhan Ali for educating me and helping with the example workflow.Related ArticleBeginners guide to painless machine learningGet a deep dive on Google Cloud AI tools that make machine learning painless, and learn tips for building AI-powered apps fast.Read Article
Quelle: Google Cloud Platform

3 common serverless patterns to build with Workflows

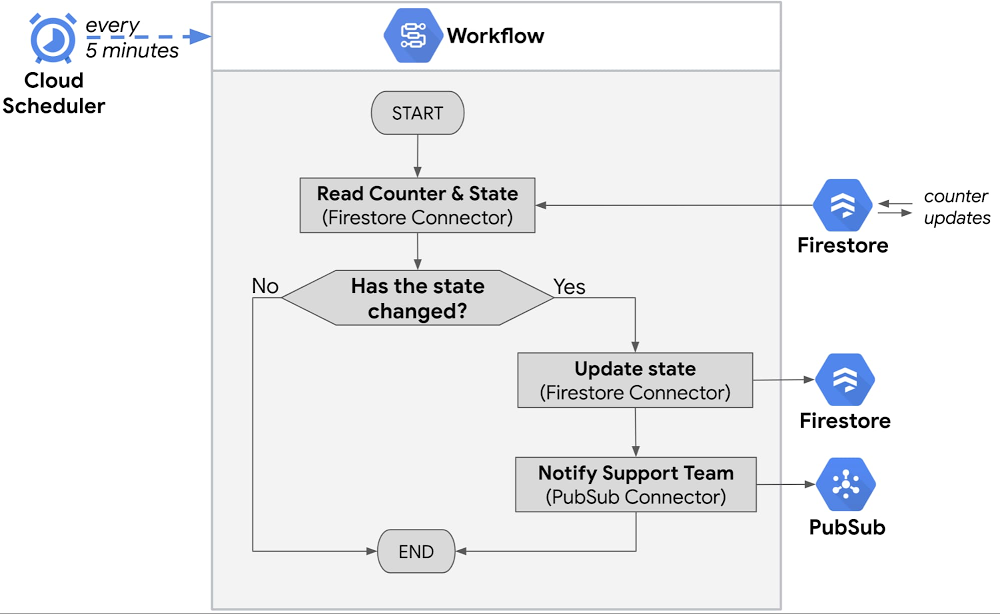
In January 2021, our Workflows orchestration and automation service reached General Availability. At the same time, we updated Workflows with a preview of Connectors, which provide seamless integration with other Google Cloud products. Workflows plus Connectors are a great way to design common architecture patterns that can help you build advanced serverless applications. Workflows is a serverless product designed to orchestrate work across Google Cloud APIs as well as any HTTP-based API available on the internet. It requires no infrastructure management and generates no charges when workflows are waiting for operations to complete. You can learn more about Workflow’s core capabilities in our previous blog post. In this blog post, we will take a look at a few useful architecture patterns including scheduling recurring workflow executions, handling long-running API requests by polling for results, and iterating through an array of database entries. Scheduled workflowsLet’s consider an e-commerce website or a gaming application that requires the support team’s intervention whenever user traffic is not within an expected, normal range. For example, exceptionally low number of online users may indicate an outage, while a higher than expected number of concurrent users may cause scalability issues. The number of concurrent online users is stored in a Firestore database as a distributed counter updated by log-in/log-out transactions. Our workflow needs to periodically check the value of the counter and react accordingly, depending on its value. Consider the following workflow:The workflow is triggered every 5 minutes and retrieves the value of the current user counter from a Firestore database using the Firestore Connector. Along with the counter value, it also retrieves the last state of the traffic, e.g., “Low”, “Normal”, “High”, that was saved during the workflow’s  previous run. Workflows’ built-in switch step, combined with a custom formula, is used to determine whether the current value of the counter would make it fall to a different state than the one saved in the previous run of the workflow. If so, the new state is saved in the Firestore database and  Pub/Sub Connector pushes a message to the support team, informing them about state change. The workflow is checking not only the current value of the counter but also the last recorded state, so that only status changes result in notifications. With only a few steps, the workflow above becomes a reliable serverless application with full tracking of execution history. Built-in Identity and Access Management (IAM) integration reduces the complexity of interacting with other Google Cloud products, like Firestore or Pub/Sub.Learn how to schedule workflow executions using Cloud Scheduler, similar to the example above, in this guide.Workflows with API polling Consider a workflow that requests an execution of a long-running job using an external API. The external API accepts a job execution request and returns a unique JobID that can be used to poll for this job’s execution status. The job can take hours and the workflow can only proceed to the next steps only once this job is completed. As there is no feature in this API to notify the workflow about a job completion, the workflow needs to periodically poll for the job status.The workflow presented below implements this pattern, checking the status of the job every 2 minutes. Note that Workflows’ pricing model is based on the number of executed steps and there is no time-related charge for a sleep operation. Workflows can run for up to a year, so you can be confident that they will follow through on even the longest-running jobs.In real life scenarios, you may need to add an extra step at the beginning of this workflow to retrieve an authentication key for the external API from a secure storage system. We recommended you use Secret Manager as a key or password storage system and get the key values using the Secret Manager Connector feature.Iterating through an array of database recordsIn this example, the application needs to check customer records once a day, and send email reminders to customers with overdue invoices. The workflow below uses a Firestore Connector to run a query that retrieves entries for all customers with overdue payments. The workflow then iterates through this set and sends an email reminder about the pending payment to each customer, using an external Email API like SendGrid.The above example uses Workflow’s ability to process arrays and perform tasks for every element of an array, as shown in this example. By specifying error handling and retries in the workflow, you can be sure that intermittent failures, or errors with a particular entry, will not prevent the rest of the customer messaging from sending successfully.Similar to the previous example, this workflow may need to be extended with a connector call to Secret Manager to retrieve an access key for the email service. Get ready to WorkflowReal-life, line-of-business applications often need to use a combination of architecture patterns. While your actual use cases may differ from the examples above, the patterns of periodic scheduling, polling and array iterations are universal and the building blocks of countless implementations. Workflows’ support for serverless and API-based architectures allow you to minimize ongoing operational overhead but maintaining full control over your business logic, while Connectors to Google Cloud products like Pub/Sub, Firestore, Compute Engine, Secret Manager or Cloud Tasks make it easy to integrate Workflows into your environment.Now that Workflows is generally available, you can feel confident using it for production line-of-business applications, while built-in error handling for API calls further improves reliability of your applications. To learn more, visit the Workflows landing page today, or go directly to the Cloud Console to try it out.Related ArticleGet to know Workflows, Google Cloud’s serverless orchestration engineGoogle Cloud’s purpose-built Workflows tool lets you orchestrate complex, multi-step processes more effectively than general-purpose tools.Read Article
Quelle: Google Cloud Platform

Run data science at scale with Dataproc and Apache Spark

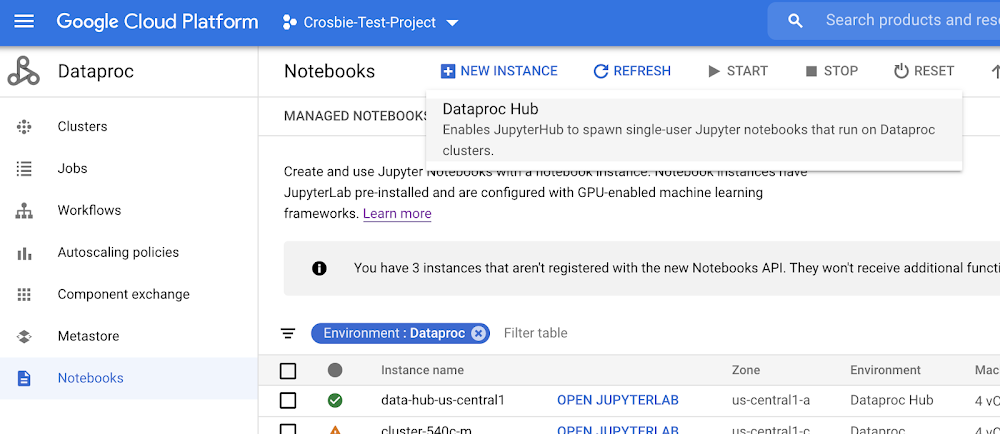
Data driven enterprises are transforming their businesses by migrating their on-prem data lakes and data warehouses to the cloud so they can enable new analytics at scale. As every enterprise looks to migrate, it’s important that IT leaders don’t forget about a key data stakeholder, the data scientist. Open source software (OSS) and libraries are a crucial piece of a data scientists toolkit and we’ve made significant progress to make OSS easier to manage for data scientists on Google Cloud’s data analytics platform.Data scientists rely on a suite of powerful open source applications to work on solving the world’s biggest challenges. With the integration of leading open source tools like Dask and RAPIDS on Google Cloud, the Dataproc team is making NVIDIA GPU-accelerated data science at scale more accessible. Scott McClellan Sr Director, Data Science Product Group, NVIDIADataproc Hub feature is now generally available: Secure and scale open source machine learningDataproc Hub, a feature now generally available for Dataproc users, provides an easier way to scale processing for common data science libraries and notebooks, govern custom open source clusters, and manage costs so that enterprises can maximize their existing skills and software investments. Dataproc Hub features include:Ready to use big data frameworks including JupyterLab with BigQuery, Presto, PySpark, SparkR, Dask, and Tensorflow on Spark.Access to custom Dataproc clusters within an isolated and controlled data science sandbox. Data scientists do not have to rely on IT to make changes to the programming environment. Access to BigQuery, Cloud Storage and AI Platform using the notebook users’ credentials ensures that permissions are always in sync and the right data is available to the right users. IT cost controls that include the ability to set auto scaling policies, CPU/RAM sizes and NVIDIA GPUs, auto-deletions and timeouts, and more. Integrated security controls including custom image versions, locations, VPC-SC, AXT, CMEK, Sole tenancy, shielded VMs, Apache Ranger, and Personal Cluster Authentication, to name a few. Easy to generate templated Dataproc configurations that can be reused for other clusters based on existing Dataproc clusters. A simple export is all that is needed. The current state of open source machine learning on Google CloudDataproc Hub was created by working in partnership with several companies that were facing rapid adoption of cloud sized datasets (big data), machine learning, and IoT. These new and large datasets were coupled with data analysis techniques and tools that simply do not fit into the traditional data warehousing model. Data science teams were combining methodologies across ETL (creating their own data structures), administration (using programming skills to configure resource sizing), and reporting (using Jupyter notebooks for exchanging data results). In addition, data scientists often work with unstructured data, which does not follow the same table/view permissions model as the data warehouse. The IT leaders we worked with wanted an easy way to control and secure data science environments. They also wanted to maintain production stability, control costs, and ensure security and governance controls were being met. They asked us to simplify the process of creating a secured data science environment that could serve as an extension of their BigQuery data warehouse. At the same time, the data scientists who are setting up their own data science environments felt frustrated by having to do what they consider “IT work” such as figuring out various security connections and package installations. They wanted to focus on exploring data and building models with the tools they are familiar with. Working with these organizations, we built Dataproc Hub to eliminate these primary concerns of both IT leaders and data science teams. IT governed Dataproc clusters personalized to your data scientist’s use caseWith Dataproc Hub, you can extend existing data warehouse investments at a cost that grows in proportion to the value without having to compromise on security and compliance standards. Dataproc Hub allows IT leaders to specify templated Dataproc clusters that can leverage a variety of controls ranging from custom images which can be used to include standard IT software such as virus protection and asset management software to autoscaling policies that let customers automatically scale their code within limits set in advance. Dataproc templates can easily be created from a running Dataproc cluster using the export command. Customers of AI Platform Notebooks that want to use their BigQuery or Cloud Storage data for model training, feature engineering, and preprocessing will often exceed the limits of a single node machine. Data scientists also want to quickly iterate on ideas from inside the notebook environment without having to spend time packaging up their models to send off into a separate service just to try out an idea. With Dataproc Hub, data scientists can quickly tap into APIs like PySpark and Dask that are configured to autoscale to meet the demands of the data without having to do a lot of setup and configuration. They can even accelerate their Spark XGBoost pipelines with NVIDIA GPUs to process their data 44x faster at a 14x reduction in cost vs CPUs. The data scientist is in full control of the software environment spawned by Dataproc Hub and can install their own packages, libraries and configurations, achieving freedom within the framework set by IT. Using Dataproc Hub and Python-based libraries for genomic analysisOne example of this need to balance IT guardrails with data science flexibility is in the field of genomics, where data volumes continue to explode. By 2025, an estimated 40 exabytes of storage capacity will be required for human genomic data. Researchers need the freedom to try out a variety of techniques and run large scale jobs without IT intervention. However, IT organizations need to protect personal health data that comes with genomics datasets—something that Google Cloud, Dataproc, and the open source community are well suited to help with. If you want to see the genomic analysis we talked about above in action, please register for our upcoming webinar where we will demo Dataproc Hub. Next stepsThe Dataproc Hub feature is now generally available and ready for use today. To get started, log into the Google Cloud Console and from the Dataproc page, choose Notebooks and then “New Instance”. Name the instance and populate the Dataproc Hub fields to configure the settings according to your standards. Alternatively, you can accept the default settings to be provided with a Dataproc Hub environment based on two example clusters. The IP address of the Dataproc Hub can then be provided to data scientists so teams can self-provision Jupyter environments based on Dataproc clusters. When the data task is completed, the user can go to File->Return to Control Panel and then “Stop Cluster”. Cluster templates can also be set with a TTL to ensure that resources are cleaned up. Related ArticleDataproc Metastore: Fully managed Hive metastore now in public previewDataproc Metastore lets you use your Apache Hive metastore to simplify technical metadata management when you’re building a data lake on …Read Article
Quelle: Google Cloud Platform

Migrating Apache Hadoop to Dataproc: A decision tree

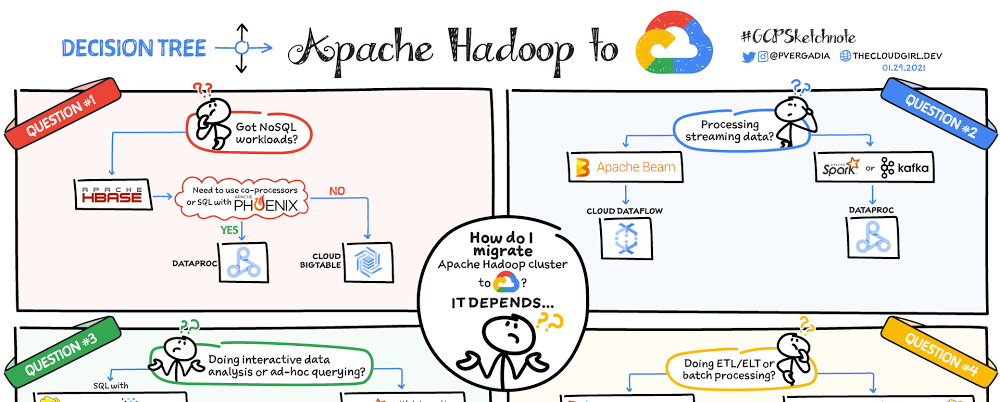
Are you using the Apache Hadoop ecosystem? Are you looking to simplify the management of resources while continuing to use your existing tools? If yes, then checkout Dataproc. In this blog post, we will briefly cover Dataproc and then highlight four scenarios for migrating your Apache Hadoop workflows to Google Cloud.What is Dataproc?Dataproc is a managed Apache Spark and Apache Hadoop service that lets you take advantage of open-source data tools for batch processing, querying, streaming, and machine learning. If you are using the Apache Hadoop ecosystem and looking for an easier option to manage it then Dataproc is your answer. Dataproc automation helps you create clusters quickly, manage them easily, and save money by turning clusters off when you don’t need them. With less time and money spent on administration, you can focus on what matters the most—your DATA!Key Dataproc FeaturesDataproc installs a Hadoop cluster on demand, making it a simple, fast, and cost-effective way to gain insights. It simplifies the traditional cluster management activities and creates a cluster in seconds. Key Dataproc features include:Support for open source tools in the Hadoop and Spark ecosystem including 30+ OSS tools Customizable virtual machines that scale up and down as neededOn-demand ephemeral clusters to save costTight integration with other Google Cloud analytics and security service. How does Dataproc work?To move your Hadoop/Spark jobs to Dataproc, simply copy your data into Google Cloud Storage, update your file paths from HDFS to GS and you are ready to go!Watch this video for more:What is Google Cloud Dataproc Youtube VideoWhat is Google Cloud Dataproc Youtube VideoDataproc disaggregates storage and compute. Say an external application is sending logs that you want to analyze, and you store them in a data source. From Cloud Storage the data is used for processing by Dataproc, which then stores it back into Cloud Storage, BigQuery, or Bigtable. You could also use the data for analysis in a notebook and send logs to Cloud Monitoring and Cloud Logging.Since storage is separate, for a long-lived cluster you could have one cluster per job. To save cost, however, you could also use ephemeral clusters that are grouped and selected by labels. And finally, you can also save costs by using just the right amount of memory, CPU, and disk to fit the needs of your application.What are the migration scenarios to consider?Here are four common scenarios that help you decide how to migrate a Hadoop cluster to Dataproc:Are you trying to migrate NoSQL workloads?Are you processing streaming data? Are you doing interactive data analysis or ad hoc querying?Are you doing ETL or batch processing?Question 1: Do you have NoSQL workloads?If you are using HBase then check if you need to use co-processors or SQL with Phoenix. If so, Dataproc is the best option. But if you don’t require a co-processor or SQL, then Bigtable is a good choice.Question 2: Are you processing streaming data?If you’re using Apache Beam it makes sense to use Dataflow because it is based on the Beam SDK. If you are using Spark or Kafka then Dataproc is a good option.Question 3: Are you doing interactive data analysis or ad hoc querying?If you are doing interactive data analysis in Spark with interactive notebooks then Dataproc is great in combination with Jupyter Notebook or Zeppelin. If instead you are doing data analysis with SQL in Hive or Presto AND want to keep it that way then Dataproc is a good fit. But if you are interested in a managed solution for your interactive data analysis then you’ll want to look at BigQuery. It is a fully managed data analysis and warehousing solution.Question 4: Are you doing ETL or batch processing?Use Dataproc if you are running ETL or batch processes using MapReduce, Pig, Spark, or Hive. If you’re using a workflow orchestration tool such as Apache Airflow or Oozie and want to keep the jobs as they are, then again Dataproc is great. However, if you prefer a managed solution then take a look at Cloud Composer, which is managed by Apache Airflow.ConclusionSo there you have it—four different scenarios to plan the migration of your Apache Hadoop cluster to Google Cloud.For more details, check out the Dataproc product page. And, for more #GCPSketchnote and similar cloud content follow me on Twitter and Instagram @pvergadia and keep an eye out on thecloudgirl.dev.Related ArticleCombining the power of Apache Spark and AI Platform Notebooks with Dataproc HubDataproc Hub: Administering Jupyter notebooks for Spark workloads on DataprocRead Article
Quelle: Google Cloud Platform
Compiling Qt with Docker Using Caching

This is a guest post from Viktor Petersson, CEO of Screenly.io. Screenly is the most popular digital signage product for the Raspberry Pi. Find Viktor on Twitter @vpetersson.

In the previous blog post, we talked about how we compile Qt for Screenly OSE using Docker’s nifty multi-stage and multi-platform features. In this article, we build on this topic further and zoom in on caching. 

Docker does a great job with caching using layers. Each command (e.g., RUN, ADD, etc.) generates a layer, which Docker then reuses in future builds unless something changes. As always, there are exceptions to this process, but this is generally speaking true. Another type of caching is caching for a particular operation, such as compiling source code, inside a container.

At Screenly, we created a Qt build environment inside a Docker container. We created this Qt build to ensure that the build process was reproducible and easy to share among developers. Since the Qt compilation process takes a long time, we leveraged ccache to speed up our Qt compilation. Implementing ccache requires volume mounting a folder from outside of the Docker environment. 

The above steps work well if you are the only developer working on the project. What happens if you want to be able to have a shared cache across a team?

There are a few ways to accomplish this style of caching in Docker. 

The easiest way to establish a shared cache is by following what we did in the previous article. We used disk cache along with some neat features for speeding up caching in BuildKit. We then compressed the cached files and distributed them to team members. The process is not very elegant, but it gets the job done. 

If we want to automate the process a bit further, we can include retrieving the cache as part of the build process. An example of this could looks like this:

RUN curl -o /tmp/build-cache.tgz https://some-domain.com/build-cache.tgz &&
tar xfz /tmp/build-cache.tgz -C /tmp &&
rm /tmp/build-cache.tgz

This process above is neat, but it does mean that someone will need to periodically upload the build cache in order to keep cache files fresh. In addition, you need somewhere to store the files (such as S3).

It would be nice if we could avoid manual tasks and use native Docker technologies to do the same thing, right? As it turns out, we can use Docker to improve the process. We just need to use our imagination. 

As we showed in the previous article, we can use multi-stage builds to copy data between different docker images. What if we move the cache to a dedicated Docker image? We can then push this image to Docker Hub and pull it into the build process. 

The process is straightforward. Start by creating two different images in Docker Hub. Call them screenly/build-cache and screenly/build-env. Building on the previous article, we use this Dockerfile as the basis for screenly/build-env.

In the Dockerfile, we set the environment variable CCACHE_DIR to /src/ccache. This step tells ccache that the cache resides in /src/ccache. In the previous post, the step was just a volume mount to the system. However, in this case, we want to alter this step so that the cache lives outside of /src, as this is used for volume mounting the code base, such as /usr/ccache.

We can now launch the container with:

$ docker run –rm -t
-v ~/tmp/qt-src:/src
-v ~/tmp/qt-build:/build
-v ~/tmp/ccache:/usr/ccache
screenly-build-env

After you have run through your compilation, you can now build and push our cache image. The final Dockerfile will look like this:

FROM scratch
COPY ccache /ccache

To build this image, use the following code:

$ cd ~/tmp
$ docker build
-f /path/to/Dockerfile
-t screenly/build-cache
$ docker push screenly/build-cache

Finally, you can now include this layer in the Dockerfile for screenly/build-env. Add the line:

COPY –from=screenly/build-cache /ccache /usr/ccache

Next time you rebuild screenly/build-env, Docker will automatically pull down the cache. Also, you only need to add volume mounting when you are refreshing the cache. 

About Screenly

Screenly is the most popular digital signage product for the Raspberry Pi. If you want to turn a physical screen into a secure, remote-managed device (over UI or digital signage API), Screenly makes setup a breeze. Users can display beautiful dashboards, images, videos, and web page content.

Screenly is available in two flavors: an open source version and a commercial version. You can try out our commercial version with a 14-day free trial.
The post Compiling Qt with Docker Using Caching appeared first on Docker Blog.
Quelle: https://blog.docker.com/feed/