Ankündigung für Amazon EC2 M5n-, M5dn-, R5n- und R5dn-Bare Metal-Instances

Ab heute sind Amazon EC2 M5n-, M5dn-, R5n- und R5dn-Instances, die bis zu 100 Gbit/s Netzwerkbandbreite nutzen können, und Elastic Fabric Adapter (EFA) für HPC/ML-Workloads verfügbar. Bare Metal-Instances für Amazon EC2 bieten Ihren Anwendungen den direkten Zugriff auf den skalierbaren Intel® Xeon®-Prozessor und die Arbeitsspeicher-Ressourcen des zugrunde liegenden Servers. Diese Instances eignen sich ideal für Workloads, die Zugriff auf Hardwarefunktionen (wie Intel® VT-x) benötigen, oder für Anwendungen, die aus Lizenz- oder Support-Gründen in einer nicht virtualisierten Umgebung ausgeführt werden müssen. 
Quelle: aws.amazon.com

Einführung des Amazon CloudFront-Sicherheitssparpakets

Heute stellen wir das Amazon CloudFront-Sicherheitssparpaket vor, ein flexibles Self-Service-Preismodell, mit dem Sie bis zu 30 % Ihrer CloudFront-Kosten für eine monatliche Zahlung mit 1-jähriger Laufzeit einsparen können. Das Sparpaket enthält zudem eine kostenlose AWS-WAF (Web Application Firewall)-Nutzung bis zu 10 % Ihres zugesagten Betrags. Sämtliche zusätzlichen Standard-CloudFront- oder WAF-Gebühren, die nicht vom CloudFront-Sicherheitssparpaket abgedeckt werden, fallen dennoch an.
Quelle: aws.amazon.com

6 best practices for effective Cloud NAT monitoring

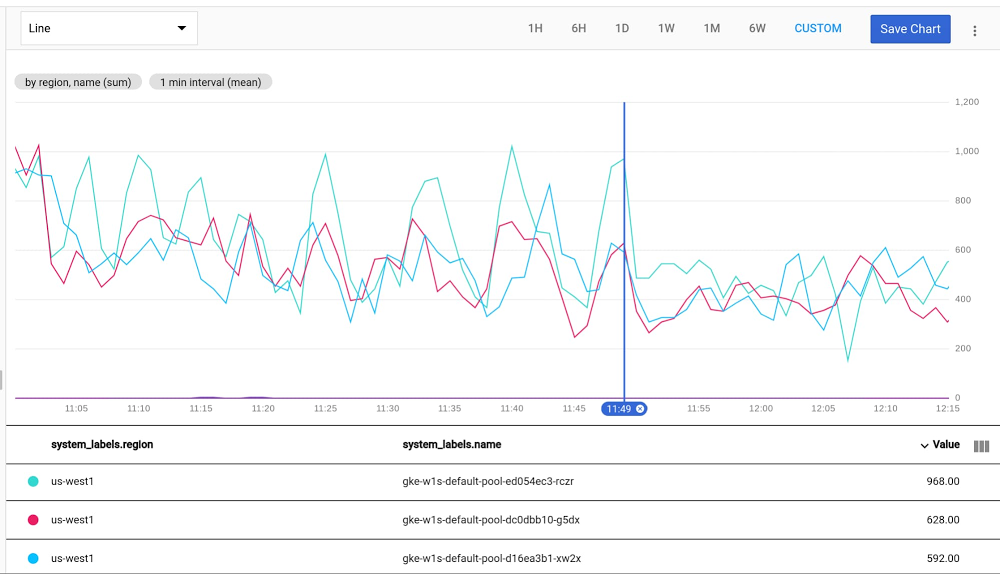
For anyone building distributed applications, Cloud Network Address Translation (NAT) is a powerful tool: with it, Compute Engine and Google Kubernetes Engine (GKE) workloads can access internet resources in a scalable and secure manner, without exposing the workloads running on them to outside access using external IPs. Cloud NAT features a proxy-less design, implementing NAT directly at the Andromeda SDN layer. As such, there’s no performance impact to your workload and it scales effortlessly to many VMs, regions and VPCs.In addition, you can combine Cloud NAT with private GKE clusters, enabling secure containerized workloads that are isolated from the internet, but that can still interact with external API endpoints, download package updates, and engage in other use cases for internet egress access.Pretty neat, but how do you get started? For example, monitoring is a crucial part of any infrastructure platform. When onboarding your workload onto Cloud NAT, we recommend that you monitor Cloud NAT to uncover any issues early on before it starts to impact your internet egress connectivity.From our experience working with customers who use Cloud NAT, we’ve put together a few best practices for monitoring your deployment. We hope that following these best practices will help you use Cloud NAT effectively.Best practice 1: Plan ahead for Cloud NAT capacityCloud NAT essentially works by “stretching” external IP addresses across many instances. It does so by dividing the available 64,512 source ports per external IP (equal to the possible 65,536 TCP/UDP ports minus the privileged first 1,024 ports) across all in-scope instances. Thus, depending on the number of external IP addresses allocated to the CloudNAT gateway, you should plan ahead for CloudNAT’s capacity in terms of ports and external IPs.Whenever possible, try to use the CloudNAT external IP auto-allocation feature, which should be adequate for most standard use cases. Keep in mind that Cloud NAT’s limits and quotas, might limit you to using manually-allocated external IP addresses.There are two important variables that dictate your CloudNAT capacity planning: How many instances will utilize the CloudNAT gatewayHow many ports you allocate per instance The product of the two variables, divided by 64,512, gives you the number of external IP addresses to allocate to your Cloud NAT gateway:The number of external IP addresses you come up with is important should you need to use manual allocation (it’s also important to keep track of in the event you exceed the limits of auto-allocation).A useful metric to monitor your external IP capacity is the nat_allocation_failed NAT GW metric This metric should stay 0, denoting no failures. If this metric registers 1 or higher at any point, this indicates a failure, and that you should allocate more external IP addresses to your NAT gateway.Best practice 2: Monitor port utilizationPort utilization is a very important metric to track. As detailed in the previous best practice, Cloud NAT’s primary resource is external IP:port pairs. If an instance reaches its maximum port utilization, its connections to the internet could be dropped (for a detailed explanation of what consumes Cloud NAT ports from your workloads, please see this this explanation). Using Cloud Monitoring, you can use the following sample MQL query to check port utilization in Cloud NAT:Click to enlargeIf the maximum port utilization is nearing your per-instance port allocation, it’s time to think about increasing the numbers of ports allocated per instance.Best practice 3: Monitor the reasons behind Cloud NAT dropsIn certain scenarios, Cloud NAT might fail to allocate a source port for a connection. The most common of these scenarios is that your instance has run out of ports. This shows up as “OUT_OF_RESOURCES” drops in the dropped_sent_packets_count metric. You can address these drops by increasing the numbers of ports allocated per instance.The other scenario is endpoint independence drops, when Cloud NAT is unable to allocate a source port due to endpoint independence enforcement. This shows up as “ENDPOINT_INDEPENDENCE_CONFLICT” drops.To keep track of these drops, you can add the following MQL query to your Cloud Monitoring dashboard.Click to enlargeIf you have an increasing number of drops of type “ENDPOINT_INDEPENDENCE_CONFLICT”, consider turning off Endpoint-Independent Mapping, or try one of these techniques to reduce their incidence. Best practice 4: Enable Cloud NAT logging and leverage log-based metricsEnabling Cloud Logging for Cloud NAT lets you proactively detect issues as well as provides additional context for troubleshooting. Please see these instructions to learn how to enable logging.Once you have enabled logging, you can create powerful metrics with these logs by creating log-based metrics. For example, use the following command and YAML definition file to expose NAT allocation events as metrics grouped by source/destination, ip/port/protocol as well as gateway name. We will explore ways to use these metrics in the next best practice.metric.yamlBest practice 5: Monitor top endpoints and their dropsBoth types of Cloud NAT drops (“ENDPOINT_INDEPENDENCE_CONFLICT” and “OUT_OF_RESOURCES”) are exacerbated by having many parallel connections to the same external IP:port pair. A very useful troubleshooting tool is to identify which of these endpoints are causing more drops than usual. To expose this data, you can use the log-based metric discussed in the previous best practice. The following MQL query graphs the top destination IP and ports causing drops.Here’s an example of a resulting graph:Click to enlargeWhat should you do with this information? Ideally you would try to spread out connections to these concentrated endpoints across as many instances as possible. Failing that, another mitigation step could be to route traffic to these endpoints through a different Cloud NAT gateway by placing it in a different subnet and associating it with a different gateway (with more port allocations per instance).Finally, you can mitigate these kinds of Cloud NAT drops by handling this kind of traffic through instances that attach external IPs.Please note that if you’re using GKE, ip-masq-agent can be tweaked to disable Source NATing traffic to only to certain IPs which will reduce the probability of a conflict. Best practice 6: Baseline a normalized error rate All the metrics we’ve covered so far show absolute numbers that may or may not be meaningful to your environment. Depending on your traffic patterns, 1000 drops per second could be a cause for concern or could be entirely insignificant.Given your traffic patterns, some level of drops might be a normal occurrence that don’t  impact your users’ experience. This is especially relevant for endpoint independence drops incidents, which can be random and rare.Leveraging the same log-based metric created in best practice 4, you can normalize the numbers by the total number of port allocations using the following MQL query:Click to enlargeNormalizing your drop metrics help you account for traffic level scaling in your drop numbers. It can also baseline “normal” levels of drops and make it easier to detect abnormal levels of drops when they happen.Monitor Cloud NAT FTWUsing Cloud NAT lets you build distributed, hybrid and multi-cloud applications without exposing them to the risk of outside access from external IPs. Follow these best practices for a worry-free Cloud NAT experience; keeping your pager silent and your packets flowing. To learn more, check out our Cloud NAT overview, review all Cloud NAT logging and metrics options, or take Cloud NAT for a spin in our Compute Engine and GKE tutorials!Related ArticleCloud NAT: deep dive into our new network address translation serviceAmong all the network services that you rely on when running your applications, Network Address Translation (NAT) is key. It allows your …Read Article
Quelle: Google Cloud Platform

Improved troubleshooting with Cloud Spanner introspection capabilities

Excellent developer experience is one of the most important focus areas for Cloud Spanner, Google’s fully managed horizontally scalable relational database service. Whether you are a database specialist or a developer, it is important to have tools that help you understand the performance of your database, detect if something goes wrong, and fix the problems. So, Spanner has been continuously adding new introspection capabilities that allow you to easily monitor database performance, diagnose and fix potential issues, and optimize the overall efficiency of your application. We’ve recently launched a number of introspection tools in the form of built-in tables that you can query to gain helpful insights about operations in Spanner such as queries, reads, and transactions. These new introspection tables, when combined with existing alerting and monitoring capabilities, provide a powerful combination of tools that help you to diagnose and troubleshoot issues. Let’s take a closer look at these new introspection tools. We will start with the basics on how you can leverage the introspection and monitoring capabilities in Spanner to get the best out of your data-driven applications.How do you monitor resource utilization?CPU and storage are key resources that you need to monitor in Spanner to make sure that your instance is provisioned with enough nodes to give you the expected performance. Spanner already has integration with the Google Cloud Monitoring suite, where you can set alerts for CPU and storage utilization metrics based on recommended thresholds. You will be automatically alerted when the value of the metrics cross the threshold. You can visit the monitoring tab in the Spanner console to look at the metrics in detail and analyze how those change over time. Here’s an example: Let’s say you received an alert for CPU utilization and found a spike in the monitoring graph, as shown below.You can further slice and dice the data by visiting the Cloud Monitoring console and selecting the time periods. You can also filter by options such as instance, database, and priority of operations for detailed analysis and to decide where to focus for further investigation. You can even correlate different metrics from the metrics list to identify reasons for the spike and decide on possible remedies. For example, if an increase in API requests correlates with an increase in CPU utilization, you can infer that the workload on Spanner is causing an increase in CPU utilization and you need to provision more nodes to bring CPU utilization back within recommended limits.If CPU utilization has spiked without an increase in requests, then inefficient SQL queries or reads could be consuming higher CPU. How do you know which SQL queries or reads you should investigate? We have built introspection tables to help you with that. Visit the “New Introspection Tools” section in this blog, below, or the documentation to learn more.How do you monitor performance?You may have specific performance requirements for your application such as throughput expectation or latency expectation. For example, let’s say you want the 99th percentile latency for write operations to be less than 60ms, and have configured alerts if the latency metric raises above that threshold.Once you are alerted that write latency has exceeded the threshold, you can investigate this incident via the Spanner console by reviewing the latency graph. For example, in the image above, you can see that 99th percentile latency for write operations had spiked at around 6:10AM. Using the Cloud Monitoring console, you can determine which API methods contributed to latency spikes. Let’s say you find out that Commit APIs were responsible for the latency spike. As a next step, you want to know which transactions involve expensive commits. What were the reasons for increase in commit latency? To help you with that troubleshooting, we have built new introspection tools that provide detailed information and statistics regarding top queries, reads, transactions, and transaction locks. These tools consist of a set of built-in tables that you can query to gain more insight. Refer to this table to decide when to use each tool. Now, let’s take a closer look at what each tool offers.Exploring new Spanner introspection toolsDiving deep into SQL queriesQuery statistics: When you want to identify and investigate the expensive queries and their performance impact, use theQuery statistics table. This table helps you answer questions such as:Which are the most CPU-consuming queries?What is the average latency per query?What were the number of rows scanned and data bytes returned by the query? Here is an example of the result from the table, where you can easily identify the fingerprint of the top two queries that consumed the most CPU and had highest latency.Use these fingerprints to retrieve actual query texts from the table. As a next step, you can use the query explanation feature in the Spanner console to analyze query execution plans and optimize the queries. Spanner recently enhanced query statistics further by adding additional insights to cancelled/failed queries so that customers can troubleshoot different kinds of queries, not just completed queries.Oldest active queries: While the query statistics table helps you analyze past queries, oldest active queries table helps you identify the queries that are causing latency and high CPU usage issues as they are happening. This table helps you answer questions such as: How many queries are running at the moment?Which are the long-running queries?Which session is running the query?These answers will help you to identify the troublesome queries and resolve the issue quickly rather than boiling the ocean. For example: Once you identify the slowest query that is impacting the application performance, you can take steps such as deleting the session for an immediate resolution.Diving deep into read operationsRead statistics: When you want to troubleshoot issues caused by read traffic, use the Read statistics table. This table helps you answer questions such as: Which are the most CPU-consuming read operations?What is the average CPU consumption per read?What was the amount of different wait times associated with these reads?As a next step, you can optimize these read operations or take a decision on the suitable read operation (strong vs. stale reads) for your use case.Diving deep into read-write transactionsTransaction statistics: When you want to troubleshoot issues caused by transactions, use the Transaction statistics table to get greater visibility into factors that are driving the performance of your read-write transactions. This table helps you answer questions such as:Which are the slow-running transactions? What is the commit latency and overall latency for transactions?How many times did the transaction attempt to commit? Which columns were written or read by the transaction?By analyzing this information, you can discover potential bottlenecks such as large volumes of updates to a particular column slowing down the transaction. One of the frequent causes of transaction performance issues is lock conflict. If you see an increase in commit latency or overall latency for any transaction, use the lock statistics table to identify if transaction locks are causing issues.Lock statistics: Once you identify the transactions that are affecting the performance, use the lock statistics table to correlate transaction performance characteristics with lock conflicts. This table helps you answer questions such as:Which rows and columns are the sources of higher lock conflicts?Which kinds of lock conflicts are occurring?What is the wait time due to lock conflict?When you combine these crucial insights regarding sources of lock conflicts in the database with the transaction statistics table, you can identify the troublesome transactions. As a next step, apply the recommended best practices to optimize the transactions and improve the performance.Client-side metrics and Google Front End metrics monitoringSo far, we discussed how to use introspection metrics and tools at the Spanner layer. But for end-to-end monitoring, it is important to monitor the application layer (client side) and the network layer (Google Front End) too since sometimes the issues could be in those layers. Spanner already has integration with OpenCensus to help you monitor client-side metrics and gRPC metrics. Spanner also provides Google Front End-related metrics to help you determine if latency issues are due to the network layer. When you combine client-side metrics and Google Front End metrics with Spanner layer metrics, you can perform end-to-end monitoring and find out the source of the issue to proceed with further troubleshooting.We hope these updates to Spanner introspection capabilities make developing on Spanner even more productive.Check out our Spanner YouTube playlist for more about Spanner. Learn moreTo get started with Spanner, create an instanceor try it out with a Spanner Qwiklab.Read the following blogs to learn more about how you can use the introspection tools for troubleshooting:Cloud Spanner: Read StatisticsIncrease visibility into Cloud Spanner performance with transaction statsLock Statistics: Diagnose performance issues in Cloud SpannerAnalyze running queries in Cloud SpannerUse GFE Server-Timing Header in Cloud Spanner DebuggingTroubleshooting Cloud Spanner Applications with OpenCensusRelated ArticleDatabase observability for developers: introducing Cloud SQL InsightsNew Insights tool helps developers quickly understand and resolve database performance issues on Cloud SQL.Read Article
Quelle: Google Cloud Platform

Security keys and zero trust

A security key is a physical device that works alongside your username and password to verify your identity to a site or app. They provide stronger login protection than an authenticator app or SMS codes, and the same device can be used for many services, so you don’t need to carry around a necklace of dongles and fobs.Security Keys provide the highest level of login assurance and phishing protection.In this issue of GCP Comics we are covering exactly that. Think of a Security Key as a way to protect yourself–and your company–from bad passwords and tricked users, as it stops fake sites from tricking people into logging in. Here you go!A password alone turns out to be fairly minimal protection for an account, so we’ve seen many new options for 2-Step Verification (also called multi-factor authentication), a phrase meaning “more than just your username and password” to log in.Getting a code by SMS or voice call is a little better than just a password, but you can still be fooled into feeding that code to a fake site, giving up your account credentials to an attacker. Backup codes and authenticator apps fall prey to the same malicious strategies, where an attacker harvests your info and then uses it to perform their own multi-factor authentication, gaining access to your account.Only a security key can stop the cleverest of phishing attacks.Why a security key over other multi-factor methods?A key must be registered in advance to a specific account, an action you take once to enhance the level of security for your sign in.The security key and the website perform a cryptographic handshake, and if the site doesn’t validate the key’s identity, including matching a previously registered URL, the login is stopped.Using open standards (FIDO) the same security key can be used for multiple sites and devices. You only need to carry one around, and they can be used for both personal and work accounts and devices.The firmware of Google Titan Security Keys is engineered to verify integrity, preventing any tampering.They come in all kinds of shapes and sizes, so you can get USB-A, USB-C, or NFC to match the use case that fits you best!In our experience deploying security keys to replace older forms of 2-Step Verification, we’ve seen both faster logins and fewer support tickets raised.ResourcesTitan Security Keys2-Step Verification overviewAdvanced Protection ProgramWant more GCP Comics? Visit gcpcomics.com & follow us on medium pvergadia & max-saltonstall, and on Twitter at @pvergadia and @maxsaltonstall  and to not miss the next issue!Related ArticleTitan Security Keys: Now available on the Google StoreTo make stronger, more phishing-resistant 2nd factor verification accessible to more people, our Titan Security Keys, based on FIDO stand…Read Article
Quelle: Google Cloud Platform