Create a secure and code-free data pipeline in minutes using Cloud Data Fusion

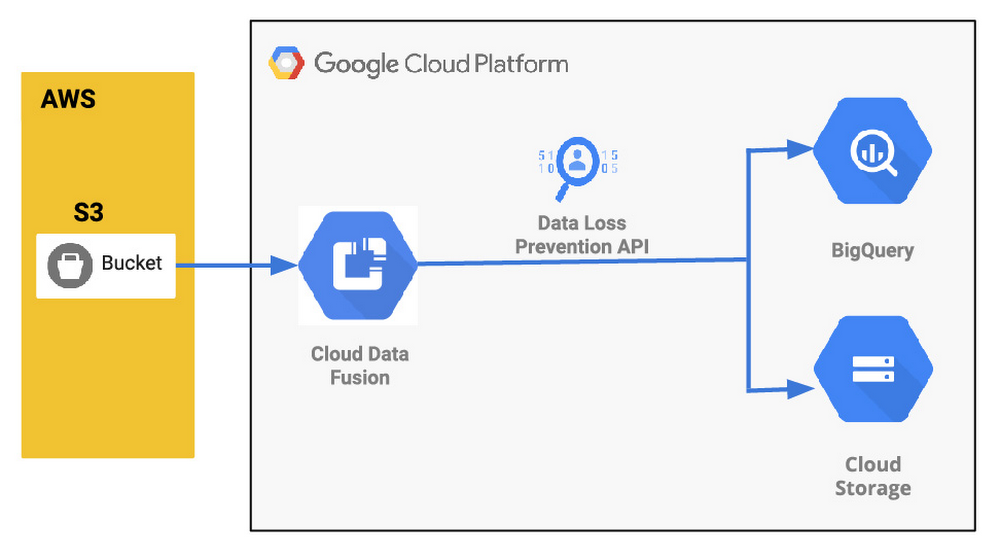
Organizations are increasingly investing in modern cloud warehouses and data lake solutions to augment analytics environments and improve business decisions. The business value of such repositories increases as additional data is added. And with today’s connected world and many companies adopting a multi-cloud strategy, it is very common to see a scenario where the source data is stored in a cloud provider different from where the final data lake or warehouse is deployed. Source data may be in Azure or Amazon Web Services (AWS) storage, for example, while the data warehouse solution is deployed in Google Cloud. Additionally, in many cases, regulatory compliance may dictate the need to anonymize pieces of the content prior to loading it into the lake so that the data can be de-identified prior to data scientists or analytic tools’ consumption. Last, it may be important for customers to perform a straight join on data coming from disparate data sources and apply machine learning predictions to the overall dataset once the data lands in the data warehouse. In this post, we’ll describe how you can set up a secure and no-code data pipeline and demonstrate how Google Cloud can help you move data easily, while anonymizing it in your target warehouse. This intuitive drag-and-drop solution is based on pre-built connectors, and the self-service model of code-free data integration removes technical expertise-based bottlenecks and accelerates time to insight. Additionally, this serverless approach that uses the scalability and reliability of Google services means you get the best of data integration capabilities with a lower total cost of ownership.Here’s what that architecture will look like:Understanding a common data pipeline use caseTo provide a little bit more context, here is an illustrative (and common) use case:An application is hosted at AWS and generates log files on a recursive basis. The files are compressed using gzip and stored on an S3 bucket. An organization is building a modern data lake and/or cloud data warehouse solution using Google Cloud services and must ingest the log data stored in AWS.The ingested data needs to be analyzed by SQL-based analytics tools and also be available as raw files for backup and retention purposes. The source files contain PII data, so parts of the content need to be masked prior to its consumption.New log data needs to be loaded at the end of each day so next day analysis can be performed on it. Customer needs to perform a straight join on data coming from disparate data sources and apply machine learning predictions to the overall dataset once the data lands in the data warehouse. Google Cloud to the rescueTo address the ETL (extract,transform and load) scenario above, we will be demonstrating the usage of four Google Cloud services: Cloud Data Fusion, Cloud Data Loss Prevention (DLP), Google Cloud Storage, and BigQuery. Data Fusion is a fully managed, cloud-native, enterprise data integration service for quickly building and managing data pipelines. Data Fusion’s web UI allows organizations to build scalable data integration solutions to clean, prepare, blend, transfer, and transform data without having to manage the underlying infrastructure. Its integration with Google Cloud simplifies data security and ensures data is immediately available for analysis. For this exercise, Data Fusion will be used to orchestrate the entire data ingestion pipeline. Cloud DLP can be natively called via APIs within Data Fusion pipelines. As a fully managed service, Cloud DLP is designed to help organizations discover, classify, and protect their most sensitive data. With over 120 built-in InfoTypes, Cloud DLP has native support for scanning and classifying sensitive data in Cloud Storage and BigQuery, and a streaming content API to enable support for additional data sources, custom workloads, and applications. For this exercise, Cloud DLP will be used to mask sensitive personally identifiable information (PII) such as a phone number listed in the records. Once data is de-identified, it will need to be stored and available for analysis in Google Cloud. To cover the specific requirements listed earlier, we will demonstrate the usage of Cloud Storage (Google’s highly durable and geo-redundant object storage) and BigQuery, Google’s serverless, highly scalable, and cost-effective multi-cloud data warehouse solution. Conceptual data pipeline overviewHere’s a look at the data pipeline we’ll be creating that starts at an AWS S3 instance, uses Wrangler and Redact API for anonymization, and then moves data into both Cloud Storage or BigQuery.Walking through the data pipeline development/deployment processTo illustrate the entire data pipeline development and deployment process, we’ve created a set of seven videos. You’ll see the related video in each of the steps here. Step 1 (Optional): Did not understand the use case yet or would like to watch a refresh? This video provides an overview of the use case, covering the specific requirements to be addressed. Feel free to watch it if required.Step 2: This next video covers how the source data is organized. After watching the recording, you will be able to understand how the data is stored in AWS and explore the structure of the sample file used by the ingestion pipeline.Step 3: Now that you understand the use case goals and how the source data is structured, start the pipeline creation by watching this video. On this recording you will get a quick overview of Cloud Data Fusion, understand how to perform no-code data transformations using the Data Fusion Wrangler feature, and initiate the ingestion pipeline creation from within the Wrangler screen.Step 4: As mentioned previously, de-identifying the data prior to its consumption is a key requirement of this example use case. Continue the pipeline creation and understand how to initiate Cloud DLP API calls from within Data Fusion, allowing you to perform data redaction on the fly prior to storing it permanently. Watch this video for the detailed steps.Step 5: Since the data is now de-identified, it’s time to store it in Google Cloud. Since the use case mandated both structured file backups and SQL-based analytics, we will store the data in both Cloud Storage and BigQuery. Learn how to add both Cloud Storage and BigQuery sinks to the existing pipeline in this recording.Step 6: You are really close now! It’s time to validate your great work. Wouldn’t it be nice to “try” your pipeline prior to fully deploying it? That’s what the pipeline preview feature allows you to do. Watch this quick video and understand how to preview and subsequently deploy your data ingestion pipeline, taking some time to observe the scheduling and deployment profile options.Step 7: Woohoo! Last step. Check this video out and observe the ability to analyze the full pipeline execution. In addition, this recording will cover how to perform high-level data validation on both Cloud Storage and BigQuery targets.Next steps:Have a similar challenge? Try Google Cloud and this Cloud Data Fusion quickstart next. Have fun exploring!
Quelle: Google Cloud Platform

The serverless gambit: Building ChessMsgs.com on Cloud Run

While watching The Queen’s Gambit on Netflix just recently, I was reminded about how much I used to enjoy playing chess. I was eager to play a game, so I started to tweet, “D2-D4” knowing that someone would recognize this as an opening move and likely respond with their move, giving me the fix I needed. I paused before hitting the tweet button because I realized that I’d need to set up a board (physical or virtual) to keep track of the game. If I received multiple responses, I’d need multiple boards. I decided not to send the tweet.Later in the day, I had the idea to create a simple service that addresses my use case. Instead of designing a full chess site, I decided to create a chess board logger/visualizer to make it practical to play via Twitter or any other messaging/social platform.Instead of tweeting moves back and forth, players tweet links back and forth, and those links go to a site that renders the current chessboard, allows a new move, and creates a new link to paste back to the opponent. I wanted this to be 100% serverless, meaning that it will scale to zero and have zero maintenance requirements. Excited about this idea, I put together a shopping list:My MVP requirements:Represent the board position—ideally completely in the URL to keep it stateless from a server-side perspectiveDisplay a chessboard and let the player make their next move.Stretch goals:Enforce chess rules (allow only legal moves).Dynamically create a png/jpg of the chessboard that I can use as an Open Graph and Twitter card image so that when a player sends the link, the image of the board will automatically display.Putting it all togetherRepresenting the board positionThere is a standard notation for describing a particular board position of a chess game called Forsyth–Edwards Notation (FEN) that was exactly what I needed. A FEN is a sequence of ASCII characters. For example, the starting position for any chess game can be represented by the following string:rnbqkbnr/pppppppp/8/8/8/8/PPPPPPPP/RNBQKBNR w KQkq – 0 1Each letter is a piece: pawn = “P”, knight = “N”, bishop = “B”, rook = “R”, queen = “Q” and king = “K”. Uppercase letters represent white pieces and lowercase letters represent black. The last part of the string is specific to certain rules in chess (read more about FEN).I knew I could use this in the URL, so my first requirement was complete and I was able to represent the board state in the URL eliminating the need for a backend data store.Displaying the chessboard and allowing drag-and-drop movesNumerous chess libraries are available. One in particular that caught my eye was chessboard.js—described as “a JavaScript chessboard component with a flexible ‘just a board’ API”. I quickly discovered that this library can display chess boards from a FEN, allow pieces to be moved, and update the FEN. Perfect!In only two hours, I had the basic functionality implemented.Enforcing chess rulesI originally thought that making this service aware of chess rules would be difficult, but then I saw the example in the chessboard.js docs showing how to integrate it with another library called chess.js—“a JavaScript chess library that is used for chess move generation/validation, piece placement/movement, and check/checkmate/stalemate detection—basically everything but the AI”. A short time later, I had it working! Stretch goal #1 completed.Where’s what a couple of game moves look like:Moving the pawn from D2 to D4 in a new game—https://chessmsgs.com/?fen=rnbqkbnr%2Fpppppppp%2F8%2F8%2F3P4%2F8%2FPPP1PPPP%2FRNBQKBNR+b+KQkq+d3+0+1&to=d4&from=d2&gid=mOhlhRlMboYsHLqBF1f7IBlack countering with a similar move of pawn from D7 to D5—https://chessmsgs.com/?fen=rnbqkbnr%2Fppp1pppp%2F8%2F3p4%2F3P4%2F8%2FPPP1PPPP%2FRNBQKBNR+w+KQkq+d6+0+2&to=d5&from=d7&gid=mOhlhRlMboYsHLqBF1f7IThe URL has the following data:fen—the new board positionfrom and to—indicating what move occurred (I use this to highlight the squares)gid—a unique game ID (I used nanoid)—I’ll use this to connect moves to a single game in the future. For example, I could add a feature that lets the user request the entire game transcript). Done! Except…At this point, there were no server requirements other than simple HTML static hosting. But after playing it with some friends and family, I decided that I really wanted to accomplish the other stretch goal—dynamically create a png/jpg of the chessboard that I can use as an Open Graph and Twitter card image.  With this capability, an image of the board will automatically display when a player sends the link. Without it, the game is a series of ugly URLs.Dynamically creating the Open Graph imageThis requirement introduced some server-side requirements. I needed two things to happen on the server.First, I needed to dynamically generate a board image from a FEN. Once again, open source to the rescue (almost). I found chess-image-generator, a JavaScript library that creates a png from a FEN. I wrapped this in a bit of Node.js/Express code so that I could access the image as if it were static. For example, here’s a demo of the real endpoint: https://chessmsgs.com/fenimg/v1/rnbqkb1r/ppp1pppp/5n2/3p4/3P4/2N5/PPP1PPPP/R1BQKBNR w KQkq – 2 3.png. This link results in this image:Second, I needed to dynamically inject this FEN-embedded URL into the content attribute of the meta tag in the main HTML. Like me, you might be thinking that you could just do some DOM manipulation in JavaScript and avoid having to dynamically change HTML on the server. But, the Open Graph image is retrieved by a bot from whatever service you use for messaging. These bots don’t execute any client-side JavaScript and expect all values to be static. So, that led to additional server-side work.I needed to dynamically convert this:Into something like this:I could have used one of many Node templating engines to do this, but they all seemed like overkill for this simple substitution requirement, so I just wrote a few lines of code for some string.replace() calls in my Node server. With this functionality added, a game on Twitter (and other services) now looks much better:Check out the codeThe source for chessmsgs.com is available on GitHub at https://github.com/gregsramblings/chessmsgs. Deciding where to host itThe hosting requirements are simple. I needed support for Node.js/Express, domain mapping, and SSL. There are several options on Google Cloud including Compute Engine (VMs), App Engine, and Kubernetes Engine. For this app, however, I wanted to go completely serverless, which quickly led me to Cloud Run. Cloud Run is a managed platform that enables you to run stateless containers that are invocable via web requests or Pub/Sub events. Cloud Run is also basically free for this type of project because the always-free-tier includes 180,000 vCPU-seconds, 360,000 GiB-seconds, and 2 million requests per month (as of this writing—see the Cloud Run pricing page for the latest details). Even beyond the free tier, it’s very inexpensive for this type of app because you only pay while a request is being handled on your container instance, and my code is simple and fast.Lastly, deploying this on Cloud Run brings a lot of added benefits such as continuous deployment via Cloud Build, and log management and analysis via Cloud Logging, both of which are super easy to set up.What’s next?If this suddenly becomes the most popular site of the day, I’m actually in good shape from a scalability point of view because of my decision to use Cloud Run. If I really wanted to engineer this for extreme loads, I could easily deploy it to multiple regions throughout the globe and set up a load balancer and possibly a CDN. I also could separate the web hosting functionality from the image generation functionality to allow each to scale as needed.When I first started thinking about the image generation, I naturally thought about caching the images in Google Cloud Storage. This would be easy to do and storage is crazy cheap. But, then I did a bit of research and learned the following fun facts. After two moves (one move for each player), there are 400 different distinct board positions. After each player moves again (two moves each), this number is now 71,782 distinct positions. After each player moves again (three moves each), the number is now 9,132,484 distinct positions! I could gain a bit of performance by caching the most popular openings, but each game would quickly go beyond the cached images so it didn’t seem worth it. By the way, to cache every possible board position would be about 1046 positions, which is a massive number that doesn’t even have a name.ConclusionThis was a fun project – almost therapeutic for me since my “day job” doesn’t allow much time for writing code. If this becomes popular, I’m sure others will have ideas on how to improve it. This was my first hands-on with Cloud Run beyond the excellent Quick Starts (examples for Go, Node.js, Python, Java, C#, C++, PHP, Ruby, Shell, etc.). Because of my role in developer advocacy at Google, I was aware of most Cloud Run capabilities and features but after using it for something real, I now understand why developers love it!Where to learn moreCloud Run Product PageCloud Run DocsHello Cloud Run QwiklabThe Cloud Run unofficial FAQ (created by co-worker Ahmet Alp Balkan and community maintained)The Cloud Run Button—Add a click-to-deploy button to your git reposList of Cloud Run videos from our YouTube channelNEW O’Reilly Book: Building Serverless Applications with Google Cloud Run by Wietse VenemaAwesome Cloud Run—massive curated list of resources by Steren Giannini‎ (Cloud Run PM)Related Article3 cool Cloud Run features that developers loveCloud Run developers enjoy pay-per-use pricing, multiple concurrency and secure event processing.Read Article
Quelle: Google Cloud Platform

Download and Try the Tech Preview of Docker Desktop for M1

Last week, during the Docker Community All Hands, we announced the availability of a developer preview build of Docker Desktop for Macs running on M1 through the Docker Developer Preview Program. We already have more than 1,000 people testing these builds as of today. If you’re interested in joining the program for future releases you should do it today!

As I’m sure you know by now, Apple has recently shipped the first Macs based on the new Apple M1 chips. Last month my colleague Ben shared our roadmap for building a Docker Desktop that runs on this new hardware. And I’m delighted to tell you that today we have a public preview that you can download and try out.

Like many of you, we at Docker have been super excited to receive and code with these new computers: they just feel so fast! We also know that Docker Desktop is a key part of the development cycle for over 3M developers using Docker Desktop with over half of you on Macs. To support all our Mac users we’ve been working hard to get Docker Desktop ready to run on the new M1 hardware. It is not release quality yet, or even beta quality, but we have an early preview build and we wanted to let you try it as soon as possible.

How We Got to a Technical Preview

When Ben announced that we were working on adapting Docker Desktop on this new hardware. We had roughly 3 engineering challenges to tackle to get this release out to you: 

Migrate from HyperKit to the Virtualization Framework.

One of the key challenges for the Docker Desktop team was to replace HyperKit, which Docker open sourced back in 2016, with the Virtualization Framework provided by Apple which was included in macOS Big Sur.

Recompile all the various binaries of Docker Desktop in native arm.

Many of the tools that we use in our toolchain to build these binaries are not yet ready to support the M1 Mac as of today. At Docker, we use the Go language extensively, and Docker Desktop is no exception. The Go language will support Apple Silicon in their 1.16 release which is targeted for February 2021.

Have enough hardware to reliably run continuous deployment on M1 macs.

The Docker Desktop team relies heavily on automated testing through continuous integration to ensure the quality of our releases. Until this week our continuous integration could not be set up because none of our partners had enough M1 machines yet. Fortunately, we are working with MacStadium and we are setting up new M1 Macs on our CI system.

Thanks to the significant progress we have been able to make on the first two steps, we are sharing a Tech Preview of Docker Desktop for M1 today. Download it here!

Multi-Platform Baked In

Many developers are going to experience multi-platform development for the first time with the M1 Macs. This is one of the key areas where Docker shines. Docker has had support for multi-platform images for a long time, meaning that you can build and run both x86 and ARM images on Desktop today. The new Docker Desktop on M1 is no exception; you can build and run images for both x86 and Arm architectures without having to set up a complex cross-compilation development environment.

Docker Hub also makes it easy to identify and share repositories that provide multi-platform images.

And finally, using docker buildx you can also easily integrate multi-platform builds into your build pipeline.

Try the M1 Preview Today

Right on time for the year-end festivities, we’re excited to share with you our M1 Preview:

Here is the Download!

Keep in mind that this is a preview release: it may break, it has not been tested as thoroughly as our normal releases and ‘here be dragons’. Your help is needed to test Docker Desktop on Apple Silicon so that we can continue to provide a great developer experience on all Apple devices. You can help us by providing bug reports on docker/for-mac. We will use this feedback to help us improve and iterate on both the Desktop product and the multi-architecture experience as we aim to provide a GA build of Docker Desktop in the first quarter of 2021.

In the meantime, enjoy this tech preview build of Docker Desktop for M1. Happy Holidays!
The post Download and Try the Tech Preview of Docker Desktop for M1 appeared first on Docker Blog.
Quelle: https://blog.docker.com/feed/

Baking recipes made by AI

Have you ever wondered what, fundamentally, scientifically, makes a piece of cake different from a slice of bread or a cookie? Me neither. But now this important, controversial question finally has an answer, thanks to explainable machine learning. (Sort of.)In machine learning, explainability is the study of how we can make models more interpretable, so that we can understand, at least to some extent, why they make the predictions they do–an improvement from taking the predictions of a deep neural net at face value without understanding what contributed to the model output. In this post, we’ll show you how to build an explainable machine learning model that analyzes baking recipes, and we’ll even use it to come up with our own, new recipes–no data science expertise required.This project idea comes from Sara Robinson, who works on AI for Google Cloud. In April, she started a storm of pandemic baking, and like any good machine-learning-practitioner-baker, soon turned her modeling skills to baking. She collected a dataset of recipes and then built a TensorFlow model that took in lists of ingredients and spit out predictions, like:“97% bread, 2% cake, 1% cookie”Sara’s model could accurate classify recipes by type, but she also used it to come up with a completely new recipe: something her model deemed to be about 50% cookie and 50% cake–a “cakie.”Sara Robinson’s original cakie-cookie hybrid, the “cakie.”Results were promising:“It is yummy. And it strangely tastes like what I’d imagine would happen if I told a machine to make a cake cookie hybrid.”You can find her cakie recipe on her original blog.This December, Dale and Sara teamed up to build a baking 2.0 model–using a bigger dataset, new tools, and an explainabile model, one which would give insight into what makes cakes cakes and cookies cookies and breads breads. Plus, we came up with a new hybrid recipe: the “breakie,” a bread-cookie hybrid (we wanted to call it a brookie, but that name was already taken).Dale’s first bite of a “cakie”Keep reading to learn how we did it, or scroll to the end to see our brookie recipe.Build an Explainable No-Code Model with MLFor this project, we decided to use a Google Cloud tool called AutoML Tables. It’s a no-code way to build machine learning models on tabular data, like the kind you’d find in a spreadsheet or database. We chose AutoML Tables because it’s both easy to use and just got an upgrade of new, built-in explainability tools like Feature Attribution (more on that in a bit).Collecting and Preparing DataTo start, we collected a dataset of about 600 baking recipes for cookies, cakes, and breads from the web. (We can’t share the dataset here because we don’t own it, but you can definitely find your own recipe datasets online.) Next, we whittled down each of those 600 recipes to 16 core ingredients:YeastFlourSugarEggFat (sum of any type of oil)MilkBaking SodaBaking PowderApple Cider VinegarButtermilkBananaPumpkin PureeAvocadoWaterButterSaltWe didn’t include anything else, like cinnamon, chocolate chips, or nutmeg, in our model. The choice of these 16 ingredients was slightly arbitrary, but mainly we were trying to include ingredients that affect texture and consistency and exclude ingredients that don’t affect texture and that might even let the model “cheat.” For example, you could theoretically add chocolate chips to any recipe, but they’re almost never found in bread, a hint we didn’t want our model to learn from.Oh, speaking of bread: we also made the executive decision to move sweet breads (like pumpkin bread, banana bread, zucchini bread, etc) from the “bread” category to the “cake” category, based mostly on the wisdom of Great British Bake Off judge Paul Hollywood, who said on Instagram that banana bread is most definitely not a bread.Because recipes give ingredients in all different measurement units–butter could be written in sticks or tablespoons or ounces–we converted all measurement units to ounces (using a very long and unsophisticated if statement).And finally, for our last step of preprocessing, we used a little data augmentation trick. Data augmentation is a method for creating new training examples (in this case, rows) from data you already have. We wanted our model to be insensitive to the serving size of a recipe, so we decided randomly double and triple ingredient amounts. Since a recipe for 2x or 3x a cake should be more or less identical to the original cake recipe, we were able to generate new recipe examples for free (woohoo!).Building a ModelNext we built a classification model using AutoML Tables, which was the easiest part of this project. You can find Tables under the “Artificial Intelligence” section of the GCP console:Once you create a new Tables model, you can import data directly from a csv, Google Sheets, or a BigQuery database.Once your data is imported, you’ll be able to see it in the “Train” tab:AutoML Tables automatically computes some useful metrics about your data for you, like what percent of each column has missing values or how many distinct values it contains. It also computes the handy metric “Correlation with Target.” “Target” in this case is what we’re trying to predict–cookie, cake, or bread. You can set it in the drop down up top, which in our case is the column labeled “type”:Once “target” is set, AutoML will calculate, for each ingredient in isolation, how correlated it is with the target. In the data above, you can see that baking soda has the highest correlation with recipe type (0.615), meaning that if you had to only pick one ingredient to base your decision off of, baking soda would be a good bet.But in reality, baked goods are defined by complex interactions between ingredients, and looking at just baking powder alone is not accurate enough for us. So, we’ll build a machine learning model to predict recipe type by clicking on that “Train Model” button in the top right of the UI. From there, you’ll be given a dialog that lets you name your model, specify for how long you want your model to train, and indicate what columns you want to use for training (these are called “input features”).Since we only want our model to look at ingredients, I’ll select only ingredient columns from the “Input feature selection” drop down:Next hit “Train model” and wait. In the background, AutoML will train and compare a slew of machine learning models to find one that’s accurate. This could take a few hours.When your model is done training, you can view it in the “Evaluate” tab, which gives you lots of useful stats of model quality. As you can see, our model was pretty accurate:Model Explainability with Feature ImportanceIf you scroll down on the “Evaluate” tab, we can start to gain more insight into our model through “Feature Importance” scores:These scores highlight how heavily our model depends on each ingredient when making a prediction. In our case, it seems like butter, sugar, yeast, and egg are important predictors of whether a recipe is a cookie, cake, or bread.The feature importance scores above show the overall importance of each ingredient to the model, which AutoML calculates by looking at aggregate feature importance across our test set But we can also look at feature importance through the lens of a single prediction, which might be different.For example, maybe milk isn’t in general an important model feature, but when sugar and butter values are low, milk becomes more important. In other words, we’d like to know, what features did the model depend on when it made one particular prediction?In the Test and Use tab, we can make predictions about individual recipes and see those local feature importance scores. For example, when I feed my model a recipe for cake, it correctly predicts the category is “cake” (0.968 confidence). Meanwhile, the local feature importance scores tell me that egg, fat, and baking soda were the ingredients that most contributed to that prediction. Coming Up with a Breakie RecipeThanks to those feature importance scores, we were able to figure out what made the model think a recipe was for a cookie, cake, or bread, and we used that knowledge to come up with a breakie–something our model thought was roughly 50% cookie, 50% bread.Of course, once we found our breakie recipe, we had to experimentally verify it in the lab:Sara’s breakies, fresh out of the oven.Success! We wound up with something that tasted like a cookie but that was more airy, like a bread. Machine learning–it works!We should caveat that while our model gave us ingredients, it didn’t spit out any baking directions, so we had to improvise those ourselves. And, we added chocolate chips and cinnamon for good measure.If you want to verify our results (for science), try our breakie recipe for yourself. And if you still have an appetite for ML, find more project ideas from Making with ML on YouTube.BreakieMakes ~16 bread-inspired cookies.Ingredients2 teaspoons active dry yeast¼ cup warm milk2 cups flour1 egg, lightly beaten1 teaspoon baking soda½ teaspoon salt¼ teaspoon cinnamon½ cup white sugar¼ cup brown sugar1 and ¼ stick unsalted butter, room temperature⅓ cup chocolate chipsInstructionsPreheat oven to 350 degrees Fahrenheit. Line a baking sheet with parchment paper and lightly grease it with cooking spray.Make the bread part: Heat milk in microwave until it is warm to the touch, but not hot. Dissolve yeast in warm milk and set aside. In a large bowl, combine flour, baking soda, salt, and cinnamon. Add the milk and yeast mixture to the flour mixture and stir until combined. Add the lightly beaten egg to the flour mixture until combined. When you’re done mixing it may seem like there is too much flour. That’s ok, set this mixture aside for now.Make the cookie part: In a stand mixer fitted with a paddle attachment, combine room temperature butter with both sugars on medium speed until smooth. Slowly incorporate flour mixture into butter mixture, about a cup at a time. Stir in chocolate chips.Form dough into balls (in our recipe test the cookie dough balls were 2.5 tablespoons, or 50 grams if you have a kitchen scale) and place a few inches apart on your baking sheet. Bake 13 – 15 minutes until breakies are golden brown on the outside and start to crack slightly on top. Let cool on a wire rack. Enjoy, and let us know what you think the bread to cookie ratio of these are!Related ArticleIncreasing transparency with Google Cloud Explainable AIWe’re working to build AI that’s fair, responsible and trustworthy, and we’re excited to introduce the latest developments.Read Article
Quelle: Google Cloud Platform